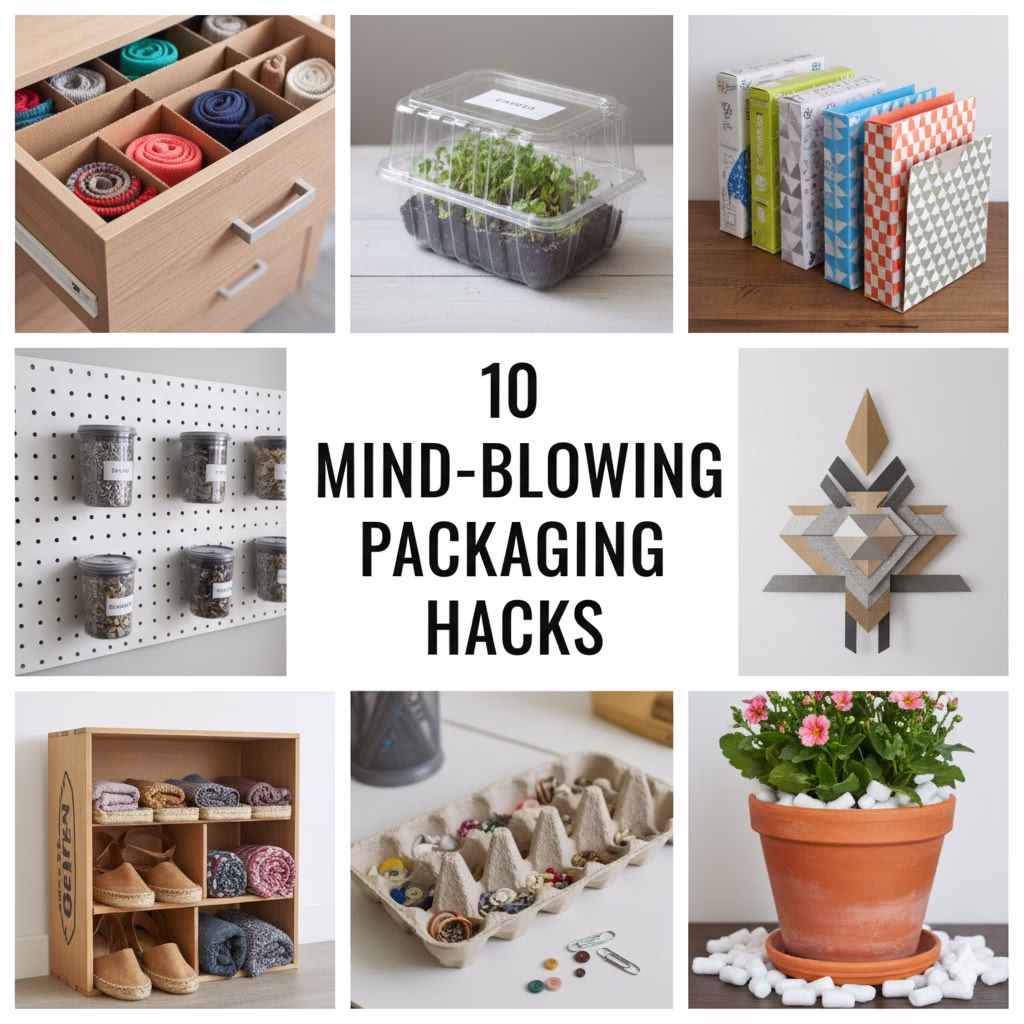
Here is the paragraph with the keywords Packaging Hacks added naturally:
We’ve all been there: looking at a big pile of empty boxes, hard plastic containers, and shipping foam. You feel a little bad before you toss it all in the recycling bin. My own recycling bin used to fill up super fast! I soon realised this stuff wasn’t trash; it was free, strong material just waiting for a new use. This change to creative upcycling has made my house tidier and led me to discover the best Packaging Hacks. It has also made me very happy. I’m excited to share the absolute best “trash to treasure” ideas I’ve found.
Introduction
We buy so much online these days. Everything comes in huge amounts of cardboard, plastic, and foam. The amount of packaging coming into our homes is huge. Recycling is good, but upcycling is the best way to reuse things. Upcycling means giving the packaging a better, more useful life.
This article is your easy guide to changing your household rubbish into useful, pretty, or super handy items. Forget the hard crafts you see online; these are 10 truly helpful, smart, and, yes, amazing packaging hacks. They will make you look at your rubbish differently. You’ll save money, and you’ll feel great every time you use one of these reused items.
Let’s find out about the hacks that will change your home and how you think about packaging waste.
Hack 1: The Cardboard Drawer Organizer
The simple shipping box is the most common kinds of packaging hacks. Instead of throwing it out right away, let its strong shape help tidy up the mess inside your drawers.
The Problem: Junk drawers, sock drawers, and office supply drawers quickly become messy. Things get lost, and you waste time looking for them.
The Solution: Cardboard dividers that fit exactly and lock together.
How to Do It:
- Measure the Space: Find the exact inside width and length of your drawer.
- Cut the Pieces: Take flat, strong pieces of corrugated cardboard (thicker is better). Cut long strips that are the same height as your drawer, but maybe a little shorter.
- Make the Slots: Decide how you want your squares to line up (for example, three rows and four columns). For the strips that cross over, cut a thin notch halfway down the middle of each strip. The notch should be as wide as the cardboard is thick.
- Put it Together: Slide the notched strips into each other to make a strong grid. Trim the outside pieces so the grid fits perfectly into the drawer.
- Place it: Put the finished divider system inside the drawer. It’s made just for you, fits perfectly, and cost nothing!

Hack 2: Bubble Wrap Mat for Plant Seeds
If you like to garden, you know how important your tiny spring plants are. Bubble wrap, which keeps fragile things safe, can also keep your plants safe from the cold.
The Problem: Cold weather or chilly concrete floors can steal heat from small plants. This can slow down or stop seeds from growing.
The Solution: A bubble wrap mat that holds in the heat.
How to Do It:
- Find the Material: Collect large, clean sheets of bubble wrap.
- Cut and Layer: Cut the bubble wrap into big enough shapes to hold several trays of small plants.
- Put it Down: Place the bubble wrap, with the bubbles facing down, right onto the cold surface (like a window sill or garage floor). The air trapped in the bubbles acts like great insulation.
- Cover: Put your trays of seeds directly on top of the smooth side of the wrap. The heat barrier helps keep the soil warm. This makes the plants grow faster.
Hack 3: Plastic Clamshell Mini Greenhouse
Those clear plastic containers that hold berries, cakes, or salads are hinged. Their design makes them great for a very special, important use.
The Problem: Starting seeds without the right wetness and airflow is hard. This usually needs special (and costly) planting trays.
The Solution: A small, self-contained mini-greenhouse that lets air in.
How to Do It:
- Clean it: Wash the plastic clamshell container well with soap and water.
- Add Holes: Use a drill with a small bit or a hot needle. Carefully poke several small drainage holes in the bottom half of the container.
- Plant: Fill the bottom half with soil and plant your seeds.
- Close and Vent: Close the lid. The hinged design traps water and warmth, making a perfect, wet environment. Most importantly, the air holes already in most containers (or the ones you poke) let air circulate. This stops mold from growing.
- Watch it Go: Put the closed container in a sunny spot. Once the plants grow high enough, just prop the lid open for them to keep growing.

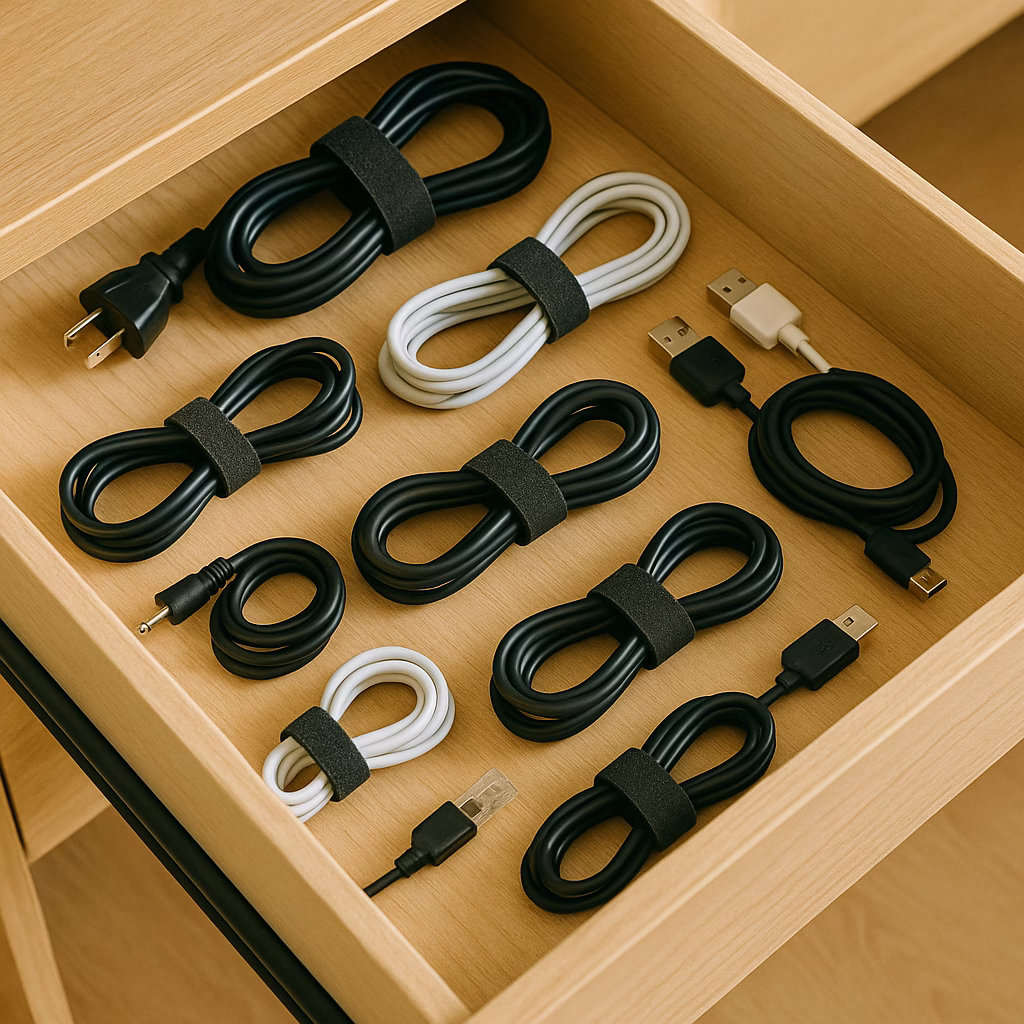
Hack 4: Foam Packing Cable Organizer
The thin, soft foam sheeting (often used to protect dishes or furniture) is surprisingly strong and doesn’t slip. This makes it perfect for managing cables.
The Problem: Wires, cables, and power cords are always getting messy. This causes a big tangle of tech clutter.
The Solution: Packaging Hacks: Custom foam wraps for securing and storing cables.
How to Do It:
- Cut the Foam: Cut the foam sheet into strips about 2 inches wide and 6 inches long.
- Get the Cable Ready: Neatly roll up the cable you want to store.
- Wrap and Secure: Start at one end and tightly wrap the foam strip around the rolled cable. The slightly sticky feel of the foam helps it grip itself.
- The Fastener: Secure the end of the foam strip by tucking it under the layer before it, or use a small piece of tape.
Hack 5: Cardboard Wall Art
Make plain cardboard into more than just storage. By layering it and cutting shapes, you can make surprisingly nice decorations.
The Problem: You need cheap, temporary art for a wall. Or you want to protect your favourite books without buying covers.
The Solution: Textured cardboard wall pieces or folded book covers.
How to Do It (Wall Art Example):
- Collect the Cardboard: Cut flat squares from a large, clean box.
- Make Texture: Peel off the top layer of paper from some pieces. This shows the ribbed layer underneath. This creates an interesting, bumpy look.
- Design the Pattern: Cut the pieces into squares or rectangles of the same size.
- Put it Up: Stick the pieces (mixing smooth and bumpy ones) to a larger backing board. Or, stick them right onto a wall using strips that you can take off. This makes a modern, shaped, textured wall feature. You can spray paint the whole thing a solid matte black or white to look even nicer.
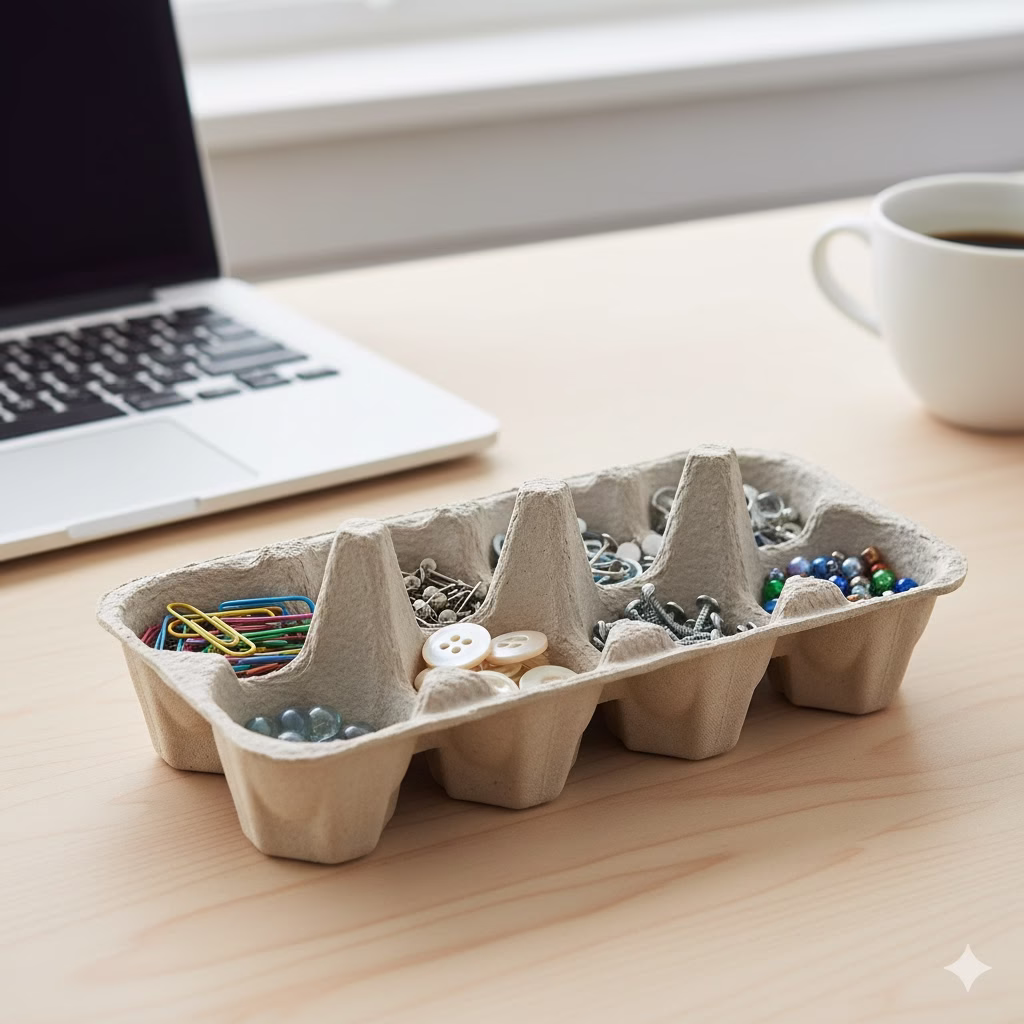
Hack 6: The Egg Carton Desk Organizer Tray
Normal paper or foam egg cartons already have perfect little sections. With one simple change, they become an amazing tool for sorting things.
The Problem: Small items like screws, buttons, beads, jewelry pieces, or paper clips get lost or mixed up in bigger containers.
The Solution: A shallow egg carton tray with separate sections.
How to Do It:
- Prepare It: Use a normal 12-egg carton. Cut off the lid completely.
- Make it Stronger (Optional): To make it stronger and look cleaner, cover the outside and inside with masking tape or contact paper.
- Fill It: Put the sectioned base in your craft area, tool bench, or desk drawer. Each little cup is perfect for holding one kind of small item. This keeps everything separate and easy to see right away.
Hack 7: Wine Box Shoe Organizer
Those strong cardboard dividers that protect wine bottles are also perfect for shoes.
The Problem: Closets and floors get full of flat shoes, sandals, or even rolled-up items like belts and scarves.
The Solution: A strong, custom-divided wine box insert.
How to Do It:
- Find the Divider: Get the cardboard divider insert from a 12-bottle wine box.
- Change the Size: If you need to store smaller things, you can use the dividers as they are. For shoes, you might need to cut the height down. This helps them fit nicely on a shelf or inside a cabinet.
- Place and Fill: Stand the insert upright in the closet. The 12 sections are great for holding 12 pairs of sandals, small heels, or a mix of scarves and belts.

Hack 8: Cereal Box Magazine Holders
Cereal and cracker boxes are usually tall, thin, and deep. These are the perfect starting shapes for a magazine or file holder.
The Problem: Magazines, manuals, and papers are stacked flat. This makes it impossible to quickly find what you need.
The Solution: A cheap, upright box file holder.
How to Do It:
- Pick the Box: Choose a tall, strong cereal box.
- Mark the Cut: On the front side, draw a slanted line. Start at the top edge and go down to a point about 3-4 inches from the bottom. This makes the classic angled opening of a file holder.
- Cut: Carefully cut along the line you drew.
- Decorate: Cover the box in nice paper, sticky paper, or just paint it one solid colour. This makes it look neat.
- Organize: Use it to store magazines, papers, school work, or even thin cutting boards in your kitchen cabinet.

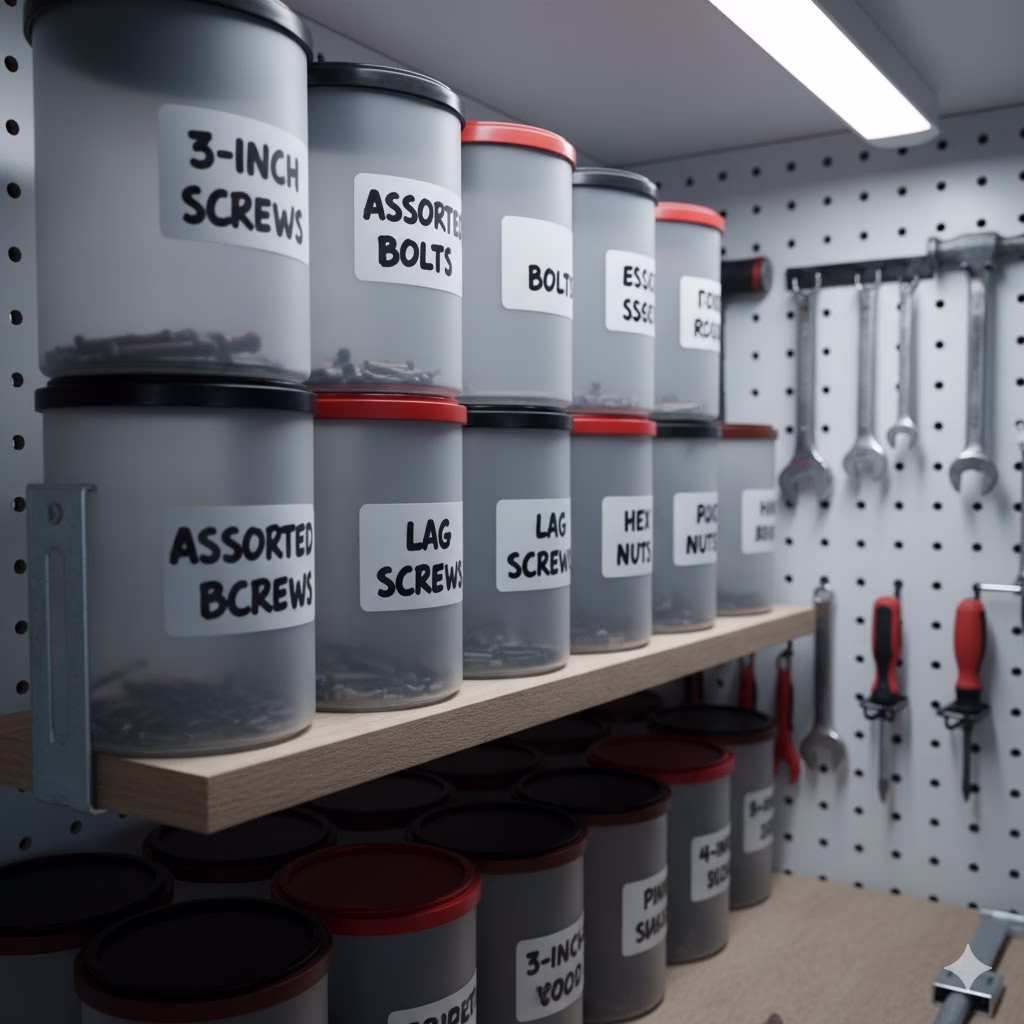
Hack 9: Coffee Canisters as Garage Organizers
Large plastic coffee containers (or similar containers for nuts or powder) are strong. They have good lids and are great for storing heavy things.
The Problem: Nails, screws, big washers, and garage junk often end up in messy piles. They can get wet or be stored in weak containers.
The Solution: Strong, stackable, moisture-proof garage containers.
How to Do It:
- Clean: Wash the plastic container very well.
- Label: Use paint, a strong marker, or a printed label to clearly show what is inside (for example, “Long wood screws,” “Mixed Bolts,” etc.).
- Fill and Stack: Fill the container with your hardware. The tight lid keeps water out. Most containers are round, so they stack easily on shelves. You can also hang them from a pegboard using a simple bracket on the side.
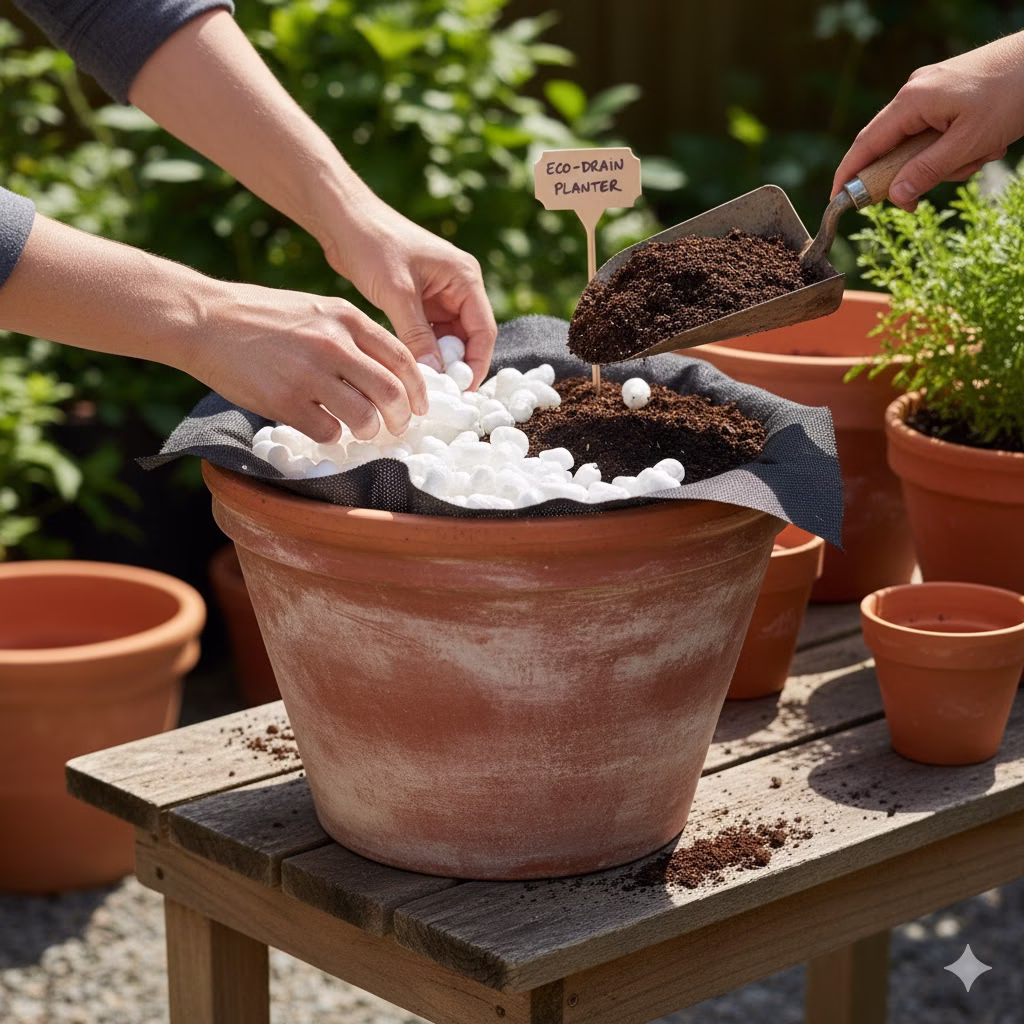
Hack 10: Packing Peanut Drainage for Planters
Styrofoam packing peanuts (make sure they are the regular Styrofoam kind, not the ones that dissolve in water) are very useful in large plant pots.
The Problem: Big pots need a lot of heavy soil. This makes them hard to move. It can also cause too much water to stay at the bottom.
The Solution: Using packing peanuts to make the pot lighter and help with water drainage.
How to Do It:
- Fill the Bottom: Put a layer of clean, traditional Styrofoam packing peanuts in the bottom third of the big plant pot. This takes up space. It greatly lowers how much heavy soil you need.
- Make a Barrier: Place a piece of garden fabric or old t-shirt material right over the peanuts. This stops the soil from falling down and trapping water.
- Add Soil: Fill the rest of the pot with soil and plant your flowers or bush.
- The Good Stuff: The peanuts let water drain out well. They stop the soil from getting too hard at the bottom. They also make the whole pot much lighter and easier to lift.
Conclusion on Packaging Hacks
The next time a delivery box comes to your house, don’t see it as another job for the recycling bin. See it as a free delivery of materials to build with. From the smallest egg carton to the biggest moving box, packaging is a surprisingly useful thing. These packaging hacks are just the start of what you can do with a little creative thinking and some scissors. By starting these upcycling habits, you’re not just making useful items for your home. You are also taking a strong step to lower waste. You embrace a cheaper, do-it-yourself life. Have fun hacking!
Frequently Asked Questions (FAQ)
Q1: How can I be sure my reused items are clean and safe?
A: Always wash any packaging that held food (like plastic clamshells and egg cartons) very well with warm, soapy water. Let them dry completely in the air. For cardboard, just make sure it has no food, dirt, or too much water on it.
Q2: Are the packing peanuts that dissolve in water good for these hacks?
A: No. The ones that break down in water (made from starch) are supposed to go in the compost or dissolve. Only use the regular Styrofoam packing peanuts for the planter drainage idea.
Q3: What glue works best for cardboard projects?
A: For strong, lasting cardboard projects, use hot glue. It dries fast and is very strong. For projects that need to look neater, use strong white craft glue (PVA glue) or wood glue.
Q4: Can I use shiny, coloured cardboard for my projects?
A: Yes, but paint and glue might not stick as well to the shiny surface. It’s always best to cover the shiny surface with a layer of primer, masking tape, or decorative paper first. This gives the best final result.
References for Packaging Hacks
- Theupcyclemoovement – The Upcycle Movement
- Tradebe – Downcycling or upcycling?
Recent Posts