Cookie Consent by Free Privacy Policy Generator Update cookies preferences

Make Skewered Herb Dumplings In A Kidney Bean Sauce

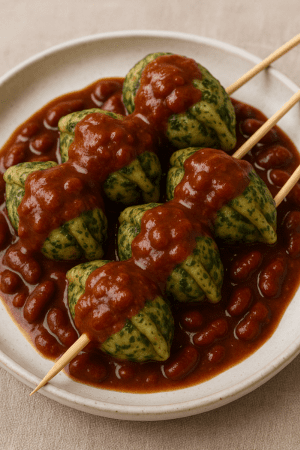
A complete guide to making Skewered Herb Dumplings in a Kidney Bean Sauce — healthy, vibrant, and satisfying


Skewered herb dumplings topped with thick kidney bean sauce on a white plate
Herb Dumplings

A Flavor-Packed Plant-Skewered Herb Dumplings

If you’ve ever wanted to create a wholesome, show-stopping plant-based dish, skewered herb dumplings might just be the answer. These dumplings are inspired by the soft, comforting texture of Jamaican steamed dumplings but with a modern, vegetable-filled twist. Coated in fresh green herbs and served with a thick, savory kidney bean sauce, they’re as beautiful as they are delicious.

This recipe is perfect for anyone seeking a hearty meal without meat, yet full of flavor and texture. The combination of soft, steamed dough, vibrant herbs, and rich kidney bean sauce provides a satisfying bite that works for lunch, dinner, or even a special weekend meal.

The best part? It’s surprisingly simple to make. You can prepare these dumplings ahead of time, skewer them just before serving, and have a healthy meal on the table in less than an hour. And because they’re plant-based, they suit a wide range of dietary preferences.

In this guide, you’ll learn exactly how to make skewered herb dumplings from scratch, prepare a luscious kidney bean sauce, and plate them for a visually stunning presentation that will impress guests and family alike.


Time to Prepare

15 minutes

Time to Cook/Blend

35 minutes

Servings: 4


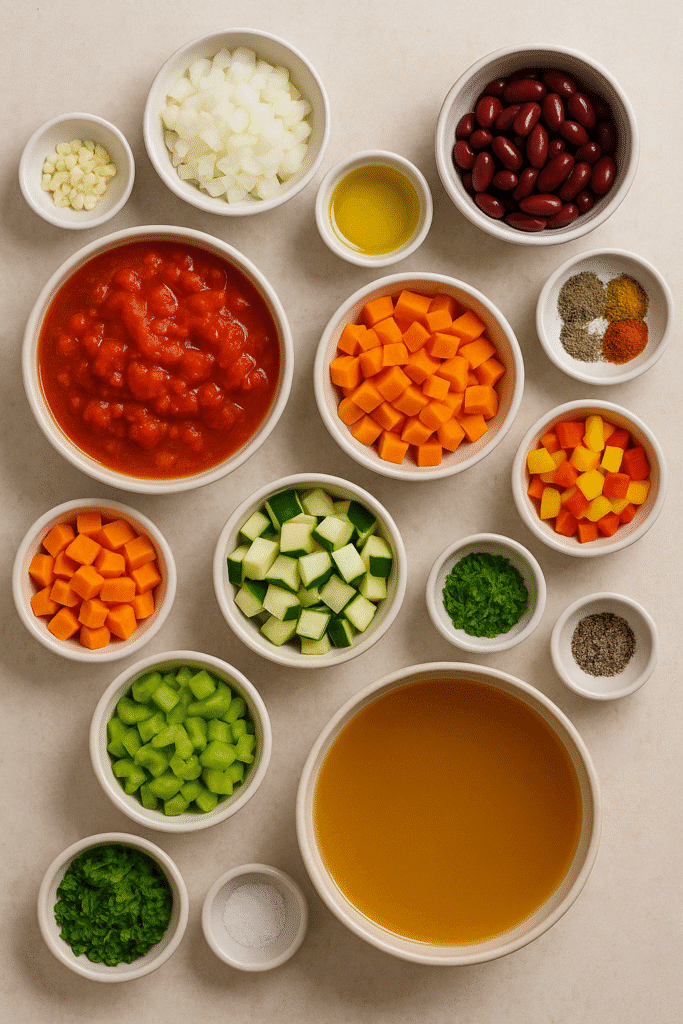
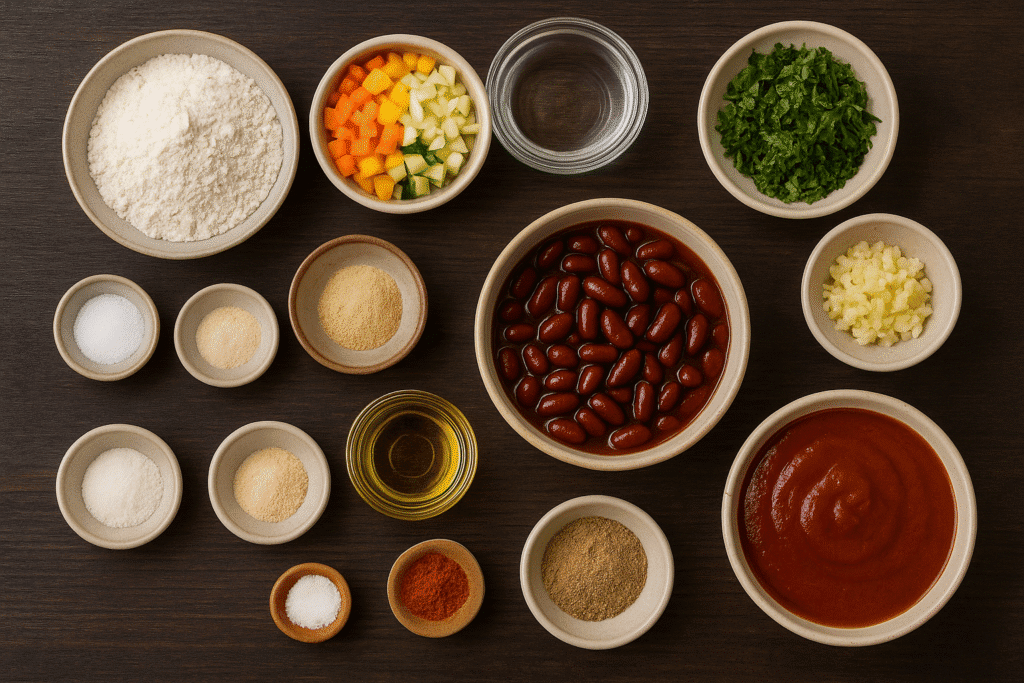
Ingredients For Skewered Herb Dumplings

For the Dumplings:

  • 2 cups whole wheat flour (or gluten-free flour blend)
  • ½ tsp salt
  • ¾ cup warm water (adjust as needed)
  • 1 cup finely chopped mixed vegetables (carrot, cabbage, bell pepper, zucchini)
  • 2 tbsp fresh parsley, finely chopped
  • 2 tbsp fresh coriander, finely chopped
  • 1 tsp garlic powder
  • 1 tsp onion powder

For the Kidney Bean Sauce:

  • 1 can (400g) red kidney beans, drained and rinsed
  • 1 small onion, finely chopped
  • 2 garlic cloves, minced
  • 1 tbsp olive oil
  • 1 tsp smoked paprika
  • ½ tsp cumin
  • 1 cup vegetable broth
  • ½ cup tomato puree
  • Salt and pepper to taste

For Garnish:

  • Fresh parsley or coriander leaves
  • Extra kidney beans (optional)
Ingredients

Instructions For Skewered Herb Dumplings

  1. Make the Dumpling Dough
    • In a mixing bowl, combine the flour and salt. Gradually add warm water, mixing until a smooth, slightly firm dough forms. Cover and let rest for 10 minutes.
  2. Prepare the Vegetable Filling
    • Finely chop your vegetables and sauté them lightly in a non-stick pan with garlic powder and onion powder for 3–4 minutes until just softened. Set aside to cool slightly.
  3. Shape the Dumplings
    • Divide dough into equal portions. Flatten each portion into a disc, spoon a little vegetable filling in the center, and fold edges together to seal. Shape each dumpling like a traditional Jamaican steamed dumpling (round with slightly flattened top).
  4. Steam the Dumplings
    • Place dumplings in a steamer basket lined with parchment paper. Steam for 12–15 minutes or until cooked through.
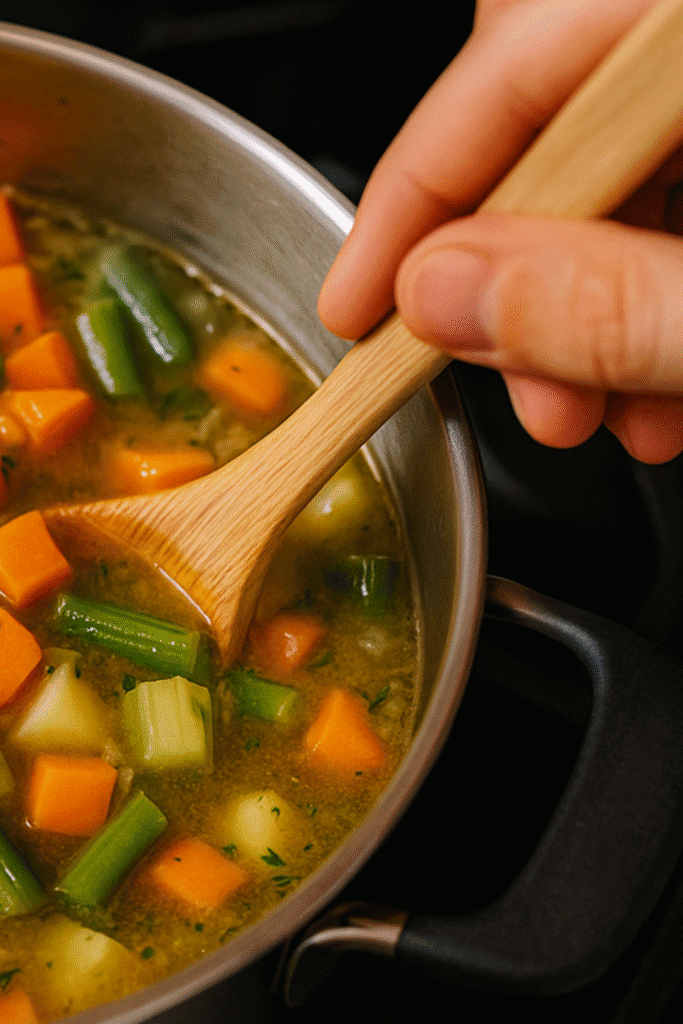
  5. Prepare the Kidney Bean Sauce
    • Heat olive oil in a saucepan over medium heat. Sauté onion and garlic until fragrant. Add smoked paprika and cumin, then stir in tomato puree.
    • Add kidney beans and vegetable broth, simmer for 10 minutes. Blend until smooth (or keep slightly chunky if preferred). Season to taste.
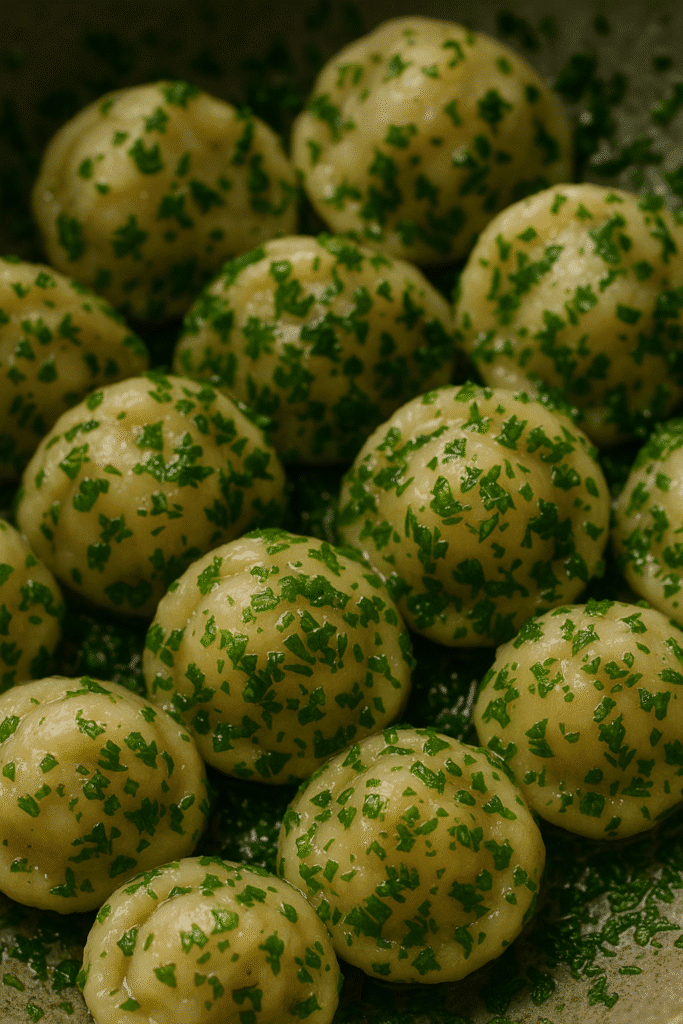
  6. Coat the Dumplings in Herbs
    • Once steamed, roll dumplings gently in the chopped fresh herbs until fully coated.
  7. Skewer and Serve
    • Carefully skewer dumplings, drizzle with kidney bean sauce, and garnish with fresh herbs. Serve with extra sauce on the side.
Close-up of freshly steamed dumplings shaped like mini domes being rolled in chopped green herbs, with skewers threading through on a wooden plate.
Herb Coated Dumplings

Nutritional Information (Per Serving)

  • Calories: 280 kcal
  • Protein: 10g
  • Carbohydrates: 50g
  • Fat: 6g
  • Fiber: 9g
  • Sugar: 4g

(Values are approximate and will vary based on exact ingredients used.)
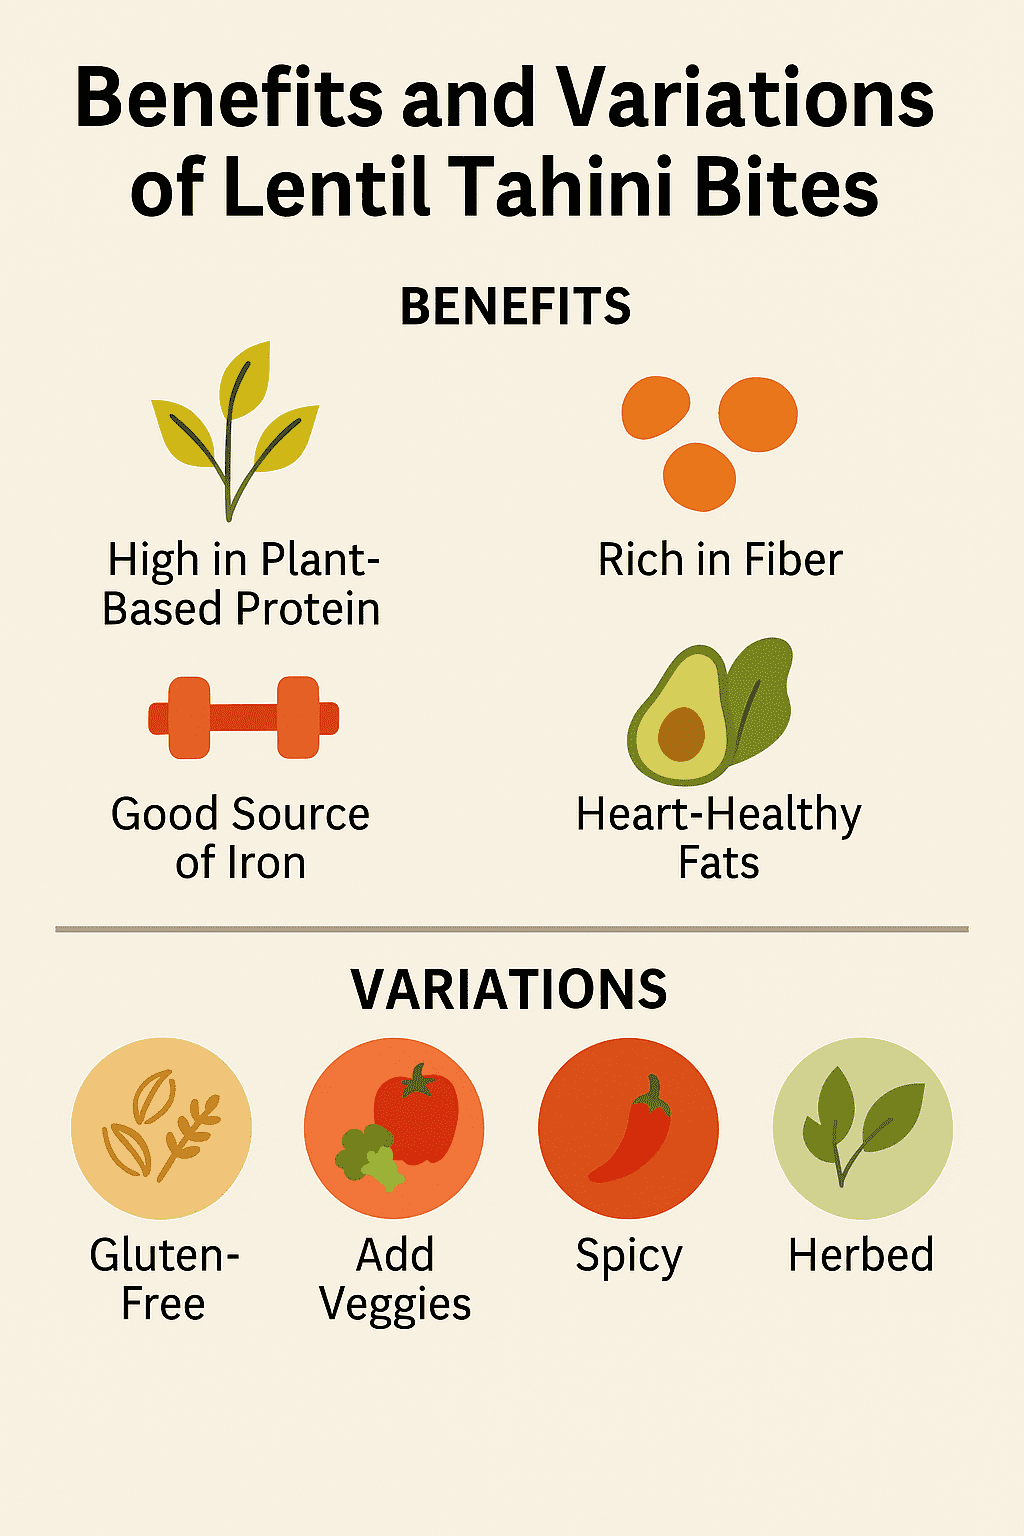

Benefits

1. High in Plant-Based Protein
The kidney beans in this recipe are a great source of protein, supporting muscle repair and overall energy.

2. Rich in Fiber
With whole wheat flour, vegetables, and beans, these dumplings aid digestion and help maintain satiety.

3. Nutrient-Dense Herbs
Fresh parsley and coriander are rich in antioxidants and vitamins, supporting immune health and reducing inflammation.

4. Heart-Healthy Ingredients
Olive oil and plant-based components help promote cardiovascular wellness.


Variations

Variation TypeHow to Adjust the Recipe
Gluten-FreeUse gluten-free flour and ensure all spices are GF-certified.
SpicyAdd chopped chili or cayenne pepper to the sauce.
Extra ProteinAdd crumbled tofu or tempeh to the vegetable filling.
Low-CarbUse almond flour and more vegetables, reducing dough portion size.

Frequently Asked Questions (FAQs)

Q1: Can I make these dumplings ahead of time?
Yes! You can prepare the dumplings up to the steaming stage, store them in the fridge for up to 24 hours, and steam them fresh before serving.

Q2: Can I freeze the dumplings?
Absolutely. Arrange uncooked dumplings on a tray, freeze until solid, then transfer to a sealed bag. Steam directly from frozen, adding 3–4 extra minutes to cooking time.


Final Thoughts On Skewered Herb Dumplings

Skewered herb dumplings in kidney bean sauce offer the best of both worlds: comforting textures and fresh, vibrant flavors. This dish is healthy, filling, and versatile enough for everyday meals or special occasions. Try making them this week, and enjoy a plant-based recipe that’s as beautiful on the plate as it is nourishing for your body.


References

  1. Harvard T.H. Chan — Legumes and Pulses
  2. USDA FoodData Central — Cooked Red Kidney Beans
  3. American Heart Association — How to Cook Healthier at Home

Recent Posts


The Ultimate Plate With Greens, Chicken & Roasted Veg

This hearty recipe featuring chicken & roasted veg is a beautiful blend of color, nutrition, and comfort. It’s perfect for clean eating without sacrificing flavor. Packed with vibrant greens and rich textures, it makes healthy meals feel truly satisfying.


Showing is a plate with Greens, Chicken & Roasted Veg with a dribble of  herb sauce
Greens And Chicken

A colorful, nutrient-rich Chicken & Roasted Veg meal you’ll love.


Eating healthy doesn’t have to mean eating boring. In fact, some of the most nutritious meals are the ones that burst with color and texture on your plate. This recipe—featuring tender herb chicken, garlicky sautéed greens, creamy cauliflower mash, and sweet roasted red peppers—isn’t just balanced, it’s visually stunning and crave-worthy.

This dish brings together the best of clean eating with real comfort food satisfaction. Each component is prepared simply, but thoughtfully, to let the natural flavors shine. Whether you’re cooking for yourself, your family, or meal prepping for the week, this meal is designed to be nourishing, impressive, and easy to make.

More than just a healthy option, this plate represents a shift toward mindful eating. When your meal is colorful, thoughtfully arranged, and full of texture, it invites you to slow down and appreciate each bite. Studies have shown that colorful, well-plated food can enhance mood and even digestion. This recipe embraces that idea, delivering not only nutrients but also joy.


Time to Prepare & Cook

Time to Prepare: 20 minutes
Time to Cook: 35 minutes


Ingredients For Chicken & Roasted Veg

For the Herb Chicken:

  • 2 boneless, skinless chicken breasts
  • 1 tablespoon olive oil
  • 1 teaspoon dried Italian herbs
  • 1 clove garlic, minced
  • 1/2 teaspoon salt
  • 1/4 teaspoon black pepper
  • Juice of 1/2 lemon

For the Greens:

  • 4 cups mixed leafy greens (baby kale, spinach, arugula)
  • 1 teaspoon olive oil
  • 1 clove garlic, minced
  • Pinch of sea salt

For the Cauliflower Mash:

  • 1 small head cauliflower, chopped
  • 2 cloves garlic, peeled
  • 1 tablespoon olive oil or Greek yogurt
  • Salt and pepper to taste

For the Roasted Reds:

  • 1 red bell pepper, sliced into strips
  • 1 cup cherry tomatoes
  • 1 teaspoon olive oil
  • Pinch of salt


Instructions For Chicken & Roasted Veg

  1. Preheat the oven to 400°F (200°C). Line a baking sheet with parchment paper.
  2. Prepare the chicken. In a bowl, mix olive oil, lemon juice, garlic, herbs, salt, and pepper. Coat the chicken breasts in the marinade and set aside.
  3. Roast the vegetables. On the lined sheet, arrange red bell pepper and cherry tomatoes. Drizzle with olive oil and a pinch of salt. Roast for 25–30 minutes or until caramelized.
  4. Bake the chicken. Add the marinated chicken to the same sheet pan or a separate one. Bake for 20–25 minutes until the internal temperature reaches 165°F.
  5. Make the cauliflower mash. Steam the cauliflower and garlic cloves until soft (about 10 minutes). Transfer to a blender or food processor with olive oil or Greek yogurt. Blend until smooth and season to taste.
  6. Sauté the greens. Heat olive oil in a pan over medium heat. Add garlic and greens. Sauté just until wilted—about 2 minutes.
  7. Assemble the plate. Spoon cauliflower mash onto a plate, add a pile of greens, arrange roasted reds, and top with sliced chicken. Garnish with lemon zest or fresh herbs if desired.

Raw Ingredients on a table in preparatin for cooking
Fresh Ingredients

What Makes This Plate So Visually Satisfying?

This meal isn’t just nutritious—it’s designed to be a feast for the eyes. The vibrant greens, creamy whites, golden chicken, and deep red vegetables create a balanced color palette that instantly draws you in. That’s no accident.

Eating the rainbow isn’t just trendy—it helps ensure a wide range of nutrients while keeping meals exciting. Plating food with clear sections and varied textures adds a restaurant-quality touch. Use contrasting elements: crisp roasted edges, tender chicken, velvety mash, and bright greens. A sprinkle of fresh herbs, a drizzle of olive oil, or a twist of lemon zest elevates the dish visually and flavor-wise.

Nutritional Information

Here’s a breakdown of the approximate nutritional content per serving:

  • Calories: 420 kcal
  • Protein: 38g
  • Carbohydrates: 18g
  • Fiber: 6g
  • Fat: 22g
  • Saturated Fat: 3g
  • Sugar: 6g
  • Sodium: 550mg

Note: Nutritional values are estimates and can vary based on portion size and exact ingredients used.

This meal offers a balanced macronutrient profile, making it suitable for high-protein diets, clean eating, or general healthy eating goals.

Benefits of Chicken & Roasted Veg

  • Balanced macronutrients: Protein, healthy fats, and complex carbs for long-lasting energy.
  • Antioxidant-rich: Tomatoes, greens, and peppers provide immune-boosting antioxidants.
  • Gut-friendly: Cauliflower and leafy greens support digestion.
  • Low-calorie, high-satiety: Filling without heaviness.
  • Visually satisfying: A rainbow plate encourages mindful, enjoyable eating.
  • Easy to meal prep: Each element stores well and holds up in reheating.

Variations Of Chicken & Roasted Veg

VariationSwap or Add
VegetarianReplace chicken with grilled tofu or portobello mushrooms
Low-carbUse zucchini ribbons instead of cauliflower mash
SpicyAdd chili flakes to the greens or chicken marinade
HeartyAdd roasted sweet potatoes or quinoa on the side
Dairy-FreeUse olive oil instead of yogurt in the mash

Variation of greens and chicken
Greens and Chicken

Frequently Asked Questions (FAQs)

Can I meal prep this recipe?

Yes! All components hold up well in the fridge for up to 4 days. Store separately and reheat gently for best texture.

Can I use frozen vegetables?

You can substitute frozen cauliflower and spinach in a pinch. Just be sure to drain excess moisture before use.

Is this recipe gluten-free?

Yes, this entire recipe is naturally gluten-free as written.

What herbs work best if I don’t have Italian seasoning?

Try a mix of rosemary, thyme, parsley, and oregano.


Final Thoughts For Chicken & Roasted Veg

This dish is proof that healthy eating can be both beautiful and deeply satisfying. With its stunning color palette, clean flavors, and nutrient-dense ingredients, it’s the kind of recipe you’ll want to return to again and again. Whether you’re cooking for one or preparing for a group, it delivers elegance and ease in every bite.

So grab a fork and enjoy the balance—your body (and your eyes) will thank you.


References


Recent Posts


Easily Make: Egg white & Herb Muffins

Meal prep just got better with these easy egg white muffins packed with herbs, spinach, and fresh veggies. They’re low-calorie, high-protein, and perfect for busy mornings or clean eating goals. Customize each bite and enjoy a nourishing breakfast all week long.


Close-up of stacked egg white muffins with spinach and red bell pepper on an aquamarine plate, placed on a dark wooden surface. One muffin is sliced in half to reveal the fluffy egg white interior, highlighting texture and freshness.
Egg White & Herb Muffins

Egg White Breakfasts That Are Clean, Lean & Satisfying


If you’re looking for a quick, nourishing breakfast that fuels your morning and fits into just about any eating style, look no further than these egg white muffins. Light, protein-packed, and loaded with colorful veggies and herbs, they’re the kind of meal prep essential that makes healthy living feel easy. Whether you’re running out the door or sitting down to a slow breakfast, these muffins offer a perfect blend of convenience and clean ingredients.

Egg whites are an underrated superfood. They’re fat-free, cholesterol-free, and contain almost pure protein—ideal for anyone watching calories, reducing cholesterol intake, or increasing lean muscle mass. By combining them with nutrient-rich veggies like spinach and bell pepper, plus flavorful herbs like chives or parsley, you get mini frittata-style muffins that taste great and support your health goals.

What makes this recipe so appealing is its versatility. You can enjoy them fresh out of the oven, chilled from the fridge, or reheated on a busy weekday. Make a full batch on Sunday, and you’ll have a ready-to-go breakfast (or snack) all week long. In this post, we’ll walk you through the full recipe, highlight health perks, answer common questions, and show you how to make these egg white muffins your own.

All the raw Ingredients for the egg white muffin
Ingredients

Time to Prepare & Cook

Time to Prepare: 10 minutes
Time to Cook: 20–25 minutes


Ingredients For Egg white & Herb Muffins

  • 2 cups liquid egg whites (or whites from 8 large eggs)
  • 1/2 cup chopped spinach
  • 1/4 cup diced red bell pepper
  • 1/4 cup diced onion
  • 2 tablespoons chopped fresh parsley or chives
  • 1/4 teaspoon garlic powder
  • 1/4 teaspoon black pepper
  • Salt to taste
  • Olive oil spray or muffin liners

Optional Add-ins:

  • 1/4 cup crumbled feta or shredded cheese (if not dairy-free)
  • 1/4 cup cooked quinoa or oats (for extra texture)
  • Chili flakes for heat


Instructions

  1. Preheat and Prep:
    Preheat your oven to 350°F (175°C). Lightly grease a 12-cup muffin tin with olive oil spray or use silicone muffin liners.
  2. Mix the Veggies and Herbs:
    In a medium bowl, combine the chopped spinach, bell pepper, onion, and fresh herbs. Stir in the garlic powder, pepper, and salt.
  3. Add Egg Whites:
    Pour the egg whites into a large measuring jug or bowl with a spout. Gently mix in the veggie and herb mixture.
  4. Fill Muffin Cups:
    Pour the egg white mixture evenly into each muffin cup, filling about 3/4 full. Stir the mixture as you go so each cup gets an even amount of veggies.
  5. Bake:
    Place the muffin tray in the oven and bake for 20–25 minutes, or until the muffins are puffed and the centers are set.
  6. Cool and Store:
    Let muffins cool in the tin for 5 minutes, then transfer to a wire rack. Store in an airtight container in the fridge for up to 5 days, or freeze for up to 1 month.

Benefits of These Egg White Muffins

These muffins aren’t just delicious—they offer real nutritional perks, especially for those focused on clean eating or high-protein diets:

  • High in Protein: Each muffin delivers a lean protein boost that supports muscle repair and keeps you fuller longer.
  • Low-Calorie & Low-Fat: Egg whites are low in calories and contain no fat or cholesterol.
  • Meal-Prep Friendly: Make a batch on Sunday and enjoy grab-and-go breakfasts or snacks all week.
  • Versatile & Customizable: Change up the veggies, herbs, or seasonings to suit your taste.
  • Clean Eating Approved: Made with whole, minimally processed ingredients—no additives or preservatives.
This is a comparison infographic to show the benefits of egg whites.
Nutrition Comparison

Variations: Make It Your Way

Customize your egg white muffins using the ideas below:

PreferenceSwap or Add
Dairy-FreeOmit cheese or use dairy-free alternatives
VegetarianAdd mushrooms, cherry tomatoes, or zucchini
High-FiberStir in cooked oats, quinoa, or flaxseed
SpicyAdd jalapeños, chili flakes, or a dash of hot sauce
Savory & FillingTop with avocado or serve with whole grain toast
Kid-FriendlyUse mild cheese and finely chopped vegetables
Want a bit of variety. These servings suggestions shows you how.
Different Toppings

Alternative Cooking Methods

Air Fryer Version

Want to make these even faster? Use your air fryer!

  1. Line silicone muffin molds with your egg white mixture.
  2. Place them in the air fryer basket and cook at 300°F (150°C) for 12–15 minutes.
  3. Let cool slightly before removing.

Microwave Hack (Single-Serve)

In a rush? Try this:

  1. Pour egg white mixture into a microwave-safe mug.
  2. Microwave on high for 90–120 seconds.
  3. Stir halfway to prevent overflow. Enjoy instantly!

Frequently Asked Questions (FAQs)

1. Can I use whole eggs instead of just egg whites?

Yes, you can use whole eggs if you prefer the added fat and flavor. Use about 6 large eggs in place of 2 cups of egg whites. Just note the muffins will be richer and slightly higher in calories.


2. How do I keep them from sticking to the pan?

Grease the muffin tin well with olive oil spray, or use silicone or parchment paper liners. Let the muffins cool slightly before removing, which helps them release more easily.


3. Are egg white muffins good for weight loss?

Absolutely. They are low in calories and high in protein, which helps with satiety. Plus, using vegetables adds bulk and nutrients without extra calories.


Final Thoughts For Egg white & Herb Muffins

These muffins are a meal prep win—simple to make, endlessly customizable, and packed with flavor. Whether you’re eating clean, watching your calories, or just want something fast and healthy in the morning, these muffins check all the boxes.

Try them with your favorite veggies, play around with herbs and spices, or top them with avocado for extra richness. However you make them, you’ll be coming back for more.


References

  1. USDA FoodData Central – Egg White, Raw
  2. Harvard T.H. Chan School of Public Health – Protein
  3. Mayo Clinic – Healthy meals start with planning

Recent Posts


Loaded with Veggies: A Healthy Chunky Soup You’ll Love

Discover how easy it is to nourish your body with real, whole foods—starting with this hearty, healthy chunky soup. Packed with vibrant vegetables and bold flavor, it’s a recipe you’ll turn to again and again. Whether you’re meal prepping or craving comfort, this bowl brings both health and satisfaction to the table.


Close-up of a healthy chunky soup in a white bowl, showing vibrant chunks of carrots, zucchini, kidney beans, celery, and leafy greens in a rich tomato broth.
Healthy Chunky Soup

Healthy Chunky Soup Packed with Flavor & Nutrients

There’s something deeply satisfying about a steaming bowl of chunky vegetable soup. It’s warm, comforting, and full of texture—every spoonful feels like a nourishing hug. But what makes this recipe stand out is that it doesn’t sacrifice health for heartiness. This healthy chunky soup is made with real, whole ingredients that come together to create a flavorful, filling meal you can feel great about eating.

If you’re looking for a way to add more vegetables to your daily routine without feeling like you’re eating another salad, this soup is the answer. It’s loaded with fiber-rich beans, colorful vegetables, fragrant herbs, and a splash of lemon for brightness. You don’t need any fancy equipment—just a cutting board, a soup pot, and about 45 minutes. Plus, it’s naturally vegetarian, easily vegan, and can be adjusted to suit different dietary needs.

Whether you’re meal prepping lunches, feeding a family, or just cooking for yourself on a chilly evening, this healthy chunky soup is flexible enough to fit your lifestyle. It’s hearty enough to be a full meal on its own and pairs beautifully with crusty bread, a grain bowl, or even a fresh green salad. In this post, you’ll find a complete recipe breakdown, customization options, health benefits, and answers to your most common soup questions.

Time to Prepare & Cook Healthy Chunky Soup

Time to Prepare: 15 minutes
Time to Cook: 35 minutes


Ingredients For Healthy Chunky Soup

  • 1 tablespoon olive oil
  • 1 yellow onion, chopped
  • 3 garlic cloves, minced
  • 3 carrots, peeled and diced
  • 2 celery stalks, diced
  • 1 zucchini, diced
  • 1 bell pepper (any color), chopped
  • 1 can (15 oz) diced tomatoes
  • 1 can (15 oz) kidney beans, drained and rinsed
  • 4 cups vegetable broth
  • 1 teaspoon dried thyme
  • 1 teaspoon dried basil
  • ½ teaspoon smoked paprika
  • Salt and pepper to taste
  • 1 cup chopped spinach or kale (optional, for added greens)
  • Juice of half a lemon (for brightness)
  • Fresh parsley, chopped (for garnish)


Instructions For Healthy Chunky Soup

  1. Sauté the Aromatics:
    In a large soup pot, heat the olive oil over medium heat. Add the chopped onion and sauté for 3–4 minutes, until soft and translucent.
  2. Add Garlic and Base Veggies:
    Stir in the minced garlic, carrots, and celery. Cook for another 4–5 minutes until slightly softened.
  3. Add Remaining Vegetables and Seasoning:
    Toss in the zucchini, bell pepper, and seasonings (thyme, basil, paprika, salt, and pepper). Stir well to combine.
  4. Pour in Liquids and Tomatoes:
    Add the diced tomatoes (with juice), kidney beans, and vegetable broth. Stir everything together and bring to a boil.
  5. Simmer Gently:
    Reduce heat to low, cover, and let the soup simmer for about 25 minutes or until all the vegetables are tender.
  6. Add Greens and Lemon Juice:
    Stir in the chopped spinach or kale (if using) and the lemon juice. Let it simmer for 2–3 more minutes to wilt the greens.
  7. Serve and Garnish:
    Ladle the soup into bowls and top with fresh parsley before serving.

Benefits of This Healthy Chunky Soup

This soup isn’t just cozy and tasty—it brings real nutritional value:

  • Rich in Fiber: Thanks to the beans and vegetables, it supports digestion and helps you stay fuller longer.
  • Low in Calories, High in Volume: You can enjoy a big bowl without excess calories—perfect for mindful eating.
  • Immune-Boosting Ingredients: Onions, garlic, carrots, and leafy greens contribute to immune system health.
  • Heart-Healthy: Made with olive oil and no saturated fats, it’s a heart-friendly comfort food.
  • Great for Meal Prep: It keeps well in the fridge for up to 5 days and also freezes beautifully.

Variations: For Healthy Chunky Soup

Here are a few ways to customize your healthy chunky soup based on preferences or pantry staples:

Variation TypeIdeas
Protein BoostAdd cooked shredded chicken or chickpeas
Low-Carb VersionReplace beans with chopped cauliflower or extra greens
Spicy KickAdd chili flakes or a dash of hot sauce
Herby TwistUse fresh rosemary, dill, or Italian seasoning blend
Extra FillingStir in cooked quinoa, barley, or small pasta shapes before serving
Creamy TextureBlend half the soup for a mix of chunky and smooth
Infographic titled “Healthy Chunky Soup Variations” showing three customization tips: adding leafy greens, choosing low-sodium broth, and mixing in different vegetables like zucchini or squash.
Soup Variations

Alternative Cooking Methods

Slow Cooker Method

If you prefer a hands-off approach, the slow cooker is a fantastic way to make this healthy chunky soup.

Instructions:

  1. Add all ingredients except the spinach/kale and lemon juice to the slow cooker.
  2. Cook on low for 6–7 hours or high for 3–4 hours, until the vegetables are tender.
  3. Stir in the leafy greens and lemon juice during the final 10 minutes of cooking.

Pros:

  • Great for busy days—set it and forget it.
  • Flavors have more time to develop slowly.
  • Frees up your stovetop for other cooking tasks.

Air Fryer Method (For Roasted Variation)

While you can’t cook the whole soup in an air fryer, you can roast the vegetables in it first to give your soup a deeper, slightly smoky flavor.

Instructions:

  1. Toss chopped carrots, zucchini, bell pepper, and onion with olive oil and seasoning.
  2. Air fry at 375°F (190°C) for about 10–12 minutes, shaking halfway through.
  3. Add the roasted vegetables to a pot with broth, tomatoes, beans, and remaining ingredients, then simmer for 15–20 minutes on the stovetop.

Pros:

  • Adds a caramelized, roasted depth to your soup.
  • Speeds up veggie prep and reduces need for sautéing.

Cons:

  • You’ll still need a pot to combine and simmer everything.
  • Extra step, but worth it for enhanced flavor.

Frequently Asked Questions (FAQs)

1. Can I freeze this soup?

Yes! This soup freezes extremely well. Let it cool completely, then portion it into airtight containers or freezer bags. Freeze for up to 3 months. Reheat gently on the stovetop or in the microwave, stirring occasionally for even heat.


2. What if I don’t have all the vegetables listed?

No problem! This recipe is very flexible. You can use frozen mixed vegetables, leftover roasted veggies, or whatever fresh produce you have on hand. Just try to maintain the same total quantity of vegetables to keep the texture balanced.


3. How can I add protein without using meat?

To keep it plant-based, consider adding canned lentils, chickpeas, white beans, or tofu cubes. These all blend seamlessly into the soup and provide a satisfying protein boost without altering the flavor too much.


4. Can I make this in a slow cooker?

Yes, absolutely! See the “Alternative Cooking Methods” section above for full slow cooker instructions. It’s a great option for meal prep days or busy schedules.


5. Is this soup good for weight loss?

Absolutely. It’s high in fiber, low in calories, and very filling—making it ideal for anyone focused on healthy weight management. It helps curb cravings while delivering a wide range of vitamins and minerals your body needs.


Final Thoughts

This healthy chunky soup is a feel-good dish that’s perfect any time of the year—whether you’re trying to eat healthier, clean out your fridge, or just warm up with a bowl of comfort. With simple ingredients, customizable options, and loads of flavor, it’s sure to become a regular on your meal plan.

Try making a big batch on Sunday and enjoy it throughout the week—or freeze a few portions for future busy days. Once you see how easy and satisfying it is, you’ll wonder how you ever lived without it.


References

  1. Harvard T.H. Chan School of Public Health – Vegetables and Fruits
  2. Mayo Clinic – Fiber: Essential for a Healthy Diet
  3. Cleveland Clinic – Heart-Healthy Diet: 8 Steps to Prevent Heart Disease

Recent Posts


Guilt-Free Chocolate Avocado Ice Cream You’ll Love

This creamy chocolate avocado dessert is everything you want in a guilt-free ice cream: rich, silky, naturally sweetened, and loaded with healthy fats. Serve it with fresh berries, coconut flakes, or chopped almonds for the perfect clean-eating treat!


The image shows chocolate avocado in a square, white, casserole dish with ice cream on the  spoon, and serving bowls. It is topped with green pistachio nuts. The image also shows this as ice lollies.
Avocado Chocolate

A Healthy Indulgence Without the Guilt

If you’ve ever wished you could dive into a bowl of ice cream and still feel great about it afterward—this is your moment. Say hello to chocolate avocado ice cream, your new go-to treat that satisfies every craving without a drop of dairy, refined sugar, or guilt. It’s smooth, chocolatey, nutrient-packed, and so indulgent you won’t believe it’s actually good for you.

Made with ripe avocados as the creamy base, this dessert is loaded with heart-healthy fats, antioxidants, and fiber. Avocados blend into a luxuriously smooth texture, while raw cacao or unsweetened cocoa brings that rich, deep chocolate flavor we all love. Natural sweeteners like maple syrup or dates keep it clean without sacrificing taste. It’s a no-churn recipe that comes together in minutes—and disappears just as fast.

Whether you’re following a dairy-free diet, trying to cut back on sugar, or just looking for a better way to satisfy your sweet tooth, this dessert delivers on all fronts. It’s also an excellent option for anyone with food sensitivities or dietary restrictions, since it’s naturally gluten-free, vegan, and paleo-friendly with just a few swaps. Best of all, no ice cream maker is needed—just a blender, freezer, and a spoon ready to scoop.

This recipe is perfect for hot summer days, clean dessert cravings, or sharing with guests who won’t believe there’s avocado in it. You can even prep a big batch in advance and store it for when chocolate calls. And if you’ve got kids, they’ll never know they’re eating something healthy. With a rich flavor profile and decadent texture, this is not just an alternative—it’s an upgrade.


Time to Prepare For Chocolate Avocado

10 minutes

Time to Blend & Freeze

4–6 hours (freezing time)


Ingredients For Chocolate Avocado

  • 2 ripe avocados
  • 1/2 cup unsweetened cocoa powder or raw cacao
  • 1/2 cup full-fat coconut milk (from a can)
  • 1/3 cup maple syrup (or 4–5 Medjool dates, pitted)
  • 1 teaspoon vanilla extract
  • Pinch of sea salt
  • Optional: 2 tablespoons dark chocolate chips or cacao nibs

Instructions For Chocolate Avocado

  1. Cut the avocados in half, remove the pits, and scoop the flesh into a blender.
  2. Add cocoa powder, coconut milk, maple syrup (or honey), vanilla extract, and sea salt.
  3. Blend on high until the mixture is smooth and creamy. Scrape down the sides as needed to ensure everything is well combined.
  4. Taste and adjust sweetness if necessary.
  5. Stir in optional chocolate chips or cacao nibs if using.
  6. Transfer the mixture into a freezer-safe container and smooth the top.
  7. Cover and freeze for at least 2–3 hours, or until firm.
  8. Before serving, let it sit at room temperature for 10–15 minutes to soften slightly.
  9. Scoop into bowls or cones and enjoy your guilt-free chocolate avocado ice cream!

Benefits of Chocolate Avocado Ice Cream

🥑 Nutrient-Rich Ingredients

Avocados are packed with monounsaturated fats, fiber, and vitamins like potassium and vitamin E, making this dessert a good-for-you indulgence.

🍫 Antioxidant Boost

Cocoa powder is rich in antioxidants, particularly flavonoids, which may help lower inflammation and improve heart health.

🌿 Naturally Dairy-Free & Refined Sugar-Free

This recipe is a fantastic option for those avoiding dairy or processed sugar, relying instead on coconut milk and natural sweeteners.

🍦 No Ice Cream Maker Needed

You only need a blender and a freezer, making this recipe super accessible for clean-eating beginners and seasoned foodies alike.


Variations For Chocolate Avocado

PreferenceVariation Idea
Nut-FreeUse oat milk instead of almond milk
Extra RichAdd a tablespoon of almond or peanut butter
Vegan-FriendlyStick to maple syrup and coconut milk
Low SugarUse stevia or monk fruit sweetener
Texture BoostAdd chopped nuts or shredded coconut

Frequently Asked Questions (FAQs)

Q: Can I make this ice cream without a blender?

A: A food processor can also work. Just make sure to blend thoroughly to achieve a smooth texture.

Q: How long does this ice cream last in the freezer?

A: It will keep well for up to 1 week in an airtight container. For best texture, allow it to thaw slightly before serving.


Final Thoughts For Chocolate Avocado

Chocolate avocado ice cream proves that dessert doesn’t have to be a guilty pleasure. With heart-healthy fats, antioxidants, and clean ingredients, this treat delivers everything you want in a dessert—flavor, texture, satisfaction—while still supporting your wellness goals.

It’s also a crowd-pleaser. Whether you’re hosting a summer BBQ, celebrating a special occasion, or just craving something cold and chocolaty after dinner, this ice cream has your back. Try it once, and it just might replace your store-bought favorites.


References


Recent Posts


Taco Casserole: Baking Made Clean And Simple

This wholesome taco casserole brings together clean ingredients and bold flavor in one easy dish. Pair it with guacamole, citrus slaw, or a crisp green salad for a complete, satisfying meal. Meal-prep approved and family-loved!


A close-up shot of a freshly baked taco casserole in a deep green ceramic dish with handles, showing rich layers of meat, beans, and melted cheese. A large spoon with a portion of the casserole sits to the side, making the taco casserole look warm, delicious, and ready to serve.
Taco Casserole

A Family-Favorite Taco Casserole—Cleaner & Simpler

Taco night is always a hit—but what if you could enjoy all the bold, zesty flavors of tacos in a fuss-free, baked dish that’s better for your body? This taco casserole delivers on that promise. It’s everything you love about tacos—lean protein, savory spices, melty cheese, and fresh toppings—layered into one nourishing, oven-baked meal.

Perfect for busy weeknights or weekend meal prep, this taco casserole skips the processed ingredients found in many traditional versions. Instead, it’s loaded with real, whole foods—think lean ground turkey or beef, black beans, chopped veggies, and a seasoning blend that packs a punch without additives or excess sodium. You’ll still get that crave-worthy taco flavor but in a lighter, cleaner format that’s easier to digest and keeps you feeling good.

And the best part? It’s endlessly customizable. Whether you’re gluten-free, dairy-free, low-carb, or just looking to add more veggies to your diet, this recipe can be adjusted to meet your needs. Plus, it’s a one-dish wonder—less cleanup and more time to relax. So go ahead: scoop it onto a plate, top with avocado or salsa, and enjoy a feel-good version of taco night everyone can get behind.

Beyond just a quick fix for dinner, this taco casserole is a meal prep dream. It stores beautifully in the fridge or freezer, reheats without getting soggy, and tastes even better the next day. Whether you’re cooking for one or feeding a crowd, it scales easily and satisfies every time.

Let this become your go-to comfort food with a healthy twist—perfect as a standalone dish or paired with fresh greens, guacamole, or a citrusy slaw.


Time to Prepare For Taco Casserole

15 minutes

Time to Cook

30 minutes


A flat lay of colorful, fresh ingredients for taco casserole including ground turkey, chopped vegetables, beans, spices, and shredded cheese arranged neatly on a kitchen counter.
Fresh Ingredients

Ingredients For Taco Casserole

Base:

  • 1 lb lean ground turkey (or ground beef)
  • 1/2 onion, finely chopped
  • 2 garlic cloves, minced
  • 1 bell pepper, chopped (any color)
  • 1 can (15 oz) black beans, drained and rinsed
  • 1 can (15 oz) diced tomatoes (low-sodium)
  • 1/2 cup corn kernels (fresh, frozen, or canned)
  • 2 teaspoons chili powder
  • 1 teaspoon ground cumin
  • 1/2 teaspoon smoked paprika
  • Salt and pepper to taste
  • Olive oil for cooking

Casserole Layer:

  • 1 cup cooked brown rice or quinoa (optional for extra bulk)
  • 1/2 cup shredded cheese (cheddar or Mexican blend)
  • 1/4 cup fresh cilantro, chopped

Toppings (optional but encouraged):

  • Sliced avocado
  • Salsa or pico de gallo
  • Greek yogurt or sour cream
  • Jalapeño slices
  • Fresh lime wedges


Instructions For Taco Casserole

  1. Preheat your oven to 375°F (190°C).
  2. In a large skillet, heat a drizzle of olive oil over medium heat. Add the onion and garlic, cooking until fragrant and softened (about 3–4 minutes).
  3. Add the ground turkey or beef to the skillet. Cook until browned and fully cooked through, breaking it up with a spatula as it cooks.
  4. Stir in the bell pepper, black beans, diced tomatoes, corn, and all the spices. Simmer for 5–7 minutes until the mixture thickens slightly and the flavors meld together.
  5. In a large mixing bowl, combine the cooked rice or quinoa (if using) with the meat and veggie mixture.
  6. Spread the mixture evenly into a lightly greased 9×13-inch baking dish.
  7. Sprinkle the shredded cheese evenly over the top.
  8. Bake for 20–25 minutes or until the cheese is melted and bubbly.
  9. Remove from the oven, let cool slightly, and top with cilantro.
  10. Serve with your favorite toppings like avocado, salsa, or Greek yogurt.

A step-by-step image showing taco casserole ingredients being layered into a square baking dish before cooking, highlighting textures and colors of the wholesome, clean ingredients.
Casserole Prep

Benefits of This Taco Casserole

🥗 Balanced Nutrition

With lean protein, fiber-rich beans, and wholesome veggies, this casserole provides a balanced and filling meal.

⏱ Meal Prep Friendly

Cooks in one pan, stores well in the fridge, and reheats without losing texture—perfect for weekly meal planning.

🧡 Comfort Food Without the Guilt

You’ll enjoy that cozy, satisfying taco flavor in a cleaner, nutrient-dense version.

🥑 Family-Friendly & Customizable

Kids and adults alike will love it. Easily modify for dairy-free, gluten-free, or vegetarian needs.


Variations For Taco Casserole

Dietary Need or PreferenceSwap or Add
VegetarianUse lentils or crumbled tofu
Gluten-FreeOmit grains or use GF rice/quinoa
Extra VeggiesAdd zucchini, spinach, or mushrooms
Low DairyUse dairy-free cheese or omit cheese
Low-CarbSkip rice and use cauliflower rice

A clean, flat-design infographic titled "Healthy Taco Casserole Variations," showing colorful icons and two main sections: one with ingredient swaps for dietary needs like vegetarian or gluten-free, and another with topping ideas like avocado, salsa, and lime wedges. Designed to enhance the taco casserole experience with visual clarity.
Ingredients Swaps

Frequently Asked Questions (FAQs)

Q: Can I freeze this taco casserole?

A: Absolutely! Let it cool completely, then cover tightly or portion into containers. Freeze for up to 3 months. Thaw overnight in the fridge before reheating.

Q: Can I use ground chicken or tofu instead?

A: Yes. Ground chicken works just as well. For a plant-based version, use crumbled tofu or lentils and adjust seasonings to taste.


Final Thoughts For Taco Casserole

Taco casserole doesn’t need to be loaded with processed ingredients or take hours to prepare. With this clean and simple version, you’ll get all the flavor and satisfaction in a healthier, easier-to-digest format. It’s a flexible, family-friendly recipe you’ll want to keep in your weekly rotation.

Pair it with a fresh side salad, roasted vegetables, or a scoop of guacamole to complete the meal. Whether you’re making it for a cozy family dinner or prepping lunches for the week, this casserole delivers flavor, comfort, and nourishment in every bite.


References


Recent Posts


Lentil Tahini Bites You’ll Love

These flavorful lentil tahini bites are the perfect plant-based main or side dish, pairing beautifully with salads, grain bowls, or roasted veggies. With clean ingredients, anti-inflammatory benefits, and plenty of protein, they make healthy eating feel indulgent. Whether baked fresh or meal-prepped for the week, they’ll quickly become your go-to for guilt-free satisfaction.

Person dipping a lentil tahini bite into a bowl of tahini sauce, set in a cozy home kitchen setting.
Lentil Tahini

A Clean-Eating Lentil Tahini Favorite That Packs a Punch

Looking for a new plant-based recipe that’s simple, satisfying, and versatile? These lentil tahini bites might just be your next favorite. Combining cooked lentils with herbs, spices, and a creamy tahini drizzle, they’re the perfect mix of earthy flavor and bright, nutty zing.

Whether you’re meal-prepping for the week or assembling a quick, nourishing snack, these bites are as easy to love as they are to make. They work beautifully on their own, but also shine as a side to grain bowls, salads, or wraps. You can even enjoy them as an appetizer for a gathering, where they’re sure to impress health-conscious guests and omnivores alike.

These bites are also incredibly budget-friendly. Lentils are one of the most affordable and accessible plant-based protein sources, and a small amount goes a long way. Tahini, while rich and luxurious in taste, is surprisingly cost-effective, especially when bought in bulk. When combined, they create a dish that feels elevated yet approachable—perfect for those looking to eat healthy on a budget.

You can serve them warm out of the oven, or chilled with a drizzle of lemon-tahini sauce. Either way, you’re getting a nutrient-rich bite that’s packed with fiber, protein, and healthy fats—great for anyone looking to eat clean without sacrificing taste. These lentil tahini bites are also highly portable, making them ideal for packed lunches, road trip snacks, or outdoor picnics.

Whether you follow a vegan, vegetarian, flexitarian, or simply health-curious lifestyle, this recipe fits the bill. It’s also kid-friendly, meal-prep-friendly, and can be made ahead of time without losing flavor or texture. With all that going for it, there’s really no reason not to give it a try!


Time to Prepare For Lentil Tahini

15 minutes

Time to Cook

20 minutes


Ingredients for lentil tahini bites displayed on a wooden surface, including cooked lentils, tahini, rolled oats, herbs, garlic, onion, and spices.
Lentil Ingredients

Ingredients

For the Lentil Tahini Bites:

  • 1 cup cooked green or brown lentils (well drained)
  • 1/2 cup rolled oats
  • 1/4 cup finely chopped onion
  • 2 cloves garlic, minced
  • 2 tablespoons chopped parsley or cilantro
  • 1 tablespoon ground flaxseed + 2.5 tbsp water (flax egg)
  • 1 tablespoon olive oil
  • 1/2 teaspoon cumin
  • 1/4 teaspoon smoked paprika
  • 1/2 teaspoon salt
  • Freshly ground black pepper, to taste

For the Lentil Tahini Drizzle:

  • 3 tablespoons tahini
  • 1 tablespoon lemon juice
  • 1 teaspoon maple syrup
  • 2 tablespoons water (or more for thinning)
  • Pinch of salt

Instructions For Lentil Tahini Bites

  1. Prepare the Flax Egg: Mix ground flaxseed with water and let it sit for 5 minutes to gel.
  2. Mash the Lentils: In a large bowl, mash the lentils with a fork or potato masher until mostly smooth.
  3. Combine the Mixture: Add the oats, onion, garlic, herbs, spices, flax egg, and olive oil. Mix thoroughly.
  4. Form the Bites: Roll into small balls or form into patties. Place on a parchment-lined baking sheet.
  5. Bake: Preheat oven to 375°F (190°C) and bake for 20 minutes, flipping halfway through, until golden and firm.
  6. Make the Tahini Drizzle: Whisk tahini, lemon juice, maple syrup, water, and salt until smooth.
  7. Serve: Drizzle sauce over warm lentil bites or serve on the side for dipping.

Benefits of Lentil Tahini Bites

🌱 Plant-Based Protein

Lentils and tahini both offer plant-based protein, making this a complete, nourishing meal.

🧠 Brain & Heart Health

Tahini is rich in healthy fats and antioxidants, while lentils provide folate and iron to support brain and cardiovascular health.

🌾 Gut-Friendly Fiber

The combo of oats, lentils, and herbs supports digestion and promotes satiety.

💪 Blood Sugar Balance

Lentils have a low glycemic index and may help stabilize energy and prevent crashes.

🕒 Great for Meal Prep

Make a batch and enjoy throughout the week—they store well and can be eaten hot or cold.

Close-up of hands rolling lentil tahini mixture into small round bites on a wooden surface, preparing them for baking.
Shaping with Hands

Cooking Method Variations For Lentil Tahini Bites

These lentil tahini bites are incredibly versatile in how they can be cooked:

🔥 Pan-Frying

Add a tablespoon of olive oil to a nonstick skillet and cook the bites over medium heat for about 3–4 minutes per side, or until golden brown and crispy. This method adds a delicious crisp edge.

🌬 Air Frying

Preheat your air fryer to 375°F (190°C). Lightly spray the bites with oil and air fry for 10–12 minutes, flipping halfway. This method yields crispy, golden bites with less oil.

🔥 Griddle or Grill Pan

Press the bites slightly into patty form and grill on a lightly oiled griddle or grill pan for those delicious sear marks. Just 2–3 minutes per side should do the trick.


Variations

Need/PreferenceVariation Idea
Gluten-FreeUse certified gluten-free oats
Extra ProteinAdd hemp seeds or chopped walnuts
Spicy VersionAdd cayenne or chili flakes to mixture
Mediterranean TwistAdd sun-dried tomatoes and oregano
Creamy CenterHide a cube of vegan cheese inside each bite
Tangy Flavor BoostMix sumac or za’atar into the tahini sauce
Nut-FreeReplace tahini with sunflower seed butter
Colorful infographic illustrating the health benefits and variations of lentil tahini bites, including gluten-free, spicy, and Mediterranean options.
Benefits

Frequently Asked Questions (FAQs)

Q: Can I pan-fry instead of baking?

A: Yes! Pan-fry in a little oil over medium heat for 3–4 minutes per side until crispy and heated through.

Q: How long will they keep in the fridge?

A: They’ll last up to 5 days in an airtight container. Reheat in a skillet or oven for best texture.


Final Thoughts For Lentil Tahini

Whether you’re new to lentils or a long-time fan, these lentil tahini bites bring something fresh to the table. They’re flavorful, satisfying, and incredibly adaptable to different eating styles and dietary goals.

Pair them with a vibrant side salad, wrap them in a pita, or serve over rice with extra tahini sauce and a side of roasted veggies. However you enjoy them, you’re getting a delicious and balanced dish that supports clean eating and makes plant-based cooking fun.

Once you try them, you’ll want to keep them in regular rotation. The flavor payoff is huge, and the prep is refreshingly simple. Give them a go this week and enjoy every nourishing bite!

Close-up of baked lentil tahini bites with creamy tahini sauce dripping over the top, one bite cut in half to show texture inside.
Lentil Tahini Bites

References


Recent Posts


18 Easy Meal-Prep Tips for a Calmer, Healthier Week

Today, I will share practical Meal-Prep Tips to help busy individuals plan, cook, and store meals with ease. My goal is to make healthy eating simple and stress-free for every week.


Stacked glass meal-prep containers filled with colorful cooked vegetables and grains, showcasing practical meal-prep tips for a calmer, healthier week.
Meal Prep Tips

Introduction For Meal-Prep Tips

Meal-Prep Tips can transform your week from chaotic to calm. By setting aside time on the weekend (or any day you choose), you create a toolbox of ready-to-eat foods that support healthy choices. No more last-minute takeout—just balanced meals that match your goals.

In this guide, you’ll explore strategies for planning menus, shopping smart, and using the right tools. You’ll learn how to batch-cook staples like grains and proteins, prep colorful produce, and pack meals that stay fresh all week. These methods save time and reduce food waste, so you get more value from every ingredient.

Whether you want to boost nutrition, save money, or simply reclaim your evenings, these meal-prep tips have you covered. You’ll build confidence in the kitchen, feel less stressed, and enjoy delicious meals without daily cooking. Ready to dive in? Let’s get started with step one: planning like a pro.


Time to Prepare and Time to Cook/Blend

  • Time to Prepare: 15 minutes planning, 30 minutes prep
  • Time to Cook/Blend: 20–40 minutes total cooking or blending

Tools & Supplies For Meal-Prep Tips

  • Meal prep containers (various sizes)
  • Zip-top freezer bags
  • Labels and permanent markers
  • Cutting board and sharp knives
  • Digital kitchen scale and measuring cups
  • Blender or food processor
  • Sheet pans and baking dishes
  • Rice cooker or Instant Pot (optional)
  • Mason jars for salads and dressings
  • Silicone spatula and tongs

A selection of storage container for meal prep tips. These come in different sizes and shapes.
Variety of Meal Prep containers

Storage Containers for Meal Prepping

Choosing the right storage containers is key to keeping your meals fresh, organized, and ready to grab. Glass containers with airtight lids are ideal—they won’t absorb odors or stains, and they’re microwave and oven-safe. Look for borosilicate glass or tempered options to handle temperature changes without cracking. If you prefer lighter options, BPA-free plastic containers work well; just ensure they’re labeled safe for food storage and freezer use.

Size and shape matter, too. Opt for a mix of large 3–4 cup containers for main dishes and smaller 1–2 cup ones for sides or snacks. Square or rectangular shapes make the most of fridge and freezer space, allowing containers to nest side by side. Mason jars are perfect for salads or layered meals, keeping wet ingredients at the bottom and greens crisp on top.

Finally, seal quality affects longevity. Containers with silicone gaskets or locking clips keep air and moisture out, maintaining flavor and preventing leaks. Stackable designs save shelf space, and clear containers let you see contents at a glance, so you always know what’s on hand.


Instructions: 18 Easy Meal-Prep Tips

  1. Plan Your Menu Ahead
    Set aside one day to choose recipes for the week. Write a clear plan to avoid last-minute stress.
  2. Make a Shopping List
    Group items by category (produce, proteins, grains). Stick to your list to save time and money.
  3. Schedule Prep Time
    Block a 1–2 hour window for chopping, cooking, and packing. A set time boosts focus.
  4. Batch-Cook Staples
    Cook grains, proteins, and legumes in large batches. Portion and refrigerate for quick assembly.
  5. Use Multi-Tasking Appliances
    Try an Instant Pot or slow cooker to handle multiple dishes at once.
  6. Prep Produce First
    Wash, peel, and chop all fruits and veggies before cooking. Store in airtight containers.
  7. Portion Snacks
    Pre-portion nuts, seeds, and cut fruits into small bags for healthy grabs.
  8. Label Everything
    Write the date and contents on each container. Rotate older meals first.
  9. Mix and Match
    Prepare several proteins, grains, and veggies. Combine them differently each day.
  10. Prep Dressings and Sauces
    Whisk or blend vinaigrettes and sauces in advance. Store in mason jars for easy pouring.
  11. Use Clear Containers
    See contents at a glance. It speeds up meal choice and keeps you organized.
  12. Freeze Portions
    Freeze soups, casseroles, and chili in meal-size bags. Thaw overnight in the fridge.
  13. Pack Balanced Meals
    Aim for a balance of protein, carbs, and healthy fat in each container.
  14. Keep Herbs Fresh
    Wrap herbs in damp paper towel and store in a sealed bag to last longer.
  15. Clean as You Go
    Wash utensils and bowls while cooking. A tidy kitchen feels calm.
  16. Use One-Pan Recipes
    Sheet-pan dinners cut cooking time and cleanup.
  17. Track Your Favorites
    Note which meals you love. Repeat them to save planning time.
  18. Review and Adjust
    Each week, reflect on what worked and tweak your plan for next time.

A woman in the kitchen chopping vegetables using meal prep tips
Chopping vegetable

Benefits For Meal-Prep Tips

  • Saves Time: Prep once, eat all week.
  • Reduces Waste: Use all ingredients and store leftovers.
  • Improves Nutrition: Plan balanced meals, avoid fast food.
  • Cuts Stress: No more nightly “what’s for dinner?” panic.
  • Saves Money: Bulk buying and cooking lower grocery bills.


Variations (Customize Your Prep)

VariationDescription
VeganSwap meats for tofu, beans, and legumes.
Low-CarbReplace rice and pasta with cauliflower rice.
Gluten-FreeUse quinoa, rice, or gluten-free oats.
High-ProteinAdd extra chicken, Greek yogurt, or protein powder.
PaleoFocus on meats, veggies, nuts; skip grains and legumes.

Frequently Asked Questions (FAQs)

Q1: How often should I meal prep?
A: Aim for once a week. You can do small midweek top-ups if needed.

Q2: How long do prepped meals last?
A: Fresh fridge meals last 4–5 days. Frozen meals keep 2–3 months.

Q3: Can I change recipes midweek?
A: Yes. Mix fresh salads with prepped grains or proteins to keep it fun.


How to Start a Meal Prep Business

Ready to turn your meal-prep expertise into an income? Here are some proven ways to monetize your skills:

  • Sell Digital Guides: Create PDF meal-prep guides or ebooks and sell them on platforms like Etsy, Gumroad, or your own website.
  • Subscription Plans: Offer personalized weekly meal plans via a subscription model on Patreon or a dedicated membership site.
  • Workshops & Coaching: Host virtual or in-person meal-prep workshops and one-on-one coaching sessions.
  • Local Partnerships: Partner with gyms, wellness centers, or corporate offices to provide meal-prep services or plans.

For a detailed roadmap, check out How to Start a Meal Prep Business by NerdWallet: https://www.nerdwallet.com/article/small-business/how-to-start-meal-prep-business


Final Thoughts

Meal-Prep Tips gives you back your time and health. By planning, prepping, and storing smartly, you can enjoy tasty, balanced meals without daily cooking stress. Start with a small batch this week. Build your routine, tweak as you go, and reap the calm.

References

  1. Harvard T.H. Chan School of Public Health. Meal Prep Guide
  2. U.S. Department of Agriculture. MyPlate: Meal Planning.
  3. American Heart Association. Meal Planning

Recent Posts


Your New Favorite Breakfast: Avocado Toast with Chili & Eggs

This avocado toast recipe is the perfect mix of creamy, spicy, and satisfying—an energizing breakfast that’s as good for your body as it is for your taste buds.


Top-down view of three slices of avocado toast on a white background—one topped with avocado and diced red peppers, one with mashed avocado and a fried egg, and one with avocado and crumbled feta cheese. Ingredients listed below include olive oil, garlic, natural yogurt, ciabatta, avocado, eggs, chickpeas, and bread."
Avocado Toast

Avocado Toast: A Power Breakfast You’ll Crave Every Morning

There’s something undeniably comforting about a slice of crispy toast topped with creamy avocado and perfectly poached eggs. Add a sprinkle of chili flakes and you’ve got the ultimate flavor combo: creamy, spicy, crunchy, and totally satisfying. This isn’t just another avocado toast recipe—this is your new morning obsession.

Avocado toast has become a breakfast staple for good reason. It’s nutrient-dense, takes just minutes to make, and is endlessly customizable to your mood or dietary needs. Whether you’re powering up before work or enjoying a slow weekend brunch, this version elevates the classic with a spicy twist and rich, runny yolk.

If you’re looking for a healthy breakfast that feels indulgent and looks like it came from a café, this recipe is for you. It’s easy to prep, filled with whole foods, and it’ll keep you full for hours without weighing you down. Even better, it supports your clean-eating goals while feeling like a treat.

Not only is this dish quick to whip up, but it’s also incredibly versatile. It works for any mealtime, from breakfast and brunch to a light lunch or even a quick dinner when you’re craving something satisfying but don’t want to spend a lot of time in the kitchen.


Time to Prepare Your Avocado Toast

5 minutes

Time to Cook

5–7 minutes


Ingredients For Avocado Toast

  • 2 slices of whole-grain or sourdough bread
  • 1 ripe avocado
  • 2 large eggs
  • ½ teaspoon red chili flakes (adjust to taste)
  • 1 teaspoon lemon juice
  • Salt and pepper to taste
  • Optional toppings: microgreens, sesame seeds, cherry tomatoes, olive oil drizzle, everything bagel seasoning, crumbled feta, fresh herbs


Instructions For Avocado Toast

  1. Toast the Bread: Place the slices of bread in a toaster or on a hot skillet until golden and crisp.
  2. Prepare the Avocado: Scoop the avocado into a bowl, add lemon juice, a pinch of salt, and mash until slightly chunky.
  3. Poach the Eggs: Fill a small saucepan with water and bring it to a gentle simmer. Crack one egg into a small bowl, then gently slide it into the water. Cook for about 3 minutes for a soft yolk. Repeat with the second egg.
  4. Assemble the Toast: Spread the mashed avocado evenly on both slices of toast.
  5. Add Eggs: Gently remove the poached eggs with a slotted spoon and place one on each slice of avocado toast.
  6. Top It Off: Sprinkle with chili flakes, pepper, and any optional toppings you like.
  7. Serve Immediately: Best enjoyed fresh while the yolk is warm and runny!

Pro Tips:

  • For an extra layer of flavor, rub the toast with a garlic clove before adding avocado.
  • Want creamier avocado? Add a spoonful of plain Greek yogurt while mashing.
  • If poaching feels tricky, try soft-boiled or pan-fried eggs instead.

Benefits of This Avocado Toast

🥑 Healthy Fats for Heart Health

Avocados are rich in monounsaturated fats that help reduce bad cholesterol levels and lower your risk of heart disease. They also provide potassium, fiber, and antioxidants.

🍳 Protein Power

Eggs are a complete protein, containing all essential amino acids. They help keep you full longer and support muscle repair and metabolism. The addition of eggs balances the healthy fats from avocado, making the dish more satiating.

🌶 Anti-Inflammatory Boost

Chili flakes provide capsaicin, a compound known to reduce inflammation and support weight management by slightly increasing thermogenesis.

🍞 Fiber for Digestion

Whole-grain or sourdough bread adds complex carbohydrates and fiber, which support digestion and provide lasting energy. A high-fiber breakfast like this one can help prevent energy crashes later in the day.

🕒 Fast & Fuss-Free

This recipe takes just 10 minutes total, making it perfect for busy mornings without sacrificing quality or taste. It’s ideal for those days when you want a wholesome meal but don’t have a lot of time.

🌱 Loaded with Micronutrients

This dish delivers a spectrum of vitamins and minerals including vitamin E, vitamin B6, folate, magnesium, and lutein—an antioxidant that supports eye health.


Variations For Avocado Toast

Dietary GoalSwap or Addition
VeganUse scrambled tofu instead of eggs
Gluten-FreeUse gluten-free bread
Extra ProteinAdd smoked salmon or a sprinkle of hemp seeds
Low-CarbServe on grilled eggplant or sweet potato slices
Mediterranean StyleAdd feta cheese, olives, and fresh herbs
Spicy KickUse hot sauce or sliced jalapeños
Detox-FriendlyAdd radish slices and a sprinkle of chia seeds
Creamy TextureAdd a dollop of cottage cheese or tahini
Tangy FlavorAdd pickled onions or a splash of apple cider vinegar

Frequently Asked Questions (FAQs)

Q: Can I use a different type of bread?

A: Absolutely. Sourdough, whole wheat, gluten-free, or even sprouted grain bread work well. Just aim for something sturdy enough to hold the toppings. You can also use a bagel or English muffin as a base.

Q: Can I make this ahead of time?

A: You can mash the avocado and toast the bread in advance, but the eggs are best prepared fresh. Store components separately for quick assembly in the morning. If you do prep, keep the avocado in an airtight container with lemon juice to prevent browning.

Q: How can I make this more filling?

A: Add extras like chickpeas, black beans, smoked salmon, or grilled tofu on top. You can also serve it alongside a green smoothie or fruit bowl for a more complete meal.


Final Thoughts For Avocado Toast

Avocado toast with chili and eggs is more than just a trendy breakfast—it’s a satisfying, nutrient-rich way to start your day. With heart-healthy fats, energizing protein, and a kick of spice, it’s a recipe that supports your wellness goals while delighting your taste buds.

This recipe also makes a great brunch or light lunch and pairs beautifully with herbal tea, black coffee, or even a fresh juice. Whether you’re keeping it classic or adding your favorite toppings, avocado toast is one of those meals you’ll never get bored of.

Start incorporating it into your weekly routine, and you’ll notice better energy, improved digestion, and fewer mid-morning cravings. It’s the perfect balance of nourishment and enjoyment.

Make it once, and it just might earn a permanent spot in your morning lineup. And with so many ways to personalize it, this avocado toast can be a little different every time—without ever losing its clean, delicious foundation.


References


Recent Posts


The Best Vegetable Scramble for Clean Eating

This simple vegetable scramble is your go-to clean eating recipe—easy to make, protein-packed, and full of vibrant vegetables for a satisfying and healthy start.


A vibrant vegetable scramble featuring broccoli florets, zucchini noodles, and red bell peppers, served on a wooden board with a sprig of rosemary, ideal for clean eating.
Vegetable Scramble

Start Your Day Right with a Vegetable Scramble Clean-Eating Classic

Clean eating doesn’t have to mean bland, repetitive meals. In fact, some of the most satisfying dishes are the simplest—like a fresh vegetable scramble. With just a few wholesome ingredients and minimal prep time, you can enjoy a delicious, nutrient-dense breakfast that fuels your body and supports your wellness goals.

This recipe is loaded with vibrant vegetables like spinach, tomatoes, and bell peppers, gently sautéed and folded into fluffy scrambled eggs. It’s naturally low in carbs, high in protein, and full of flavor, making it a perfect option for anyone trying to clean up their diet without sacrificing taste or satisfaction.

Whether you’re meal prepping for the week or cooking up a quick weekday breakfast, this vegetable scramble will become your go-to. Let’s explore how to make it, the health benefits it brings, and how to customize it for your unique dietary needs.


Time to Prepare

5 minutes

Time to Cook

7–10 minutes


Ingredients For Vegetable Scramble

  • 4 large eggs
  • ½ cup cherry tomatoes, halved
  • ½ cup bell peppers, diced (any color)
  • 1 cup baby spinach, loosely packed
  • ¼ cup onion, finely diced
  • 1 tablespoon olive oil or avocado oil
  • Salt and pepper to taste
  • Optional: red chili flakes, chopped parsley, or feta cheese

Instructions For Vegetable Scramble

  1. Crack the eggs into a bowl, add a pinch of salt and pepper, and beat them lightly with a fork.
  2. Heat olive oil in a non-stick skillet over medium heat.
  3. Add the onions and bell peppers to the pan and sauté for 2–3 minutes until slightly softened.
  4. Toss in the cherry tomatoes and continue cooking for another 2 minutes.
  5. Add the spinach and stir gently until wilted.
  6. Lower the heat slightly and pour the beaten eggs into the pan.
  7. Stir slowly and consistently with a spatula, folding the eggs and vegetables together.
  8. Cook until the eggs are just set—soft but not runny—about 2–3 minutes.
  9. Remove from heat, sprinkle with optional toppings, and serve immediately.

Benefits of This Vegetable Scramble

🥬 Rich in Vitamins and Minerals

Spinach, tomatoes, and peppers are packed with essential vitamins like A, C, K, and folate. These nutrients support immune health, eye function, and energy production.

🍳 High in Protein

Eggs are one of the most bioavailable sources of protein, which means your body can absorb and use them efficiently. Protein helps build muscle, supports metabolism, and keeps you full longer.

🫑 Supports Weight Management

This vegetable scramble is naturally low in calories and carbs but high in nutrients and satiety. It’s ideal for those managing their weight or reducing processed food intake.

💚 Clean Ingredients

No added sugars, processed meats, or artificial additives. Just whole, simple foods that nourish and energize.

🧠 Brain & Mood Support

Eggs are also a great source of choline, a nutrient essential for brain development and mood regulation. When combined with leafy greens like spinach, you’re getting a meal that helps support cognitive clarity and emotional well-being.

🕒 Quick & Convenient

This entire dish can be prepared and cooked in under 15 minutes, making it ideal for anyone juggling a busy schedule. It’s proof that clean eating doesn’t have to take hours in the kitchen.


Variations Of Vegetable Scramble

Preference/GoalSwap or Addition
Dairy-FreeSkip cheese or use a plant-based alternative
Keto-FriendlyAdd avocado and cheese, reduce tomatoes
Low-FODMAPUse green onions instead of regular onions
Extra FiberAdd mushrooms or shredded zucchini
Spicy KickAdd jalapeño slices or chili flakes
Mediterranean TwistAdd kalamata olives and crumbled feta
High-ProteinAdd egg whites or turkey sausage
Meal-Prep FriendlyBake scramble into muffin tins for grab-and-go

Frequently Asked Questions (FAQs)

Q: Can I meal prep this vegetable scramble?

A: Yes! While scrambled eggs are best fresh, you can prep the chopped veggies ahead of time and store them in the fridge. If you want to store the cooked scramble, keep it in an airtight container for up to 2 days and reheat gently on the stovetop.

Q: Can I use frozen vegetables instead of fresh?

A: Absolutely. Just be sure to thaw and drain any excess water before cooking to avoid a soggy scramble. Frozen spinach, bell peppers, and onions work well.

Q: Can I make this with egg whites only?

A: Yes, using only egg whites is a great way to reduce cholesterol or increase protein. Replace each whole egg with 2 egg whites for best results.

Q: Is this recipe suitable for kids?

A: Definitely! It’s mild, colorful, and loaded with hidden veggies. You can even serve it in a wrap or with toast to make it more fun for picky eaters.


Final Thoughts For Vegetable Scramble

A vegetable scramble is the kind of recipe that reminds you how easy and enjoyable clean eating can be. With minimal effort and maximum flavor, it’s a dish you’ll return to again and again. Plus, it’s endlessly adaptable based on what’s in season or in your fridge.

Start your day with this colorful plate of goodness, and you’ll feel the difference in energy, digestion, and focus. Whether you’re eating clean for the first time or returning to healthy habits, this vegetable scramble fits beautifully into any balanced lifestyle.

It also works well as a light lunch or even a weeknight dinner. Pair it with a green salad or whole-grain toast, and you’ve got a balanced meal that takes almost no time. If you’re a meal prep fan, try baking the scramble into muffin tins for easy reheating during the week.

Make it once and it just might become a new morning tradition—or even an all-day favorite.


References


Recent Posts