Cookie Consent by Free Privacy Policy Generator Update cookies preferences

The BEST Beginner Sewing Project for a Sustainable Life

A frustrated shopper stands at a grocery checkout line with a clear plastic bag of produce, looking guilty, while in the foreground, a sewing machine suggests a solution for a Beginner Sewing Project to reduce plastic waste.

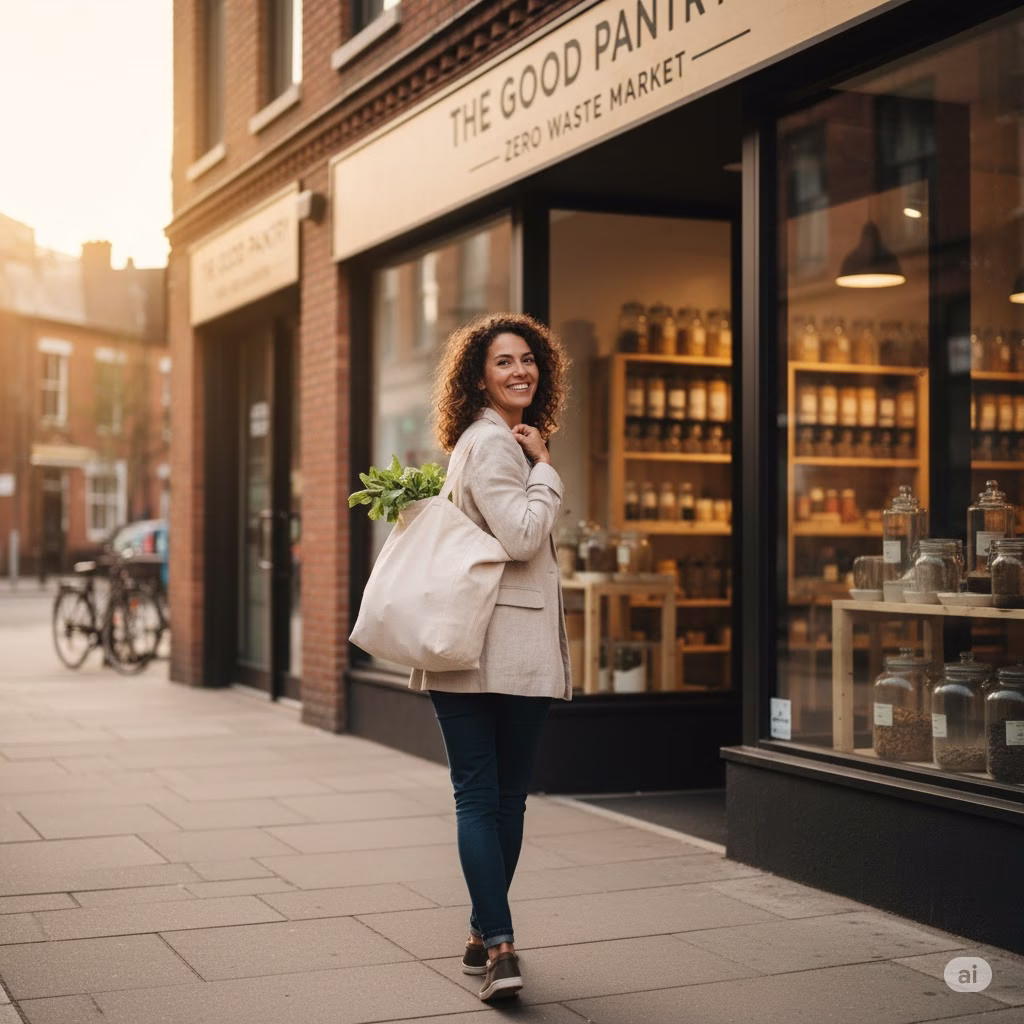
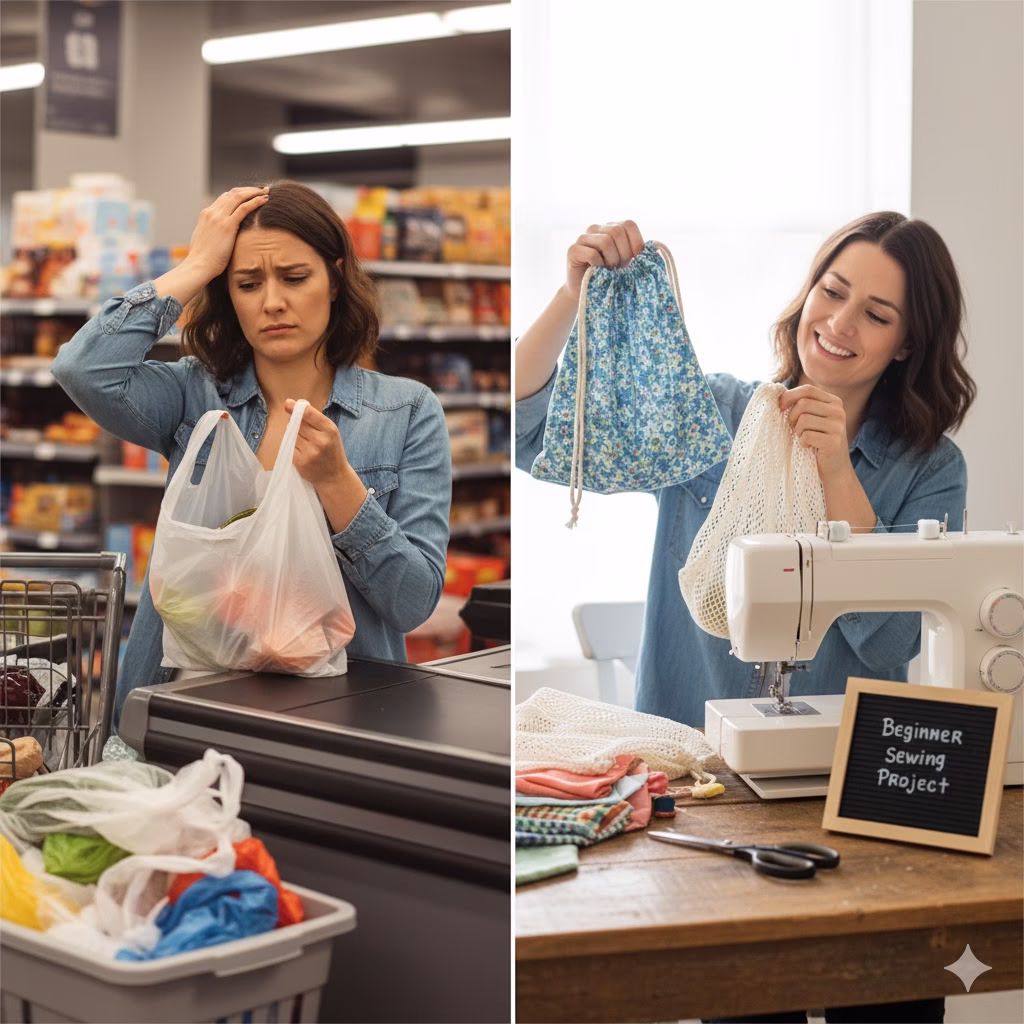
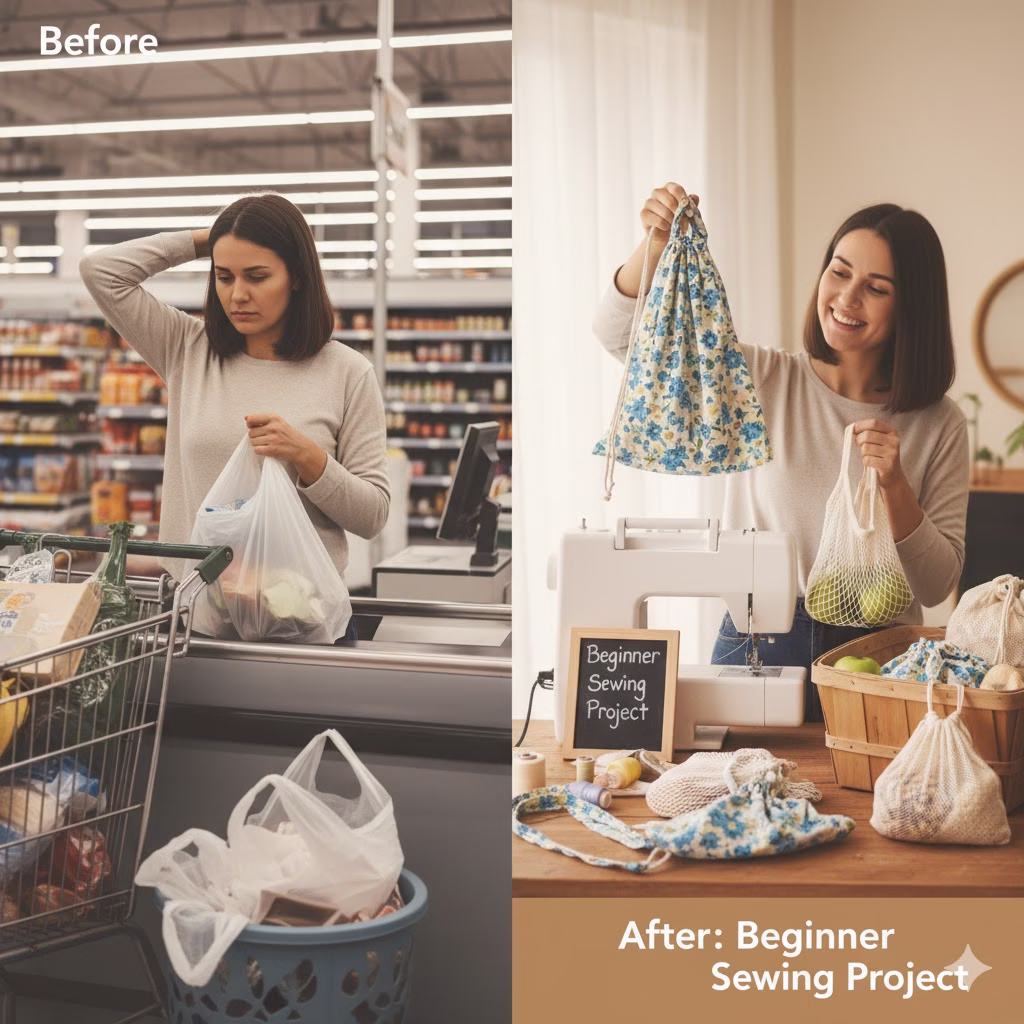
Ever felt that tug of eco-guilt at the checkout, adding yet another plastic bag to your overflowing bin? You’re not alone! I used to dread grocery shopping, knowing I was contributing to a problem I desperately wanted to solve. But what if I told you there’s a super simple, incredibly rewarding way to make a real difference, even if your sewing machine mostly collects dust? This Beginner Sewing Project changed my shopping habits and my outlook, and it’s about to change yours too.


Stitching Towards a Greener Future with this Beginner Sewing Project

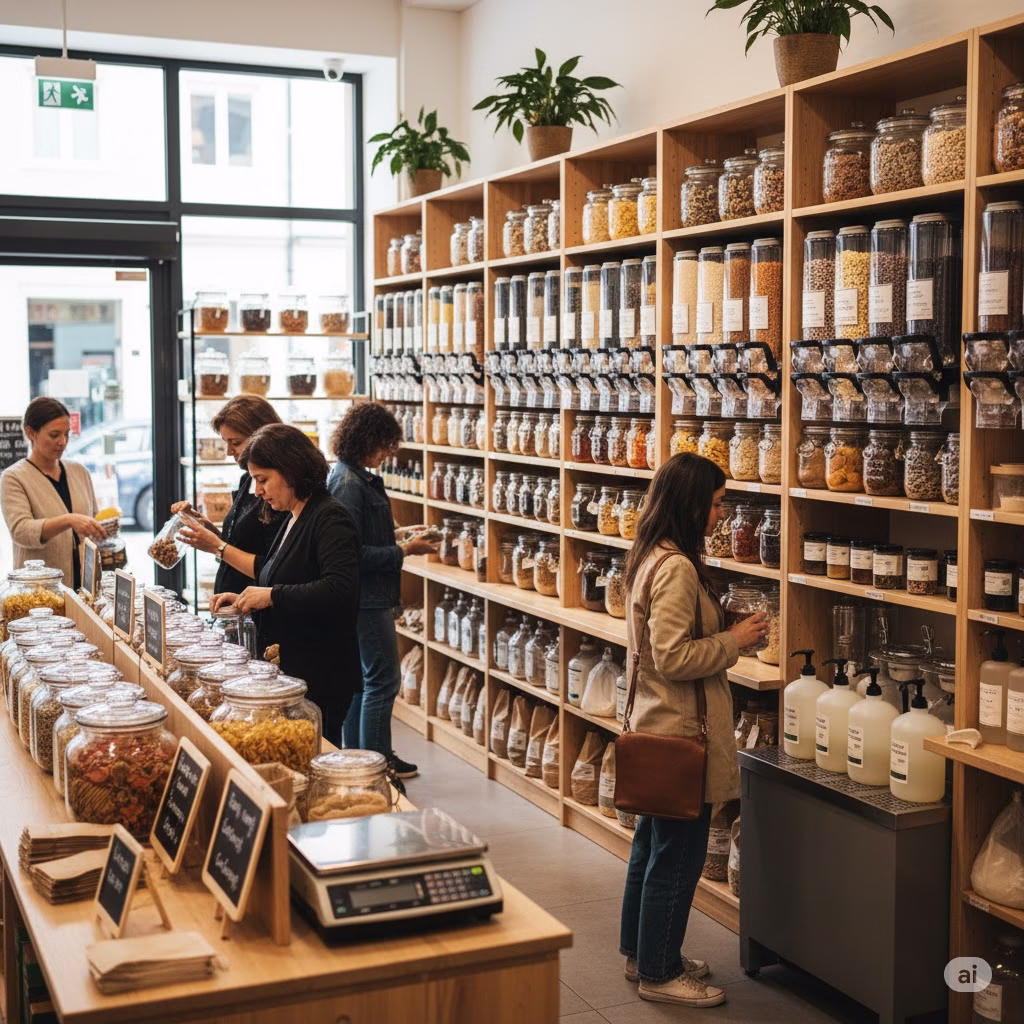
In a world increasingly aware of its environmental footprint, many of us are searching for tangible ways to reduce our impact. One of the most pervasive sources of waste in our daily lives comes from single-use plastics, particularly in the realm of grocery shopping. From flimsy produce bags that tear before you get home to the endless stream of plastic bread bags, it can feel overwhelming to navigate the supermarket aisle without accumulating a mountain of non-recyclable waste.

But what if the solution was not only simple but also incredibly satisfying? Enter the humble, yet mighty, DIY zero-waste bag. This isn’t just a craft project; it’s a statement, a step towards a more sustainable lifestyle, and arguably the BEST beginner sewing project for a sustainable life. If you’ve ever wanted to learn to sew, or even if your sewing machine has been gathering dust in a closet, this guide is your invitation to create something truly meaningful.

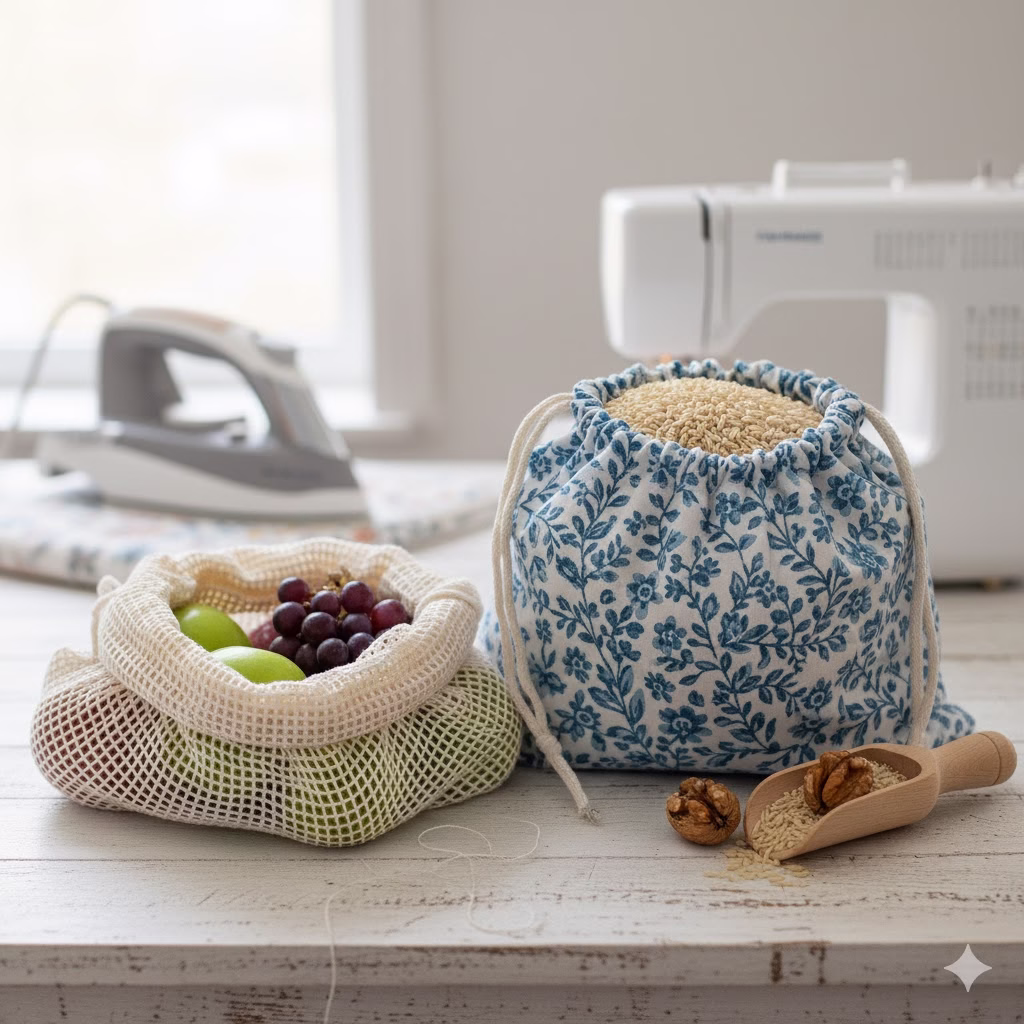
We’re going to walk through how to make two types of essential zero-waste bags: a simple cotton produce bag and a versatile mesh bag. Both are perfect for carrying everything from apples and leafy greens to bulk grains and nuts, eliminating the need for countless plastic alternatives. Not only will you save money in the long run, but you’ll also gain a sense of accomplishment and contribute directly to a healthier planet. So, dust off that sewing machine, grab your fabric scraps, and let’s stitch our way to a greener future!


Why Zero Waste Bags Are Your New Best Friend

Before we dive into the nitty-gritty of sewing, let’s talk about why these bags are such a game-changer:

  • Environmental Impact: This is the big one. Every reusable bag you make and use means one less plastic bag ending up in landfills, polluting our oceans, or harming wildlife. Plastic takes hundreds of years to decompose, if at all, breaking down into microplastics that infiltrate our food and water systems.
  • Cost Savings: While there’s an initial investment in fabric (often you can use scraps!), you’ll save money in the long run by not having to purchase reusable bags repeatedly or paying for plastic bags in some areas.
  • Durability & Longevity: Handmade bags, especially those made from sturdy cotton or repurposed materials, are often far more durable than their store-bought counterparts. They can withstand countless washes and heavy loads, serving you for years.
  • Customization & Style: Express yourself! Choose fabrics that match your personal style, create bags in different sizes for different purposes, and even add fun embellishments. Who said sustainability couldn’t be chic?
  • Empowerment: There’s immense satisfaction in making something with your own hands. This beginner sewing project gives you a tangible way to take control of your consumption and contribute positively to your community and the planet.
  • Healthier Produce: Mesh bags allow your produce to breathe, extending its freshness compared to being suffocated in plastic bags.

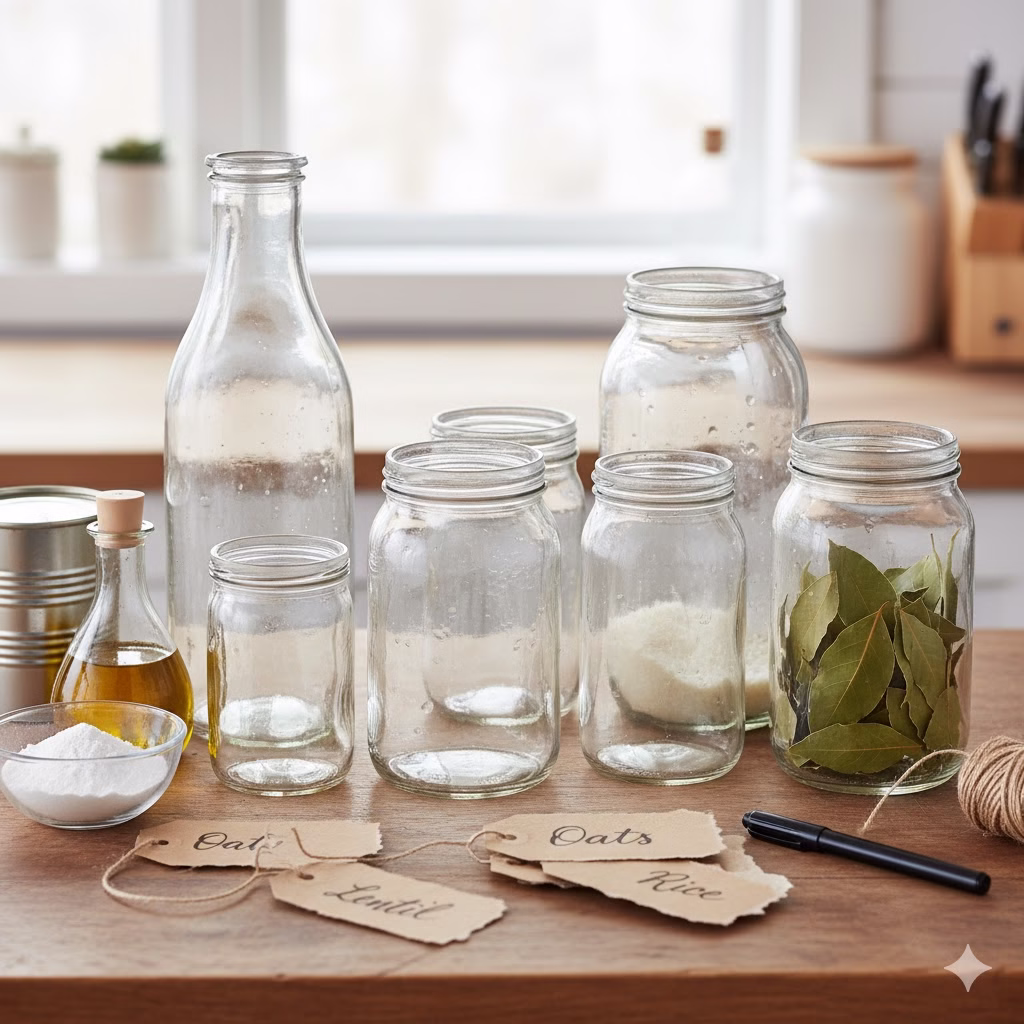
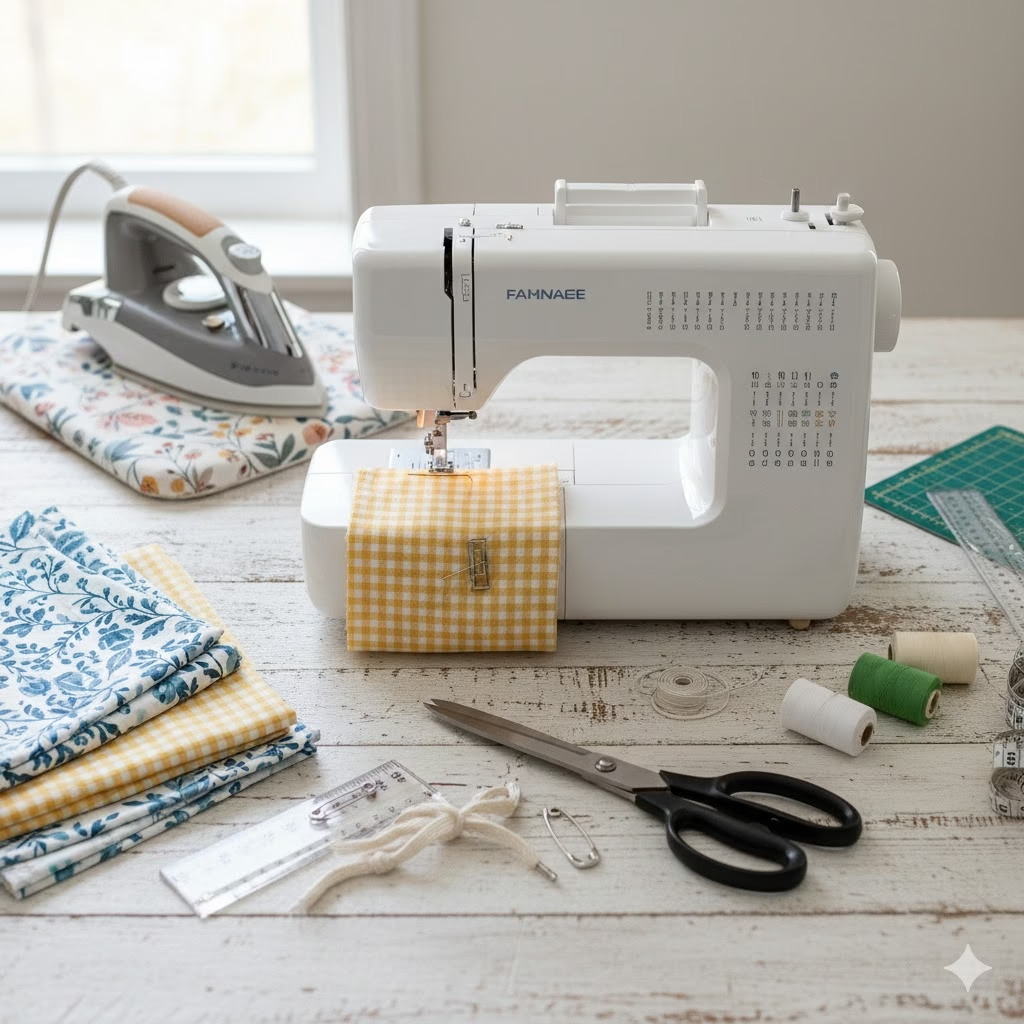
What You’ll Need for This Beginner Sewing Project (The Essentials)

Don’t be intimidated! You likely have many of these items already.

  • Sewing Machine: Any basic functional machine will do.
  • Fabric:
    • For Cotton Produce Bags: Lightweight, tightly woven cotton fabric. Old cotton sheets, pillowcases, duvet covers, or even men’s button-down shirts are perfect for upcycling! Muslin, calico, or quilting cotton also work beautifully. You’ll need about 1/2 to 3/4 yard per bag, depending on desired size.
    • For Mesh Produce Bags: Lightweight mesh fabric. This can be tricky to find in small quantities, but look for old sheer curtains, laundry bags, or specialty “eco-mesh” fabrics online. Alternatively, you can repurpose old tulle or netting. A standard size might need about 1/2 yard.
  • Matching Thread: Polyester all-purpose thread is generally suitable for both cotton and mesh.
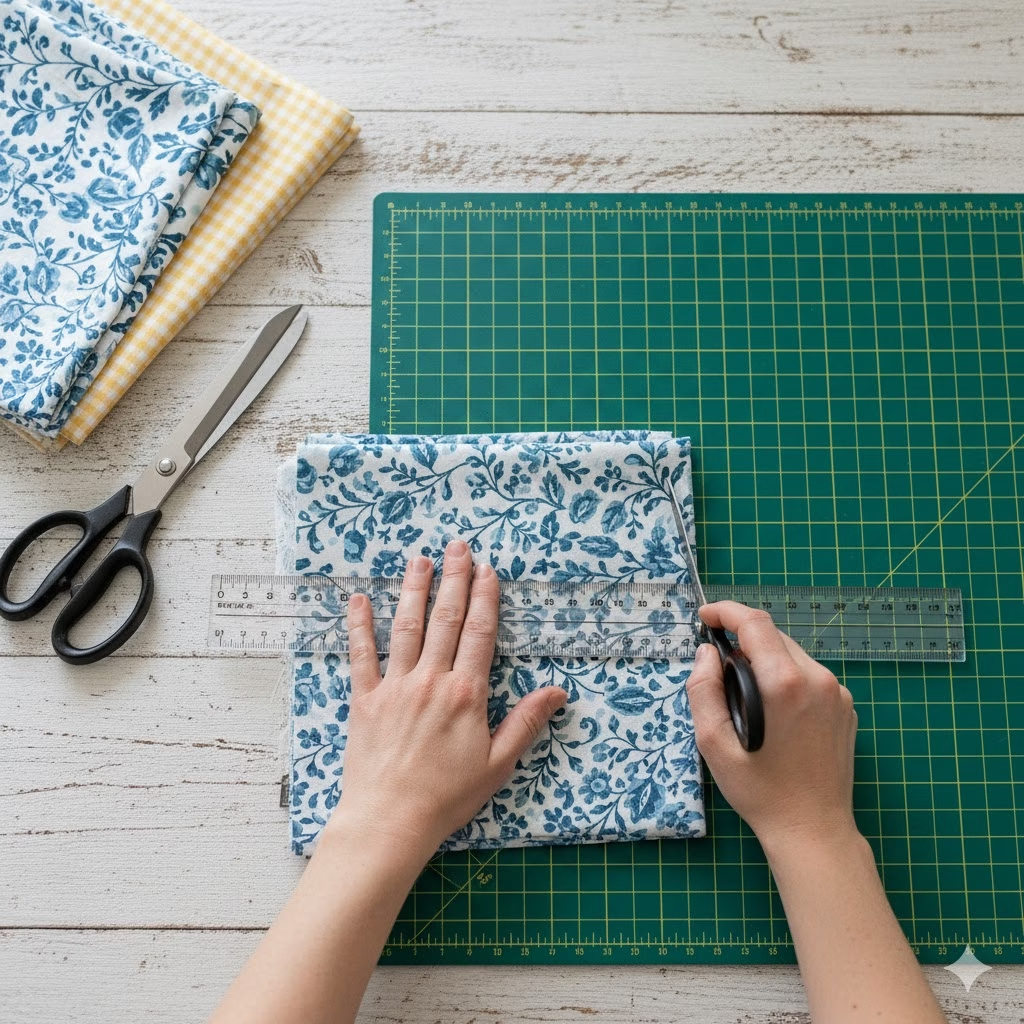
  • Fabric Scissors: Sharp scissors are crucial for clean cuts.
  • Ruler or Measuring Tape: For accurate measurements.
  • Pins or Fabric Clips: To hold fabric pieces together.
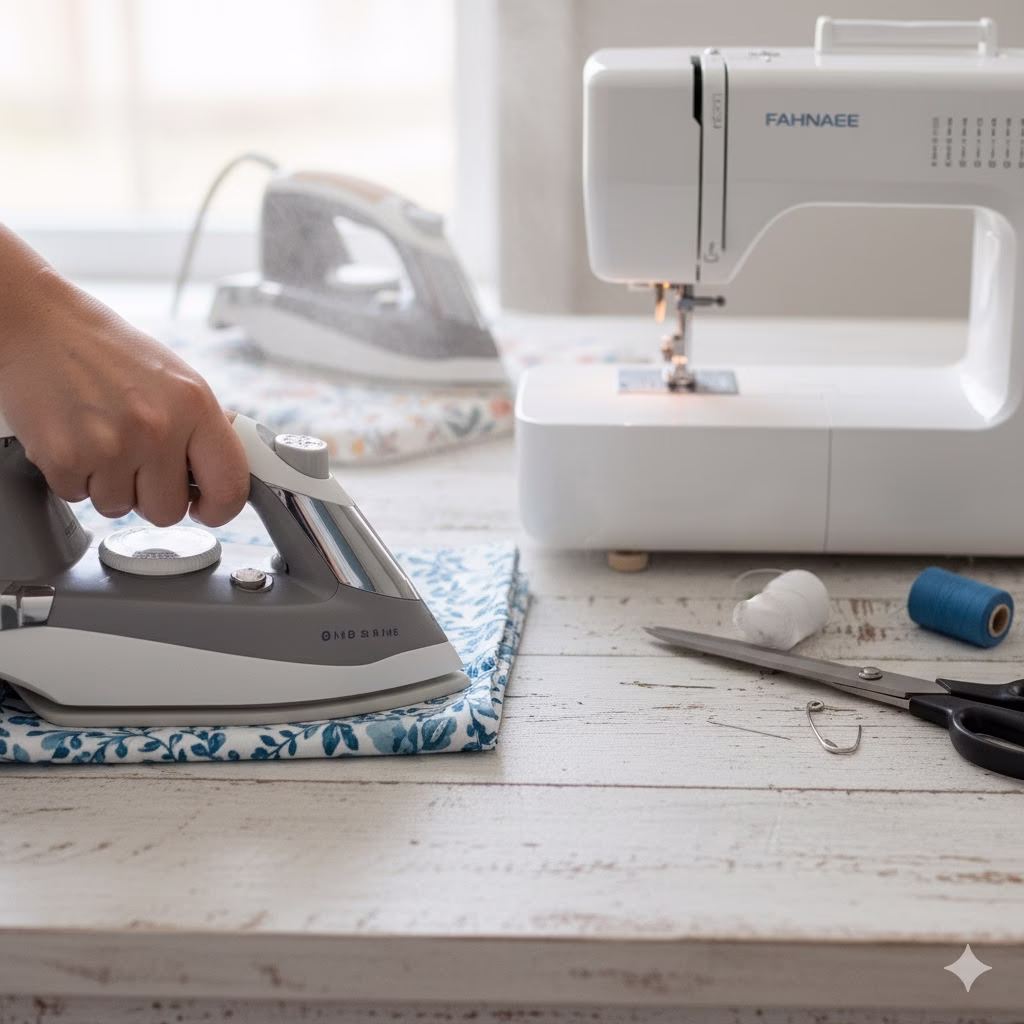
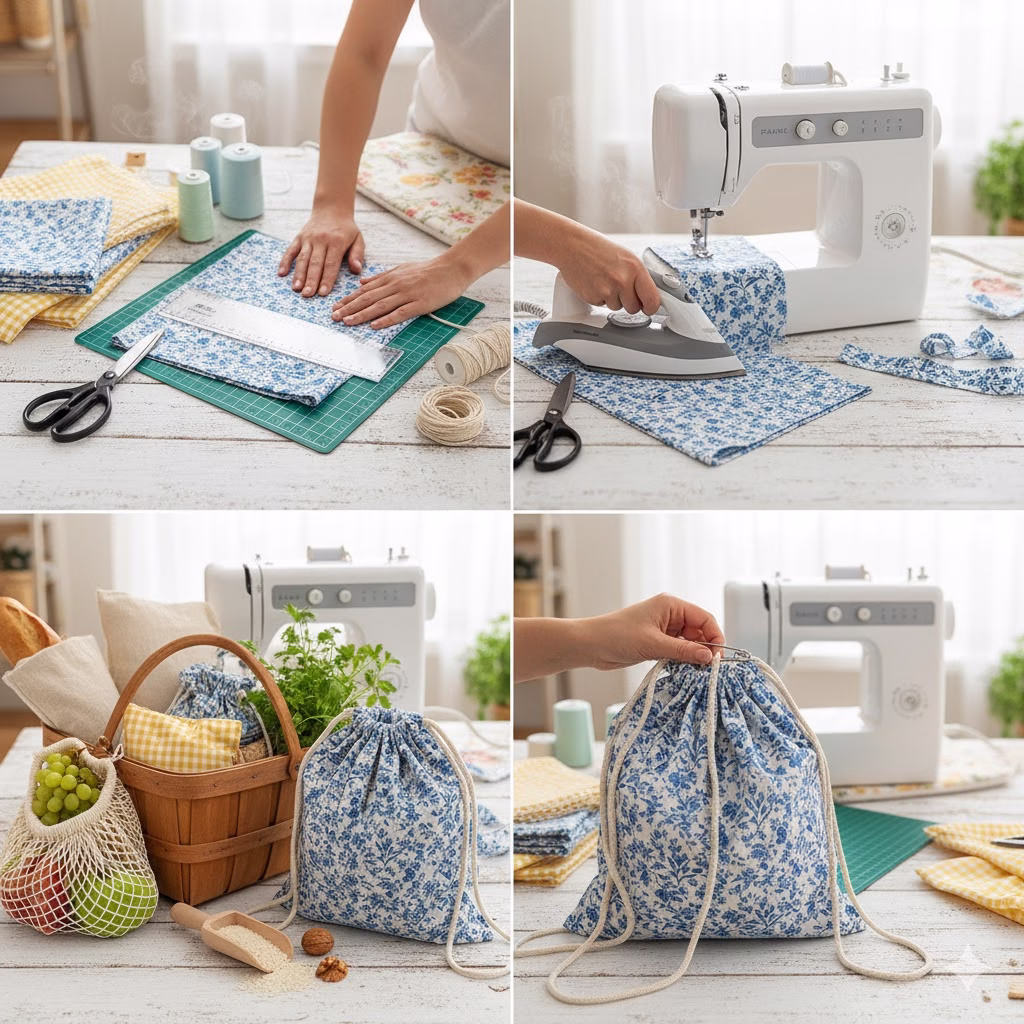
  • Iron and Ironing Board: For pressing seams (makes a huge difference!).
  • Safety Pin: For threading drawstrings.
  • Drawstring Material:
    • Cotton cord, ribbon, or even a strip of fabric you make yourself (about 1/2 inch wide).
    • For mesh bags, you can use a thinner cord or even elastic if you prefer.
    • You’ll need about 25-30 inches per bag.

A flat lay photo of a white sewing machine surrounded by essential tools for a beginner sewing project, including blue and yellow patterned cotton fabric, sharp scissors, white and green thread spools, an iron, a measuring ruler, and safety pins.

Part 1: How to Make a Simple Cotton Drawstring Produce Bag (The Ultimate Beginner Sewing Project!)

This is truly a fantastic beginner sewing project because it involves mostly straight seams and introduces basic techniques like hemming and creating a casing.

Step 1: Prepare Your Fabric

Decide on your desired bag size. A good starting point for a medium produce bag is a rectangle of fabric approximately 15 inches wide by 30 inches long. This will give you a bag roughly 14×14 inches when finished (allowing for seam allowances and the drawstring casing).

  • Wash and press your fabric. This pre-shrinks it and makes it easier to cut and sew.
  • Cut your fabric to the desired dimensions. Remember, your length will be folded in half.

Step 2: Hem the Top Edge

This will be the top opening of your bag.

  • Along one of the 15-inch edges (the top of your future bag), fold the raw edge over by 1/4 inch towards the wrong side of the fabric and press.
  • Fold it over again by 1/2 inch and press firmly. This creates a neat double-fold hem.
  • Stitch this hem in place, close to the inner folded edge. Backstitch at the beginning and end. Repeat for the other 15-inch edge if you’re making a bag that opens at both ends, but for a simple produce bag, you only need to hem one of the short edges that will become the bag’s opening.

Step 3: Fold and Sew the Side Seams

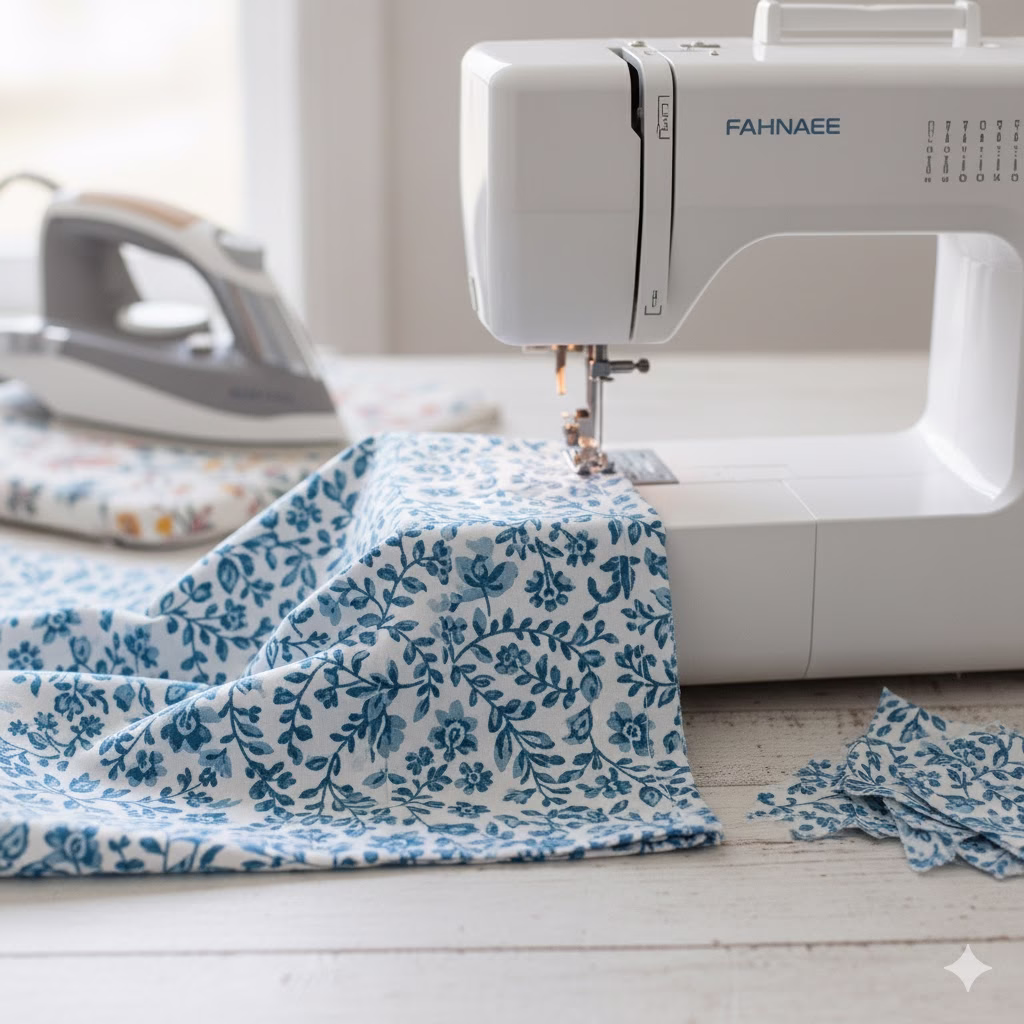
  • Lay your fabric piece flat, right side up.
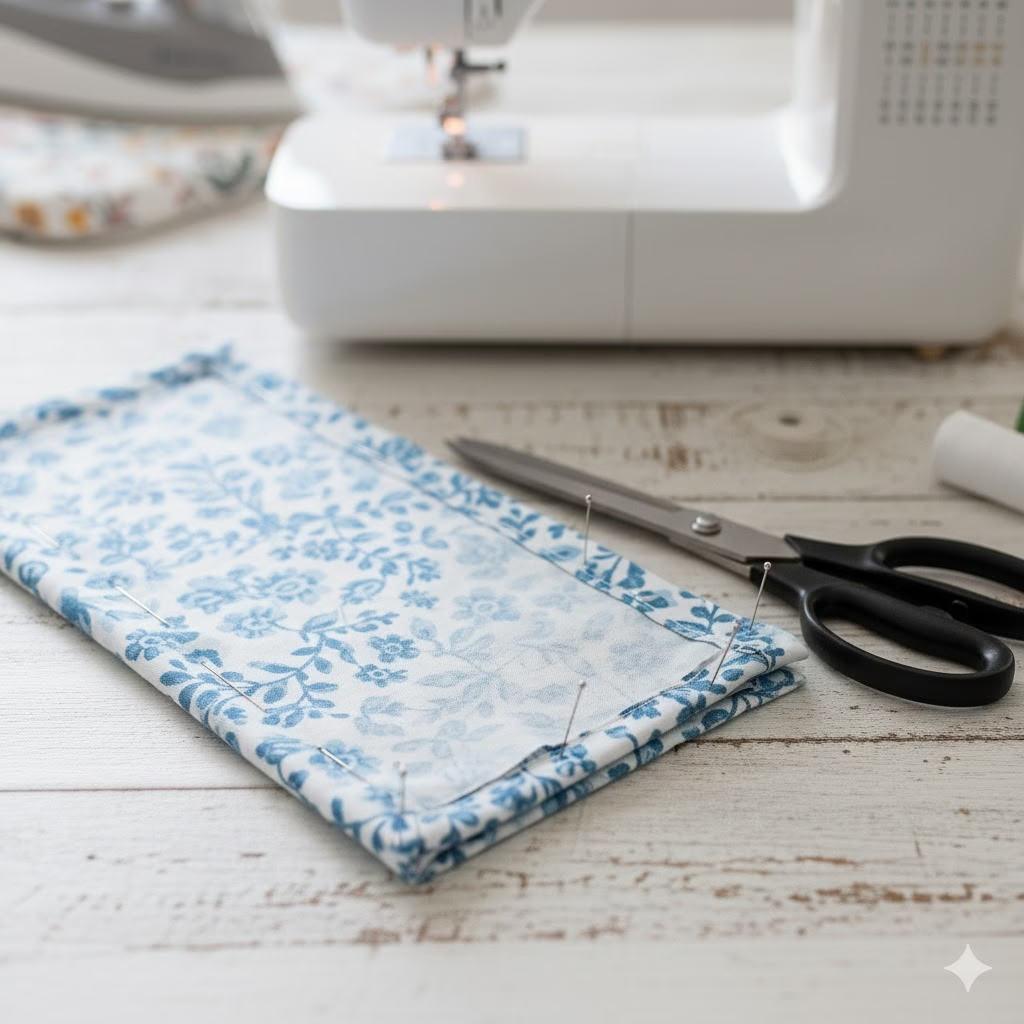
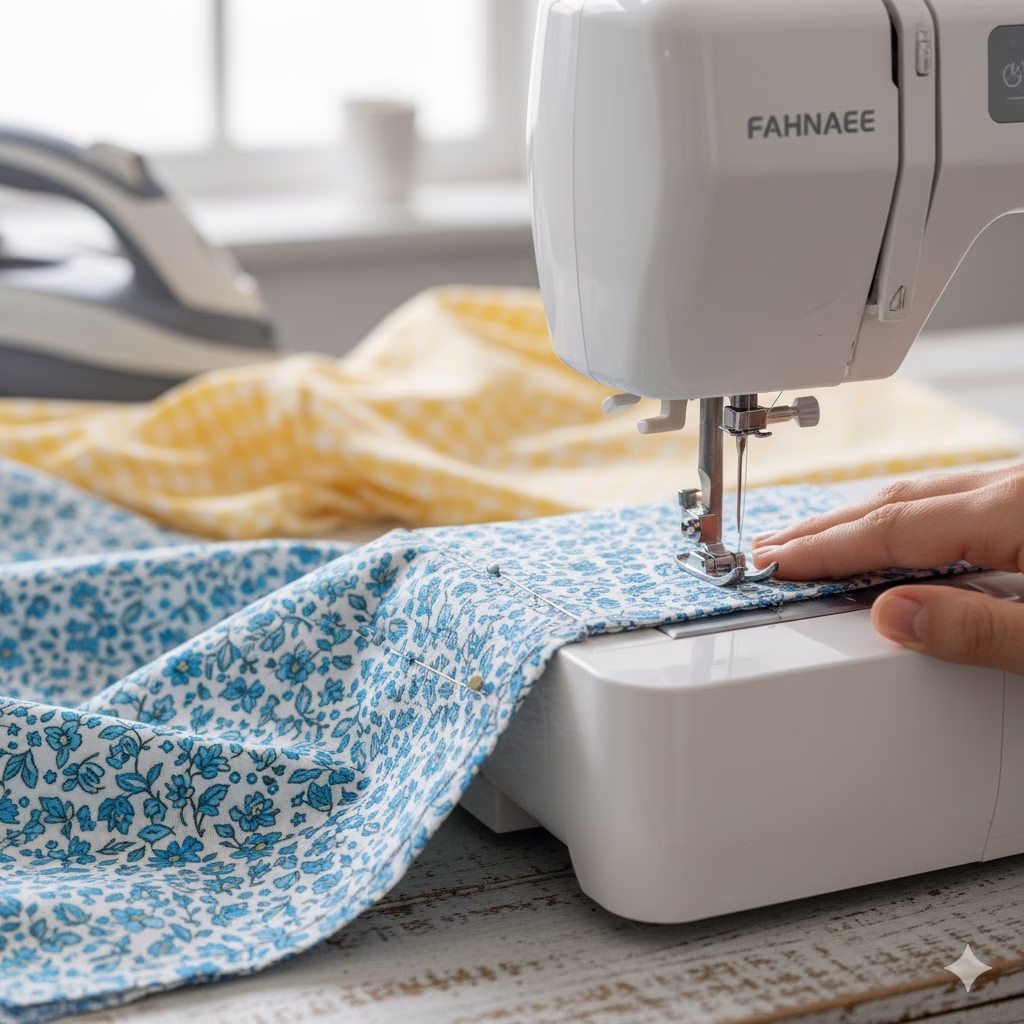
  • Fold the fabric in half width-wise, bringing the two 15-inch (hemmed) edges together. The right sides of the fabric should be facing each other. The raw edges of the long sides should align perfectly. Pin along the two raw side edges and the bottom raw edge.
  • Starting from one top corner of the bag, sew down the side seam, across the bottom, and up the other side seam, using a 1/2-inch seam allowance. Remember to backstitch at the beginning and end of each seam to secure it. If your fabric is prone to fraying, you can do a second line of stitching or finish the raw edges with a zigzag stitch or serger.

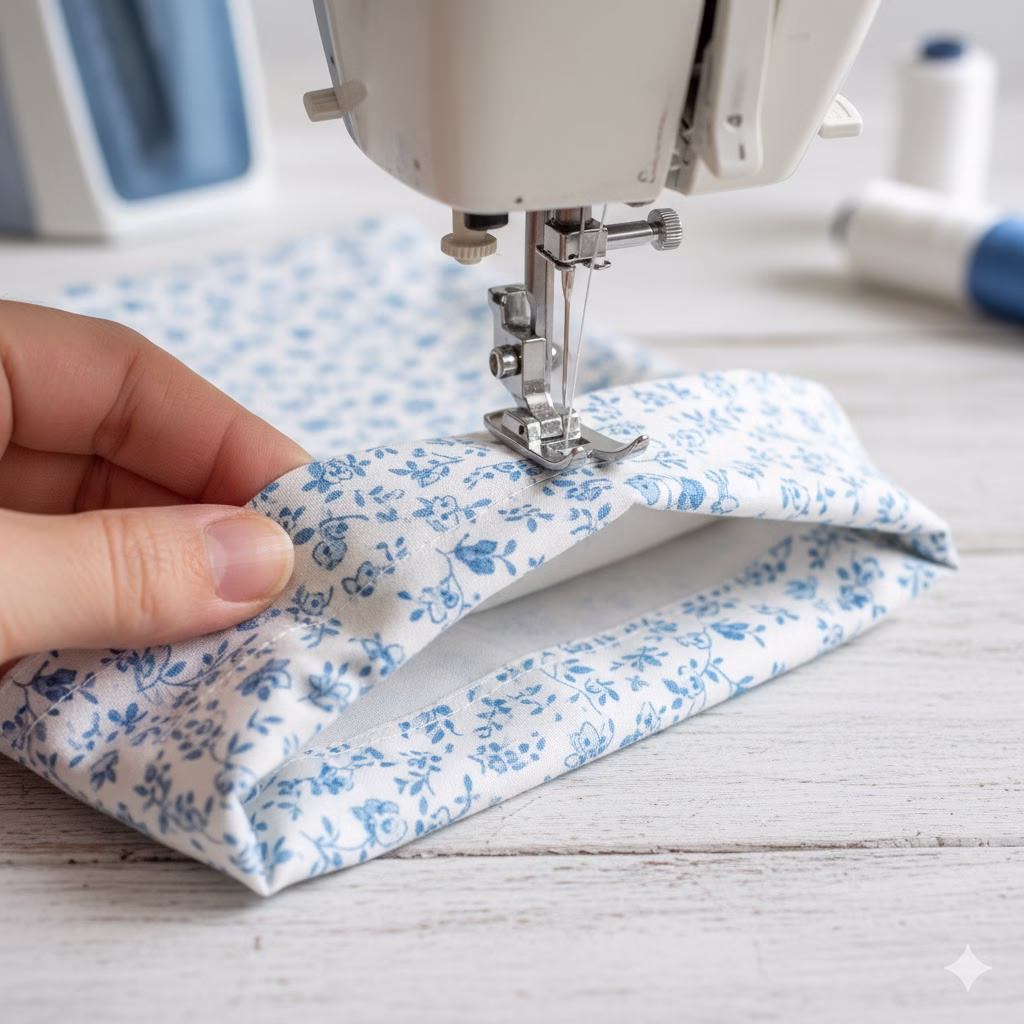
Step 4: Create the Drawstring Casing

  • Turn your bag right side out.
  • At the top opening of your bag, fold the hemmed edge down towards the inside of the bag by about 1 inch (or enough to accommodate your drawstring material, plus a little extra for the seam). Press firmly.
  • Stitch this casing down, about 1/8 inch from the bottom folded edge. Make sure not to stitch the casing closed at the top where the drawstring will exit! You want a channel for the drawstring to go through. Leave a small opening (about 1/2 inch) in the side seam of the casing for the drawstring to enter and exit. This is usually created by backstitching, leaving a gap, and then starting to stitch again.

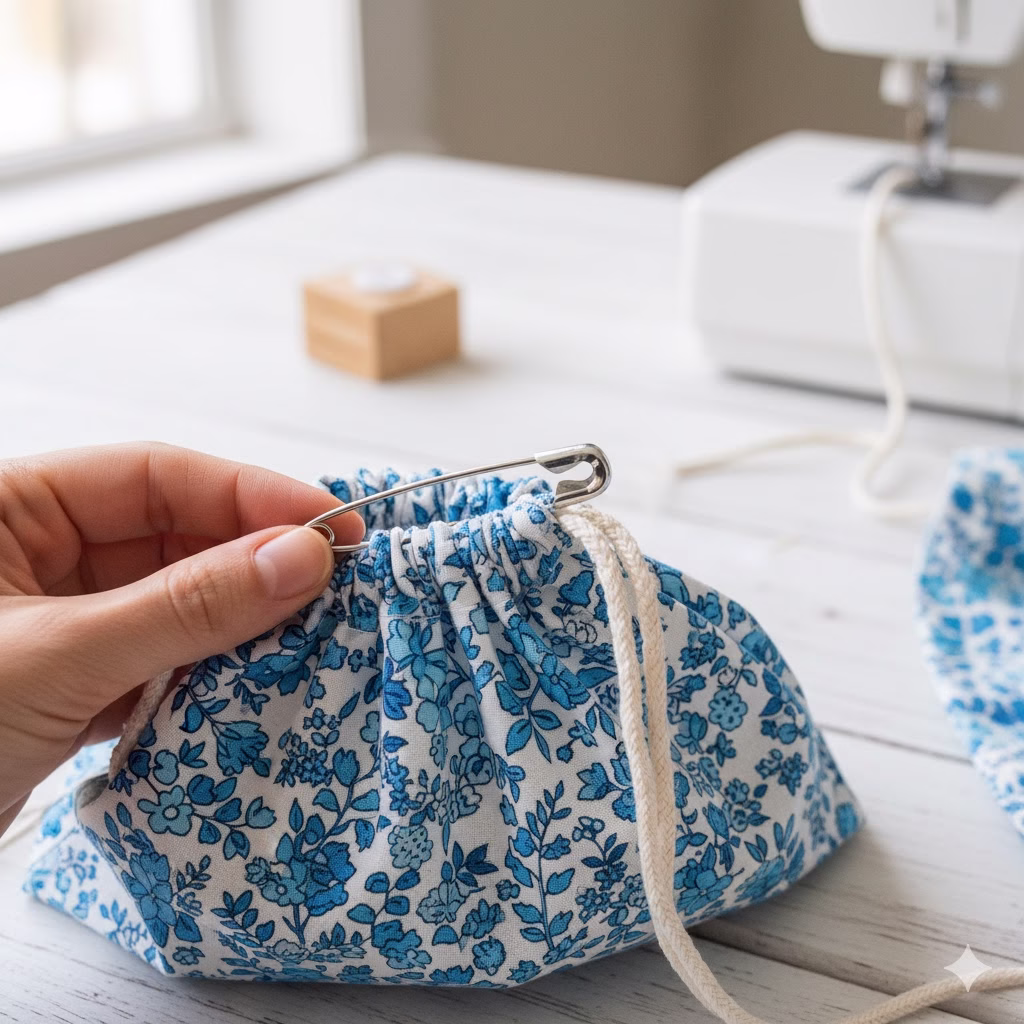
Step 5: Thread the Drawstring

  • Cut a piece of drawstring material about 25-30 inches long (this allows for a bow).
  • Attach a safety pin to one end of your drawstring.
  • Thread the safety pin, with the drawstring following, through the opening you left in your casing. Work it all the way around the top opening of the bag until it emerges from the same opening.
  • Tie the two ends of the drawstring together in a knot. Now you have a functional drawstring!

Congratulations! You’ve made your first zero-waste produce bag!


Part 2: How to Make a Simple Mesh Produce Bag (For Breathability!)

Mesh bags are fantastic for fruits and vegetables that need to breathe. The process is very similar to the cotton bag, with a few key differences due to the nature of the fabric.

Step 1: Prepare Your Mesh Fabric

  • Cut a rectangle of mesh fabric, again around 15 inches wide by 30 inches long for a medium bag.
  • Mesh can be slippery! Take your time and use lots of pins or fabric clips.

Step 2: Fold and Sew the Side Seams

  • Fold the fabric in half width-wise, right sides together.
  • Pin along the two raw side edges and the bottom raw edge.
  • Sew down the side, across the bottom, and up the other side, using a 1/2-inch seam allowance.
  • Important for Mesh: Mesh often doesn’t fray, but if your mesh is delicate, consider using a French seam for cleaner, stronger edges. A French seam involves sewing the seam twice: first with wrong sides together (1/4 inch seam), then trimming, turning right sides together, and sewing again (1/4 inch seam) to encase the raw edges. For a beginner sewing project, a simple straight stitch with a small zigzag over the raw edge after the main seam is usually sufficient to prevent unraveling.

Step 3: Create the Drawstring Casing

  • At the top opening of your bag, fold the raw edge down towards the inside of the bag by about 1/4 inch and press (mesh might not hold a press well, so pin well).
  • Fold it down again by about 3/4 inch to create the casing. Pin liberally.
  • Stitch this casing down, about 1/8 inch from the bottom folded edge. Leave an opening for your drawstring.
  • Since mesh can be tricky, a zigzag stitch might work better than a straight stitch for the casing to allow for stretch and reduce puckering.

Step 4: Thread the Drawstring

  • As with the cotton bag, cut your drawstring (cotton cord or ribbon works well here) about 25-30 inches long.
  • Use a safety pin to thread it through the casing, emerging from the same opening.
  • Tie the ends together.

Tips for Success (Especially for Beginners!)

  • Practice Makes Perfect: Don’t expect your first bag to be flawless. Each one you make will get better.
  • Press Your Seams: This is a golden rule in sewing. Pressing seams open or to one side creates a much neater and more professional-looking finish.
  • Use the Right Needle: A universal needle is fine for most cottons. For mesh, a finer needle (like a sharp or microtex) might glide through better without snagging.
  • Don’t Rush: Take your time with measuring, cutting, and pinning. Precision here saves headaches later.
  • Backstitch! Always backstitch at the beginning and end of each seam to lock your stitches in place.
  • Don’t Be Afraid of Imperfection: Handmade items have character. Embrace it!

Beyond Produce Bags: Other Zero Waste Bag Ideas

Once you master this beginner sewing project, a world of zero-waste possibilities opens up!

  • Bread Bags: Larger, sturdier cotton bags for loaves of bread.
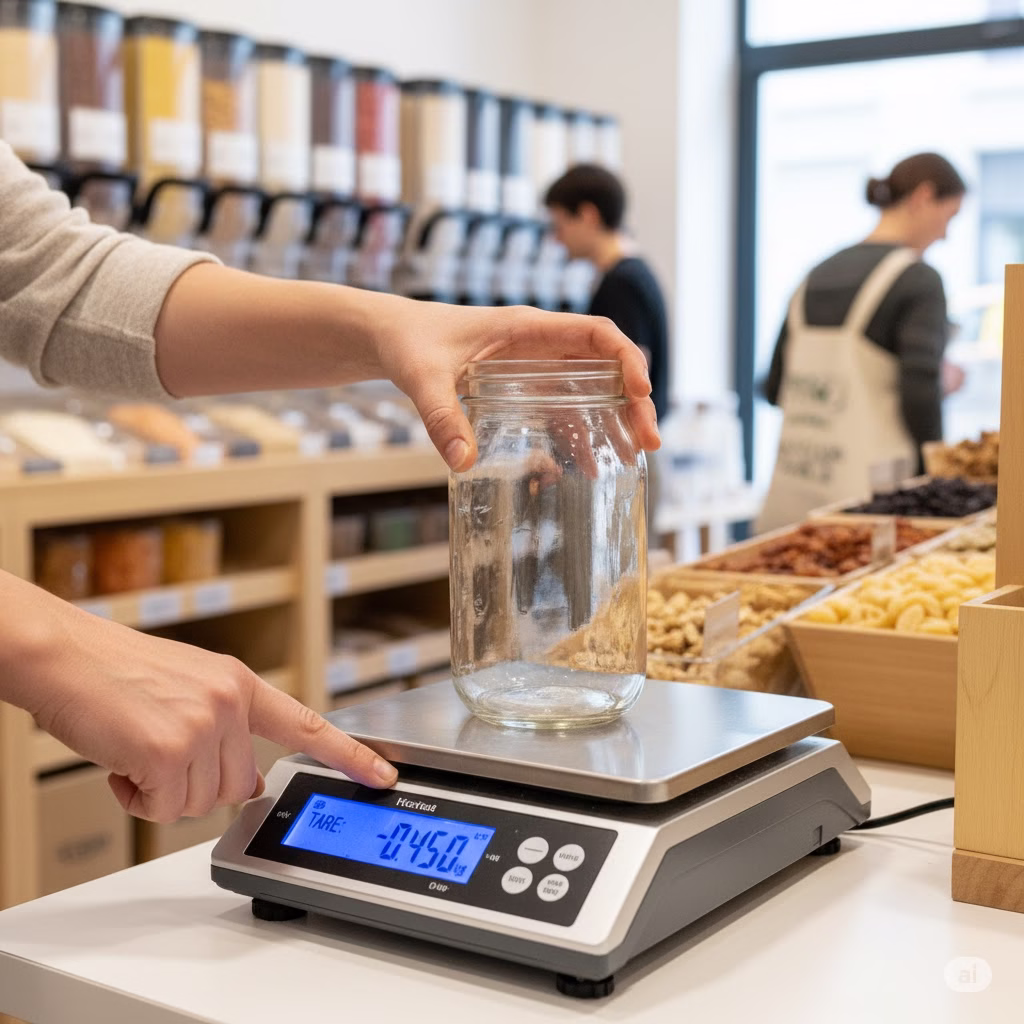
  • Bulk Bin Bags: Larger, perhaps with a flat bottom, for heavier items like rice, flour, or pasta. You can even add a small patch to write the tare weight (weight of the empty bag) on.
  • Sandwich Wraps/Snack Bags: Lined with food-safe material (like PUL or beeswax-coated fabric) for reusable alternatives to plastic baggies.
  • Gift Bags: Fabric gift bags are beautiful, reusable, and eliminate wrapping paper waste.
  • Everyday Tote Bags: Use heavier canvas or denim for a sturdy reusable shopping bag.

Conclusion: Your Sustainable Journey Starts Now

Congratulations, eco-warrior! You’ve not only learned a new skill but you’ve also taken a significant step towards a more sustainable lifestyle. Making your own zero-waste bags is incredibly rewarding, practical, and a fantastic beginner sewing project that builds confidence and creativity.

Every time you pull out one of your handmade bags at the grocery store, you’re doing more than just carrying groceries. You’re making a statement, inspiring others, and actively reducing your environmental footprint. So, keep sewing, keep creating, and keep making a positive impact, one stitch at a time. The planet thanks you, and so do future generations!


FAQ Section

Q1: What kind of fabric is best for beginner sewing projects like these?

A1: For cotton produce bags, quilting cotton, muslin, old cotton sheets, or even repurposed cotton shirts are ideal. They are easy to cut, don’t stretch, and hold a press well. For mesh bags, look for lightweight, soft mesh, old sheer curtains, or even laundry bags.

Q2: I don’t have a sewing machine. Can I hand sew these bags?

A2: Absolutely! It will take longer, but a simple backstitch (which mimics a machine stitch) is strong enough. Just ensure your stitches are even and relatively small for durability.

Q3: How do I wash my zero-waste bags?

A3: Most cotton and mesh bags can be machine washed in cold water with similar colors and then air-dried or tumble-dried on low. For items that held very dirty produce, a pre-soak might be helpful. Avoid fabric softeners as they can reduce absorbency and breathability over time.

Q4: Can I make these bags in different sizes?

A4: Yes, definitely! The beauty of DIY is customization. Simply adjust your initial fabric rectangle dimensions. For small bags, try 10×20 inches; for large, 20×40 inches. Remember the length is twice the height you want your finished bag to be.

Q5: What if my fabric frays a lot?

A5: If your fabric is prone to fraying, you have a few options:

  • French Seams: This is a very neat finish that encases all raw edges.
  • Zigzag Stitch: After sewing your main straight seam, trim the seam allowance and then zigzag over the raw edge.
  • Pinking Shears: These scissors create a zigzag edge that helps reduce fraying.
  • Serger/Overlocker: If you have one, this is the most professional finish.

Q6: What else can I use for the drawstring?

A6: Besides cotton cord, you can use thin ribbon, bias tape, old shoelaces, or even create a narrow fabric tube from the same fabric as your bag. Elastic can also be used, but you’ll want to stitch it into a loop before threading.


References


Recent Posts


10 Creative New Lives for Glass Jars

A collection of clean, empty Glass Jars of various sizes, along with twine, scissors, craft paper, and paint brushes, laid out on a rustic wooden table, ready for upcycling projects.

We all have them. Empty glass jars. They collect in the recycling bin. They once held pasta sauce, jam, pickles, or candles. For a long time, I just threw them away without a second thought. But then, I started to see their hidden potential. Each jar was a blank canvas. Now, I see chances for creativity and organization. They add a touch of charm to my home. I no longer just see waste.

If you’ve ever felt bad throwing away a good jar, or just wanted a greener way to organize, you’re in the right place. Come with me. We will explore ten fantastic ways to give those simple glass jars a creative new life. We will turn them into useful and beautiful items for your home.


Why Upcycle Glass Jars?

Before we start our projects, let’s quickly look at why upcycling glass jars is such a smart idea:

  1. Good for the Earth: It means less trash. It saves energy (making new glass uses a lot of power). It also means we need fewer new raw materials.
  2. Saves Money: Most of these projects need very few new items, if any. You are using what you already have!
  3. Make it Your Own: You can change each project to fit your personal style. Match it to your home decor.
  4. Boosts Creativity: It is a great way to use your hands and mind. You turn something plain into something special.

Are you ready to begin? Gather your clean, label-free glass jars. Let’s get creative!


1. Smart Pantry & Spice Storage

Using glass jars to organize your pantry is one of the best and most useful ideas. Jars that all look the same make things appear very tidy. You can easily see what you have. This helps reduce food waste. It also makes cooking faster.

How to do it:

  1. Wash and Dry: Make sure your glass jars are very clean and completely dry. Take off all labels. Soaking in warm, soapy water often helps. For sticky bits, scrub with baking soda.
  2. Fill Them Up: Put dry foods into jars of different sizes. Think pasta, rice, lentils, oats, flour, sugar, coffee beans, nuts, and spices.
  3. Add Labels: Labels are super important for good order. You can use:
    • Chalkboard Labels: Stick on chalkboard labels or paint a spot with chalkboard paint. Write on it with chalk markers.
    • Printed Labels: Design and print your own labels. Then stick them on.
    • Handwritten Tags: Tie small paper tags with string for a rustic look.
  4. Arrange Them: Put your organized jars on shelves, in drawers, or on a counter. This will make your pantry look good and work better.

Example: Imagine a row of clear glass jars. They are filled with bright spices like paprika, turmeric, and cumin. All are neatly labeled. Or bigger jars holding different kinds of pasta, sealed tight and easy to reach.


2. Lovely Vases & Planters

Glass jars, especially ones with unique shapes or colors, make wonderful vases. Small jars are perfect for a single flower or a small bunch. Bigger ones can hold larger flower displays. You can also turn them into cute small planters for succulents or herbs.

How to do it:

  1. Clean Very Well: Remove any dirt that might harm plants or make the water cloudy.
  2. For Vases: Just fill with water and put your flowers in. For a special touch, you can:
    • Paint: Spray paint the outside (or inside for a shiny look) with opaque or frosted glass paint.
    • Wrap: Wind string, ribbon, or lace around the top or middle of the jar.
    • Decorate: Glue on beads, buttons, or small shells to add texture.
  3. For Planters:
    • Drainage is Key: Glass jars do not have holes for water to drain. This is very important. Put a layer of small stones or charcoal at the bottom first. This stops roots from rotting. Then add potting soil.
    • Plants: Small plants like succulents, herbs (like basil or mint), or plant cuttings grow well in jar planters.
    • Water Gently: Since there are no drainage holes, be careful not to water too much.

Example: A group of small baby food jars, painted white. Each holds a single green leaf on a windowsill. Or a big pickle jar filled with a green fern. It adds a touch of nature to your living room.


3. Homemade Candle Holders & Lanterns

Turning glass jars into pretty candle holders or lanterns makes any room feel warm and cozy. They are great for quiet evenings, outdoor parties, or even as backup lights.

How to do it:

  1. Be Safe: Make sure your jar is stable. It should not tip over easily. Keep anything that can burn far from the flame.
  2. Simple Holders: Just put a small tea light or votive candle inside a clean jar.
  3. Decorated Holders:
    • Frosted Look: Use frosted glass spray paint for a soft light.
    • Lace & Burlap: Wrap jars with lace, burlap, or patterned cloth. Stick it down with glue. The light will shine through beautifully.
    • Glitter: Put Mod Podge glue on the outside of the jar. Then roll it in glitter for a festive feel.
    • Painted Designs: Use glass paint to draw patterns or simple shapes.
  4. Hanging Lanterns:
    • Wire Handle: Securely attach a wire handle around the top of the jar. You can use craft wire or even old coat hangers. Make sure it is strong enough to hold the jar’s weight.
    • Fairy Lights: For a safer, battery-powered choice, fill jars with LED fairy lights instead of candles.

Example: A line of decorated Mason jars. Tea lights flicker inside them along a garden path. This creates a magical feel for an evening get-together. Or a beautifully frosted jar filled with fairy lights. It sits on a bedside table.


4. Bathroom & Craft Room Organization

Mess makes us feel stressed. Glass jars are great helpers in making things tidy, especially in bathrooms and craft rooms. These rooms often have many small items.

How to do it:

  1. See What You Have: Decide what you need to put in order. Cotton swabs, cotton balls, hair ties, makeup brushes, bath salts, paintbrushes, beads, buttons, paper clips, rubber bands – there are so many things!
  2. Match Sizes: Pick the right size glass jars for different items. Tall jars for brushes, wider jars for cotton balls.
  3. Label (Good Idea): Clear glass lets you see inside. But a label makes it look even better.
  4. Put Like Things Together: Keep similar items in their own jars.
  5. Place Them: Arrange them on shelves, on your counter, or inside drawers.

Example: Three nice glass jars sit on a bathroom counter. They hold cotton pads, Q-tips, and small soaps. In a craft room, a wooden shelf holds many jars. These jars neatly contain embroidery thread, beads, and sewing tools.


5. Unique Drinking Glasses & Mugs

Glass jars, especially Mason jars, make excellent drinking glasses. They have a simple, rustic charm. They are strong, easy to hold, and give a fun, casual vibe to your drinks.

How to do it:

  1. Clean and Sterilize: Make sure jars are very clean. They should have no chemical traces. Washing them in a hot dishwasher is a good idea.
  2. Straw Holes: For some canning jars, you can make a hole in the lid with a drill for a straw. Make sure the edges are smooth.
  3. Add Handles: You can buy wire handles that fit Mason jars. These turn them into mugs.
  4. Decorate (If You Want): Clear is classic. But you can etch designs onto the glass. Or paint safe designs on the outside. Don’t paint near the rim where you drink.

Example: Iced tea served in charming Mason jars. They have lemon slices and mint. Perfect for a summer barbecue. Or a tasty smoothie enjoyed from a reused jam jar. It has a colorful straw.


6. Glass Jars for Creative Gift Packaging

Forget the usual gift bag! Putting small gifts in decorated glass jars adds a personal, handmade touch. This makes the present feel even more special.

How to do it:

  1. Think About Contents: What could fit inside a jar?
    • DIY Baking Mixes: Layer dry ingredients for cookies, brownies, or soups.
    • Spa-in-a-Jar: Fill with bath bombs, small soaps, a face mask, and a loofah.
    • Emergency Kit: Put in small basics like pain relievers, bandages, lip balm, and hand sanitizer.
    • Craft Kit: Small sewing items, buttons, beads, or tiny art supplies.
  2. Decorate the Jar:
    • Lid: Cover the lid with fabric, ribbon, or fancy paper.
    • Label: Attach a special gift tag or label.
    • Fillers: Use crinkled paper, tissue paper, or shredded newspaper. This adds cushioning and looks nice.
    • Outside Decorations: Tie string, lace, or add small ornaments to the jar.

Example: A pint-sized glass jar. It is filled with layers of brownie mix ingredients. Chocolate chips top it off. A recipe tag is tied with a festive ribbon. It’s an instant homemade gift. Or a set of small garden tools and seed packets nestled in a larger jar. A perfect gift for a friend who loves plants.


7. Terrariums & Fairy Gardens

Glass jars are like tiny worlds waiting to be made! Making a terrarium or a small fairy garden inside a jar is a lovely way to bring nature inside. It’s also surprisingly easy.

How to do it:

  1. Pick Your Jar: Jars with wide openings are easier to work with.
  2. Layering:
    • Drainage: Start with a thin layer of small stones or gravel at the bottom.
    • Charcoal: Add a thin layer of activated charcoal. This helps stop bad smells and filters water.
    • Mesh (Optional): A thin layer of mesh or cloth can go over the charcoal. This stops soil from mixing.
    • Soil: Add a layer of the right potting mix. Use succulent mix for dry plants. Use general potting mix for humid terrariums.
  3. Plants: Choose small, slow-growing plants. They should thrive in small spaces. Succulents and air plants are good for open jars. Mosses and ferns are good for closed terrariums.
  4. Decorate: Add small stones, twigs, tiny figures (for fairy gardens), or shells.
  5. Care: Water very little. Closed terrariums make their own moisture. They need very little watering.

Example: A large cookie jar turned into a green, self-sustaining terrarium. It has tiny ferns and moss. A small world under glass. Or a small jam jar. It holds a charming fairy garden with a tiny gnome and colorful stones.


8. Desk Organizers

Get rid of desk clutter with the simple beauty of glass jars. They are perfect for keeping office supplies visible and neat.

How to do it:

  1. Collect Your Supplies: Pens, pencils, markers, paper clips, binder clips, staples, pushpins, rubber bands, scissors, rulers – almost any small item.
  2. Sort Them: Give different glass jars to different kinds of items.
  3. Place Them: Arrange the jars neatly on your desk, inside a drawer, or on a shelf.
  4. Make it Personal (Optional): You can paint the jars. Wrap them in pretty paper. Or add nice labels to match your office look.

Example: Three glass jars of different sizes, neatly on a desk. The tallest holds pens and pencils. A middle-sized one contains scissors and markers. A short, wide jar keeps paper clips and binder clips organized.


9. Piggy Banks & Coin Glass Jars

Start saving spare coins or even small bills. Turn a simple glass jar into a clear piggy bank. It’s nice to watch your savings grow!

How to do it:

  1. Choose a Strong Jar: A wider opening makes it easier to get money out when you need it.
  2. Change the Lid:
    • Slotted Lid: Carefully cut a slot in the middle of a metal lid. Use tin snips or a Dremel. Smooth any sharp edges with sandpaper or a file.
    • No Lid: Just use the open jar to drop money in quickly.
  3. Decorate:
    • Savings Goal: Write your savings goal on the jar. For example, “Vacation Fund,” or “New Gadget.”
    • Paint/Decoupage: Decorate the outside to make it more attractive.
  4. Start Saving!

Example: A medium-sized Mason jar. It has a brightly painted lid and a slot. It is clearly marked “Adventure Fund.” It slowly fills with coins and small bills. A constant visual reminder of a future trip.


10. Memory Glass Jars & Time Capsules

This is a very special and meaningful way to use glass jars. Make a memory jar to collect good moments all year. Or create a time capsule to capture a picture of today.

How to do it:

  1. Memory Jar (Ongoing):
    • Decorate: Label the jar “Memory Jar” or “Gratitude Jar.”
    • Collect: All year, when something good happens, or you have a memorable time, write it on a small piece of paper. Drop it into the jar.
    • Look Back: On New Year’s Eve, open the jar. Read all the wonderful moments you collected. It gives a beautiful summary of your year.
  2. Time Capsule (Sealed):
    • Pick a Date: Decide when you will open it. For example, in 5 years, or 10 years.
    • Gather Items: Put in things that show the current time. Photos, newspaper clippings, a list of popular trends, movie tickets, a handwritten letter to your future self, small toys, notes from family members.
    • Seal It: Close the lid very tightly. You can even use wax to seal it completely.
    • Hide/Bury It: Keep it in a safe, dry place. Or bury it. Make sure the jar is well-sealed and safe from water.

Example: A beautiful, simply decorated glass jar on a living room shelf. It slowly fills with folded notes. These notes tell about family events, funny sayings, and small wins through the year. Or a sealed, strong jar buried in the garden. It holds letters and small items from childhood. It waits to be dug up years later.


Conclusion for Glass Jars

From simple storage to touching time capsules, glass jars are truly amazing. By trying these upcycling ideas, you do more than just add unique touches to your home. You also actively help reduce waste and live greener. So, next time you finish that jar of pickles or jam, don’t just throw it away. See what it can become. Clean it up. Give it one of these 10 creative new lives. Your home, your wallet, and the planet will all thank you. Happy upcycling!


FAQ about Recycling Glass Jars

Q1: How do I get rid of stuck labels and glue from glass jars?

A: Soak jars in hot, soapy water for 30 minutes to an hour. Many labels will then peel off easily. For very sticky glue, mix baking soda with a little oil. Make a paste. Put it on the glue. Let it sit for 15-30 minutes. Then scrub with a pad. Rubbing alcohol or nail polish remover can also work. Always test them in a hidden spot first.

Q2: Can I paint glass jars? What paint should I use?

A: Yes, you can! For decoration, use acrylic paint made for glass. Spray paint (especially frosted or matte colors) or enamel paints work well. For jars you will wash, look for paints that say “dishwasher safe.” Some need baking to set the paint for a long-lasting finish. Always follow the paint maker’s directions.

Q3: Are all glass jars safe for storing food or drinking?

A: Yes, generally, if they are very clean. But be careful with jars that held things like candles or chemicals. Only use them for food if you are sure they can be cleaned to be completely food-safe. For long-term canning, always use special canning jars (like Mason jars). These are made to handle high heat and pressure.

Q4: How can I make a handle for a glass jar to hang it up as a lantern?

A: You can use thick craft wire, flexible aluminum wire, or even an old metal coat hanger. Wrap the wire tightly around the neck of the jar. Twist the ends together. Then, make a loop at the top for hanging. Make sure the handle is strong enough to hold the jar’s full weight, especially if it has candles or other heavy things inside.

Q5: What are some tips for making terrariums in glass jars?

A: Pick plants that grow slowly. They should like humidity (for closed terrariums) or dry weather (for open ones). The right layers of drainage stones, charcoal, and soil are very important. Water very little, especially in closed terrariums. They create their own moisture. If your jar has a narrow opening, use long tweezers or chopsticks to arrange items.


References


Recent Posts


ASMR: Is It Actually Good For You, or Just Weird?

An older man with a gentle smile is carefully mixing bright oil paints on a wooden palette while wearing a denim apron. A large, vintage-style microphone stands next to his work, positioned to capture the meticulous, soothing sounds of his brush movements and scraping, which is characteristic of ASMR content.

Ever felt a strange tingle down your spine from a whisper, or found yourself mesmerized by the crinkle of a chip bag? You’re not alone! I’m , and like many, I stumbled into the world of ASMR with a mix of curiosity and doubt. This article is my journey to find out if those “tingles” really help us relax or if they are just another internet fad. Let’s explore this odd but loved thing together.


ASMR: The Whispering Digital Trend

Do you recall that feeling when someone spoke softly near your ear? Maybe the gentle sound of a page turning gave you a shiver down your neck? For some people, these everyday happenings, when done on purpose and over and over, start a unique feeling called Autonomous Sensory Meridian Response, or ASMR. People often say it feels like static or a tingling on the skin. It usually starts on the scalp and moves down the back of the neck and upper spine. This feeling brings on deep relaxation and happiness.

For years, people who felt ASMR didn’t have a name for it. They knew they felt it, but they could not talk about it or describe it. Then, the internet changed things. YouTube, especially, became the birthplace for this new group. Users began sharing videos made to cause these special feelings. This small, odd part of the web, with amateur creators whispering into cheap mics, has now become a worldwide hit. It has millions of fans, professional video makers, and even scientists studying it.

But even though it is very popular, ASMR still seems strange. Many people doubt it. Is it a real way to calm stress and worry? Is it a special kind of rest? Or is it just a strange internet trend that appeals to a small group? This article will look closely at ASMR. We will check its roots, its supposed benefits, the science (or lack of it), and decide if it is truly good for you, or just… weird.


What Exactly is ASMR? What is That Tingle?

To really grasp ASMR, we must look beyond just the simple “tingles.” While that’s the main sign, the experience is much more complex. It’s how we sense things. It’s a mix of sounds and sights that leads to a physical reaction and a calming feeling.

Think of it this way: some triggers—sounds, things you see, or even soft touch—can easily cause this tingly feeling in people who are sensitive to it. These triggers are very different, but here are some common ones:

  • Whispering or soft speaking: The close, quiet tones are often the strongest trigger.
  • Tapping sounds: Fingers gently hitting surfaces like wood, plastic, or glass.
  • Scratching sounds: Fingers softly scratching cloth, paper, or even microphone covers.
  • Crinkling sounds: The sound of paper, plastic, or foil being gently moved.
  • Page turning: The soft sound of turning pages in a book.
  • Brushing sounds: The gentle sweep of a makeup brush or hairbrush.
  • Personal attention: Videos where the creator pretends to be a doctor, hairdresser, or makeup artist. They give the watcher all their gentle attention.
  • Slow, careful movements: Hand motions, focusing on a job very precisely.
  • Visual triggers: Watching someone do a detailed task, like painting or delicate crafting, even without sound.

The reaction to these triggers is very personal. What makes one person feel calm and happy might do nothing for another. It might even be annoying. This difference is why ASMR can cause strong feelings both for and against it.


ASMR: From Secret Feelings to a Digital Group

Before the internet, people who felt ASMR simply did not have a name for it. They might have called it “brain tingles” or “head pleasure” (a confusing name that led to early errors). The start of the ASMR group really began on online forums. There, people started sharing their unique feelings carefully.

A key moment was a discussion thread on a health forum called “Steady Health” in 2007. A user named ‘okaywhatever5’ posted about having “that good feeling/weird sensation/shiver.” This thread quickly brought together others who knew the feeling. It was clear many people shared this unnamed experience.

Jennifer Allen created the name “Autonomous Sensory Meridian Response” in 2010. She felt a name that sounded more scientific would help make the experience seem real. She wanted to move it away from words that were too suggestive or wrong. The name was meant to be neutral and academic, and it worked.

At the same time, YouTube channels started showing up. Early leaders like ‘WhisperingLife’ and ‘GentleWhispering’ began making videos just to cause ASMR. At first, they didn’t even know the feeling had a name. Their success proved that there was a huge audience waiting for these special sensory experiences.

Over the last ten years, ASMR has grown very fast. What started as an effort by regular people has turned into a refined content industry. Creators spend money on high-quality microphones (like mics that make 3D sound), detailed sets, and complex role-play stories. This shows how powerful sharing human experiences can be in the modern digital world.


Is It Good For You? Looking at the Reported Benefits

The main reason people watch ASMR videos is because they say it helps ease many mental worries. Thousands of personal reports, and more scientific studies over time, suggest that ASMR can be truly helpful.

1. Less Stress and Worry

This is likely the benefit people talk about most. Many people use ASMR as a natural way to reduce stress. The slow speed, soft sounds, and focused attention in most ASMR videos can be a strong counter to the busy pace of life. It offers a gentle break, slowly guiding the mind away from worried thoughts toward the present moment. The tingling feeling itself is often described as deeply relaxing, almost like a mental rub-down.

2. A Good Night’s Sleep

For people who can’t sleep and struggle with bedtime, ASMR has become a popular habit. The dull, repeated, and gentle nature of many ASMR triggers helps quiet a mind that is racing. This makes it easier to fall asleep. Instead of just looking at the ceiling, people can focus on a soft whisper or tapping sound. This gives their mind a calming place to rest. Research has shown that ASMR can truly slow the heart rate, which helps a person sleep.

3. Better Mood

Besides just relaxing, many users say their mood is much better after an ASMR session. When feel-good brain chemicals are released (like dopamine and oxytocin, which we will discuss later) during an ASMR experience, it can lead to feelings of happiness and mild joy. For people fighting sadness, ASMR can offer a short rest, a soft escape from bad thoughts.

4. Helping with Pain

Though scientists have studied this less, some people who have long-term pain say ASMR helps them manage their symptoms. The idea is that focusing deeply on the sounds and feelings of ASMR takes attention away from pain signals. This is like how meditation can help manage pain. The deep relaxation from ASMR could also help lower muscle tension that makes some types of pain worse.

5. Feeling Less Lonely

The personal attention videos, where creators pretend to have close, one-on-one talks, can give viewers a feeling of connection. For people who feel lonely, especially when they are isolated, these videos can offer a feeling of companionship and care, even if it is only pretend. The soft voices and gentle actions can create a sense of being looked after and understood.


The Science of ASMR (or Lack Thereof): Is It Just Weird, or Real?

This is where the “weird” factor often comes in for people who doubt ASMR. If it is so powerful, why don’t doctors use it as a standard treatment? The truth is, while many people tell similar stories of success, real scientific research is still very new.

Early scientific studies on ASMR have started to show how it works:

Brain Activity: Studies with Scans

Some of the strongest evidence comes from studies that scan the brain. Functional magnetic resonance imaging (fMRI) has shown that people who feel ASMR have different ways their brains light up. One study, printed in PLOS ONE in 2018, found that people who felt ASMR had more activity in brain areas linked to reward and strong feelings (like the medial prefrontal cortex) when they watched ASMR videos. This was compared to people who didn’t feel it. This proves there is a unique brain reaction.

Other studies have used EEG (which measures brain waves). These studies sometimes show changes in brain waves that match relaxed states, such as more alpha waves. This is similar to what happens during meditation.

Physical Body Reactions

Beyond brain activity, scientists have seen changes in the body. A 2018 study found that people who experience ASMR had a much slower heart rate while watching the videos. This is similar to what happens with other ways to relax. They also showed more skin conductance responses. This shows they were emotionally interested and engaged.

Ideas About Brain Chemicals

While it’s hard to measure directly, researchers think ASMR might cause the release of several brain chemicals:

  • Dopamine: Linked to feeling rewarded and happy.
  • Oxytocin: Linked to closeness, trust, and feelings of well-being. This matches the “personal attention” videos.
  • Serotonin: A chemical that balances mood. This could explain why people feel better.
  • Endorphins: Natural pain relievers. This might explain some of the reports about helping with pain.

The “Default Mode Network” Idea

One interesting theory suggests that ASMR works because it changes the brain’s “Default Mode Network” (DMN). The DMN is active when our minds wander, when we think about ourselves, or when we worry about the past or future. This is often where anxiety comes from. ASMR, with its highly focused sensory input, might stop or quiet the DMN. This moves the brain into a more present, relaxed state, much like when people do mindfulness meditation.

So, the science is still catching up. But early findings strongly suggest that ASMR is not “just weird.” It is a real reaction in the brain and body that needs more study. It is a genuine physical event for people who can feel it.


How to “Do” ASMR: Finding Your Tingle

You don’t “do” ASMR like you do an action. You “experience” it. But if you want to find out if you are someone who responds to ASMR, here is how to try it:

1. Start with the Source: YouTube

The easiest place to begin is YouTube. Search for “ASMR” and prepare to see a massive amount of content.

2. Try Different Triggers

Don’t give up if the first video doesn’t work. Remember, triggers are very personal. Try different kinds:

  • Whispering: Search “ASMR whispering”
  • Tapping: Search “ASMR tapping”
  • Crinkling: Search “ASMR crinkling”
  • Role-plays: Search “ASMR doctor,” “ASMR hair salon,” “ASMR ear cleaning” (these are common and popular)
  • Accidental ASMR: Sometimes the best ASMR is not made on purpose. Watch videos of people doing precise jobs, like Bob Ross painting or detailed cooking videos.

3. Use Headphones for ASMR

This is very important. Many ASMR videos are recorded with special binaural microphones. These mics record sound in a way that feels like it’s coming from all around you, just like real life. Headphones (especially large, over-ear ones) will greatly improve the experience and how well the triggers work.

4. Set the Scene

Get rid of distractions. Find a quiet, cozy place where no one will interrupt you. Turn the lights down if you can. The goal is to fully focus on the sounds and sights.

5. Be Patient and Open

ASMR is not a guarantee for everyone. Some people just don’t get the tingles. Others might need to try many different creators and trigger types before they find what works. If you approach it with an open mind, instead of expecting a certain feeling, it might help.


The Dark Side? Controversies and Criticisms

Even with its growing acceptance, ASMR has its share of arguments and people who criticize it.

1. Wrong Ideas and Sexualization

One of the first and longest-lasting problems was mixing up ASMR with sexual feelings. Words like “brain orgasms” (though mostly stopped by the community) added to this confusion. The feeling can be nice and joyful, but for most ASMR people, it is clearly not sexual. Sadly, a few creators have made videos that blur this line on purpose or by accident. This can scare away new users and keep the wrong ideas alive.

2. “ASMR Fatigue” and Less Effect

Some people who have enjoyed ASMR for a long time say they get “ASMR fatigue.” The triggers that used to give them strong tingles now work less well. They have to search for new creators or different triggers. This happens with many sensory experiences and brain rewards, but it is hard for those who rely on ASMR to relax.

3. The “Weird” Factor and Social Stigma

For people who don’t feel ASMR, the idea of watching someone whisper into a mic or tap on objects can seem very strange, even creepy. This often leads to people being ashamed to admit they enjoy ASMR. This is slowly changing as ASMR becomes more common, but the idea that it’s “weird” still exists.

4. The Misophonia Conflict

While ASMR relaxes many people, for others, the very sounds that cause tingles—whispering, chewing, tapping—can cause strong negative feelings and physical reactions. This problem is called Misophonia, or “hatred of sound.” For someone with Misophonia, the content is not calming. It can be very annoying or even cause anger. This split shows how differently people’s brains process certain sounds.

5. Selling Out and Being Fake

As ASMR has become popular, it is now heavily commercial. Companies now pay creators for videos that are ads. This makes people worry if the content is truly authentic. When a video is an ad pretending to be a real relaxation tool, it can break the crucial feeling of immersion needed for the tingle. This can lead to “tingle immunity” or tiredness among long-time fans. The need for more views can also push creators toward triggers that are stranger or more shocking, moving the focus away from real health benefits.


The Creator’s Perspective: Behind the Mic

What does it take to make a relaxing experience for millions? Creating ASMR content is much harder than it looks. It demands special skills and often, big life changes.

The Gear: Investing in the Feeling

The most important tool for an ASMR artist is the microphone. Most professional creators use binaural microphones. These have two separate inputs spaced like human ears (often looking like a fake head). This lets them record sound that travels to your headphones with a realistic sense of space. When an artist whispers from the “left,” you really hear it in your left ear. This creates the close feeling that they are right next to you. This gear is costly and needs a quiet setup to get rid of any noise.

The Art of Control and Care

A successful ASMR artist must be able to control their voice and body well. They must whisper softly but clearly for a long time. They must do repetitive actions with a steady, gentle rhythm. This perfect execution is what starts the relaxation response.

More importantly, the best creators are very empathetic. The “personal attention” videos work because the creator acts like a friend, caregiver, or service provider, focusing only on the viewer. This copies the safe, soothing feeling often linked to early childhood care. Researchers think this is a main reason for it’s stress-relieving powers.

The Things They Give Up

Being an ASMR artist means giving up certain things. Many creators report:

  • Voice Strain: Whispering or speaking softly for hours can cause long-term voice cord problems.
  • Social Isolation: The need for a totally quiet recording space means videos are often made late at night or alone.
  • Dealing with Hate: Even though the videos are about peace, being public on YouTube exposes creators to doubts, bullying, and the “weird” label.
  • Tingle Immunity: Oddly, many creators become immune to their own triggers. This happens because they are exposed to them all the time while testing and editing their content.

Conclusion: Good, Weird, or Both?

So, after looking at all the stories, the new science, and the arguments, where is the truth about ASMR?

Is it weird? Without a doubt, yes. To someone outside the community, watching a person brush a tiny microphone or pretend to do a brain check seems very unusual. The “weirdness” is simply because it’s new and different from regular media or therapy.

But is it good for you? For the millions who use this to fight sleeplessness, calm severe worry, and find a quiet moment in a busy world, the answer is a strong yes. The scientific data, though new, proves the physical reality: ASMR slows the heart rate and activates brain areas linked to reward and happiness. It is a real mental and physical event.

This is perhaps best seen as a kind of digital self-help—an easy, free tool that uses the brain’s special power to find comfort in certain sensory patterns. It won’t take the place of professional mental health care, but it is a strong, proven tool for self-soothing.

In the end, whether you think the idea is strange or wonderful, the power of ASMR to cause a real, measurable physical reaction in the human body confirms that it is much more than just a quick internet trend. It is a real, deeply personal path to finding calm.


    Frequently Asked Questions (FAQ)

    1. Does everyone feel ASMR?

    No. Studies suggest that only a small part of the population (maybe around 10-20% of people tested) feels the classic, strong tingling feeling. Many others just find the videos relaxing without the intense physical response.

    2. Can ASMR cure worry or sadness?

    This is a good way to cope with the feelings of stress, worry, and trouble sleeping. However, it is not a cure for medical conditions like serious anxiety or depression. If you are struggling with serious mental health issues, you must seek help from a doctor or professional.

    3. Why do I sometimes get annoyed by ASMR sounds?

    This could be due to Misophonia. This is a condition where certain sounds (often repeated or mouth-related) cause an immediate, strong negative feeling (anger, distress). If you feel annoyed, you should simply stop watching and try a different kind of sound or visual trigger.

    4. What is “Tingle Immunity”?

    Tingle immunity, or ASMR fatigue, happens when a person who once felt strong tingles finds that their usual triggers no longer work, or the feeling is much weaker. This occurs because the brain gets used to things that happen over and over. The best fix is often to take a break from it for a few weeks or to try completely new kinds of triggers and creators.

    5. Is there ASMR with only visuals?

    Yes. Some people only get tingles from seeing things. This could be watching someone tracing shapes, putting on makeup, or doing silent, slow hand movements. These are often called “No Talking” ASMR videos that focus on what you see.


    References

    1. NIH – The Default Mode Network in Healthy Individuals
    2. Psychology What Is ASMR and Why Are People Watching These Videos?
    3. Healthline – ASMR: Benefits and Emerging Research

    Recent Posts


    How to Make Delicious Healthy Mocktails (Low-Sugar & Low-Calorie)

    A stylish food photo showcasing Lychee Dragon Fruit Healthy Mocktails. Three glasses filled with pink liquid and fruit spheres are framed by a fresh mint sprig, whole lychees, and a cross-section of dragon fruit.

    Like many of you, I love a good drink, but I don’t always enjoy the sugar crash or the next-day regrets. I started exploring the world of Healthy Mocktails because I wanted a beverage that was refreshing, exciting, and genuinely good for me. What began as a personal quest quickly turned into a passion for crafting vibrant, low-sugar drinks that anyone can enjoy. I’m thrilled to share my journey and simple recipes for delicious Healthy Mocktails with you right here!


    Welcome to the World of Delicious Healthy Mocktails

    Do you want a refreshing drink that won’t ruin your health goals? Do you crave a sophisticated beverage without the sugar, calories, or alcohol? You’ve come to the right place! Welcome to the world of healthy mocktails. This is where taste, wellness, and creativity meet.

    For too long, non-alcoholic drinks have been sugary sodas, plain water, or very sweet juices. But things are changing! People are watching what they eat and drink. They want delicious, low-sugar, and low-calorie choices. Healthy mocktails are the perfect answer. They work if you are cutting back on alcohol, watching your sugar intake, or just want healthier hydration. They are great for parties, quiet evenings, or a delightful pick-me-up any time.

    This complete guide will show you how to create truly delicious healthy mocktails. We will cover essential ingredients, simple techniques, and many inspiring recipes. You will be able to make impressive, guilt-free drinks that everyone will love.


    The Idea Behind Healthy Mocktails: Why Simpler is Better

    The main rule for healthy mocktails is to get maximum flavor and fun while avoiding too much sugar, artificial ingredients, and empty calories. This doesn’t mean the drinks taste boring; it’s the opposite! We focus on high-quality, natural ingredients. These items give complex flavors and natural sweetness. They also often bring useful nutrients.

    Why should you choose healthy mocktails?

    1. Lower Sugar Intake: Regular cocktails and many store-bought mocktails are full of sugar. This leads to energy crashes, weight gain, and other health issues. Healthy mocktails use natural sweeteners lightly or rely on the natural sweetness of fruits and vegetables.
    2. Fewer Calories: Less sugar and fewer high-calorie mixers mean lighter drinks. These are great for managing your weight or just feeling better.
    3. Better Hydration: Many healthy mocktails are water-based. They use hydrating ingredients that help you drink more fluids overall.
    4. Nutrient Boost: Using fresh fruits, vegetables, herbs, and spices gives you vitamins, minerals, and antioxidants in every sip.
    5. No Alcohol, No Regrets: You get all the fun of a fancy drink without the alcohol effects. This is perfect for designated drivers, pregnant people, those in recovery, or anyone who chooses to be sober.
    6. Easy Creativity: Mocktails are an easy way to be creative in the kitchen. Try unique flavor mixes and beautiful presentations.

    Essential Items for Your Healthy Mocktails

    You need the right items to build a great healthy mocktail. Think fresh, bright, and natural.

    1. The Base: Fizz and Tea

    These items are the foundation for most healthy mocktails.

    • Sparkling Water or Club Soda: Your best friend for bubbles without sugar. Choose unflavored types. Mineral water can add a subtle, earthy taste.
    • Chilled Brewed Teas: Green tea, black tea, hibiscus tea, mint tea, or herbal fruit teas work well. They provide complex flavors and nice colors. Brew them extra strong for a bolder taste.
    • Coconut Water: Great for a tropical taste. It naturally contains electrolytes.

    2. Best Flavors: Fresh Fruits and Vegetables

    This is where your drink gets exciting! Use produce that is in season for the best flavor.

    • Citrus (Lemons, Limes, Oranges, Grapefruits): These are vital for brightness, acidity, and balance. Always use fresh juice.
    • Berries (Strawberries, Raspberries, Blueberries): Naturally sweet, colorful, and full of antioxidants. Mash them gently for a strong flavor.
    • Tropical Fruits (Pineapple, Mango, Passion Fruit): They add an exotic sweetness and a bright smell.
    • Stone Fruits (Peaches, Cherries): They taste wonderful mashed or puréed when it’s their season.
    • Cucumbers: They offer a cool, refreshing, and slightly green taste. They help balance other flavors.
    • Ginger: Adds a spicy kick. Use it grated, sliced, or as a simple homemade syrup (see below).
    • Herbs (Mint, Basil, Rosemary, Thyme, Cilantro): These boost your mocktails with complex scents. Mint is common, but try basil with berries, or rosemary with citrus.

    3. Natural Sweeteners (Use Only a Little)

    We aim for low sugar, but a little sweetness sometimes helps to balance tart flavors.

    • Maple Syrup or Agave Nectar: Use very little. These are natural but still have calories and raise blood sugar.
    • Stevia/Erythritol (Natural Sweeteners): These are zero-calorie options. They provide sweetness without changing blood sugar. Use them carefully, as too much can taste funny.
    • Fruit Purées: A great way to add natural sweetness and thickness. Blend ripe fruits like dates (soaked), bananas, or berries.
    • Homemade Simple Syrups (Diluted): Infuse water with fruit or ginger. Then add a very small amount of sweetener. This lets you control the sugar!

    4. Spices and Extracts

    Don’t forget the power of a pinch of spice or a few drops of extract.

    • Cinnamon, Cardamom, Cloves: Great for cozy, warm mocktails, especially with apple or citrus.
    • Vanilla Extract: Adds a smooth, sweet smell.
    • Almond Extract: Just a few drops can change a simple drink.

    How to Make Healthy Mocktails:Techniques and Tips

    Making healthy mocktails is about more than mixing ingredients. It’s about learning a few easy techniques that make your drink truly amazing.

    1. Muddling

    What it is: Gently pressing fruits or herbs. This releases their juices and essential oils using a muddler or a spoon.

    How to do it: Put your fruit or herbs into the bottom of a strong glass. Press down and twist a few times, but be gentle. You want to release the flavors, not make a mess of pulp.

    Examples: Mint for a Mojito-style mocktail, or berries for a fruity spritzer.

    2. Shaking

    What it is: Mixing ingredients in a shaker with ice. This chills, slightly dilutes, and mixes the drink well.

    How to do it: Fill a cocktail shaker halfway with ice. Add your liquid items (juices, syrups, etc.). Close the lid tightly and shake hard for 10 to 15 seconds. The shaker should look frosty.

    Examples: Drinks with citrus juice, purées, or anything that needs a good chill and blend.

    3. Layering

    What it is: Creating separate colored layers in your drink. You pour liquids with different densities carefully.

    How to do it: Pour the heaviest (most dense) liquid first. Then, pour the lighter liquid slowly over the back of a spoon. Hold the spoon against the inside of the glass.

    Examples: Adding a splash of fruit juice to the bottom, then topping it with sparkling water.

    4. Infusing & Syrups (Low-Sugar Style)

    Make healthier syrups instead of using sugar-heavy ones.

    • Herbal or Fruit Infusions: Steep fresh herbs (like mint or rosemary) or fruit slices (cucumber, ginger) right in your sparkling water or tea. Do this for 30 minutes or an hour for subtle flavor.
    • Low-Sugar Simple Syrup: Mix equal parts water and a small amount of maple syrup/agave/erythritol in a pot. Heat it until the sweetener dissolves. For flavored syrups, add herbs or fruit while heating, then strain the mix after it cools. This keeps the sugar in your control!
      • Example: Ginger Syrup: Mix 1/2 cup water, 1/4 cup erythritol, and 1/4 cup sliced fresh ginger. Simmer for 10 minutes. Strain and cool.

    5. Garnishes: The Perfect Finish

    Garnishes look nice and add scent. They make the drinking experience better.

    • Fresh Herbs: A small bunch of mint, a basil leaf, or a sprig of rosemary.
    • Citrus Slices or Peels: Classic and fragrant.
    • Fruit Sticks: Berries or melon balls placed on a skewer.
    • Edible Flowers: For a touch of fancy style.
    • Cucumber Ribbons: Adds a spa-like feel.

    5 Delicious Healthy Mocktails to Try Now

    Let’s start mixing! Here are five easy and delicious healthy mocktail recipes. They are low-sugar and low-calorie. They work perfectly for any time.

    1. Sparkling Berry Mint Refresher

    A bright, refreshing, and naturally sweet mocktail.

    Calories: About 30-50 per serving

    Ingredients:

    • 1/2 cup mixed berries (strawberries, raspberries, blueberries), fresh or frozen
    • 5-6 fresh mint leaves
    • 1/2 lime, juiced
    • 1/4 to 1/2 teaspoon erythritol or a small amount of maple syrup (optional, to your taste)
    • 1 cup unflavored sparkling water or club soda
    • Ice
    • Garnish: Fresh berries and a mint sprig

    How to make it:

    1. In a strong glass, add the mixed berries and mint leaves.
    2. Gently muddle the berries and mint. This releases their juices and oils.
    3. Add the fresh lime juice and the sweetener (if you are using it).
    4. Fill the glass with ice.
    5. Pour sparkling water over the top.
    6. Stir gently to mix.
    7. Garnish with extra berries and a mint sprig.

    2. Cucumber Ginger Spritzer

    Cool, spicy, and very hydrating.

    Calories: About 20-40 per serving

    Ingredients:

    • 4-5 thin slices of cucumber
    • 2-3 thin slices of fresh ginger
    • 1/2 lemon, juiced
    • 1/4 teaspoon erythritol or a tiny drizzle of agave (optional)
    • 1 cup unflavored sparkling water
    • Ice
    • Garnish: A cucumber ribbon and a lemon slice

    How to make it:

    1. In a glass, gently muddle the cucumber and ginger slices. This releases their flavors.
    2. Add the fresh lemon juice and sweetener (if you are using it).
    3. Fill the glass with ice.
    4. Pour sparkling water over the top.
    5. Stir well.
    6. Garnish with a cucumber ribbon (use a vegetable peeler to make one) and a lemon slice.

    3. Tropical Green Tea Tango

    An exotic, antioxidant-rich mocktail with a subtle tea base.

    Calories: About 40-60 per serving

    Ingredients:

    • 1/2 cup chilled, strong-brewed green tea
    • 1/4 cup unsweetened pineapple juice (or mashed fresh pineapple chunks)
    • 1 tablespoon fresh lime juice
    • 1/2 teaspoon passion fruit purée (unsweetened, if possible) or a few fresh passion fruit seeds
    • A pinch of erythritol or stevia (optional, to your taste)
    • 1/2 cup sparkling water or club soda
    • Ice
    • Garnish: A pineapple wedge and a lime wheel

    How to make it:

    1. If using fresh pineapple, mash a few chunks in a shaker.
    2. Mix the chilled green tea, pineapple juice, lime juice, passion fruit purée, and sweetener (if using) in a cocktail shaker. Fill it with ice.
    3. Shake hard for 10 to 15 seconds until the mix is very cold.
    4. Strain the drink into a glass filled with fresh ice.
    5. Pour sparkling water over the top.
    6. Garnish with a pineapple wedge and a lime wheel.

    4. Spiced Apple Cider Fizz

    A cozy, warm, yet refreshing mocktail for colder times.

    Calories: About 50-70 per serving

    Ingredients:

    • 1/2 cup unsweetened apple cider (or natural apple juice mixed with water)
    • 1/4 teaspoon ground cinnamon
    • A pinch of ground cloves (optional)
    • A squeeze of fresh lemon juice
    • 1/2 cup unflavored sparkling water
    • Ice
    • Garnish: An apple slice and a cinnamon stick

    How to make it:

    1. In a glass, mix the apple cider, cinnamon, cloves (if using), and lemon juice. Stir well.
    2. Fill the glass with ice.
    3. Pour sparkling water over the top.
    4. Stir gently.
    5. Garnish with an apple slice and a cinnamon stick.

    5. Rosemary Grapefruit Elixir

    A sophisticated, slightly tart, and lovely smelling drink.

    Calories: About 30-50 per serving

    Ingredients:

    • 1/2 cup fresh grapefruit juice (unsweetened)
    • 1 sprig of fresh rosemary, plus extra for garnish
    • 1/4 teaspoon erythritol or a tiny drizzle of agave (optional, to cut bitterness)
    • 1/2 cup unflavored sparkling water
    • Ice
    • Garnish: A rosemary sprig and a grapefruit slice

    How to make it:

    1. In a glass, gently muddle the rosemary sprig. This releases its oils.
    2. Add the fresh grapefruit juice and sweetener (if using). Stir well.
    3. Fill the glass with ice.
    4. Pour sparkling water over the top.
    5. Stir gently to mix.
    6. Garnish with a fresh rosemary sprig and a grapefruit slice.

    Tips for Best Results and Customization for Healthy Mocktails

    • Taste as You Go: This is very important! Everyone has a different taste. Start with less sweetener. You can always add more later.
    • Fresh Tastes Best: Always use fresh juices and herbs for the best flavor.
    • Use Lots of Ice: Plenty of ice keeps your mocktail cold. It prevents it from tasting watery too fast. Use large ice cubes if you can.
    • Try Infusions: Try letting your sparkling water sit with cucumber and mint overnight. Or make a large batch of low-sugar ginger syrup.
    • Balance is Key: A great mocktail balances sweet, sour, and sometimes bitter or spicy notes.
    • Make Batches for Parties: If you are hosting, prepare your fruit purées, juices, and low-sugar syrups ahead of time. Mix individual drinks with sparkling water right before serving. This keeps the drink fizzy.
    • Good Presentation Matters: A nice glass and a beautiful garnish make the experience much better.

    Taking Your Healthy Mocktails to the Next Level

    To make your mocktails even better, try a little more creativity and attention to detail.

    Homemade Infusions and Flavored Ice

    Fruit and Herb Ice Cubes: Freeze water with small bits of fruit (berries, citrus peel) or herb leaves (mint, basil). When they melt, they subtly flavor the drink instead of watering it down.

    Floral Teas: Brewed and chilled hibiscus, rosehip, or lavender tea can make a beautiful base. They add complex floral tastes and vibrant colors.

    Vegetable Juices: A small amount of fresh carrot, beet, or celery juice adds an earthy depth and nutrients. They pair well with citrus or ginger.

    The Right Tools

    You don’t need a professional bar setup, but a few tools help:

    • Muddler: Necessary for getting the flavor out of fruits and herbs.
    • Cocktail Shaker: For properly chilling and mixing your ingredients.
    • Jigger or Measuring Spoons: For measuring concentrated flavors accurately.
    • Citrus Juicer: A good squeezer makes juicing fresh citrus very easy.
    • Fine-Mesh Strainer: Use this to remove pulp or herb pieces if you want a smoother drink.
    • Variety of Glasses: Different glass shapes can make the drink more enjoyable.

    Conclusion: Drink Healthy Mocktails for Greater Hydration

    Making delicious healthy mocktails is a fun way to try new things. Use fresh, natural ingredients. Use less sugar. Experiment with different flavors. You can create drinks that taste great and also help your well-being. Whether you are hosting a party, relaxing after a long day, or just need a refreshing, healthy drink, these low-sugar, low-calorie mixes offer endless choices. So, grab your muddler, choose your favorite fruits and herbs, and start mixing. Your taste buds and your body will both thank you!


    FAQ (Frequently Asked Questions)

    Q1: What makes a mocktail truly “healthy”?

    A1: A mocktail is healthy when it uses mostly fresh, natural items. It is low in added sugars and artificial sweeteners. And low in calories. It typically includes fruits, vegetables, herbs, and sparkling water or unsweetened teas.

    Q2: Can I use frozen fruit for healthy mocktails?

    A2: Yes, absolutely! Frozen fruit works great for mashing (muddling) or blending into purées. It also helps keep your drink colder for longer without getting watery too fast.

    Q3: How can I make my mocktails more fizzy without adding sugar?

    A3: Use unflavored sparkling water, club soda, or seltzer as your main bubbly base. Make sure these are very cold before you mix. You can also try naturally fermented drinks like kombucha (choose low-sugar types) for extra fizz and probiotics.

    Q4: What is the best way to sweeten a mocktail without using sugar?

    A4: Focus on the natural sweetness found in ripe fruits (like berries, mango, or pineapple). If you need more sweetness, use very small amounts of zero-calorie sweeteners like erythritol or stevia. A tiny bit of pure maple syrup or agave nectar also works. You can also make low-sugar syrups by mixing these sweeteners with water and infusing them with fruit or herbs.

    Q5: How early can I prepare the mocktail ingredients?

    A5: You can prepare most juices, purées, and low-sugar syrups 1 to 2 days before. Store them in closed containers in the refrigerator. For the best taste and fizz, always mix the final mocktail with sparkling water and ice right before you serve it. Add fresh herbs and garnishes at the very end.

    Q6: Are the store-bought “zero-proof” spirits healthy?

    A6: It depends on the brand. They are alcohol-free, but some might still have added sugars or fake ingredients. Always check the nutrition facts and ingredient list. Make sure they meet your goal for a healthy mocktail.


    References


    Recent Posts


    Sustainably Slaying: Reusable Outfits You Need to See

    Four stylish people walk down a cobblestone street in bright sunlight, wearing creative, reusable outfits. The clothing features extensive upcycling, including a denim bustier top with patchwork shorts and boots, a man in a vest and trousers made from mixed-fabric patchwork, a woman in a long denim skirt with fringed details, and a man in a repurposed green military-style jacket.

    As fashion lovers, we all know the feeling of having a full closet yet believing there’s “nothing to wear.” This constant cycle of buying too much only leads to waste and a drained bank account. Luckily, the amazing world of sustainable style and Reusable Outfits offers a better way to look great. Join us as we explore how this movement helps your personal style, your wallet, and the well-being of the planet.


    Fast Fashion and Reusable Outfits

    We live in a world that always wants what is new. It is easy to get pulled into the quick flow of fast fashion. New trends come and go faster than we can buy them. This leaves us with clothes we never wear and harms the environment more and more. But what if there was a better way? A way to dress that is thoughtful, fun, and looks great? Welcome to the world of reusable outfits. Here, style gets better, not lost, by making smart choices and loving what you already have.

    This is not just about saving cash (though you certainly will!). It is about finding a style that is truly yours. And about causing less harm to the planet. It is also about the great feeling of turning old items into fresh, exciting looks. Forget the idea that earth-friendly fashion is boring; today, we will look deeply at how to dress great with reusable outfits you must see—and how you can make them yourself.

    The Problem with “New”: Why Reusable Fashion Matters

    Let’s first talk about the big issue in shopping: fast fashion hurts our world. The constant wish for cheap, trendy clothes has caused huge costs for the environment and for people. Think about the facts: Cotton farming uses lots of water and chemicals. Harmful dyes pollute rivers. Huge piles of old clothes sit in dumps. The impact is massive. Add to this the concerns about workers in many clothing factories, and it is clear that what we buy has big effects.

    Reusable fashion is a strong answer. When we make clothes last longer, we lower the need for new things to be made. We save resources. And cut down on waste. We even reduce the air pollution that comes from making and moving clothes. It is a win for the Earth, a win for kind shopping, and a big win for your own style.

    What Exactly are Reusable Outfits?

    At its heart, reusable fashion means clothes that last and can be used in many ways. It means seeing your clothes not as things you will soon throw away, but as smart buys and core pieces. A reusable outfit is not always something you bought second-hand (though thrift store finds are amazing!). It is any look made from clothes you own, clothes you have fixed or changed, or items you bought with the goal of wearing them often and in many styles.

    Think about it: that simple white shirt, those perfect trousers, that denim jacket—these are the heroes of reusable fashion. The magic happens when you see them not as fixed items, but as parts that can be mixed, styled, and changed up forever.


    The Pillars of Sustainably Slaying: How to Build Your Reusable Wardrobe

    Making a closet centered on reusable outfits takes time, but the reward is huge. Here are the main steps:

    1. Master the Art of the Wardrobe Audit: Reusable Outfits

    You must know what you have before you can build. The first step to embracing reusable outfits is to truly know what you own now.

    How to Do It:

    • Take Everything Out: Do it. Take every piece of clothing, every belt, every shoe out of your closet and drawers.
    • Make Groups: Put similar items together (all shirts, all jeans, all dresses).
    • The “Keep, Fix, Give Away” Rule:
      • Keep It: You love these items. They fit well, feel good, and are useful.
      • Fix It: These items need a small repair (a missing button, a small rip). Do not throw them out! They can become core reusable items.
      • Give It Away: These are items that do not fit, are too stained to fix, do not match your style, or have not been worn in a year. Put them in piles to sell, give away, or turn into cleaning cloths.
    • Find Missing Items: Once you see all your clothes, you can find things you truly need (e.g., a good basic black top). This stops you from buying things you do not need.

    2. Embrace Quality Over Quantity

    This is the most important change in how you think. Fast fashion needs cheap, disposable items. Reusable fashion needs well-made items that will last a long time.

    How to Do It:

    • Spend Wisely: When you do buy new (after finding a real need), choose items with better materials (cotton, linen, wool), strong sewing, and simple designs that will not look old next season. Think about how much it costs each time you wear it, not just the price tag. A high-quality item worn 100 times costs much less per wear than a cheap item worn twice.
    • Shop Second-Hand: Thrift shops, old clothing stores, and online sites (like Depop, ThredUp) are great places to find high-quality, pre-loved clothes. This is the best way to do reusable fashion! You find special items, often cheaper, and give them a new life.

    3. Cultivate Versatility: The Capsule Wardrobe Approach

    A capsule wardrobe is a small set of clothes that all work together. This helps you make the most number of outfits possible. It is the best plan for reusable outfits.

    How to Do It:

    • Pick Colors: Choose one main color (like black, blue, or gray) and a few bright colors. This helps make sure everything matches.
    • Focus on Key Pieces: Pick useful basics like good jeans, classic pants, a simple skirt, basic tops, a jacket, and an easy dress.
    • Layering is Key: Think about how items can be worn over or under each other to make new looks and suit the weather. A simple dress can be worn alone, over a shirt, or under a thick sweater.
    • Mix and Match: Push yourself to try new pairings with the clothes you already have. Take pictures of good outfits to use as ideas later.

    4. The Power of Accessories and Styling

    Small items like jewelry and bags are the secret weapon of reusable outfits. They can totally change how a simple piece of clothing looks.

    How to Do It:

    • Scarves: A scarf can be used in your hair, as a belt, a top, a bag decoration, or simply around your neck.
    • Belts: Use a belt to make a loose dress fit better, add shape to a thick sweater, or dress up simple jeans.
    • Jewelry: Big necklaces, small chains, hoop earrings, or bracelets can quickly change if an outfit is formal or casual.
    • Shoes & Bags: Changing sneakers for heels, or a big tote for a small clutch, instantly changes the outfit’s purpose.

    5.Reusable Outfits: Repair, Repurpose, Reimagine

    Do not throw away clothes just because of small issues. This is where true sustainable slaying happens!

    How to Do It:

    • Learn Basic Mending: A simple sewing kit can fix missing buttons, loose seams, and small tears. Videos online are very helpful here!
    • Use a Tailor: A garment that fits perfectly looks much better. Take items to a tailor for small changes (making pants shorter, taking in the waist). This is an investment that makes the item last.
    • Upcycling/DIY:
      • Turn old jeans into shorts or a skirt.
      • Make an oversized shirt or sweater shorter.
      • Add patches or designs to hide stains or tears, making them a cool feature.
      • Change the color of faded clothes with fabric dye.

    Reusable Outfits in Action: Examples to Inspire You

    Let’s see how these ideas work in real reusable outfits. Imagine having these few core pieces and seeing all the possibilities:

    Example 1: The Versatile Black Midi Dress

    Your Core Piece: A simple, well-fitting black midi dress.

    • Casual Day Out: Black dress + white shoes + denim jacket tied around your waist + a baseball cap.
    • Office Chic: Black dress + smart jacket + high heels + a nice necklace.
    • Evening Glam: Black dress + thin-strapped heels + simple gold jewelry + a small, elegant bag.
    • Cozy Weekend: Black dress + thick knit sweater worn over the top (making the dress look like a skirt) + ankle boots.
    • Bohemian Vibe: Black dress + wide-brimmed hat + many layered necklaces + rope sandals.

    Example 2: The Classic White Button-Down Shirt

    Your Core Piece: A crisp white large button-down shirt.

    • Effortlessly Cool: White shirt open over a tight top + high-waisted jeans + sneakers.
    • Polished Professional: White shirt tucked into smart pants + a thin belt + simple, flat shoes.
    • Beach Ready: White shirt worn open over a bathing suit + denim shorts + sandals.
    • Unexpected Glam: White shirt partly tucked into a silk skirt + heels + large earrings.
    • Layered Look: White shirt under a round-neck sweater, with the collar and cuffs showing + cotton pants.

    Example 3: The Beloved Pair of Jeans

    Your Core Piece: A comfortable, great-fitting pair of blue jeans.

    • Classic Casual: Jeans + fun graphic tee + sneakers + an open cardigan.
    • Smart Casual: Jeans + a silky top + a blazer + heels.
    • Cozy Comfort: Jeans + a large, soft sweatshirt + thick socks for resting at home.
    • Boho Edge: Jeans + an embroidered shirt + ankle boots + a bag with fringe.
    • Date Night: Jeans + an off-the-shoulder top + simple jewelry + heeled slip-on shoes.

    The Joy of the Sustainable Slay: Reusable Outfits

    Choosing reusable outfits is more than just a trend; it is a way of life that feels deeply satisfying. And also makes you use your clothes in more fun ways. It makes you value the quality of good clothing. It helps you find a unique style that is not just based on passing fads.

    Imagine the feeling of confidently walking into a room, knowing your outfit is not only stylish but also a sign of smart choices. This is more than just wearing clothes; it’s making a profound point. You instantly become part of a growing group that believes in long life, creativity, and caring for the world—you are, simply put, sustainably slaying.

    It might feel hard at first to stop the need to buy new things all the time. But with every good outfit you make from your own closet, every repair you do, and every smart second-hand buy, your style will become clearer and stronger. Your closet will turn into a small, cherished collection, not a mess of forgotten items.

    So, are you ready to change your closet and your view on fashion? The world of reusable outfits is here, showing a future where great style and care for the Earth go hand-in-hand. Start with one item, one outfit, one small change, and watch your style—and your impact—change for the better.


    FAQ: Your Reusable Outfit Questions Answered

    Q1: Is reusable fashion only for people who are good at sewing?

    A1: Not at all! It helps to know how to sew, but you do not have to be an expert. Many tailors and dry cleaners can fix clothes for a small fee. Just learning how to reattach a button or sew a small tear can make a piece of clothing last much longer. Also, you can change clothes without sewing, like cutting jeans into shorts or tying a shirt in a new way.

    Q2: How do I find good quality second-hand items?

    A2: Look for natural materials (cotton, linen, wool, silk) because they usually wear well and feel better. Look at the seams for loose threads. Check zippers and buttons. Look for stains or holes that cannot be fixed. Shopping in richer areas or on certain websites can often lead to better brands. Do not be afraid to try things on and see how you can wear them with the clothes you already have.

    Q3: What if I get tired of my reusable outfits?

    A3: This is where you get creative!

    * Accessories: As we said, scarves, belts, jewelry, and different shoes can totally change the look of an outfit.

    * Layering: Add a jacket, vest, or cardigan. Wear a top open over a dress or t-shirt.

    * Hair and Makeup: These can greatly change your whole look without changing any clothes.

    * Seasonal Swaps: Put away some clothes for a season and bring them back later. They will feel new again.

    * DIY/Fixing: Change the color of a faded item, add patches, or have a tailor change the shape of the clothing.

    Q4: How many clothes do I need for a good reusable wardrobe?

    A4: There is no perfect number. The goal is to have a set of clothes where most items can be mixed and matched. Some people aim for a “capsule wardrobe” of about 30 to 50 items (including shoes and jackets) for each season. This is a guide, not a rule. Focus on having enough choice to make different looks without having too much stuff.

    Q5: Is sustainable fashion more expensive?

    A5: Buying new, high-quality items can cost more at first than cheap fast fashion. But you will save money over time because those clothes last longer. You do not have to replace them as often, and you will shop less. Buying second-hand is often much cheaper than buying new, making sustainable fashion very easy on your wallet. It is all about choosing quality and long life over a lot of cheap stuff.


    References


    Recent Posts


    How to Choose a Truly Eco-Friendly Vacation

    A quiet, Eco-Friendly forest path surrounded by green trees and sunlight, suggesting a beautiful, less-crowded hiking destination during the shoulder season.

    If you have always wanted to explore amazing places without causing harm. For years, I found it hard to tell the difference between real Eco-Friendly sustainable trips and just clever ads. This made choosing an Eco-Friendly vacation a guessing game. This guide comes from my own travel research and personal trips. It should help you travel with confidence and joy.


    The Eco-Friendly Imperative: Why Your Next Trip Needs to Be Responsible

    The urge to get away is powerful. We crave the promise of new sights, sounds, and experiences. However, we also know more now about the planet’s needs. This makes us want to travel in a better, more responsible way. Today, the phrase “eco-friendly vacation” is everywhere. You see it on every website and travel brochure.

    But what does it really mean to travel sustainably? More important, how can you spot a true commitment from a simple marketing trick?

    This complete guide will give you the knowledge you need. You’ll learn how to plan a trip that not only lifts your spirits but also respects the earth and its people. We’ll look at the core ideas of eco-friendly travel. We will give you easy “how-to” steps and clear examples. This will make sure your next trip leaves a positive mark.


    The Four Main Parts of an Eco-Friendly Trip

    To choose well, you must first know what makes a vacation truly eco-friendly. It is much more than just putting bottles in the recycling bin. It is a full approach that cuts down on bad effects and boosts good ones.

    1. Protecting Nature: This is the clearest goal. It means reducing your carbon footprint. And also saving resources like water and energy. It means guarding wildlife and keeping garbage to a minimum. You must choose companies that actively work to protect the local ecosystems.
    2. Helping Local People: Real eco-tourism must benefit the local people you visit. This includes paying fair wages and providing good jobs. It means supporting local shops and businesses. It also involves respecting their culture. Locals should be part of the travel decisions. Tourism should help the community, not exploit it.
    3. Saving Culture: Sustainable travel means you must respect local ways, traditions, and sacred places. It encourages real, positive connections. You should avoid any activities that treat local customs like products to be sold.
    4. Local Economy: For eco-tourism to last, it must also be good for local people’s wallets. This means creating jobs. It means the money you spend stays in the area. It gives locals a clear reason to protect their natural resources.

    The Greenwashing Trap: How to Spot Fakes

    Greenwashing is when companies pretend to be green. They trick people into thinking their services are good for the environment. This happens a lot in the travel business. A hotel might show a sign asking you to reuse towels. At the same time, it may use huge amounts of power with no plan to use clean energy.

    How to Spot Greenwashing:

    • Vague Statements: Be wary of simple claims like “eco-conscious.” They need to provide specific details or proof.
    • Lack of Clear Facts: If a business won’t show clear facts about their green or social work, be suspicious.
    • Focus on Only One Tiny Thing: A hotel may only talk about its recycling plan. But it may ignore its high water use or poor treatment of workers.
    • No Official Proof: A trusted certificate or third-party check helps. Without one, the claims are hard to verify.
    • Misleading Pictures: Photos of beautiful nature do not prove the business is sustainable.

    Step-by-Step: How to Plan a Truly Eco-Friendly Vacation

    We know the basics and the traps. Now, let’s go through the simple steps for planning your next responsible adventure.

    Step 1: Research Where You Go Carefully

    Your choice of destination is the most important step. Some places are more sensitive. Others have better systems for sustainable tourism.

    • Try Off-Season Travel: Traveling when it’s less crowded is smarter. This takes the pressure off local services and wildlife. It often gives you a more real experience.
    • Choose Places That Care: Look for countries or parks with clear sustainability plans. Choose places known for their conservation efforts. Costa Rica is a famous example.
    • Skip Over-Crowded Spots: Too many tourists often damage nature and local culture. Look for places that are actively managing visitor numbers.

    Step 2: Choose Greener Ways to Travel

    The way you travel often creates the biggest part of your trip’s carbon footprint.

    • Fly Less: If a long flight is a must, think about paying to offset your carbon. This isn’t a perfect fix, but it does help. Choose direct flights. Take-offs and landings use the most fuel.
    • Use Better Alternatives: For shorter distances, trains, buses, bikes, and walking are far more eco-friendly.
    • Pick Eco-Friendly Local Transport: Once you arrive, walk, bike, or use public transport. If you must rent a car, get an electric or hybrid vehicle.
    • Example: Don’t fly from Seattle to Vancouver. Take the Amtrak train. It’s scenic and much better for the earth. In a city, use the metro instead of ride-shares.

    Step 3: Pick Certified Sustainable Places to Stay

    Trusted third-party proof is very helpful here. Look for this proof when booking.

    • Look for Real Proof/Certificates: Search for hotels and guesthouses that have been checked by known organizations. Examples include:
      • Green Globe: A worldwide standard for sustainable tourism.
      • EarthCheck: A major science group that rates travel businesses.
      • Travelife: This group focuses on accommodations and tour companies.
    • Ask More Questions: Even without a certificate, you can ask about their habits:
      • Do they use clean energy?
      • How do they save water and handle trash?
      • Do they get food from local farmers?
      • Can they hire and train local people fairly?
      • Do they give money to local conservation?
    • Example: A hotel shows commitment by using solar power. It also uses recycled water for gardening. Plus, it only buys meat and produce from nearby farms, helping the local economy.

    Step 4: Choose Responsible Tours and Activities

    What you do on your trip has a direct effect.

    • Find Companies with Clear Green Rules: Look for tour companies that state they protect nature and help the local community.
    • Prefer Small Group Tours: Smaller groups are less likely to damage sensitive environments. They also give you better cultural contact.
    • Say No to Animal Exploitation: Never pay for things like elephant rides or swimming with captive sea life. Always research animal encounters. Make sure it is ethical (e.g., watching wild animals from a respectful distance).
    • Hire Local Guides: Local guides offer better insights. This also puts money directly into their hands.
    • Example: Instead of a huge, loud jeep tour, pick a small, locally-led bike tour. Your guide can teach you about the area’s history and plants.

    Step 5: Pack Smart and Light

    What you take (or don’t take) matters to the environment.

    • Bring Reusables: Always pack a reusable water bottle, coffee cup, and shopping bag. This cuts down on plastic trash.
    • Use Eco-Friendly Toiletries: Use sunscreen that won’t harm coral reefs. Use soaps that break down easily to protect rivers and oceans.
    • Pack Less: Lighter luggage means less fuel is burned during travel.
    • Example: Use a portable water filter bottle. This means you don’t have to buy plastic bottles, which is vital in places with poor tap water.

    Step 6: Be a Responsible Tourist While You’re There

    Your actions on the ground are key to a successful eco-friendly trip.

    • Respect Local Culture: Learn a few words in the local language. Dress respectfully. Always ask before taking pictures of people. Respect all local traditions.
    • Save Resources: Turn off the lights and AC when you leave your room. Take quick showers. Be mindful of your consumption.
    • Create Less Trash: Say no to plastic bags. Throw away your trash properly. Recycle when you can.
    • Support Local People: Eat at local cafes and restaurants. Buy gifts directly from local artists. Your money stays in the community.
    • Leave No Trace: If you are in nature, stay on the paths. Pack out all your trash. Never disturb animals or plants.
    • Example: Eat street food from a trusted local vendor instead of eating at a global fast-food chain.

    Step 7: Offset Your Carbon Footprint (Last Resort)

    Your main goal is to reduce your pollution. But some emissions from travel are hard to avoid.

    • Pick Verified Offset Programs: Look for programs that invest in real projects like clean energy or planting trees. Choose groups like Gold Standard or Verified Carbon Standard (VCS).
    • Know Its Limits: Offsetting only makes up for pollution. It is not a free pass. You should only use it after trying hard to cut down first.
    • Example: Use a reputable website to calculate your flight’s carbon. Then, invest in a certified project to offset that amount.

    The Future of Travel is Sustainable

    Choosing a truly eco-friendly vacation needs effort and careful planning. You must look past the flashy “green” marketing. You need to look for real sustainability at every stage.

    It takes a little more work, but the payoff is big. You will have a richer travel experience. You will have a clearer conscience. And you’ll know that your trip is helping the earth and making communities stronger.

    Go ahead and plan that perfect trip. Just make sure it’s one that gives back as much as it takes.


    Frequently Asked Questions (FAQ)

    Q1: Is eco-friendly travel always more expensive?

    A1: Not always. Certified places might cost a little more. But many sustainable choices can actually save you money. Using public transport and staying in local guesthouses is often cheaper than high-end resorts.

    Q2: How do I know if a carbon offsetting program is real?

    A2: Check if they are certified by known standards. These groups—like the Gold Standard—make sure the projects are real, measurable, and checked by others.

    Q3: What’s the difference between eco-tourism and sustainable tourism?

    A3: Eco-tourism is a small part of sustainable tourism. Eco-tourism focuses on nature travel. Its goal is to protect the environment and help local people. Sustainable tourism is a wider term. It applies to all travel and aims to reduce harm across the board.

    Q4: Should I bring a water filter if tap water is unsafe?

    A4: Yes, absolutely! This is the best way to avoid buying tons of plastic water bottles. Always pack a portable water filter or purification tablets.

    Q5: How can I be sure my visit helps the local community?

    A5: Spend your money at places owned by locals. This means using local guides, eating at small restaurants, and buying souvenirs directly from artists. This makes sure your money stays in their community.


    References


    Recent Posts


    The Ultimate Immune-Boosting Carrot Stew

    Two steaming bowls of vibrant, Immune-Boosting carrot and chickpea stew, garnished with fresh herbs and spinach, sit on a rustic wooden table with carrots and garlic in the background.
    Carrot Stew

    Ever feel like you need a simple way to stay healthy without eating boring food? I know I do! Juggling work, family, and life can make eating well feel tough. This article is for anyone who wants to give their Immune-Boosting systems a delicious edge, making healthy eating fun and easy. Let’s dig into the power of food to keep you feeling your best.


    When we talk about staying healthy, the food we eat is our first line of defense. There’s no magic pill, but a bowl full of vitamins and antioxidants is the next best thing! That’s why we created The Ultimate Immune-Boosting Carrot Stew—a recipe that is both easy to make and packed with powerful, sickness-fighting ingredients.

    This long article will show you exactly why this stew is so good for you, give you the step-by-step recipe, compare it to the rich Jamaican style, and answer all your questions. Get ready to cook up some serious health!

    The Science Behind Your Bowl: Why This Stew is a Health Hero

    Carrots: The Golden Foundation

    Everyone knows carrots help your eyes, but they do much more! They are loaded with beta-carotene, which gives them their bright color. Your body changes beta-carotene into Vitamin A, which is vital for:

    • Fighting Germs: Vitamin A helps keep the linings of your nose, throat, and stomach strong. These linings are the first things germs run into!
    • Building Defenders: This vitamin helps your body make white blood cells, which are the immune system’s soldiers.
    • Cleaning Up: Beta-carotene is a strong antioxidant that cleans up harmful stuff in your body called free radicals.

    Tip: Cooking carrots with a bit of healthy oil (like the olive oil in the recipe) helps your body soak up more of that powerful beta-carotene.

    Garlic & Ginger: The Flavorful Protectors

    These two ingredients don’t just add a great taste; they are ancient remedies.

    • Garlic: It has a special compound called allicin. This stuff is known for fighting viruses and bacteria. Eating garlic may help you avoid colds and the flu, or at least feel better faster.
    • Ginger: It gives the stew a warm zing. Gingerols, the active part of ginger, are great at reducing swelling (inflammation) in your body. When there’s less swelling, your Immune-Boosting system can work better.

    Turmeric & Pepper: The Dynamic Duo

    Turmeric is the spice that makes curry yellow, but its real power comes from a compound called curcumin.

    • Less Swelling: Curcumin is famous for being a powerful anti-inflammatory.
    • Teamwork: You must use black pepper with turmeric! Pepper has piperine, which acts like a key, helping your body absorb curcumin much more easily.

    Chickpeas & Greens: Fiber & Fillers

    • Chickpeas: They add plant-based protein, which your body needs to build and fix immune cells. They are also packed with fiber.
    • Gut Health: Over two-thirds of your immune system is in your gut! Fiber feeds the good bacteria in your stomach, and those bacteria keep your immune system happy and strong.
    • Bell Peppers & Spinach: These veggies are loaded with Vitamin C. Vitamin C is an antioxidant that helps your white blood cells do their job well and protects them from damage.

    The Ultimate Immune-Boosting Carrot Stew Recipe

    This recipe is simple, delicious, and built for immune-boosting power.

    Prep time: 20 minutes

    Cook time: 40 minutes

    Yields: 6-8 servings


    Essential Equipment

    You don’t need fancy tools to make this nourishing stew, but having the right basic gear makes the process quick and easy.

    • Large Pot or Dutch Oven: A 5-quart (or larger) heavy-bottomed pot is ideal. This gives you enough room to sauté your aromatics, add all the vegetables, and stir the stew without splashing.
    • Cutting Board and Sharp Knife: Essential for safely and quickly prepping all the root vegetables, onions, and garlic.
    • Vegetable Peeler: For peeling the carrots and sweet potatoes (unless you opt to leave the skin on for extra fiber).
    • Box Grater or Microplane: Useful for grating the fresh ginger. If you don’t have one, finely mincing the ginger with a knife works well, too.
    • Wooden Spoon or Spatula: For stirring the stew, especially when sautéing spices and making sure the bottom doesn’t stick.
    • Can Opener and Colander: For easily preparing the crushed tomatoes and rinsing the chickpeas.

    Ingredients:

    • 2 tbsp olive oil (healthy fat)
    • 1 large yellow onion, chopped
    • 4 cloves garlic, minced
    • 1 tbsp fresh ginger, grated
    • 1 tsp ground turmeric
    • 1/2 tsp ground cumin
    • 1/2 tsp ground coriander
    • 1/4 tsp black pepper (don’t skip this!)
    • 6 medium carrots (about 1.5 lbs), chopped into rounds
    • 2 celery stalks, chopped
    • 1 red bell pepper, diced
    • A yellow bell pepper, diced
    • 1 (28-ounce) can crushed tomatoes
    • 4 cups low-sodium vegetable broth
    • 1 (15-ounce) can chickpeas, rinsed and drained
    • 1 large sweet potato (about 1 lb), peeled and cubed
    • 1/2 cup chopped fresh parsley, divided
    • 4-5 cups fresh spinach or chopped kale
    • Salt to taste
    • Lemon wedges for serving (optional)

    Instructions:

    1. Start the Flavors: Heat the olive oil in a large pot. Add the onion and cook until soft (5-7 minutes). Add the garlic and ginger and cook for just one minute until you can smell them well.
    2. Toast the Spices: Stir in the turmeric, cumin, coriander, and black pepper. Cook for 30 seconds. This step wakes up the flavor of the spices.
    3. Add the Core: Put in the carrots, celery, bell peppers, crushed tomatoes, vegetable broth, chickpeas, and sweet potato. Stir everything so it’s mixed well.
    4. Simmer Time: Bring the stew to a gentle boil, then turn the heat down low. Cover the pot and cook for 25-30 minutes, or until the carrots and sweet potatoes are soft enough to poke with a fork.
    5. Finish Strong: Stir in half of the fresh parsley and all the spinach (or kale). Cook until the greens are just wilted (about 2-3 minutes). Taste and add salt as needed.
    6. Serve: Scoop the stew into bowls. Sprinkle the rest of the parsley on top. A squeeze of fresh lemon juice at the end gives it a great, bright taste!

    Variation: Creamy & Spicy Jamaican Carrot Stew (Ital Style)

    If you love a rich, spicy flavor and a creamy texture, try the Jamaican version! This is often called an “Ital” stew because it follows a natural, vegan tradition from Jamaica. It’s packed with nutrients but offers a different flavor profile.

    Prep time: 25 minutes

    Cook time: 50-60 minutes

    Yields: 6-8 servings

    Ingredients:

    • 2 tbsp coconut oil
    • 1 large yellow onion, chopped
    • 4 cloves garlic, minced
    • 1 tbsp fresh ginger, grated
    • 1 tsp dried thyme
    • 1/2 tsp ground allspice (pimento)
    • 1 whole Scotch Bonnet pepper (add whole for flavor, but don’t cut it!)
    • 6 medium carrots, chopped into rounds
    • 1 large sweet potato, peeled and cubed
    • 1 green plantain, peeled and sliced
    • A medium Irish potato (white potato), peeled and cubed
    • 1 (15-ounce) can kidney beans, rinsed and drained
    • 1 (13.5-ounce) can full-fat coconut milk
    • 3 cups vegetable broth
    • 1/2 cup chopped fresh scallions
    • Salt to taste
    • Small flour dumplings (optional)

    Instructions:

    1. Aromatic Base: Heat coconut oil. Cook onion, then add garlic and ginger for a minute.
    2. Spice it Up: Stir in thyme, allspice, and a whole Scotch Bonnet pepper. Cook for 30 seconds.
    3. Add the Roots: Add carrots, both potatoes, plantain, and kidney beans.
    4. Get Creamy: Pour in the coconut milk and broth. Bring to a boil, then turn the heat low, cover, and simmer for 40-50 minutes until all the roots are tender. (If you want to add flour dumplings, do it during the last 20 minutes.)
    5. Serve: Take out the Scotch Bonnet pepper (be careful not to break it!). Stir in the scallions and add salt.

    Comparison: Which Stew is Best for Immune-Boosting?

    Both stews are good for you, but they help your body in different ways!

    FeatureThe Ultimate Immune-Boosting StewCreamy & Spicy Jamaican Stew
    Main Health FocusLow-fat, high in Vitamin C, anti-inflammatory (Turmeric). Great for gut and cellular health.High in diverse root vegetable nutrients, rich in healthy fats (coconut). Great for sustained energy.
    Main FlavorEarthy and warm (Cumin, Turmeric, Ginger).Rich, creamy, and spicy (Allspice, Coconut, Scotch Bonnet).
    Main LiquidBroth and Tomatoes (very light).Coconut Milk (very creamy, higher fat).
    StarchesSweet Potato and Chickpeas.Sweet Potato, Irish Potato, Plantain, and Kidney Beans.

    The Bottom Line: If your goal is a very light, low-fat meal built around maximum antioxidant power, choose The Ultimate Immune-Boosting Stew. If you need a heartier, richer meal with lots of complex starches and a taste of the Caribbean, go for the Jamaican Stew.


    How To Make It a Complete Immune-Boosting Meal

    You can make your healthy stew even better by adding the right sides!

    • Whole Grains: Serve the stew over brown rice or quinoa. These grains give you lasting energy and extra fiber, which is a great boost for your immune system’s home base (your gut!).
    • Healthy Fats: When serving, put a swirl of extra olive oil or a sprinkle of pumpkin seeds on top. These healthy fats help your body soak up the fat-soluble vitamins (A, D, E, K) that are packed in the carrots and sweet potatoes.
    • Good Bacteria: Try serving the stew with a small side of fermented foods like sauerkraut or kimchi. These foods are full of probiotics (good bacteria) that work with the fiber in your stew to keep your gut—and your immune system—in great shape.

    Kitchen Tricks to Maximize Nutrition and Increase Immune-Boosting

    Here are some pro tips to make sure you get the most out of every spoonful:

    1. Wake Up the Garlic: After you chop the garlic, let it sit on the cutting board for 5 to 10 minutes before adding it to the pot. This simple wait time lets the full amount of fighting power (allicin) develop!
    2. Use Every Drop: When cooking vegetables, many vitamins (like Vitamin C) escape into the water. If you steam any veggies before the stew, use that liquid as part of your broth. Don’t let those vitamins go down the drain!
    3. Keep the Peel: If your carrots and sweet potatoes are well-washed, leave the peel on! The peel is where a lot of the fiber and antioxidants hide.

    Frequently Asked Questions (FAQ)

    Q1: Can I make this stew in a slow cooker or instant pot?

    A: Yes! This stew works great in both.

    • Slow Cooker: Sauté your onions, garlic, and spices on the stove first for the best flavor. Then, dump everything else into the slow cooker. Cook on low for 6-8 hours or high for 3-4 hours.
    • Instant Pot: Use the Sauté button for your onions and spices. Add the rest of the ingredients, secure the lid, and pressure cook on high for 5 minutes. Let it naturally release pressure for 10 minutes before opening.

    Q2: What can I use instead of fresh parsley?

    A: If you don’t like parsley, you can use fresh dill or chives. They still add a nice, fresh flavor and give you a dose of extra antioxidants.

    Q3: How long does this stew last?

    A: The stew is excellent for making ahead! It keeps in the refrigerator for 4 to 5 days. You can also freeze it for up to 3 months. Just make sure it cools completely before you put it in a freezer-safe container.

    Q4: Is the Jamaican stew (Ital) always vegan?

    A: Yes, traditionally! “Ital” food in Jamaica is based on a natural, plant-based diet. While some modern “Jamaican stews” might include meat, an authentic Ital stew is always free of meat and processed foods.

    Q5: Can I substitute the carrots for a different root vegetable?

    A: Sure! You can use parsnips or a mix of butternut squash with your sweet potatoes. These all have similar nutrients and will absorb the powerful spice blend beautifully.


    References

    1. WHO – Vitamin A supplementation
    2. Healthline – Ginger Health Benefits: Digestion, Nausea, and More
    3. Medicalnewstoday – Garlic: Health benefits and uses
    4. Clevelandclinic – What You Should Know About Your Gut Health

    Recent Posts


    10 Amazing Ways Turmeric Can Boost Your Health

     Close-up photo showing a pile of bright yellow turmeric powder next to several freshly cut turmeric roots on a dark wooden cutting board, with sunlight streaming from a window in the background.

    I used to think spices just made food taste good. Who would have guessed that the bright yellow powder in my kitchen—the one I only used for curry—was a secret health weapon. I love finding easy, natural fixes for daily health problems. It could be fighting fatigue or getting glowing skin. After researching the facts, I learned that Turmeric isn’t a new trend. It’s a powerful, old remedy that we all need to start using the right way.


    Check your spice rack. You have a powerful secret right there! People have used it for thousands of years in Indian and Chinese medicine: Turmeric. This bright, yellow-gold root is called Curcuma longa by scientists. It gives curry its famous color and its deep, earthy taste. Turmeric is great for cooking, but its real power comes from its healing properties.

    The huge power of turmeric comes from special parts called curcuminoids. The most important one is curcumin. Curcumin is a strong plant chemical. It does amazing things, especially when fighting bad cells and stopping swelling inside your body. Most of the health benefits of turmeric are thanks to this one, very active part.

    Here is a major key: your body has trouble absorbing curcumin on its own. Your body breaks it down fast and throws it out. To get the most benefit from this golden spice, you must know how to eat it correctly. We will tell you that crucial secret soon.

    Ready to unlock the full power of this simple spice? Here are 10 great ways research proves Turmeric can give your health a major lift.


    1. Turmeric is the Best Natural Fighter Against Long-Term Swelling

    If curcumin had one super power, it would be stopping inflammation. Short-term swelling is good. It helps your body fix injuries and fight sickness. But chronic (long-term) swelling is a huge problem. Experts now believe it causes or worsens almost every major illness. This includes heart disease, cancer, diabetes, and memory loss.

    Curcumin works deep inside your cells. It blocks a key molecule called NF-kappaB. This molecule goes into your cells and turns on the genes that create swelling. By stopping NF-kappaB, curcumin basically hits the ‘stop’ button on the whole swelling process.

    Example & How to Do It:

    • How to Do It: To get this strong effect, you usually need a powerful supplement. It must include piperine (the active part of black pepper). Piperine helps your body take in the curcumin up to 2,000% better.
    • Dosage Example: Studies often use 500 mg to 2,000 mg of curcumin extract daily. This extract is usually concentrated to 95% curcuminoids. Always ask your doctor or health expert for the right dose for your needs.
    Close-up photo showing a pile of bright yellow turmeric powder next to several freshly cut turmeric roots on a dark wooden cutting board, with sunlight streaming from a window in the background.

    2. Sharpening Your Focus and Boosting Your Memory

    Years ago, scientists thought brain cells could not grow once you were an adult. We now know that’s wrong! This growth is fueled by Brain-Derived Neurotrophic Factor (BDNF). BDNF is like a fertilizer for your brain. It is vital for learning, holding memories, and keeping all your brain cells healthy.

    Low BDNF levels are linked to issues like depression and Alzheimer’s disease. Curcumin has been shown to raise the level of BDNF in your brain. This may help improve your memory and slow down the mental decline that happens with age.

    How to Do It:

    • Daily Golden Latte: Drink a “Golden Milk” or Turmeric Latte every day (see the recipe below). Always add a healthy fat, like full-fat milk or coconut oil, and a pinch of black pepper. You must use it daily to see long-term brain benefits.

    3. Protecting Your Heart by Improving Blood Flow

    Heart disease kills more people than anything else worldwide. A major reason is damage to the endothelium. This is the special lining of your blood vessels. When it is damaged, it can’t properly manage blood pressure, clotting, or other key body jobs.

    Curcumin has been proven to improve the way the endothelium works. In one important study of heart surgery patients, those who took four grams of curcumin daily before and after surgery had a 65% lower chance of having a heart attack while in the hospital.

    How to Do It:

    • Dietary Integration: Start adding turmeric to savory meals. Try it in soups, stews, and roasted vegetables. Use between a half and one teaspoon of turmeric powder daily. Add a healthy cooking oil like olive or avocado oil for better absorption.

    4. Natural Pain Relief, Especially for Joint Pain

    Curcumin is great at stopping swelling, so it makes sense that it helps fight painful conditions like arthritis. Arthritis causes swollen joints, stiffness, and pain.

    Several quality studies show that curcumin supplements can lower pain and help people move better. This applies to both osteoarthritis and rheumatoid arthritis. In some cases, it worked as well as standard pain pills, but without the risk of their side effects.

    How to Do It:

    • Supplementation: If you have ongoing joint pain, you will likely need a strong curcumin supplement. You need the high doses used in studies to feel real relief.

    5. Boosting Your Body’s Own Ability to Fight Damage

    Oxidative damage is a main cause of aging and sickness. This damage comes from free radicals. These are unstable molecules that hurt important parts of your cells, like fats and DNA.

    Curcumin is a very strong antioxidant. Its structure lets it directly stop these free radicals. Curcumin does more than just stop them. It also boosts your body’s own natural antioxidant enzymes. This gives you double protection against cell damage.

    How to Do It:

    • Turmeric Tea: Make a simple turmeric tea. Boil 1 cup of water. Add 1 teaspoon of ground turmeric (or a slice of fresh root), a squeeze of lemon, and a necessary pinch of black pepper. Drink this warm tea in the afternoon.

    6. A Promising Tool in the Fight Against Serious Illness

    We still need more studies on people, but lab tests show exciting results for curcumin against cancer. Cancer is when cells grow out of control. Curcumin has been shown to affect this process in a few ways.

    Researchers have looked at its ability to:

    • Help abnormal cells die (this is called apoptosis).
    • Slow down angiogenesis (when tumors grow new blood vessels to get food).
    • Reduce metastasis (when a tumor spreads to other body parts).

    How to Do It:

    • Include it in: Always follow your doctor’s medical advice first. But regularly adding turmeric to your daily diet is a safe, easy step toward better health. Mix it into soup bases, use it on chicken, or blend it into your vegetable sauces.

    7. Helping to Improve Your Mood and Fight Sadness

    Turmeric’s benefits even reach your mental health. Evidence suggests that curcumin may help with depression. In one study, 60 people with major depression were split into three groups. One group took an anti-depressant drug, one took curcumin, and one took both. The group that took only curcumin showed improvements just as good as the drug group.

    This mood lift is likely connected to the higher BDNF levels we talked about. It may also help increase key brain chemicals like serotonin and dopamine. These are essential for keeping your mood happy and stable.

    Example & How to Do It:

    • Mindful Dosing: If you use supplements for mood help, try splitting your daily dose into two. Take one in the morning and one in the evening. This keeps the curcumin level in your blood steady.

    8. Supporting a Healthy Stomach and Better Digestion

    Turmeric has been used for a long time to calm stomach issues. Today’s science agrees with these old uses. Its power to stop swelling helps calm irritation inside the gut. This relief is especially good for people with issues like IBS (Irritable Bowel Syndrome) and chronic gut swelling.

    Also, curcumin may help your gut microbiome. It seems to help good bacteria grow. At the same time, it makes the environment worse for bad bacteria. This leads to a better, more balanced digestive system.

    How to Do It:

    • DIY Turmeric Shots: Juice fresh turmeric and ginger root. Mix 1 tablespoon of this strong juice with a dash of black pepper and 1 teaspoon of honey. Take this shot daily for a strong stomach boost.

    9. A Natural Glow: Getting Healthier Skin

    From old ceremonies to modern beauty products, putting turmeric on the skin is famous. But eating it also helps your skin from the inside. By stopping swelling and fighting skin damage, curcumin can:

    • Help clear up acne and reduce redness.
    • Smooth out the look of fine lines and wrinkles.
    • Give your skin a much brighter, more natural look.

    Example & How to Do It:

    • DIY Face Mask: For outside use, mix 1/2 teaspoon of turmeric powder with 1 tablespoon of plain yogurt and 1 teaspoon of honey. Put it on your face for 10 to 15 minutes, then wash it off. Note: Turmeric will stain yellow! Use towels you don’t care about.

    10. Helping Your Metabolism and Managing Blood Sugar

    If you are trying to manage or avoid issues like diabetes, turmeric is a great thing to add to your diet. Studies show that curcumin can help your body use insulin better. This helps your body handle glucose (sugar) well.

    Its strong anti-inflammatory effects play a big part here, too. Long-term swelling is directly tied to insulin problems. By calming this swelling, curcumin helps your body use blood sugar more easily.

    How to Do It:

    • Consistency over Quantity: Adding small amounts to your meals every day is the best way to support your metabolism over time. Try a small pinch in your morning smoothie, your eggs, or on top of roasted vegetables.

    How to Maximize Turmeric’s Absorption: The Key Secret

    We know that your body doesn’t absorb curcumin well. To get the maximum health impact from Turmeric, follow these two critical rules:

    1. Always Add Black Pepper (Piperine): Black pepper has piperine. This natural compound is what makes all the difference. It can increase your body’s ability to use curcumin by a huge 2,000%. If you use turmeric powder in cooking, a small pinch of pepper is a must. Most quality supplements already include piperine.
    2. Combine with a Healthy Fat: Curcumin is fat-soluble. This means it dissolves in fat, not water. Eating it with a healthy fat like olive oil, coconut oil, or whole milk helps your body take it from your stomach and put it into your blood better. This is the main reason why the traditional “Golden Milk” recipe works so well.

    Recipe Example: The 3-Minute Golden Milk (Turmeric Latte)

    This is the perfect and tastiest way to get your daily dose of easily-absorbed curcumin.

    Ingredients:

    • 1 cup of your choice of milk (dairy, almond, or coconut)
    • 1/2 teaspoon of ground Turmeric
    • 1/4 teaspoon of ground ginger (optional, for extra flavor)
    • A small dash of black pepper (THIS IS A MUST for absorption)
    • 1 teaspoon of coconut oil or another healthy oil/fat
    • Honey or maple syrup to make it sweet

    Instructions:

    1. Put all the ingredients (except the sweetener) into a small pot.
    2. Whisk it without stopping over medium heat until it is hot and foamy. Do not let it boil (about 3 minutes is enough).
    3. Take the pot off the heat, strain the drink if you want it smoother, add your sweetener, and enjoy!

    Frequently Asked Questions (FAQ)

    Q1: Will I get all the health benefits just by using turmeric in my normal cooking?

    A: Using turmeric in your food is excellent for general health. But the small amounts people use in cooking have very little curcumin. To get the strong, healing effects (like reducing long-term swelling or joint pain) found in studies, you usually need a strong, specialized curcumin supplement. These are often made with piperine to help absorption. Using about 1 teaspoon of turmeric powder in your food every day is great for overall wellness.

    Q2: Is fresh turmeric root better than the dried powder?

    A: Fresh turmeric root tastes better and keeps all its natural oils. Dried powder is just the root ground up. They are very similar in nutrition. Fresh might be slightly better because it keeps more of the natural oils. The best choice is what you find easiest to use. However, for getting the highest dose of curcumin, the concentrated extracts are the strongest choice.

    Q3: Are there any side effects or risks to taking turmeric or curcumin?

    A: Turmeric as a spice is very safe. Curcumin supplements are also safe for most people, even in large doses. But large doses can sometimes cause minor stomach problems like pain or diarrhea. Curcumin can also slightly thin the blood. If you already take blood thinning medication, you must talk to your doctor before taking any supplements.

    Q4: How fast can I expect to see the health benefits of turmeric?

    A: This really depends on what issue you are trying to help and how much you are taking. If you are treating simple muscle soreness, you might feel better in a few days. For long-term problems like joint pain, it might take four to 12 weeks of using a quality supplement every day to notice real changes. Consistency is the most important thing.


    Conclusion

    Turmeric is much, much more than a yellow spice. It is a powerful root that gives you a huge number of health benefits. These benefits are mainly due to its power to fight swelling and free radicals. The compound behind this is curcumin. Whether you start drinking Golden Milk, brew a simple tea, or take a quality supplement, adding this golden spice to your life is an easy step toward a healthier and more energetic future. Start small, use it every day, and watch the ancient magic work.


    References

    1. NIH – Therapeutic Roles of Curcumin:
    2. Healthline – 10 Health Benefits of Turmeric and Curcumin
    3. Harvard Health – Turmeric benefits: A look at the evidence

    Recent Posts


    MY ULTIMATE GUIDE to Zero Waste Shopping

    A Zero Waste butcher or deli counter where a customer, wearing a black coat and carrying a cloth tote bag, hands a clean, empty glass container with a wooden lid to a smiling male staff member wearing an apron. The counter displays various cuts of meat, cheeses, and bulk olives in large glass jars, with small signs that read, "BYO Containers Welcome!"

    For years, I struggled with the guilt of overflowing bins and the endless cycle of disposable products. But then I discovered the transformative power of Zero Waste living, especially when it comes to shopping, and it completely changed my perspective and my pantry! Join me as I share everything I’ve learned to help you navigate the wonderful world of shopping smarter, not harder.


    Zero Waste Shopping Guide

    Have you ever looked at your trash can and felt bad? That big pile of plastic, cardboard, and food scraps is a clear sign of how much we buy and use. For many, the idea of “Zero Waste” living can seem too hard. It feels like something only very dedicated environmentalists do. But what if I told you that using Zero Waste ideas, especially when you shop, isn’t just possible? What if it actually makes your life easier, saves you money, and greatly helps the planet?

    This journey isn’t about being perfect; it’s about making progress. It’s about making simple choices that match your values and help create a healthier world. In this ultimate guide, we will make Zero Waste shopping easy to understand. We’ll break it down into steps anyone can use in their daily routine. Get ready to change your shopping list, your kitchen, and the effect you have on the world.


    The “Why” Behind Zero Waste Shopping: It’s More Than Just a Fad

    Before we talk about how to shop this way, let’s quickly look at why Zero Waste shopping matters. It’s more than a short-lived trend—it’s a move toward a better future.

    Every year, people create billions of tons of trash. Much of this waste ends up in landfills. There, it can take hundreds of years to break down. During this time, it leaks bad chemicals into our soil and water. Plastic is the worst offender. It pollutes our oceans, hurts animals, and even gets into our food as tiny pieces called microplastics.

    Zero Waste shopping fixes these issues. It focuses on the “5 R’s”:

    • Refuse: Say “no” to things you don’t need (like free samples or one-time-use plastics).
    • Reduce: Buy less, use less, and live with fewer things.
    • Reuse: Choose items you can use again instead of throwing them away (like bags, bottles, and jars).
    • Recycle: Properly sort and recycle things you cannot refuse, reduce, or reuse.
    • Rot (Compost): Turn food scraps and yard waste into good soil.

    By picking products with little or no packaging, choosing reusable items, and supporting green businesses, you are doing more than just buying food. You are choosing the kind of world you want to live in.


    Step 1: Clean Out Your Old Habits (and Your Kitchen!) for Zero Waste

    The first step to Zero Waste shopping isn’t buying new stuff. It’s about seeing what you already own and what you truly need.

    How to Do It:

    1. Check Your Trash: For one week, pay attention to what you throw away. What kind of packaging do you see the most? This shows you the biggest source of your waste.
    2. Clean Your Pantry: Look through your pantry, fridge, and bathroom drawers. What has expired? What do you use rarely? Give away unopened food that hasn’t expired, and plan to use up what you have. This stops food waste and shows you where you buy too much.
    3. Find Single-Use Items: Make a list of things you use once and throw away. Is it plastic wrap, paper towels, coffee pods, or plastic toothbrushes? These are the first things you will replace with Zero Waste options.

    Step 2: Get Your Zero Waste Shopping Kit Ready

    You wouldn’t go on a hike without the right gear, and Zero Waste shopping is the same. A few key items will make your store trips easy and cut down on trash.

    How to Do It:

    1. Reusable Shopping Bags: This is the simplest, but most important item. Keep some strong bags in your car, by the front door, or folded in your purse.
      • Example: Cotton canvas bags last a long time and you can wash them.
    2. Produce Bags: Stop using the thin plastic bags for fruits and veggies.
      • Example: Mesh or light cotton bags let air flow and let the clerks see the food inside.
    3. Bulk Bins and Containers: For dry items like grains, nuts, pasta, and even cleaning liquids, you need containers to fill at bulk stores.
      • Example: Glass jars (Mason jars work best), light plastic containers you already own, or cloth bulk bags.
    4. Reusable Water Bottle & Coffee Cup: Stop buying bottled water or takeaway coffee cups.
      • Example: Steel bottles and travel coffee mugs that keep drinks hot or cold.
    5. Cutlery Set & Napkin (Optional): For eating food when you are out.
      • Example: A small pouch with a fork, spoon, knife, and a cloth napkin.

    Step 3: Learn How to Buy in Bulk

    Bulk stores and sections are the main place for Zero Waste shopping. They let you buy only the amount you need, without any extra packaging.

    How to Do It:

    1. Find Your Local Bulk Store: Many normal grocery stores now have bulk bins. Special Zero Waste shops are also opening. Search online for “bulk food stores near me.”
    2. Weigh Your Containers (Tare): Before filling them, you must weigh your empty containers. This “tare weight” is removed at the checkout so you only pay for the product. Most bulk stores have a scale for this.
      • Pro Tip: Write the tare weight right on the container with a marker you can wipe off.
    3. Fill Them Up: Bring your weighed containers and fill them with what you want.
      • Example: Fill a large jar with oats, a small bag with lentils, and a different container with dish soap.
    4. Label Everything: Write down the product code (PLU) or the name of the item on your container. This makes paying much faster.
    5. Start Small: Don’t try to buy everything at once. Begin with foods you use all the time, like oats, rice, pasta, nuts, and spices.

    Step 4: Choose Produce Without Packaging

    Fruits and vegetables are naturally Zero Waste! Yet, we often see them wrapped in plastic or placed on foam trays.

    How to Do It:

    1. Pick Loose Produce: Always choose fruits and vegetables that are not wrapped.
    2. Use Produce Bags (or Nothing): Instead of plastic bags, put loose produce into your reusable produce bags. For foods with a strong peel, like bananas or oranges, you don’t need any bag at all!
    3. Shop at Farmers’ Markets: These markets are great for Zero Waste shopping. You can often buy straight from the person who grew the food. Bring your own bags and sometimes even containers for berries or herbs.
    4. Grow Your Own: To get the best Zero Waste produce, think about growing a small herb garden or a few vegetables at home.

    Step 5: Use Reusable Items for Everything

    Zero Waste shopping is not just about food. It includes all the products you bring into your house.

    How to Do It (Beyond the Food Store):

    1. Personal Care:
      • Solid Bars: Use shampoo bars, conditioner bars, and soap bars instead of liquid products in bottles.
      • Bamboo Toothbrushes: These can be composted instead of thrown away like plastic ones.
      • Reusable Razors: Razors with replaceable metal blades make much less trash.
      • DIY Products: Make your own toothpaste, deodorant, or lotions if you want to try something new.
      • Example: Refill an empty bottle with bulk lotion or shampoo at a Zero Waste shop.
    2. Cleaning Supplies:
      • Bulk Refills: Refill your empty cleaner bottles (all-purpose, laundry soap, dish soap) at bulk stores.
      • DIY Cleaners: Simple things like vinegar, baking soda, and oils can clean almost anything.
      • Reusable Cloths: Use cloth towels or old t-shirts instead of paper towels.
      • Example: Buy a strong cleaner tablet that you drop into your own spray bottle with water.
    3. Items for When You Are Out:
      • Always carry your reusable water bottle, coffee cup, and perhaps a small fork and spoon.
      • Example: When you order food to go, ask if they can put it in your own clean container (always ask first!).

    Image Placement 7: Zero-waste cleaning supplies (refillable bottles, cloths, baking soda, vinegar).

    Step 6: Smart Shopping for Meat, Dairy, and Deli Items

    While this can be tricky due to rules about food safety, there are ways to cut waste in these areas.

    How to Do It:

    1. Bring Your Own Containers: At the deli or butcher counter, ask nicely if they can put your meat, cheese, or sliced cold cuts right into your clean reusable containers. Some stores will be happy to help. Others may have store rules that say no. Don’t worry if the first place says no; try another!
      • Pro Tip: If possible, have your containers weighed empty first (tared), or ask the staff to weigh the empty container before they fill it.
    2. Buy More at Once: If you have to buy pre-packaged food, choose bigger sizes. This means less plastic for the amount of food you get.
    3. Choose Other Options: Look for plant-based options for milk (oat milk, almond milk often come in cartons that are easier to recycle than plastic jugs) and meat. Many Zero Waste shops also sell vegan cheese and other items in bulk.
    4. Milk in Glass Jars: Some companies sell milk in glass bottles that you can return to the store for a small refund.
    A Zero Waste butcher or deli counter where a customer, wearing a black coat and carrying a cloth tote bag, hands a clean, empty glass container with a wooden lid to a smiling male staff member wearing an apron. The counter displays various cuts of meat, cheeses, and bulk olives in large glass jars, with small signs that read, "BYO Containers Welcome!"

    Step 7: Food Waste: The Quiet Part of Zero Waste

    Even when we try our best, some food waste happens. The “Rot” part of the 5 R’s is very important here.

    How to Do It:

    1. Compost Your Scraps:
      • At Home: Start a compost pile in your yard or a worm bin for fruit and veggie scraps, coffee grounds, and plants.
      • Community: Check if your city picks up compost or if there are local drop-off spots.
      • Example: Many coffee shops collect old coffee grounds to use for composting.
    2. Plan Your Meals: Plan what you will cook so you use up ingredients and prevent food from going bad. This also saves you money!
    3. Store Food Well: Learn how to store food to make it last longer (like putting herbs in water or wrapping leafy greens in a damp cloth).
    4. Use Leftovers: Get creative! Turn old roasted vegetables into an egg dish or mix small amounts of leftovers into a soup.

    Step 8: Beyond the Store – Expanding Your Zero Waste Mindset

    Zero Waste shopping is a great place to start, but this way of thinking can be used in all parts of your life.

    How to Do It:

    1. Fix It, Don’t Replace It: Before buying something new, see if the old one can be fixed. Learn simple repair skills or find a local repair shop.
    2. Borrow or Rent: For tools or things you use only once in a while, ask a friend to borrow theirs or rent from a local “library of things.”
    3. Buy Used Items: Thrift stores, consignment shops, and online sites have many great clothes, furniture, and books. This gives items a second life and means less need to make new things.
    4. Think Simply: Look at your belongings often. Do you really need it? Does it make you happy? Less clutter usually means less waste later.

    Your Zero Waste Journey Starts Now

    Starting your Zero Waste journey, especially with how you shop, is a very strong step. It’s a chance to feel closer to your food, help good businesses, and greatly lower the amount of trash you create. Remember, don’t try to be perfect. Just try to make better choices all the time. Every bag you don’t take, every jar you refill, and every food scrap you compost makes a real difference.

    Start small, feel proud of your successes, and try new things. This ultimate guide to Zero Waste shopping is not a strict rulebook. It is a flexible map to a better, more helpful, and less wasteful life. Happy shopping!


    Frequently Asked Questions (FAQ) About Zero Waste Shopping

    Q1: Is Zero Waste shopping more expensive?

    A: Not really! You need to buy reusable items (jars, bags) first, which costs money. But buying in bulk often saves you a lot of money later because you do not pay for all the packaging. Also, you buy only what you need, so you throw away less food, which also saves cash.

    Q2: What if I don’t have a Zero Waste shop near me?

    A: That’s fine! Many regular stores now have bulk sections for grains, nuts, and spices. You can also focus on getting food without packaging, choosing items in glass or cardboard, and asking your local deli if they will take your containers. Farmers’ markets are also great for low-waste buying.

    Q3: How do I keep food fresh after buying it in bulk?

    A: Containers that seal tightly are your best friend! Glass jars (like Mason jars) are perfect because they are strong, clear, and easy to clean. You can also reuse plastic containers you already own. Keep food in a cool, dry place to make it last.

    Q4: Is it safe to bring my own containers to stores?

    A: Yes, as long as your containers are very clean! Most stores that allow you to bring your own containers have clear rules for safety. Always make sure your containers are spotless. The store usually has a system (like weighing them empty) to make sure only the product is weighed and handled properly.

    Q5: What are the easiest things to start with for Zero Waste shopping?

    A: Start with the simple things!

    1. Always bring reusable shopping bags.
    2. Carry a reusable water bottle and coffee cup.
    3. Choose loose produce instead of pre-packaged items.
    4. Try buying one or two bulk foods like oats or rice.The key is to keep doing it, so start with what you can handle easily!

    References


    Recent Posts


    The Essential Pantry Checklist: 20 Staples You Need Now

    A clean, organized pantry shelf filled with various sizes of airtight glass jars containing dry goods like grains, beans, and flour, illustrating an essential Pantry Checklist for a zero-waste kitchen.

    Like many of you, I started my zero-waste journey feeling completely overwhelmed. My kitchen cabinets were a chaotic mess of single-use plastic, half-used ingredients, and a nagging feeling that I was constantly contributing to landfill. I quickly learned that the secret to a sustainable, less wasteful home wasn’t buying fancy new eco-products, but simplifying my life down to a core list of truly versatile ingredients. This article is the guide I wish I had back then—a roadmap to a streamlined pantry that saves you money, cuts down on packaging, and makes sustainable living genuinely achievable. It all starts with having the right Pantry Checklist.


    A Revolution in Your Cupboard: The Zero-Waste Pantry Checklist

    For those stepping into the world of zero-waste living, the kitchen often feels like the final frontier. It is here that disposable packaging, food waste, and single-use products seem to multiply on their own. The good news? The solution is not in a complicated series of expensive swaps, but in a profound simplification. A well-stocked, zero-waste pantry is the bedrock of a sustainable home, moving beyond just food to become a source for powerful, non-toxic cleaning agents, personal care ingredients, and a host of other uses.

    This comprehensive guide focuses on the ultimate Pantry Checklist: 20 fundamental, multi-purpose staples. These are the workhorses of the zero-waste movement—ingredients that not only form the basis of countless delicious meals but can also transform into effective, plastic-free household cleaners and more. By buying these items in bulk using your own reusable containers, you can dramatically reduce your household’s plastic footprint, save money in the long run, and streamline your entire cooking and cleaning routine.


    The Zero-Waste Philosophy: Progress Over Perfection

    Before diving into the pantry checklist, remember the golden rule of zero-waste: progress, not perfection. You don’t need to ditch everything overnight. Start by using up what you already have, and only replace it with a bulk, plastic-free alternative when it runs out. Your goal is a pantry that is organised, visible, and stocked with items that serve multiple functions, thereby reducing clutter, minimizing food spoilage, and eliminating packaging waste.


    The Essential Pantry Checklist: 20 Multi-Purpose Staples

    Our list of 20 staples is divided into categories for easy stocking and use. Each item is chosen for its versatility in both the kitchen and the wider home.

    Section 1: Grains, Legumes & Bulk Powerhouses

    These form the foundation of your meals and are the easiest items to purchase in bulk.

    1. Dried Beans & Legumes (Chickpeas, Lentils, Black Beans)

    • Why they’re essential: Excellent source of protein, incredibly filling, and versatile for a variety of global cuisines. Buying dry means zero waste and maximum value.
    • How to do it: Soak overnight (for most beans) and cook in large batches.
    • Example Use (Cooking): Use chickpeas for hummus, lentil for soups/curries, or black beans for burritos/burgers.
    • Example Use (Zero-Waste Hack): The water from cooking chickpeas (aquafaba) can be whipped into a foam to replace egg whites in vegan baking (meringues, mousses).

    2. Oats (Rolled/Jumbo)

    • Why they’re essential: A breakfast staple, great for baking, and surprisingly useful for non-food applications.
    • How to do it: Store in an airtight container to prevent pests.
    • Example Use (Cooking): Oatmeal, overnight oats, or ground into a flour substitute.
    • Example Use (Zero-Waste Hack): Use oats as a soothing, natural addition to a bath soak for irritated skin (place in a muslin bag to avoid clogging the drain).

    3. Rice (Brown or White)

    • Why they’re essential: The ultimate neutral side dish, binder, and bulk filler for meals.
    • How to do it: Buy a large sack if possible and decant into multiple airtight containers.
    • Example Use (Cooking): Base for stir-fries, rice bowls, or pilafs.
    • Example Use (Zero-Waste Hack): Uncooked rice can be placed in a sock or cloth bag to create a reusable, microwaveable heating pad.

    4. All-Purpose Flour (Wheat or GF Alternative)

    • Why they’re essential: Necessary for baking, thickening sauces, and making DIY doughs.
    • How to do it: Keep in a sealed container in a cool, dark place to maintain freshness.
    • Example Use (Cooking): Bread, pasta, tortillas, or a thickening roux for gravy.
    • Example Use (Zero-Waste Hack): Combine with salt and water to make a simple, non-toxic homemade playdough.

    5. Pasta (Various Shapes)

    • Why they’re essential: A quick, universally loved meal base that stores indefinitely.
    • How to do it: Purchase from a bulk shop or in paper packaging.
    • Example Use (Cooking): Quick weeknight dinners, cold pasta salads.

    Section 2: Fats, Oils & Vinegars (The Flavour Trio)

    These are crucial for adding depth of flavour and providing natural, non-toxic cleaning power, add them to your Pantry Checklist.

    6. White Distilled Vinegar

    • Why they’re essential: An acid for cooking and an unparalleled, cheap, natural, and non-toxic cleaner.
    • How to do it: Purchase in the largest glass bottle available or refill a bottle at a bulk liquid station.
    • Example Use (Cooking): Brightens up sauces, acts as a mild preservative for pickling.
    • Example Use (Zero-Waste Hack): The ultimate all-purpose cleaner. Mix 1:1 with water in a spray bottle for streak-free windows, kitchen surfaces, and bathroom disinfection. Add citrus peels to the bottle for a week to infuse a fresh scent (see How to Do It below).

    7. Olive Oil (or other preferred cooking oil)

    • Why they’re essential: The base for most cooking, salad dressings, and seasoning and an important part in your Pantry Checklist.
    • How to do it: Look for refill stations that allow you to bring your own bottle.
    • Example Use (Cooking): Sautéing, roasting, dipping, and dressing.
    • Example Use (Zero-Waste Hack): Mixed with vinegar and a few drops of essential oil (like lemon), it makes an excellent, natural wood furniture polish.

    8. Salt (Sea Salt or Himalayan)

    • Why they’re essential: The most basic and necessary seasoning, plus a fantastic scrubber and deodorizer.
    • How to do it: Buy in bulk bags and store in a durable container or salt pig.
    • Example Use (Cooking): Seasoning all meals.
    • Example Use (Zero-Waste Hack): Use a paste of salt and lemon to scrub and naturally disinfect wooden cutting boards, or use it to scour pots and pans.

    9. Baking Soda (Bicarbonate of Soda)

    • Why they’re essential: A leavening agent for baking and a powerhouse for cleaning, deodorizing, and mild scrubbing.
    • How to do it: Buy the largest box or bag possible and store it in an airtight jar to prevent it from absorbing odours.
    • Example Use (Cooking): Used in baking recipes to create rise.
    • Example Use (Zero-Waste Hack): Place an open container in your fridge to absorb odours. Use as a gentle abrasive scrub for sinks and tubs. Mix with vinegar for a powerful, non-toxic drain cleaner.

    Section 3: Flavour Enhancers & Spices

    Spices are vital for delicious food and often contain natural properties useful in the Pantry Checklist.

    10. Black Peppercorns

    • Why they’re essential: Universal seasoning.
    • How to do it: Buy whole peppercorns in bulk and grind fresh.

    11. Herbs & Spices (Choose 3-5 key ones, e.g., Oregano, Cumin, Chilli Powder)

    • Why they’re essential: Adds complexity and variety to simple base meals.
    • How to do it: Buy small amounts in bulk (just what you’ll use in 6 months) to ensure freshness. Store in small, labelled, airtight jars away from heat and light.

    12. Garlic Powder & Onion Powder

    • Why they’re essential: Quick flavour for when fresh is unavailable or you need a deeper, more mellow flavour.
    • How to do it: Same bulk rules as other spices.

    13. Nutritional Yeast

    • Why they’re essential: A key vegan staple that adds a cheesy, umami depth to dishes.
    • How to do it: Buy in bulk.
    • Example Use (Cooking): Vegan ‘cheese’ sauces, dusting on popcorn.

    Section 4: Sweeteners & Liquids

    Essential for flavour balance and can be used to make homemade wellness products, add these to your Pantry Checklist.

    14. Sugar (Granulated or Coconut Sugar)

    • Why they’re essential: Sweetener for baking and beverages.
    • How to do it: Buy in bulk and ensure a completely dry, airtight seal to prevent clumping.
    • Example Use (Zero-Waste Hack): Mix with a small amount of oil to create a simple, invigorating body scrub.

    15. Pure Maple Syrup or Honey

    • Why they’re essential: Natural sweetener. Choose honey for its medicinal properties.
    • How to do it: Buy in glass jars. Look for local honey/syrup to reduce transit impact.

    16. Dried Fruit (Raisins, Apricots)

    • Why they’re essential: Healthy snack, natural sweetener for baking, and great for adding texture to oats or trail mix.
    • How to do it: Bulk buy.

    17. Dried Nuts & Seeds (Almonds, Sunflower Seeds)

    • Why they’re essential: Snack, baking ingredient, and base for homemade nut butter or plant milk.
    • How to do it: Bulk buy and store in the fridge or freezer to prevent them from going rancid (which is a common issue with nuts).
    • Example Use (Zero-Waste Hack): The leftover pulp from making nut milk can be dehydrated and ground into flour.

    Section 5: Multi-Use Kitchen & Home Staples

    These final three on the Pantry Checklist are the ultimate multi-taskers for the kitchen and cleaning arsenal.

    18. Lemon/Lime (Fresh or Dried Citrus Peels)

    • Why they’re essential: Flavour enhancer, source of Vitamin C, and a natural disinfectant.
    • How to do it: Always keep a few fresh, or collect and dry the peels.
    • Example Use (Cooking): Juice for dressings, zest for flavouring.
    • Example Use (Zero-Waste Hack): Rubbing a cut lemon over a chopping board helps sanitise and deodorise it. Citrus peels are essential for infusing cleaning vinegar (see How to Do It below).

    19. Castile Soap (Liquid or Bar)

    • Why they’re essential: While technically a specialty item, it’s a necessary, highly concentrated, vegetable-based, biodegradable soap that replaces nearly every cleaning and body product.
    • How to do it: Buy the largest size bottle or a large bar.
    • Example Use (Zero-Waste Hack): Diluted for hand soap, dish soap, laundry detergent, body wash, and even a mild pest repellent for plants.

    20. Coffee Grounds/Used Tea Bags

    • Why they’re essential: The ultimate “waste” that still has plenty of life left.
    • How to do it: Collect in a designated jar or compost caddy.
    • Example Use (Zero-Waste Hack): Used coffee grounds are fantastic for composting, deodorizing the fridge (if dry), or mixing with oil as a DIY cellulite scrub. Used tea bags can be used to deodorize smelly shoes.

    How to Do It: Zero-Waste Pantry Storage & Application

    Transitioning your pantry requires a system. Here is a step-by-step guide on how to implement the zero-waste mindset for a Pantry Checklist.

    Step 1: The Container Overhaul (Image Placement 7)

    You don’t need to buy new containers! Reuse, Repurpose, and Thrift.

    • How to do it: Save all your old glass jars (pasta sauce, pickles, jam). Wash them thoroughly, remove labels (soak in hot, soapy water, then scrub off residue with a paste of baking soda and oil). These are your new bulk storage containers.
    • Pro Tip: Uniformity is nice, but function is better. Make sure the lid creates an airtight seal to keep pests out and freshness in.

    Step 2: The Shopping Protocol

    • How to do it: Before you shop, take an inventory of what you need from your Pantry Checklist. Pack your reusable containers and produce bags.
    • The Tare Weight: When shopping in a bulk store, you must get the tare weight (the weight of your empty container) recorded before filling it. This weight is subtracted at the till so you only pay for the product you’ve added.
    • Pro Tip: Start small. Only buy a few weeks’ worth of a new bulk item to ensure you like it and will use it up before it goes stale.

    Step 3: Mastering the Multi-Use Staples

    Here are two essential recipes that use your Pantry Checklist items for zero-waste cleaning:

    A. All-Purpose Citrus-Infused Vinegar Cleaner

    • What you need (from the list): White Distilled Vinegar (No. 6), Lemon/Lime Peels (No. 18).
    • How to do it:
      1. Fill a jar about half to three-quarters full with fresh citrus peels (lemon, orange, grapefruit—any you have saved).
      2. Pour White Distilled Vinegar (No. 6) over the peels until the jar is full. Seal it.
      3. Store in a cool, dark place for 2-4 weeks. The vinegar will absorb the citrus oils and scent.
      4. Strain the liquid and discard the peels (compost them).
      5. To use, mix the infused vinegar with water in a 1:1 ratio in a spray bottle.

    B. Non-Toxic Drain Declogger

    • What you need (from the list): Baking Soda (No. 9), White Distilled Vinegar (No. 6), Boiling Water.
    • How to do it:
      1. Pour $1/2$ cup of Baking Soda (No. 9) down the clogged drain.
      2. Follow immediately with $1/2$ cup of White Distilled Vinegar (No. 6).
      3. Cover the drain and let the fizzing reaction work for about 30 minutes (this is the key to dissolving the gunk).
      4. Flush the drain with a pot of boiling water.

    The Zero-Waste Pantry and Food Waste Reduction

    A well-stocked pantry is your best weapon against food waste. When you can clearly see what you have, you are far less likely to overbuy or let perishable food spoil, this Pantry Checklist will help you get organized.

    Example: The Scrap Revolution

    • How to do it: Keep a large glass jar or silicone bag in your freezer and toss in vegetable scraps (carrot ends, onion peels, celery leaves, mushroom stems) and herb stems.
    • The Payoff: Once the container is full, simmer the scraps in a large pot of water for a few hours with a pinch of Salt (No. 8) and Black Peppercorns (No. 10) to create a deeply flavourful, zero-cost vegetable stock. You can then use this stock as a base for almost any soup, rice dish, or sauce, maximizing the use of every single food item.

    Frequently Asked Questions (FAQ)

    Q1: How do I deal with pests like pantry moths and weevils in my bulk items?

    A: Prevention is key! Always store dry goods (grains, flours, nuts) in completely airtight glass or metal containers (not plastic or fabric bags). Before storing, some people freeze new bulk grains and flours for 48-72 hours to kill any potential eggs. If you get an infestation, immediately discard the contaminated food in a sealed compost bag outside, clean the area thoroughly with White Distilled Vinegar (No. 6), and store new items with a bay leaf tucked inside the container—pests hate the smell.

    Q2: I don’t have access to a bulk store. Can I still do a zero-waste pantry?

    A: Absolutely. While bulk is ideal, you can focus on reducing plastic waste. Look for items packaged in paper bags (Flour, Oats, Salt), cardboard (Pasta), or glass/metal (Oils, Honey). Prioritize items you use most often for the highest-impact swaps. Consider coordinating with neighbours for a large online order of staple items packaged in paper or biodegradable materials to reduce packaging per unit.

    Q3: Is it safe to use vinegar-based cleaners on all surfaces?

    A: No, be cautious. While highly effective, the acidity of White Distilled Vinegar (No. 6) can etch or dull natural stone surfaces like granite, marble, and soapstone over time. For these surfaces, a solution made with diluted Castile Soap (No. 19) and water is a safer, non-acidic alternative. Always test a small, inconspicuous area first.

    Q4: How do I store fresh produce zero-waste without plastic?

    A: Use cotton mesh bags for non-leafy produce. Leafy greens stay fresh longer when wrapped in a damp cotton tea towel (or “unpaper towel”) and stored in the crisper drawer of your fridge. Root vegetables should be stored in a cool, dark place with good air circulation (like a paper bag or basket) outside the fridge.

    Q5: How do I make the switch to a zero-waste pantry affordable?

    A: Focus on the staple ingredients that replace high-waste, pre-packaged foods and cleaners. Buying dried Beans & Legumes (No. 1), Oats (No. 2), and Rice (No. 3) in bulk is significantly cheaper than buying canned or pre-made versions. Making your own cleaner with Baking Soda (No. 9) and Vinegar (No. 6) costs pennies compared to brand-name solutions. The initial investment in a few good containers will be recouped quickly through these savings.


    References


    Recent Posts