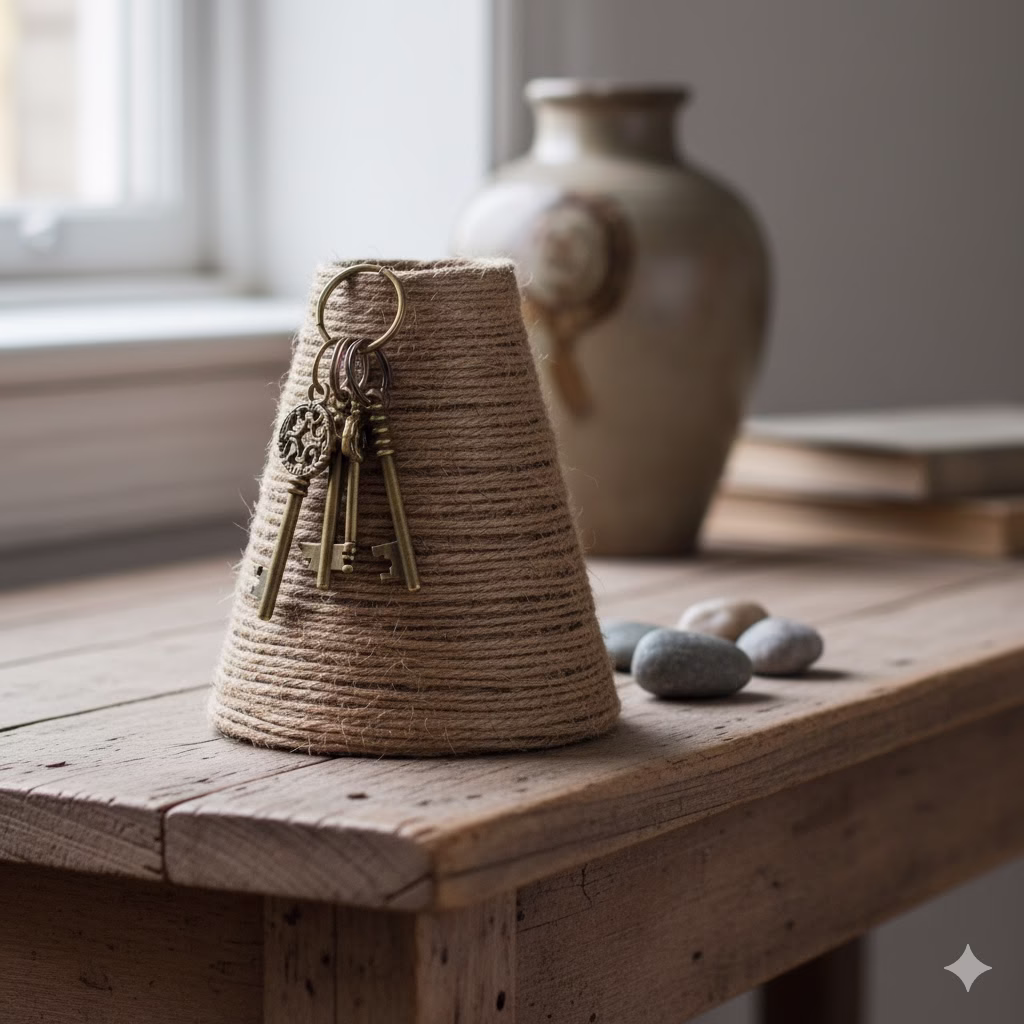
Like many people, my junk drawer is a fascinating repository of forgotten things, from spare buttons to that collection of beautiful, mysterious old keys that no longer open anything. I’ve always felt a twinge of guilt tossing them out, knowing each one holds a silent history. This project was born from the desire to honor that past, combining a love for rustic decor and the satisfying chime of a homemade wind chime. Join me in transforming these rusty relics into pieces of functional, shabby chic art.
I. Introduction: The Charm of Repurposing
In the world of decor, nothing speaks to warmth and character quite like the shabby chic style. It is a look defined by aged elegance, soft textures, and the beautiful patina of time. One of the most satisfying elements of this style is its reliance on repurposing—taking forgotten objects and giving them a new, elevated purpose. Among the most evocative and plentiful items for this kind of transformation are old, mismatched old keys.
We all have them: those rusty, ornate, heavy brass or iron keys that have been relegated to the bottom of a bowl or a drawer. They are beautiful relics, heavy with implied history, but ultimately useless in their current state. This article will guide you through a truly rewarding project: turning those discarded Old Keys into enchanting DIY wind chimes.
Not only is this a sustainable and cost-effective way to decorate, but the resulting sound—a delicate, rustic clink instead of the standard tubular ringing—is uniquely charming. We will focus specifically on two distinct designs, directly inspired by the two images provided, allowing you to choose the look that best suits your home or garden. This is a perfect Wind chimes Craft for beginners and experienced crafters alike.
II. Gathering Your Materials: The Essential Toolkit
Before diving into the “how-to,” a well-stocked workspace is crucial. For both styles of wind chimes, the required materials are largely the same, differing only in the selection of the main top piece.
A. Core Materials (For Both Chimes)
- Old Keys: This is the heart of the project. Aim for a mix of sizes and metal types (iron, brass, or mixed metals) for a varied sound and texture. The older and rustier, the better for that authentic shabby chic appeal.
- Twine/Jute Cord: Natural fiber twine is the ideal choice for its rustic texture, which perfectly complements the aged metal of the keys. Avoid synthetic string, as it looks out of place and can be less durable when exposed to the elements.
- Drill and Small Drill Bit (Optional but Recommended): While most old keys have large loops (bows) for stringing, you may need a small bit to drill holes into the wooden top piece. Always use caution when drilling, especially into wood.
- Strong Craft Glue/Epoxy (Optional): Useful for securing knots or attaching decorative elements.
- Scissors/Craft Knife: For cutting the twine.
- Sealing Spray (Optional but Recommended): A clear matte sealant (like polyurethane spray) to protect the wood and slow down further rust/aging on the keys if the chime will be placed outdoors.
B. Specific Materials for Design A: The Circular, Painted Chime
This design features a clean, circular wooden base with a distressed, painted finish.
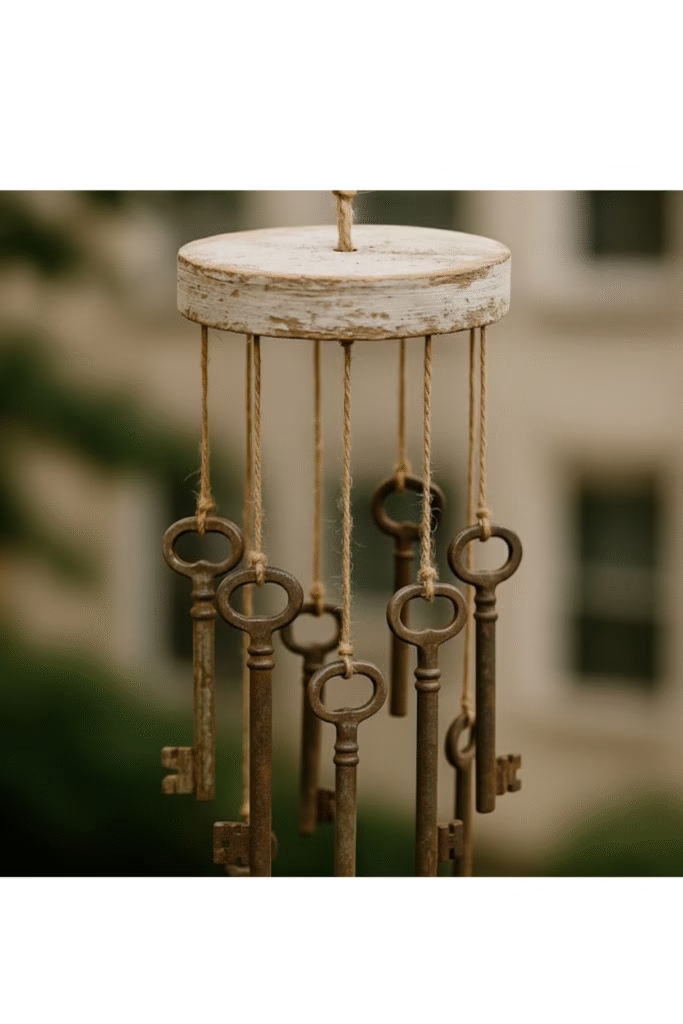
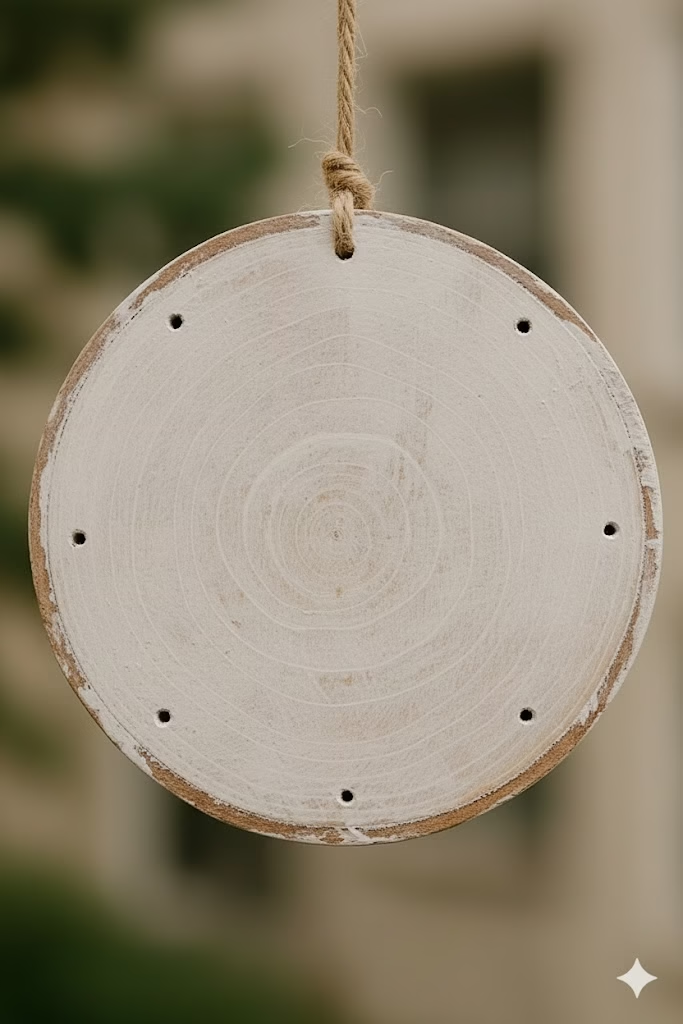
- Top Piece: A circular wood slice or a pre-cut wooden coaster/plaque. A diameter of about 4-6 inches is ideal for supporting 7-9 keys.
- Paint: White or light beige chalk paint or distressed acrylic paint.
- Sandpaper: Medium-grit (around 120-180) for distressing the painted finish.
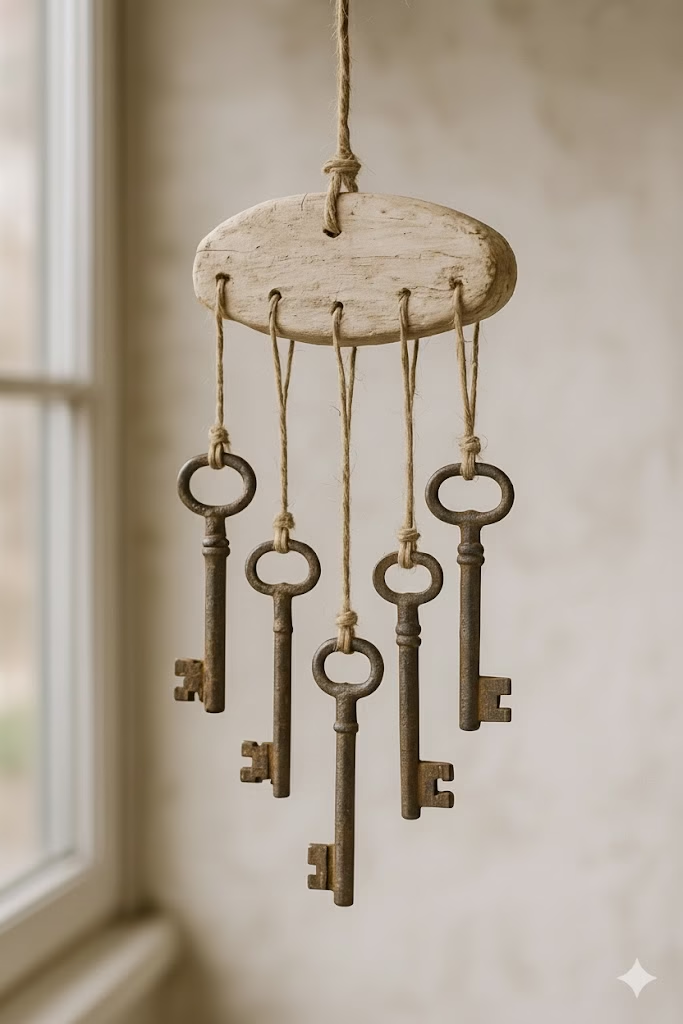
C. Specific Materials for Design B: The Oval, Natural Chime
This design highlights the natural grain and shape of the wood for a more purely rustic look.
- Top Piece: A flat piece of driftwood, a naturally tumbled wooden oval, or a sanded, smooth plank with rounded edges. The shape should be roughly oval or oblong, about 6-8 inches long.
- Wood Stain/Wax (Optional): If the wood is too new or light, a light coat of natural stain or a clear furniture wax can deepen the tone and protect it without concealing the grain.
III. The Transformation: Preparing Your Components
The shabby chic aesthetic is built on layers of wear and age. You may need to artificially enhance this look before assembly.
A. Prepping the Keys
If your keys are already beautifully aged and rusted, you can skip this step. However, if they are modern, shiny keys, you will need to give them a vintage makeover.
- Cleaning (Lightly): Wipe away any excessive dirt or grime, but do not aggressively clean the keys. The goal is to retain the patina.
- Creating Rust (For New Keys): Place new keys in a plastic container with a mixture of vinegar and salt. Let them soak for a few hours, then remove, rinse lightly, and place them outside to air dry. The combination of salt, acid, and air will accelerate the rusting process.
- Matte Finish: If you wish to protect the old keys from excessive further rust (especially if handling them often), a quick, thin spray of matte clear coat will help stabilize the existing finish.
B. Prepping the Wooden Top Pieces
The wood piece is the foundation and sets the tone for the entire chime.
For Design A (Circular, Painted)
- Paint Base: Apply one or two thin coats of chalk paint (white or off-white) to the wood slice. Ensure the paint covers the surface but does not fill the natural grain or texture too heavily. Allow to dry completely.
- Distressing: Once dry, take your medium-grit sandpaper and lightly sand the edges and high points of the wood. Focus on areas where natural wear would occur. The goal is to let the raw wood peek through the paint, giving it that characteristic “chippy” and aged look.
- Sealing: Apply a very thin layer of clear wax or a matte sealant spray.
For Design B (Oval, Natural)
- Sanding/Shaping: If you are using a raw piece of wood, sand the edges until they are rounded and smooth. If using driftwood, a light brushing to remove loose debris is sufficient.
- Natural Finish: Apply a coat of wood wax or natural oil if desired, or simply leave the wood untreated for the most authentic rustic look.
IV. Detailed Assembly Guide: Creating the Two Wind Chime Styles
The assembly process requires precision in spacing and knot tying to ensure the chime hangs straight and the old keys can tap against each other effectively.
A. Assembly for Design A: The Circular Chime
This design creates a dense, full chime by arranging the keys in a neat circle.
- Marking and Drilling:
- Find the exact center of the circular wood piece and mark it—this is for the main hanging cord.
- Next, mark the spots for your keys. For a standard 5-inch circle with 8-9 keys (as shown in the image), mark points evenly around the outer edge, approximately half an inch in from the rim. Use a small ruler or a compass to ensure the spacing is consistent.
- Carefully drill small pilot holes through the marked spots. The holes only need to be large enough to thread the twine through easily.
- Attaching the Keys:
- Cut your twine pieces. For a varied look, cut the strings to different lengths (e.g., ranging from 10 to 18 inches).
- Thread one end of a twine piece through the bow (the loop) of an Old Keys.
- Tie a secure, tight double knot just above the key bow. Ensure the knot is pulled taut so the key hangs straight.
- Thread the unknotted end of the twine up through one of the small holes in the wooden circle.
- Adjust the string length from the top until the key hangs at the desired height. Varying the key heights is key to achieving a good “tinkle” when the wind moves the chime.
- Tie a knot or a loop on the top side of the wooden circle to secure the string at that desired height. You can add a dab of craft glue to the knot on the top surface to prevent slipping.
- Repeat this process for all your keys, ensuring the lengths are varied yet balanced visually.
- Creating the Hanger:
- Cut a long piece of twine (about 3 feet).
- Fold it in half and thread the loop end down through the center hole of the wood slice.
- On the underside of the wood slice, use the two ends of the string to create a strong loop or knot. Alternatively, tie a large, decorative knot on the underside to prevent the string from pulling through.
- The loop at the top is what you will use to hang the finished wind chime.
B. Assembly for Design B: The Oval Chime
This design is simpler, focusing on fewer keys hanging straight down from an organically shaped piece of wood.
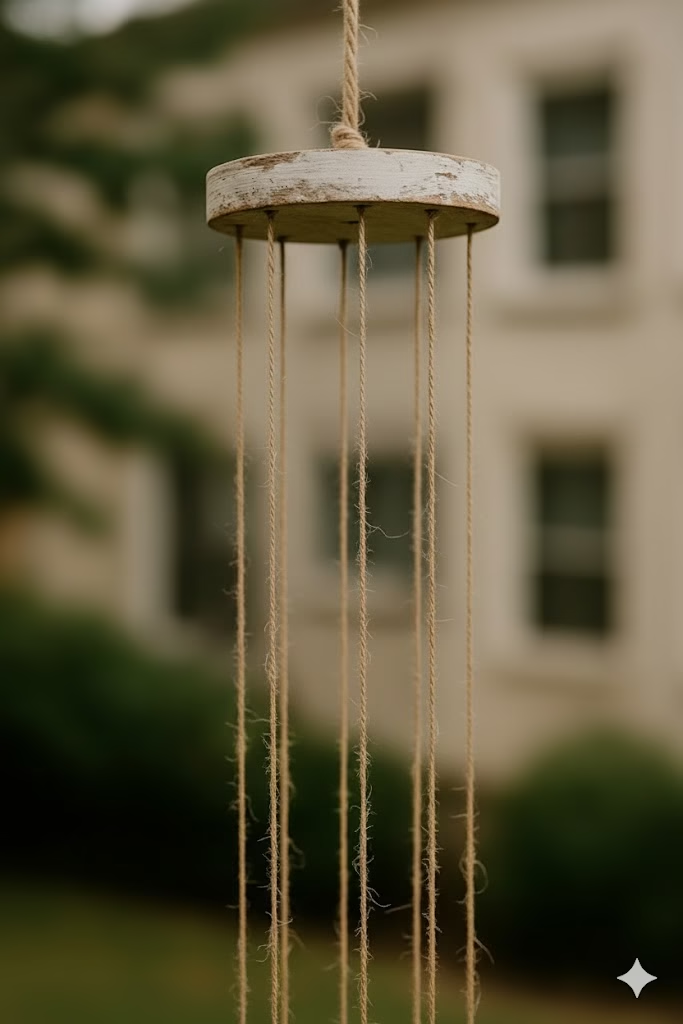
- Marking and Drilling:
- Examine your oval wood piece. Determine the best orientation for hanging (usually lengthwise).
- Mark the center point along the top edge—this is for the main hanger.
- Mark the points for the keys. For the five keys shown in the image, mark five evenly spaced points along the bottom edge of the oval.
- Drill small pilot holes through all the marked spots.
- Attaching the Keys:
- The keys in this design are hung relatively straight and at similar lengths, giving it a clean, minimalist feel. Cut five pieces of twine to roughly the same length (e.g., 10-14 inches).
- Tie the twine to each Old Keys bow with a secure double knot.
- Thread the string up through the corresponding holes on the bottom of the oval wood piece.
- As before, adjust the key height so the keys hang straight and are close enough to tap each other.
- Tie secure knots on the top surface to hold the keys in place. Again, a small dab of glue can add extra security.
- Creating the Hanger:
- Unlike the circular chime, the oval chime has two distinct hanging points to prevent it from spinning excessively.
- Measure the distance between the two outermost keys. Cut a piece of twine slightly longer than that distance.
- Tie this piece of twine securely to the strings of the two outermost keys (on the top side of the wood). This forms a hanging bridge.
- Now, attach a single long piece of hanging twine to the center of this bridge. This will ensure the chime hangs level and is less prone to tilting.
V. Customization and The Shabby Chic Finish
The difference between a simple craft project and a piece of shabby chic decor often comes down to the finishing touches.
A. Enhancing the Chime Sound
The clinking sound of metal keys is inherently pleasant, but you can enhance it:
- Vary the Weight: Use a mix of heavy cast iron keys (for a deep clunk) and lighter brass keys (for a delicate tinkle). The contrast of materials enhances the musicality of your DIY wind chimes.
- The Clapper: For a more active sound, consider adding a clapper (the piece that strikes the keys) underneath the wooden base. A small, distressed wooden bead or a slightly heavier, decorative Old Keys can be suspended below the other keys. This central piece ensures that even in light breezes, the chime is activated.
B. Incorporating Themed Elements
To lean further into the Shabby Chic look, consider adding small, non-key elements:
- Beads: Small, antique-style wooden beads or rustic glass beads can be strung along the twine above the keys for visual interest.
- Lace/Ribbon: Tie small, frayed pieces of off-white lace or linen ribbon onto the twine near the top piece. This adds softness and texture, a hallmark of the shabby chic style.
- Found Objects: Attach other small, weathered metal objects alongside the old keys, such as old washers, small metal tags, or even vintage buttons with metal shanks. This adds an extra layer of interest to your Wind chimes Craft.
VI. Placement and Maintenance
A. The Best Location for Your Chime
The location you choose will impact the chime’s longevity and performance.
- Wind Exposure: Place the chime in an area that receives a gentle, consistent breeze. Too strong a wind can tangle the keys or cause them to strike the supporting structure. A covered porch, near a window, or under an eave is often ideal.
- Visual Appeal: The keys are beautiful, so ensure the chime is placed where it can be admired. The contrast between the dark, rustic keys and a light background (such as a pale wall or window frame) is particularly striking.
- Indoors: These chimes are also lovely indoors, hung near a window or door that is often opened, creating a delicate, unexpected sound when the air moves.
B. Long-Term Care and Maintenance
Even with a protective sealant, the elements will eventually affect your chime, which is part of the charm.
- Rust and Patina: Embrace the gradual rusting of the iron keys. It only enhances the shabby chic look. If you notice excessive rust bleeding onto the wooden top, simply wipe the wood with a damp cloth and reapply a thin coat of wax or sealant.
- Twine Deterioration: Over time, natural twine will degrade, especially when exposed to rain and sun. Periodically inspect the knots and strings. If a cord looks frayed or weak, simply cut the key down, replace the length of twine, and re-tie it. This is a very easy fix for any DIY wind chimes.
VII. FAQ
Q: Where is the best place to find Old Keys for this project?
The best places to search for good quality Old Keys are flea markets, antique shops, garage sales, and online marketplaces. You can often buy them in large, inexpensive lots. You may also find that friends and family have a forgotten bowl of old, useless keys they would be happy to donate.
Q: Will these wind chimes make a loud sound?
No. Unlike the high-pitched ringing of tubular metal wind chimes, these DIY wind chimes produce a much softer, more muted sound. The clinking of the solid, heavy keys creates a delicate, rustic ‘tinkle’ or a gentle, low-pitched ‘clunk,’ which is very relaxing and non-intrusive.
Q: How can I ensure the keys are spaced correctly so they actually make noise?
The keys need to be close enough to touch easily in a light breeze. When hanging the keys, ensure the widest point of the key next to it is only about an inch or less away. The varying lengths of the strings are crucial; by setting keys at different heights, you guarantee they have the vertical space to swing into each other.
Q: Can I use wire instead of twine?
Yes, you can use wire, but it will significantly change the aesthetic. Using metal wire, especially copper or brass wire, will make the chime look more industrial or steampunk rather than truly shabby chic. Natural jute or hemp twine is highly recommended to maintain the soft, rustic, and weathered look that defines the shabby chic style.
Q: How long does a project like this typically take?
Once you have gathered your materials, this project is relatively fast. The preparation (drilling, painting, distressing) might take a few hours, factoring in drying time. The actual assembly and stringing of the keys usually only takes about an hour or two, making it a perfect weekend Wind chimes Craft.
VIII. Conclusion
Transforming a handful of forgotten Old Keys into a melodic piece of home decor is one of the most satisfying acts of repurposing a crafter can undertake. The beauty of this Wind chimes Craft lies not only in its simplicity but in the character it adds to your space. Each chime whispers a story of the past, now ready to sing a new, gentle tune on your porch or in your sunroom. By following these steps for either the circular, painted Design A or the natural, oval Design B, you will have created a charming, unique piece of shabby chic art that will be treasured for years to come.
Reference Section
The following sources provide background on the techniques and aesthetic principles used in this article:
- Vgradneomare – Shabby Chic Room Decor
- Bluefoxfarm – How to Make Metal Look Old
- Instructables – How to Make Rope / String With Natural Plant Fibers
Recent Posts