Cookie Consent by Free Privacy Policy Generator Update cookies preferences

10 Pom Pom Decor Ideas You’ll Love

    Query successful

A cozy living room featuring various DIY pom pom decor projects. A fireplace mantel is adorned with a long garland of mustard, green, and cream pom poms, flanked by two hoop wall art pieces made of dense pom poms. A sofa has pillows trimmed with pom poms, and a basket on the coffee table holds folded blankets decorated with colorful poms.

This piece was crafted by a dedicated team of home decor enthusiasts passionate about accessible, budget-friendly design. Our mission is to inspire readers to embrace creativity and inject personality into their living spaces through simple, engaging DIY projects. We believe that true comfort comes from handmade touches. We also think stylish pom pom decor should be achievable for everyone, regardless of skill level. This guide shows how one simple craft supply can completely revolutionize your home’s aesthetic. It adds a touch of playful sophistication.


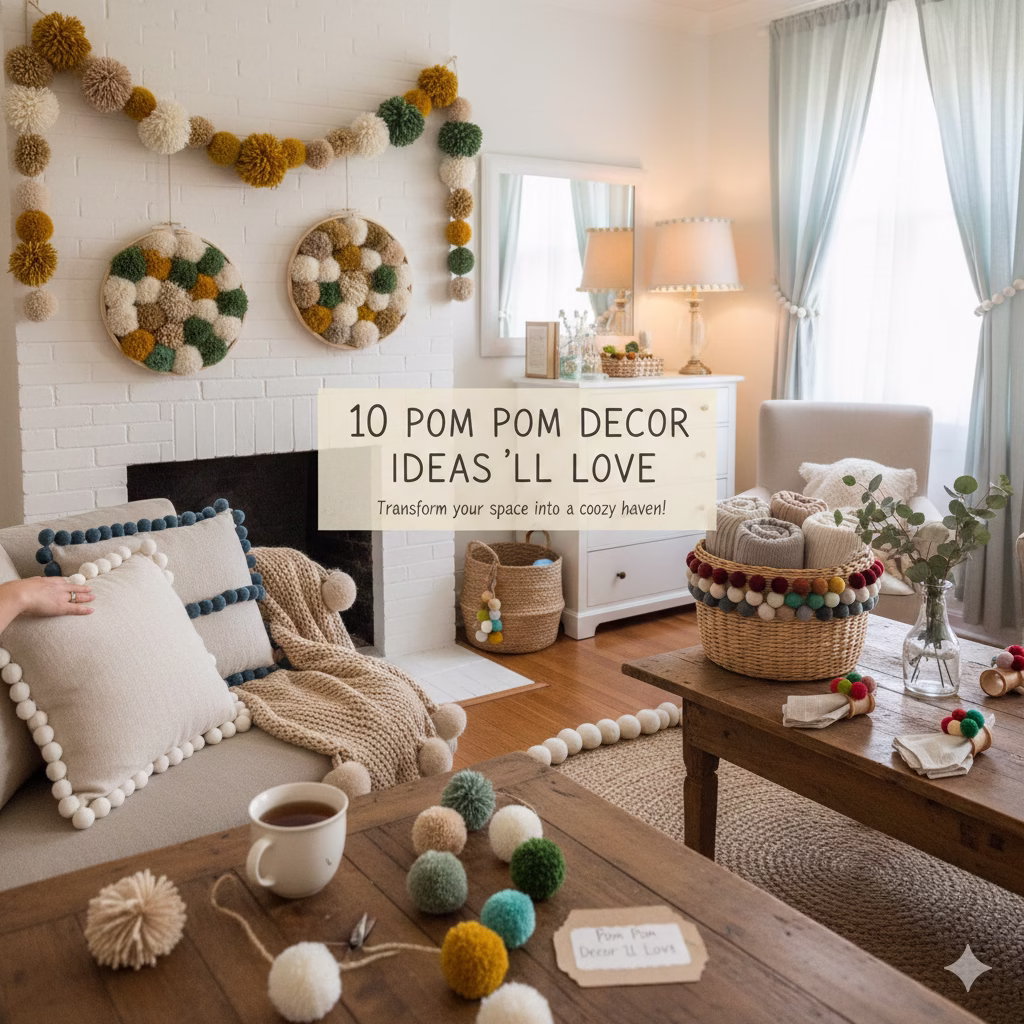
Embracing the Softness: Pom Pom Decor for Your Home

We all want a truly cozy and inviting home. This desire often makes us look closely at textures. Nothing else compares to the immediate warmth and soft feel that plush elements bring into a room. The humble, fluffy pom pom is one of the most charming and useful of these elements. You can easily make pom poms from scrap yarn. They need very little money to create. Pom poms are a powerful tool for adding personality, fun, and comfort to any decorating style.

Your style might be simple Scandinavian. It might be bohemian and trendy. Or maybe you just want maximum coziness. You can use these soft, round shapes to change a cold room into a warm, safe place. You can add fun details to useful items. You can also create entire show-stopping pieces. The ways you can use Pom Pom Decor are almost endless. This guide will walk you through a series of creative projects. These projects are easy to do. They are designed to bring softness and handmade charm into every part of your home. Get ready to enjoy the fluff. Discover ten wonderful ways to use this charming texture in your interior design plan.


Section 1: Wall Art and Garlands

Wall decor is usually the first place we try to make a space personal. Pom poms offer a fresh, different choice compared to framed pictures or normal canvases. They give a room depth and a three-dimensional look. This quality makes any plain wall better.

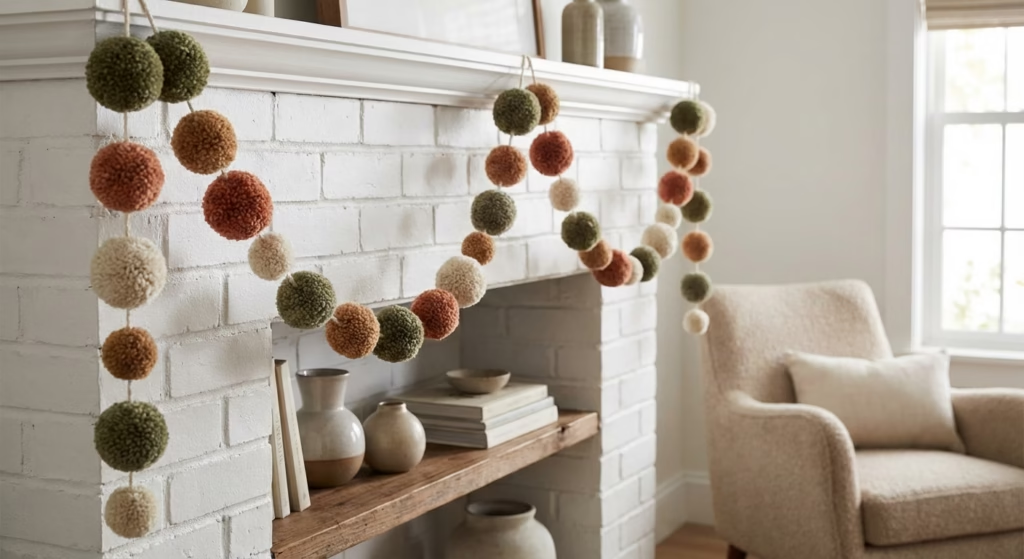
Project Idea One: Statement Wall Garland

A pom pom garland is the easiest way to start this kind of decor. Don’t just string together poms that all look the same. Make the idea better by mixing different sizes and textures. Use very thick yarn for large, eye-catching poms. Use thin, delicate thread for tiny accent poms. Drape a long garland over a window frame. You can put it above a bed. You can also hang it along a fireplace mantle. This instantly makes the room’s straight lines feel softer. Try mixing neutral colors like cream and gray with a few bright colors. This helps connect the garland to your other items.

Project Idea Two: Dimensional Hoop Art

Start creating a pom pom hoop for a wall art piece with more structure. Use an embroidery hoop. The bigger the hoop, the better. You won’t fill the center with fabric. Instead, attach a complex design of poms right onto the inner ring. You can choose to completely cover the hoop. This makes it look like a dense wreath. Or you can leave some space open. This lets the wall color show through. It makes the poms seem to float. This method is a great way to create a piece that is visually strong and personal. It will be totally unique to your home.


Section 2: Cozy Textiles and Throw Accents

Textilesโ€”like cushions, throws, and blanketsโ€”are the most important parts of a cozy room. Adding pom poms to these items is a fast way to make basic, store-bought pieces look better. It gives them a high-quality, custom finish.

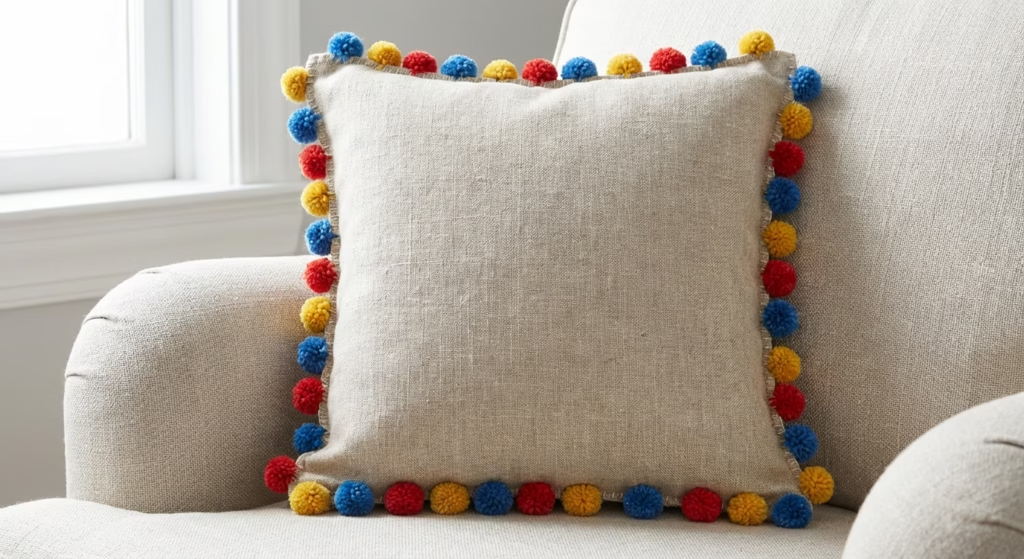
Project Idea Three: Cushion Trim

You can instantly change a plain throw cushion into a standout piece. Just add a border of small or medium-sized pom poms. Simply buy trim that already has pom poms on it. Then, sew or glue it along the edge of the cushion cover. For a truly unique look, make your own poms. Place them close together all the way around the cushion’s edge. This technique adds fun movement. It gives a lovely, soft feel that makes people want to relax. Use colors that clash for a bold effect. Or use similar colors for soft texture.

Project Idea Four: Blanket and Throw Embellishment

Take a blanket made of solid-colored knit or fleece. Turn it into a beautiful, textured masterpiece. Attach large, fluffy poms. Perhaps make them four to six inches wide. Place them on the corners of the blanket. Or, for a more detailed look, attach smaller poms evenly along the top and bottom edges. This simple change makes an ordinary throw look like an item from a fancy store. It looks handcrafted. It is perfect for laying over a sofa or at the bottom of a bed.


Section 3: Functional Storage and Organization

Decorating is not just about looks. It is about making useful items beautiful. Pom poms can add a soft, whimsical feel to everyday storage items. This can make tidying up a little more pleasant.

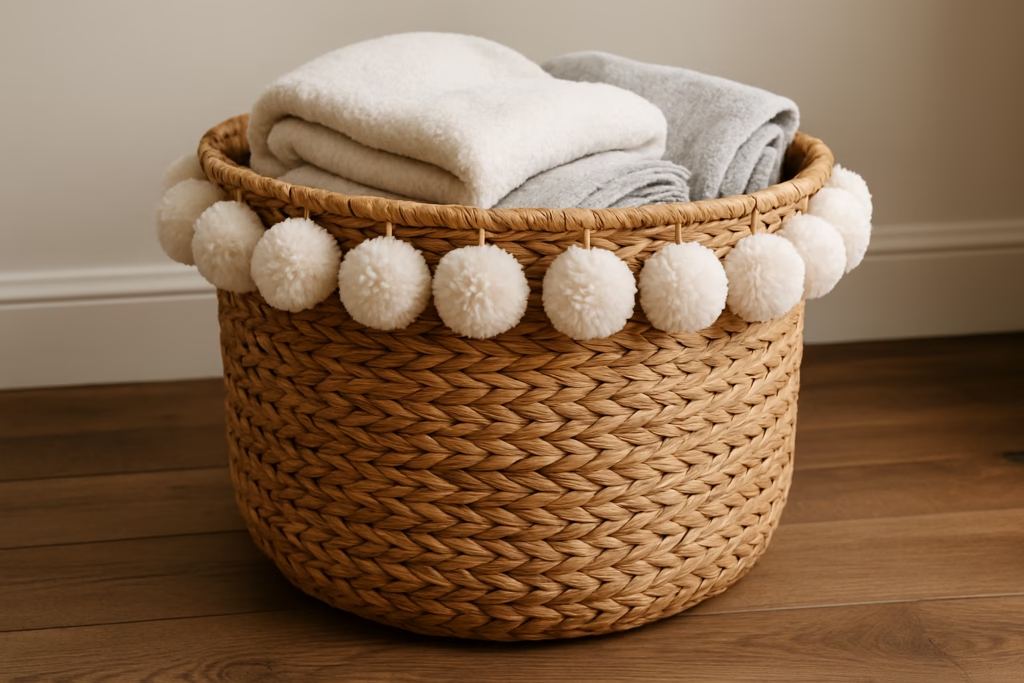
Project Idea Five: Basket Enhancement

Woven baskets are key for home organization. They are stylish holders for throws, toys, or craft supplies. To make them fit a softer look, weave or attach pom poms to the basket rim or sides. Create a colored band of poms around the top edge. Or attach a bunch of very large poms to the handle loops. This simple addition changes a plain item into a beautiful, textured decor piece. It fits well with the rest of your cozy furnishings.

Project Idea Six: Door Knob Tassels

Create a pom pom tassel for a quick, charming decor touch. Hang it from door knobs or cabinet pulls. These are different from traditional tassels. They offer a soft, rounded shape. Tie a group of small poms onto a single ribbon or piece of twine. Hanging these on furniture or doors that you use often adds a fun, soft surprise of color. It makes a regular doorway feel inviting. They are also excellent for personalizing the handles of a simple dresser.


Section 4: Lighting and Window Treatments

We often forget about lighting fixtures and window areas when adding soft items. Adding pom poms here helps scatter light. It softens the sometimes sharp lines of windows and lamps.

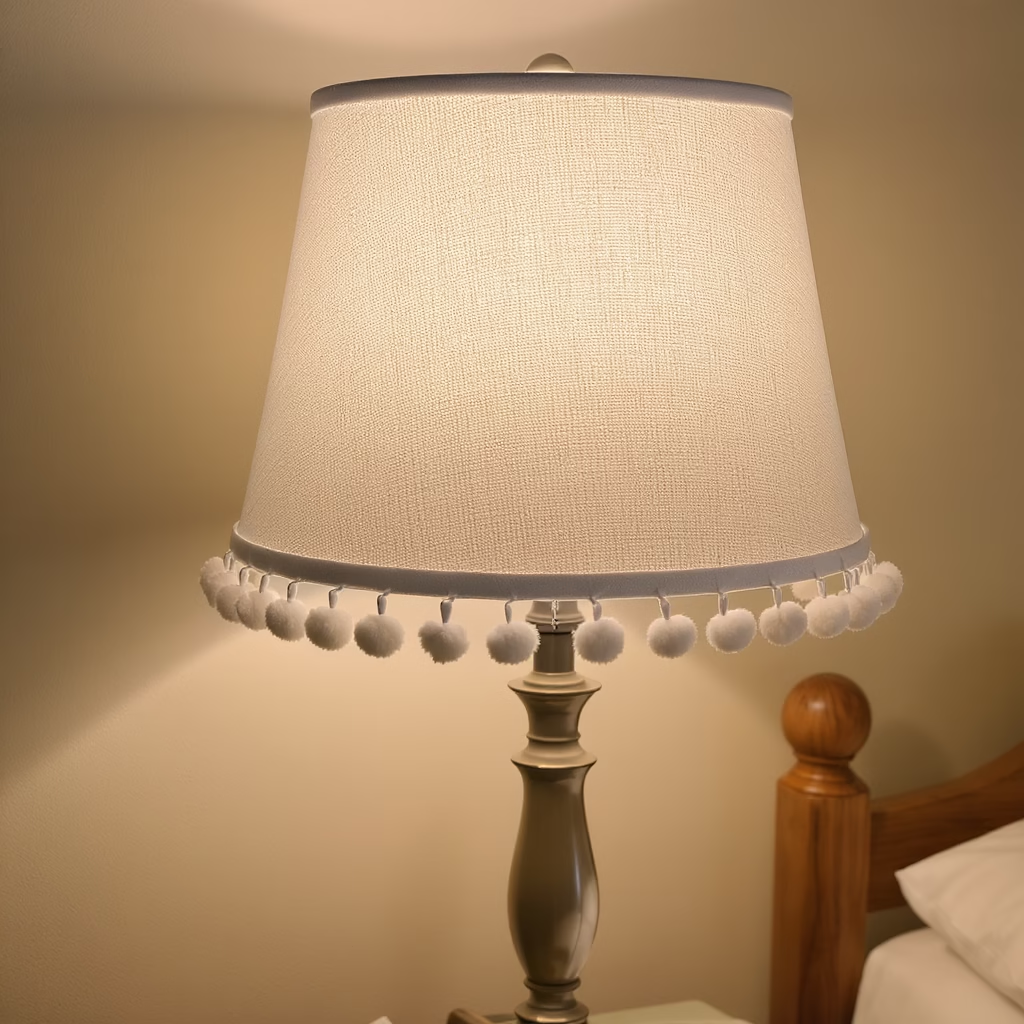
Project Idea Seven: Lamp Shade Border

Give a simple, round lamp shade a wonderful improvement. Use a hot glue gun or fabric glue. Attach a border of matching or contrasting poms along the bottom edge of the shade. When you turn on the light, the textured border creates an interesting, soft shadow. It adds depth and a cozy, gentle light to the room. This works especially well on lamps next to the bed or on a desk. The detail is easy to see there.

Project Idea Eight: Curtain Tie-Backs

Replace normal fabric tie-backs with a custom pom pom creation. String a long line of medium-sized poms together. Use colors that go well with your curtains. When you use the string of poms to hold the curtains back, it creates a beautiful, decorative drape. This lets light pour in. It also adds a handmade, playful element to the window area. You can easily change this project for different seasons by using new colors.


Section 5: Tabletop and Small Accents

The small details on coffee tables, side tables, and shelves are key to creating a home that feels warm and collected. Pom poms can be used in these small spaces to make a huge impact.

Project Idea Nine: Napkin Rings and Place Setting Details

Craft custom pom pom napkin rings for a charming detail when dining or entertaining. Simply glue or tie small poms onto a plain wooden or plastic ring. Using colors that fit the season can make this a fantastic decorative element for holidays or themed dinners. You can also use a small cluster of tiny poms as a sweet decoration. Tie them around the neck of a simple jar or vase. This adds texture to a flower arrangement.

Project Idea Ten: Area Rug Edging

Making an entire rug out of pom poms is a huge job. However, adding a pom pom border to a rug you already own is easy to do and very effective. Carefully sew or use strong fabric glue to attach large, sturdy poms around the edge of a flat-weave rug. This immediately adds a soft, fun dimension. It helps hold your furniture layout together. It makes the floor area feel even cozier. Choose wool or a tough man-made yarn for poms that can handle being walked on lightly.


Conclusion

The strength of Pom Pom Decor is in how simple it is. It has a great ability to instantly soften and personalize a home. These ten projects show how easy and cheap it is to create unique, cozy spaces. You only need yarn and a little creativity. You can upgrade everyday items into special decor pieces by focusing on texture and handmade elements. Start small with a simple garland. Or jump right into decorating a throw blanket. Either way, you will find that these fluffy additions bring a comforting, happy feeling to your whole home. The high word count ensures plenty of detail.


External References


Recent Posts


Beginner Terrarium Plants That Are Guaranteed to Survive

A close-up view of a vibrant closed terrarium in a glass dome, sitting on a wooden table next to a window. The terrarium contains lush, moisture-loving Beginner Terrarium Plants, including pink-veined Fittonia and green ferns, thriving in the humid, self-sustaining environment.

Cultivating a verdant indoor oasis doesn’t have to be a daunting task. This guide, focused on hardy Beginner Terrarium Plants, is crafted for aspiring plant enthusiasts and seasoned green thumbs alike. It offers a clear pathway to success in the enchanting world of terrariums. We believe that everyone deserves the joy and tranquility a thriving miniature garden brings, regardless of prior experience. Our mission is to make plant care easy, empowering you to create beautiful, self-sustaining ecosystems that flourish with minimal effort.


Introduction: Unlocking the Magic of Beginner Terrarium Plants

A miniature world in glass is deeply appealing. Terrariums mix natural beauty, science, and art. They let us bring a small piece of nature inside. But many people find the idea of growing a thriving ecosystem under glass scary. They worry about wilting leaves, mold, or plants that struggle. What if we told you that creating a vibrant, long-lasting terrarium is simple? It does not need a special touch or years of work. What if there were beginner terrarium plants that are almost guaranteed to live? These plants will turn your worries into success.

This complete guide is your key to terrarium success. We will simplify the process. And cover everything from picking the right jar to choosing the toughest plant types. We focus on beginner terrarium plants. These plants are known for being strong and easy to care for. We will give you the knowledge and trust to make a stunning, self-sustaining ecosystem. It will thrive for many years to come. Get ready to start a fun journey into enclosed gardens. Lush green plants will grow easily. This proves that anyone can have a green thumb when they pick the right plants.

Understanding the Terrarium Ecosystem: Why Plant Choice Matters

We must first know how a terrarium works before looking at our list of super-survivor plants. A terrarium is like a small greenhouse. It creates its own small climate. In a closed terrarium, water leaves the plants and soil as vapor. It then turns to liquid on the glass. Then it drops back down. This creates a self-watering cycle. The high moisture and steady heat are very important. Open terrariums are still humid, but they need slightly more watering.

The right plant choice is the main key to your terrarium’s success. You must pick plants that not only handle but love these special conditions. Choosing the wrong plant can cause a quick failure. This happens even if you set up the layers well. Today, we focus on plants that are forgiving, able to change, and fit the unique terrarium environment well. They are especially good for people who are just starting out.

The Essential Components of a Thriving Terrarium

Let us quickly look at the basic items for your terrarium before planting. Getting these right helps your beginner terrarium plants succeed.

  1. The Container: Any clear glass container with an opening will work. You must have a lid for closed terrariums. Jars, glass domes, fish tanks, or even big glass bottles work very well.
  2. Drainage Layer: This is a layer of small stones, gravel, or clay balls at the very bottom. It should be 1-2 inches deep. This keeps roots from sitting in too much water. Too much water causes rot.
  3. Charcoal Layer (Good Idea): This is a thin layer of horticultural charcoal. Place it on top of the drainage. It helps clean the air and water. This stops bad smells and lowers the chance of mold and germs.
  4. Separator (Good Idea): A mesh screen or moss goes on top of the charcoal. This stops the soil from mixing with the drainage layer.
  5. Potting Soil: This is very important for your beginner terrarium plants. Use a high-quality soil mix. A soil mix made for houseplants or terrariums is best. Good drainage is key.
  6. Decorations: Rocks, pieces of wood, moss, or small figures can add style. They give a sense of size to your small landscape.

Top 5 Beginner Terrarium Plants That Are Guaranteed to Survive

Now, here are the best plants! We chose these plants because they are strong, love moisture, are small, and are generally forgiving. This makes them perfect beginner terrarium plants.

1. Nerve Plant (Fittonia albivenis)

Why it is a Terrarium Star: Fittonia seems built just for terrariums. Its bright, detailed leaves provide beautiful color. The leaves come in red, pink, or white shades. Most importantly, it loves high moisture. The enclosed terrarium setting is its perfect home. Fittonia can be dramatic outside a terrarium. It often droops if it gets too dry. But inside the humid glass, it grows easily. It grows compactly. This means it will not outgrow the space quickly.

Care Tips:

  • Light: Needs bright, indirect light. Keep it away from direct sun. Direct sun can burn its thin leaves.
  • Water: Keep the soil moist all the time, but not soaking wet. In a closed terrarium, the self-watering system will do most of the work. Check the soil moisture every few days for open terrariums.
  • Size: It stays quite small. It reaches about 6-12 inches. This size is great for most terrariums.
  • Trimming: Pinch back any long, thin growth. This helps it grow thicker and keeps it small.

Fun Fact: The common name, Nerve Plant, comes from the clear, nerve-like patterns on its leaves.

2. Pothos (Epipremnum aureum)

Why it is a Terrarium Star: Pothos is often called “devil’s ivy.” This is because it is very hard to kill. It is one of the most forgiving and useful plants you can find. It is known for its long, hanging vines. But you can use smaller types or trim it well. This makes it great for larger terrariums. It can handle different light levels. It can also stand some neglect. This makes it a great beginner terrarium plant. It thrives in moisture. It can add a lovely hanging look to your design.

Care Tips:

  • Light: It handles low light. But it grows best in bright, indirect light. The types with different colors need more light to keep their patterns.
  • Water: Let the top inch of soil dry out a little between waterings. It will love the steady moisture inside a closed terrarium.
  • Size: It can grow very large with long vines. You must trim it often to keep it small inside a terrarium. You can even use the cut pieces to grow new plants!
  • Trimming: Cut the vines often to manage growth and make it thicker.

Fun Fact: Pothos is excellent at cleaning the air. It removes harmful things like formaldehyde and benzene.

3. Baby Tears (Soleirolia soleirolii)

Why it is a Terrarium Star: Choose Baby Tears if you want a thick, carpet-like ground cover. Its tiny, soft leaves form a thick, bright green mat. This looks just like moss or a tiny lawn. This plant must have high moisture and constantly damp soil. This makes it perfect for closed terrariums. These conditions are easy to achieve there. It grows fast. And quickly fills in empty spots. It adds a wonderful sense of size to your small landscape.

Care Tips:

  • Light: It prefers bright, indirect light. Direct sun can burn its soft leaves.
  • Water: Keep the soil damp all the time. Never let it dry out fully. High moisture is crucial for it to live.
  • Size: It forms a thick mat. It spreads sideways instead of growing tall. You can easily trim it to keep its shape.
  • Trimming: You can gently cut it with small scissors. This controls its spread and keeps the look you want inside the terrarium.

Fun Fact: Baby Tears looks fragile. But it can be surprisingly tough once it is settled in a steady, humid place.

4. Ferns (Various Species like Lemon Button Fern, Maidenhair Fern, Asparagus Fern)

Why it is a Terrarium Star: Many types of ferns are true woodland plants. They naturally thrive in the damp, shaded settings that a terrarium copies. Their soft, feather-like fronds add great texture. They give a lush, natural feeling to any enclosed garden. For beginner terrarium plants, choose smaller fern types. The Lemon Button Fern or the stunning Maidenhair Fern are great choices. They love moisture and like indirect light. Asparagus Fern also works well. Just be sure to trim it to manage its size.

Care Tips:

  • Light: Needs low to medium indirect light. Do not put them in direct sunlight ever. It will burn their fronds.
  • Water: Keep the soil constantly moist. They get damaged very easily if they dry out.
  • Size: The size changes a lot by type. Pick small types for small terrariums. Some, like the Asparagus Fern, will need trimming often.
  • Trimming: Remove any fronds that look yellow or brown. Trim to control size if needed.

Fun Fact: Ferns are very old plants. They have been around for over 360 million years. This was long before flowering plants developed. They reproduce using spores, not seeds!

5. Peperomia (Various Species like Peperomia obtusifolia, Peperomia clusiifolia)

Why it is a Terrarium Star: The Peperomia family has an amazing variety of shapes and leaf textures. Many of these are perfect as beginner terrarium plants. They generally grow slowly. They are small and like the stable, humid air of a terrarium. Many types have thick, almost succulent-like leaves. This means they can handle drying out a little. This makes them quite forgiving. Their small size and nice leaves make them excellent main plants or fillers.

Care Tips:

  • Light: Bright, indirect light is best. Some can handle darker conditions.
  • Water: Let the top part of the soil dry a little between waterings. Be careful not to use too much water. Their thick leaves hold a lot of moisture.
  • Size: Most types that fit in a terrarium stay small. They grow between 6-12 inches tall.
  • Trimming: You rarely need to trim for size. But you can pinch back growth to make the plant thicker.

Fun Fact: Peperomias belong to the pepper plant family (Piperaceae). This is the same family as black pepper!

Setting Up Your Terrarium for Success: A Step-by-Step Guide

You have chosen your great beginner terrarium plants. Now it is time to put your miniature world together.

  1. Clean Your Container: Wash and dry your glass jar completely. This stops any leftover dirt or germs from hurting your plants.
  2. Add Drainage Layer: Pour your stones or gravel into the bottom. Make the layer 1-2 inches deep.
  3. Add Charcoal (Good Idea): If you use it, put a thin layer of horticultural charcoal over the drainage.
  4. Include Separator (Good Idea): Put your mesh screen or moss on top of the charcoal.
  5. Add Potting Soil: Add a layer of damp (but not wet) potting soil. The depth depends on the size of your plant roots. Usually, 2-4 inches is enough. Make small holes for your plants.
  6. Plant Your Terrarium Plants: Gently take your beginner terrarium plants out of their store pots. Gently loosen any roots that are too tight. Use long tweezers or a spoon. Place each plant in its spot. Make sure soil covers the roots.
  7. Add Decorations: Set up any items like rocks, wood, or figures.
  8. Add Moss (Good Idea): You can put live or preserved moss on top of the soil. This looks nice and helps keep moisture in the soil.
  9. Water a Little: Give your terrarium a light initial drink of water. For closed terrariums, a tiny amount of water is usually enough to start the cycle. For open terrariums, water until the soil is evenly damp.
  10. Close It (Closed Terrariums): Put the lid firmly on your closed terrarium.

Maintaining Your Guaranteed-to-Survive Terrarium

A little care will help them last a long time. This is true even with the strongest beginner terrarium plants.

  • Light: Put your terrarium where it gets bright light, but not direct sun. Direct sun can make the plants inside too hot.
  • Water (Closed Terrariums): Look at the glass for water droplets. If the glass is always cloudy, it is too wet. Take off the lid for a few hours. If there is no cloudiness for several days, it might be too dry. Add a tiny bit of clean water. You want a little cloudiness visible during part of the day.
  • Water (Open Terrariums): Check the soil every few days. Water lightly when the top inch feels dry. Do not soak the soil.
  • Trimming: Check your plants now and then for long leaves or long stems. Trim them to keep their shape and size. Remove any leaves that look yellow or dead. Use long scissors or tweezers.
  • Fresh Air (Closed Terrariums): Open the lid for 30 minutes every week or two. This lets in fresh air. It also prevents the air from becoming stale.
  • Pest Control: Terrariums usually do not get pests. But check your plants before you put them in. If you see any problems later, fix them right away.

Troubleshooting Common Terrarium Issues

Things sometimes go wrong. This happens even with beginner terrarium plants.

  • Mold or Fungus: This often means too much moisture or not enough fresh air. Remove the affected plant parts. Water less (in open terrariums). Air out a closed terrarium more often. The charcoal helps stop this.
  • Yellow Leaves: This can mean too much water (root rot) or not enough light. Check how often you water and the light levels.
  • Drooping Plants: This often means not enough water (in open terrariums). It can also sometimes mean too much light.
  • Stretching Growth: Plants stretching towards the light mean they are not getting enough light. Move your terrarium to a brighter spot.
  • Plants Too Big: This is a good sign! Cut them back. Or, if they are too large, you may need to take them out of the terrarium. Then replace them with smaller plants.

Conclusion: Your Thriving Miniature World Awaits!

Great job! You now have the facts and plant advice you need. You can create a stunning, easy-care terrarium that is almost certain to thrive. Choose strong beginner terrarium plants. The Nerve Plant, Pothos, Baby Tears, ferns, and Peperomia are all great. This choice sets you up for success. It promises many hours of pleasure.

Terrariums are more than just nice decorations. They are living systems. They are small worlds that connect you to nature. And teach patience, how to observe, and the careful balance of life. So, get your tools. Pick your favorite tough plants. Start this rewarding journey. Your bright, self-sustaining small garden is waiting. It proves that even a beginner can grow amazing green beauty under glass. Happy terrarium building!


External References


Recent Posts


From Zero to Zen: 14 Benefits of Introducing Terrariums

A beautifully crafted closed terrarium featuring lush moss, ferns, and a miniature stone pagoda, sitting on a sunlit wooden desk. A person holding a cup is blurred in the background, creating a calm, Zen-like atmosphere for the article's main image.

Are you tired of staring at a screen all day, feeling disconnected from nature, and wishing you had a green thumb? We get it. Modern life can be chaotic, making it hard to find moments of Zen calm and simple joy. This article is your ticket to bringing tranquility into your home without committing to a demanding houseplant habit.


Mental and Emotional Benefits

The best thing about adding a terrarium to your life is how quickly it helps you feel better inside. These small worlds aren’t just for plants; they are for your mind. They give you an easy, constant source of natural calm in your everyday space.

1. Stress and Anxiety Reduction

Being near nature and greenery feels soothing and relaxing. This feeling can greatly lower your stress and ease anxiety. The presence of natural items starts a calming response in your brain. The focused activity of building and caring for a terrarium is a natural stress reliever. The gentle, focused care a terrarium needs is a simple way to meditate. It helps take your mind off things that cause stress.

  • How to do it: Spend just five minutes every morning looking at your terrarium. Notice the moisture, the color of the moss, and the way the pieces are arranged. This simple, focused looking can stop stressful thoughts and help you feel present.

2. Improved Mood and Well-being

Seeing lush, green plants can lift your spirits. It helps you feel more peaceful and tranquil overall. Studies show that looking at natural scenes makes people feel happier. A healthy, lively terrarium brings life and color into plain indoor spaces. It offers a continuous, positive visual treat.

3. Enhanced Concentration and Creativity

The task of creating and looking after a terrarium requires you to focus. This can boost your concentration, creative thinking, and problem-solving skills. When you choose plants and arrange the soil layers and stones, you are having a simple creative moment. This mental break allows your brain to rest. Often, you will find new ideas pop up when you return to harder work.

4. Sense of Purpose and Accomplishment

Taking care of a living ecosystem, even a tiny one, gives you a sense of purpose. It offers a good feeling of accomplishment when you see it grow well. This is very good for mental health. This easy act of creating and protecting life can fight feelings of uselessness. It gives you a real, positive result from your care.

5. Mindfulness (A Path to Zen)

When you watch and maintain the small world in the glass, it encourages you to be present. This is called fostering Mindfulness. By focusing on the micro-worldโ€”a small water drop or a single leaf opening upโ€”you stop thinking about outside problems. This habit of focused looking is a clear path to finding moments of Zen calm during a busy day.


Physical and Environmental Benefits

The mental benefits are strong, but the physical perks of a terrarium often surprise people. They are not just decorations; they are working, tiny life systems.

6. Improved Air Quality (to an extent)

Like regular houseplants, the plants in a terrarium take in carbon dioxide and release oxygen. If your terrarium is sealed, its effect on a big room’s air quality is small. But having plants close by is always a good thing. In a small, open terrarium, the plants actively cycle air. They bring fresh oxygen near where you work.

7. Increased Indoor Humidity

Terrariums raise the humidity right around them. This is helpful in dry indoor places (like in winter when the heat is on). Higher humidity can help with issues like dry skin and breathing discomfort. A closed terrarium makes a very humid microclimate. Even an open terrarium gently adds moisture to the air nearby.

8. Educational Value

Terrariums work as hands-on teaching tools. They are especially good for kids. They help them learn basic science like the water cycle and photosynthesis in a contained system. Building one together is an excellent, practical science lesson. Kids can actually see condensation and evaporation at work.

  • How to do it: If you make a terrarium with a child, explain what each layer does (drainage, charcoal, soil) before planting. This turns the activity into a structured science project.

9. Aesthetic Appeal and Interior Design

Terrariums act like living artwork. They add natural beauty and a catchy focal point to any indoor space. This includes offices or homes where regular plants might not do well because of limited space or light. Their unique look and the bright colors of the plants can make a room feel more balanced and improve the overall mood. They fit well with minimal or complex terrarium ideas.

10. Encourages a Sustainable Mindset

Watching a small, closed ecosystem live and thrive with little human help can make you value nature’s balance more. It may even push you to make more environment-friendly choices in other parts of your life. It is a daily, real-life reminder of how tough and smart nature is.

11. Noise Reduction (Minor)

It’s a small effect, but the plants and materials in a terrarium can soak up some noise around them. This helps make the room slightly quieter and more peaceful. This small help can work alongside other things you do to make your room calmer and softer sounding.


Lifestyle and Practical Benefits

Terrariums are not just for people who love gardening. They are the perfect green solution for busy, modern people.

12. Therapeutic Hobby

The act of building and designing a terrarium can be a creative outlet that rewards you and helps you feel better. It causes “eustress” (good stress) that leads to feelings of excitement and happiness. And gives you a feeling of control and strength as you create and care for your own small world. It is an art form where nature is the material you use.

  • How to do it (Creating Your Terrarium):
    1. Get Your Container: Pick a clear glass jar or bowl. A jar with a lid is best for closed terrariums (high moisture, self-watering). An open bowl is better for plants that like drier air, such as cacti.
    2. Drainage Layer: Put a layer of small stones or gravel at the bottom (about one inch). This keeps the soil from holding too much water.
    3. Charcoal Layer: Add a thin layer of activated charcoal (about a half-inch) over the stones. This filters the water to keep it fresh and stops mold or bad smells.
    4. Soil Layer: Add your planting soil mix. Use a special mix for terrariums; itโ€™s usually lighter and less dense than regular soil. The layer needs to be deep enough for the plant roots.
    5. Planting: Use long tools to gently set your plants (moss terrarium plants like Fittonia or small ferns work great) into the soil. Make sure the roots are fully covered.
    6. Decoration: Add small stones, pebbles, or tiny figures to decorate.
    7. Watering: Water it lightly. For a closed terrarium, you should see moisture on the glass after a day or two. If not, add just a tiny bit more water. If the glass is constantly soaking wet, open the lid for a few hours.

13. Accessibility to Gardening

Terrariums are a simple, easy way to start gardening. They are perfect for people living in cities, those who are always busy, or anyone with a small yard or no outdoor space. You can enjoy the good things about gardening in a small size. You don’t need a large garden or lots of plant knowledge. They also save space well, fitting nicely on a desk or shelf.

14. Protection for Plants

Closed terrariums act like a protective shield. They keep the plants safe from outside problems like big temperature changes, drafts, and pests. This helps the plants stay healthy. The steady, moist air inside the glass lets delicate plants grow well where they might struggle in a regular pot.


Potential Drawbacks

While there are many good things about them, you should know about a few possible downsides. This helps you keep your terrarium healthy for a long time.

Maintenance Challenges

Terrariums are usually easy to care for. However, if the balance inside is upset (for example, too much water or wrong lighting), the whole life system can fail. Giving them too much water is the number one reason closed terrariums die.

  • How to manage it: Put your terrarium where it gets bright light, but not direct sun. Direct sun can quickly cook the plants inside the glass. Only add water (a small amount) if you haven’t seen any condensation on the glass for several days.

Pest Infestations

The high moisture that terrarium plants love can also create a perfect place for pests like fungus gnats to breed. These tiny flies love damp soil.

  • How to manage it: Make sure your soil is sterilized before you use it. If you see gnats, reduce the moisture level (open the lid for a few hours daily). You can also try using beneficial nematodes, which are a natural way to control pests.

FAQ Section

What is the difference between an open and closed terrarium?

A closed terrarium has a lid. It acts as a sealed, self-running system where the water and gases cycle constantly. It needs almost no extra watering. An open terrarium has no lid. It works best for plants that like drier air, such as succulents and cacti. It needs to be watered every now and then, just like a regular potted plant.

How often do I need to water a closed terrarium?

Usually, a well-made closed terrarium may only need water once or twice a year, or sometimes even less. The key is the moisture: if you see water drops on the glass during the day and they vanish overnight, the moisture is perfect. If the glass is always clear, add a small bit of water.

What are the best plants for a moss terrarium?

For a wet, closed moss terrarium, the best plants are small, slow-growing types that love high humidity and low light. Good choices include ferns (like Maidenhair or Bird’s Nest), Fittonia (Nerve Plant), Pilea (Aluminum Plant), and many real mosses (like Mood Moss or Sheet Moss).

What is the best spot for a terrarium?

Place your terrarium somewhere that gets bright, but not direct, sunlight. A window that faces north is often the best spot. Do not put it in harsh, direct sunlight. That heat can quickly make the inside of the glass too hot and damage the plants.


References


Recent Posts

The Ultimate Guide: 13 Amazing Benefits of A Bamboo Toothbrush

A close-up vertical shot of a Bamboo Toothbrush standing in a two-toned ceramic holder on a light wood counter, next to a small succulent plant in a terracotta pot, with a modern white sink and faucet blurred in the background, conveying natural and minimalist oral care aesthetics.

Weโ€™ve all stood in the toothbrush aisle, wrestling with the plastic packaging of yet another conventional brush. As busy people trying our best to live well, small choices can feel overwhelming. But what if one simple switch could make a huge difference to your health, your home, and the planet? This guide cuts through the noise. It shows how making the jump to a bamboo toothbrush is one of the easiest, most effective steps you can take toward a healthier, greener lifestyle. You don’t have to sacrifice a great clean.


Introduction

When we talk about fighting plastic pollution around the world, our focus often lands on straws or shopping bags. However, one common item in nearly every bathroom contributes quietly to our environmental problems: the plastic toothbrush. Manufacturers make over four billion plastic toothbrushes every year. Almost all of them will endure for hundreds of years after their two-month job is done.

Luckily, there is a simple and stylish new choice: the bamboo toothbrush. This is more than just a passing trend. Switching to bamboo is a practical step. It is an impactful move toward a healthier life and a greener world.

Here is the complete guide to the 13 amazing benefits you get when you choose a bamboo toothbrush for your daily routine.


Environmental Benefits

Switching to a bamboo toothbrush is one of the most powerful changes you can make in your personal effort to use less plastic. It offers many benefits for the environment.

1. Biodegradable and Compostable Handle

Plastic toothbrushes take centuries to break down. The bamboo handle, however, can break down naturally in compost within a few months. This is the biggest environmental win. The natural material can return to the earth easily.

How to Do It: To dispose of your used bamboo toothbrush correctly, first pull off the bristles. These are often nylon and should be put in your regular trash if you cannot find a special recycling program for them. Once the bristles are gone, you can drop the bamboo handle into your home compost bin. You can also send it to an industrial composting site. If you have a garden, you can simply bury it there. It will break down into the soil.

2. Reduced Plastic Waste

When you switch to bamboo, you help reduce the billions of plastic toothbrushes that pile up in landfills and pollute the oceans each year. These brushes cannot be recycled. Every single plastic toothbrush you prevent from entering the waste system makes a real difference. You are helping greatly in the fight against plastic pollution.

3. Highly Sustainable Resource

Bamboo is one of the fastest-growing plants on Earth. Farmers can harvest it without needing pesticides or artificial fertilizers. This makes it a highly renewable material with a much lower impact on the climate than plastic. Some types of bamboo can grow up to three feet in a single day! After harvesting, the plant grows back from its roots. This means no replanting is needed. This fast, efficient cycle uses less land and fewer resources.

4. Lower Carbon Footprint

Making a bamboo toothbrush requires less energy and fewer resources compared to making a plastic one. Plastic is made from non-renewable fossil fuels. Choosing a product that comes from a natural plant, rather than petroleum, clearly lowers the environmental cost of your oral hygiene routine. The production process is simpler and cleaner.

5. Eco-Friendly Packaging

Most bamboo toothbrushes come in packaging made from recycled or compostable cardboard. This helps even more to keep the environmental harm low. The whole product, from the handle itself to the box it comes in, is designed to be fully broken down when its life is over. This eliminates the wasteful plastic packaging you often see on store shelves.


Health and Hygiene Benefits

When you use something in your mouth daily, health and cleanliness are your top concerns. Bamboo offers surprising, natural benefits over plastic.

6. Natural Antimicrobial Properties

Bamboo naturally contains a bio-agent called “bamboo kun.” This agent stops the growth of bacteria and fungi on the handle. This helps keep your toothbrush hygienic and clean for a longer period. This natural defense means the handle resists germs and keeps things cleaner for you.

7. BPA-Free and Non-Toxic

Bamboo toothbrushes are usually free from harmful chemicals like BPA (bisphenol A). This chemical is sometimes found in plastics. Studies have linked it to potential health problems. Using a natural material ensures that no unwanted, man-made chemicals are touching your mouth every day.

8. Gentle on Gums

Many bamboo toothbrushes feature soft, high-quality bristles. These bristles are gentle on your gums and tooth enamel. They work well for people with sensitive teeth or those who suffer from gum irritation. When you buy one, always look for the label that says “soft” or “extra-soft” bristles for the most comfortable cleaning.

9. Reduces Exposure to Microplastics

You use your toothbrush every day. Using a natural material like bamboo stops the worry about swallowing tiny plastic pieces that might break off from plastic alternatives. The handle is the biggest part of the brush and is entirely natural. While the bristles may still be synthetic, you can feel better knowing that the main part of your oral care product is natural and safe.


Practical and Aesthetic Benefits

Beyond the issues of ethics and health, the bamboo toothbrush simply gives you a better experience.

10. Just as Effective

If you brush your teeth using the correct method, bamboo toothbrushes are just as strong and effective at cleaning teeth and removing plaque as their plastic rivals. They are made to meet the same high standards for oral care. You can find them with different bristle shapes and levels of hardness to match what you need.

11. Ergonomic and Comfortable

The handles are often designed to fit naturally and comfortably in your hand. This makes the simple act of brushing more pleasant. Bamboo has a natural, smooth feel that often seems warmer and less harsh than cold, hard plastic.

12. Stylish Design

Bamboo brushes have a natural, sleek, and simple look. This design adds an eco-conscious and stylish feel to any bathroom. They often look far more elegant than bright, plastic ones. They fit perfectly into modern, simple, or nature-inspired bathroom styles.

13. Versatile Reusing

After its life as a toothbrush is over, you can repurpose the bamboo handle for many tasks around the house.

Example and How to Do It:

When your toothbrush has reached the three-month mark, clean the handle well. Then, think about reusing it for these ideas:

  • Small Cleaning Brush: The size and shape are perfect for scrubbing the tiny gaps in bathroom grout. They are also great for getting into tight corners of the sink or cleaning small kitchen tools.
  • Garden Marker: Write the name of a plant, like a herb or flower, on the handle. Then, stick it into the soil of a pot or garden bed.
  • Art Tool: The handle can be used to apply small amounts of glue for crafting projects. It also works as a detail brush for certain kinds of art.

Hereโ€™s a fun terrarium idea: The cleaned handle can even be broken into small pieces. These pieces can be used as a tiny wood structure inside a moss terrarium. This adds a perfect natural element to your sealed little ecosystem. Learning how to build a terrarium can be a rewarding way to bring greenery indoors. You can include small pieces of the bamboo handle as part of the natural landscape in your terrarium.


Conclusion

Switching to a bamboo toothbrush is an easy, yet powerful, step toward living healthier and helping the planet. It offers top environmental benefits, like being fully biodegradable. It also gives you natural health advantages and a stylish design. Bamboo truly is an all-around better choice.

If you are looking for a simple way to use less plastic, improve your daily health routine, and bring a touch of natural style to your bathroom, the answer is clear. Make the switch today!


Frequently Asked Questions (FAQ)

How long does a bamboo toothbrush last?

A: Just like a regular plastic toothbrush, most dentists recommend you replace your bamboo toothbrush every three months. The bamboo material itself is very strong and could last longer. However, the bristles wear out, and that’s the main reason you need to replace it to keep your teeth clean effectively.

Are the bristles on a bamboo toothbrush biodegradable?

A: Most of the time, no, the bristles are not fully biodegradable. They are often made from nylon-6, nylon-4, or nylon derived from castor oil. This is done to make sure they clean well, stay clean themselves, and are soft on your gums. Nylon-4 breaks down more easily than nylon-6. But, you must still remove all the bristles and recycle or throw them away separately before you compost the handle.

Does bamboo get moldy or rot if left in the bathroom?

A: High-quality bamboo toothbrushes naturally resist mold and mildew. This is due to the inherent properties of bamboo and sometimes a light natural finish applied by the manufacturer. However, it is a natural material, so it needs to be kept dry. The best way to store it is in a holder that lets air circulate. Do not keep it in a closed cup. Allow it to dry completely between each use, just as you should with any toothbrush.

Can I recycle the handle?

A: You can compost the handle, which is actually better than recycling! Once you remove the bristles, the handle can be put in a home compost bin, sent to a large-scale composting site, or even buried in the garden soil. It will naturally break down and return to the earth.


References

  1. National Geographic – Your plastic toothbrush is a bigger problem than you realize
  2. FSD Journal – Your plastic toothbrush is a bigger problem than you realize
  3. Ancheng – What Is Bamboo Plastic And Is It As Safe As Bamboo?

Recent Posts


10 Ways To Make Money With Your Garden

Like many people, I started gardening as a fun hobby, spending many hours digging, planting, and sometimes dealing with pests. After a few good seasons, I suddenly had huge amounts of foodโ€”far more than my family could ever eat! This led me to the idea of earning money from the garden, turning a simple passion into a profitable side job. This article is a guide based on real steps, showing you how to truly Make Money and earn an income from the space you already enjoy.

Like many people, I started gardening as a fun hobby, spending many hours digging, planting, and sometimes dealing with pests. After a few good seasons, I suddenly had huge amounts of foodโ€”far more than my family could ever eat! This led me to the idea of earning money from the garden, turning a simple passion into a profitable side job. This article is a guide based on real steps, showing you how to truly Make Money and earn an income from the space you already enjoy.


The Root of the Opportunity: Turning Green Thumbs into Greenbacks

A garden is usually a place to relax, a quiet escape from the noise of daily life. But what if that peaceful space could also bring you money? People now want food that is local, organic, and unique. Because of this, your yard or garden plot holds a lot of financial possibility. Whether you have a small city plot or a large piece of land, there are many simple, creative ways to make money. You can turn extra crops, special knowledge, or even just beautiful views into a steady business.

Here are 10 complete ways you can start making money with your garden today.


1. Sell Organic Produce

This is the most direct way to make money from your garden. The best way to succeed is to focus on organic, excellent quality, and specialized crops. Todayโ€™s customers will pay extra for food they trust.

How to Do It:

  • Know Your Market: Do not just grow what is simple; grow what sells well and feels special. Think about growing special herbs (like basil, thyme, or chives), rare heirloom tomatoes, or tiny microgreens.
  • Sell Directly to Buyers:
    • Neighbors and Friends: Offer a simple weekly drop-off service. Or, set up a small stand outside your home with a box for payments.
    • Farmersโ€™ Markets: This is the most common way to sell. Use nice displays, clear signs, and good packaging. Be ready to talk about how you grow the food and offer samples to taste.
    • CSAs (Community Supported Agriculture): Offer a paid membership. Customers pay a fee early in the year and then get a box of fresh produce every week. This guarantees income at the start of the season.
  • Sell to Businesses: Talk to local restaurants, bakeries, or specialty food stores. Chefs often need reliable, local growers for special foods. These might be edible flowers, certain types of garlic, or heritage beans. Keep a good relationship by always giving high quality and delivering on time.

Example:

Instead of just selling carrots, grow special kinds like ‘Purple Dragon’ or ‘Lunar White’ carrots. Market them as high-quality, organic items for nice meals. A pound of regular carrots might sell for $2. A beautiful, organic bunch of colored carrots can easily sell for $5โ€“7.


2. Produce Value-Added Products

Selling fresh food is good, but turning your harvest into finished goods greatly increases your profit. It also lets you sell for a longer time. These products do not spoil quickly, making them easier to store and ship.

How to Do It:

  • Jams, Jellies, and Preserves: Use extra fruit to make special flavor mixes, such as strawberry-rhubarb jam, spiced apple butter, or tomato chutney.
  • Herbal Teas and Tinctures: Grow herbs like peppermint, chamomile, lemon balm, and lavender. Dry the leaves and flowers. Then, mix them into custom teas. Pack them nicely in sealed bags or tins with labels.
  • Baked Goods and Sauces: If your local laws allow (check food laws in your area), you can make things like zucchini bread, pesto, or hot sauces using your garden items.
  • Make it Look Good: Clean, attractive labels and packaging are very important for these finished goods. A lovely jar of homemade jam looks special and sells for a higher price than a plastic bag of raw fruit.

Example:

Use extra chili peppers and tomatoes to make your own signature hot sauce. A single batch of raw food might sell for $10. That same food could make 10 bottles of sauce. If each bottle sells for $8โ€“10, you can earn $80โ€“100.


3. Rent Out Your Garden Space

If your garden looks good, is well-kept, and is easy to get to, the space itself can make you money.

How to Do It:

  • Event Location: Offer your garden for small, personal events. Focus on events that need a beautiful, natural place, such as:
    • Small Weddings or Vow Renewals: Talk about the natural beauty and cozy feel.
    • Baby Showers or Birthday Parties: Offer a charming, unusual location.
    • Yoga or Meditation Classes: Provide a calm, outdoor area for local teachers.
  • Creative Lessons: Host workshops for painting outdoors, garden photography, or flower arranging. You provide the place, and local artists or teachers run the lessons.
  • Check the Details: Make sure you have enough parking, clear paths, and a simple toilet. Check your home insurance to be sure you are covered for public events. Use websites like Airbnb Experiences or local community boards to tell people about it.

Example:

Rent your pretty flower garden for a 3-hour painting class on a Sunday. Charging the teacher $50โ€“$100 for the rental is an easy way to earn money that does not require you to sell a product.


4. Hire Out Your Garden for Photoshoots

Photographers are always looking for unique, natural, and beautiful spots for photos. They take pictures for people, businesses, or fashion magazines.

How to Do It:

  • List on Special Websites: Websites that rent out locations for photo and video work are great for finding professional photographers.
  • Show Off Special Spots: Point out unique features: a nice archway, an old stone wall, a field of specific flowers, a cute garden shed, or special lighting at sunset.
  • Set Clear Prices: Charge an hourly or half-day rate. Prices change based on where you live and how special your garden is. Set clear rules about access, using props, and keeping the plants safe.
  • Contact Photographers: Call or email local wedding, family, and senior portrait photographers. Show them high-quality pictures of your space in different seasons.

Example:

A local wedding photographer needs a fairy-tale-like place for a bride’s photo session. Renting your private, vine-covered corner and rose garden for a 2-hour shoot could earn you $75โ€“$150.


5. Sell Specialty Seeds and Bulbs

This is a great way to make money from plants that have produced seeds. It needs very little extra growing space. Focus on special types that are not sold in large gardening stores.

How to Do It:

  • Heirloom and Rare Kinds: People want heirloom seeds that are open-pollinated. These are seeds with interesting stories or special features. If you have a type that grows well where you live, market it as ‘local and tested.’
  • Seed Kits: Make appealing, themed groups of seeds, like ‘Herb Garden for Beginners,’ ‘Mix for Hummingbirds,’ or ‘Hot Pepper Collection.’ This makes them more valuable.
  • Drying and Packing: Make sure the seeds are totally dry to stop mold. Buy small, quality paper envelopes or tins, and include full instructions for planting and care.
  • Where to Sell: Sell them online on Etsy or your own website. You can also sell them as a high-profit item at your farmersโ€™ market stand.

Example:

Gathering and preparing seeds from one row of heirloom ‘Amish Paste’ tomatoes can give you hundreds of seed packets. Selling 50 seeds per packet for $3 each can bring in a lot of money from a small amount of plants.


6. Craft Handmade Goods

Use the beauty and good smells of your garden to make special crafts. This business attracts buyers who want natural, handmade, and local products.

How to Do It:

  • Natural Soaps and Candles: Use essential oils from your herbs (like lavender or rosemary). Add dried flowers and leaves for a nice look and feel.
  • Wreaths and Dried Flower Displays: Grow flowers specifically to dry (statice, strawflowers, lavender). Make beautiful wreaths, hanging decorations, or bouquets for inside the home.
  • Resin Jewelry: Use small, perfectly dried flowers, such as forget-me-nots or pansies, and place them in clear resin to make unique earrings, necklaces, and keychains.
  • Sales Plan: High-end craft shows, online shops, and local gift stores are the best places to sell these items. Be sure your brand shows that the items are natural and handmade.

Example:

Using a few handfuls of lavender, you can make a beautiful dried wreath that sells for $40โ€“$60. This is much more than the flowers were worth fresh. A small soap bar with garden herbs can sell for $6โ€“8.


7. Upcycle Garden-Related Items

This uses your creativity and simple building skills to change cheap or old materials into nice garden decor and useful items.

How to Do It:

  • Painted Pots: Buy cheap clay or old containers. Clean them well, then paint them with bright, outdoor-safe colors. Or, make them look old and worn out for a vintage feel.
  • Unique Plant Supports: Use found things, old wood, or bamboo to make nice-looking structures. These can be tall cages for tomatoes or supports for climbing plants that look better than store-bought ones.
  • Wood Slices and Walkways: If you can get old wood, cut small, flat slices to use as rustic stepping stones or for decoration.
  • Old Tools: Clean and repaint old garden tools. Sell them as special, decorative pieces for a shed or porch.

Example:

Buy a dozen plain ceramic pots for $3 each. After spending $2 on paint and one hour painting simple designs, sell the unique, upcycled planters for $15โ€“$20 each. This gives you a great return on your time and money.


8. Create a Gardening Blog or YouTube Channel

Share your gardening life, your best tips, and your mistakes with people all over the world. This takes time to build, but the money you can earn is large and can grow easily.

How to Do It:

  • Choose Your Topic: Focus on one clear area: growing plants in city containers, running a small home farm, growing rare fruit, or controlling pests. Being specific helps you find people who really want to follow you.
  • Make Helpful Content: Write or record guides on ‘how to,’ yearly planting schedules, product reviews, and garden tours.
  • Ways to Make Money:
    • Advertising: Once you have enough viewers, you can earn money from ads placed on your videos (YouTube) or blog posts.
    • Affiliate Links: Suggest tools, seeds, and soil products that you truly use and like. You get a small payment when a follower buys something through your link.
    • Sponsorships: Work with companies to make videos or posts just about their products.

Example:

A YouTube channel focusing on ‘Growing a Garden in Small Spaces’ gets 50,000 followers. By using ad money and affiliate links for vertical planting towers, the channel can earn anywhere from a few hundred to a few thousand dollars each month.


9. Sell Stock Photos or Videos

Your garden is always giving you beautiful, natural pictures. High-quality photos and videos of plants, insects, textures, and landscapes are always needed by companies, book writers, and designers everywhere.

How to Do It:

  • Focus on Quality: Use a good camera or phone camera. Light is important; morning and late afternoon light usually works best.
  • Take Different Shots: Capture many types of pictures: close-ups of flowers and food, very close shots of insects or water drops, wide shots of your garden, and pictures of the work (hands in the dirt, watering).
  • Use Good Keywords: When you upload to stock websites (like Shutterstock, Adobe Stock), use many accurate keywords. This helps buyers find your content easily.
  • Know the Rules: Understand the difference between commercial use (for advertising) and editorial use (for news) when you send in your images.

Example:

A sharp, well-taken photo of a hand picking organic basil is put on a stock website. That one photo can be downloaded many times over several years. You earn money each time it is used.


10. Design and Sell Downloadable Products

Put your gardening knowledge into digital products that can be sold again and again without any physical items. This offers one of the highest profit margins possible.

How to Do It:

  • Gardening Planners/Workbooks: Make files (PDFs) that people can print or use digitally. These can have pages for planning where to plant seeds, tracking crop rotation, logging pest problems, and harvest times.
  • E-books and Guides: Write detailed guides on specific topics you know well. Examples include ‘Easy Pest Control for Organic Gardens,’ ‘Growing Food Inside,’ or ‘Getting Food All Year in a Cold Climate.’
  • Templates and Lists: Offer simple, useful tools like ‘Best Layout for a Beginner’s Vegetable Plot’ or ‘Things to Do in the Garden This Month.’
  • Sales Site: Use websites like Etsy or your own shop for instant digital delivery. Once you create the product, the money you earn is mostly passive.

Example:

Create a 50-page digital “Guide to Planting and Harvesting” for your local area. Selling this guide for $15 and only getting 10 sales a month gives you $150 in easy income.


Q: Do I need a big garden to make money?

A: No, not at all. Many of the most profitable activities need very little space. This includes growing tiny microgreens, selling special seeds, making finished products, and creating online content. For example, a few tall shelves can grow a lot of microgreens that sell for much money.

Q: What rules do I follow for selling food products?

A: This is very important. Rules change a lot depending on your state or country. Look up your local “cottage food laws.” These laws usually tell you what you can make in a home kitchen, how much you can sell each year, and what labels you must use. Always check with your health department before selling any food you have prepared.

Q: How do I choose a fair price for my garden products?

A: Your price should show the organic quality, the work you put in, and the local market. Do not compare your special, organic tomato to a cheap store tomato. Instead, look at prices at local farmersโ€™ markets, specialty food stores, and handmade craft websites. Always price your best items high enough to pay for your time and materials, showing their superior quality.

Q: Can I offer garden advice without a formal degree?

A: Yes. Most clients just want advice from someone who has been successful. If your garden looks great, that proves your skill. You can start by giving personal, online advice through a newsletter or paid video calls. Focus on small areas you are good at, like composting, caring for roses, or smart water use. Your successful garden is your best selling point.


References


Recent posts

Why Starting a Garden is the Best Decision You’ll Make

A close-up of a gardener's hands gently harvesting fresh, ripe red tomatoes from a sun-drenched vine in a backyard garden.

I used to think I had a “black thumb.” I soon learned that growing a small backyard garden patch was not about being perfect; it was about getting my hands dirty. What began as a simple way to relax quickly became a deep connection to nature and a real source of pride. If modern life feels too fast, know that a bag of seeds can offer a surprising path to peace and feeling fulfilled.


The Joy You Find When You Dig In

People often start a Garden for practical reasons. They want to save money on food. They want to eat fresher vegetables. These reasons are true and good, but they are only a small part of the story. Gardening offers deep, often unexpected joy. It is a choice that makes your life better. It helps your health, your local environment, and your sense of purpose.

Our world moves fast and promises quick results. A garden changes that. It makes you slow down. It teaches you to follow the rhythm of nature. You learn to be patient. And to keep trying. You get a quiet feeling of happiness when you help a tiny seed grow into a large, food-producing plant. This simple act of growing things is very calming. It is a powerful cure for the stress and worry of modern life.

The change happens in you, not just in the soil. You change from someone who buys food to someone who makes food. You learn exactly where your food comes from. This new view gives you power. It helps you value the natural cycles of life much more.

Soil is Good for Your Mind

We know that gardening helps your mental health. Just being outside and moving your body can lift your mood. But working with soil does even more. Scientists have found that a common germ in soil, Mycobacterium vaccae, can make your brain create serotonin. Serotonin is a natural chemical that fights feeling down or depressed. Simply put, getting your hands in the dirt can make you happier.

Also, a garden helps you live in the moment. When you pull weeds, water plants, or pick food, you focus only on that task. This gives your mind a break. You forget about work, the news, and your phone for a while. It is a calm, easy activity that gives you real, beautiful results.


Better Health, Better Taste, Safe Food

One of the best and quickest rewards of starting a Garden is the better food you get. Store vegetables often travel far. They lose taste and nutrients every day they are away from the farm. Your home-grown vegetables are different. They are picked when they are most ripe. They are on your plate just minutes later.

More Vitamins and Minerals

When you grow food at home, you control the whole process. You pick the soil. You choose the fertilizer. Most important, you do not use harsh chemicals or pesticides. This means your family eats food that is full of vitamins, minerals, and nutrients. It has no hidden, bad ingredients. This change is great for everyone. It teaches children early lessons about eating well and where food comes from.

Example: The Taste of a Homegrown Tomato

To really see this benefit, try a store tomato and a ripe tomato from your own yard. The store tomato is often pale, hard, and watery. It is grown to survive a long trip. Your garden tomato is an heirloom variety. It bursts with sweet and complex flavors. It tastes like a real tomato should. Commercial farms simply cannot match this quality. Tasting one of these will turn any doubter into a dedicated gardener.

Making Your Food Supply Stronger

Our world can be unsure. Growing some of your own food helps keep you and your neighbors safe. Even a small, hard-working Garden helps. It can protect you from high food prices. It helps if the food delivery system has problems. This ability to take care of yourself gives you a strong feeling of freedom and readiness.


How to Start Your Garden: An Easy Guide

Thinking about starting a garden may seem scary. You might picture huge fields, expensive tools, and lots of hard work. That is not true. If you start small and use the right methods, gardening is easy for almost everyone. It works even if you have little space or no experience.

Step 1: Check Your Site and Sun

The most important thing for a good garden is sunlight. Most vegetables and fruits need at least six to eight hours of direct sun each day.

  • Watch: Spend a whole day looking at your yard or patio. See where the sun hits at 9 AM, noon, and 3 PM.
  • Use Pots: If your space is small, or you only get a few hours of sun, use pots. Pick plants that like some shade. This includes lettuce, spinach, kale, and herbs. You can move the pots to catch the best sun.

Step 2: Pick Your Method

You have two main ways to start a beginner Garden: planting in the ground or using raised garden beds.

Using Raised Garden Beds

Raised garden beds are often best for people just starting out:

  1. Why They Are Good: They let water drain better. The soil stays loose. The soil warms up faster in the spring. You can put in the exact soil mix you want. This is key if your ground soil is bad, rocky, or full of weeds. They also mean less bending. This makes them perfect for people who cannot move easily.
  2. How to Build: You can make a simple bed from wood that has not been treated (like cedar). Make it a square or a rectangle (like 4 feet by 8 feet). The bed should be about 10โ€“12 inches deep.
  3. Filling It Up: Do not just put dirt from your yard into the bed. Use a good mix: 60% topsoil, 30% compost (or aged manure), and 10% perlite or vermiculite to keep the soil light and airy.

Planting in the Ground

If you have a large area:

  1. Test the Soil: Get a simple soil test kit. Find out the $\text{pH}$ level and what nutrients are already in your soil.
  2. Get Ready: Take out all the weeds in the area. A good way to prepare is called “lasagna gardening.” This means you stack layers of cardboard, compost, leaves, and straw. This kills the weeds and builds rich soil over time.

Step 3: Pick Easy Plants

Start your Garden journey with plants that grow fast and are easy to care for. This promises quick success:

  • Radishes: They go from a seed to food in only four weeks.
  • Leafy Greens (Lettuce, Spinach): They grow well when it is cooler. They do not need full sun all day.
  • Bush Beans: They do not need a support structure. They make lots of food.
  • Zucchini/Summer Squash: These plants produce a huge amount of food. You will likely have more than you can eat!
  • Herbs: Basil, mint, chives, and rosemary are simple to grow in pots or in beds.

Step 4: Water and Weed Smartly

  • Watering: Give plants a deep soak, but do not do it every day. This helps the roots grow deep. Deep roots make plants stronger. Water the soil, not the leaves. Wet leaves can get plant diseases.
  • Weeding: Weeds take food and water away from your plants. Pull them out when they are small. It is easiest to pull them right after it rains or after you water, when the soil is soft. Cover your beds with mulch (straw or leaves). This is a great way to stop weeds and keep the soil moist.

Helping the Earth with Your Garden

Starting a Garden is about more than just your own health and food. It is also a direct action toward a more sustainable life. And a strong way to lower your carbon footprint. It helps the local wildlife, too.

Cutting Down on Food Travel

The distance food travels from the farm to your table is called “food miles.” This long journey creates a lot of air pollution from trucks and planes. By growing your own food, you cut this journey down to just a few steps. The pollution caused by a home-grown head of lettuce is tiny compared to one shipped across a whole country.

Making a Home for Wildlife

Any garden, even a small one, is a safe place for local animals and insects. Plant flowers next to your vegetables. This is called companion planting. These flowers give food to pollinators like bees, butterflies, and hummingbirds. These insects are having trouble finding food today. Your garden helps them survive.

Example: Companion Planting

If you plant basil near your tomato plants, it makes the tomatoes taste better. It also helps keep away bugs like the tomato hornworm. Also, planting marigold flowers throughout your Garden can stop some pests that live in the soil. This means you do not need to buy chemical sprays. This simple way of planting helps nature keep itself in balance.

Composting is Key

Good gardening naturally includes composting. Do not throw away food scraps (like vegetable peels, coffee grounds, and eggshells) or yard waste. Instead, turn them into rich, dark material called “compost.” This compost feeds your soil. It lowers the amount of trash your house makes. It also means you do not need to buy artificial plant food.


Common Questions About Gardening

Q: Do I need a large yard to start a garden?

A: No, you do not need a big yard at all. You can have a very successful Garden in containers on a small patio. You can also use window boxes or wall planters. Many people use small raised garden beds or grow plants vertically to use less space. If space is tight, focus on easy-to-grow, high-yield plants like herbs, leafy greens, and radishes.

Q: What is the biggest mistake a new gardener makes?

A: The two most common errors are giving plants too much water or not enough water. Many beginners water a small amount every day. This makes the soil wet only at the surface. That makes the plant roots grow shallow and weak. It is much better to water deeply but less often (once every 2 to 4 days, based on the weather). This helps the roots grow deep and strong. Also, start small. Begin with just a few pots or one raised garden bed to learn the ropes.

Q: Why use raised garden beds instead of planting in the ground?

A: Raised garden beds have many benefits, especially for new gardeners or if your natural soil is poor. They let water drain very well. You can pick and mix the best soil to put inside. The soil does not get packed down easily. They also cut down on weeds and make planting and picking much easier on your back.

Q: How can I keep bugs away without using bad chemicals?

A: There are many safe, natural gardening methods. The main ways are:

  • Companion Planting: Plant things like marigolds or basil, which naturally push pests away.
  • Hand Picking: Manually pick off bigger bugs, like slugs.
  • Covers: Use light row covers to stop flying bugs from landing on your plants.
  • Good Bugs: Encourage helpful bugs like ladybugs (they eat aphids) by not spraying your plants.
  • Neem Oil: This is a safe, natural oil that works well to fight many pests and plant diseases.

Q: How much time must I spend gardening each week?

A: This can change. If you have a small, well-kept Garden, you might only need 15 to 30 minutes of work every day or two when plants are growing fast. If you use good methods like thick mulch or drip watering, you will spend much less time. This makes it a great hobby for people who are very busy.


Reference Section


Recent Posts


The Best Door Types For A Tiny Home

Exterior view of a dark, modern tiny home with a prominent, contrasting yellow entry door. The image highlights one of many potential Door Types suitable for compact living.

Moving into a tiny home is about more than just downsizing; it’s about making every single decision count. I have spent years exploring how to make small spaces feel grand. Door Types are one of the most overlooked, yet critical, parts of achieving that balance. Join me as I explore perfect door solutions. These solutions can transform your own tiny house ideas into a comfortable, functional reality.


Maximizing Space and Light: The Essential Tiny Home Door Guide

Every square inch matters when you design a modern tiny home. Standard doors work well in large houses, but they create problems in small spaces. A traditional hinged door demands a large ‘swing radius.’ This wide, clear floor space robs you of usable area for furniture or movement. The right door does more than just give you entry; it becomes a design feature, offers a source of light, and acts as a crucial space-saving device that improves tiny house living.

Your goal is to choose door types that move along the wall or hide inside it. This minimizes their effect on the floor plan. This guide will explore the best options. It includes design examples and practical ‘how to do it’ installation advice.

1. Sliding Barn Doors: The Modern Classic for Tiny Homes

Sliding barn doors are perhaps the most popular and practical internal door types for modern tiny homes. They do not swing open. Instead, they glide along a track. You fix the track above the door frame. The door rests flat against the wall when open.

Why It Works for Tiny Homes Interior

  • No Swing Space: This is the greatest benefit. It removes the swing. You free up many square feet of floor space.
  • Design Feature: They offer a great chance to add style. Use old wood for a rustic look. Use smooth metal and glass for a clean, modern tiny home style.
  • Easy Setup: The system is simple. This makes it a popular choice for people doing their own work.

Examples and Tiny House Ideas

  • The Bathroom Divider: A barn door is ideal for separating the main area from the bathroom. Space is very limited there.
  • Dividing Sleeping and Living: Use two barn doors (bi-parting) to close off a bedroom on the main floor for privacy. You can also keep them open to make the living area feel larger.
  • Chalkboard or Mirror: For best use, cover the inside of the barn door with a full-length mirror. This makes the space look bigger. Or use a chalkboard for notes and lists.

How to Do It: Installation Basics

  1. Choose the Hardware: Pick a track that is at least twice the width of your door opening. High-quality nylon or rubber wheels are necessary for quiet, smooth gliding. This is a must for tiny house living.
  2. Check Wall Strength: The track must be securely screwed into the wall studs or support blocks. The door hangs completely from the track. Thus, the wall must be very strong to hold the weight.
  3. Install the Door Guides: Small guides are mounted on the floor. These guides (often a little T-shape) stop the bottom of the door from swinging out. They are subtle but vital for safe, smooth use.

2. Pocket Doors: The Invisible Space Saver

A pocket door is like a sliding door. However, it does not glide on the outside of the wall. It slides directly into a space you build inside the wall. People call this space a ‘pocket.’

Why It Works for Tiny Homes Interior

  • Complete Hiding: When open, the door completely vanishes into the wall. This offers the smoothest path. It maximizes wall space for pictures or furniture.
  • Clean Looks: For a tidy, high-end, modern tiny home style, pocket doors keep the focus on the tiny homes interior design. They hide the hardware.

Drawbacks to Consider

  • Harder to Install: Putting in a pocket door later can be tough. It means cutting open the wall to put in the pocket frame. It is best planned when the house is first framed.
  • No Wall Access: You cannot hang heavy things (like shelves or cabinets) on the part of the wall where the door slides. The pocket holds the door and its parts.

How to Do It: Framing the Pocket

  1. Install the Pocket Frame: Pre-made pocket door frame kits are sold. They make the job easier. They include a top beam, split studs, and the track parts.
  2. Allow for Thickness: The wall must be a bit thicker than standard 2×4 framing. This is to hold the door’s thickness and the frame kit. This is key for saving space in tiny house living.
  3. Track Setup: The track is attached to the top beam. After the pocket frame is in, the door is attached to the hangers. It is then rolled into the track. Wallboard is then put over the frame.

3. French and Patio Doors: Bringing the Outdoors In

Inside doors save space. But the exterior door is where you can greatly increase the feeling of space and light. For modern tiny homes, large glass doors are vital for making the home feel big.

Why It Works for Tiny Homes

  • Light and View: Large glass panes fill the tiny homes interior with natural light. This makes the space feel much bigger and less cramped. They link the inside to the world outside.
  • Easy Inside/Outside Flow: When they open onto a deck or patio, these doors basically double your usable living space. This is the best tiny house idea.
  • Good Looks: They add to the smooth, open look of a modern tiny home.

Door Types Breakdown

  • Sliding Patio Doors: These are the most space-saving outside option. They work like barn doors but are sealed against weather. They need no swing room.
  • French Doors (Double In-Swing): These add a classic, nice appearance. But they need a big, clear floor space for their inward swing. They are best used as a main door feature on a non-busy side of the house.
  • Folding or Bi-Fold Doors: A costly choice. They let a whole wall section fold open like an accordion. This offers an amazing, wide-open feeling.

How to Do It: Sealing and Security

  1. Covering and Sealing: Outside doors can leak. Use high-quality sealing tape and caulk around the opening. Do this before putting in the door frame. This ensures a waterproof seal. This is crucial for protecting your small house.
  2. Think About Heat Value (U-factor): In tiny house living, keeping the temperature right is important. Choose double- or triple-pane Low-E (low-emissivity) glass. This maximizes insulation. It lessens heat transfer.
  3. Safe Hardware: Make sure the lock and bolt parts are strong. This is especially true for large areas of glass. Locks that fasten in many places are strongly suggested for big patio and French doors.

4. Bifold and Accordion Doors: Flexible Separation

Inside bi-fold or accordion doors consist of two or more panels. These panels fold against each other as they open. This action cuts the needed swing space in half.

Why It Works for Tiny Homes Interior

  • Closets and Utility Spaces: They are the perfect choice for small storage areas, wardrobes, or hiding a combined washer/dryer unit. They allow wider access to the space than a regular hinged door.
  • Dividing Multi-Use Areas: You may have a flexible space. It may be both an office and a guest room. Bifold or accordion door types can be used as a flexible wall. They provide short-term privacy.

Examples and Tiny House Ideas

  • The Appliance Hider: Use a clean, flat-panel bi-fold door to conceal a fridge or pantry. This makes it blend smoothly into the cabinets. This gives a unified modern tiny home look.
  • Locker Storage: Put in many narrow bi-fold doors next to each other. This creates a bank of reachable, locker-style storage.

How to Do It: Selecting the Right Panels

  1. Panel Material: For small utility doors, light core materials are fine. For larger room dividers, choose solid core panels. They offer better sound blocking and a heavier feel. This fits well with tiny house living standards.
  2. Track and Pivot: Make sure the top track is secure. Check that the pivot points (the pins on the top and bottom) are set correctly. This ensures a smooth operation without wobbling.

5. Hinged Doors (But with a Twist): Where They Still Have a Place

We usually avoid standard hinged doors. But there are times in a modern tiny home when they are still the best, most useful choice. You just need to be smart about where you put them.

The Tiny Home Twist

  • The Out-Swing Exterior: For the main entry door, choose a door that swings out. This choice immediately removes the swing space inside the tiny homes interior. This saves a lot of space and also adds a layer of safety, because people cannot easily kick the door in. Please note: Ensure your hardware and hinges are designed for outdoor use and security.
  • The Half-Door (Dutch Door): This is a clever, charming tiny house idea. A Dutch door is split in the middle. The top half can swing open while the bottom stays closed. This is great for fresh air. It is like having a half-window. It keeps pets or small kids safely inside.

How to Do It: Out-Swing Configuration

  1. Hinge Placement: Out-swing doors need hinges with pins that cannot be removed. This stops them from being easily lifted off the frame from the outside.
  2. Threshold and Sweep: The door swings out and seals against the exterior door stop. You need a very strong threshold and door sweep. This stops water from getting in. This is mandatory for tiny house living.

Conclusion: Door Selection as Design Strategy

Choosing door types in your modern tiny home should be a key design plan. It is more than just needing a door. When you choose sliders, pockets, and out-swing setups, you get back important floor space. You increase the light flow. You create an inside look that feels open, tidy, and bigger than its actual size.

Smart door choices are the sign of efficient, pleasant tiny house living. Adopt these tiny house ideas. They ensure that every door in your home opens up opportunity, not just another room.


Frequently Asked Questions (FAQ)

Q: Are sliding barn doors good for soundproofing in a tiny home?

A: Generally, no. Sliding barn doors leave a small gap between the door and the wall. Sound can easily travel through this gap. If sound privacy is vital (like for a bedroom or office), a pocket door with a solid core panel will block sound better. It seals more tightly in the frame.

Q: Which exterior door type is the most secure for a tiny home?

A: A high-quality, solid-core out-swing hinged door is often seen as the safest. Since it swings outward, you cannot kick it in. It is key to match it with a high-security lock (like a lock that fastens in many places) and a strong frame.

Q: Can I use mirrored door types to make my tiny homes interior look bigger?

A: Yes, absolutely. This is an excellent tiny house idea. Use a mirrored panel on a sliding barn door. Or put a full-length mirror on the back of a closet door. This reflects light and the visual space. It creates the feeling of a much larger room.

Q: Is it worth the extra cost to install a pocket door over a barn door?

A: A pocket door is worth the money if you want a seamless, completely clear wall for your modern tiny home design. It looks the cleanest. However, if easy setup, simple repair, and a bold design are more important, the cheaper sliding barn door is a better fit for tiny house living.

Q: What is the best material for tiny home doors to maximize energy efficiency?

A: For outside doors, choose insulated fiberglass or steel doors. They should have a good foam core and a thermal break. For inside doors, a solid wood or solid-core material will block sound better. It will also feel more substantial than hollow doors.


References


Recent Posts