Is your recycling bin overflowing with plastic? Before you toss those everyday containers, pause and see their potential. This article explores innovative and beautiful ways to Upcycle plastic jugs into functional, aesthetically pleasing storage solutions. Join us on a journey to reduce waste, save money, and add a touch of eco-chic style to your home with simple DIY upcycling projects.
Introduction: Unlock the Design Potenetial When You Upcycle Plastic Jugs
The everyday plastic jug often ends up in the bin after a single use. That’s a huge waste! These common containers, from milk jugs to detergent bottles, are everywhere. But imagine if your recycling bin was a treasure chest of design ideas. What if those plain, empty jugs could become stylish, functional, and totally chic storage pieces that upgrade your home decor?
This is your complete guide to upcycling. We will focus on plastic jugs and show you how simple it is to create beautiful, useful items for any room. Forget plain, boring plastic. Think elegant organizers, cool planters, and smart holders. They will not only work well but also bring modern style to your space. Get ready to be creative. Reduce your waste. And find the real joy of giving old items a second, better life.
Why Upcycle Plastic Jugs?
The good things about upcycling go beyond just saving a few dollars. When you choose to upcycle plastic jugs, you are making a deliberate, positive choice for your home and the planet.
- Good for the Planet: Every plastic jug you keep from the landfill or skip the energy-intensive recycling process for is a win. Upcycling cuts the need for new products. It saves resources and lowers pollution.
- Save Money: Why buy expensive new storage bins? You can easily create unique, custom pieces using materials you already own. Upcycling is a very smart, low-cost way to get organized and decorate.
- Unique Style: Items bought in stores often lack character. Upcycling lets you put your own style and personality into every piece. This creates items that are truly unique to you.
- A Fun Hobby: DIY projects are very rewarding. It is a chance to relax and be creative. You get a great feeling of success when you turn something ordinary into something amazing.
- Long-Lasting: Many plastic jugs are made to be strong and tough. This makes them perfect for creating durable storage that will last for years.
Your goal is not just to reuse the plastic. It is to reimagine it. Turn that simple plastic into pieces that look high-quality, modern, and beautiful.
Getting Started: Tools and Safety
Before starting your projects, make sure you have the correct tools and take simple safety steps.
Essential Tools Checklist:
- Sharp Craft Knife or Box Cutter: Use this for precise cuts on thick plastic. Always be careful.
- Strong Scissors: Good for simpler cuts and trimming edges.
- Cutting Mat: This protects your table or work surface.
- Ruler and Marker: You need these for accurate measuring and drawing straight lines.
- Fine Sandpaper: Use this to smooth down any rough or sharp plastic edges.
- Adhesives: A hot glue gun, strong craft glue, or spray adhesive, depending on the job.
- Safety Gear: We suggest wearing safety glasses and gloves when you are cutting plastic.
Key Safety Reminders:
- Adult Supervision: Always watch children closely if they help with cutting.
- Cut Safely: When using a craft knife, always cut in a direction that moves away from your body.
- Keep it Stable: Make sure your cutting surface is flat and does not move.
- Smooth Edges: Plastic edges can be very sharp. Always use sandpaper to smooth them down and prevent cuts.
- Good Airflow: If you use spray paint or strong glues, work in an area with lots of fresh air.
- Clean Everything: Always wash and dry all plastic jugs completely before you start. This is especially important for containers that held food or harsh cleaners.
Project 1: The Modern Kitchen Utensil Holder
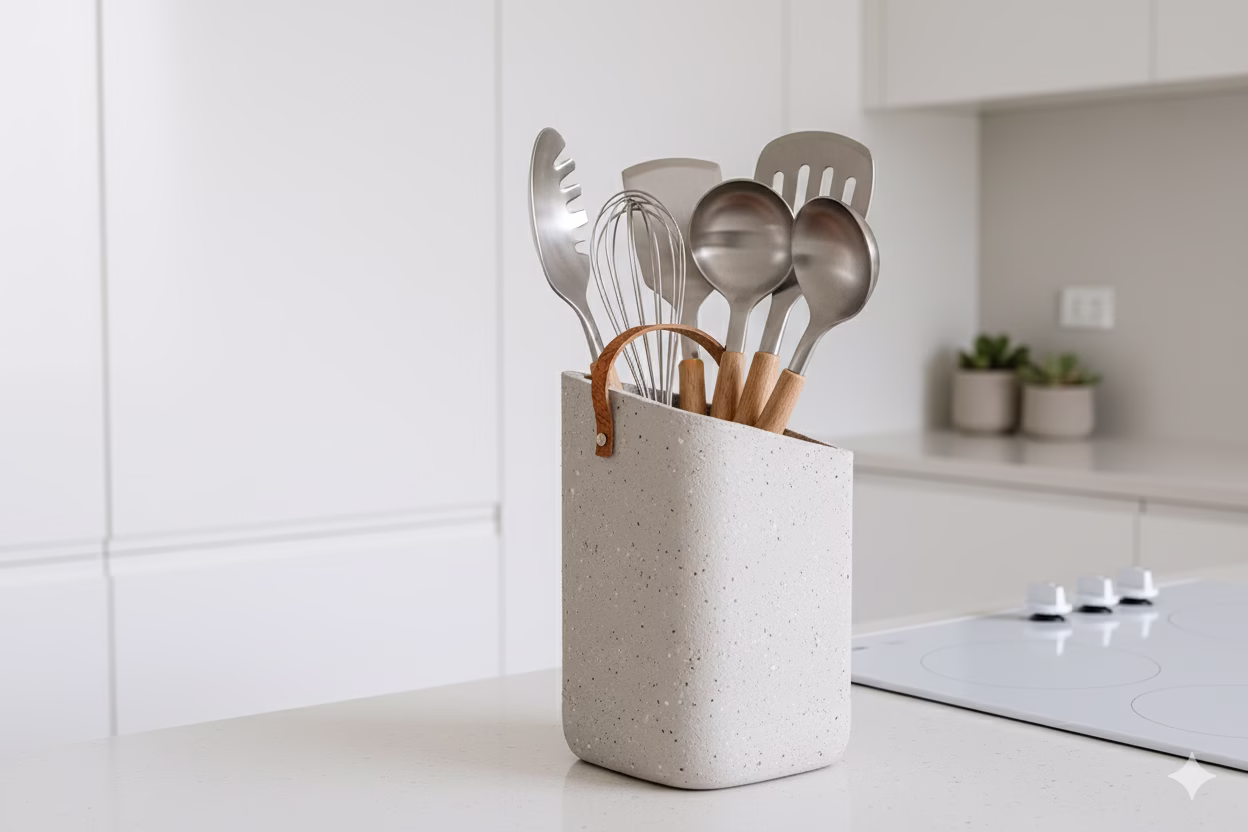
Purpose: This smart utensil holder reuses a common plastic jug as a stylish piece for your kitchen. It keeps essential cooking tools neat and easy to grab. The speckled paint and small handle give it a very clean, modern feel.
How to Do It:
- Pick Your Jug: Choose a sturdy jug with a square or rectangle shape. Think about a container that held laundry detergent or bleach. Wash it really well and let it air dry completely.
- Mark the Cut: Get your ruler and marker. Draw a diagonal line across the top of the jug. This creates a sloped opening. This modern angle is a key part of the design. You can also measure the same height on three sides. Then connect these points for a perfect slope.
- Cut the Jug: Cut along your marked line slowly and carefully. Use a sharp craft knife or strong scissors. Go slow to get a clean, smooth edge. Use fine sandpaper to smooth any rough spots right away.
- Add Texture: To get the speckled, stone-like look, you have a few options:
- Textured Spray Paint: Look for paint that is made to look like stone or granite. You might need to use a primer coat first.
- DIY Texture Paste: Mix simple acrylic paint with baking soda or fine sand. This makes a thick, textured paste. Apply this using a brush or a sponge.
- Paint and Finish: Apply the textured paint in thin, even coats. Follow the product directions. Allow plenty of time for drying between coats. If you use the DIY paste, let it dry completely. You can add a clear sealant coat if you want extra protection.
- Add a Handle (Optional): For a finished, sophisticated look, add a small leather or fake leather loop. Punch two small holes near the top edge. Secure the handle with strong glue or small rivets. This small detail adds a nice contrast.
Placement: This holder looks best next to your sink or stovetop. It adds a touch of simple elegance to any kitchen counter.
Project 2: The Modern Basket Weave Storage Caddy
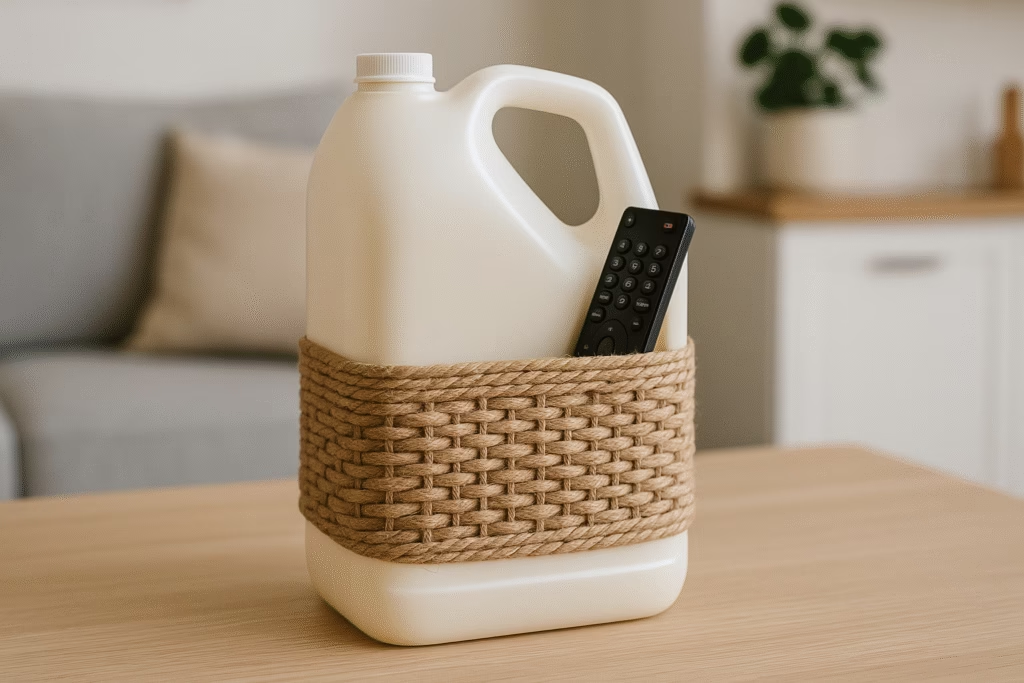
Purpose: This project changes a basic plastic jug into a charming and practical caddy. It is perfect for storing remote controls, art supplies, or small household items. The rope wrapping adds a great texture and warmth.
How to Do It:
- Pick Your Jug: Use a medium-to-large plastic jug. It should have a sturdy base and a smooth, straight body. Clean and dry it very well.
- Prep the Jug: Decide how tall you want your caddy. You can leave the top handle area on the jug. This is great for a grab-and-go handle, as shown. Or, you can cut the top off completely for a fully open container. If you cut it, mark your line first. Use strong scissors and then sand the edges smooth.
- Select Rope: Natural ropes like jute, sisal, or thick cotton cord work best for this style. A thicker rope will give you a better texture and cover the jug faster.
- Start Wrapping: Put a line of hot glue near the bottom edge of the jug. Press the end of your rope firmly onto the glue line.
- Wrap the Rope: The simplest way to get this basket-weave look is to glue rows of rope very close together. Apply the hot glue in small sections as you wrap. This keeps the rope snug and tight against the jug. Work your way up the side until the rope reaches your desired height. Be sure to press the rows together to hide the plastic underneath.
- Note: For the exact cross-hatch pattern shown, you can glue thin, vertical strips of rope first. Then, weave your horizontal rope through them. However, simple coiled wrapping is much easier and still looks fantastic.
- Finish It: When the rope reaches the right height, trim the end. Use a final dot of hot glue to secure the end of the rope. Tuck the end neatly into the coil next to it.
Placement: This caddy looks perfect on a coffee table, a bedroom nightstand, or even a home office desk for small supplies.
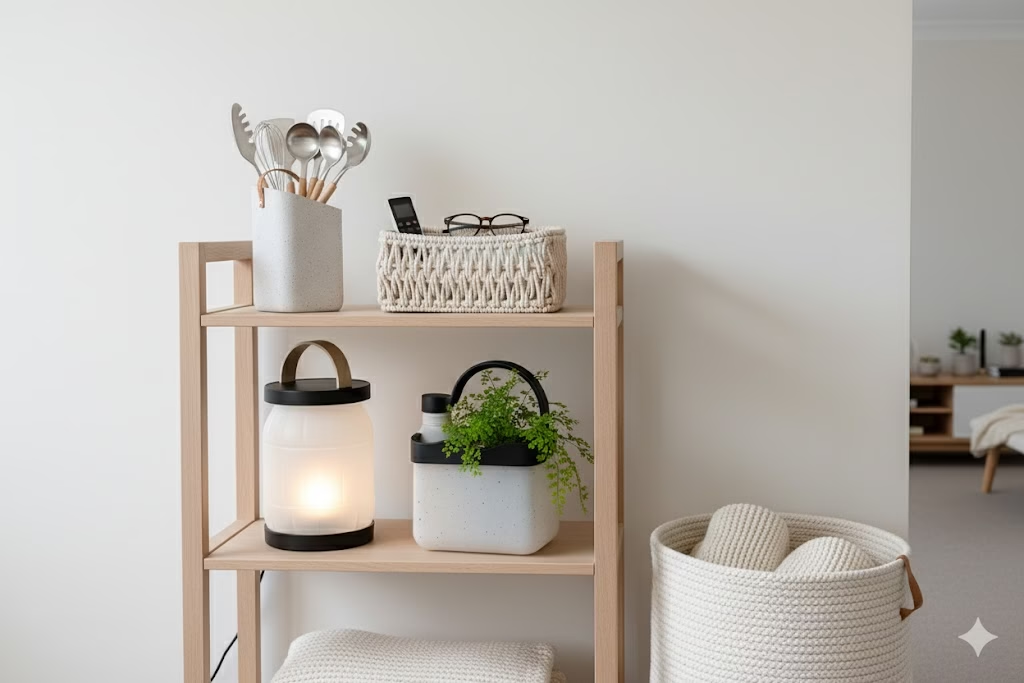
Project 3: The Minimalist Modern Lantern
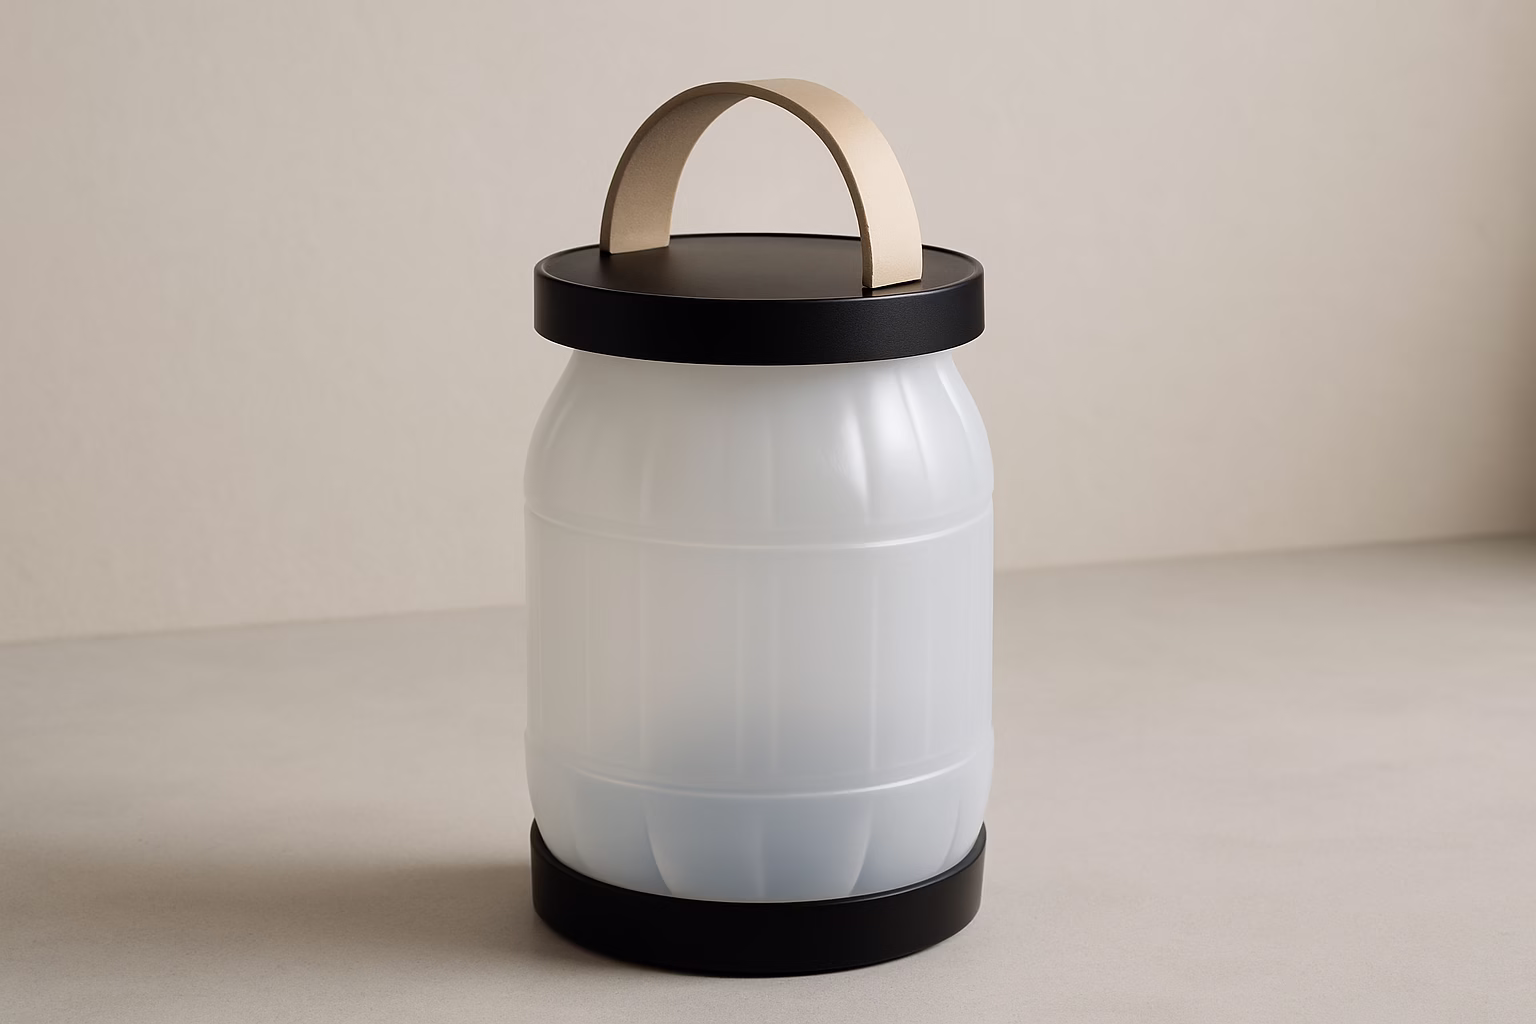
Purpose: This project transforms a translucent plastic container into a stylish, soft lantern. It is great for creating a cozy, warm mood indoors or outside on a deck. The simple shape and clean black lines make it a chic home accessory.
How to Do It:
- Pick Your Jug: Look for a translucent or frosted plastic jug. A large water jug or a rounded cleaning container works well. Wash and dry it completely.
- Prep the Jug: Cut off the very top, narrow part of the jug. You want to be left with an open cylinder shape. The bottom of the jug should stay solid. Use sandpaper to smooth all the cut edges.
- Create the Rings: To give it a clean, finished look, you need a base and a top ring. Use thick craft foam, thin wood circles, or even lids from other containers for this.
- Measure the size of the jug’s base and top opening.
- Cut two circles from your chosen material. One should fit well around the bottom. The other should fit right on the top edge.
- Paint both of these rings a contrasting color, like a matte black, for that modern touch.
- Attach the Handle:
- The example uses a curved wooden or faux leather handle. Cut a strip of thin, flexible material (wood or thick faux leather) into a curved shape.
- Attach the ends of the handle to the top painted ring. Use a very strong glue or small rivets. Make sure the handle is solid.
- Assemble the Lantern:
- Glue the painted base ring around the bottom edge of your jug.
- Glue the top ring (with the handle) to the top cut edge of the jug.
- Wait for all the glue to dry completely and securely.
- Add the Light: Place battery-operated LED fairy lights or a small LED candle inside the jug. This gives off a safe, beautiful, glowing light.
Placement: Use this lantern as a centerpiece on a table, on a bookshelf, or to add ambiance to any seating area.
Project 4: The Wavy Handle Caddy
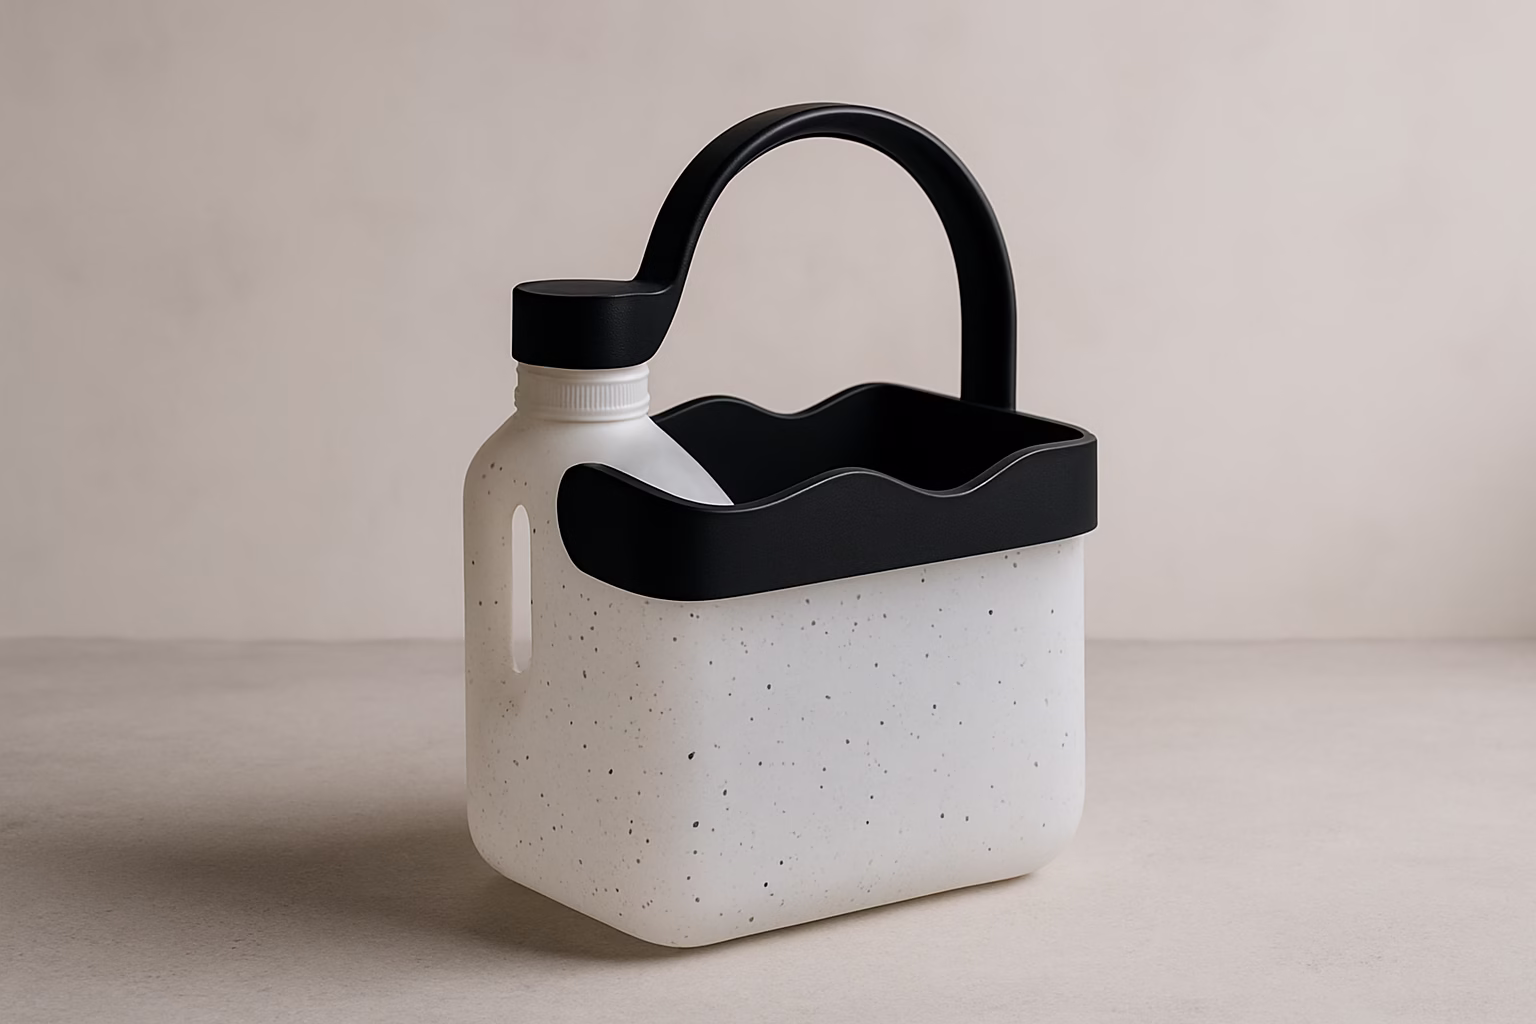
Purpose: This eye-catching caddy has a wavy, decorative top edge and a strong, practical handle. It’s perfect for organizing art supplies, holding small cleaning bottles, or working as a decorative plant holder. The speckled body and black contrast look refined and artistic.
How to Do It:
- Pick Your Jug: Select a jug that is tall and has a square or rectangular base. Make sure its surface is smooth. Clean and dry it very well.
- Mark the Wavy Edge: Decide on the caddy’s final height. Use your marker to draw a freehand wavy or scalloped line around the top edge. Draw it slowly and make sure the curves look planned and smooth.
- Cut the Wavy Edge: Cut along your wavy line with a sharp craft knife or strong scissors. Be very precise and careful with the curves. Sand down all the cut edges to make them smooth.
- Create the Handle Accent: You need to make the striking black handle and top trim.
- The Best Method: Cut the wavy top and a matching handle shape from a piece of sturdy material. Think thick EVA foam or hard plastic.
- Paint this piece a solid matte black.
- Attaching: Once the black piece is dry, glue it securely to the wavy cut edge of your jug. Use a very strong adhesive. It should sit perfectly on the jug’s edge.
- Paint the Jug (Optional): To get that speckled texture, paint the main body of the jug. Use a light spray paint for plastic. Then, add a speckled topcoat or apply your DIY texture as described in Project 1.
- Add a Base (Optional): For extra stability, you can glue a simple black ring to the very bottom, similar to the method in Project 3.
Placement: This caddy looks amazing in a home office, a craft area, or a stylish bathroom.
Project 5: The Stylish Laundry Hamper / Blanket Storage
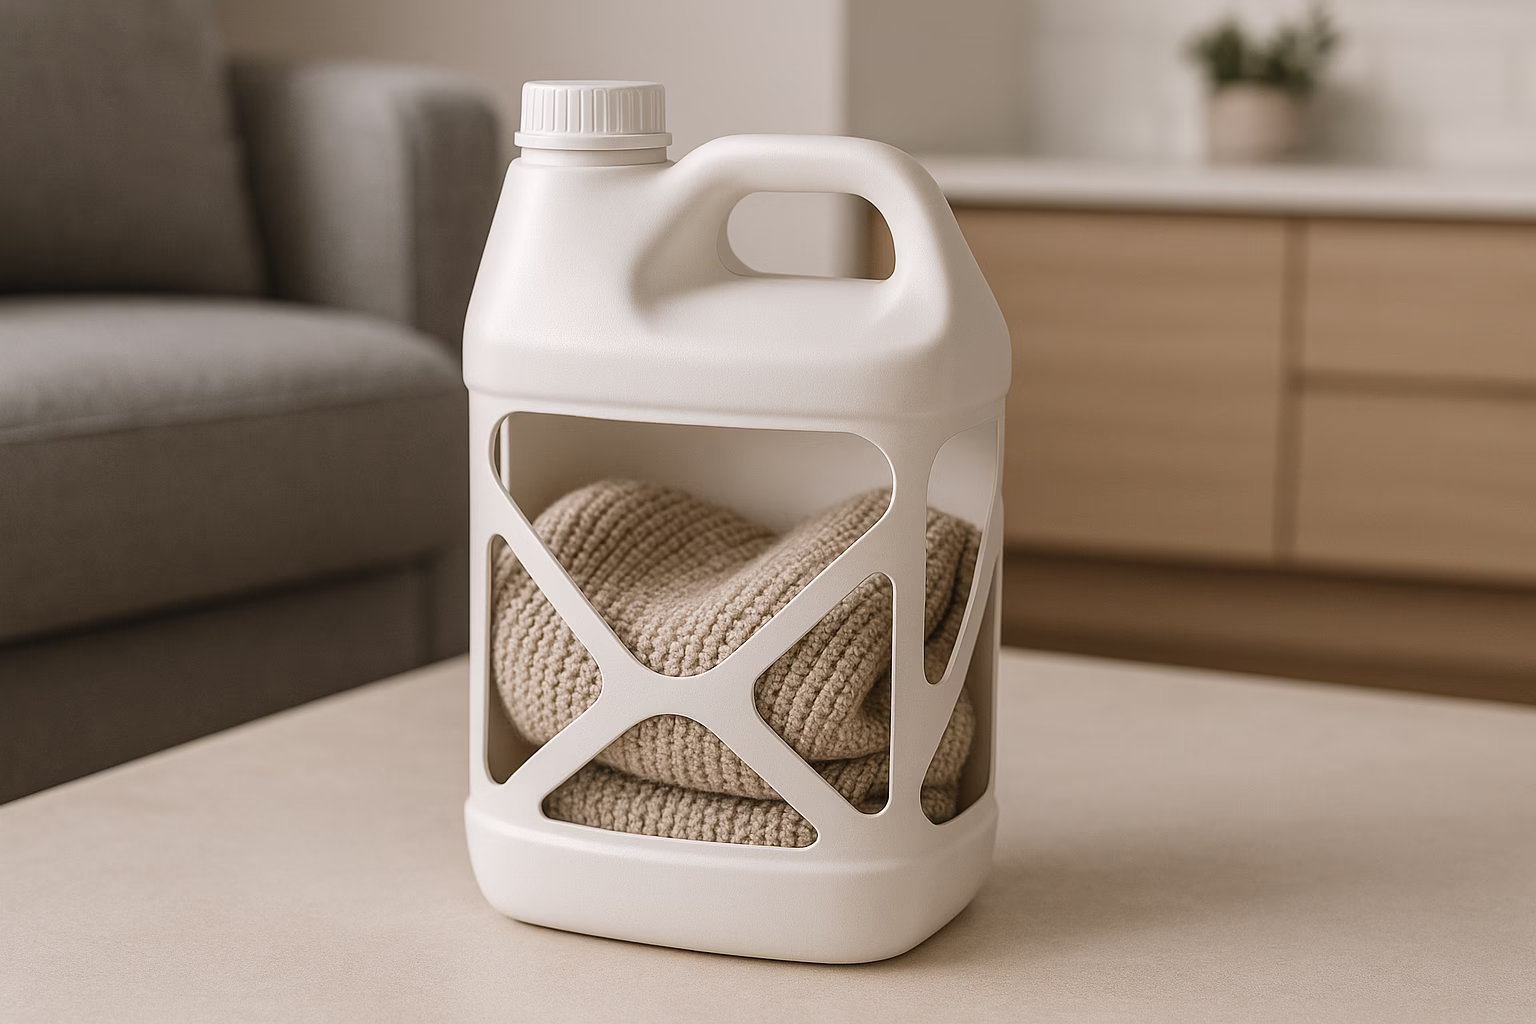
Purpose: This smart project turns a large plastic container into a striking storage solution. It is ideal for throw blankets, extra towels, or even a small, decorative laundry hamper. The cut-out pattern adds a modern, architectural feel.
How to Do It:
- Pick Your Jug: Choose a very large, strong plastic jug. The kind that holds a gallon or more of laundry detergent is perfect. It should have a strong handle and a square or rectangular base. Wash and dry it completely.
- Design the Cut-Out: This is the most creative step. Use a marker and ruler to plan your pattern. The example shows interlocking “X” shapes within a large window.
- First, mark a large rectangle on two opposite sides of the jug. Leave a solid border at the top, bottom, and sides for strength.
- Next, draw your geometric pattern inside this window. Keep the strips of plastic wide enough so the jug stays structurally sound.
- Tip: Measure carefully. Draw the pattern on one side, then trace it onto the opposite side for a matching look.
- Cut the Design: Use a sharp craft knife or a precision cutting tool. Very carefully cut out the marked sections. This step needs a steady hand and patience. Be sure to smooth all the cut edges with fine sandpaper.
- Paint (Optional): If the jug isn’t already a good neutral color (like white or cream), spray paint it. A matte finish often looks the most expensive and modern.
- Final Touches: Make sure all edges are smooth and clean. The jug’s shape, combined with the open cuts, creates a nice look. The blankets or towels you store inside become part of the decor.
Placement: This piece fits perfectly in a living room next to a sofa or in a bedroom as smart storage for extra linens.
More Upcycled Plastic Jug Ideas
The chances to upcycle plastic jugs are endless! Here are a few more concepts to keep your creative momentum going. These ideas keep that high-end, modern look.
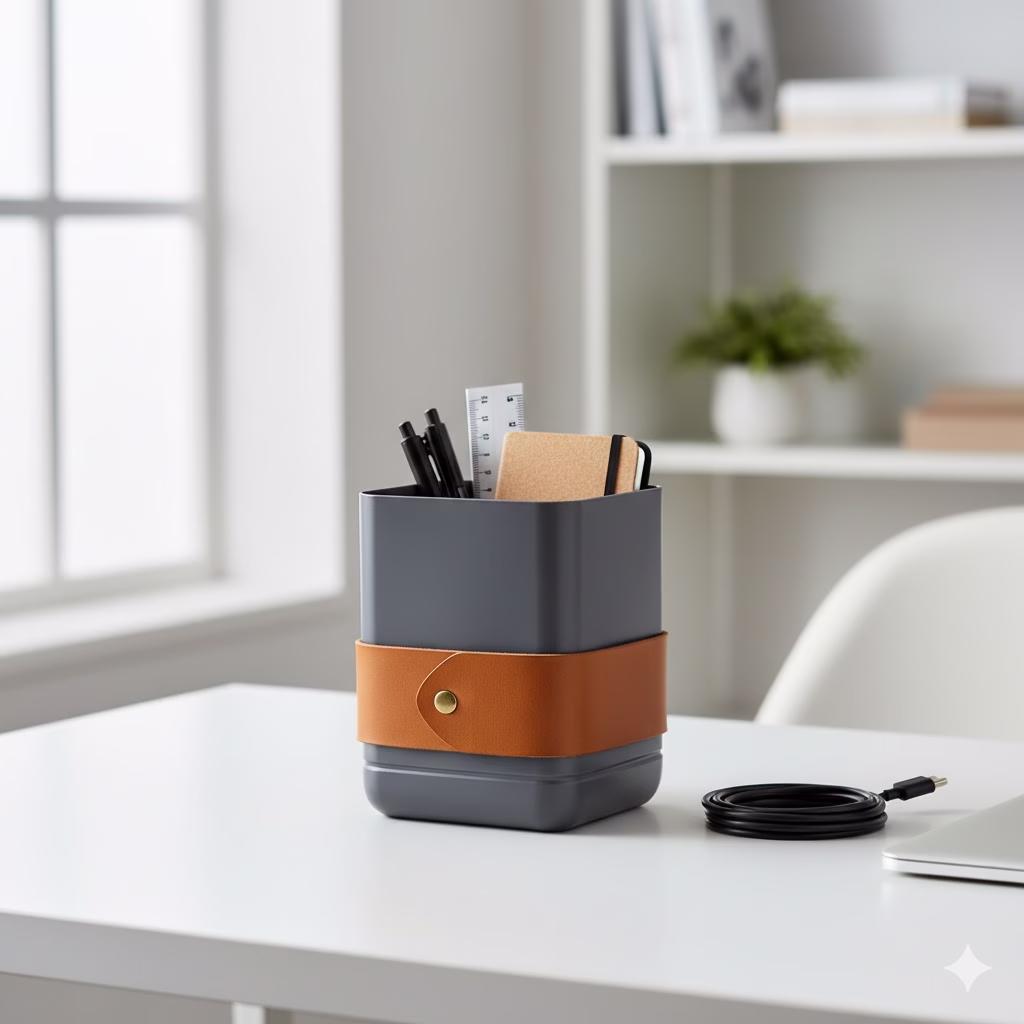
- Stylish Desk Organizers: Cut off the top handle part of a jug. Paint it a solid color (matte grey or black). Then, wrap the bottom third with a leather strap or thin cork sheeting. This creates a smart holder for pens, scissors, or charging cables.
Hanging Planters: Cut jugs in half. Drill drainage holes in the bottom. Paint them with a textured paint (like Project 1). Add faux leather or rope straps and hang them on a wall. They are perfect for small indoor plants or succulents.

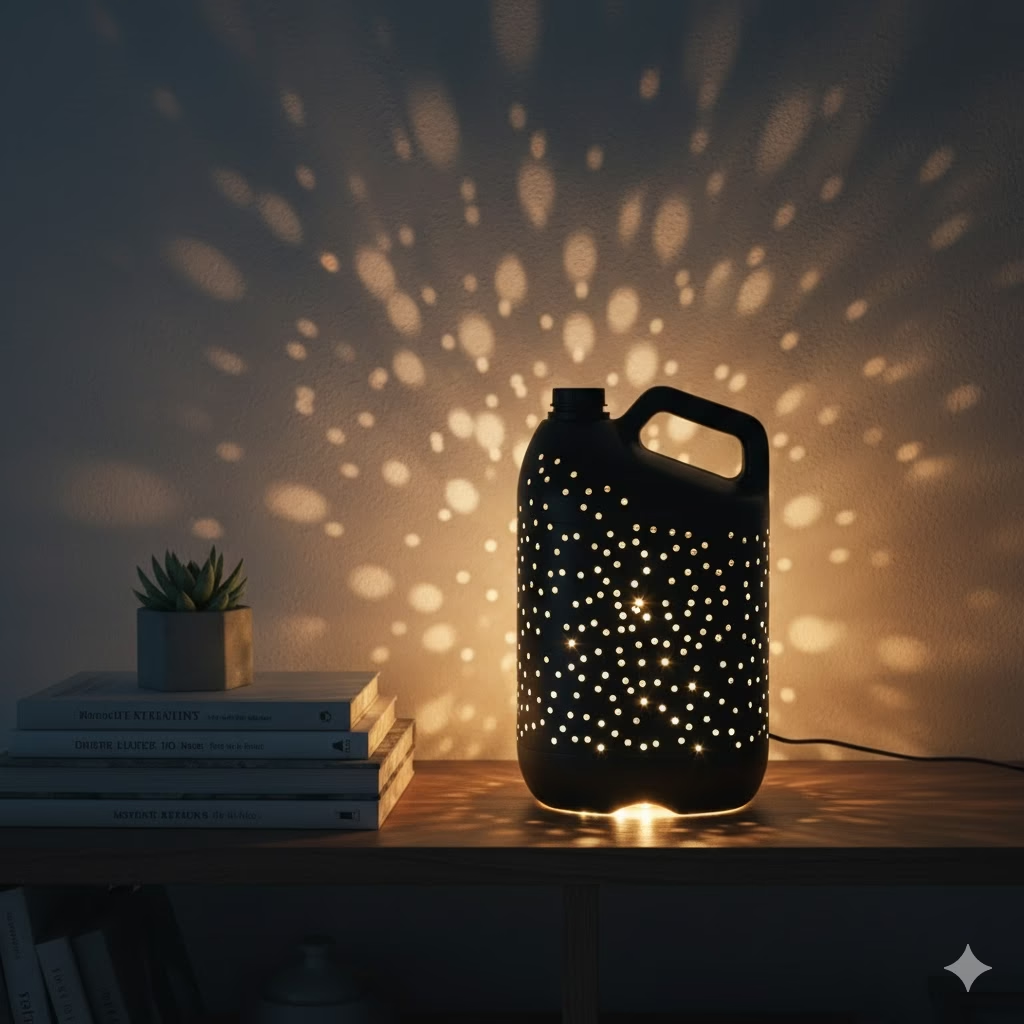
The Patterned Light Diffuser: For a different take on Project 3, paint the entire jug matte black (or another dark color). Carefully drill or cut small, random holes across the surface. Place LED lights inside. This creates a dramatic, starry-night effect when the light shines through.
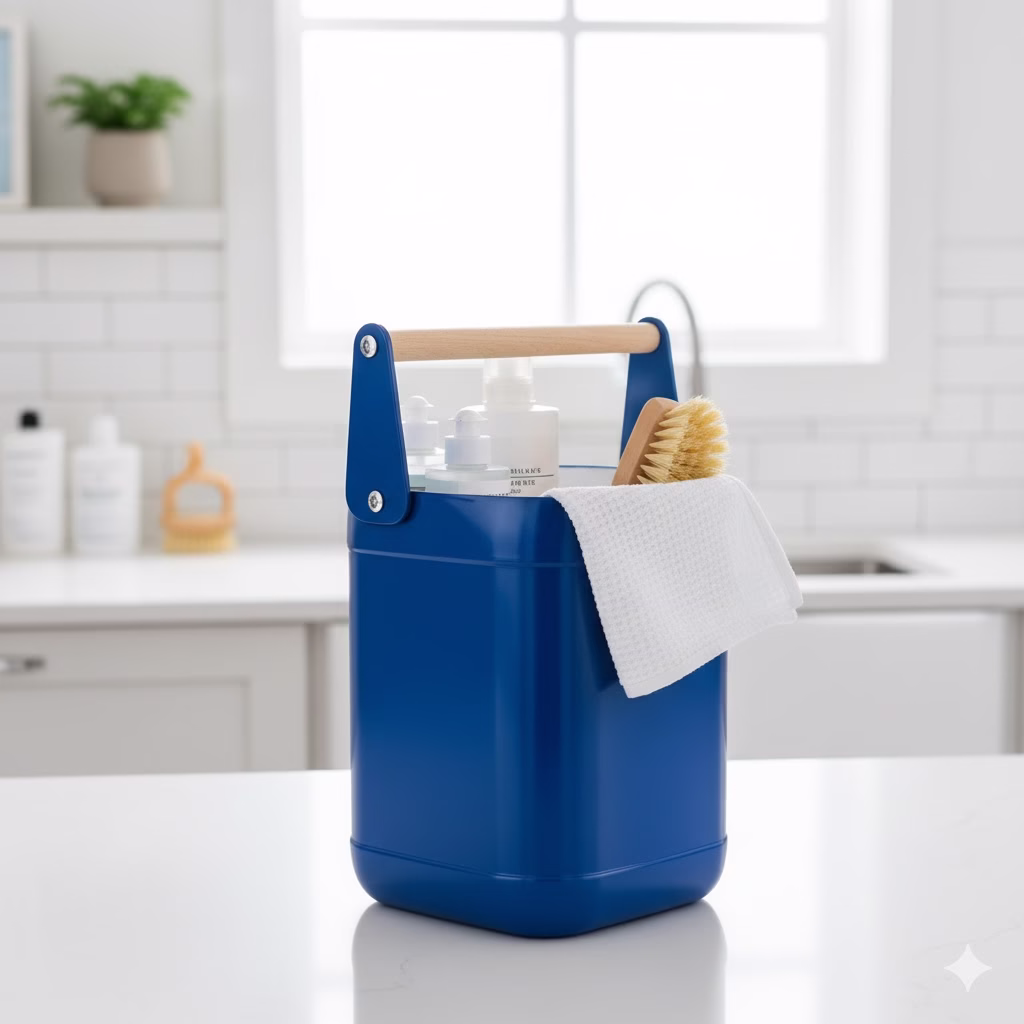
Cleaning Supply Caddy: Use a large, open-top jug (like a milk jug). Cut the top off neatly. Apply a glossy, solid-color paint (like deep emerald or cobalt blue). Add a simple wooden dowel handle secured by small bolts. This makes a great-looking caddy for moving cleaning supplies around the house.
Kids’ Toy Bins: Use very large jugs (like commercial detergent containers). Cut the tops off to create wide, open bins. Paint them in two-tone patterns (like white and tan). These make durable, chic bins for tidying away toys in a stylish living space.
FAQ – Upcycle Plastic Jugs
Q: What kind of plastic jugs are best for upcycling projects?
A: The best containers are usually made from HDPE plastic (often marked with a #2 recycling symbol). These are commonly found as milk jugs, laundry detergent bottles, and some cleaning solution containers. They are thicker, sturdier, and hold their shape well, making them ideal for cutting and converting into strong storage.
Q: Is it safe to cut the plastic? What is the best way to get a smooth edge?
A: Safety is always first. Use a sharp craft knife for heavy cuts and strong scissors for trimming. Always cut away from your body. The most important step for safety and a professional look is to smooth the edges. Use fine-grit sandpaper (around 120-220 grit) and gently rub the cut line until it is completely smooth and no longer sharp to the touch.
Q: What is the best paint to use on plastic jugs for a long-lasting finish?
A: You need to use paint specifically made for plastic, which usually contains an additive that helps it adhere to the slick surface. Spray paint is often the easiest option for a smooth, even finish. Look for products labeled “Paint for Plastic” or “All Surface” spray paint. For the best result, apply a thin coat of plastic primer first, then apply several light coats of your color.
Q: How can I hide the texture or logos already on the plastic jug?
A: You have a few options:
- Textured Paint: As shown in Project 1 and 4, thick or textured spray paint (stone, granite, or stucco effect) does a great job of covering small details.
- Wrapping: Projects 2 and 4 use materials like rope or cork/leather to fully or partially wrap the body of the jug, covering the original markings completely.
- Sanding: For raised letters, you can often sand them down with a coarse sandpaper before applying primer and paint.
Q: Are upcycled containers safe to use for food storage?
A: It is strongly recommended that you do not use upcycled plastic for direct food storage or serving. Unless you are absolutely certain of the plastic type and its original use, it’s safest to reserve these containers for non-food items like blankets, cleaning supplies, art materials, or planters.
References
- Plasticreimagined – Upcycling Defined: A Creative Approach to Sustainable …
- Plasticforchange – The Benefits Of Using Recycled Plastic
Recent Posts