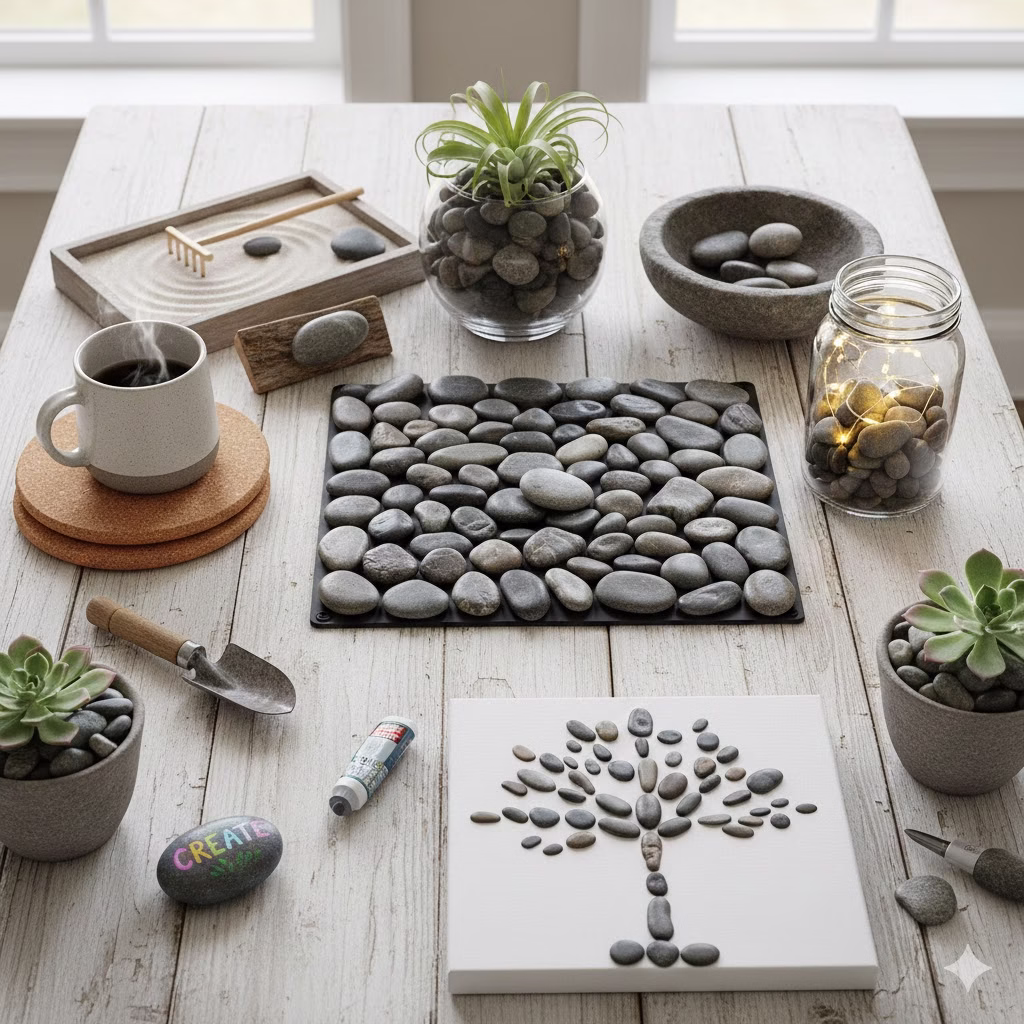
This information is presented with the goal of making great design accessible to everyone. Achieving a beautiful home does not require a large budget. All that is needed is a little creativity and a willingness to explore fun DIY Décor Ideas. This content specializes in simple, easy-to-follow projects that yield big results, demonstrating that the most effective home updates often come from a weekend of simple diy crafts. Discover how these easy diy and crafts projects can transform old furniture into stylish conversation pieces.
Mastering Small Space Style: The Ultimate DIY Décor Ideas
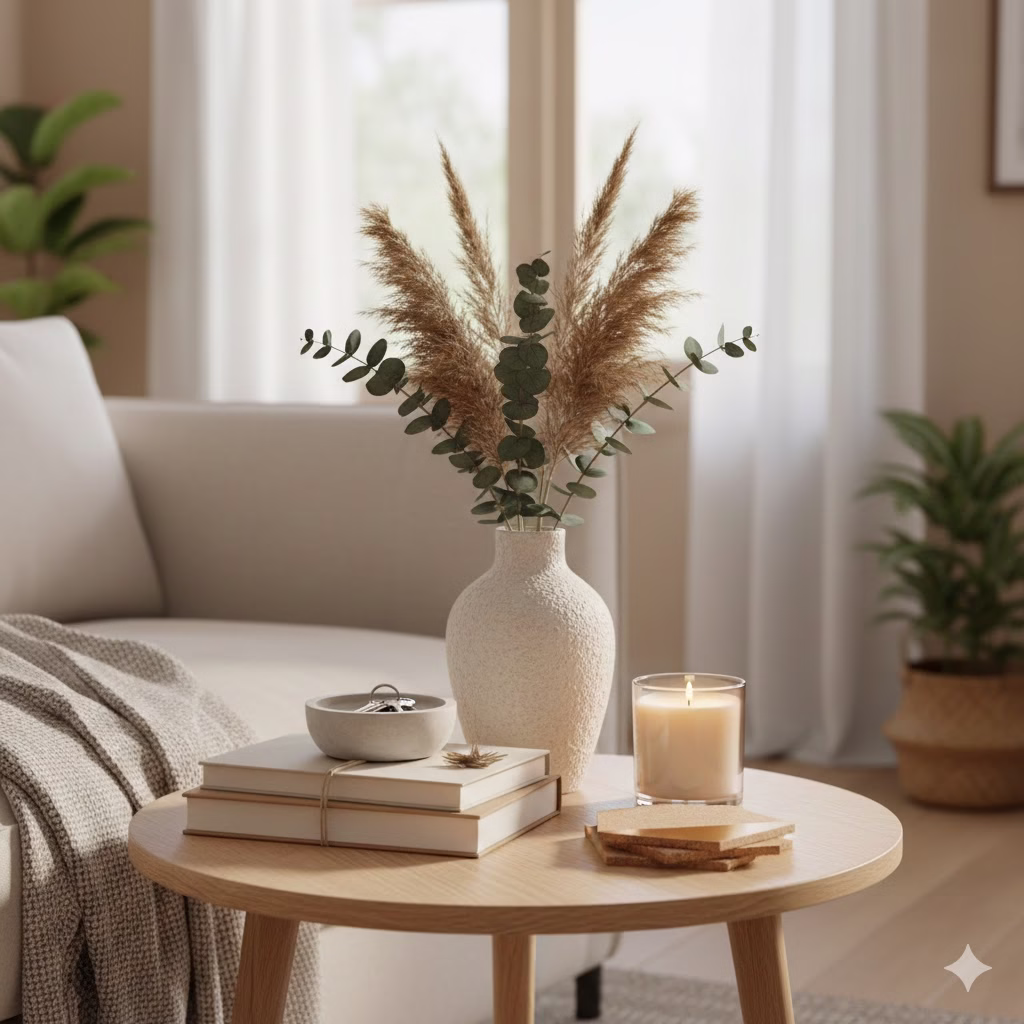
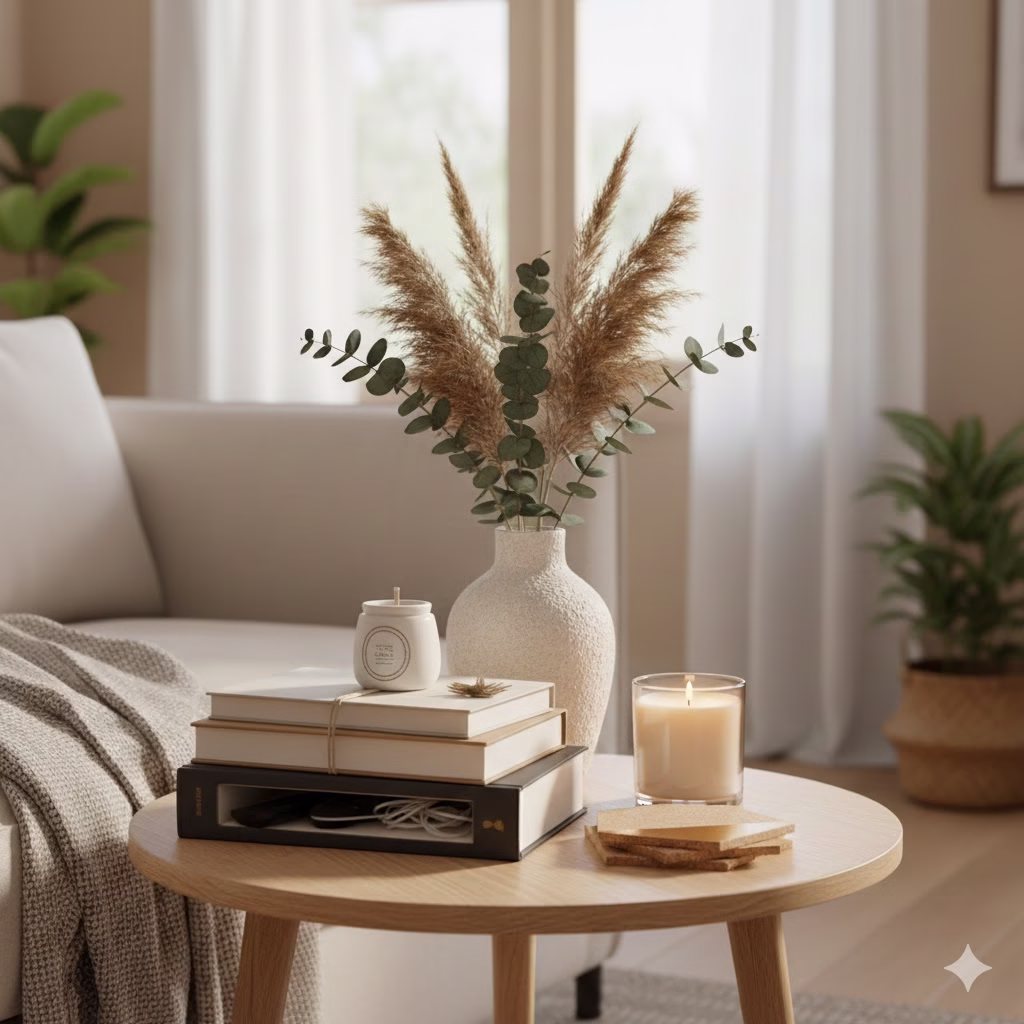
Small accent tables are often placed next to a couch or a bed. They are the quiet heroes of home design. These tables are useful and necessary, yet people often forget to style them well. Too many homeowners just put a lamp on them and stop there. They miss a big chance to add style, texture, and high-end design to their living area. A small table can be a strong focal point. If you decorate it well, it can make the whole room feel more finished and put together.
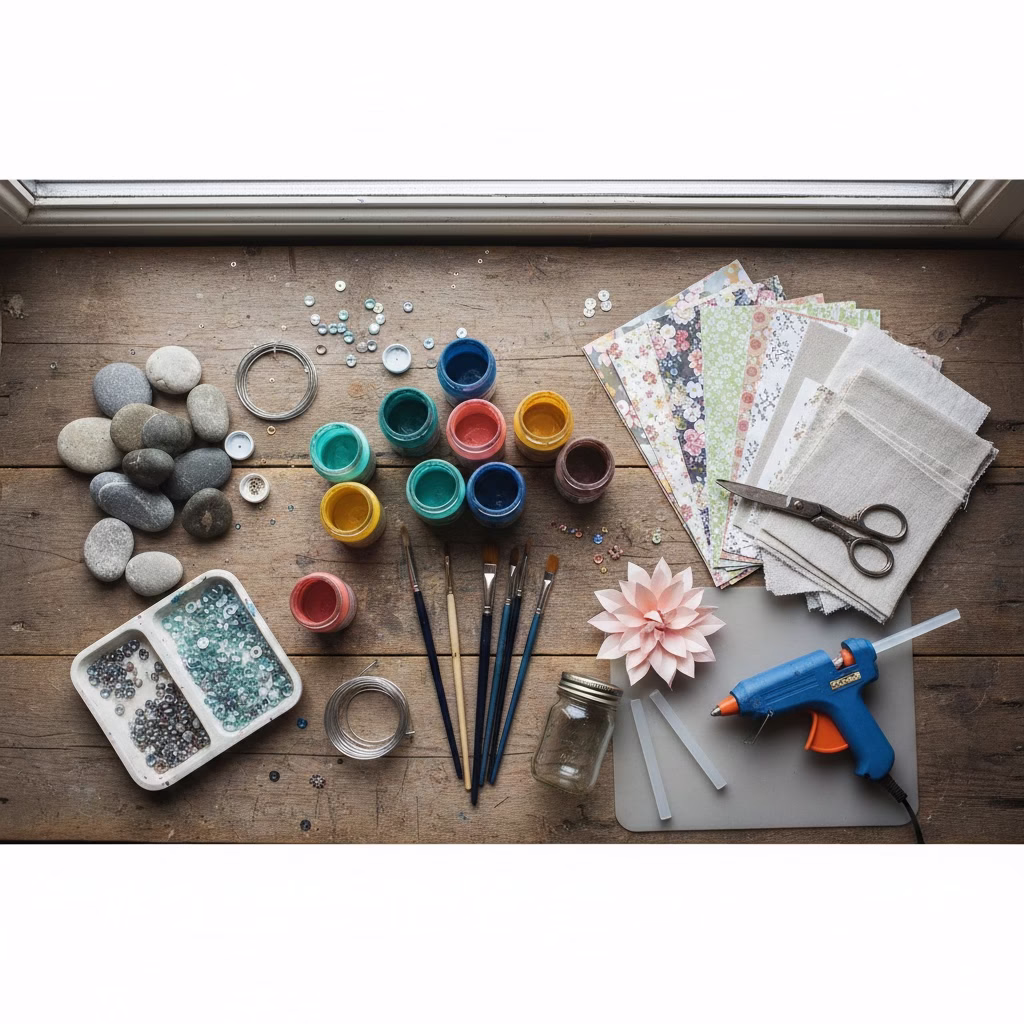
The great news is that you do not need expensive store items to get this stylish look. In fact, the most charming, personal, and stunning displays often come from great DIY Décor Ideas. This long guide gives you ten important projects. They cover many styles and techniques. They are all made to work perfectly for small accent tables. These ideas are great craft for adults who want to add a personal touch to their home. They show that great-looking décor is easy to achieve for anyone. We look closely at the tools, the steps, and the styling advice for each project. This will help your accent table go from just useful to truly beautiful.
1. The Textured Clay Vase Update

A lovely vase is key to any table display. Still, store-bought vases can cost a lot of money. This project takes a cheap vase and changes its surface. It will look like an expensive, textured piece.
The Idea and Inspiration
The popular high-end look is matte, textured ceramics. This style often has a rough, stucco-like surface. Making this look at home is much simpler than you might think. You can take any plain glass or ceramic vase. Even a vase from a thrift store will work. You can give it a full style makeover. This is one of the fastest and best DIY Décor Ideas for accent tables.
Materials and Process
- Materials: A basic, clean vase (any shape), baking soda, matte acrylic paint (white, cream, or beige), a brush, and a small cup for mixing.
- The Mix: The paint and baking soda mix is the secret to the texture. Start by pouring a good amount of paint into your cup. Slowly mix in baking soda until the mix is thick. It should look like light frosting or thick batter. If you add more baking soda, the texture will be rougher.
- Application: Use an uneven, dabbing brush stroke. Put the mix onto the vase. Do not try to make it smooth. The uneven look is what makes it look like real, hand-made ceramic. Cover the whole outside surface. Let it dry fully. You might need a second layer to fully cover the original surface and make the texture pop.
- Styling Tip: Put dry pampas grass, cotton stems, or fake eucalyptus in the finished vase. This gives you a clean, modern look that needs no care.
2. Elevated Stacked Book Storage
Books are a basic item on any table. But just stacking them can look messy. This project changes a stack of books into a smart display stand and a place to hide things.
The Idea and Inspiration
Home designers often use books to add height. They use them to hold smaller décor items in place. This trick goes even further. It uses a hollowed-out book or box as the base. This lets you hide remote controls, phone cords, or reading glasses right on the table. This project mixes style and use. It is a perfect example of great DIY Décor Ideas.
Materials and Process
- Materials: Three to five attractive hardback books (pick colors that match your room), strong craft glue, and a small, shallow box made of wood or cardboard (this is for the hidden storage, it is optional).
- The Look: Take off the paper dust covers. This gives the books a more stylish, textured look. Choose books with spine colors that work well together. For a matching style, paint the spines of all the books one matte color (like black or brown-grey).
- Creating the Riser: Stack the books with the biggest one at the bottom. Put a thin layer of strong craft glue between each book. This keeps the stack steady and solid.
- Adding Storage (Optional): If you want to add storage, here is a simple diy crafts step: Use a sharp utility knife to carefully cut out the center pages of the bottom book. Leave a half-inch border. Or, use a small, nice wooden box. Paint it the same color as the book spines. Glue it to the bottom of the lowest book.
- Styling Tip: Place one small, valued item on top of the stack. A scented candle, a nice coaster, or a small framed photo works well. This makes people look at the height you have created.
3. Geometric Cork Coasters
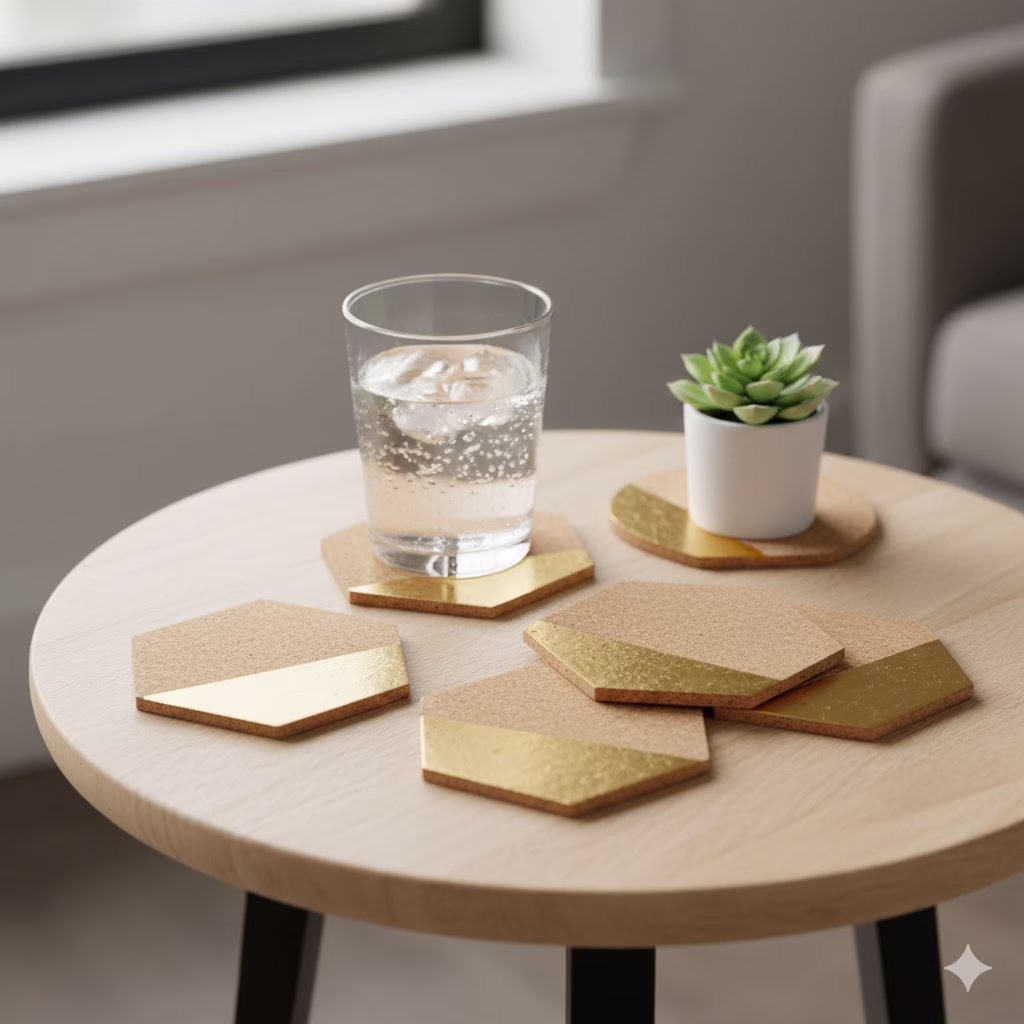
Coasters must protect your table. Yet, they often do not add much style. These geometric cork coasters are a simple, high-impact craft for adults project. They add natural texture and modern shapes to your table.
The Idea and Inspiration
Cork is a great, nature-friendly material. It soaks up water well. It also keeps things from sliding. Cut the cork into cool, unexpected shapes. Add a touch of metal. This moves the coaster from just useful to truly decorative.
Materials and Process
- Materials: Thin sheets of cork (you can buy this at most craft shops), a very sharp utility knife, a ruler, masking tape, and metallic gold or copper spray paint.
- The Shape: Do not cut simple circles or squares. Instead, cut the cork into six-sided shapes (hexagons), long diamonds, or half-moon shapes that overlap. Use a pencil and ruler to draw your lines before you cut.
- The Metallic Accent: Use masking tape to cover one-third or one-fourth of the coaster. For example, tape off one corner of the hexagon or the bottom edge of a diamond shape. Spray the part that is showing with the metallic paint. Let it dry completely. Then, carefully pull off the tape. This shows a clean line between the natural cork and the metallic color.
- Styling Tip: When you are not using the coasters, place them slightly over each other on your table. Put a mug on one and a small, low succulent plant on another. This shows them off as decorative items.
4. Marble Effect Serving Tray

A tray is a designer’s secret tool. It keeps small items together. It also marks a special area on a small table. This project creates the look of costly marble or stone. It does this without the high cost or heavy weight.
The Idea and Inspiration
A tray gives a group of objects (a lamp, a vase, a candle) a visual border. This makes them look like a planned arrangement, not just random things. Real marble trays are expensive. But you can get a stunning fake finish. You just need a simple painting trick. This is a top-level DIY Décor Ideas project that gives you very nice results.
Materials and Process
- Materials: A simple tray made of wood or MDF (even a cutting board with handles can work), white or light grey paint, black and dark grey acrylic paint, a very thin artist’s brush, and clear sealant spray. Optional: metallic gold paint for the “veins.”
- The Base: Paint the whole tray with two coats of the light base color (white or light grey).
- Creating the Veins: Dip the thin brush into the black or dark grey paint. Use a very light touch to draw thin, branching lines across the surface. Right away, use a damp cloth or sponge to gently dab and smudge the lines. This softens them so they blend into the base color. This blurred effect makes the marble look real.
- Finishing: After the paint is fully dry, spray the tray with a clear sealant. This makes it strong and gives it a shiny finish that looks like smooth stone.
- Styling Tip: Use the tray to hold all your table must-haves: a lamp, a small bowl for keys, and a remote control. The tray makes this collection look planned and organized.
5. Industrial Concrete Bowl Catchall
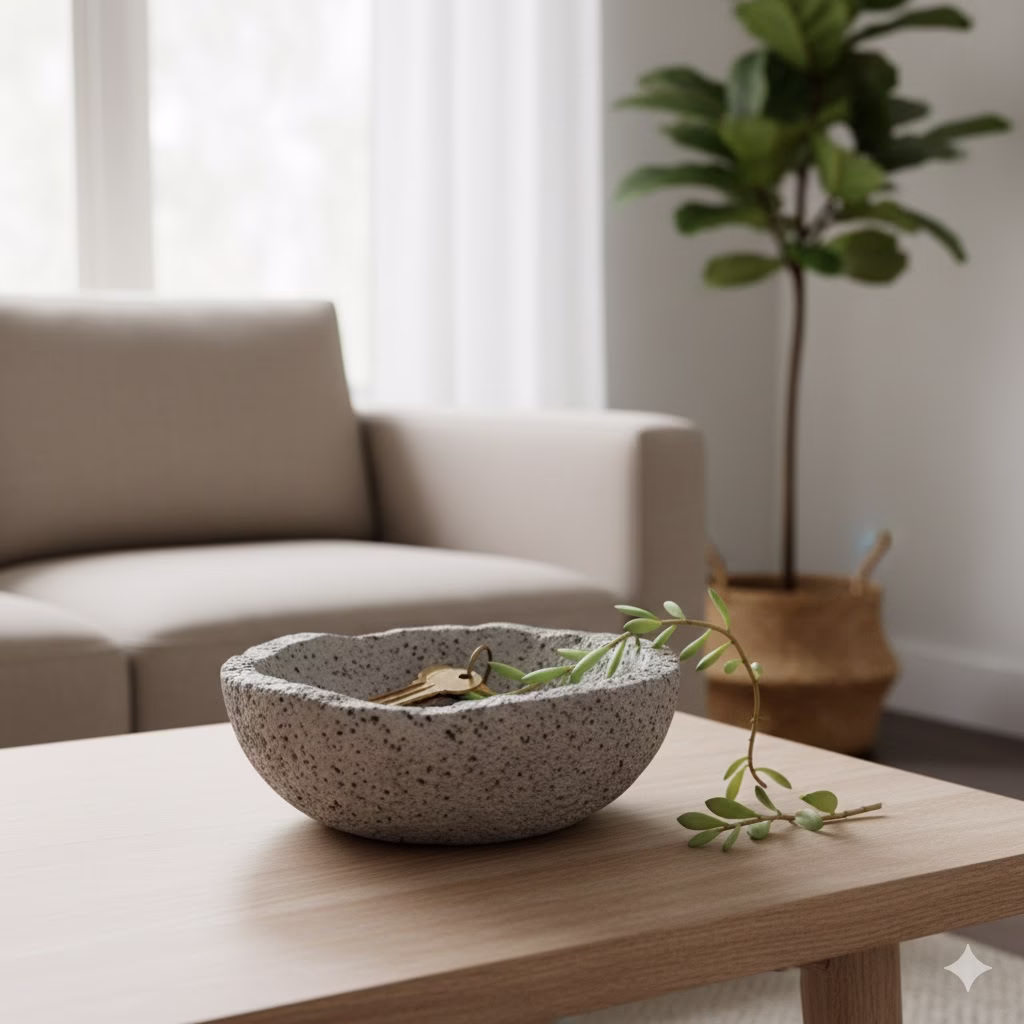
Small bowls work well on accent tables. They catch little items like keys or coins. This project uses quick-setting concrete to make a simple, industrial-style bowl. It will be unique and look handmade.
The Idea and Inspiration
The raw, unfinished look of concrete is a key style in modern, industrial design. Making a small concrete bowl is a simple diy and crafts activity. It gives you a very smart, touchable object.
Materials and Process
- Materials: Quick-setting cement or plaster of Paris, two different-sized plastic or silicone bowls (one small, one a little larger), non-stick cooking spray, and sandpaper.
- The Pour: Mix the cement as the package tells you. Make sure it is smooth but not too runny. Spray the inside of the larger bowl. Also, spray the outside of the smaller bowl with cooking spray.
- Casting: Pour the cement into the larger bowl. Fill it halfway. Gently push the smaller bowl into the center of the cement mix. The cement should rise up around the edges. You may need to put weights or stones inside the inner bowl to hold it down.
- The Cure: Let the cement dry and harden for the time given on the package. Once it is fully hard, carefully twist and pull out the two bowls. This shows your new concrete catchall. Sand down any rough edges.
- Styling Tip: Put moss in the finished bowl. Place a nice air plant inside it. Or, just use it to drop your keys or jewelry when you sit down.
6. Cane Webbing Lamp Shade Revamp
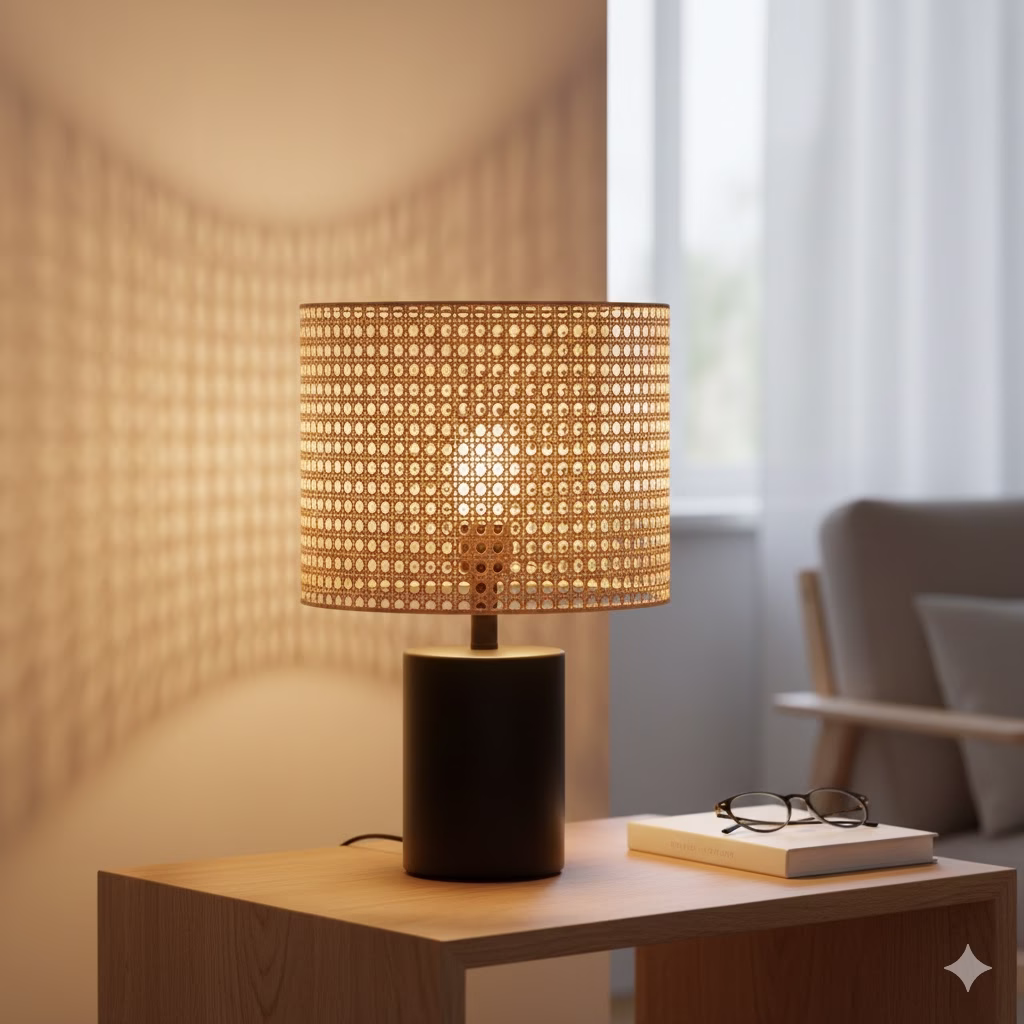
If you have a plain lamp already sitting on your table, this is a great DIY Décor Ideas project. You can update its look using materials from nature that are very popular right now.
The Idea and Inspiration
Cane webbing is a material made from woven natural fibers. It is very popular in nice furniture. It brings a lovely, light texture that reminds people of older mid-century design. When you put it on a simple lamp shade, the lamp instantly looks much better.
Materials and Process
- Materials: A simple drum-style lamp shade (one with flat sides is best), a sheet of cane webbing (you can buy this online), spray adhesive or hot glue, and scissors.
- Measuring and Cutting: Roll the lamp shade across the cane webbing. Measure the length and height you need. Leave a bit extra for the overlap where the ends meet. Carefully cut the cane webbing to the right size.
- Adhering: Work on small parts at a time. Spray the shade with glue or put hot glue along the edges. Slowly and tightly wrap the cane webbing around the shade. Make sure the weave is straight and the meeting point is neat.
- Finishing: Use a little hot glue along the seam to hold it firmly. The woven pattern lets the light shine through in a beautiful way. It casts unique patterns in the room.
- Styling Tip: Use the cane shade with a simple, modern lamp base (made of wood, metal, or ceramic). This makes the texture of the shade the main point of the design.
7. Faux Agate Slice Tray Inlays
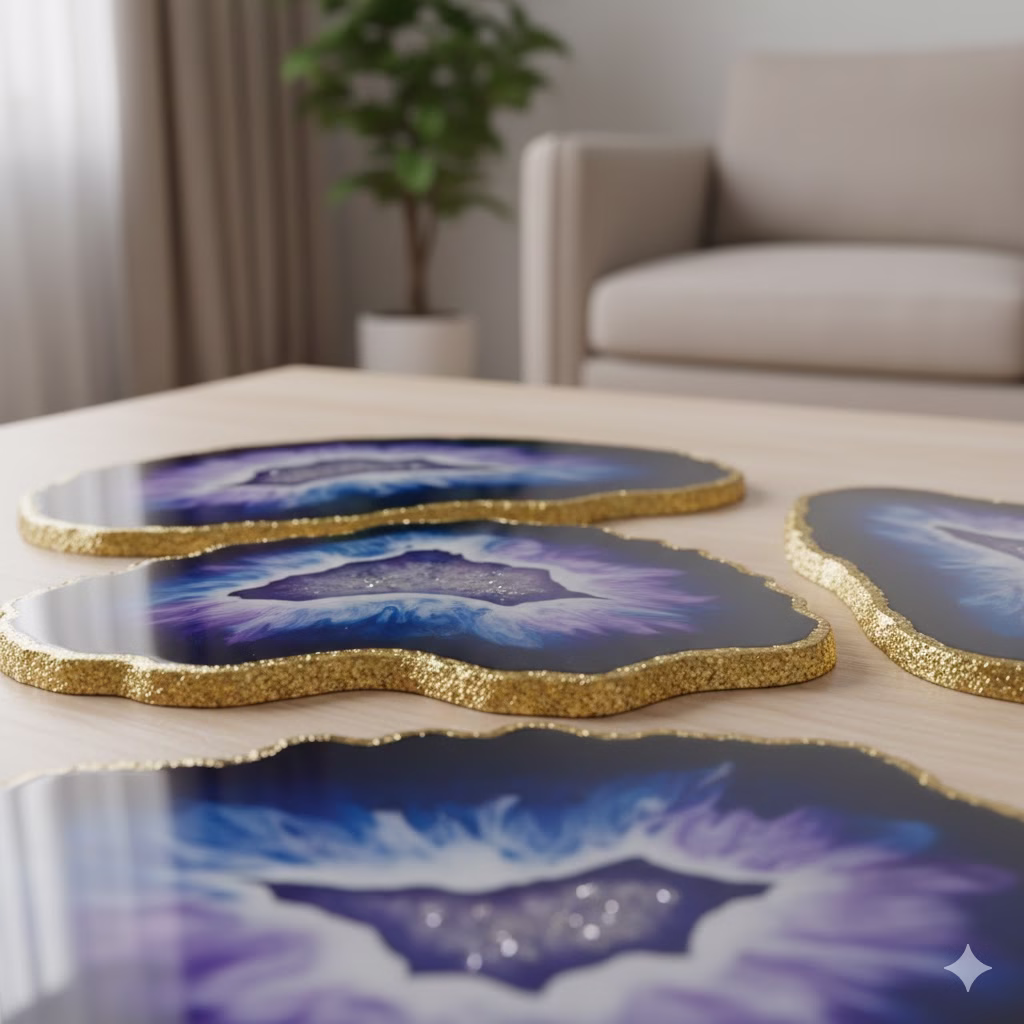
This is a small touch that looks very dramatic. It turns a plain wooden or metal tabletop or tray into a piece of art. It uses clear resin and bright colors.
The Idea and Inspiration
Real agate slices are beautiful, but they break easily and cost a lot. You can make the look of a colorful, crystal-filled stone slice. Use epoxy resin and colored powder. Then, put this fake slice into your tabletop or a tray. This is a more complex craft for adults project. The result is a custom look that feels professional.
Materials and Process
- Materials: Two-part clear epoxy resin, colored mica powder (blue, purple, gold), small plastic cups for mixing, wooden sticks, and a silicone mold (round or long).
- Mixing: Follow the resin instructions exactly for mixing the two parts. Pour small amounts of the mixed resin into separate cups. Mix in different colors of mica powder.
- Pouring the Agate: Pour the colors into the mold. Start with the main color. Drizzle small amounts of a second color and the gold color around the edge. This copies the crystal bands of the real stone. Use a stick to gently swirl (do not mix!) the colors together. This creates the stone-like vein lines.
- Inlay (Optional): Once the resin is hard, you can glue it into a cut-out spot in your table or tray. Use a strong glue for this. Or, just use the finished slice as a dramatic coaster or a decorative piece by itself.
- Styling Tip: The bright colors of the agate slice look best next to neutral things on the table. Things like white paint or dark wood work well.
8. Repurposed Picture Frame Mirror
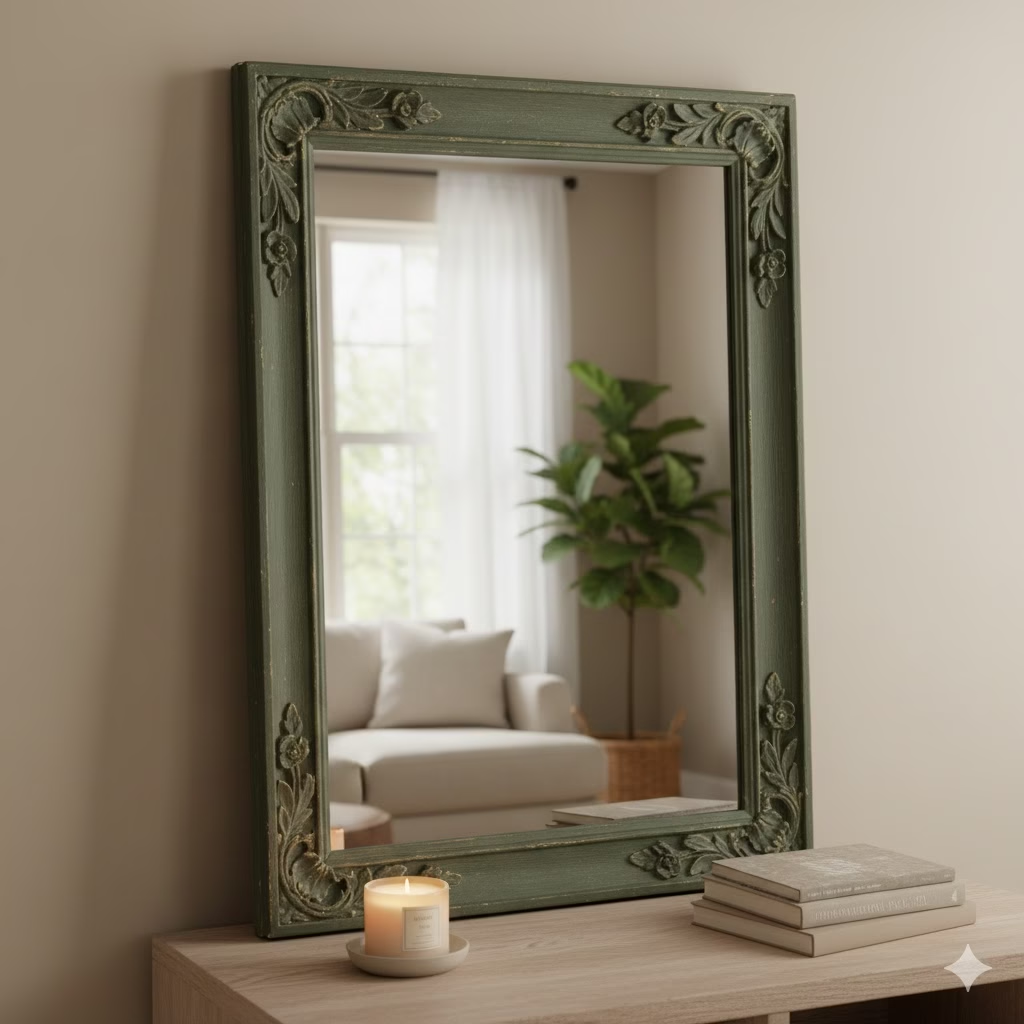
Every small accent table looks better with something reflective. This bounces light around and makes the area feel bigger. This project takes an old frame and turns it into a stylish, decorative mirror.
The Idea and Inspiration
Mirrors are excellent DIY Décor Ideas because they add shine and depth. Find an attractive picture frame (one with fancy designs works well). Take out the photo and put a mirror piece in its place. This creates a high-end decorative item. It costs much less than a mirror bought from a store.
Materials and Process
- Materials: A nice picture frame (wood, metal, or painted), a piece of mirror cut to fit the frame’s opening (most hardware or glass stores can cut this for you), and strong hardware for hanging (if you hang it) or a stand (if it rests on the table).
- The Frame: Sand the frame and paint it or stain it to match your room. A worn look or a deep, dark stain can give it a vintage feel.
- Assembly: Just put the custom-cut mirror piece into the frame. Do this just like you would put in a photo or print. Secure the backing.
- Styling Tip: Lean the framed mirror up against the wall behind your table. The reflection will quickly add depth. It also makes the items in front of it (like a vase or candle) look more important.
9. DIY Painted Terra Cotta Pedestals
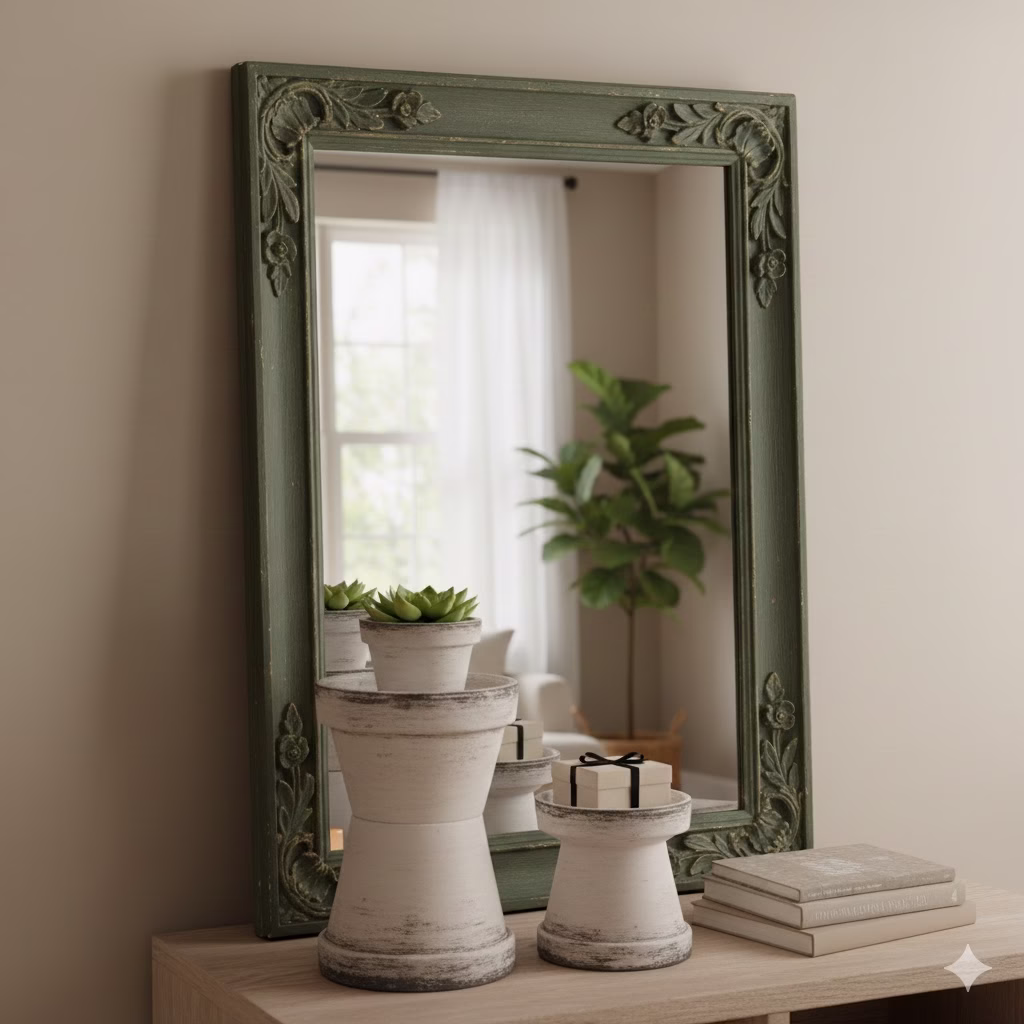
Give your smallest planters or decorative items the attention they should have. Put them on simple, custom-made stands.
The Idea and Inspiration
A stand lifts objects up. This makes them look special, like something in a museum. Use cheap terra cotta pots and saucers. You can make a simple but elegant stand. This adds height differences, which is a key part of good staging. This is a very good and cheap set of DIY Décor Ideas.
Materials and Process
- Materials: Two terra cotta pots (one a little bigger than the other, or two the same size), matching terra cotta saucers, strong glue (epoxy or strong craft glue), and matte paint in your chosen color (like white or black).
- The Assembly: Turn the larger pot upside down. Glue the smaller pot (also upside down) right on top of the larger pot’s base. This makes a stepped stand. Or, for an easier look, glue a small terra cotta saucer upside down onto the top rim of a single, inverted pot. Let the glue dry completely.
- The Finish: Paint the whole stand with two coats of paint. For a more rustic or factory look, use a thin, dry brush to lightly add a different color paint onto the edges.
- Styling Tip: Put a small succulent plant, a nicely wrapped box, or a tiny statue on the finished stand. This will instantly draw the eye up.
10. Textured Paint Dipped Wood Votives
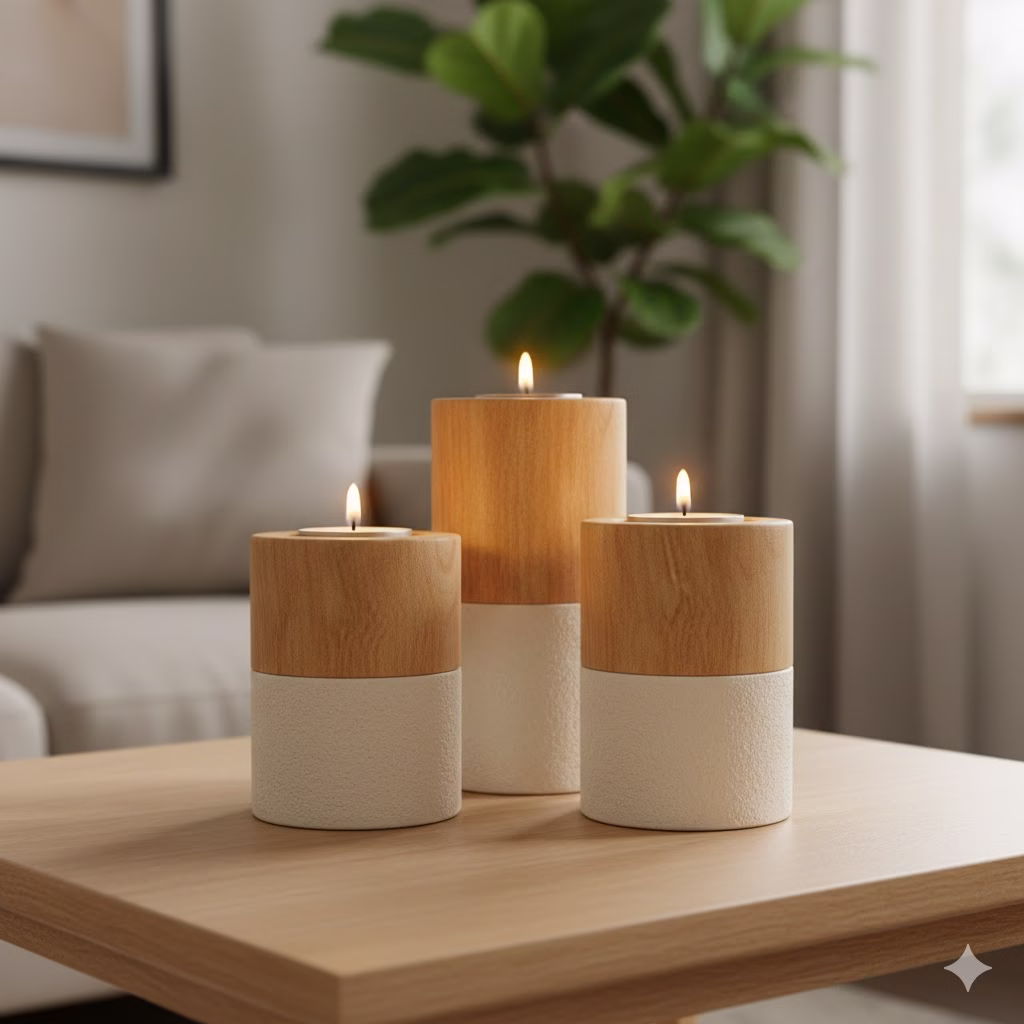
Candlelight is needed for a cozy feel. These custom holders add both texture and a bit of color.
The Idea and Inspiration
Simple wooden candle holders can often look too plain. Dip them in paint mixed with baking soda (use the same trick as in Idea 1). This gives them a lovely, matte, and soft finish. It looks great next to the natural wood grain. This is a quick and useful diy and crafts project.
Materials and Process
- Materials: Simple, plain wooden votive holders, matte paint, baking soda, a mixing cup, and masking tape.
- The Dip Line: Use masking tape to cover the top two-thirds of the candle holder. Leave the bottom part showing. This creates a clean, professional line where the paint starts.
- The Mix and Dip: Make the textured paint mix (paint plus baking soda) as described earlier. Hold the votive by the taped section. Slowly dip the bottom part that is showing into the paint mix. Make sure the paint covers the area up to the tape line.
- The Cure: Carefully place the candle holder on wax paper. Let it dry fully. Once it is dry, gently pull off the masking tape. This shows the crisp line between the natural wood and the textured paint.
- Styling Tip: Use three votives of different heights together on your accent table. This creates a warm, layered lighting display.
Conclusion: Your Small Table, Elevated
Your small accent table is more than just a place to put your cup. It is a key spot for design in your home. By taking on these DIY Décor Ideas, you are doing more than just saving money. You are adding your own unique style and creativity to your home. Each of these projects is a chance to make your space look better. They help you practice fun diy crafts and make truly custom pieces that everyone will admire. Great design is found in the small details. With these ten ideas, you have everything you need to change a plain table into a stunning design piece. Start your next project today, and watch your room get a fresh, new look.
References
For more reading and help with materials, these places offer great information on the skills and items used in these DIY Décor Ideas:
- Beau Property Staging – Transform Your Home
- Resin Glory – Beginner’s Guide to Epoxy Resin
- Art News DFW – Understanding Acrylic Paint Additives
- Rattanvn- Rattan Cane Webbing
Recent Posts