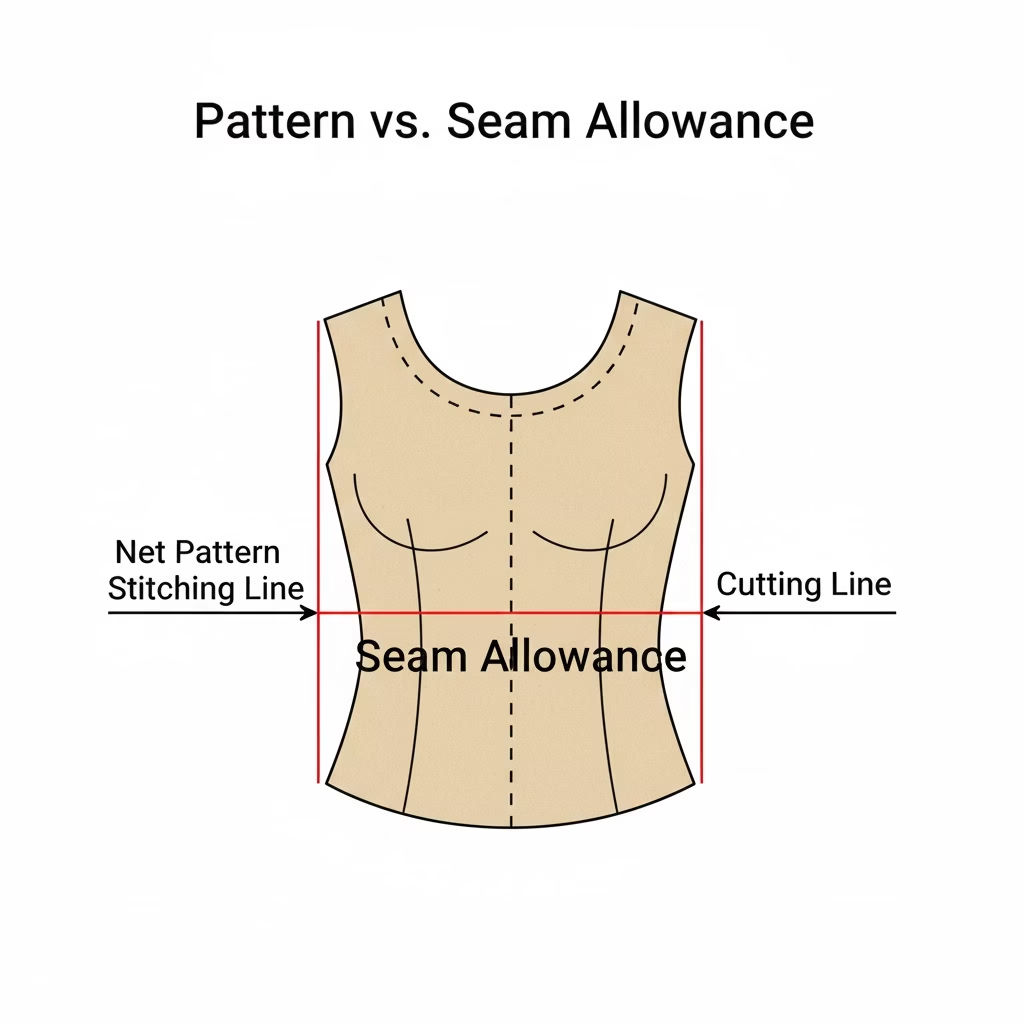
Once you have used your sloper to create new designs, you must add seam allowances before you cut your fabric. A master sloper has no seam allowances so that you can see the exact fit lines of the body. However, if you sew along the edge of a sloper without adding extra width, the dress will be much too small. Adding these allowances is a vital skill for anyone working with dress patterns.
Step 1: Choose Your Seam Allowance Width
The width you choose depends on the fabric and the type of seam you want to use. While commercial dress patterns often use a standard width, you can choose what works best for your project.
- Standard (1.5 cm or 5/8 inch): This is the most common width. It gives you enough room to finish the edges or make small fit changes.
- Narrow (1 cm or 3/8 inch): This is great for tight curves, like necklines or armholes. It is also good for knits or when using an overlocker.
- Wide (2 cm or more): Use this for center back seams where you might put a zipper, or for side seams if you think you might need to let the dress out later.
Step 2: Trace Your Design Copy

Never add seam allowances to your master sloper. Instead, trace your new design onto a fresh piece of pattern paper. Use a pencil to mark the “stitch line” (the original edge of your sloper). This line is where your sewing machine needle will go.
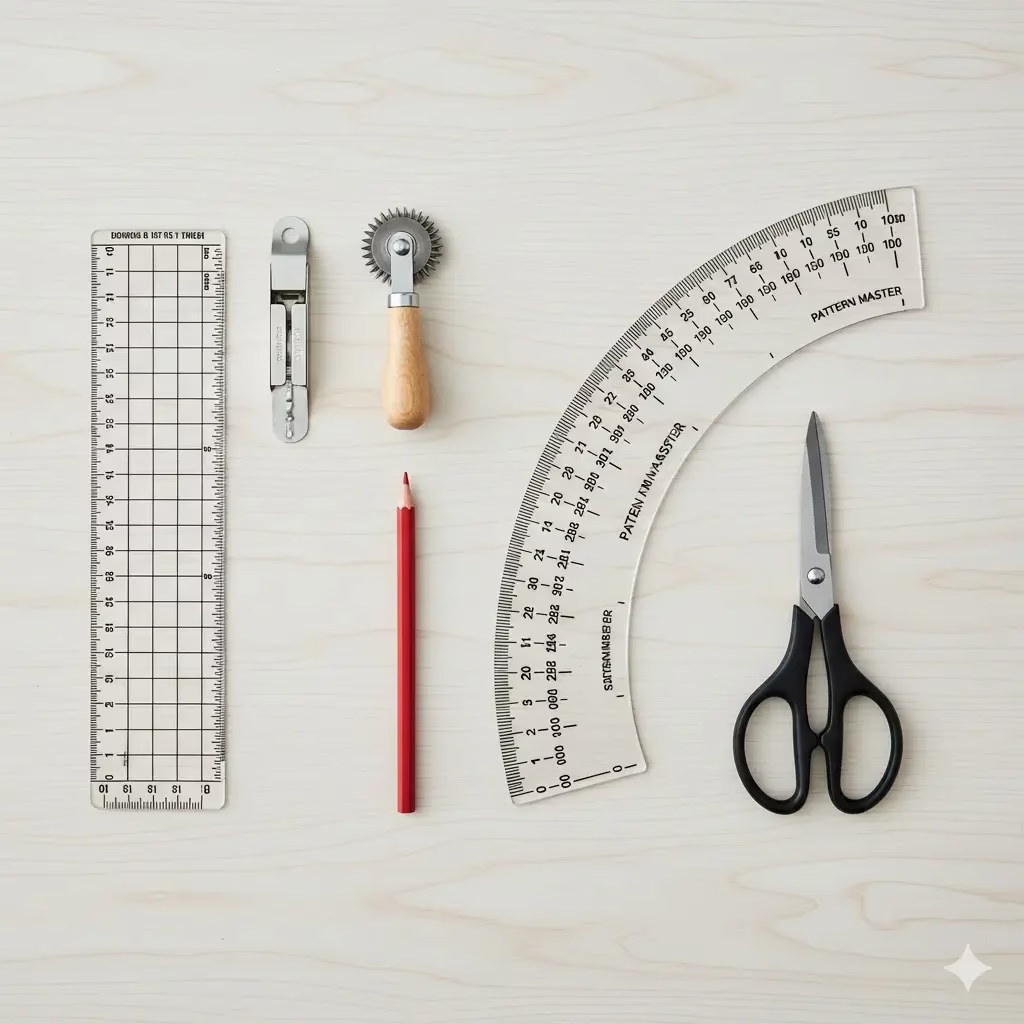
Step 3: Use a Grading Ruler for Accuracy
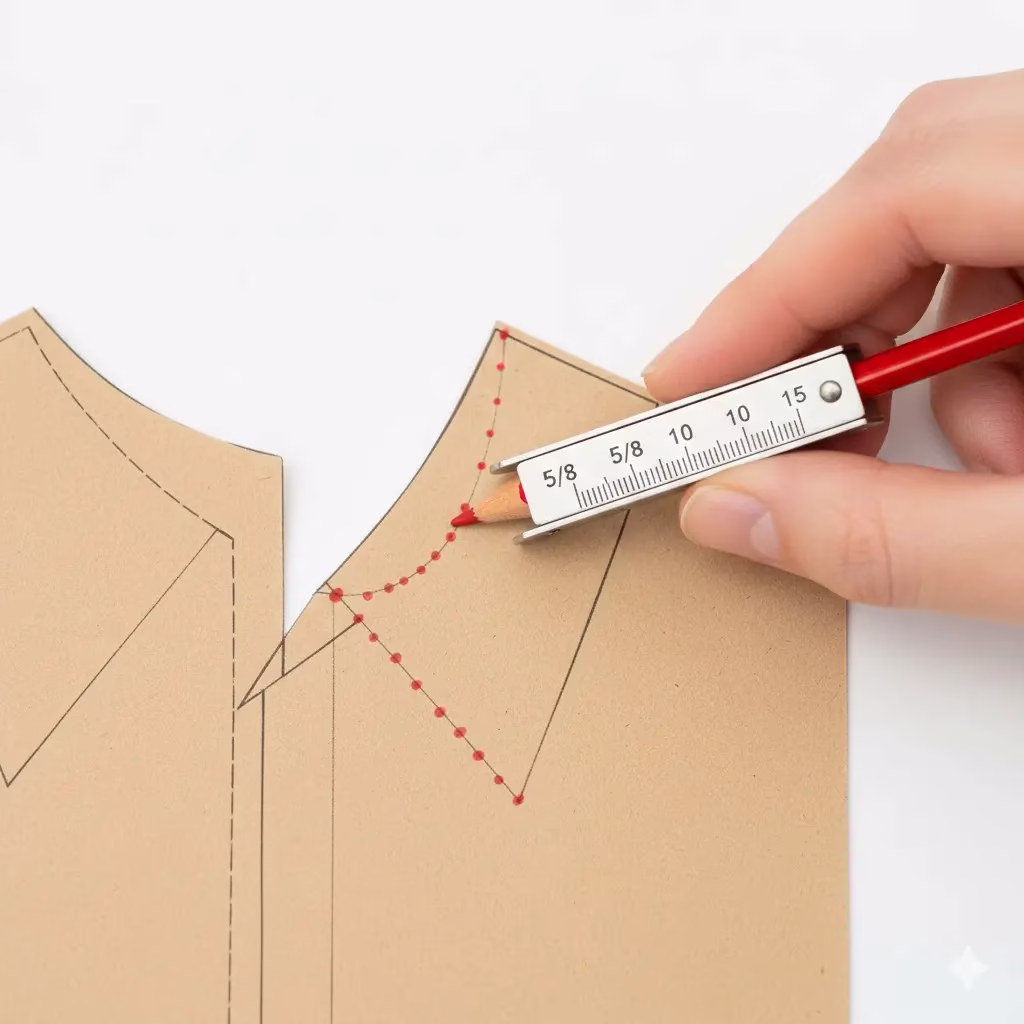
To add the allowance, place a clear grading ruler on your paper. Align the ruler so that the 1.5 cm mark sits exactly on your stitch line. Draw a new line on the outside. Do this all the way around the piece.
For curves, like the armhole or a V-neck, move the ruler slowly. Mark small dots every few centimeters and then connect them with a smooth line using a French curve. This ensures your dress pattern stays accurate.
Step 4: Handle Corners and Notches

When you reach a corner, like the bottom of a side seam, extend your lines until they cross. This creates a sharp point that is easy to follow.

Don’t forget to move your notches! If you have a notch on your stitch line to help you line up a sleeve, draw a line straight out to the new edge of the paper. Use a pattern-notcher to make a small snip so you can see it on your fabric.
Step 5: Adding the Hem Allowance
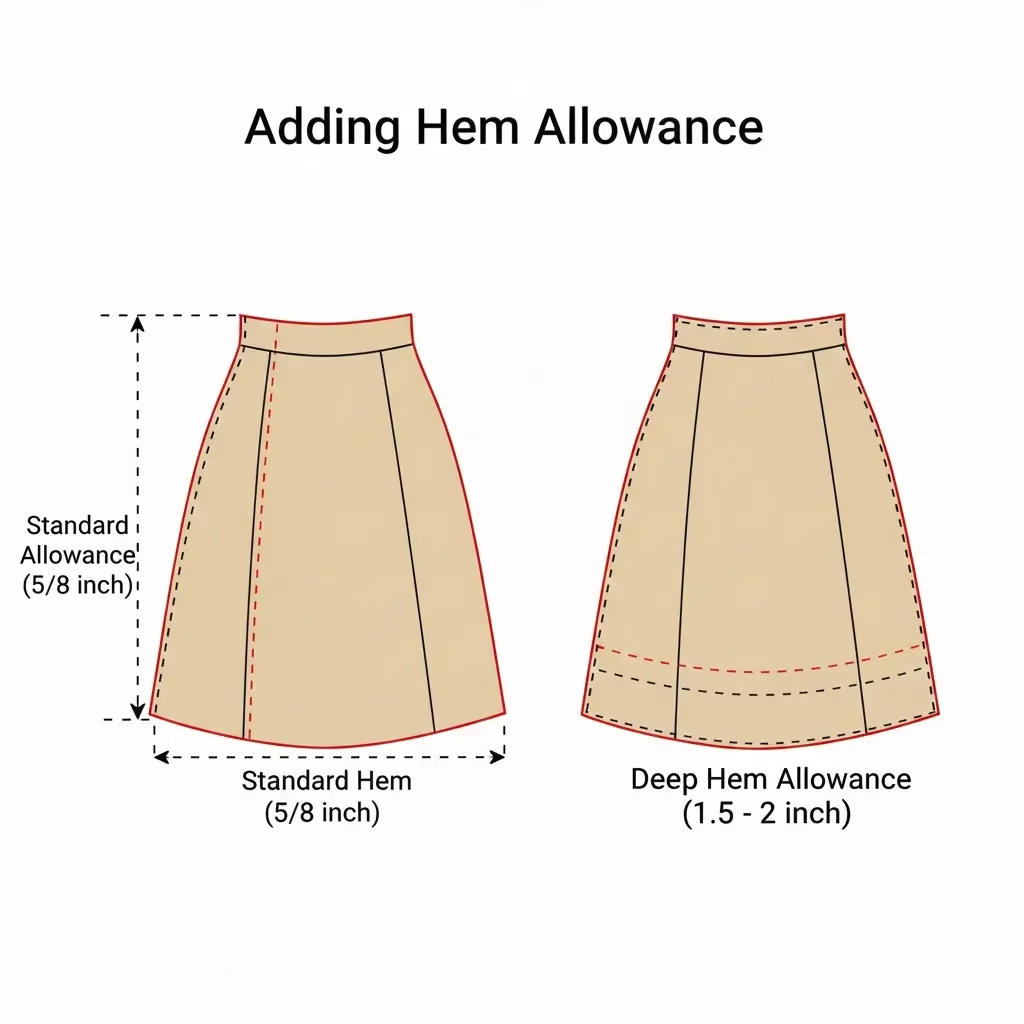
The bottom of your dress or sleeve needs a larger allowance so you can fold the fabric up.
- Straight Skirts: Add 4 to 5 cm for a deep, stable hem.
- Circle Skirts: Add only 1 to 1.5 cm. A wide hem on a curved edge will bunch up and look messy.
Final Check and Labeling
Before you cut the paper, check that your seams match. Place the front side seam against the back side seam. They should be the exact same length. Label each piece clearly with the name of the style and the date.
By taking the time to add seam allowances carefully, your DIY dress patterns will look just as professional as any bought from a store. You will find that your pieces sew together much more easily when the math is correct from the start.
External References
How to Finish Your Seams for a Professional Look
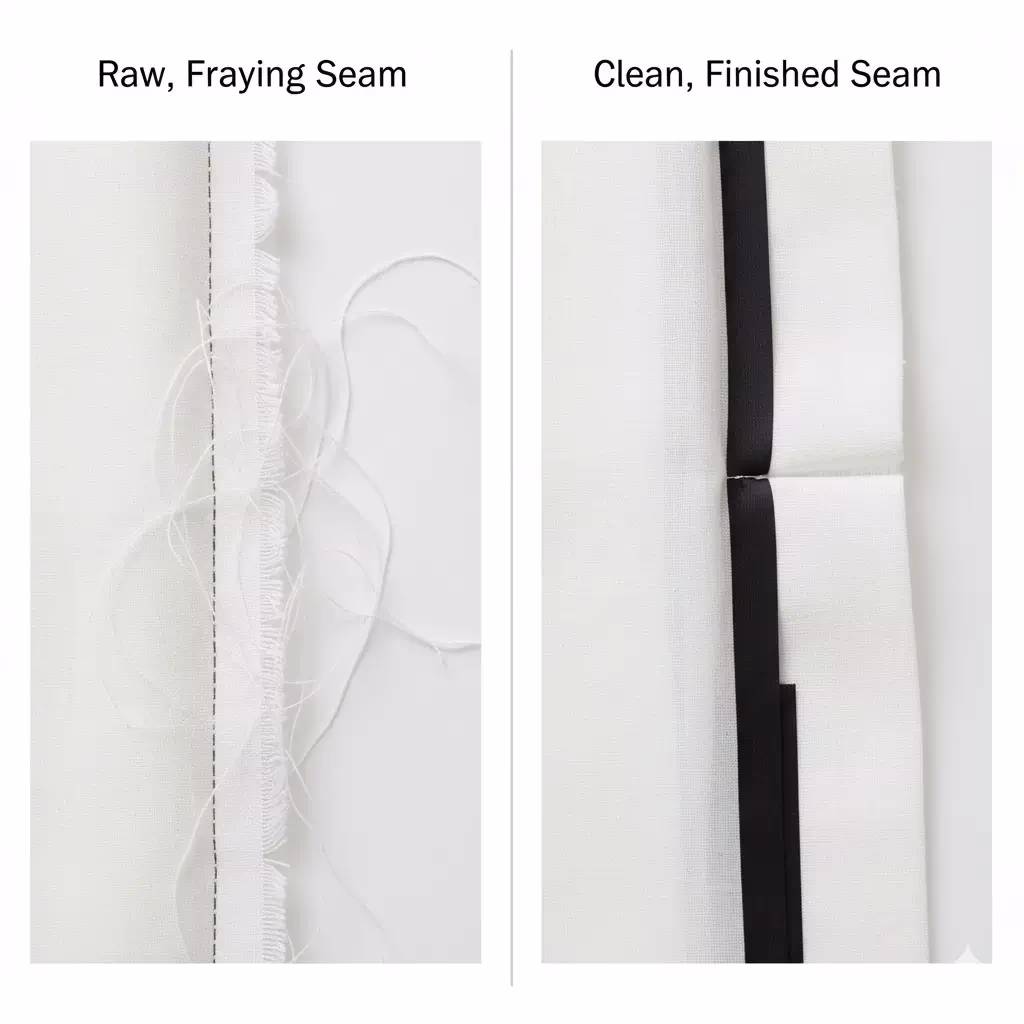
Once you have added your seam allowances and cut your fabric, the last step is to finish the raw edges. A raw edge can fray over time, which may ruin your dress. Choosing the right finish depends on the fabric you used for your dress pattern and how much wear the garment will get.
Method 1: The French Seam

The French seam is the gold standard for high-end dress patterns. It hides the raw edge completely inside a small tuck of fabric. This is best for thin, light fabrics like silk or chiffon.
- Sew Wrong Sides Together: Start by sewing your pieces with the “wrong” sides of the fabric touching. Use a small seam allowance (about 0.5 cm).
- Trim and Press: Trim the edge very close to the stitches and press the seam open.
- Fold and Sew Again: Fold the fabric so the “right” sides are now together. Sew again at 1 cm. The raw edge is now trapped inside the seam.
Method 2: Bias Binding
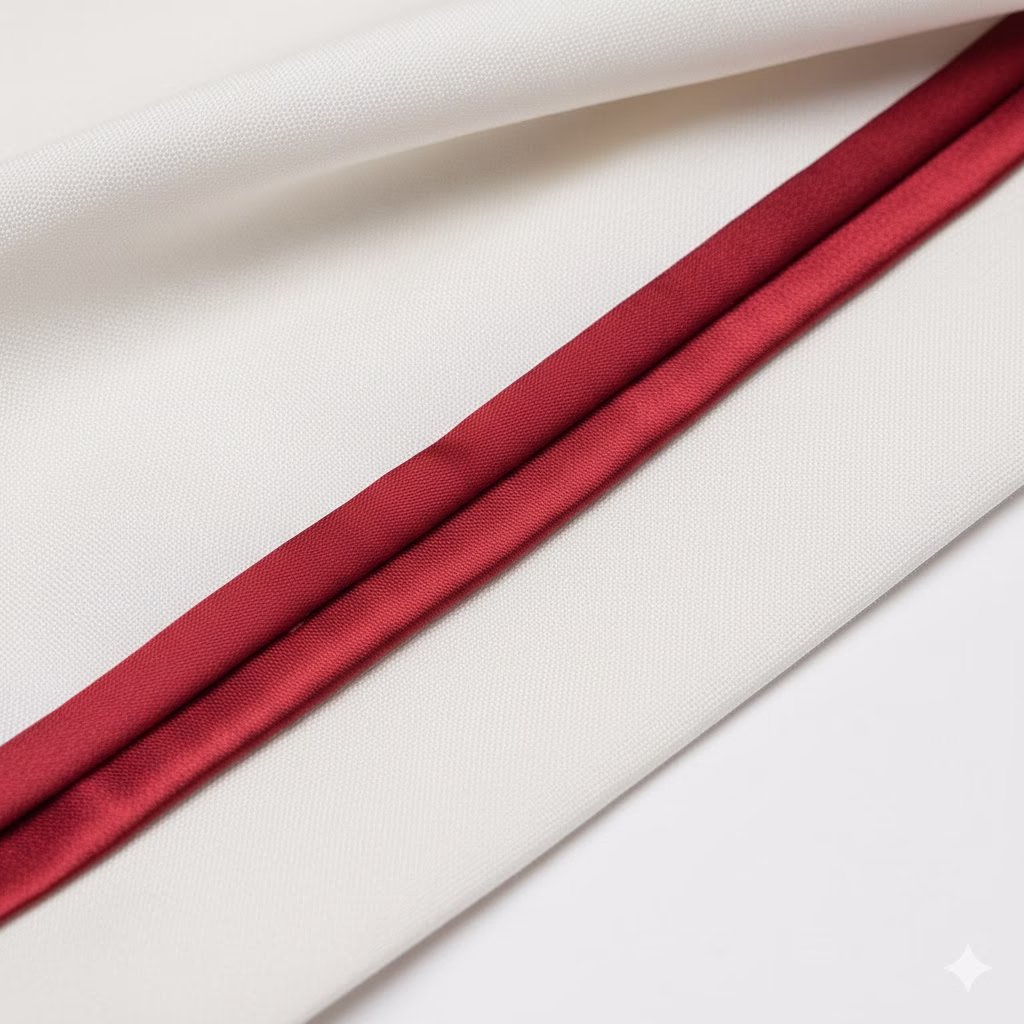
Bias binding is a beautiful way to finish necklines or armholes. It involves sewing a thin strip of fabric over the raw edge. This adds strength and a pop of color to your dress sewing patterns.
- Clean Finish: It hides the edge and keeps the shape of the curve from stretching.
- Comfort: It feels smooth against the skin, making it great for sleeveless dresses.
To do this, pin the binding to the right side of the edge. Sew along the fold, then flip the binding over to the inside and stitch it down.
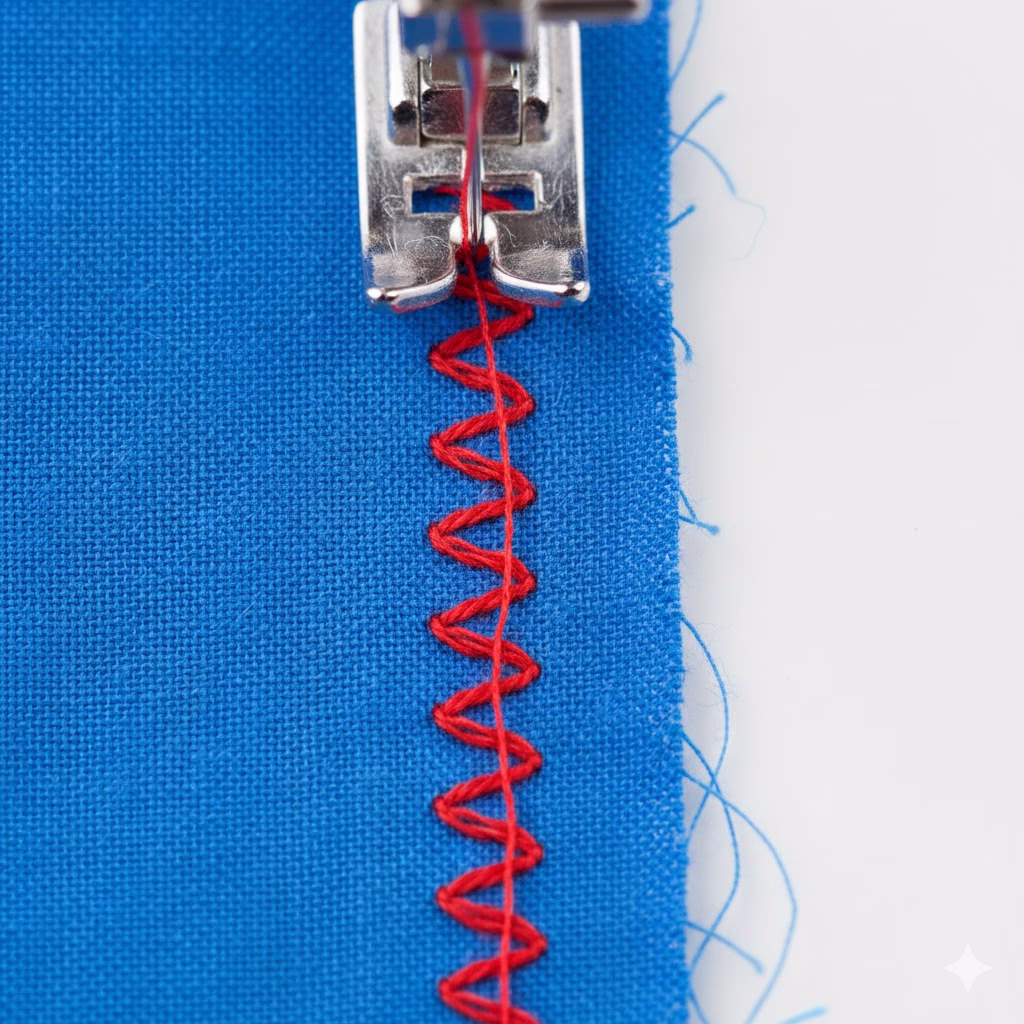
Method 3: The Zig-Zag or Overlock Stitch

If you want a fast and strong finish, use a zig-zag stitch on your home machine or an overlocker (serger). This is the standard for most commercial dress patterns.
- Zig-Zag: Set your machine to a medium width. Sew right along the edge so the needle drops off the fabric on one side. This “locks” the threads in place.
- Overlock: This machine trims the fabric and wraps it in thread all at once. It is very fast and gives a look like store-bought clothes.
Method 4: Pinking Shears
For fabrics that do not fray easily, like sturdy wool or some cottons, you can use pinking shears. These are scissors with a saw-tooth blade. By cutting the edge in a zig-zag pattern, you break up the thread lines and stop them from pulling out. This is a great “quick fix” for your DIY dress pattern projects.
Final Pressing Tips
No matter which finish you choose, always press your seams with an iron.
- Press Flat: First, press the seam just as it was sewn to “set” the stitches into the fabric.
- Iron to One Side: For most seams, press both allowances toward the back of the dress.
- Press Open: For heavy fabrics, press the allowances away from each other to keep the seam flat.
Using these finishes ensures that the custom designs you made from your sloper will last for years to share or wear.
External References
- The Spruce Crafts: Essential Seam Finishes
- National Sewing Circle: Professional Finishing Techniques
Final Assembly Checklist for Your Custom Dress
Building a dress from a custom dress pattern is a journey of many small steps. After you have hacked your sloper, added seam allowances, and chosen your finishes, it is time to put it all together. Use this checklist to stay on track. This will help you avoid the need to use a seam ripper and ensure your dress sewing patterns turn into a professional garment.
Phase 1: Preparation and Marking
Before you sit at the machine, ensure your fabric pieces are ready. Mistakes made during the cutting phase are hard to fix later.
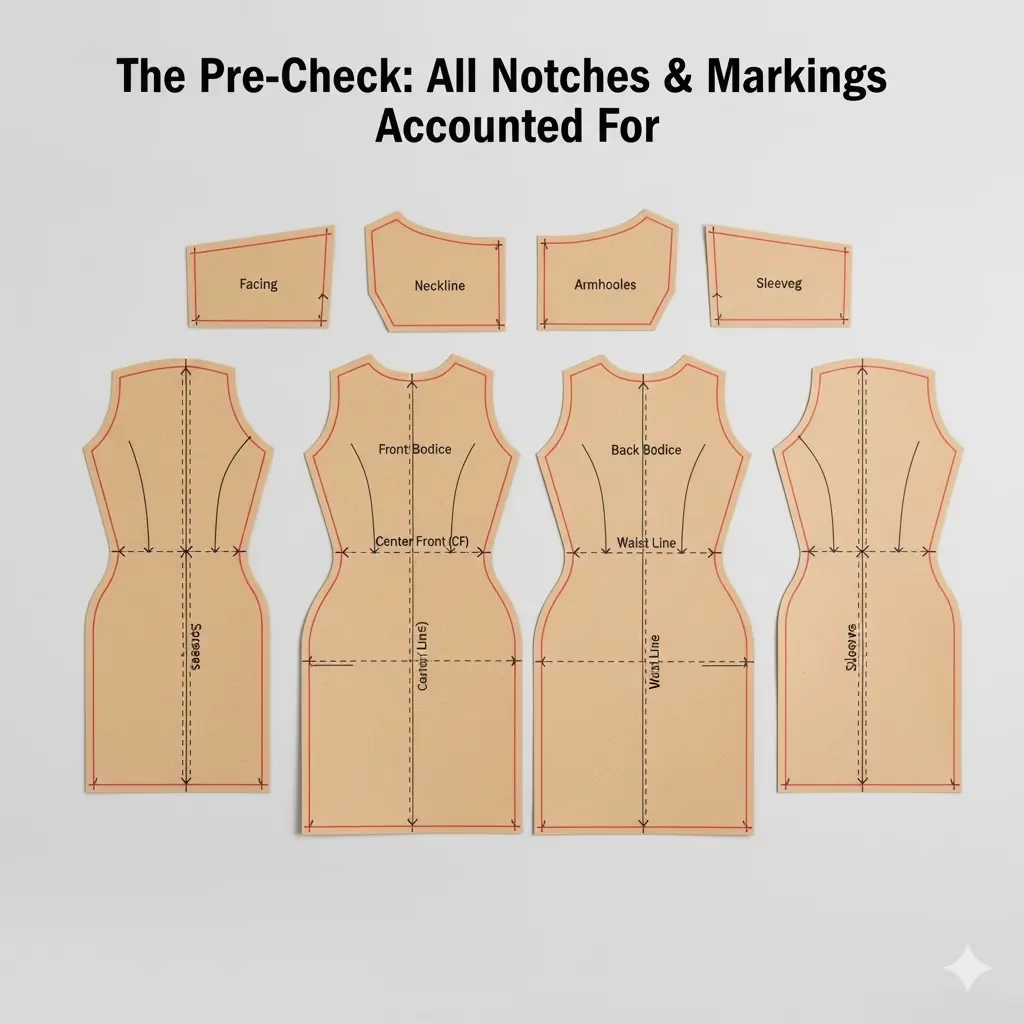
- [ ] Check Grainlines: Ensure every piece was cut on the grain as marked on your dress pattern. If the grain is off, the dress will twist on your body.
- [ ] Transfer All Marks: Check that you have marked every dart point, notch, and pleat line. Use tailor’s chalk or a small snip within the seam allowance.
- [ ] Stay-Stitch Curves: Sew a row of long stitches 3 mm inside the stitch line on necklines and armholes. This stops the curves from stretching out of shape as you handle the fabric.
Phase 2: Structural Sewing

This is where your sloper comes to life. Focus on the “inner” shape of the dress first.
- [ ] Sew and Press Darts: Always sew darts from the wide end to the point. Tie a knot at the point rather than backstitching. Press bust darts down and waist darts toward the center.
- [ ] Assemble the Bodice: Sew the shoulder seams first, then the side seams. If you are making a dress with princess seams, take extra care to pin the curves.
- [ ] Check the Fit: Slip the bodice on. Since you used a tested dress sewing pattern, the fit should be close. If you need to make a change, do it now before the skirt is attached.
Phase 3: Closures and Sleeves

Closures like zippers or buttons give your dress its function. Sleeves provide the style and silhouette.
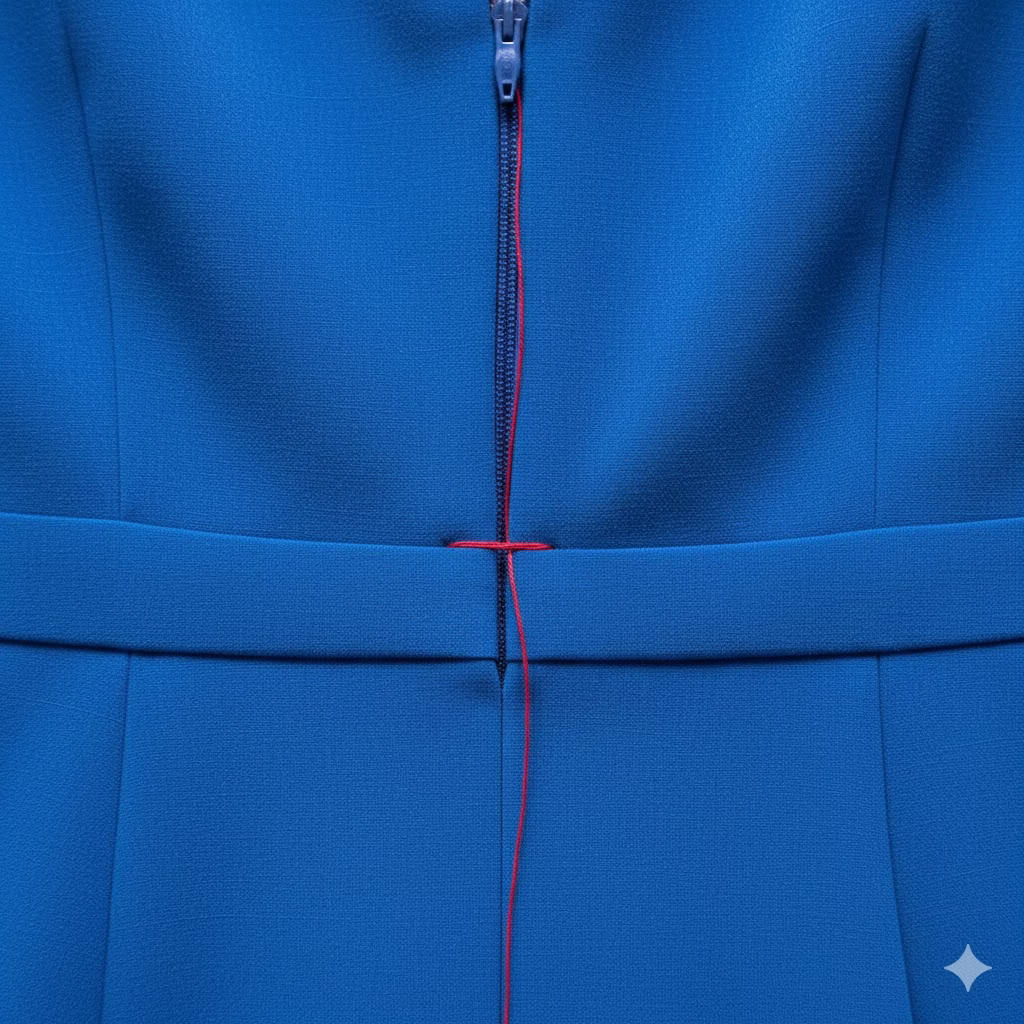
- [ ] Install the Zipper: Whether it is a center back or a side zip, baste it in place first. This ensures the waist seams on the left and right sides line up perfectly.
- [ ] Set the Sleeves: Pin the sleeve into the armhole, matching your notches. Distribute any “ease” (extra fabric) at the top of the sleeve cap for a smooth look.
- [ ] Finish the Neckline: Apply your facing or bias binding as planned. Ensure the transition at the top of the zipper is clean and flush.
Phase 4: The Skirt and Hem
The skirt adds the final weight and drape to your design.
- [ ] Attach Skirt to Bodice: Match the center front, center back, and side seams. If your skirt is gathered, ensure the gathers are spread out evenly.
- [ ] Let the Dress Hang: If you have made a circle skirt or any flared style, let the dress hang on a form for 24 hours. This allows the bias of the fabric to stretch before you hem it.
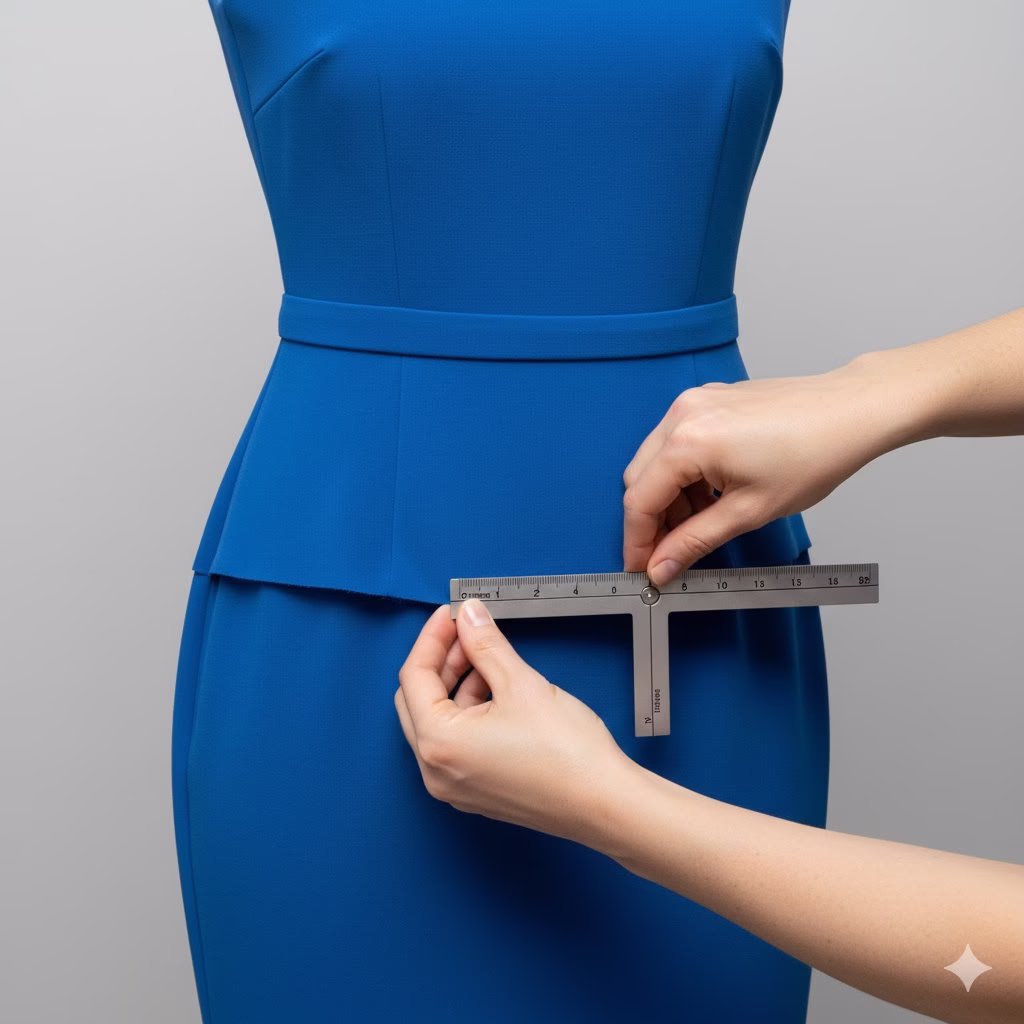
- [ ] The Final Hem: Measure the hem from the floor up to ensure it is level. Use your chosen finish from the previous guide to close the raw edge.
Phase 5: The Final Press

A dress is not truly finished until it has been “pressed into shape.” This is the difference between a homemade look and a high-end dress pattern result.
- [ ] Clip and Grade: Trim away any bulky fabric inside the seams, especially where multiple seams meet.
- [ ] Remove Basting: Pull out any temporary stitches used for the zipper or gathers.
- [ ] Final Steam: Give the entire dress a thorough steam. Focus on the collar, cuffs, and hemline.
External References
Troubleshooting Common Fit Issues
Even with a well-tested dress pattern, fabric choice or small cutting errors can cause fit issues. During the assembly phase, it is vital to spot these problems early. Fixing a fit issue on a bodice is much easier before you attach the skirt or sleeves. Use this guide to solve the most common problems seen when using custom dress sewing patterns.
Issue 1: Gaping at the Neckline or Armhole

If the fabric stands away from your body at the neck or armhole, it usually means the curve has stretched or the pattern needs more contouring.
- ** The Fix:** Pinch the extra fabric into a small, temporary dart. Measure the width of this “pinch.” On your paper dress pattern, slash from the edge to the nearest dart and overlap the paper by that same amount. This “closes” the gap for your next version. For the current dress, you may need to add a tiny dart or use bias binding to pull the edge in tight.
Issue 2: Pulling Lines at the Bust

Horizontal pull lines across the chest mean the dress is too tight. If the lines point toward the bust apex, your dart may be in the wrong place.
- The Fix: If the dress is too tight, let out the side seams. This is why adding a 2 cm seam allowance to your dress sewing patterns is so helpful. If the dart is the problem, unpick it and move the point. The dart should end about 2.5 cm (1 inch) away from the fullest part of your bust, not right on top of it.
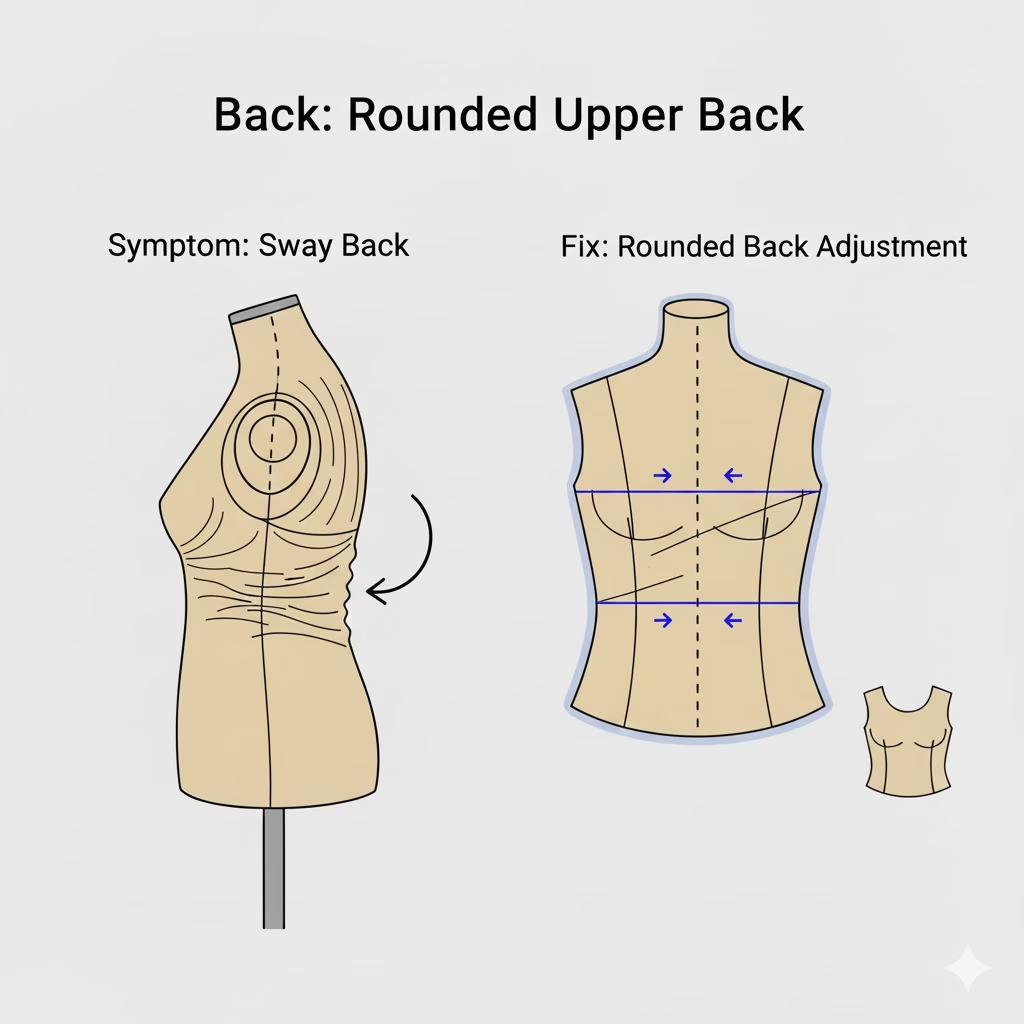
Issue 3: Folds or “Pooling” at the Lower Back
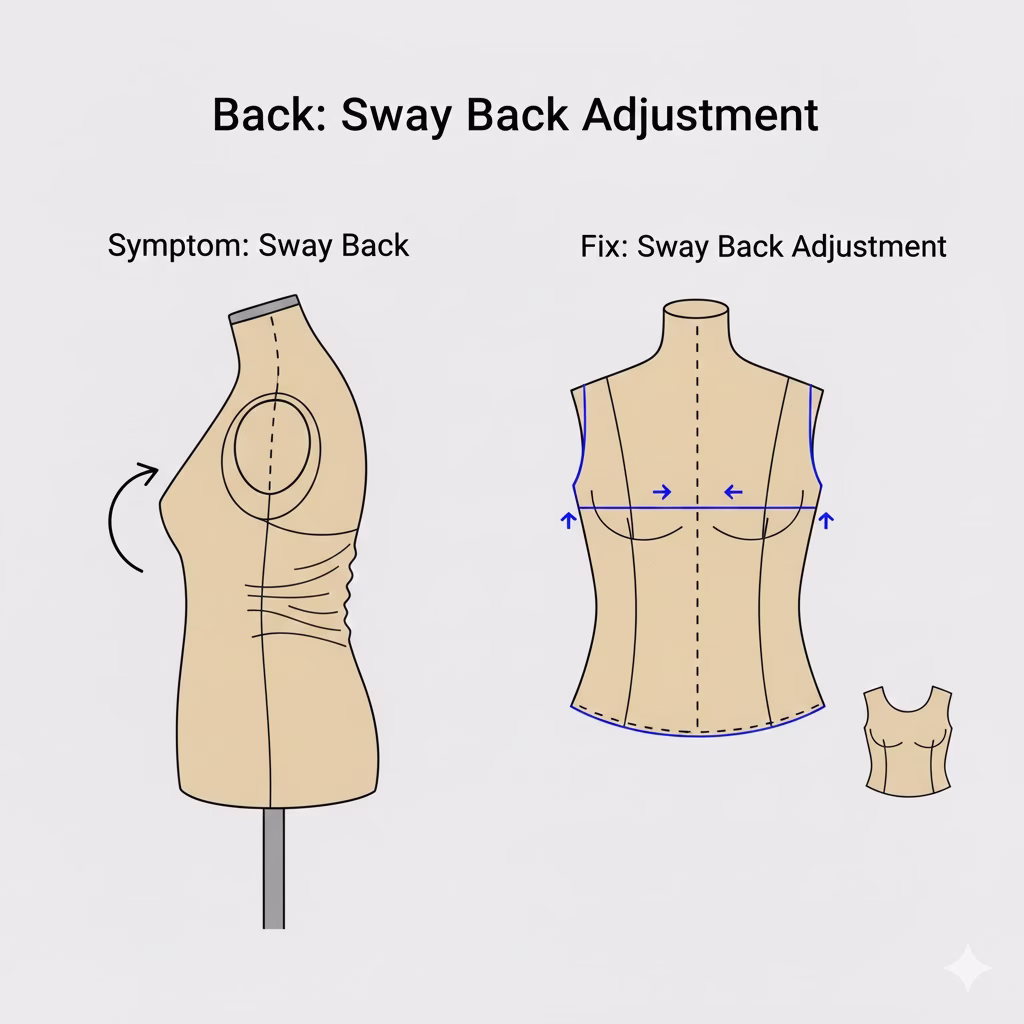
If you see fabric bunching up just above your waist at the back, you likely have a “short back.” This happens when the distance from your neck to your waist is shorter than the standard dress pattern size.
- The Fix: Pin a horizontal tuck across the back bodice until the fabric lies flat. Measure the tuck. On your paper pattern, draw a line across the back and slide the top piece down by that amount. This shortens the back length without changing the width of the dress.
Issue 4: Tightness Across the Shoulders
If you feel like you cannot move your arms forward, the across-back width is too narrow. This is a common issue when moving from a sloper to a more structured dress pattern.
- The Fix: Check your seam allowance at the armhole. You may need to trim a small amount (about 5 mm) from the back curve of the armhole to give your shoulder more room to move. For your master sloper, you should add a bit of “ease” to the across-back measurement.
Issue 5: Drag Lines at the Hips
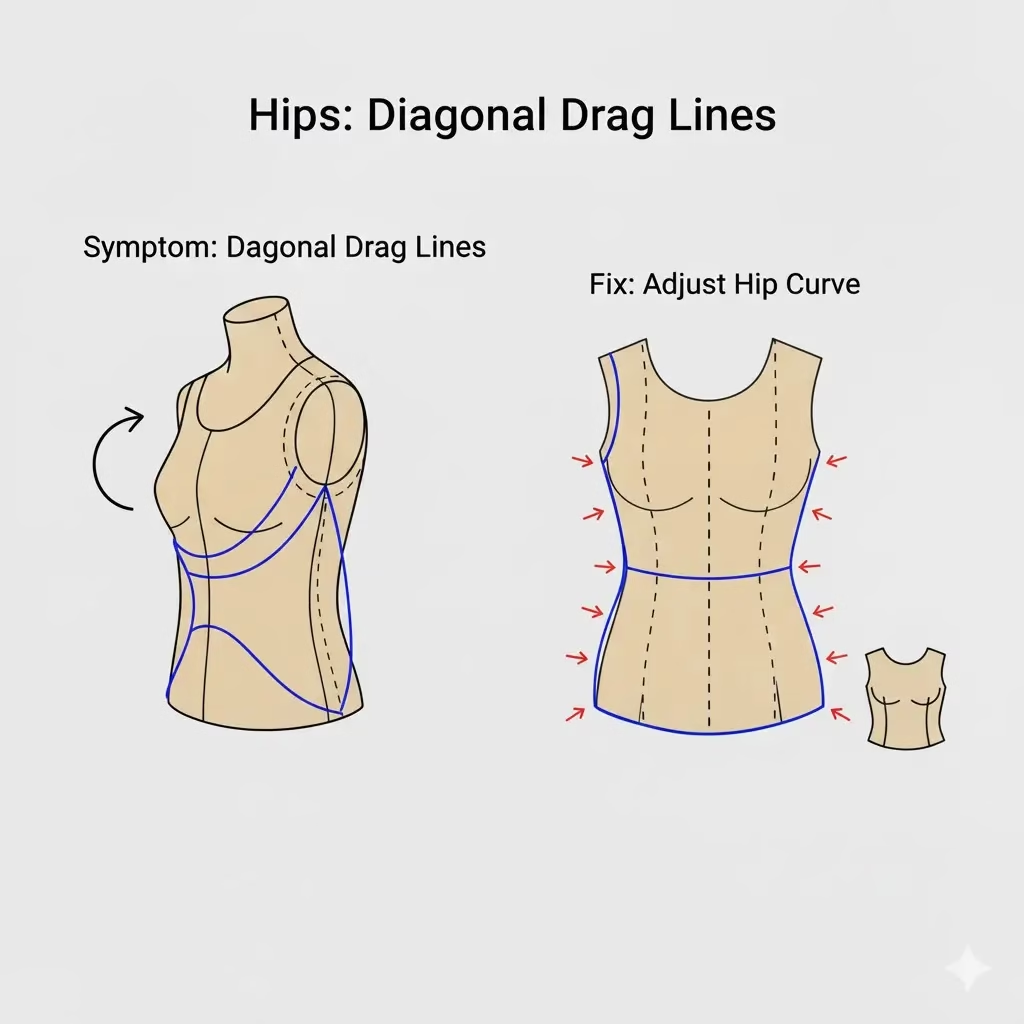
If the skirt of the dress rides up or shows “smile” lines across the hips, it is too tight in the seat or hip area.
- The Fix: Open the side seams from the waist down. Let the fabric fall naturally and see how much it opens up. You can then sew a new seam with a smaller allowance. When you update your dress patterns, make sure to add more width to the hip curve of the skirt block.
Quick Fit Reference Table
| Fit Sign | Meaning | Quick Action |
| Vertical Folds | Too much width | Take in the side seams. |
| Horizontal Folds | Too much length | Shorten the bodice or skirt. |
| Diagonal Lines | Tension point | Release the seam at the point the lines start. |
| Gaping Edges | Curve is too long | Shorten the edge with a small dart or binding. |
Final Pro Tip: The “Sitting Test”
Before you finish your seams, put the dress on and sit down in a chair. A dress might look perfect while you stand, but feel too tight when you sit. If it feels tight in the waist or hips, use those extra seam allowances to give yourself a bit more room.
External References
How to Choose the Best Fabric for Your Dress Patterns
Selecting the right fabric is the final step in turning your dress pattern into a masterpiece. The “hand” of a fabric—how it feels, falls, and moves—will change how your design looks on the body. A hack that works for a structured office shift may not work for a flowy party dress. Use this guide to match your fabric to your dress sewing patterns for the best results.
Understanding Fabric Weight and Drape
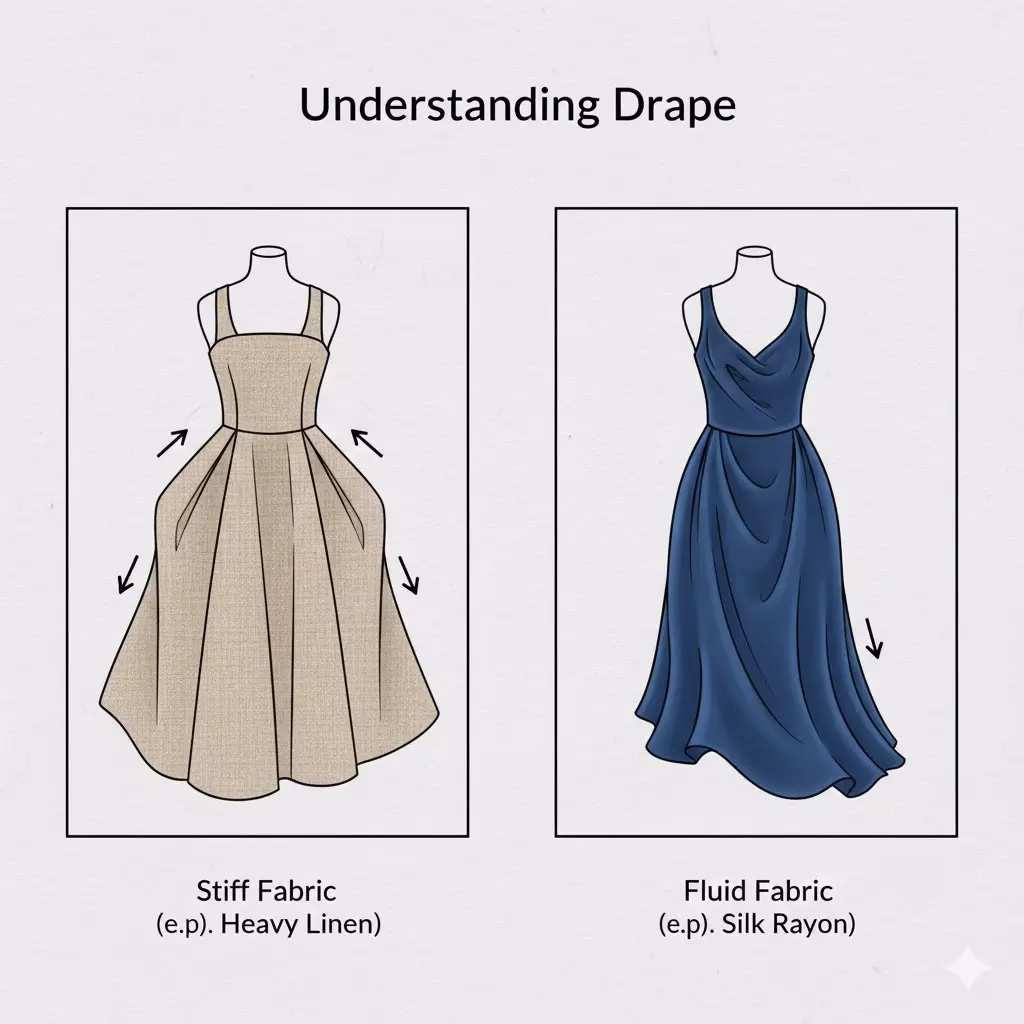
Before buying material for your dress patterns, you must consider two things: weight and drape.
- Weight: This is how heavy the fabric feels. Light weights are for summer dresses, while heavy weights are for structured winter garments.
- Drape: This is how the fabric hangs. A fabric with “high drape” (like silk) will cling to your curves. A fabric with “low drape” (like denim) will hold its own shape.
Matching Fabrics to Your Dress Styles

Different styles created from your sloper require different types of support from the cloth.
1. Structured Styles (Shift Dresses, Pencil Skirts)
For these looks, you want the fabric to hold the lines of the dress pattern.
- Best Choices: Cotton Poplin, Linen, Light-weight Wool, or Denim.
- Why: These fabrics are easy to sew and show off sharp darts and clean seams.
2. Flowy Styles (A-line Skirts, Empire Waists, Gathers)
Styles with extra fullness need fabric that moves easily and does not look bulky at the waist.
- Best Choices: Rayon (Viscose), Cotton Lawn, Voile, or Silk Crepe.
- Why: These materials are thin enough to be gathered without adding too much “poof” to your silhouette.
3. Formal Styles (Princess Seams, Evening Gowns)
For gowns that need a bit of shine and a lot of structure, look for fabrics that feel expensive and sturdy.
- Best Choices: Satin, Taffeta, or Brocade.
- Why: These fabrics highlight the vertical lines of princess seams and hold the volume of a full skirt.
Fabric Choice and Your Pattern Hacks
| If You Are Making… | Choose a Fabric That Is… | Avoid… |
| A Circle Skirt | Light and drapey (like Rayon) | Very stiff or heavy fabric. |
| Puff Sleeves | Crisp and firm (like Organdy or Poplin) | Very soft fabric that will collapse. |
| A V-neck Bodice | Stable (like Linen) | Slippery fabrics that may stretch. |
| A Wrap Dress | Slightly stretchy (like Jersey or Crepe) | Rigid fabrics that won’t move with you. |
Tips for Shopping for Dress Sewing Patterns
- The “Scrunch” Test: Take a corner of the fabric in your hand and squeeze it. If it stays wrinkled, it may be hard to keep looking fresh during a long day.
- Check the Width: Most dress sewing patterns assume the fabric is 115 cm or 150 cm wide. Check your pattern pieces at home to make sure you buy enough length.
- Pre-Wash Your Fabric: Almost all natural fabrics shrink. Wash and dry your fabric before you cut into it with your custom dress pattern. This ensures your dress fits perfectly after its first wash.
External References
Fabric Yardage Guide for Custom Dress Patterns

Estimating how much fabric you need is a vital step when you move away from store-bought dress patterns to your own custom hacks. Since you are working from a master sloper, you do not have a printed envelope to tell you how much to buy. This guide will help you calculate the yardage for your unique dress sewing patterns so you never run out of material mid-project.
How to Estimate Your Base Yardage
For a standard knee-length dress with no sleeves, a good rule of thumb is to buy twice the length of the dress plus 0.25 meters for the bodice.
- The 115 cm (45″) wide fabric: You usually need about 2.5 to 3 meters.
- For 150 cm (60″) wide fabric: You usually need about 1.5 to 2 meters.
If you are tall or making a maxi-length dress pattern, add an extra meter to these estimates.
Adding Fabric for Specific Design Hacks
When you change your sloper, you change the amount of fabric required. Use this table to add to your base estimate.
| Design Hack | Extra Fabric Needed (Approx.) | Notes |
| Short Sleeves | 0.5 Meters | For basic T-shirt style sleeves. |
| Long/Puff Sleeves | 0.75 to 1 Meter | Puff sleeves need extra width for the volume. |
| Circle Skirt | 2 to 3 Meters | These use a lot of fabric because of the wide radius. |
| A-line Skirt | 0.5 Meters | Added to the base length of the skirt. |
| Gathers/Ruffles | 1 to 1.5 Meters | Depends on how “full” you want the gathers to be. |
| Matching Plaid/Stripes | 0.5 to 1 Meter | You need extra to line up the patterns at the seams. |
The “Floor Layout” Method for Accuracy
If you want to be exact before heading to the store, try the floor layout method.
- Mark the Width: Use masking tape on the floor to mark the width of the fabric you plan to buy (usually 150 cm).
- Arrange Your Pieces: Lay your hacked dress sewing patterns inside those tape lines. Make sure to leave space for seam allowances between the pieces.
- Measure the Length: Once everything fits, measure the total length from the top piece to the bottom. This is the exact amount of fabric you need.
Tips for Buying Fabric for Dress Patterns
- The “Just in Case” Half-Meter: It is always smart to buy an extra 0.5 meters. This allows for fabric shrinkage during the pre-wash or for fixing a small cutting mistake.
- Consider the Nap: If your fabric has a “nap” (like velvet) or a one-way print (like flowers that all point up), you must lay all your pieces in the same direction. This often requires more fabric.
- Don’t Forget the Facing: If you are not using bias binding, you will need enough fabric for the neck and armhole facings. These can often be tucked into the “gaps” between larger pattern pieces in your layout.
Final Yardage Checklist
- [ ] Did I account for the hem allowance?
- [ ] Did I add extra for sleeves or pockets?
- [ ] Is the fabric wide enough for my circle skirt pieces?
- [ ] Do I need extra to match a pattern or stripe?
By using these estimates, you can shop with confidence, knowing you have exactly what you need to bring your custom dress pattern to life.
External References
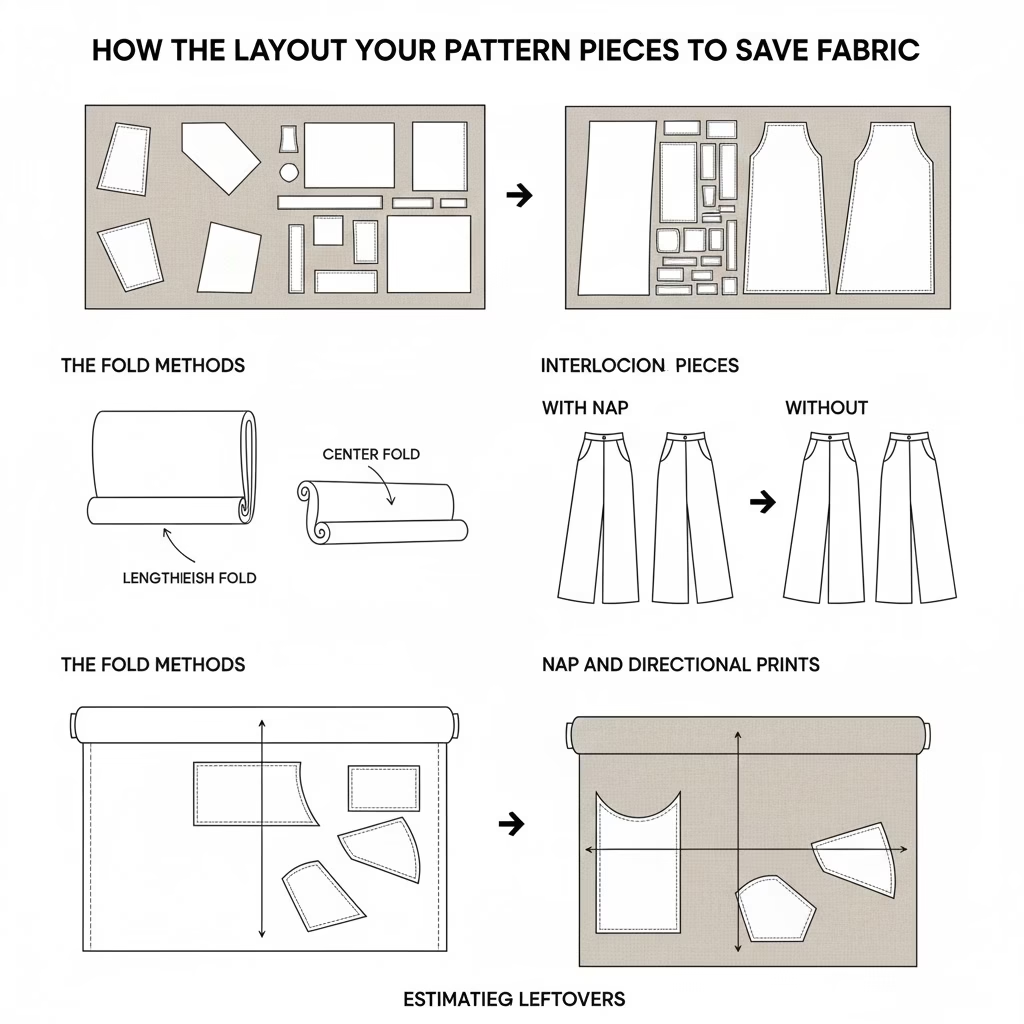
How to Layout Your Pattern Pieces to Save Fabric
Once you have your fabric and your custom dress pattern, the next step is the “cutting layout.” This is the way you place your paper pieces on the cloth. A smart layout can save you a lot of money. It lets you use less fabric and leaves you with larger scraps for future projects. Learning to layout dress sewing patterns like a pro is a great way to make your sewing more sustainable.
Step 1: Prepare the Fabric
Before you lay down a single piece of your dress pattern, you must prep the cloth.
- Iron the Fabric: Small wrinkles can lead to large cutting errors. Ensure the fabric is perfectly flat.
- Find the Grainline: Look at the “selvage” (the finished factory edge). The grain of the fabric runs parallel to this edge.
- Fold Correct-Side In: Fold your fabric with the “right” sides touching. This allows you to mark the “wrong” side with chalk and keeps the pretty side clean.
Step 2: The Logic of the Layout
There are two main ways to fold fabric for dress sewing patterns. The goal is to maximize the space.
| Layout Type | When to Use It | How to Do It |
| Lengthwise Fold | Most common for dresses. | Fold the fabric so the two selvages meet. |
| Crosswise Fold | For very wide skirt pieces. | Fold the fabric so the cut ends meet. |
| Double Fold | To cut two “on-the-fold” pieces. | Fold both selvages toward the center of the fabric. |
Step 3: Placing Your Pattern Pieces
Start with your largest pieces first, such as the skirt or the long bodice parts of your dress pattern.
- Place on the Fold: Any piece that says “cut on fold” (usually the center front or back) must be placed exactly against the folded edge of the fabric.
- The Interlocking Method: Look for ways to fit small pieces, like neck facings or pockets, into the gaps created by larger curves. For example, a sleeve can often nestle next to the curve of an A-line skirt.
- Check the Grain: Every piece of your dress sewing patterns has a grainline arrow. Use a ruler to ensure this arrow is exactly the same distance from the selvage at both the top and the bottom.
Step 4: Special Layout Rules
Some fabrics require a bit more care. If you ignore these rules, your final dress might look “off.”
- The Nap: Fabrics like velvet or corduroy have a “direction.” If you run your hand down the fabric, it feels smooth; if you run it up, it feels rough. All pieces of your dress pattern must point the same way, or the dress will look like it is made of two different colors.
- Large Prints: If your fabric has a large floral or geometric print, you may want to “fussy cut.” This means placing your pattern pieces specifically to highlight a certain flower on the bust or the center of the skirt.
Step 5: Pinning and Cutting
Once you are happy with the layout, it is time to secure the paper.
- Pinning: Place pins inside the seam allowance every 10 cm. Do not let the pins cross the cutting line.
- Weights: Many pros use “pattern weights” (like large washers or smooth stones) instead of pins. This stops the fabric from lifting off the table.
- The Long Cut: Use long, smooth strokes with your shears. Do not “chew” the fabric with short snips. This keeps the edges of your dress sewing patterns crisp and clean.
Final Saving Tip: The Scrap Bag
Even the best layout leaves small scraps. Save the long, thin strips to make bias binding. Save the larger squares for pocket linings or to test your iron heat. By using every inch, you respect the work that went into making the fabric.