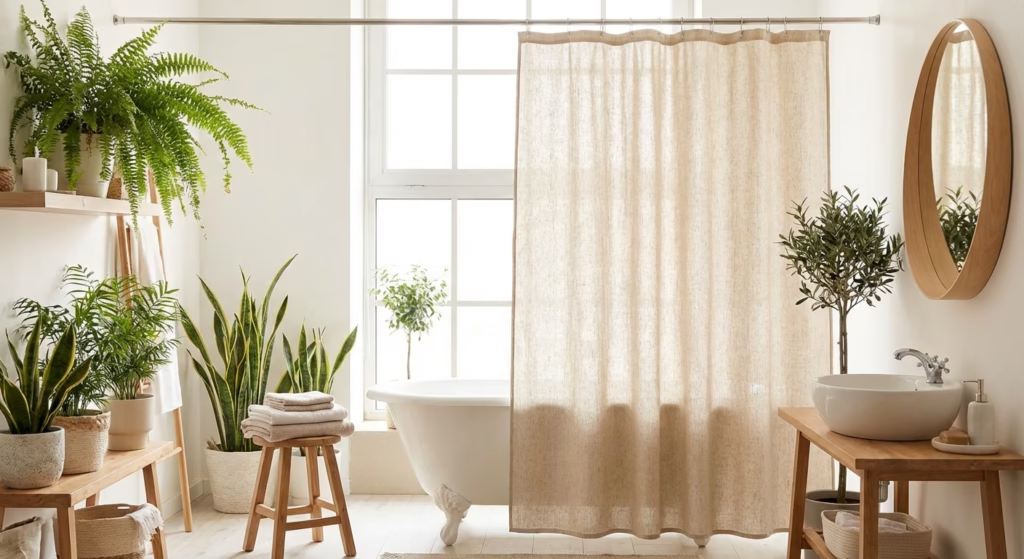
Making an eco friendly shower curtain is a great swap for a green home. This guide shows you how to make a lovely, safe curtain from scratch. Many people want to stop using plastic. They want to avoid PVC in their homes. Here, you will find easy steps, good fabric tips, and ways to make a curtain that looks great and lasts for a very long time.
Introduction: Why Your Bathroom Needs a Change
Go to any store and you will see rows of plastic curtains. They are cheap and they seem easy. But these vinyl curtains have a cost you do not see. They let off bad gases into your bathroom air. You cannot recycle them. When they get old, they go to a dump. They will stay there for hundreds of years.
Many people do not think about their shower curtain as a source of waste. But it is a big part of a green home. If you want a zero waste house, the bathroom is a great place to start. A single plastic curtain can take a very long time to break down. It sits in the ground and leaks chemicals. This is why a swap to cloth is so smart. It is a small change that makes a big impact.
The good news? Making your own green curtain is very simple. You do not need to be a pro at sewing. You do not need big tools. The result is a curtain that is better for you. It is better for the Earth. It is also much prettier than the ones you buy at the store. A handmade curtain has a special feel. It shows that you care about the things in your home. It shows that you value the world around you.
This guide will show you how to do it. We will help you pick fabric. And show you how to sew. We will even talk about how to keep it clean. You will soon have a great, green curtain. Let’s start this journey together.
The Problem With Old Shower Curtains

Why does this project matter so much? Most curtains are made of PVC or vinyl. These materials have chemicals in them. These chemicals go into the air. Do you know that “new curtain smell”? That is actually a mix of gases. It is not good to breathe those in. Your bathroom is a small room. When you take a hot shower, the heat makes these gases even stronger.
Studies show that PVC can let off many chemicals. Some can hurt your skin or your breath. They can make your eyes itch. Then there is the harm to the Earth. Making PVC uses a lot of energy. It causes a lot of waste and pollution. You cannot recycle these curtains easily. Most bins will not take them. In a world with too much plastic, this is a good place to start a change.
When we throw away a plastic curtain, it does not just go away. It stays on our planet. It breaks into tiny bits of plastic. These bits get into our water and soil. They hurt animals and the land. Choosing a natural cloth means you are not part of that cycle. You are choosing a path that respects life.
A green home does not have to be hard to build. By making your own curtain from natural things, you help your home. You also help the planet. It is a simple step that anyone can take. It feels good to know you are doing your part.
Why You Should Make Your Own Curtain

Making a DIY curtain has many perks. First, it is better for your health. Natural cloth does not let off bad gases. Your air stays clean. You stay safe from toxins. This is very important for kids and pets. They can be more sensitive to bad air.
Then, there is the look. A cloth curtain adds a soft feel to your bathroom. It looks like you put in extra care. You can pick any color or print you like. And can match your towels or your paint. You do not have to pick from the few choices at the store. You can make it as bright or as calm as you want.
A cloth curtain also lasts longer. Plastic can crack and get thin. It can turn yellow and look ugly. But a cloth curtain stays strong for years. Hemp and linen even get softer as they age. They become more beautiful over time. When they are finally worn out, you can compost them. This is a true zero waste win. You can even cut them up and use them as rags for cleaning.
Finally, it feels good to make things. We live in a world where we buy everything. It is fun to use your hands to build something for your home. It gives you a sense of pride. Every time you shower, you will see your work. You will know that you made it yourself. That is a great feeling to have.
Materials Needed

Get your tools ready first. Having everything in one place makes the work fast and fun. Here is what you will need for your project:
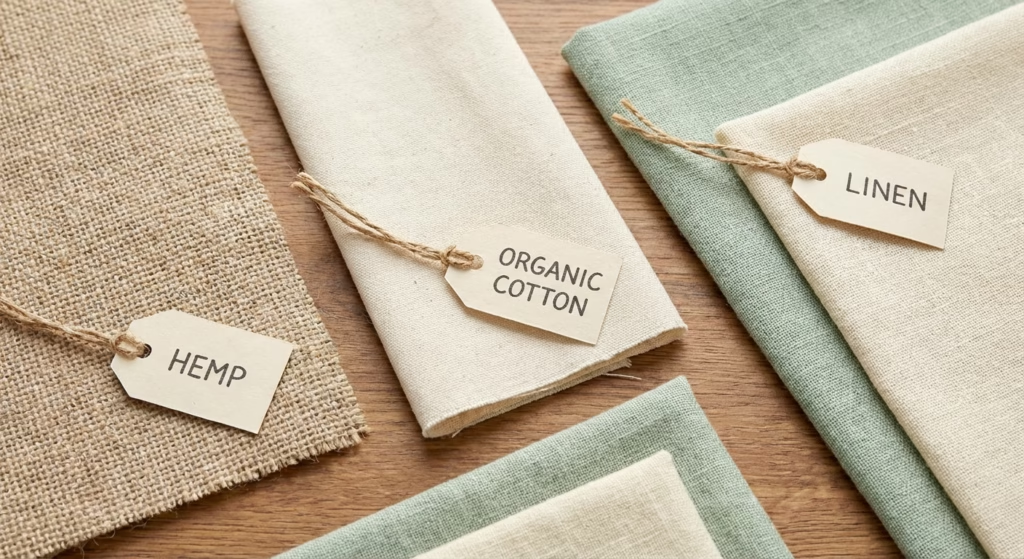
Fabric Choices
This is the most important part of the job. You want a cloth that is strong and safe. Here are some great options for you to think about:
- Hemp linen is a top pick. It is very strong and lasts a long time. And stops mold from growing on its own. It feels a bit stiff at first but gets soft later.
- Organic cotton canvas is thick and heavy. It keeps water in the tub very well. And it is very easy to find in most shops. It is also easy to sew.
- Old bed sheets are great for a zero waste goal. You might have some in your closet right now. Use cotton or linen sheets that are still in good shape. This saves money too!
- GOTS cotton is a very safe pick. It has a special seal. This means it is made without any bad chemicals at all. It is good for the farmers and for you.
You will need about 2 to 2.5 meters of cloth. Most showers need a curtain that is 180cm by 180cm. Be sure to measure your space first. You want it to be wide enough to cover the whole opening.
Tools and Hardware
- Rings and Rods: Use metal or wood rings. Do not use plastic ones that break. Stainless steel is a good choice because it does not rust. These last a lifetime.
- Tape or Holes: You need holes for the rings. You can use eyelet tape to make it easy. You can also sew buttonholes with your machine. This looks very neat and clean.
- Sewing Gear: You need a machine that can do a straight stitch. You also need thread that matches your cloth. Get sharp scissors to make clean cuts. You also need pins, a tape measure, and an iron. The iron is your best friend in this project!
- Wax (Optional): You can use beeswax to stop water from soaking in. But most people find they do not need it. They just wash their curtain once a month instead.
Extra Items
- Chalk or a pencil to mark the cloth
- A long ruler for straight lines
- A tool to fix mistakes (seam ripper)
- Strong thread for the top part where the rings go
Step-By-Step Instructions
Now we can start sewing. Do not rush. Take your time and enjoy the process. Follow these steps to finish your curtain in one afternoon.
Step 1: Measure
Check your shower size. Find out how wide and long it needs to be. Most are 180cm by 180cm. Add 10cm to each side for the edges. This is for the hems. Write your numbers down on a piece of paper so you do not forget them. Measuring twice is always a good idea.
Step 2: Wash the Cloth
Wash and dry your cloth before you cut it. This is a very big step! Natural cloth can shrink a lot in the wash. You do not want a curtain that is too short later on! Use the same water heat you will use in the future. Iron it flat after it dries so it is easy to work with.
Step 3: Cut
Lay the cloth on a big table or on a clean floor. Mark your lines with chalk. Use your ruler to make sure the lines are straight. Check your numbers one more time before you pick up the scissors. Cut along the lines with your sharp scissors. Try to keep your hand steady for a nice edge.
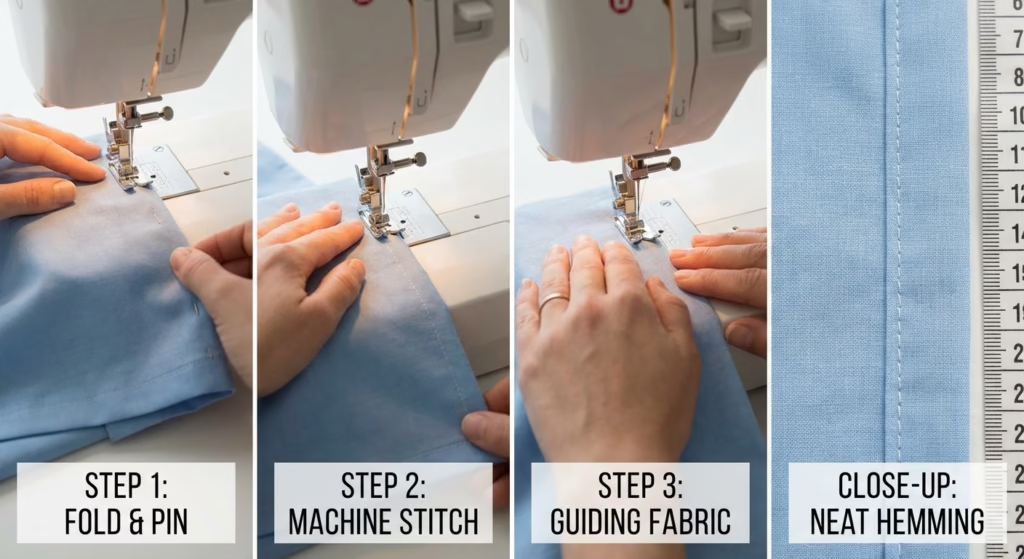
Step 4: Sew the Sides
Fold the side edge over by 1cm. Press it with a hot iron to make a crisp line. Fold it again by 1cm and press it one more time. This hides the raw edge so it does not fray. Pin it every few inches. Sew a straight line down the side. Do this for both the left and right sides.
Step 5: Sew the Bottom
The bottom needs to be a bit heavy. This helps it stay still when the water hits it. Fold the bottom edge up by 1.5cm and press. Fold it again by 2.5cm and press. This makes a nice, thick hem. Pin it and sew it across the whole width.
Step 6: Sew the Top
The top holds all the weight of the curtain. It must be very strong. Fold the top down by 1cm and press. Fold it again by 4cm and press. This makes a wide band at the top. Pin it well. Sew two lines of stitches here if you want it to be extra strong.
Step 7: Mark the Holes
You usually need 10 or 12 rings for a standard shower. Space them out across the top band. Use your tape measure to make them even. Mark each spot with your chalk. Put them about 2cm down from the top edge. Even spacing makes the curtain hang straight.
Step 8: Make the Holes
If you have a metal ring kit, put those in now. You just hammer them into place. If not, sew buttonholes at each mark. Most machines have a setting for this. Once you sew the border, cut the center of the hole open with your scissors. Be careful not to cut the stitches!
Step 9: Iron it Flat
Iron your new curtain one last time. This makes it look professional. Look for any loose threads and snip them off with your scissors. Now your curtain is ready to hang! Slide the rings through the holes and put it on the rod.
Optional: Making it Waterproof
Some cloth works fine on its own. The fibers swell when they get wet and stop the water. But you can add more protection if you want to be extra safe. Here are three natural ways to do it:
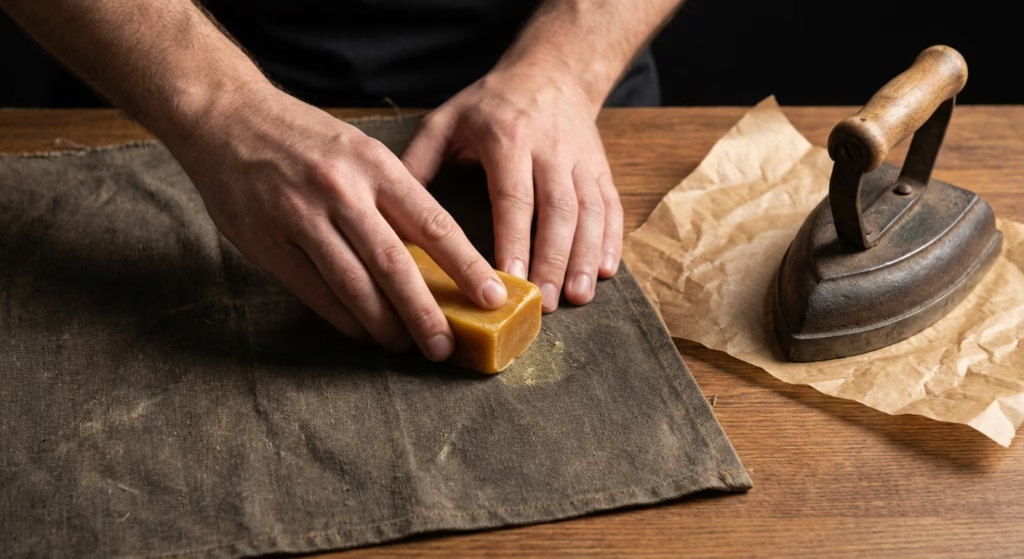
- Beeswax: This is a classic method. Rub a block of wax on the cloth. Use an iron on low heat to melt it into the fibers. Put a piece of paper between the iron and the wax. This keeps water away and smells like honey.
- Wax and Oil: You can mix melted wax and a little bit of oil. Rub it in with a soft cloth. This makes the fabric very soft and water-tight. Let it dry for a full day before you hang it up.
- Green Sprays: There are new sprays you can buy. They are made from plants and do not have bad chemicals. These are very easy to use. You just spray it on and let it dry.
Hemp and thick cotton do a good job on their own. If your bathroom has a fan or a window, you might not need any wax at all. The air will help it dry before any water leaks through. Try it without wax first to see how it goes.
How To Care For Your Curtain

Your green curtain will last a long time if you take care of it. It is not like plastic that you just throw away. It needs a little love to stay fresh.
After you shower, pull the curtain closed. Do not leave it bunched up at one side. This helps the water run off and lets air get to all parts of the cloth. This stops mold from growing. If you can, open a window or turn on a fan. Fresh air is the best way to keep a bathroom clean.
Wash your curtain every few weeks. Every two weeks is best if you have a big family. Use a green soap that is mild. Use cool or warm water. Do not use fabric softener. Softener coats the fibers and can make them less able to block water. It can also lead to more buildup over time.
Dry it on a line in the sun if you can. The sun is a natural way to kill germs and bleach away stains. It also makes the curtain smell wonderful. If you must use a dryer, keep the heat on low. Too much heat can shrink the cloth again.
If you see a small dark spot, do not worry. You can fix it fast. Use a mix of baking soda and water to scrub it with a small brush. Let it sit for a bit, then rinse. Putting a cup of white vinegar in the wash also helps keep it fresh and clean. Vinegar is great at killing bacteria and keeping colors bright.
Tips For The Best Result

- Weight Matters: Use a heavy cloth like canvas. Thin cloth might blow around when you are trying to wash. It can also stick to your legs, which is not fun.
- Width Matters: Make the curtain a bit wider than the shower opening. This keeps water from splashing out the sides. An extra 15cm on each side is a good rule to follow.
- Practice First: If you are new to sewing, try a few lines on a scrap piece of cloth first. It will help you get a feel for the machine.
- Double Up: You can sew a second layer of cloth at the bottom 30cm of the curtain. This part gets the most water. It helps the curtain last much longer.
- Be Kind to Yourself: Do not worry if your lines are not perfectly straight. A handmade item has its own charm. It shows that a human made it, and that is a beautiful thing.
- Ironing is Key: Do not skip the iron. It makes the sewing much easier and the final result much better.
Conclusion

Making a green shower curtain is a fun and helpful task. It helps your health by keeping the air clean. It helps the Earth by reducing waste. You are moving away from cheap plastic. You are choosing a zero waste life that feels good and looks great.
The steps are easy to follow. Anyone can do this with a little time and a sewing machine. The result is a unique piece for your home. Your new curtain will be with you for years. It will get better and softer with every wash. It will tell a story of care and love for the planet.
One day, many years from now, it will return to the earth. It will break down and leave nothing bad behind. That is the best part of choosing natural things over plastic. It is a full circle of goodness.
Get your fabric and start your project today. Your home will feel much better for it. You will breathe easier. The planet will also be glad you made the switch to a green way of living. Enjoy your new, beautiful bathroom!
References
If you want to learn more about green living and safe homes, check out these sites:
- EPA: Learn About the Safer Choice Label
- Ellen MacArthur Foundation: Eliminate Waste & Pollution
Recent Posts