Cookie Consent by Free Privacy Policy Generator Update cookies preferences

Crafting Made Easy: 5 Quick Macrame Gift Ideas

A styled lifestyle collage featuring five handmade Macrame Gift Ideas together on a neutral background: a geometric plant hanger, a spiral twist keychain, a mini wall banner, a set of fringed coasters, and a boho clip, showcasing quick and modern DIY projects.

Ever scroll through social media, admiring all the beautiful, handmade décor and wish you could create something just as stunning? I get it. We all love giving a thoughtful, personalized gift, but sometimes the sheer time commitment for a DIY project just isn’t there, especially when looking for quick Macrame Gift Ideas.

If you’re anything like me—someone who loves the idea of crafting but needs a project that delivers maximum impact with minimum effort—then macrame is your new best friend for creating stylish, quick Macrame Gift Ideas. It’s a beautifully tactile art form that has made a huge comeback, moving far beyond the chunky, retro wall hangings of the past. Today’s macrame is all about clean lines, modern geometry, and chic texture. Get ready to knot your way to the most stylish gifts this season!


Introduction

Macrame, the art of knotting cord into patterns, has experienced a resurgence in popularity, evolving into a sophisticated and minimalist craft perfect for generating unique Macrame Gift Ideas. The beauty of this technique lies in its simplicity: all you need are a few basic knots and some quality rope to create something truly special. For the busy crafter, macrame is the perfect solution. Unlike knitting or crochet, which can take weeks, many macrame projects can be completed in a single afternoon or over a weekend.

This guide focuses on five modern and chic macrame projects that make for incredible, personalized gifts. We’ll show you exactly how to do them, focusing on quick construction and high-end results. You don’t need to be an expert; just be ready to tie two essential knots: the Lark’s Head Knot and the Square Knot.

Materials You’ll Need for All Projects:

  • Single twist cotton rope or macrame cord (3mm or 4mm is ideal for quick projects)
  • Sharp scissors
  • Measuring tape
  • A dowel rod, ring, or S-hook to hang your work while knotting (a clothing rack or clipboard works great!)

1. The Modern Minimalist Key Fob (Keychain)

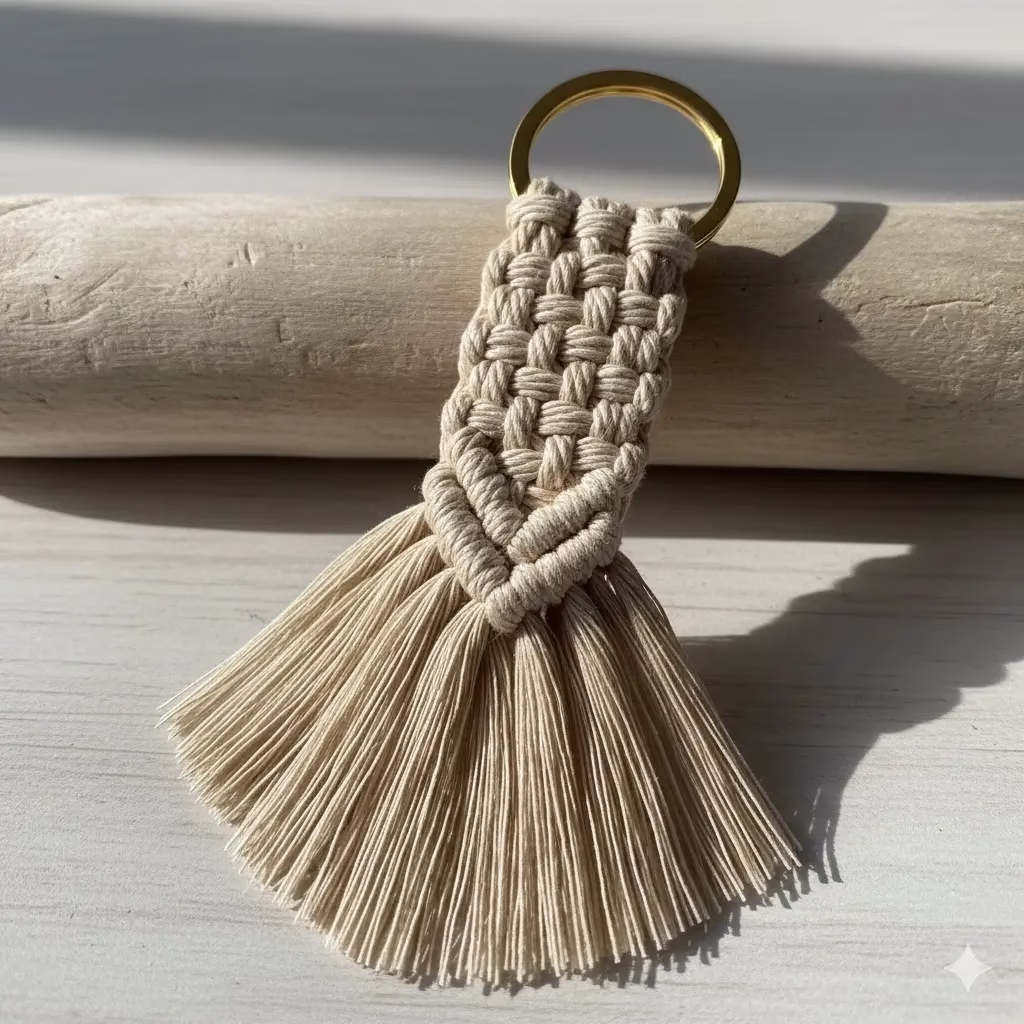
This gift is quick, functional, and requires minimal cord. It’s perfect for housewarmings, stocking stuffers, or as a small token of appreciation. We’ll use the basic Square Knot to create a dense, satisfying texture.

How to Do It: The Modern Minimalist Key Fob

Materials (Per Fob):

  • 3mm macrame cord
  • One keyring or lobster clasp
  • A small piece of masking tape (optional, to prevent fraying)

Cutting the Cord:

  1. Working Cords (2): Cut two pieces of cord, each 40 inches long.
  2. Filler Cord (1): Cut one piece of cord, 12 inches long.

Step-by-Step Instructions:

  1. Attach to the Ring: Fold the two 40 inch working cords in half. Use a Lark’s Head Knot to attach them to the keyring. You should now have four working strands hanging down. (Quick Knot Recap: Lark’s Head Knot: Fold the cord in half, loop the folded end over the ring, pull the tails through the loop, and tighten).
  2. Add the Filler: Lay the 12 inch filler cord horizontally across the four working strands, just below the ring. This cord will be the core that the knots are tied around.
  3. Start Knotting: You will now tie Square Knots around the filler cord. A single Square Knot uses all four working strands, with the middle two strands acting as the core.
    • Half Knot 1 (Left): Take the outermost left cord (Cord 1) and cross it over the middle two strands. Take the outermost right cord (Cord 4) and cross it under Cord 1, and then up through the loop created on the left side. Pull tight.
    • Half Knot 2 (Right): Now, reverse the process. Take the outermost right cord (Cord 4) and cross it over the middle two strands. Take the outermost left cord (Cord 1) and cross it under Cord 4, and then up through the loop created on the right side. Pull tight. This completes one full Square Knot.
  4. Repeat: Continue tying Square Knots for about 3 to 4 inches, or until you reach the desired length.
  5. Finish: Once the cord is fully knotted, remove the temporary filler cord. Tie all four working strands together in a tight Overhand Knot right under the last Square Knot. Trim the tails to about 2 inches and brush them out with a fine-tooth comb to create a soft tassel.

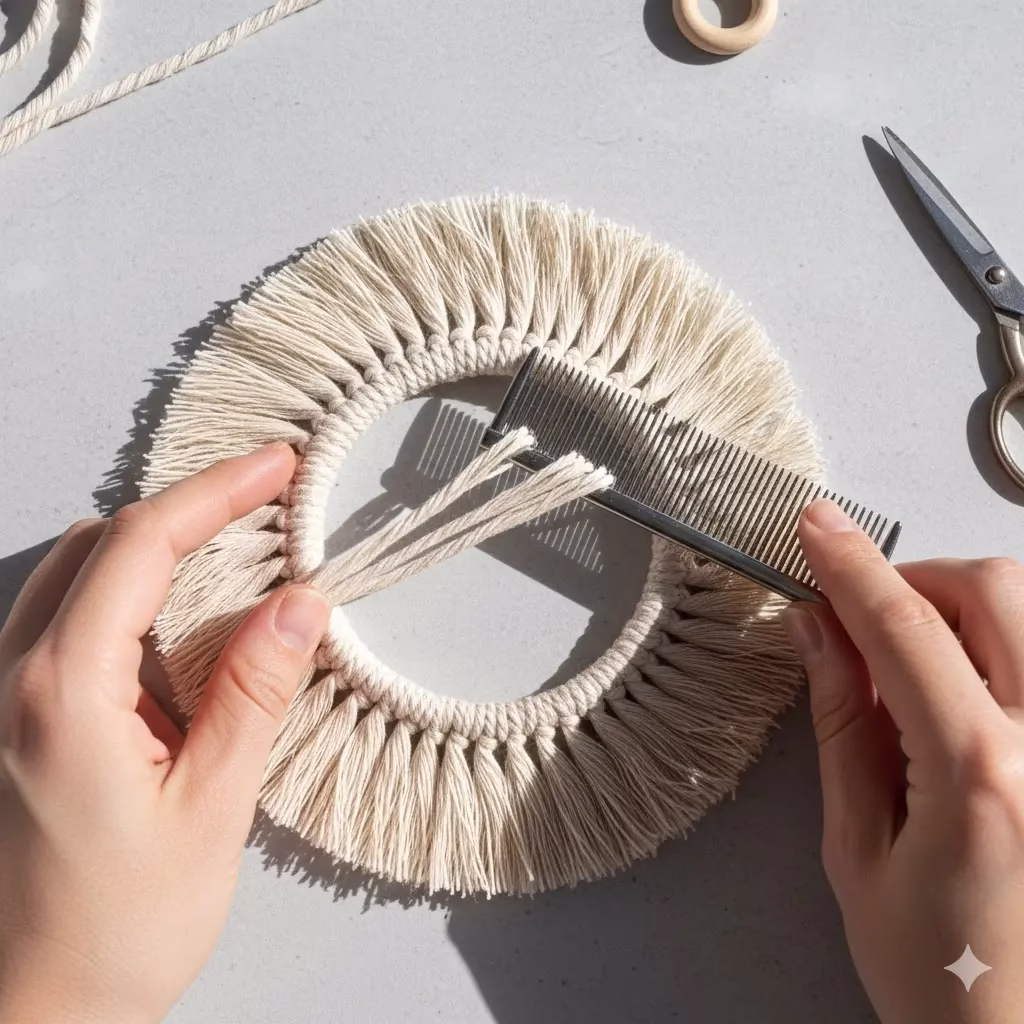
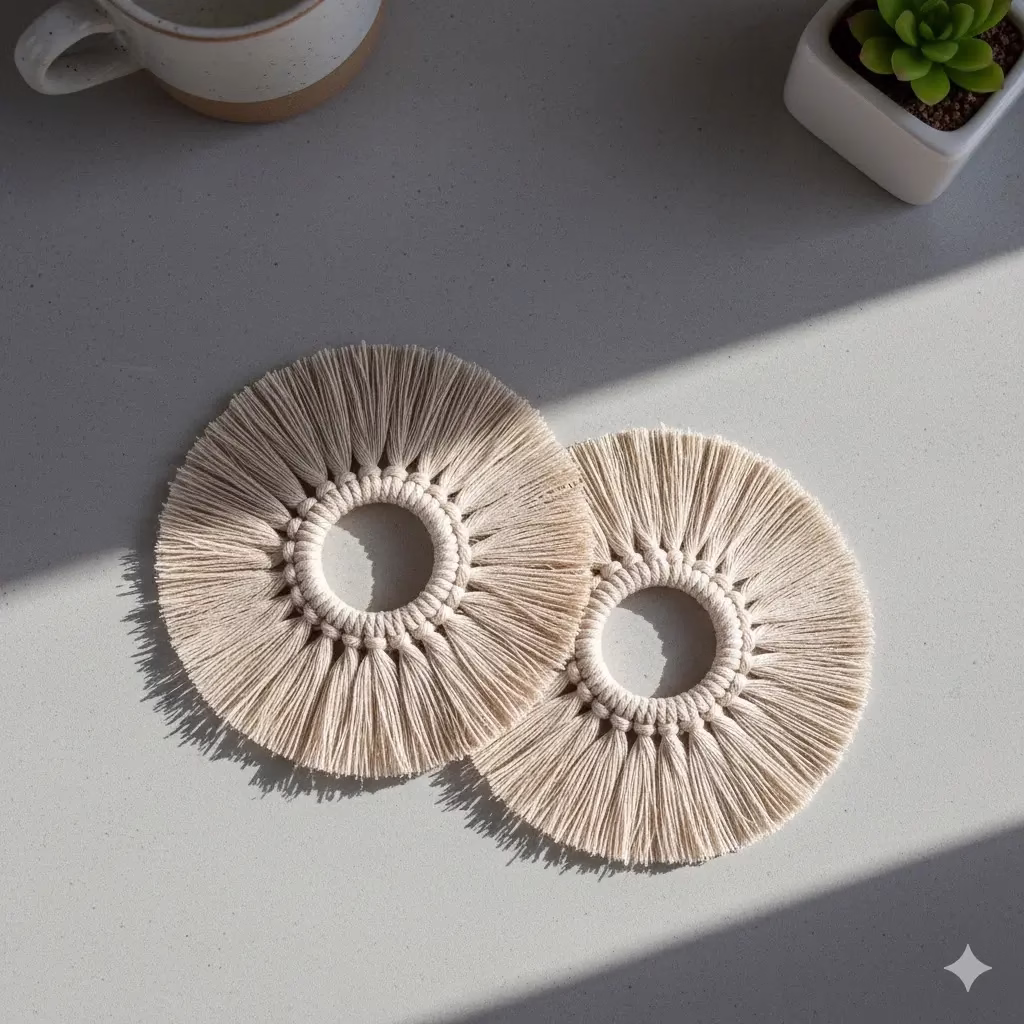
2. The Chic Coaster Set (Set of Two)

Here is the revised paragraph, incorporating the keywords Macrame Gift Ideas:


Coasters are a fantastic and under-appreciated gift. Macrame coasters offer beautiful texture and are much more absorbent than traditional stone or wood, making them excellent Macrame Gift Ideas. This project uses a simple technique of tying knots around a center point, making it a fast build that yields a very modern, mandala-like finish.

How to Do It: The Chic Coaster Set

Materials (Per Coaster):

  • 4mm macrame cord
  • A small, circular wooden ring (about 1 inch diameter) or a metal washer
  • Comb

Cutting the Cord:

  • Cut 16 pieces of cord, each 16 inches long.

Step-by-Step Instructions:

  1. Attach the Spokes: Take one 16 inch cord, fold it in half, and attach it to the circular ring using a Lark’s Head Knot. Repeat this process with all 16 cords, evenly spacing the resulting 32 strands around the ring. This creates the “spokes” of your coaster.
  2. The Gathering Knot (Optional but Recommended): To secure the spokes right against the ring, take a separate, short piece of cord (about 6 inches) and tie a Gathering Knot directly under the ring, pulling all 32 strands together into a tight cylinder. (Quick Knot Recap: Gathering Knot: Form a small loop of the extra cord, lay it along the strands. Wrap the tail end tightly around the loop and strands. When you reach the desired tightness, pull the tail through the bottom of the loop and tug the top of the loop until the bottom tail is pulled up and hidden beneath the wrapping).
  3. The Final Cut and Brush: You will not be knotting further; the beauty of this coaster is its simple fringe.
    • Lay the coaster flat.
    • Measure approximately 4 inches from the bottom of the ring/gathering knot and trim all the strands horizontally.
    • Starting from the ring outwards, use a fine-tooth comb to brush out every single strand of the cord. The single-strand cord will unravel into a soft, thick fringe, creating a solid circle. Trim any uneven edges for a crisp, circular shape.

3. The Minimalist Geometric Plant Hanger

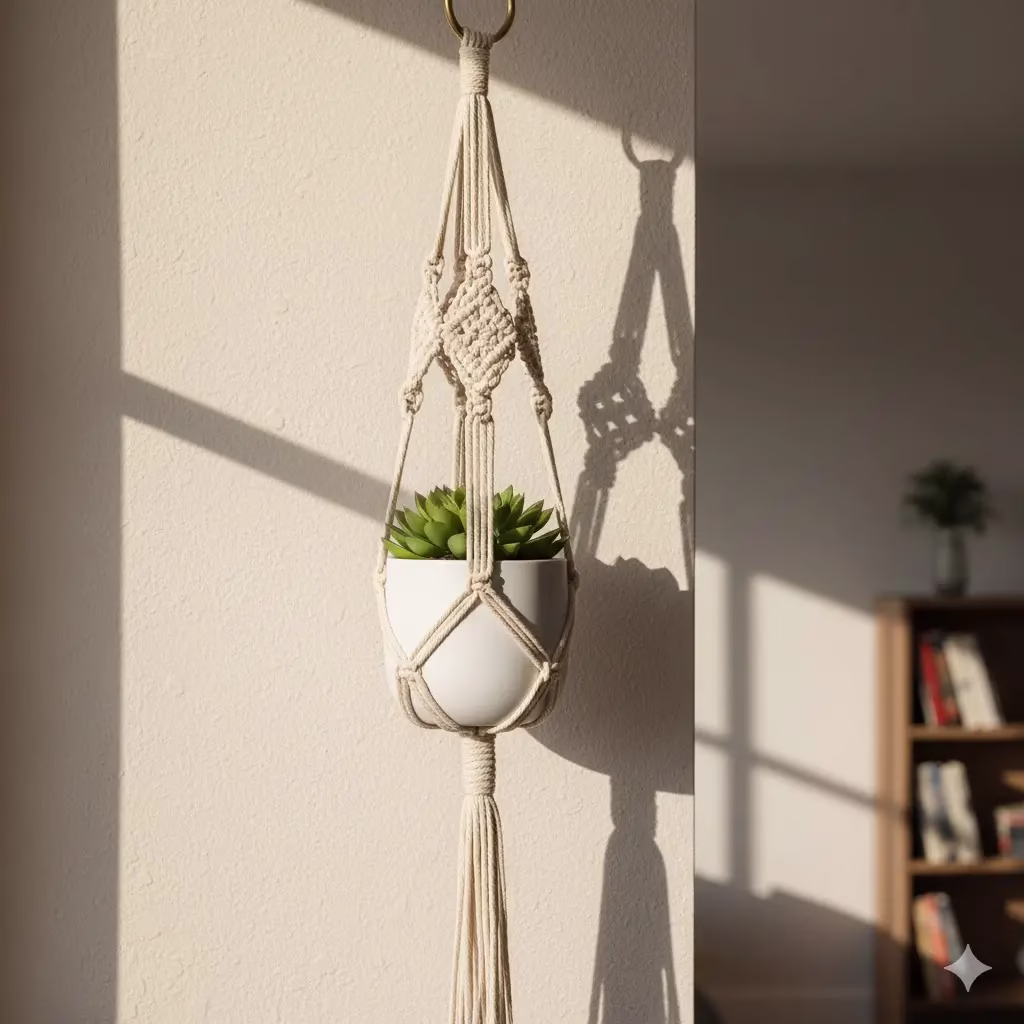
Plant hangers are the quintessential macrame gift, but they don’t have to be bulky. This modern version uses minimal knots and focuses on geometric lines to cradle a small succulent or air plant, making it fast to create and one of the most popular Macrame Gift Ideas perfect for small spaces.

How to Do It: The Minimalist Geometric Plant Hanger

Materials (For a Small Pot):

  • 4mm macrame cord
  • A wooden ring (about 2 inches diameter)

Cutting the Cord:

  • Cut four pieces of cord, each 8 feet long.

Step-by-Step Instructions:

  1. Attach to the Ring: Fold all four cords in half. Attach them to the wooden ring using eight Lark’s Head Knots. You now have eight hanging strands.
  2. Section 1: The Hanging Arm:
    • Divide the eight strands into four groups of two strands each.
    • About 1 inch below the ring, tie an Overhand Knot with each of the four pairs. These knots stabilize the top section.
    • Below the Overhand Knots, you will be creating the geometric shape using the Square Knot.
    • Knot Row 1: Take the four leftmost strands (Group 1). Tie a single Square Knot about 2 inches below the Overhand Knots.
    • Knot Row 2 (The Alternating Row): This is key to the geometric design. Skip the two outermost strands on the left. Take the next four strands (the two innermost of the first group and the two outermost of the second group). Tie a Square Knot about 1 inch below the first row.
    • Repeat Knotting: Continue tying Square Knots down the length of the strands, alternating the placement of the knots in each row to create a subtle, open chain or diamond pattern. Stop when the total knotted length is about 18 inches.
  1. The Basket:
    • The Gathering Knot: Gather all eight strands together and tie a large, tight Gathering Knot about 8 inches from the end of the cords. This creates the “basket” where the pot will sit.
  2. Finish: Trim the remaining tail cords to a uniform length and fray them out for a clean, shaggy tassel.

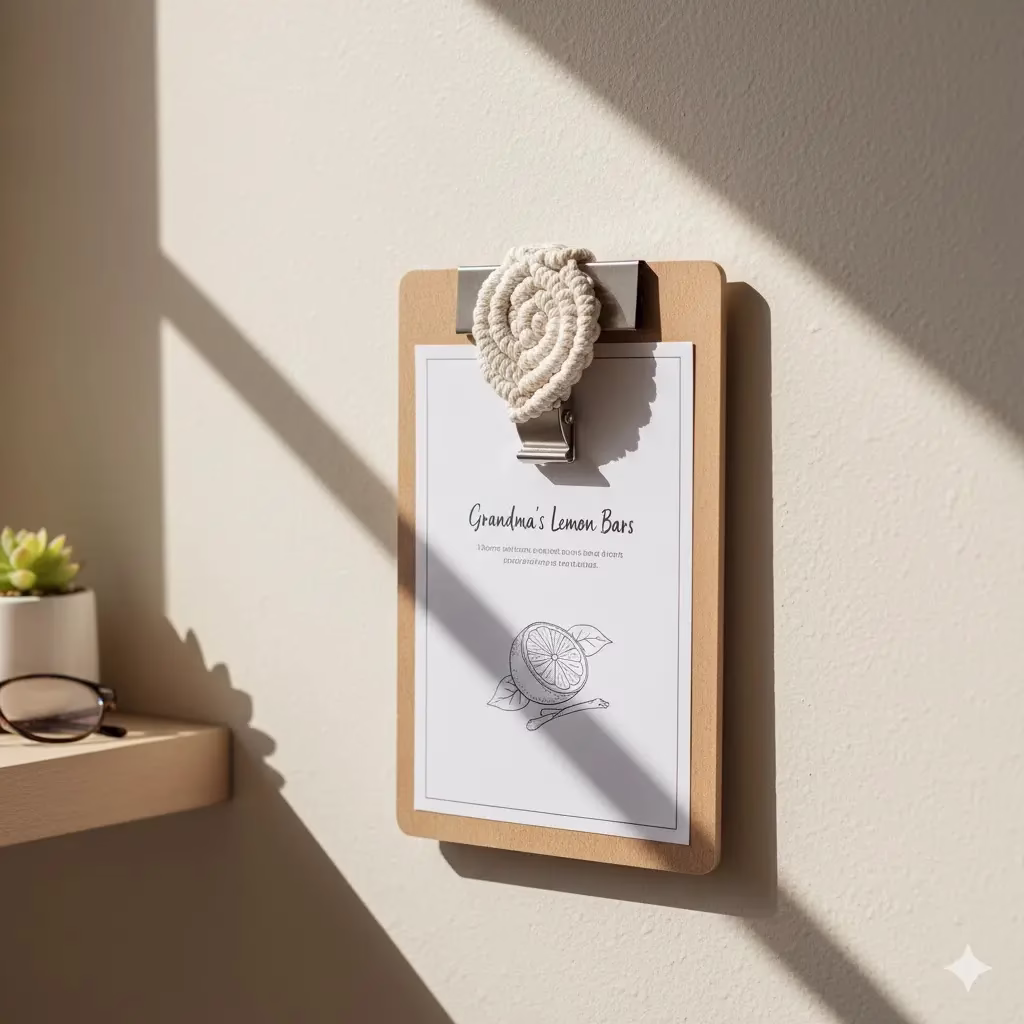
4. The Boho Book/Wall Clip

This is an innovative take on macrame that moves beyond traditional wall art. This small piece, attached to a metal clipboard or a heavy-duty clip, serves as a chic way to display a favorite recipe, a photo, or even to hold a collection of notes on a fridge, making it one of the most original Macrame Gift Ideas. The finished piece is small and uses Half Square Knots (also called spiral knots) to create a beautiful twist.

How to Do It: The Boho Book/Wall Clip

Materials (Per Clip):

  • 3mm macrame cord
  • A metal clip, binder clip, or a small, round metal ring

Cutting the Cord:

  • Working Cords (2): Cut two pieces of cord, 50 inches long.
  • Mounting Cord (1): Cut one piece of cord, 12 inches long.

Step-by-Step Instructions:

  1. Mount: Use the 12 inch mounting cord to attach the two working cords to the top of the metal clip using a Lark’s Head Knot (or just tie them tightly to the ring). You should have four strands hanging down. The two inner strands are the filler cords.
  2. The Twist: Instead of the full Square Knot, you will only be tying the first half of the Square Knot repeatedly. This is called a Half Square Knot or Spiral Knot.
    • Step A (Left): Take the outermost left cord (Cord 1) and cross it over the middle two strands. Take the outermost right cord (Cord 4) and cross it under Cord 1, and then up through the loop created on the left side. Pull tight.
    • Step B (Repeat): Always start the next knot on the left side again. Do not alternate sides.
  3. Watch the Spiral: As you repeat the Half Square Knot, the tension will naturally cause the entire length of the knotting to spiral or twist.
  4. Length: Continue this spiral knotting for about 4 to 6 inches.
  5. Finish: Tie all four strands in a tight Overhand Knot under the last Spiral Knot. Trim and comb out the remaining tails for a delicate fringe.

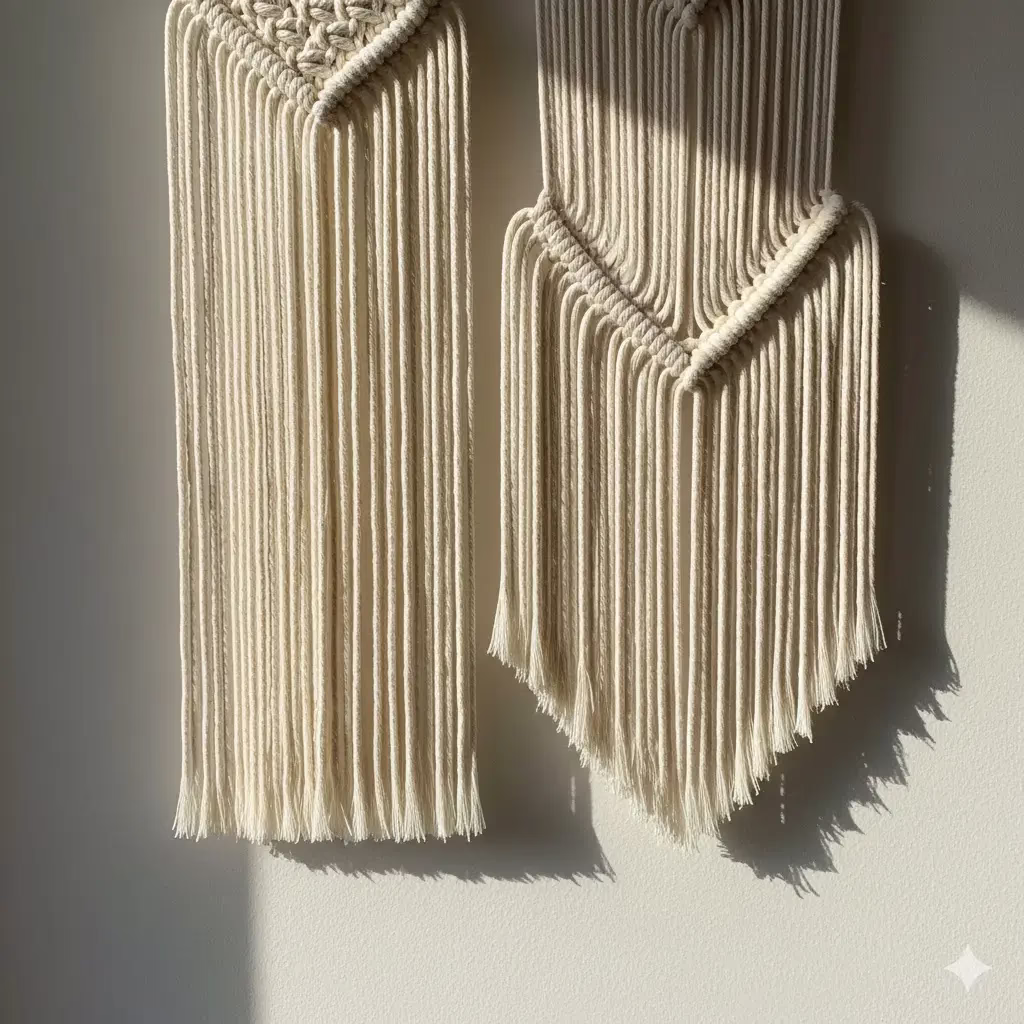
5. The Mini Wall Banner

A classic wall hanging, downsized for speed and maximum chic appeal. This mini banner uses just two main knots and can be customized with color, beads, or different lengths of fringe, making it one of the quickest Macrame Gift Ideas. It’s perfect for adding a touch of texture to a gallery wall or a small office space.

How to Do It: The Mini Wall Banner

Materials:

  • 3mm macrame cord
  • A small wooden dowel rod (about 6 to 8 inches long)

Cutting the Cord:

  • Cut 10 pieces of cord, each 50 inches long.

Step-by-Step Instructions:

  1. Mounting: Fold each of the 10 cords in half and attach them to the dowel rod using Lark’s Head Knots. You should now have 20 hanging strands.
  2. Row 1: Square Knots:
    • Divide the 20 strands into five groups of four strands each.
    • Tie a single Square Knot with each group. Space them evenly across the dowel. This forms your top knot row.
  3. Row 2: Alternating Knots (The V-Shape):
    • Skip the first two outermost strands on the left.
    • Take the next four strands (the two innermost of the first Square Knot and the two outermost of the second Square Knot). Tie a Square Knot 1 inch below the first row.
    • Repeat this alternating Square Knot pattern across the row. You will end this row with four Square Knots, and two strands remaining loose on the far left and far right.
  4. Repeat: Repeat the pattern of Row 1 and Row 2 one or two more times to create a woven section of about 4 inches deep.
  5. Finishing the Shape:
    • For a traditional banner shape, cut the hanging tails into a sharp V-shape.
    • For a modern look, cut the bottom edge of the tails in a straight, horizontal line.
    • Brush out the fringe for a soft, full texture.
  6. Hanging: Tie a separate piece of cord to the two ends of the dowel for hanging.

Conclusion

Macrame is a testament to the fact that you don’t need expensive materials or endless time to create something beautiful and meaningful. These five quick, modern, and chic projects—the Minimalist Key Fob, the Chic Coaster Set, the Geometric Plant Hanger, the Boho Book Clip, and the Mini Wall Banner—prove that a handmade gift can be both effortless and high-end. So, grab your cord, pick your project, and start knotting! The best Macrame Gift Ideas are always the ones made with a little love and a few simple knots.


Frequently Asked Questions (FAQ)

Q: What is the best cord for macrame gifts?

A: For a soft, modern, and chic look, single-twist cotton cord (also called single-strand string) in 3mm or 4mm is recommended. It unravels easily for a beautiful, full fringe. For more structured items, like the plant hanger, a 3-ply twisted rope is a good choice.

Q: Where can I buy macrame cord?

A: Macrame cord is widely available at large craft stores, online retailers, and dedicated textile shops. Look for “recycled cotton cord” for an environmentally friendly option.

Q: Can I use different knots in these projects?

A: Absolutely! Once you master the basic Lark’s Head and Square Knot, you can easily incorporate other knots like the Double Half Hitch Knot to create more intricate texture and patterns. These five projects serve as simple templates for expansion.

Q: How do I calculate the cord length I need for a project?

A: A general rule of thumb is that the working cords should be about four times the length of the finished piece. For projects with many Square Knots, like the Key Fob, you may need closer to five or six times the finished length, as knots consume a lot of cord. It’s always better to cut too long than too short!

Q: How do I keep the fringe from getting messy?

A: The best way is to use a fine-tooth comb (a pet flea comb works wonderfully) to thoroughly brush out the single-strand cord until it is completely unraveled and soft. You can also lightly mist the fringe with water and lay a heavy book on it while it dries to keep it straight.


References


Recent Posts


The Ultimate Dozen: 12 Homemade Christmas Trees To Make

A beautiful, rustic Homemade Christmas Trees crafted from stained wooden planks, featuring a star topper and adorned with delicate garlands of wooden hearts and stars, set in a cozy, neutral-toned room.

My holiday motto is simple: if I can make it, I will. This year, tired of the same old tinsel and pine, I challenged myself to reimagine the Christmas tree as a piece of sophisticated home decor. The result is this curated collection of twelve modern, boutique-hotel-worthy Homemade Christmas Trees. I hope these projects inspire you to ditch the generic store-bought look and infuse your space with handmade elegance this season.


12 Homemade Christmas Trees

The scent of pine needles is classic, but sometimes, the same old evergreen just doesn’t fit the aesthetic. If your style leans more toward minimalist luxury, gallery-wall chic, or refined modernity, it’s time to rethink the traditional centerpiece. This year, transform your holiday decor with a collection of Homemade Christmas Trees that look less like a seasonal craft project and more like they belong in a high-end boutique or a five-star hotel lobby.

We’ve curated twelve truly unique, sophisticated, and surprisingly simple DIY projects. These are not your grandmother’s felt crafts; they are elegant, architectural, and completely customizable to your modern home.


1. The Gilded Geometric Wire Tree

Concept: A three-dimensional, architectural sculpture that captures light and creates stunning shadows. This piece is all about negative space and clean lines.

Materials:

  • Thin gauge wire (craft wire or floral wire)
  • Needle-nose pliers
  • Gold or copper metallic spray paint
  • Small wooden base (optional)
  • Micro LED string lights (battery operated)

How to Do It:

  1. Form the Base: Begin by bending the wire into a large triangle for the base. This will define the size of your tree. Twist the ends to secure them.
  2. Build the Sides: Cut three more lengths of wire. From each corner of your base triangle, bend one length upwards and meet them at a single point, forming a pyramid shape. Secure the peak by twisting the wires tightly.
  3. Add Structure: For a more complex geometric look, add horizontal or diagonal wire bracing inside the pyramid. Think of it like building a basic tetrahedron structure. The cleaner the angles, the more modern the result.
  4. Finish: Once the shape is secure, spray the entire structure with the metallic paint. When dry, wrap it sparingly with micro LED lights for a delicate sparkle. This tree works perfectly on a console table or mantelpiece.

2. The Floating Driftwood Cone Tree

Concept: A coastal-meets-Scandinavian look. This tree uses natural, weathered elements arranged in a classic conical shape, lending an organic, textured feel.

Materials:

  • A sturdy cardboard or foam cone base
  • Small, uniform pieces of thin driftwood or smooth, light-colored twigs
  • Hot glue gun and ample glue sticks
  • White or pale gray craft paint (optional)
  • Small starfish or shell ornaments

How to Do It:

  1. Prep the Wood: Ensure your driftwood pieces are clean and dry. For a unified, boutique look, lightly dry-brush them with white or very pale gray paint, allowing the natural wood grain to still show through.
  2. Start at the Base: Working in small sections, apply hot glue near the wide base of the cone. Start adhering the driftwood pieces horizontally, staggering the lengths so they overlap slightly but keep the overall circular shape.
  3. Layer Up: Continue gluing the pieces, working your way up the cone. Let the wood dictate the spacing; a slight overlap adds texture. Ensure the cone is completely covered.
  4. Display: Place on a simple pedestal or in a sleek ceramic vase. The finished look is textural, airy, and effortlessly chic.

3. The Minimalist Ladder Tree

Concept: A highly versatile, space-saving, and industrial-chic piece. This is less about decoration and more about structural display.

Materials:

  • Four equally long wooden dowels (about 4–6 feet tall)
  • Smaller dowels or branches for “rungs”
  • Wood glue and clamps
  • Drill and small screws (optional, for extra stability)
  • White, black, or dark charcoal paint/stain

How to Do It:

  1. Cut and Sand: Decide on the height and angle. Cut the small dowels to gradually decreasing lengths—these will be the “branches.” Sand all pieces smooth.
  2. Assemble: Create two identical ladder frames by gluing and securing the short dowels between two long ones. Use clamps to hold the pieces until the glue is fully set.
  3. Paint: Apply your modern finish (white for Scandinavian, black for industrial, or natural stain for a rustic look).
  4. Stand: Once dry, stand the two ladder frames up, opening them slightly at the bottom (like an A-frame tent) and securing them at the top with a single screw or thick twine. Hang lightweight, geometric ornaments directly from the rungs.

4. The Stacked Marble Book Tree

Concept: An intellectual, elegant centerpiece perfect for a library, office, or sophisticated living area. This tree uses the color and structure of books and blocks.

Materials:

  • 10–15 hardback books of varying sizes (use old books and cover them)
  • Contact paper or wrapping paper in a chic, neutral design (e.g., solid gray, black, or white marble print)
  • Small, upscale ornaments (e.g., glass globes, brass stars)

How to Do It:

  1. Cover the Books: For a unified, modern look, cover all the books in the same marble-patterned contact paper. This is the key to achieving the “boutique” aesthetic.
  2. Create the Base: Start with the largest book on a flat surface.
  3. Stack: Continue stacking the books in gradually decreasing size, turning them slightly on each layer to create a spiral or offset effect that mimics a tree shape.
  4. Decorate: The spine of each book serves as a perfect ledge for small, curated ornaments or a delicate garland of pearls. The “tree” instantly looks refined and tailored.

5. The Corkscrew Paper Garland Tree

Concept: A textural, monochrome fantasy that provides incredible depth and movement. It’s surprisingly simple and budget-friendly.

Materials:

  • Large foam or cardboard cone (at least 3 feet tall)
  • Dozens of circles cut from thick cardstock or metallic paper (all the same size, about 1-inch diameter)
  • Hot glue gun

How to Do It:

  1. Prepare the Circles: The trick is to give them texture. Gently fold or crimp the paper circles to create a soft, dome-like shape.
  2. Attach: Starting from the base of the cone, apply a small dot of hot glue to the top edge of a circle and press it onto the cone.
  3. Layering: Overlap the circles slightly and stagger the placement as you work your way around and up the cone. The crimped edges should stick out, giving the tree a feathered, corkscrew-like appearance.
  4. The Reveal: When finished, the tree should look like it’s made of layered scales or petals. Use matte white paper for a snow-drift look or metallic silver for high glamour.

6. The Minimalist PVC Pipe Grid Tree

Concept: A true modernist’s dream—industrial materials used to create a clean, gridded display unit that happens to be triangular.

Materials:

  • PVC pipes of a moderate diameter (about 1.5–2 inches)
  • PVC pipe T-connectors and 90-degree elbows
  • PVC cement
  • Matte black or dark bronze spray paint

How to Do It:

  1. Measure and Cut: Determine your desired height and width. Cut the PVC pipes into various short lengths that, when connected, will form small, uniform squares or rectangles.
  2. Build the Grid: Use the T-connectors and elbows to create a large triangular grid structure, securing all joints with PVC cement. Take time to ensure the lines are perfectly straight.
  3. Finish: Once cured, spray the entire structure with a matte black or deep metallic paint to remove the cheap plastic appearance.
  4. Style: The open cubbies become perfect niches to display single, standout ornaments—a tiny succulent, a glass cloche, or a single statement bulb.

7. The Painted Canvas Mural Tree

Concept: For walls where space is at a premium, this is a two-dimensional, graphic, and highly impactful solution.

Materials:

  • Large, square or rectangular blank canvas (at least 3×4 feet)
  • Painter’s tape
  • Acrylic paints in a sophisticated palette (e.g., deep charcoal, gold, blush pink, or navy)

How to Do It:

  1. Tape the Shape: Use painter’s tape to mark out the shape of your tree directly on the canvas. Instead of a traditional triangle, consider a modern geometric design—three overlapping triangles, or a single thick, stylized geometric cone.
  2. Paint: Paint the taped-off area with your main color. Once dry, remove the tape for crisp, clean lines.
  3. Detailing: For a truly boutique look, add abstract brushstrokes of a metallic paint (gold or silver) over the main color. Alternatively, use a contrasting color to paint a second, smaller shape inside the main tree outline.
  4. Hang: The canvas becomes a statement piece of holiday art.

8. The Stacked Log Base Tree

Concept: A sophisticated, rustic-meets-contemporary look. This piece uses the beautiful, raw texture of wood slices arranged on a central pole.

Materials:

  • Wooden slices of varying diameters (pre-cut from a craft store or sawed from a log)
  • A central wooden dowel or metal rod for support
  • A sturdy, heavy base (a piece of thick wood or a metal plate)
  • Drill with a bit slightly larger than the dowel
  • Wood glue

How to Do It:

  1. Drill the Slices: Drill a centered hole in all the wooden slices.
  2. Secure the Base: Drill a hole in the sturdy base and glue the central dowel into it. Let it dry completely.
  3. Stack: Start with the largest log slice and thread it onto the dowel. Continue stacking the slices in decreasing size. You can place a small bead of glue or a thin washer between each slice to keep them slightly separated for an airy look.
  4. Final Touches: Top with a small, brass star. This tree is naturally beautiful and only needs a few subtle micro-lights.

9. The Golden Hoop and Garland Tree

Concept: An utterly modern, mobile-inspired take on the traditional chandelier tree. It’s light, airy, and glamorous.

Materials:

  • Three to four brass or gold metal hoops (different sizes, from small to large)
  • Invisible fishing line
  • Pre-made or DIY simple, minimalist garland (e.g., white pom-poms, wooden beads, or simple green sprigs)
  • Ceiling hook

How to Do It:

  1. Arrange the Hoops: Tie fishing line to the largest hoop. Then, suspend the next size up from the first, and so on, creating a stack of concentric circles that form a cone shape.
  2. Hang: Hang the stacked hoops from the ceiling hook.
  3. Drape: Drape the garland or string of beads around the edges of the hoops. Keep the garlands sparse for an upscale, not cluttered, effect. The circular shape is a chic break from the classic triangle.

10. The Cone of Curled Magazine Paper

Concept: Recycling meets sophistication. This tree uses the color and gloss of magazine paper to create a vibrant, yet structured, textural piece.

Materials:

  • Large cone (foam or cardboard)
  • Glossy magazine pages or art paper (curate the pages to a specific color palette—e.g., only black, white, and silver)
  • Wood skewers or pencil
  • Hot glue

How to Do It:

  1. Cut the Strips: Cut the paper into uniform strips (e.g., 6 inches long and 1 inch wide).
  2. Curl: Tightly wrap each strip around a wooden skewer or pencil to create a paper curl. Slide the curl off the skewer.
  3. Attach: Starting from the bottom of the cone, apply a dot of hot glue to the inside of the curl and press it onto the cone.
  4. Layer: Overlap the curls slightly and work your way up. By carefully choosing the colors from the magazines (avoiding harsh reds or greens), you can achieve a muted, gallery-quality look.

11. The Acrylic Pyramid Display

Concept: A highly sleek, almost invisible tree that focuses entirely on the ornaments. This is ideal for showcasing a curated collection of beautiful ornaments.

Materials:

  • Clear acrylic sheets (thin and easy to cut)
  • Acrylic glue or strong, clear epoxy
  • Metal clips or small plastic clamps
  • Small, elegant hooks for ornaments

How to Do It:

  1. Cut: Carefully cut four large triangles from the acrylic sheets (three sides and a base, if desired). Ensure the sides meet at a clean, sharp point.
  2. Glue: Use the acrylic glue to join the three sides into a pyramid shape. You may need to clamp the edges while the glue cures.
  3. Place Hooks: Before the glue is completely dry, you can embed small metal hooks into the seams or use a drill to carefully thread fishing line through the edges once dry.
  4. Style: The tree itself is nearly invisible, letting your precious ornaments float in mid-air.

12. The Woven Yarn Tassel Tree

Concept: A soft, tactile, and highly unique bohemian-meets-modern look. It uses texture and a single, muted color for a cozy, upscale vibe.

Materials:

  • Large cardboard cone
  • Thick, high-quality yarn in a luxurious, muted color (e.g., cream, deep forest green, terracotta, or navy)
  • Hot glue gun

How to Do It:

  1. Make the Tassels: Create dozens of small, uniform tassels. The key is using thick, quality yarn.
  2. Make the Loops: Before securing the tassels, make simple loops of yarn about 2 inches long. These will act as the “needles” or texture on the cone.
  3. Attach the Loops: Start at the base and cover the entire cone with the yarn loops, gluing them tightly together to completely hide the cardboard underneath. This gives the tree its plush texture.
  4. Add the Tassels: Glue the finished tassels to the exterior, staggering them slightly. Use a different textured yarn for the tassels than the loops for added visual interest.

Tips for Achieving a Boutique Look

  • Edit Your Palette: For a boutique feel, limit your tree palette to just two to three colors. Think monochrome (white and silver), deep jewel tones (navy and brass), or earthy neutrals (cream, terracotta, and natural wood).
  • Embrace Negative Space: Modern design loves negative space. Don’t over-decorate your Homemade Christmas Trees. Let the structure and the materials speak for themselves. A single strand of lights is often more impactful than a dozen.
  • Choose High-Quality Materials: Swap cheap plastic for real wood, metal, glass, or thick cardstock. A coat of matte spray paint can instantly upgrade plastic or cardboard.
  • Lighting is Key: Use delicate, warm-white micro LED wire lights. Avoid large, multicolored bulbs, which can instantly cheapen the look.

Scaling Your Design: From Tabletop to Tree-Sized Centerpiece

While many of the chic Homemade Christmas Trees featured here are perfect as sophisticated tabletop accents, most of these modern designs are easily scaled up to replace a traditional 6- or 7-foot floor tree. The key is to simply increase the size of the core materials and ensure the base is stable.

For projects where the instructions might seem small, remember these scaling tips to achieve a full-sized, boutique-worthy centerpiece:

Project Name for Homemade Christmas TreesScaling Requirement to Reach 5–7 Feet
The Minimalist Ladder TreeUse 4–6 foot dowels for the main vertical supports and increase the diameter of the wood for stability.
The Minimalist PVC Pipe Grid TreeUse wider diameter PVC pipe (2–3 inches) and buy pipes in 10-foot lengths to build a full, tall pyramid structure.
The Golden Hoop and Garland TreeSource large metal hoops, with the bottom hoop measuring at least 30–36 inches in diameter, and hang from the ceiling using strong, secure hooks.
The Stacked Log Base TreePurchase a central threaded metal rod (not just a dowel) 6 feet long and use large, heavy wood slices for the base to ensure stability.
The Corkscrew Paper Garland TreeSource a large conical form that is 3–4 feet high, then place it on an elevated stand or pedestal to achieve the full height.
The Painted Canvas Mural TreeIncrease the size of the canvas to at least 4×6 feet to make it an impactful visual replacement for a tree in a main living area.

By committing to larger materials, you ensure your DIY project is not only elegant but also fulfills the role of a proper holiday centerpiece.


Frequently Asked Questions (FAQ)

Q: Are these trees durable enough to last multiple seasons?

A: Yes, absolutely. Projects utilizing materials like wood, metal, PVC, and thick acrylic (Trees 1, 3, 6, 8, 9, and 11) are built to last. For the paper and yarn-based trees (Trees 5, 10, and 12), use a sealant spray or store them carefully in a box to maintain their shape.

Q: I have very little crafting experience. Which tree is the easiest to start with?

A: The Floating Driftwood Cone Tree (Tree 2) and the Stacked Marble Book Tree (Tree 4) are excellent beginner projects. They primarily rely on simple gluing and stacking techniques, with minimal cutting or complex construction needed.

Q: How can I safely light the wooden or paper-based trees?

A: Always use battery-operated, cool-to-the-touch LED micro-lights for any tree built from paper, yarn, or wood. These lights do not generate significant heat, making them a safe choice for all your Homemade Christmas Trees.

Q: Where is the best place to find unique, modern ornaments for these trees?

A: Look for geometric shapes, matte finishes, and natural materials like unfinished wood, brass, or colored glass. Many craft stores sell basic ornaments that can be spray-painted in your chosen modern color palette (e.g., matte black or metallic gold) to achieve a coordinated, upscale look.

Q: I don’t have enough space for a full-sized tree. Which of these can be made small?

A: Nearly all of them can be scaled down. The Geometric Wire Tree (Tree 1), the Stacked Log Base Tree (Tree 8), and the Corkscrew Paper Garland Tree (Tree 5) all make exceptional, sophisticated tabletop displays when made in miniature.


Reference Section


Recent Posts


Easy Ways to Upcycle Plastic Jugs into Stylish Storage

Modern white plastic jug Upcycled into Plastic Jugs storage container with a clean, geometric cut-out design, holding a neatly folded knit blanket.

Is your recycling bin overflowing with plastic? Before you toss those everyday containers, pause and see their potential. This article explores innovative and beautiful ways to Upcycle plastic jugs into functional, aesthetically pleasing storage solutions. Join us on a journey to reduce waste, save money, and add a touch of eco-chic style to your home with simple DIY upcycling projects.


Introduction: Unlock the Design Potenetial When You Upcycle Plastic Jugs

The everyday plastic jug often ends up in the bin after a single use. That’s a huge waste! These common containers, from milk jugs to detergent bottles, are everywhere. But imagine if your recycling bin was a treasure chest of design ideas. What if those plain, empty jugs could become stylish, functional, and totally chic storage pieces that upgrade your home decor?

This is your complete guide to upcycling. We will focus on plastic jugs and show you how simple it is to create beautiful, useful items for any room. Forget plain, boring plastic. Think elegant organizers, cool planters, and smart holders. They will not only work well but also bring modern style to your space. Get ready to be creative. Reduce your waste. And find the real joy of giving old items a second, better life.


Why Upcycle Plastic Jugs?

The good things about upcycling go beyond just saving a few dollars. When you choose to upcycle plastic jugs, you are making a deliberate, positive choice for your home and the planet.

  1. Good for the Planet: Every plastic jug you keep from the landfill or skip the energy-intensive recycling process for is a win. Upcycling cuts the need for new products. It saves resources and lowers pollution.
  2. Save Money: Why buy expensive new storage bins? You can easily create unique, custom pieces using materials you already own. Upcycling is a very smart, low-cost way to get organized and decorate.
  3. Unique Style: Items bought in stores often lack character. Upcycling lets you put your own style and personality into every piece. This creates items that are truly unique to you.
  4. A Fun Hobby: DIY projects are very rewarding. It is a chance to relax and be creative. You get a great feeling of success when you turn something ordinary into something amazing.
  5. Long-Lasting: Many plastic jugs are made to be strong and tough. This makes them perfect for creating durable storage that will last for years.

Your goal is not just to reuse the plastic. It is to reimagine it. Turn that simple plastic into pieces that look high-quality, modern, and beautiful.


Getting Started: Tools and Safety

Before starting your projects, make sure you have the correct tools and take simple safety steps.

Essential Tools Checklist:

  • Sharp Craft Knife or Box Cutter: Use this for precise cuts on thick plastic. Always be careful.
  • Strong Scissors: Good for simpler cuts and trimming edges.
  • Cutting Mat: This protects your table or work surface.
  • Ruler and Marker: You need these for accurate measuring and drawing straight lines.
  • Fine Sandpaper: Use this to smooth down any rough or sharp plastic edges.
  • Adhesives: A hot glue gun, strong craft glue, or spray adhesive, depending on the job.
  • Safety Gear: We suggest wearing safety glasses and gloves when you are cutting plastic.

Key Safety Reminders:

  • Adult Supervision: Always watch children closely if they help with cutting.
  • Cut Safely: When using a craft knife, always cut in a direction that moves away from your body.
  • Keep it Stable: Make sure your cutting surface is flat and does not move.
  • Smooth Edges: Plastic edges can be very sharp. Always use sandpaper to smooth them down and prevent cuts.
  • Good Airflow: If you use spray paint or strong glues, work in an area with lots of fresh air.
  • Clean Everything: Always wash and dry all plastic jugs completely before you start. This is especially important for containers that held food or harsh cleaners.

Project 1: The Modern Kitchen Utensil Holder

Purpose: This smart utensil holder reuses a common plastic jug as a stylish piece for your kitchen. It keeps essential cooking tools neat and easy to grab. The speckled paint and small handle give it a very clean, modern feel.

How to Do It:

  1. Pick Your Jug: Choose a sturdy jug with a square or rectangle shape. Think about a container that held laundry detergent or bleach. Wash it really well and let it air dry completely.
  2. Mark the Cut: Get your ruler and marker. Draw a diagonal line across the top of the jug. This creates a sloped opening. This modern angle is a key part of the design. You can also measure the same height on three sides. Then connect these points for a perfect slope.
  3. Cut the Jug: Cut along your marked line slowly and carefully. Use a sharp craft knife or strong scissors. Go slow to get a clean, smooth edge. Use fine sandpaper to smooth any rough spots right away.
  4. Add Texture: To get the speckled, stone-like look, you have a few options:
    • Textured Spray Paint: Look for paint that is made to look like stone or granite. You might need to use a primer coat first.
    • DIY Texture Paste: Mix simple acrylic paint with baking soda or fine sand. This makes a thick, textured paste. Apply this using a brush or a sponge.
  5. Paint and Finish: Apply the textured paint in thin, even coats. Follow the product directions. Allow plenty of time for drying between coats. If you use the DIY paste, let it dry completely. You can add a clear sealant coat if you want extra protection.
  6. Add a Handle (Optional): For a finished, sophisticated look, add a small leather or fake leather loop. Punch two small holes near the top edge. Secure the handle with strong glue or small rivets. This small detail adds a nice contrast.

Placement: This holder looks best next to your sink or stovetop. It adds a touch of simple elegance to any kitchen counter.


Project 2: The Modern Basket Weave Storage Caddy

Purpose: This project changes a basic plastic jug into a charming and practical caddy. It is perfect for storing remote controls, art supplies, or small household items. The rope wrapping adds a great texture and warmth.

How to Do It:

  1. Pick Your Jug: Use a medium-to-large plastic jug. It should have a sturdy base and a smooth, straight body. Clean and dry it very well.
  2. Prep the Jug: Decide how tall you want your caddy. You can leave the top handle area on the jug. This is great for a grab-and-go handle, as shown. Or, you can cut the top off completely for a fully open container. If you cut it, mark your line first. Use strong scissors and then sand the edges smooth.
  3. Select Rope: Natural ropes like jute, sisal, or thick cotton cord work best for this style. A thicker rope will give you a better texture and cover the jug faster.
  4. Start Wrapping: Put a line of hot glue near the bottom edge of the jug. Press the end of your rope firmly onto the glue line.
  5. Wrap the Rope: The simplest way to get this basket-weave look is to glue rows of rope very close together. Apply the hot glue in small sections as you wrap. This keeps the rope snug and tight against the jug. Work your way up the side until the rope reaches your desired height. Be sure to press the rows together to hide the plastic underneath.
    • Note: For the exact cross-hatch pattern shown, you can glue thin, vertical strips of rope first. Then, weave your horizontal rope through them. However, simple coiled wrapping is much easier and still looks fantastic.
  6. Finish It: When the rope reaches the right height, trim the end. Use a final dot of hot glue to secure the end of the rope. Tuck the end neatly into the coil next to it.

Placement: This caddy looks perfect on a coffee table, a bedroom nightstand, or even a home office desk for small supplies.


Project 3: The Minimalist Modern Lantern

Purpose: This project transforms a translucent plastic container into a stylish, soft lantern. It is great for creating a cozy, warm mood indoors or outside on a deck. The simple shape and clean black lines make it a chic home accessory.

How to Do It:

  1. Pick Your Jug: Look for a translucent or frosted plastic jug. A large water jug or a rounded cleaning container works well. Wash and dry it completely.
  2. Prep the Jug: Cut off the very top, narrow part of the jug. You want to be left with an open cylinder shape. The bottom of the jug should stay solid. Use sandpaper to smooth all the cut edges.
  3. Create the Rings: To give it a clean, finished look, you need a base and a top ring. Use thick craft foam, thin wood circles, or even lids from other containers for this.
    • Measure the size of the jug’s base and top opening.
    • Cut two circles from your chosen material. One should fit well around the bottom. The other should fit right on the top edge.
    • Paint both of these rings a contrasting color, like a matte black, for that modern touch.
  4. Attach the Handle:
    • The example uses a curved wooden or faux leather handle. Cut a strip of thin, flexible material (wood or thick faux leather) into a curved shape.
    • Attach the ends of the handle to the top painted ring. Use a very strong glue or small rivets. Make sure the handle is solid.
  5. Assemble the Lantern:
    • Glue the painted base ring around the bottom edge of your jug.
    • Glue the top ring (with the handle) to the top cut edge of the jug.
    • Wait for all the glue to dry completely and securely.
  6. Add the Light: Place battery-operated LED fairy lights or a small LED candle inside the jug. This gives off a safe, beautiful, glowing light.

Placement: Use this lantern as a centerpiece on a table, on a bookshelf, or to add ambiance to any seating area.


Project 4: The Wavy Handle Caddy

Purpose: This eye-catching caddy has a wavy, decorative top edge and a strong, practical handle. It’s perfect for organizing art supplies, holding small cleaning bottles, or working as a decorative plant holder. The speckled body and black contrast look refined and artistic.

How to Do It:

  1. Pick Your Jug: Select a jug that is tall and has a square or rectangular base. Make sure its surface is smooth. Clean and dry it very well.
  2. Mark the Wavy Edge: Decide on the caddy’s final height. Use your marker to draw a freehand wavy or scalloped line around the top edge. Draw it slowly and make sure the curves look planned and smooth.
  3. Cut the Wavy Edge: Cut along your wavy line with a sharp craft knife or strong scissors. Be very precise and careful with the curves. Sand down all the cut edges to make them smooth.
  4. Create the Handle Accent: You need to make the striking black handle and top trim.
    • The Best Method: Cut the wavy top and a matching handle shape from a piece of sturdy material. Think thick EVA foam or hard plastic.
    • Paint this piece a solid matte black.
    • Attaching: Once the black piece is dry, glue it securely to the wavy cut edge of your jug. Use a very strong adhesive. It should sit perfectly on the jug’s edge.
  5. Paint the Jug (Optional): To get that speckled texture, paint the main body of the jug. Use a light spray paint for plastic. Then, add a speckled topcoat or apply your DIY texture as described in Project 1.
  6. Add a Base (Optional): For extra stability, you can glue a simple black ring to the very bottom, similar to the method in Project 3.

Placement: This caddy looks amazing in a home office, a craft area, or a stylish bathroom.


Project 5: The Stylish Laundry Hamper / Blanket Storage

Modern white plastic jug Upcycled into Plastic Jugs storage container with a clean, geometric cut-out design, holding a neatly folded knit blanket.

Purpose: This smart project turns a large plastic container into a striking storage solution. It is ideal for throw blankets, extra towels, or even a small, decorative laundry hamper. The cut-out pattern adds a modern, architectural feel.

How to Do It:

  1. Pick Your Jug: Choose a very large, strong plastic jug. The kind that holds a gallon or more of laundry detergent is perfect. It should have a strong handle and a square or rectangular base. Wash and dry it completely.
  2. Design the Cut-Out: This is the most creative step. Use a marker and ruler to plan your pattern. The example shows interlocking “X” shapes within a large window.
    • First, mark a large rectangle on two opposite sides of the jug. Leave a solid border at the top, bottom, and sides for strength.
    • Next, draw your geometric pattern inside this window. Keep the strips of plastic wide enough so the jug stays structurally sound.
    • Tip: Measure carefully. Draw the pattern on one side, then trace it onto the opposite side for a matching look.
  3. Cut the Design: Use a sharp craft knife or a precision cutting tool. Very carefully cut out the marked sections. This step needs a steady hand and patience. Be sure to smooth all the cut edges with fine sandpaper.
  4. Paint (Optional): If the jug isn’t already a good neutral color (like white or cream), spray paint it. A matte finish often looks the most expensive and modern.
  5. Final Touches: Make sure all edges are smooth and clean. The jug’s shape, combined with the open cuts, creates a nice look. The blankets or towels you store inside become part of the decor.

Placement: This piece fits perfectly in a living room next to a sofa or in a bedroom as smart storage for extra linens.


More Upcycled Plastic Jug Ideas

The chances to upcycle plastic jugs are endless! Here are a few more concepts to keep your creative momentum going. These ideas keep that high-end, modern look.

  • Stylish Desk Organizers: Cut off the top handle part of a jug. Paint it a solid color (matte grey or black). Then, wrap the bottom third with a leather strap or thin cork sheeting. This creates a smart holder for pens, scissors, or charging cables.

Hanging Planters: Cut jugs in half. Drill drainage holes in the bottom. Paint them with a textured paint (like Project 1). Add faux leather or rope straps and hang them on a wall. They are perfect for small indoor plants or succulents.

The Patterned Light Diffuser: For a different take on Project 3, paint the entire jug matte black (or another dark color). Carefully drill or cut small, random holes across the surface. Place LED lights inside. This creates a dramatic, starry-night effect when the light shines through.

Cleaning Supply Caddy: Use a large, open-top jug (like a milk jug). Cut the top off neatly. Apply a glossy, solid-color paint (like deep emerald or cobalt blue). Add a simple wooden dowel handle secured by small bolts. This makes a great-looking caddy for moving cleaning supplies around the house.

Kids’ Toy Bins: Use very large jugs (like commercial detergent containers). Cut the tops off to create wide, open bins. Paint them in two-tone patterns (like white and tan). These make durable, chic bins for tidying away toys in a stylish living space.


FAQ – Upcycle Plastic Jugs

Q: What kind of plastic jugs are best for upcycling projects?

A: The best containers are usually made from HDPE plastic (often marked with a #2 recycling symbol). These are commonly found as milk jugs, laundry detergent bottles, and some cleaning solution containers. They are thicker, sturdier, and hold their shape well, making them ideal for cutting and converting into strong storage.

Q: Is it safe to cut the plastic? What is the best way to get a smooth edge?

A: Safety is always first. Use a sharp craft knife for heavy cuts and strong scissors for trimming. Always cut away from your body. The most important step for safety and a professional look is to smooth the edges. Use fine-grit sandpaper (around 120-220 grit) and gently rub the cut line until it is completely smooth and no longer sharp to the touch.

Q: What is the best paint to use on plastic jugs for a long-lasting finish?

A: You need to use paint specifically made for plastic, which usually contains an additive that helps it adhere to the slick surface. Spray paint is often the easiest option for a smooth, even finish. Look for products labeled “Paint for Plastic” or “All Surface” spray paint. For the best result, apply a thin coat of plastic primer first, then apply several light coats of your color.

Q: How can I hide the texture or logos already on the plastic jug?

A: You have a few options:

  1. Textured Paint: As shown in Project 1 and 4, thick or textured spray paint (stone, granite, or stucco effect) does a great job of covering small details.
  2. Wrapping: Projects 2 and 4 use materials like rope or cork/leather to fully or partially wrap the body of the jug, covering the original markings completely.
  3. Sanding: For raised letters, you can often sand them down with a coarse sandpaper before applying primer and paint.

Q: Are upcycled containers safe to use for food storage?

A: It is strongly recommended that you do not use upcycled plastic for direct food storage or serving. Unless you are absolutely certain of the plastic type and its original use, it’s safest to reserve these containers for non-food items like blankets, cleaning supplies, art materials, or planters.


References


Recent Posts


Laughter Is The Best Sound

A candid photo of five young adults (three women and two men) sitting around a cafe table by a sunny window, all sharing a moment of genuine, unrestrained Laughter over coffee. The image captures the joy of shared social connection.

A firm believer in the power of a good laugh, the author found solace and strength in humor after navigating life’s ups and downs. This journey inspired the author to share the profound benefits of Laughter with a wider audience. When not writing, the author enjoys sharing jokes and spreading smiles wherever they go.


Introducing Laughter: The Universal Sound of Joy

Laughter is a sound all people understand. It crosses all language barriers, breaks down walls, and always means joy. Quick, catching, and really good for us, it is key to the human story, from a baby’s first little giggle to the loud laughs of old friends. It is more than just a sound we make when we are happy; this powerful tool benefits our physical and mental health. Laughter helps us connect socially, making it a core part of being human.

The world often feels full of stress, worry, and big problems. In this world, the simple act of laughing can feel like an amazing way to take care of yourself. But it is truly the “best sound”? Science, psychology, and countless personal stories say a clear yes. This article will look at the many great things laughter does for us. We will explore how it affects our bodies and minds. We will share easy ways to add more laughter to your daily routine. Finally, we will show why ‘It Is The Best Sound’ is not just a nice saying, but a deep truth.

The Science Behind the Smile: How Laughter Works Its Magic

Laughter is not just a quick feeling; it starts a complex chain reaction in your body. When you laugh, many good changes happen inside you, switching your state from bad to good.

The Body’s Quick Workout:

Think of it like a short, fun workout. It uses many different muscles. Your diaphragm muscle tightens, your chest muscles work, and even your stomach muscles get a light squeeze. This physical activity is the main reason you might feel nicely tired after a long, big laugh.

Beyond muscles, it greatly helps your heart and blood system. Your heart rate and blood pressure first go up, but then drop lower than normal, helping you relax. It brings in more oxygen, waking up your heart, lungs, and muscles. It also causes your body to release endorphins. These are natural “feel-good” chemicals that make you feel well and can even stop pain for a while.

Less Stress and a Stronger Immune System:

One of the most important benefits of laughter is its power to fight stress. Stress hormones like cortisol can harm your body over time. They weaken your immune system, cause swelling, and lead to many health issues. So this is a strong cure. It lowers these stress hormones. At the same time, it increases the number of immune cells and disease-fighting antibodies. This makes your body better at fighting off sickness. Laughter is a vital, often forgotten, part of a strong immune system.

Relief from Pain:

The release of endorphins that comes with laughter is not just about feeling happy; it is also about feeling less pain. These natural painkillers made by your body can work well to ease pain, raising your pain limit. It cannot cure long-term pain, but it can give short-term relief and make the pain easier to handle. It offers a needed break and a sense of hope.

The Mind’s Best Medicine: Mental and Emotional Benefits

The physical benefits are great, but the effects of laughter on our minds and feelings are just as deep. It helps us cope, improves our mood, and builds emotional strength.

Better Mood and Fighting Sadness:

It is nearly impossible to feel truly sad or angry while you are having a real laugh. As it instantly brightens your mood. It offers a mental break from bad thoughts and feelings. It helps you see things in a new way, making problems feel less scary and challenges seem easier to beat. For people dealing with sadness or worry, bringing more laughter into their lives can be a helpful plan. It gives moments of peace and a natural lift to their state of mind. Just the act of smiling, even if forced, can trick your brain into releasing good chemicals. Laughter makes this effect much stronger.

Increased Strength and Recovery:

Life will always have tough times. How we handle these hard moments often decides how happy we are overall. Laughter builds strength by helping us keep a hopeful view, even when things are bad. It lets us deal with negative feelings, gain a clearer view, and bounce back more quickly from bad events. When we can find humor in a hard spot, we feel more in control. We stop ourselves from being crushed by tough times.

Better Thinking and Problem Solving:

When you are relaxed and happy, your brain works much better. This helps clear out mental clutter. It reduces rigid thinking. It encourages a more open and flexible mindset. This can lead to greater creativity and improved skills for solving problems. When you face challenges with a lighter heart and a clearer head, new and smart solutions are more likely to appear.

The Social Glue: Laughter and Relationships

Aside from its personal benefits, laughter is key to our social lives. It is a powerful glue that makes relationships stronger, builds connection, and calms tension.

Building Bonds and Breaking Down Walls:

Laughter spreads easily. When you laugh with someone, a special connection forms. It signals shared understanding, care, and good feelings. This shared moment can build bridges between people from different places. It breaks down social walls. It creates a sense of belonging. Think about how fast strangers can connect over one truly funny event.

Better Talking and Solving Fights:

In any relationship, it can be a secret tool. It eases tension during arguments and offers a common ground when ideas are different. Crucially, it opens up communication. A good joke at the right time or a moment of shared humor can stop fights from escalating. This shift allows partners, friends, or coworkers to face issues with a mindset of working together. Ultimately, it reminds us not to take ourselves too seriously, even when things matter a lot.

Increased Appeal and Likeliness:

People naturally like those who are happy and can make others laugh. A sense of humor is often named as a highly wanted trait in friends and romantic partners. Laughter makes you seem more open. It creates a good feeling around you. It fosters a space where others feel safe and valued. Sharing laughter is a close act that shows trust and joy.

How To Do It: Finding More Laughter in Your Life

With all these benefits, the question is not if we should laugh more, but how. Our busy, often serious lives can make laughter feel like a luxury, not a need. But with real effort, we can create a life rich in humor and joy.

1. Go Out and Seek Humor:

Do not just wait for laughter to find you; go find it.

  • Watch Comedies: Set aside time to watch stand-up comedy, funny movies, or TV shows. Make this a regular part of your free time.
  • Read Funny Things: Look for funny writers or amusing stories online.
  • Listen to Comedy Podcasts: There are many podcasts just for humor that you can listen to while traveling or doing chores.

2. Spend Time with People Who Make You Laugh:

Humor is catching. Be around friends, family, or coworkers who have a good sense of humor and who make you laugh. Their happy energy will rub off on you. Try to connect with those who lift you up and bring joy into your life.

3. Try Laughter Yoga:

Laughter yoga is a unique idea where people laugh without needing jokes or comedy. They start the laughter as a simple physical exercise in a group. They often use playful actions and eye contact. The idea is that your body does not know the difference between real and fake laughter. Both offer the same good benefits for your body and mind. It is a great way to let go of self-doubt and feel pure, honest joy. Look for classes or groups near you.

4. Find Humor in Daily Life:

Develop a playful view of the world. Look for the silly, the odd, or the slightly crazy things in your day. A small mistake can be a source of stress, or it can be a funny story to share. Choosing the second choice can quickly change your mood.

  • Example: Spilling coffee on your shirt before a big meeting could feel terrible. Or, it could be a moment to laugh at your own clumsiness and share a relatable, funny story with a colleague.

5. Be Able to Laugh at Yourself:

Self-deprecating humor (when kind and respectful) is a strong tool. It shows humility, strength, and an ability to not be too serious about yourself. When you can laugh at your own mistakes or odd habits, you lessen the stress of needing to be perfect. You also become more relatable to others. It is a sign of emotional health and self-acceptance.

6. Start a “Laughter Journal”:

Keep a small notebook. Write down funny things that happen each day. Include jokes you hear or funny things you see. Re-reading this journal can be a fast, simple way to make yourself smile or chuckle whenever you need a lift.

7. Create a “Humor First Aid Kit”:

Gather a collection of things that always make you laugh. These could be funny videos, online jokes (memes), quotes, or even a silly hat. When you feel down, grab your kit for an instant mood boost.

8. Share Your Laughter:

This is meant to be shared. Tell funny stories, share jokes, and engage in light, fun conversation with others. When you give laughter, you often get it back many times over. This shared exchange makes the benefits stronger for everyone.

9. Practice Smiling:

While not true laughter, smiling is its close cousin. Even a forced smile can send signals to your brain that lift your mood. Practicing smiling can make it easier for real laughter to follow. Smile at strangers. Smile at yourself in the mirror. Watch the good change in how you feel.

10. Make Time for Play:

Do not let your adult life steal your sense of play. Do things that bring out your inner child. Play board games. Build something fun. Jump in puddles. Play with pets. Playfulness often leads to sudden bursts of joy and laughter.

The Great Power of Laughter in Action: Real-World Examples

To truly see how great laughter is, let’s look at some real examples of its power to change things:

  • Hospital Clowns: Groups show how laughter can greatly help sick children and adults. By bringing joy and distraction, these clowns help patients deal with pain, fear, and the cold hospital setting. This often speeds up recovery and improves emotional strength. The laughter they cause acts as a powerful, helpful treatment.
  • Laughter Clubs for Older People: Many groups have started laughter clubs, especially for older people. These clubs offer a social space and a dedicated time for shared laughter. This fights loneliness and improves overall mental and physical health. People who join often report more energy, better sleep, and a happier view of life.
  • Workplace Wellness Plans: Smart companies are adding humor to their work wellness plans. Putting in “laughter breaks,” comedy classes, or just encouraging a lighter mood can lower employee stress. And boosts team spirit. It improves teamwork. It also increases creativity. All of this leads to higher output and more job happiness.
  • Personal Stories of Strength: Countless people facing huge personal sadness or long-term sickness have found comfort and strength in humor. Using this to cope does not make their situation less serious. Instead, it gives them the power to go through it with more grace and a lighter heart. It is about finding light even when things are dark.

The Spreading Effect of Laughter

When you laugh, you are doing more than just something good for yourself. You are sending out good feelings into the world. Your laughter spreads. It can brighten the mood in a room. And bring a smile to a stranger’s face. It can inspire others to embrace joy. It creates a cycle where one person’s happiness sparks another’s. This leads to a happier and more connected community.

To sum up, ‘Laughter Is The Best Sound’ is more than just a nice thought; it is proof of a basic human experience that holds deep power. This natural cure costs nothing and has no bad side effects.

Furthermore, laughter gives many benefits for our physical health, mental well-being, and social connections. The world often asks us to be serious, but in this world, embracing laughter is an act of hope and a nod to life—a conscious choice to make joy happen. So, go ahead and let out a chuckle, a giggle, or a roaring guffaw! Your body, mind, and the people around you will thank you for it. Make this a top priority, and watch as your life becomes richer, healthier, and clearly happier.


FAQ

Q1: How much should I laugh to get the benefits?

A1: There is no set “dose” of laughter. But studies show that even just a few minutes of real laughter each day can help. The more, the better! Try to look for chances to laugh throughout your day.

Q2: Can fake laughter help as much as real laughter?

A2: Yes, it can! Research on laughter yoga suggests your body often does not know the difference between real and fake laughter. The simple physical action of laughing, even if you start by forcing it, can cause the release of endorphins. This leads to good body responses. Often, forced laughter can turn into real laughter.

Q3: Is laughter always right to use?

A3: Laughter is mostly positive. However, you must be careful of the situation and other people’s feelings. Laughter should never be at someone else’s expense. It should not be used to tease or hurt others. Its power is in its ability to connect and uplift, not to isolate or harm.

Q4: Can laughter help with pain that lasts a long time?

A4: Laughter can make your pain limit higher for a while. It does this by releasing endorphins. These are your body’s natural painkillers. It also takes your mind off the pain. While it is not a cure, it can be a valuable tool to help manage pain. It also improves your quality of life.

Q5: What if I do not feel like laughing?

A5: It is perfectly fine not to feel like laughing all the time. On bad days, just trying to smile, watching something mildly funny, or engaging in a gentle, playful activity can start to change your mood. Remember, even a little bit of humor can help. Sometimes, simply being around people who are laughing can start the good feeling in you.


References


Recent Posts


My BEST Thrifting Secrets for Aesthetic Home Decor

A chic, cream-colored barrel-style swivel chair upholstered in boucle or shearling fabric, sitting on a concrete floor in a well-stocked second-hand or vintage furniture store. This is an example of a high-quality find achieved by mastering Thrifting Secrets.

We all scroll Instagram and love those beautiful, collected homes. They look effortlessly chic. Then we see the high price tags on new furniture. I used to spend money trying to get that look. I ended up with a high credit card bill and a house that felt too plain. Everything changed when I discovered the powerful Thrifting Secrets of hunting for vintage treasures. I found that the best decor has a real story. Now, I will share my journey with you. I’ll show you how to find beautiful pieces on a small budget.


Unlocking the Aesthetic: Your First Dive into Thrifting Secrets

We live in a world with too much fast furniture. Most homes have mass-produced items. The most popular homes today feel unique and personal. They look curated. This “collected” style means your home has grown over time. It is the sign of great taste. The real secret? It always involves old, pre-loved, or thrifted items.

Thrifting is no longer just for saving money. It is a smart design choice. But walking into a huge thrift store can feel overwhelming. How can you find the good stuff among all the clutter? How can you make sure your finds look expensive, not messy?

This guide reveals my personal thrifting secrets. It gives you simple advice and easy ‘how-to’ methods. You can transform your home with stylish, unique items. Best of all, you will keep your budget low.


Part 1: Plan Your Hunt (Success Starts Before You Leave Home)

Many new thrifters make one big mistake. They go without a plan. Finding aesthetic items is not about luck. It is about being prepared.

Secret 1: Know Your Style and Your Sizes

Applying the best Thrifting Secrets starts with forming a clear vision before visiting any store: define the style you want, and identify the specific items you need.

How to Do It: Make a “Thrift List”

  1. Look Around Your Home: Walk through your rooms with a notepad. Write down what you need. Do you need art for an empty wall? A tray for the coffee table? A better light for a dark corner?
  2. Pick Your Style Words: What is your style? Mid-Century Modern, Coastal Grandma, Dark Academia, or Boho-Eclectic? Knowing these words helps you focus your search. For example, a Mid-Century modern buyer looks for solid teak wood. They want simple shapes. A Coastal Grandma buyer looks for brass frames and blue and white plates.
  3. Measure Everything: You must do this. If you need a dresser, measure the space exactly. Save those measurements (up, across, deep) on your phone. If you want a dining table, know the smallest and largest size that will fit in your space.

Secret 2: Map Out Your Treasure Route

Mastering Thrifting Secrets means knowing that not all second-hand stores are the same, as different shops hold unique finds.

  • Charity Shops (Goodwill, Salvation Army): These are best for small decor items, kitchen gear, and surprise accessories. They get many new donations every day.
  • Local Thrift/Consignment Shops: Prices here are often a little higher. But they have better quality, curated furniture. They offer truly unique vintage items.
  • Estate Sales: This is the best place for original art, high-end furniture, and special collections. You must research these sales. You usually need to arrive early.
  • Flea Markets/Swap Meets: These are great for finding fabrics, raw materials, and for negotiating prices.

How to Do It: Plan Your Day

Use a map app to plan a trip. Try to visit 3 to 5 stores in one area. Start at the nicer, more curated shops first. Then, go to the busy charity stores. Finish with a quick look at an antique mall if you have time. This plan helps you see the best items before they sell.


Part 2: Searching Smart (Mastering the Art of the Search)

The search is often where people get lost, but one of the key Thrifting Secrets is understanding that a thrift store needs a different kind of focus than a department store.

Secret 3: Use the 4 Cs Inspection Rule

When buying decor for your aesthetic, quality is important. A bad find, even a cheap one, just becomes clutter. Use the 4 C’s to check any item quickly.

  1. Condition: Does the structure feel strong? For wood, check for rot or cracks. Check for weak legs. For ceramics, look for chips or thin cracks. For fabric, check for moth holes or stains.
  2. Character (The “Vibe”): Does it look unique? Does it have a cool shape or a history? A wooden box with a few scratches often has more character than a new, perfect one. Do not buy items that look generic or like modern, cheap copies.
  3. Cost: Always ask: “If this item were new at a regular store, what would it cost?” This helps you decide. If a chipped mug is $10, skip it. If a solid brass lamp is $35, buy it.
  4. Conversion Potential: This is key for aesthetic finds. If the color is bad or the fabric is old, can you easily convert it? Can you make it beautiful? For example, an ugly wooden chest with a great shape is perfect for a coat of paint. An item that needs major fixing should probably be left behind.

Secret 4: Look Past the Mess (Visual Filtering)

Thrift stores are often very messy. The “ugly” items hide the “gold.”

How to Do It: The Aesthetic Scan

  • Focus on Material, Not Color: Forget the bright, ugly paint or the dust. Look only for the material: Is the base solid marble? Is the bowl real brass? Is the vase hand-blown glass? Good materials always look high-end. The bad color can be fixed.
  • Hunt in Weird Aisles: Skip the main furniture floor—everyone goes there. Go to the craft section for old buttons or unique frames. Check the kitchen gear for cast iron, nice cutting boards, or unusual containers.
  • Look for Great Shapes: Train your eye to see beautiful shapes. A big, unique vase instantly looks chic with a coat of matte white paint. A simple wooden cabinet with thin, nice legs has huge potential.

Part 3: The Aesthetic “Thrift Flip”

One of the best Thrifting Secrets is recognizing that most finds need work; the magic is in the simple, big changes that transform “old stuff” into aesthetic decor.

Secret 5: Master the Paint Overhaul

Paint is your most powerful tool. It quickly moves a piece from cheap to chic.

How to Do It: The Stylish Paint Job

  • The Matte Rule (Black or White): Use matte black or matte white spray paint on almost any small item (vases, ceramic animals, old statues, candleholders). This gets rid of bad colors. It makes people look at the item’s shape instead. This gives instant sophistication.
  • Furniture Makeover: Chalk paint is the easiest way to update wood. Choose soft, muted colors (like sage green, dusty blue, or light brown). Always sand the piece lightly. Clean it well. Use a good wax or sealer to make it look professional.
  • Change the Handles: Even if you keep the original wood finish, changing the knobs helps. Take off the old plastic or brass handles. Add modern leather pulls or cool glass knobs. You can find these at hardware stores or online. This simple change takes ten minutes and updates the whole piece.

Secret 6: Build a ‘Collected’ Gallery Wall

Art at the thrift store is often ignored. Yet, it offers the most personality for your walls.

How to Do It: Make Thrifted Art Look Expensive

  1. Ignore the Picture: Unless it is a special painting, ignore the actual print or image. Focus on the frame. Look for real wood, unique gold paint, or deep carvings.
  2. Use a New Mat: You can keep the old art. But change the stained, yellowing paper border (the mat) with a new, thick, white one. This instantly makes the piece look modern. It puts the focus back on the art.
  3. The Simple Abstract: Did you find an old canvas with good texture but a bad image? Flip it over. Paint the back white. Create your own simple abstract art using only one or two colors. Now you have custom, original art in a vintage frame.

Part 4: Style and Placement (Making Thrifted Look High-End)

This is the final step. Here, your thrifting secrets truly pay off. You make the items look planned, not random.

Secret 7: The Rule of Three and Stacks

High-end stylists use these rules. They make any group of objects look planned.

  • The Rule of Three: When you style a shelf, coffee table, or fireplace mantle, put objects in odd numbers (3, 5, or 7). The uneven numbers look better to the eye.
  • Stacks and Layers: Use stacks of books to make different heights. You can turn the book spines inward, or use books that are all one color. Place a thrifted item on top of the stack. This raises it up. For example, a small brass bowl on a stack of two old books looks great.

Secret 8: Mix Textures and Eras

One of the most powerful Thrifting Secrets is recognizing that a truly aesthetic home never uses only one style or era; the compelling difference between old and new is what makes a space interesting.

How to Do It: Smart Contrasts

  • Mix Rough with Smooth: Put a rough, hand-made ceramic vase next to a new, smooth, modern mirror.
  • Mix Time Periods: Put a worn, old mahogany desk in a room with a sleek, new, simple lamp. The new piece makes the old piece’s character stand out. The old piece makes the new piece look special.
  • The High-Low Accessory: Use your thrifted brass items, woven baskets, or old linens. They soften modern, simple pieces. This is the biggest thrifting secret for getting that expensive, layered look.

Part 5: Thrifting Secrets for a Better World

Thrifting is about more than style and budget. It is also good for the world. Every thrifted item means one less item in a landfill. It is a vote against constant, quick buying. When you use these thrifting secrets, you choose beautiful, lasting items. You are building a home that is both lovely and responsible. This careful way of decorating is the most valuable secret of all.


Frequently Asked Questions (FAQ)

Q: Where should I look first in a big thrift store?

A: Focus on sections with the best quality materials. Look at the art and frames section. Look at the glass and ceramic aisle. Check for heavy items and unique colors. Look at the lamp section. Often, only the lamp shade is ugly. The lamp base might be solid brass or marble.

Q: How do I clean a thrifted item safely?

A: For fabrics, use a cleaner that removes odors. Wash them in hot water if possible. Or, take them to a professional cleaner. For wood, use a mild wood soap to remove dirt. Then, use a wood polish. For glass and ceramics, just wash them with soap and water. Use a soft toothbrush and baking soda paste for tough spots.

Q: Can I ask for a lower price at a thrift store?

A: Large store chains usually have fixed prices. Do not try to negotiate there. But, you can ask for lower prices at local, independent shops, consignment stores, and estate sales. This is often expected. Always be kind. Never offer a price that is too low. Try saying, “Will you take $X for this item?” Or, “I like these three items; can I get a small discount for buying them together?”

Q: What is the single best item to always look for?

A: Mirrors. An old mirror with a detailed or unique frame is the easiest way to add light, depth, and charm to a room. Even if the frame is damaged, a coat of matte spray paint can make it look high-end.


Reference Section

This article shares common ideas and methods used in interior design, furniture fixing, and sustainable home decor. It focuses on the following concepts:


Recent Posts


Breathing Space: How to Live More Mindfully Outdoors

A person sits cross-legged on a woven cushion in a lush garden, peacefully journaling with a pen and notebook. A steaming cup is on a small wooden table beside them, creating a serene Breathing Space outdoors.

It’s easy to feel the struggle of a busy life, constantly juggling deadlines, family commitments, and the relentless ping of notifications. Like many, you may feel disconnected from nature, even while yearning for its calm embrace. Through hard work and a deep look into mindful living, many people have successfully transformed their own small urban spaces into peaceful havens. This article shares that journey and practical wisdom, offering guidance to help you find your own Breathing Space outdoors.


The Gift of Breathing Space: Cultivating Calm in Your Corner of Nature

In our fast-moving world, constant demands pull at our attention. Screens glow, alerts sound, and the to-do list seems to grow every hour. It is no surprise that many of us feel cut off from the natural rhythms that once guided human life. We desperately need a moment to stop, to breathe deeply, and just be. This desire for comfort is not just a brief wish. It is a basic human need. We can meet this need by planning and creating “Breathing Space”—a mindful connection with the outdoors.

This article is more than just about attractive landscaping. It is about changing your outdoor area, big or small, into a place that cares for your well-being. It is about building a personal spot where you can slow down. You can listen to your senses and practice mindfulness. This will ultimately improve your daily life and bring a deeper feeling of peace.

The Power of Outdoor Mindfulness: Why Breathing Space Matters

Before we talk about how to do it, let us look at the big reasons why. Mindfulness, which comes from old meditation practices, means paying attention to the present moment without judging it. When we apply this to the outdoors, it greatly increases the benefits of nature.

Many studies show that time in nature helps both the mind and body. Being in green spaces can lower stress, reduce blood pressure, lift your mood, and even improve how well you think. Nature has a strong healing power. When we mix this power with the focused practice of mindfulness, we create a strong cure for the stress of modern life.

Imagine stepping outside. Instead of quickly grabbing your phone, you purposely notice the warm sun on your skin. You hear the soft sound of leaves rustling. And smell the wet earth after a rain. You see the complex pattern of a spiderweb shining with dew. This is mindful action outdoors. It is a simple but deep change that can calm your nerves and bring you back to yourself.


Creating Your Breathing Space: A Step-by-Step Guide

Before And After (on the right)

You do not need a huge estate or a lot of money to create your Breathing Space. It starts with a clear purpose. You must be willing to see your outdoor area as a canvas for calm. This is true whether your space is a tiny balcony, a small backyard, or just a windowsill.

Step 1: Define Your Purpose – What Do You Want to Feel?

Before you plant anything or move any stones, ask yourself this: What do I want to feel in this space? Do you want a quiet place for morning meditation? A bright area for careful gardening? A place to enjoy a cup of tea in calm solitude? Your purpose will guide every choice you make next.

  • Example: A busy person might focus on a small, neat corner with a comfortable chair for quiet thought. A parent might focus on a safe, sensory-rich area where children can play mindfully with nature.
  • How to do it: Get a notebook and brainstorm. Write down words that describe your ideal feeling (e.g., peaceful, lively, calm, energized). Make quick sketches of your ideas. Write down everything that comes to mind.

Step 2: Clear Out and Keep it Simple – Less is Better

Clutter inside your home can create mental noise. Likewise, an untidy outdoor space can be distracting. A mindful outdoor space should be simple. This allows the natural elements to truly shine.

  • How to do it:
    • Remove distractions: Put away tools, toys, and anything that does not help you feel calm.
    • Prune and trim: Tidy up plants that have grown too much. Remove dead leaves and branches.
    • Create clear paths: Make sure you can walk through the space easily and safely.
    • Think about storage: Buy nice, weather-resistant storage for things you need to keep outside.

Step 3: Engage Your Senses – The Core of Mindfulness

Mindfulness is noticing what your senses tell you. Your Breathing Space should encourage you to truly see, hear, smell, touch, and even taste the natural world around you.

  • Sight:
    • Natural focal points: A beautiful plant, a small water feature, or a group of interesting stones can catch your eye.
    • Color choices: Use calming greens, blues, and whites. Use small splashes of color that are not overwhelming.
    • Texture: Add different textures with plants, paving, and decorations (e.g., smooth pebbles, rough bark, soft grasses).
    • Example: A Japanese maple tree offers amazing seasonal color. Ornamental grasses move gently in the breeze.
  • Sound:
    • Water features: A small, gently trickling fountain creates soothing background noise. This can cover up city sounds.
    • Wind chimes: Choose chimes with soft, deep tones. Chimes made of bamboo or natural materials often sound best.
    • Bird feeders/baths: Bring in birds, whose songs are naturally joyful.
    • How to do it: Test different sizes and styles of water features. Listen to various wind chimes before buying.
  • Smell:
    • Fragrant plants: Plant lavender, jasmine, honeysuckle, scented roses, and herbs like rosemary and mint.
    • Woody aromas: Think about cedar mulch or natural wood features.
    • How to do it: Plant fragrant types near where you sit or along paths so you will smell them often.
  • Touch:
    • Plants with texture: Lamb’s ear feels soft and fuzzy. Some grasses feel like feathers.
    • Natural materials: Use smooth river stones, rough-cut wood, or cool concrete pavers.
    • Comfortable seating: Choose materials that feel good (e.g., weather-resistant cushions, smooth wood benches).
    • How to do it: If you have room, make a small “sensory path” with different textures under your feet.
  • Taste (If you like):
    • Edible plants: A small herb garden (mint for tea, basil for cooking), berry bushes, or a small fruit tree.
    • How to do it: Use a small pot or raised bed for herbs and fruits that are easy to grow.

Step 4: Create a Seating Nook – Your Place to Stop

A person sits cross-legged on a woven cushion in a lush garden, peacefully journaling with a pen and notebook. A steaming cup is on a small wooden table beside them, creating a serene Breathing Space outdoors.

A special place to sit is very important. It helps you remember to stop and just be. This is where you will sit, think, and practice mindfulness.

  • Be comfortable: Choose a chair, bench, or cushion that is truly comfy for a long sit.
  • Location: Put it in a spot that has a nice view, privacy, or is near a focal point or sound element.
  • Protection: Think about an umbrella, overhead covering, or a natural plant canopy for shade and shelter.
  • Example: A simple wooden bench under a shady tree. Or, a single comfy armchair on a small balcony looking at potted plants.
  • How to do it: Try out different seating. Think about where the sun hits at different times of the day.

Step 5: Add Natural Elements and Thoughtful Art

These pieces further connect your space to nature. They also allow you to express yourself.

  • Stones and Rocks: These stand for strength and lasting quality. Arrange them carefully. Follow ideas of balance and unevenness (like the Japanese idea of ishigumi).
  • Wood: Driftwood, simple benches, or wooden screens add warmth and a natural feel.
  • Lighting: Use soft, gentle lighting for peaceful evenings. Solar lanterns, string lights, or subtle lighting can let you enjoy your space longer.
  • Art: A simple, nature-inspired sculpture, a clay pot, or a patterned stepping stone. Choose pieces that bring calm, not excitement.
  • How to do it: Start small. Just a few well-placed stones or one beautiful lantern can make a big difference.

Step 6: Welcome Imperfection and Natural Change (Wabi-Sabi)

A truly mindful outdoor space is not about being perfectly neat. It is about enjoying the beauty of nature’s cycles. This includes a leaf that is wilting, a stone that is aging, and the changing seasons. The Japanese idea of Wabi-Sabi celebrates flaws, short life, and the beauty of things getting old naturally.

  • How to do it:
    • Let nature happen (mostly): Do not worry about a few fallen leaves or a corner that is slightly messy.
    • Watch things change: Take time to see the small differences day by day and season by season. This deepens your connection.
    • Accept what is: Realize that your outdoor space is living and changing, just like you are.

Living Mindfully in Your Breathing Space: Daily Practices

Building the space is only one part. The other part is using it to practice mindfulness on purpose.

  • Mindful Observation: Just sit and watch. What do you see? And what do you hear? What do you smell? Notice these things without judging them or talking to yourself about them.
  • Sensory Walks (Even Short Ones): Walk slowly through your space. Pay close attention to each step. Feel the ground. Notice the air touching your skin.
  • Mindful Gardening: Use all your senses when you water, pull weeds, or trim plants. Feel the soil, smell the plants, listen to the sounds. This turns the work into a kind of moving meditation.
  • Outdoor Journaling: Use your space to inspire your writing. Write your thoughts, things you are thankful for, or just describe what you see.
  • Mindful Eating/Drinking: Enjoy a meal or a cup of tea. Be fully present to the tastes, smells, and the outdoor setting.
  • Simple Breathwork: Practice slow, deep, conscious breathing. Breathe in the fresh air, breathe out any tension. Let your breathing match the rhythm of nature.

Small Spaces, Big Impact: Zen on a Balcony or Patio

Do not worry if you have little room. Even the smallest outdoor area can become a powerful Breathing Space.

  • Vertical Gardening: Use wall planters, hanging baskets, and shelves to fit in the most greenery.
  • Container Plants: Choose plants that grow well in pots. Vary their height and textures.
  • Portable Pieces: A small fountain, solar lights, or a comfortable floor cushion can quickly change a space.
  • Miniature Zen Gardens: A tray with sand, small rocks, and a tiny rake can be a focus point for meditation.
  • Privacy Screens: Bamboo screens or climbing plants on a trellis can create a sense of privacy.

Conclusion: Your Continual Journey of Connection

“Breathing Space” is much more than just a location. It is a practice, a way of thinking, and a constant invitation. It asks you to reconnect with yourself and the natural world. By designing your outdoor areas carefully and using them on purpose, you create quiet moments that feed your soul, reduce stress, and improve your total well-being.

Start today, no matter how small. Step outside, take a deep breath, and let your outdoor sanctuary gently bring you back to the present moment. Your personal journey to living more mindfully outdoors starts right now.


FAQ Section

Q1: Do I need a large garden to create a “Breathing Space”?

A1: No, not at all! The ideas behind “Breathing Space” work for any outdoor area, even a small one. A balcony, a patio, a tiny courtyard, or even a window box can become a mindful place with clear purpose and design.

Q2: What are the most important things for a mindful outdoor space?

A2: While many things help, the most important are a comfortable place to sit, sensory items (like scented plants or a small water feature), and keeping the area mostly free of clutter. Your main purpose for the space is also key.

Q3: How often should I use my Breathing Space to feel the good effects?

A3: Even short, regular times can help a lot. Aim for 10 to 15 minutes every day. You could sit there with your morning coffee or for a quick meditation. The secret is to be present and consistent, not to spend long, infrequent hours there.

Q4: I live in a city with a lot of noise. How can I make a peaceful space?

A4: Water features are great for drowning out city noise with calming sounds. Planting dense bushes or putting up a privacy screen can also help soak up sound. Focus on making one private zone where you can escape.

Q5: What are some low-maintenance plants for a mindful garden?

A5: Try succulents, decorative grasses, hostas (for shade), lavender, rosemary, and many plants native to your area. Once they are established, these plants often need less water and care. This lets you relax and enjoy the space more.

Q6: Can children help create and use a Breathing Space?

A6: Yes! Having children help plant, water, and practice mindful observation is a great way to teach them about nature and focus. You could make a small sensory patch for them or ask them to identify different smells and sounds.


References


Recent Posts


10 Best Chairs with Support for your Physical Health

Finding the right chair can make a world of difference for your physical health. With so many options out there, it’s important to choose one that offers the support your body needs. This list of the 10 best chairs is here to help you pick the perfect fit for your workspace or home, prioritizing comfort and ergonomic features to keep you feeling great throughout the day.

High-End Scandinavian-Style Recliner

The high-end Scandinavian-style recliner is a perfect blend of comfort and style. Its sleek design features clean lines and a minimalist aesthetic that fits well in any modern home. The light-colored upholstery adds a touch of warmth, making it inviting and cozy.

One standout feature is the reclining mechanism, which allows you to kick back and relax with ease. Whether you’re reading a book or watching TV, this chair supports your body in all the right places. The wooden frame not only enhances its durability but also adds a natural element to your space.

This chair is more than just a piece of furniture; it’s an investment in your physical health. Proper support can help reduce strain on your back and neck, making it a great choice for long hours of sitting. If you’re looking for one of the 10 best chairs that combine style with health benefits, this recliner should definitely be on your list.

Zero Gravity Recliner

A stylish Zero Gravity Recliner in a modern setting

The Zero Gravity Recliner is a fantastic choice for anyone looking to improve their physical health while relaxing. This chair is designed to provide a weightless experience, which can help reduce stress on your spine and joints. When you sit in this chair, your body is positioned in a way that promotes better circulation and relaxation.

In the image, you can see a stylish Zero Gravity Recliner that fits perfectly in a modern setting. Its sleek design and neutral color make it an attractive addition to any room. The chair features a reclining mechanism that allows you to adjust your position easily, giving you the freedom to find your perfect comfort level.

Many people find that using a Zero Gravity Recliner can help alleviate back pain and improve overall well-being. It’s a great option for those who spend long hours sitting or standing. If you’re considering the 10 Best Chairs for your physical health, this recliner should definitely be on your list!

Power Lift Recliners

Power lift recliners are a fantastic option for anyone looking for comfort and support. These chairs are designed to help you sit down and stand up with ease. The image shows a cozy recliner in a warm living room setting, highlighting its inviting design.

The recliner is in a lifted position, making it easier for someone to get up without straining. This feature is especially beneficial for those with mobility issues or anyone who simply wants a little extra help. The soft fabric and plush cushioning provide a welcoming spot to relax after a long day.

In the context of the ’10 Best Chairs,’ power lift recliners stand out for their practical benefits. They combine style with functionality, making them a great addition to any home. Whether you’re reading, watching TV, or taking a nap, these chairs offer the support your body needs.

Oversized Or “Cuddler” Recliners

A cozy brown oversized recliner with plush cushions and a throw blanket, perfect for relaxation.

When it comes to comfort, oversized or “cuddler” recliners are hard to beat. These chairs are designed to envelop you in softness, making them perfect for relaxation after a long day. The image showcases a cozy brown recliner, complete with plush cushions and a soft throw blanket draped over the side. It’s the kind of chair that invites you to sink in and unwind.

These recliners often feature wide armrests and ample seating space, allowing you to stretch out comfortably. The added support is great for your physical health, especially for your back and joints. With a cuddler recliner, you can kick back, put your feet up, and let the stresses of the day melt away.

In the realm of the 10 Best Chairs, oversized recliners stand out for their ability to provide both comfort and support. They are perfect for family movie nights or just curling up with a good book. If you’re looking for a chair that feels like a warm hug, this style is definitely worth considering.

Recliners With Power Adjustable Headrests And Lumbar Support

Two modern recliners with power adjustable headrests and lumbar support

When it comes to comfort, recliners with power adjustable headrests and lumbar support are a top choice. These chairs are designed to provide the perfect fit for your body, helping you relax and unwind after a long day.

The image shows a pair of sleek, modern recliners in a soft cream color. They look inviting and cozy, perfect for curling up with a good book or enjoying a movie night. The power adjustable headrests allow you to find just the right angle for your neck, while the lumbar support helps maintain proper posture.

Choosing one of the 10 best chairs that offer these features can make a big difference in your physical health. Good support can reduce strain on your back and neck, making your sitting experience much more enjoyable.

Whether you’re working from home or just relaxing, these recliners can be a great addition to your space. They combine style and functionality, ensuring you stay comfortable and supported.

Sleeper/Convertible Chaise Lounges

A modern beige sleeper chaise lounge with a wooden frame, a book resting on it, and plants in the background.

Sleeper and convertible chaise lounges are fantastic options for those looking to combine comfort and versatility. These chairs not only provide a cozy spot to relax but also transform into a bed when needed. Imagine curling up with a good book on a lazy afternoon, just like the one in the image, where a simple yet stylish chaise lounge awaits you.

The design of this chaise lounge is sleek and modern, featuring a soft, neutral color that can fit into any decor. The wooden frame adds a touch of warmth, making it inviting. Plus, the surrounding plants bring a bit of nature indoors, enhancing the overall feel of the space.

When considering the 10 Best Chairs for your physical health, a chaise lounge like this can be a great addition. It encourages good posture while lounging and can be adjusted for different positions, which is essential for maintaining comfort and support.

Whether you’re entertaining guests or just enjoying some quiet time, a sleeper chaise lounge offers the perfect blend of style and functionality. It’s a smart choice for anyone looking to enhance their living space while keeping their physical health in mind.

Upholstered Indoor Chaise Lounge

A stylish upholstered indoor chaise lounge with a soft blanket draped over it, surrounded by indoor plants.

The upholstered indoor chaise lounge is a stylish addition to any living space. Its sleek design offers both comfort and support, making it a great choice for relaxation. The soft, padded surface invites you to sink in and unwind after a long day.

This chaise lounge not only looks good but also promotes good posture. The ergonomic shape helps to align your spine, reducing strain on your back. Pair it with a cozy throw blanket, and you have the perfect spot for reading or napping.

In the context of the ’10 Best Chairs,’ this piece stands out for its blend of aesthetics and functionality. Whether you place it in a sunlit corner or near a window, it enhances the overall vibe of your home while supporting your physical health.

Daybed/Double Chaise Lounge

A stylish daybed with soft cushions and decorative pillows, surrounded by plants in a bright room.

A daybed or double chaise lounge is a fantastic choice for those looking to combine style and comfort. This type of seating offers a cozy spot to relax, read, or even take a nap. With its elongated design, it can accommodate more than one person, making it perfect for lounging with a friend or family member.

The image showcases a beautifully designed daybed, featuring soft cushions and a light color palette. The addition of decorative pillows adds a touch of personality, while the cozy throw draped over it invites you to sit down and unwind. Surrounding plants bring a refreshing vibe, enhancing the overall aesthetic.

When considering the 10 best chairs for your physical health, a daybed like this one stands out. It encourages you to stretch out and find a comfortable position, which can be beneficial for your back and overall posture. Plus, it adds a stylish element to any room.

Deep-Cushion Chaise Lounges (Sectional Style)

A deep-cushion chaise lounge in a sectional style, featuring soft leather-like material and a cozy design, surrounded by indoor plants.

When it comes to comfort, deep-cushion chaise lounges in a sectional style are a fantastic choice. These pieces are designed to provide ample support while allowing you to stretch out and relax. The plush cushions invite you to sink in, making them perfect for lounging after a long day.

The image showcases a beautifully designed chaise lounge that embodies style and comfort. Its soft, leather-like material adds a touch of elegance, while the deep cushions promise a cozy experience. This kind of seating is ideal for both casual gatherings and quiet evenings at home.

Incorporating a deep-cushion chaise lounge into your living space not only enhances your decor but also supports your physical health. Good seating can help maintain proper posture and reduce strain on your back. If you’re looking for the 10 best chairs to support your physical health, this style should definitely be on your list!

Swivel Glider Recliner/Chaise

A beige swivel glider recliner with an ottoman, placed next to a small table with a book and a cup.

The Swivel Glider Recliner is a fantastic choice for anyone looking to enhance their physical health while enjoying comfort. This chair combines the benefits of a recliner and a glider, allowing you to relax and unwind effortlessly.

Its design promotes good posture, which is essential for maintaining spinal health. The gentle rocking motion can also help soothe aches and pains, making it a great spot for reading or watching TV.

With its soft upholstery and supportive structure, this chair is perfect for long hours of sitting without discomfort. Plus, the swivel feature allows you to turn and reach for items without straining your body.

In the list of the 10 Best Chairs, the Swivel Glider Recliner stands out for its blend of style and functionality. It’s not just a chair; it’s a cozy retreat that supports your well-being.


References


Recent Posts


The Ultimate Flavor Pairing: Salmon and Warm Honey-Glazed Beetroot

Grilled salmon fillet with visible grill marks, served alongside glistening honey-glazed beetroot cubes and fresh thyme, garnished with bright lemon wedges on a rustic plate.

This recipe pairs perfectly cooked salmon with warm honey-glazed beetroot, creating a delightful balance of flavors that is both rich and complementary. The inherent sweetness of the beetroot is beautifully enhanced by the honey glaze, providing a perfect counterpoint to the savory richness of the salmon. This elegant dish is surprisingly simple, allowing you to prepare a gourmet meal in under an hour. It’s an excellent choice for a healthy weeknight dinner or for impressing guests at a special gathering.


Salmon Flavor Profile and Visual Appeal

Flavor Harmony

This meal offers a truly delightful balance of flavors. The natural, earthy sweetness of the beetroots, intensified by the honey glaze, harmonizes with the savory richness of the salmon. Every bite delivers a memorable blend of taste, making for a deeply satisfying experience. The addition of honey not only sweetens but also complements the subtle earthiness of the beets, creating a unique and sophisticated profile.

Striking Presentation

The dish has a striking visual appeal. A golden-brown, crispy-skinned salmon fillet is set against the rich, vibrant hues of the warm honey-glazed beetroot. The presentation is elevated by a garnish of fresh dill or parsley, which adds a bright pop of green that beautifully contrasts the deep colors of the main components. Served on a rustic wooden table, the plate exudes a warm and inviting atmosphere.


Preparation and Cooking Guide

This recipe is designed for efficiency, taking only about 30 minutes from start to finish.

Equipment

  • Small saucepan (for boiling beetroots)
  • Large skillet or frying pan (for cooking salmon)
  • Medium frying pan (for glazing beetroots)
  • Cutting board and knife
  • Slotted spoon or strainer
  • Spatula or fish slice

Ingredients (Serves 2)

  • 2 salmon fillets
  • Two medium beetroots, peeled and diced
  • 2 tablespoons honey
  • 1 tablespoon olive oil
  • Salt and pepper to taste
  • Fresh dill or parsley for garnish

Instructions

  1. Prepare the Beetroots: In a pot of boiling water, cook the diced beetroots for about 15–20 minutes until they are tender. Drain the water and set the beetroots aside.
  2. Glaze the Beetroots: In a separate pan, warm the honey over medium heat. Add the cooked beetroots and toss them gently to ensure they are fully coated in the glaze. Continue to cook for an additional 2–3 minutes until they are warmed through and glistening.
  3. Cook the Salmon: While the beetroots are glazing, heat the olive oil in another pan over medium-high heat. Season the salmon fillets liberally with salt and pepper. Place the salmon skin-side down in the pan and cook for about 4–5 minutes to achieve a crispy skin. Flip the fillets and cook for another 3–4 minutes until the salmon is fully cooked through and moist on the inside.
  4. Serve: Arrange the crispy salmon alongside the warm honey-glazed beetroot on plates. Garnish generously with fresh dill or parsley before serving. A final drizzle of extra honey over the beetroots can enhance their shine and flavor.

Cook and Prep Times

  • Prep Time: 10 minutes
  • Cook Time: 20 minutes
  • Total Time: 30 minutes

Nutritional Benefits and Serving Suggestions

Wholesome Nutrition

This dish is not only delicious but also highly nutritious. Each serving is estimated to be around 350 calories and provides a balanced meal rich in essential nutrients.

  • Protein: Approximately 30g, excellent for muscle health.
  • Healthy Fats: The salmon is a superior source of omega-3 fatty acids, which are widely known for their benefits to heart and brain health.
  • Vitamins and Minerals: The beetroots contribute essential vitamins, minerals, and dietary fiber, making this a wholesome option for any meal.
NutrientAmount (per serving)
Calories350kcal
Fat18g
Protein30g
Carbohydrates20g

Complements and Serving Suggestions

The versatility of this dish allows for easy customization.

  • Light Sides: A simple green salad with a light vinaigrette or steamed asparagus will complement the meal without overpowering the main flavors.
  • Substantial Sides: For a heartier option, consider pairing the dish with quinoa, brown rice, or a grain of your choice.
  • Garnishing: Beyond the fresh dill, a light squeeze of lemon juice over the salmon just before serving can add a final burst of brightness.

Conclusion

The Salmon and Warm Honey-Glazed Beetroot dish is proof that simple, high-quality ingredients can combine to create a truly sophisticated culinary experience. By perfectly balancing the richness of omega-3-rich salmon with the sweetness and earthiness of honey-glazed beetroots, this recipe offers both exceptional flavor and impressive nutritional value. Whether you’re looking for a quick, healthy weeknight meal or a striking plate to serve at your next dinner party, this dish is a guaranteed winner. Don’t hesitate to make this vibrant and flavorful pairing a new staple in your kitchen rotation.


Frequently Asked Questions (FAQs)

Q: Can I use pre-cooked beetroots for this recipe?

A: Yes, using pre-cooked, peeled beetroots can significantly reduce the preparation time. Simply dice them and proceed directly to the glazing step (Step 2) until they are warmed through.

Q: What is the best way to ensure the salmon skin is crispy?

A: To achieve crispy skin, make sure the pan and oil are adequately hot before placing the salmon skin-side down. Do not crowd the pan, and resist the urge to move the fillet for the first few minutes of cooking. This allows the skin to fully crisp up before flipping.

Q: Is there an alternative to honey for the glaze?

A: Maple syrup is an excellent alternative to honey, offering a similar sweetness that still complements the earthiness of the beetroots. You would use the same amount in the recipe.


Reference Links


Recent Posts


The BEST Beginner Sewing Project for a Sustainable Life

A frustrated shopper stands at a grocery checkout line with a clear plastic bag of produce, looking guilty, while in the foreground, a sewing machine suggests a solution for a Beginner Sewing Project to reduce plastic waste.

Ever felt that tug of eco-guilt at the checkout, adding yet another plastic bag to your overflowing bin? You’re not alone! I used to dread grocery shopping, knowing I was contributing to a problem I desperately wanted to solve. But what if I told you there’s a super simple, incredibly rewarding way to make a real difference, even if your sewing machine mostly collects dust? This Beginner Sewing Project changed my shopping habits and my outlook, and it’s about to change yours too.


Stitching Towards a Greener Future with this Beginner Sewing Project

In a world increasingly aware of its environmental footprint, many of us are searching for tangible ways to reduce our impact. One of the most pervasive sources of waste in our daily lives comes from single-use plastics, particularly in the realm of grocery shopping. From flimsy produce bags that tear before you get home to the endless stream of plastic bread bags, it can feel overwhelming to navigate the supermarket aisle without accumulating a mountain of non-recyclable waste.

But what if the solution was not only simple but also incredibly satisfying? Enter the humble, yet mighty, DIY zero-waste bag. This isn’t just a craft project; it’s a statement, a step towards a more sustainable lifestyle, and arguably the BEST beginner sewing project for a sustainable life. If you’ve ever wanted to learn to sew, or even if your sewing machine has been gathering dust in a closet, this guide is your invitation to create something truly meaningful.

We’re going to walk through how to make two types of essential zero-waste bags: a simple cotton produce bag and a versatile mesh bag. Both are perfect for carrying everything from apples and leafy greens to bulk grains and nuts, eliminating the need for countless plastic alternatives. Not only will you save money in the long run, but you’ll also gain a sense of accomplishment and contribute directly to a healthier planet. So, dust off that sewing machine, grab your fabric scraps, and let’s stitch our way to a greener future!


Why Zero Waste Bags Are Your New Best Friend

Before we dive into the nitty-gritty of sewing, let’s talk about why these bags are such a game-changer:

  • Environmental Impact: This is the big one. Every reusable bag you make and use means one less plastic bag ending up in landfills, polluting our oceans, or harming wildlife. Plastic takes hundreds of years to decompose, if at all, breaking down into microplastics that infiltrate our food and water systems.
  • Cost Savings: While there’s an initial investment in fabric (often you can use scraps!), you’ll save money in the long run by not having to purchase reusable bags repeatedly or paying for plastic bags in some areas.
  • Durability & Longevity: Handmade bags, especially those made from sturdy cotton or repurposed materials, are often far more durable than their store-bought counterparts. They can withstand countless washes and heavy loads, serving you for years.
  • Customization & Style: Express yourself! Choose fabrics that match your personal style, create bags in different sizes for different purposes, and even add fun embellishments. Who said sustainability couldn’t be chic?
  • Empowerment: There’s immense satisfaction in making something with your own hands. This beginner sewing project gives you a tangible way to take control of your consumption and contribute positively to your community and the planet.
  • Healthier Produce: Mesh bags allow your produce to breathe, extending its freshness compared to being suffocated in plastic bags.

What You’ll Need for This Beginner Sewing Project (The Essentials)

Don’t be intimidated! You likely have many of these items already.

  • Sewing Machine: Any basic functional machine will do.
  • Fabric:
    • For Cotton Produce Bags: Lightweight, tightly woven cotton fabric. Old cotton sheets, pillowcases, duvet covers, or even men’s button-down shirts are perfect for upcycling! Muslin, calico, or quilting cotton also work beautifully. You’ll need about 1/2 to 3/4 yard per bag, depending on desired size.
    • For Mesh Produce Bags: Lightweight mesh fabric. This can be tricky to find in small quantities, but look for old sheer curtains, laundry bags, or specialty “eco-mesh” fabrics online. Alternatively, you can repurpose old tulle or netting. A standard size might need about 1/2 yard.
  • Matching Thread: Polyester all-purpose thread is generally suitable for both cotton and mesh.
  • Fabric Scissors: Sharp scissors are crucial for clean cuts.
  • Ruler or Measuring Tape: For accurate measurements.
  • Pins or Fabric Clips: To hold fabric pieces together.
  • Iron and Ironing Board: For pressing seams (makes a huge difference!).
  • Safety Pin: For threading drawstrings.
  • Drawstring Material:
    • Cotton cord, ribbon, or even a strip of fabric you make yourself (about 1/2 inch wide).
    • For mesh bags, you can use a thinner cord or even elastic if you prefer.
    • You’ll need about 25-30 inches per bag.

A flat lay photo of a white sewing machine surrounded by essential tools for a beginner sewing project, including blue and yellow patterned cotton fabric, sharp scissors, white and green thread spools, an iron, a measuring ruler, and safety pins.

Part 1: How to Make a Simple Cotton Drawstring Produce Bag (The Ultimate Beginner Sewing Project!)

This is truly a fantastic beginner sewing project because it involves mostly straight seams and introduces basic techniques like hemming and creating a casing.

Step 1: Prepare Your Fabric

Decide on your desired bag size. A good starting point for a medium produce bag is a rectangle of fabric approximately 15 inches wide by 30 inches long. This will give you a bag roughly 14×14 inches when finished (allowing for seam allowances and the drawstring casing).

  • Wash and press your fabric. This pre-shrinks it and makes it easier to cut and sew.
  • Cut your fabric to the desired dimensions. Remember, your length will be folded in half.

Step 2: Hem the Top Edge

This will be the top opening of your bag.

  • Along one of the 15-inch edges (the top of your future bag), fold the raw edge over by 1/4 inch towards the wrong side of the fabric and press.
  • Fold it over again by 1/2 inch and press firmly. This creates a neat double-fold hem.
  • Stitch this hem in place, close to the inner folded edge. Backstitch at the beginning and end. Repeat for the other 15-inch edge if you’re making a bag that opens at both ends, but for a simple produce bag, you only need to hem one of the short edges that will become the bag’s opening.

Step 3: Fold and Sew the Side Seams

  • Lay your fabric piece flat, right side up.
  • Fold the fabric in half width-wise, bringing the two 15-inch (hemmed) edges together. The right sides of the fabric should be facing each other. The raw edges of the long sides should align perfectly. Pin along the two raw side edges and the bottom raw edge.
  • Starting from one top corner of the bag, sew down the side seam, across the bottom, and up the other side seam, using a 1/2-inch seam allowance. Remember to backstitch at the beginning and end of each seam to secure it. If your fabric is prone to fraying, you can do a second line of stitching or finish the raw edges with a zigzag stitch or serger.

Step 4: Create the Drawstring Casing

  • Turn your bag right side out.
  • At the top opening of your bag, fold the hemmed edge down towards the inside of the bag by about 1 inch (or enough to accommodate your drawstring material, plus a little extra for the seam). Press firmly.
  • Stitch this casing down, about 1/8 inch from the bottom folded edge. Make sure not to stitch the casing closed at the top where the drawstring will exit! You want a channel for the drawstring to go through. Leave a small opening (about 1/2 inch) in the side seam of the casing for the drawstring to enter and exit. This is usually created by backstitching, leaving a gap, and then starting to stitch again.

Step 5: Thread the Drawstring

  • Cut a piece of drawstring material about 25-30 inches long (this allows for a bow).
  • Attach a safety pin to one end of your drawstring.
  • Thread the safety pin, with the drawstring following, through the opening you left in your casing. Work it all the way around the top opening of the bag until it emerges from the same opening.
  • Tie the two ends of the drawstring together in a knot. Now you have a functional drawstring!

Congratulations! You’ve made your first zero-waste produce bag!


Part 2: How to Make a Simple Mesh Produce Bag (For Breathability!)

Mesh bags are fantastic for fruits and vegetables that need to breathe. The process is very similar to the cotton bag, with a few key differences due to the nature of the fabric.

Step 1: Prepare Your Mesh Fabric

  • Cut a rectangle of mesh fabric, again around 15 inches wide by 30 inches long for a medium bag.
  • Mesh can be slippery! Take your time and use lots of pins or fabric clips.

Step 2: Fold and Sew the Side Seams

  • Fold the fabric in half width-wise, right sides together.
  • Pin along the two raw side edges and the bottom raw edge.
  • Sew down the side, across the bottom, and up the other side, using a 1/2-inch seam allowance.
  • Important for Mesh: Mesh often doesn’t fray, but if your mesh is delicate, consider using a French seam for cleaner, stronger edges. A French seam involves sewing the seam twice: first with wrong sides together (1/4 inch seam), then trimming, turning right sides together, and sewing again (1/4 inch seam) to encase the raw edges. For a beginner sewing project, a simple straight stitch with a small zigzag over the raw edge after the main seam is usually sufficient to prevent unraveling.

Step 3: Create the Drawstring Casing

  • At the top opening of your bag, fold the raw edge down towards the inside of the bag by about 1/4 inch and press (mesh might not hold a press well, so pin well).
  • Fold it down again by about 3/4 inch to create the casing. Pin liberally.
  • Stitch this casing down, about 1/8 inch from the bottom folded edge. Leave an opening for your drawstring.
  • Since mesh can be tricky, a zigzag stitch might work better than a straight stitch for the casing to allow for stretch and reduce puckering.

Step 4: Thread the Drawstring

  • As with the cotton bag, cut your drawstring (cotton cord or ribbon works well here) about 25-30 inches long.
  • Use a safety pin to thread it through the casing, emerging from the same opening.
  • Tie the ends together.

Tips for Success (Especially for Beginners!)

  • Practice Makes Perfect: Don’t expect your first bag to be flawless. Each one you make will get better.
  • Press Your Seams: This is a golden rule in sewing. Pressing seams open or to one side creates a much neater and more professional-looking finish.
  • Use the Right Needle: A universal needle is fine for most cottons. For mesh, a finer needle (like a sharp or microtex) might glide through better without snagging.
  • Don’t Rush: Take your time with measuring, cutting, and pinning. Precision here saves headaches later.
  • Backstitch! Always backstitch at the beginning and end of each seam to lock your stitches in place.
  • Don’t Be Afraid of Imperfection: Handmade items have character. Embrace it!

Beyond Produce Bags: Other Zero Waste Bag Ideas

Once you master this beginner sewing project, a world of zero-waste possibilities opens up!

  • Bread Bags: Larger, sturdier cotton bags for loaves of bread.
  • Bulk Bin Bags: Larger, perhaps with a flat bottom, for heavier items like rice, flour, or pasta. You can even add a small patch to write the tare weight (weight of the empty bag) on.
  • Sandwich Wraps/Snack Bags: Lined with food-safe material (like PUL or beeswax-coated fabric) for reusable alternatives to plastic baggies.
  • Gift Bags: Fabric gift bags are beautiful, reusable, and eliminate wrapping paper waste.
  • Everyday Tote Bags: Use heavier canvas or denim for a sturdy reusable shopping bag.

Conclusion: Your Sustainable Journey Starts Now

Congratulations, eco-warrior! You’ve not only learned a new skill but you’ve also taken a significant step towards a more sustainable lifestyle. Making your own zero-waste bags is incredibly rewarding, practical, and a fantastic beginner sewing project that builds confidence and creativity.

Every time you pull out one of your handmade bags at the grocery store, you’re doing more than just carrying groceries. You’re making a statement, inspiring others, and actively reducing your environmental footprint. So, keep sewing, keep creating, and keep making a positive impact, one stitch at a time. The planet thanks you, and so do future generations!


FAQ Section

Q1: What kind of fabric is best for beginner sewing projects like these?

A1: For cotton produce bags, quilting cotton, muslin, old cotton sheets, or even repurposed cotton shirts are ideal. They are easy to cut, don’t stretch, and hold a press well. For mesh bags, look for lightweight, soft mesh, old sheer curtains, or even laundry bags.

Q2: I don’t have a sewing machine. Can I hand sew these bags?

A2: Absolutely! It will take longer, but a simple backstitch (which mimics a machine stitch) is strong enough. Just ensure your stitches are even and relatively small for durability.

Q3: How do I wash my zero-waste bags?

A3: Most cotton and mesh bags can be machine washed in cold water with similar colors and then air-dried or tumble-dried on low. For items that held very dirty produce, a pre-soak might be helpful. Avoid fabric softeners as they can reduce absorbency and breathability over time.

Q4: Can I make these bags in different sizes?

A4: Yes, definitely! The beauty of DIY is customization. Simply adjust your initial fabric rectangle dimensions. For small bags, try 10×20 inches; for large, 20×40 inches. Remember the length is twice the height you want your finished bag to be.

Q5: What if my fabric frays a lot?

A5: If your fabric is prone to fraying, you have a few options:

  • French Seams: This is a very neat finish that encases all raw edges.
  • Zigzag Stitch: After sewing your main straight seam, trim the seam allowance and then zigzag over the raw edge.
  • Pinking Shears: These scissors create a zigzag edge that helps reduce fraying.
  • Serger/Overlocker: If you have one, this is the most professional finish.

Q6: What else can I use for the drawstring?

A6: Besides cotton cord, you can use thin ribbon, bias tape, old shoelaces, or even create a narrow fabric tube from the same fabric as your bag. Elastic can also be used, but you’ll want to stitch it into a loop before threading.


References


Recent Posts


10 Creative New Lives for Glass Jars

A collection of clean, empty Glass Jars of various sizes, along with twine, scissors, craft paper, and paint brushes, laid out on a rustic wooden table, ready for upcycling projects.

We all have them. Empty glass jars. They collect in the recycling bin. They once held pasta sauce, jam, pickles, or candles. For a long time, I just threw them away without a second thought. But then, I started to see their hidden potential. Each jar was a blank canvas. Now, I see chances for creativity and organization. They add a touch of charm to my home. I no longer just see waste.

If you’ve ever felt bad throwing away a good jar, or just wanted a greener way to organize, you’re in the right place. Come with me. We will explore ten fantastic ways to give those simple glass jars a creative new life. We will turn them into useful and beautiful items for your home.


Why Upcycle Glass Jars?

Before we start our projects, let’s quickly look at why upcycling glass jars is such a smart idea:

  1. Good for the Earth: It means less trash. It saves energy (making new glass uses a lot of power). It also means we need fewer new raw materials.
  2. Saves Money: Most of these projects need very few new items, if any. You are using what you already have!
  3. Make it Your Own: You can change each project to fit your personal style. Match it to your home decor.
  4. Boosts Creativity: It is a great way to use your hands and mind. You turn something plain into something special.

Are you ready to begin? Gather your clean, label-free glass jars. Let’s get creative!


1. Smart Pantry & Spice Storage

Using glass jars to organize your pantry is one of the best and most useful ideas. Jars that all look the same make things appear very tidy. You can easily see what you have. This helps reduce food waste. It also makes cooking faster.

How to do it:

  1. Wash and Dry: Make sure your glass jars are very clean and completely dry. Take off all labels. Soaking in warm, soapy water often helps. For sticky bits, scrub with baking soda.
  2. Fill Them Up: Put dry foods into jars of different sizes. Think pasta, rice, lentils, oats, flour, sugar, coffee beans, nuts, and spices.
  3. Add Labels: Labels are super important for good order. You can use:
    • Chalkboard Labels: Stick on chalkboard labels or paint a spot with chalkboard paint. Write on it with chalk markers.
    • Printed Labels: Design and print your own labels. Then stick them on.
    • Handwritten Tags: Tie small paper tags with string for a rustic look.
  4. Arrange Them: Put your organized jars on shelves, in drawers, or on a counter. This will make your pantry look good and work better.

Example: Imagine a row of clear glass jars. They are filled with bright spices like paprika, turmeric, and cumin. All are neatly labeled. Or bigger jars holding different kinds of pasta, sealed tight and easy to reach.


2. Lovely Vases & Planters

Glass jars, especially ones with unique shapes or colors, make wonderful vases. Small jars are perfect for a single flower or a small bunch. Bigger ones can hold larger flower displays. You can also turn them into cute small planters for succulents or herbs.

How to do it:

  1. Clean Very Well: Remove any dirt that might harm plants or make the water cloudy.
  2. For Vases: Just fill with water and put your flowers in. For a special touch, you can:
    • Paint: Spray paint the outside (or inside for a shiny look) with opaque or frosted glass paint.
    • Wrap: Wind string, ribbon, or lace around the top or middle of the jar.
    • Decorate: Glue on beads, buttons, or small shells to add texture.
  3. For Planters:
    • Drainage is Key: Glass jars do not have holes for water to drain. This is very important. Put a layer of small stones or charcoal at the bottom first. This stops roots from rotting. Then add potting soil.
    • Plants: Small plants like succulents, herbs (like basil or mint), or plant cuttings grow well in jar planters.
    • Water Gently: Since there are no drainage holes, be careful not to water too much.

Example: A group of small baby food jars, painted white. Each holds a single green leaf on a windowsill. Or a big pickle jar filled with a green fern. It adds a touch of nature to your living room.


3. Homemade Candle Holders & Lanterns

Turning glass jars into pretty candle holders or lanterns makes any room feel warm and cozy. They are great for quiet evenings, outdoor parties, or even as backup lights.

How to do it:

  1. Be Safe: Make sure your jar is stable. It should not tip over easily. Keep anything that can burn far from the flame.
  2. Simple Holders: Just put a small tea light or votive candle inside a clean jar.
  3. Decorated Holders:
    • Frosted Look: Use frosted glass spray paint for a soft light.
    • Lace & Burlap: Wrap jars with lace, burlap, or patterned cloth. Stick it down with glue. The light will shine through beautifully.
    • Glitter: Put Mod Podge glue on the outside of the jar. Then roll it in glitter for a festive feel.
    • Painted Designs: Use glass paint to draw patterns or simple shapes.
  4. Hanging Lanterns:
    • Wire Handle: Securely attach a wire handle around the top of the jar. You can use craft wire or even old coat hangers. Make sure it is strong enough to hold the jar’s weight.
    • Fairy Lights: For a safer, battery-powered choice, fill jars with LED fairy lights instead of candles.

Example: A line of decorated Mason jars. Tea lights flicker inside them along a garden path. This creates a magical feel for an evening get-together. Or a beautifully frosted jar filled with fairy lights. It sits on a bedside table.


4. Bathroom & Craft Room Organization

Mess makes us feel stressed. Glass jars are great helpers in making things tidy, especially in bathrooms and craft rooms. These rooms often have many small items.

How to do it:

  1. See What You Have: Decide what you need to put in order. Cotton swabs, cotton balls, hair ties, makeup brushes, bath salts, paintbrushes, beads, buttons, paper clips, rubber bands – there are so many things!
  2. Match Sizes: Pick the right size glass jars for different items. Tall jars for brushes, wider jars for cotton balls.
  3. Label (Good Idea): Clear glass lets you see inside. But a label makes it look even better.
  4. Put Like Things Together: Keep similar items in their own jars.
  5. Place Them: Arrange them on shelves, on your counter, or inside drawers.

Example: Three nice glass jars sit on a bathroom counter. They hold cotton pads, Q-tips, and small soaps. In a craft room, a wooden shelf holds many jars. These jars neatly contain embroidery thread, beads, and sewing tools.


5. Unique Drinking Glasses & Mugs

Glass jars, especially Mason jars, make excellent drinking glasses. They have a simple, rustic charm. They are strong, easy to hold, and give a fun, casual vibe to your drinks.

How to do it:

  1. Clean and Sterilize: Make sure jars are very clean. They should have no chemical traces. Washing them in a hot dishwasher is a good idea.
  2. Straw Holes: For some canning jars, you can make a hole in the lid with a drill for a straw. Make sure the edges are smooth.
  3. Add Handles: You can buy wire handles that fit Mason jars. These turn them into mugs.
  4. Decorate (If You Want): Clear is classic. But you can etch designs onto the glass. Or paint safe designs on the outside. Don’t paint near the rim where you drink.

Example: Iced tea served in charming Mason jars. They have lemon slices and mint. Perfect for a summer barbecue. Or a tasty smoothie enjoyed from a reused jam jar. It has a colorful straw.


6. Glass Jars for Creative Gift Packaging

Forget the usual gift bag! Putting small gifts in decorated glass jars adds a personal, handmade touch. This makes the present feel even more special.

How to do it:

  1. Think About Contents: What could fit inside a jar?
    • DIY Baking Mixes: Layer dry ingredients for cookies, brownies, or soups.
    • Spa-in-a-Jar: Fill with bath bombs, small soaps, a face mask, and a loofah.
    • Emergency Kit: Put in small basics like pain relievers, bandages, lip balm, and hand sanitizer.
    • Craft Kit: Small sewing items, buttons, beads, or tiny art supplies.
  2. Decorate the Jar:
    • Lid: Cover the lid with fabric, ribbon, or fancy paper.
    • Label: Attach a special gift tag or label.
    • Fillers: Use crinkled paper, tissue paper, or shredded newspaper. This adds cushioning and looks nice.
    • Outside Decorations: Tie string, lace, or add small ornaments to the jar.

Example: A pint-sized glass jar. It is filled with layers of brownie mix ingredients. Chocolate chips top it off. A recipe tag is tied with a festive ribbon. It’s an instant homemade gift. Or a set of small garden tools and seed packets nestled in a larger jar. A perfect gift for a friend who loves plants.


7. Terrariums & Fairy Gardens

Glass jars are like tiny worlds waiting to be made! Making a terrarium or a small fairy garden inside a jar is a lovely way to bring nature inside. It’s also surprisingly easy.

How to do it:

  1. Pick Your Jar: Jars with wide openings are easier to work with.
  2. Layering:
    • Drainage: Start with a thin layer of small stones or gravel at the bottom.
    • Charcoal: Add a thin layer of activated charcoal. This helps stop bad smells and filters water.
    • Mesh (Optional): A thin layer of mesh or cloth can go over the charcoal. This stops soil from mixing.
    • Soil: Add a layer of the right potting mix. Use succulent mix for dry plants. Use general potting mix for humid terrariums.
  3. Plants: Choose small, slow-growing plants. They should thrive in small spaces. Succulents and air plants are good for open jars. Mosses and ferns are good for closed terrariums.
  4. Decorate: Add small stones, twigs, tiny figures (for fairy gardens), or shells.
  5. Care: Water very little. Closed terrariums make their own moisture. They need very little watering.

Example: A large cookie jar turned into a green, self-sustaining terrarium. It has tiny ferns and moss. A small world under glass. Or a small jam jar. It holds a charming fairy garden with a tiny gnome and colorful stones.


8. Desk Organizers

Get rid of desk clutter with the simple beauty of glass jars. They are perfect for keeping office supplies visible and neat.

How to do it:

  1. Collect Your Supplies: Pens, pencils, markers, paper clips, binder clips, staples, pushpins, rubber bands, scissors, rulers – almost any small item.
  2. Sort Them: Give different glass jars to different kinds of items.
  3. Place Them: Arrange the jars neatly on your desk, inside a drawer, or on a shelf.
  4. Make it Personal (Optional): You can paint the jars. Wrap them in pretty paper. Or add nice labels to match your office look.

Example: Three glass jars of different sizes, neatly on a desk. The tallest holds pens and pencils. A middle-sized one contains scissors and markers. A short, wide jar keeps paper clips and binder clips organized.


9. Piggy Banks & Coin Glass Jars

Start saving spare coins or even small bills. Turn a simple glass jar into a clear piggy bank. It’s nice to watch your savings grow!

How to do it:

  1. Choose a Strong Jar: A wider opening makes it easier to get money out when you need it.
  2. Change the Lid:
    • Slotted Lid: Carefully cut a slot in the middle of a metal lid. Use tin snips or a Dremel. Smooth any sharp edges with sandpaper or a file.
    • No Lid: Just use the open jar to drop money in quickly.
  3. Decorate:
    • Savings Goal: Write your savings goal on the jar. For example, “Vacation Fund,” or “New Gadget.”
    • Paint/Decoupage: Decorate the outside to make it more attractive.
  4. Start Saving!

Example: A medium-sized Mason jar. It has a brightly painted lid and a slot. It is clearly marked “Adventure Fund.” It slowly fills with coins and small bills. A constant visual reminder of a future trip.


10. Memory Glass Jars & Time Capsules

This is a very special and meaningful way to use glass jars. Make a memory jar to collect good moments all year. Or create a time capsule to capture a picture of today.

How to do it:

  1. Memory Jar (Ongoing):
    • Decorate: Label the jar “Memory Jar” or “Gratitude Jar.”
    • Collect: All year, when something good happens, or you have a memorable time, write it on a small piece of paper. Drop it into the jar.
    • Look Back: On New Year’s Eve, open the jar. Read all the wonderful moments you collected. It gives a beautiful summary of your year.
  2. Time Capsule (Sealed):
    • Pick a Date: Decide when you will open it. For example, in 5 years, or 10 years.
    • Gather Items: Put in things that show the current time. Photos, newspaper clippings, a list of popular trends, movie tickets, a handwritten letter to your future self, small toys, notes from family members.
    • Seal It: Close the lid very tightly. You can even use wax to seal it completely.
    • Hide/Bury It: Keep it in a safe, dry place. Or bury it. Make sure the jar is well-sealed and safe from water.

Example: A beautiful, simply decorated glass jar on a living room shelf. It slowly fills with folded notes. These notes tell about family events, funny sayings, and small wins through the year. Or a sealed, strong jar buried in the garden. It holds letters and small items from childhood. It waits to be dug up years later.


Conclusion for Glass Jars

From simple storage to touching time capsules, glass jars are truly amazing. By trying these upcycling ideas, you do more than just add unique touches to your home. You also actively help reduce waste and live greener. So, next time you finish that jar of pickles or jam, don’t just throw it away. See what it can become. Clean it up. Give it one of these 10 creative new lives. Your home, your wallet, and the planet will all thank you. Happy upcycling!


FAQ about Recycling Glass Jars

Q1: How do I get rid of stuck labels and glue from glass jars?

A: Soak jars in hot, soapy water for 30 minutes to an hour. Many labels will then peel off easily. For very sticky glue, mix baking soda with a little oil. Make a paste. Put it on the glue. Let it sit for 15-30 minutes. Then scrub with a pad. Rubbing alcohol or nail polish remover can also work. Always test them in a hidden spot first.

Q2: Can I paint glass jars? What paint should I use?

A: Yes, you can! For decoration, use acrylic paint made for glass. Spray paint (especially frosted or matte colors) or enamel paints work well. For jars you will wash, look for paints that say “dishwasher safe.” Some need baking to set the paint for a long-lasting finish. Always follow the paint maker’s directions.

Q3: Are all glass jars safe for storing food or drinking?

A: Yes, generally, if they are very clean. But be careful with jars that held things like candles or chemicals. Only use them for food if you are sure they can be cleaned to be completely food-safe. For long-term canning, always use special canning jars (like Mason jars). These are made to handle high heat and pressure.

Q4: How can I make a handle for a glass jar to hang it up as a lantern?

A: You can use thick craft wire, flexible aluminum wire, or even an old metal coat hanger. Wrap the wire tightly around the neck of the jar. Twist the ends together. Then, make a loop at the top for hanging. Make sure the handle is strong enough to hold the jar’s full weight, especially if it has candles or other heavy things inside.

Q5: What are some tips for making terrariums in glass jars?

A: Pick plants that grow slowly. They should like humidity (for closed terrariums) or dry weather (for open ones). The right layers of drainage stones, charcoal, and soil are very important. Water very little, especially in closed terrariums. They create their own moisture. If your jar has a narrow opening, use long tweezers or chopsticks to arrange items.


References


Recent Posts