To successfully create dried orange slices, mastering the process of oven-drying orange slices is the secret to finding the perfect balance between heat and airflow. If the temperature is too high, the natural sugars in the fruit will caramelize and burn, leaving you with brown, bitter circles. If the temperature is too low, the process takes an eternity, and you risk the fruit molding before it dries.
Using an oven is a fantastic zero waste way to preserve citrus without needing a specialized dehydrator. By following these precise temperature guidelines and techniques, you can ensure your slices retain their vibrant color and potent aroma.
Finding the Sweet Spot: Temperature Settings
The goal of drying fruit is evaporation, not cooking. For the best results, you want to keep your oven at the lowest possible setting.
The Ideal Range:170°F to 200°F (75°C to 95°C).
The “Low and Slow” Rule: If your oven has a “warm” setting that sits around 150°F (65°C), this is actually the gold standard. It will take longer (anywhere from 4 to 6 hours), but the color of the Dried Orange Slices will remain bright and translucent rather than turning a muddy copper.
Convection Settings: If your oven has a “Convection” or “Fan Forced” mode, use it. The moving air speeds up the evaporation process significantly and helps prevent “hot spots” that can scorch individual slices.
Step-by-Step Oven Preparation
To achieve the best results for your Food Ideas, preparation is just as important as the temperature.
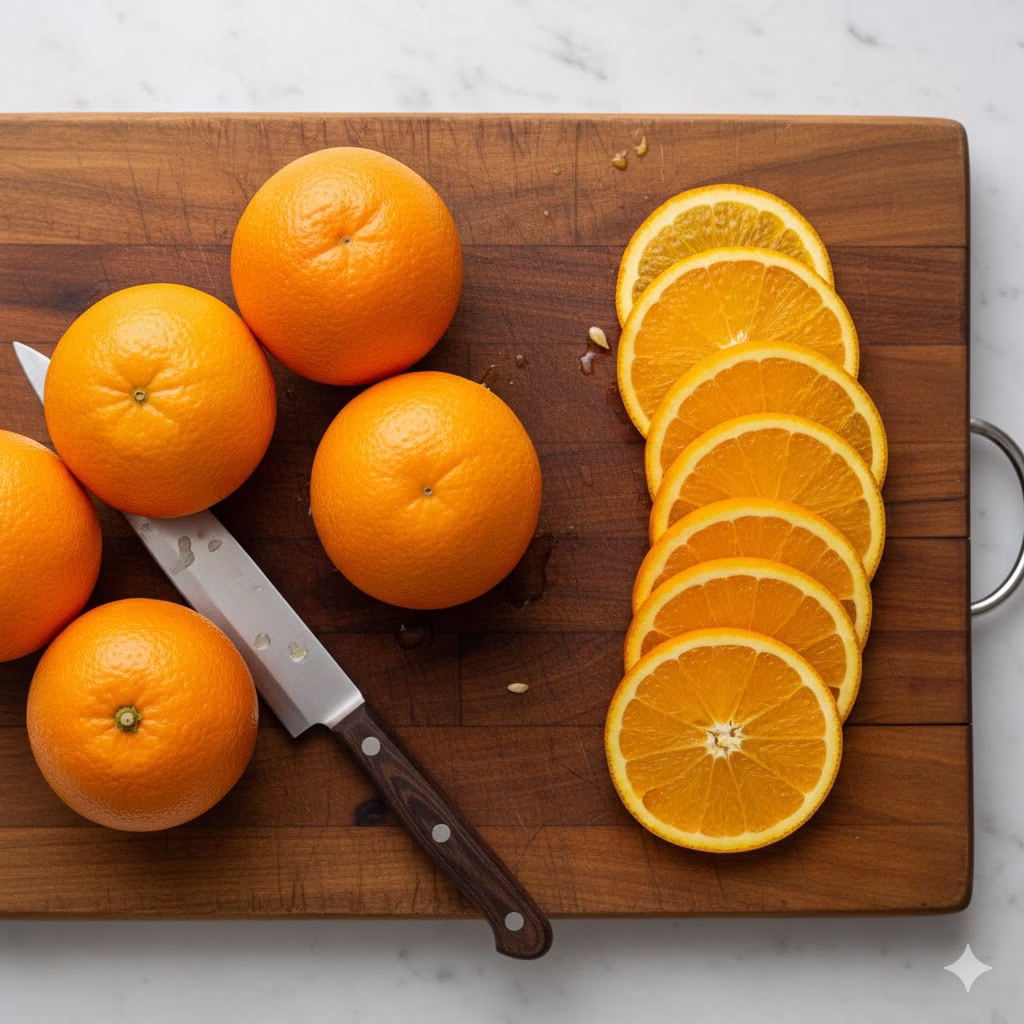
Uniform Slicing: Use a mandoline or a very sharp serrated knife to cut slices between 1/8 and 1/4 inch thick. Consistent thickness ensures they all finish drying at the same time.
Blotting: Before placing them in the oven, pat both sides of the slices with a clean kitchen towel to remove excess surface moisture.
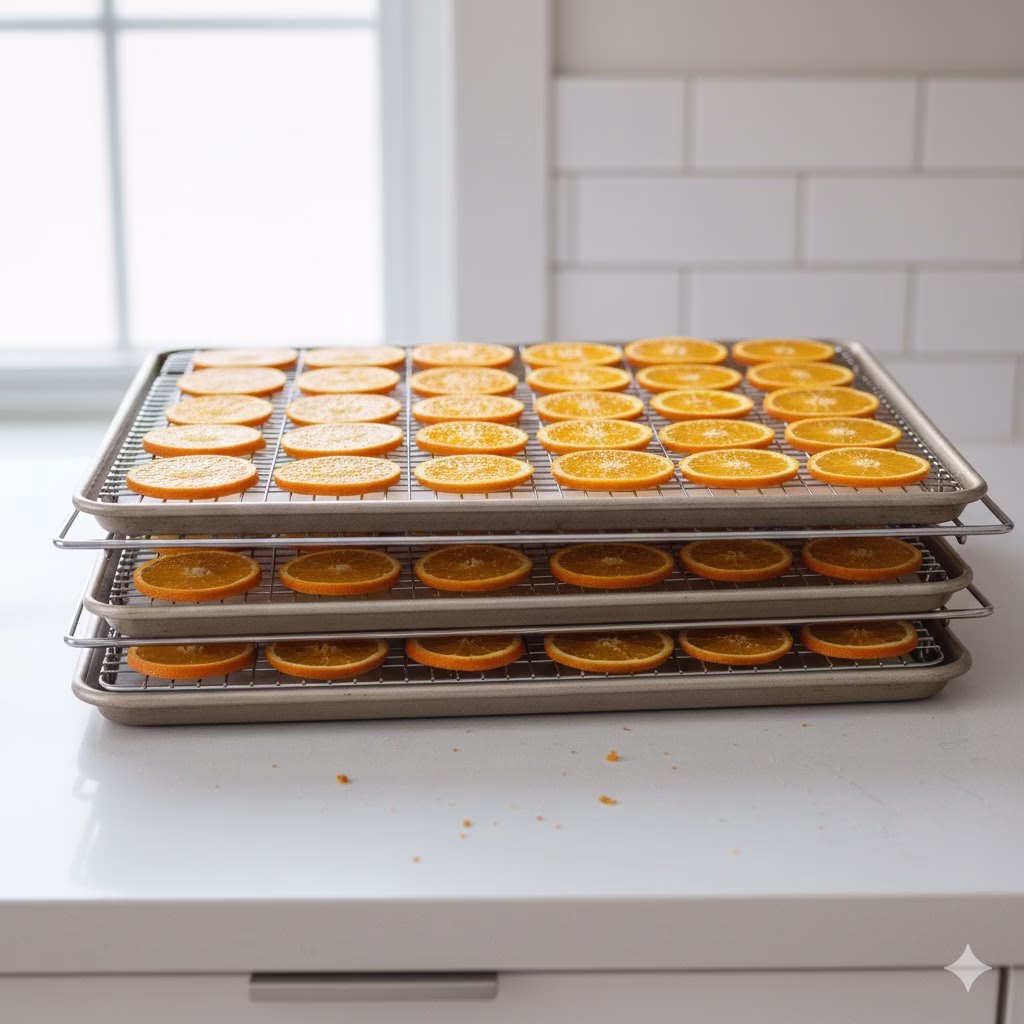
The Rack Method: Do not place slices directly on a baking sheet. Instead, place a wire cooling rack inside a large baking sheet. This allows air to circulate under the fruit, preventing the need to flip them constantly and ensuring they don’t stick to the metal.
Air Circulation: If your oven doesn’t have a fan, you can “crack” the oven door slightly (if safe to do so) using a wooden spoon. This allows moisture to escape the oven chamber, speeding up the drying time.
How to Tell When They Are Done
Because every oven is calibrated differently, you should start checking your Dried Orange Slices at the 3-hour mark.
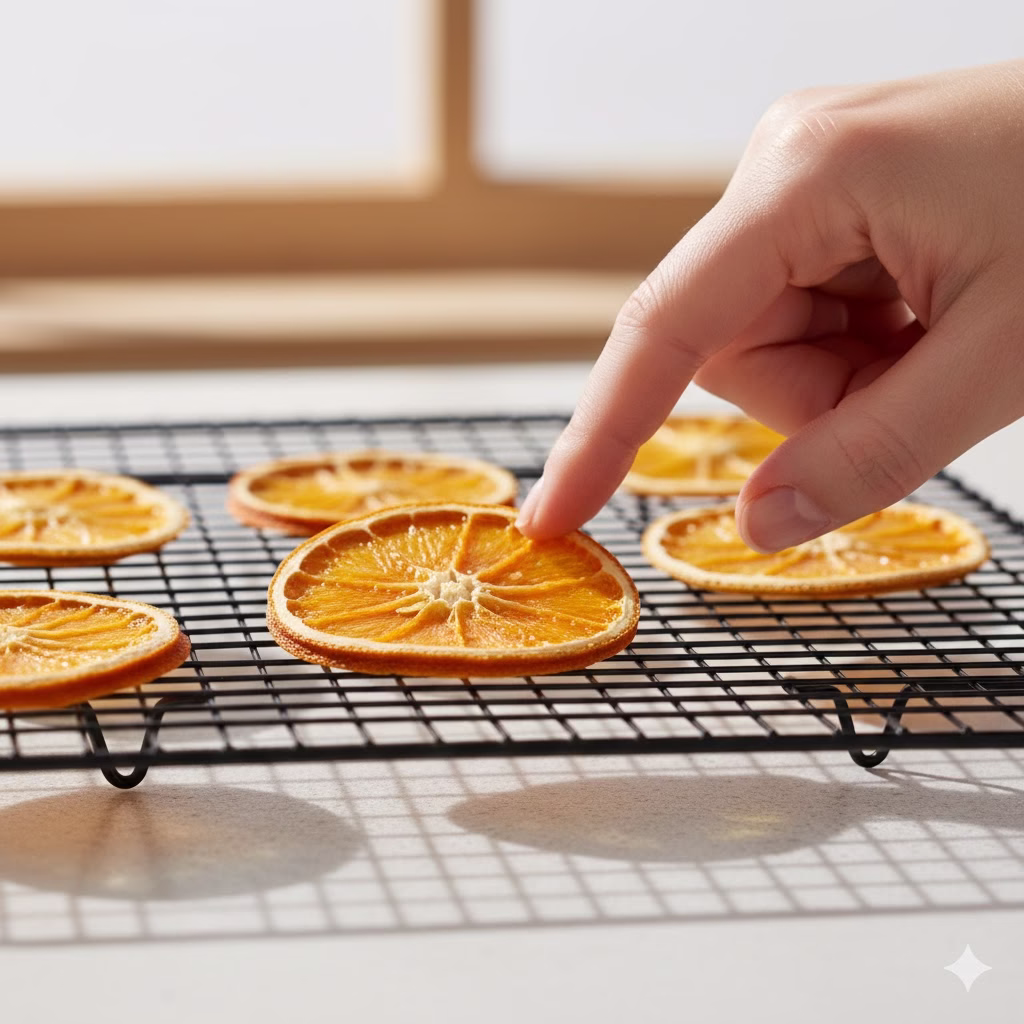
The Touch Test: The slices should feel tacky but not wet. Once they are fully done, they will feel brittle or like “leathery” plastic.
The Snap: Take one slice out and let it cool for two minutes on the counter. If it becomes crisp and snaps when bent, the batch is finished.
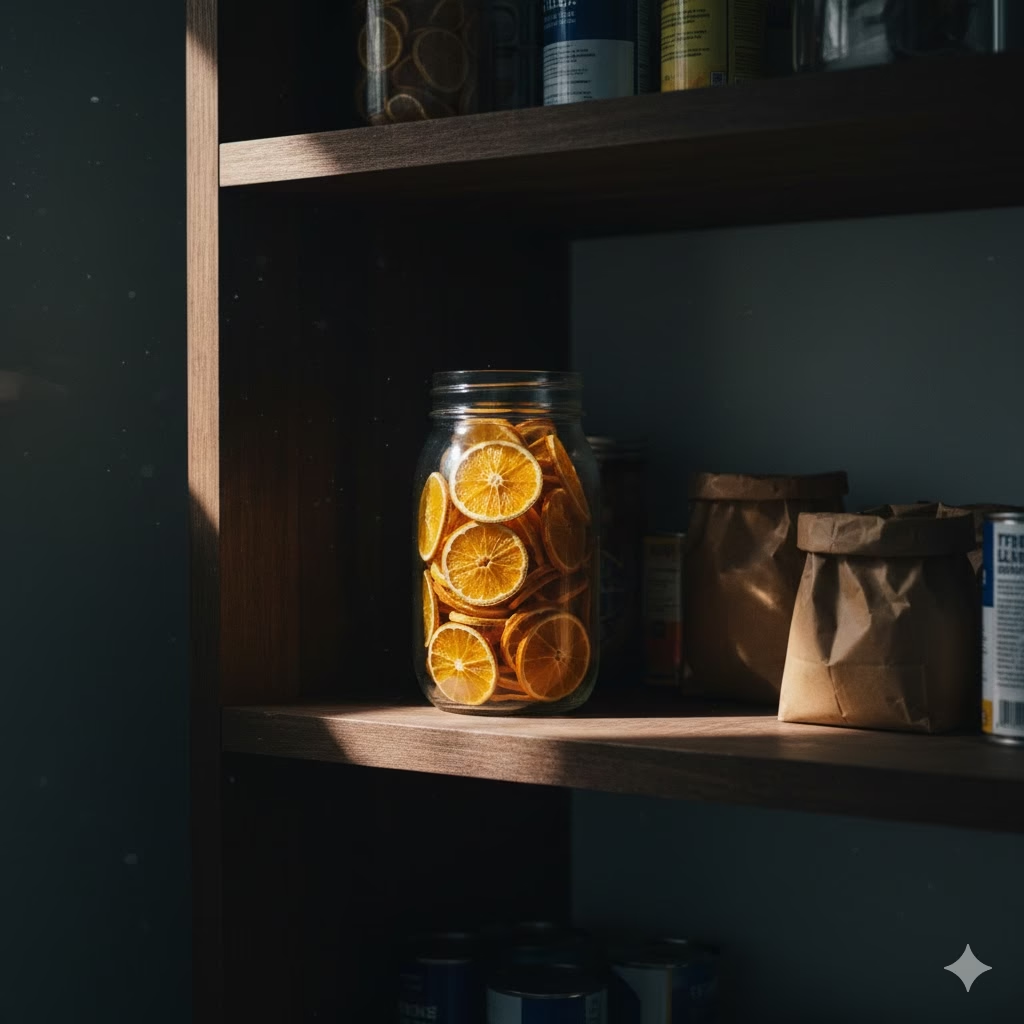
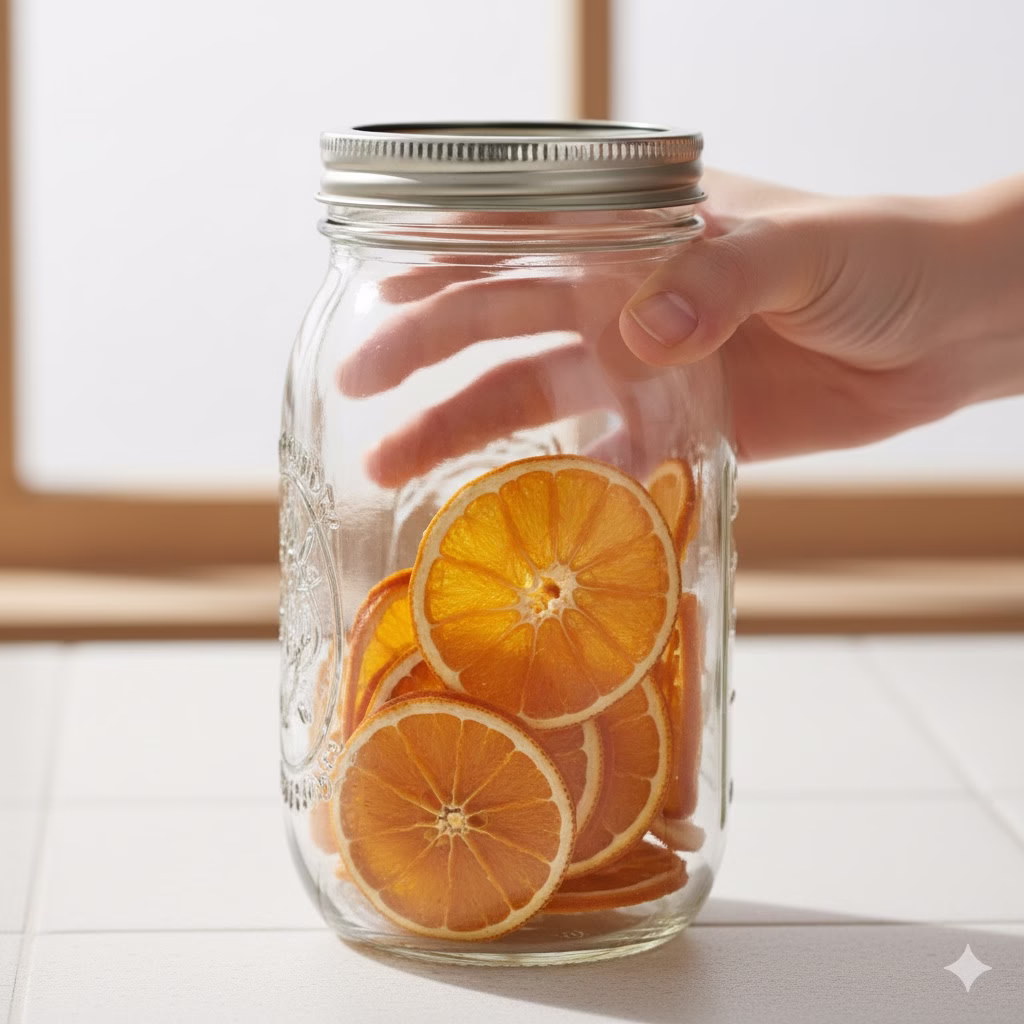
Storage: Always let the slices cool completely before putting them in an airtight jar. Any residual heat will create steam, which leads to mold—the enemy of zero waste preservation.
After spending time perfectly dehydrating your citrus. The last thing you want is for moisture or mold to ruin your hard work. Knowing how to properly store dried orange slices is the secret to keeping them vibrant, fragrant, and shelf-stable for up to a year.
Whether you plan to use them as a healthy snack. Or a beautiful cocktail garnish, or festive holiday decor, following a few simple preservation steps will ensure they stay as crisp as the day they left the air fryer. In this guide, we will cover the best containers and environmental conditions to maintain maximum freshness and longevity.
1. The Critical Cooling Phase
Never pack your orange slices away while they are still warm from the oven. Even a tiny amount of residual heat can create condensation inside your storage container, which will lead to mold within days. Allow the slices to sit on a cooling rack for at least two to four hours until they are completely cool and feel brittle or leathery to the touch.
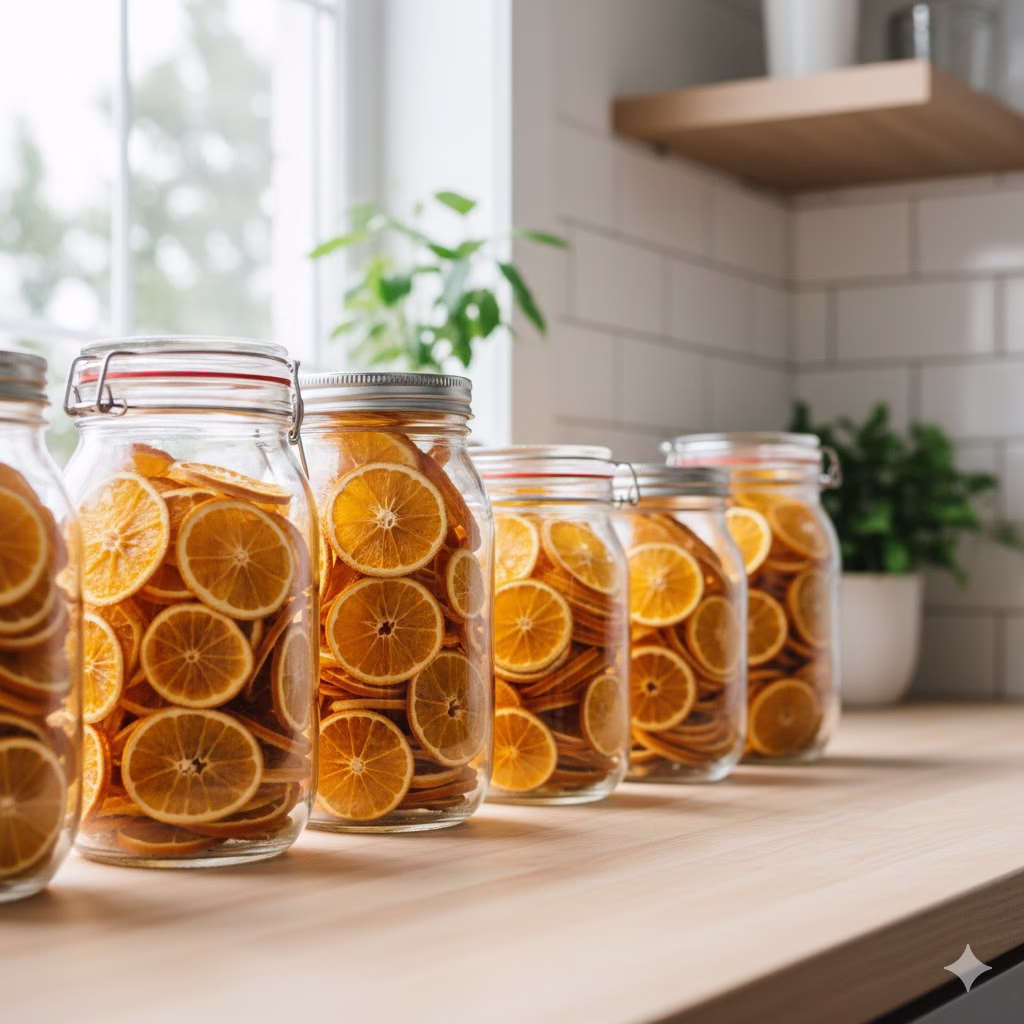
2. The Conditioning Process
To ensure your slices are truly ready for a full year of storage, “condition” them for a few days:
Place the cooled slices in a large glass jar, filling it about two-thirds full.
Shake the jar once a day for a week.
If you see any moisture or fogging on the glass, they aren’t dry enough and need to go back into the oven for another hour.
3. Choose the Right Container
For long-term preservation, airtight seals are mandatory.
Glass Jars: Mason jars or flip-top glass jars with rubber seals are the gold standard. Glass is non-porous and won’t absorb any lingering oils.
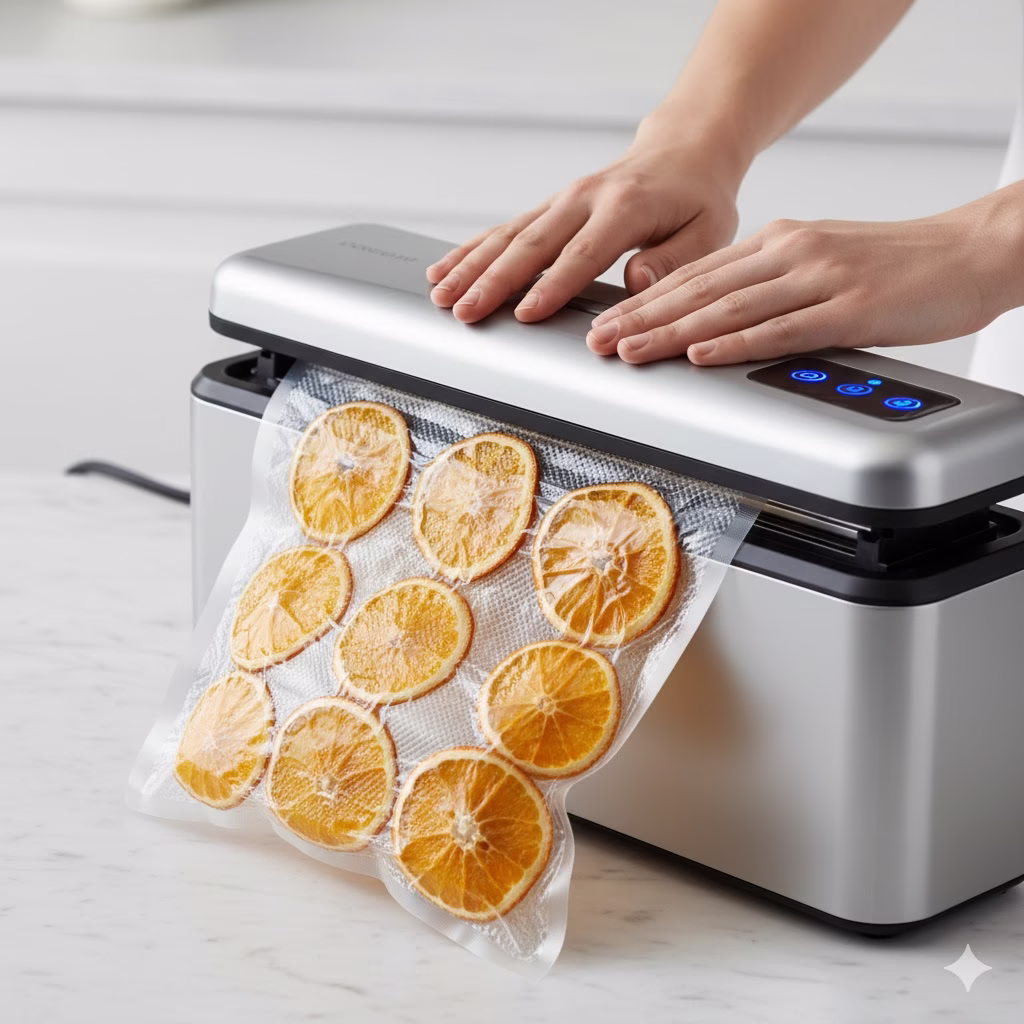
Vacuum Sealing: If you have a vacuum sealer, this is the most effective way to reach the one-year mark. It removes all oxygen, preventing any oxidation of the fruit’s color.
Mylar Bags: These are excellent for light-blocking, which helps maintain the bright orange hue.
The Essential Conditioning Process
Conditioning is a critical final step that many people overlook, but it is the only way to guarantee your fruit won’t develop mold later. Even if the slices feel dry to the touch, there may be tiny pockets of moisture hidden in the center of the pulp.
To condition your citrus, place the completely cooled slices into a clear, airtight glass jar, filling it about two-thirds of the way. For the next five to seven days, store the jar in a visible spot on your counter and give it a gentle shake once a day. This moves the slices around and redistributes any remaining moisture.
If you notice any condensation or “fogging” on the inside of the glass, it means the slices are not fully dry. In this case, you must put them back into the air fryer or dehydrator for another hour. If the slices remain dry and don’t stick together after a week, they are officially ready for long-term storage.
4. Ideal Storage Conditions
Where you put the container is just as important as the container itself.
Cool and Dark: Store your jars in a dark pantry, cupboard, or cellar. Constant exposure to sunlight will bleach the color and break down the citrus oils.
Avoid Humidity: Keep them away from the stove, dishwasher, or any area where steam is common.
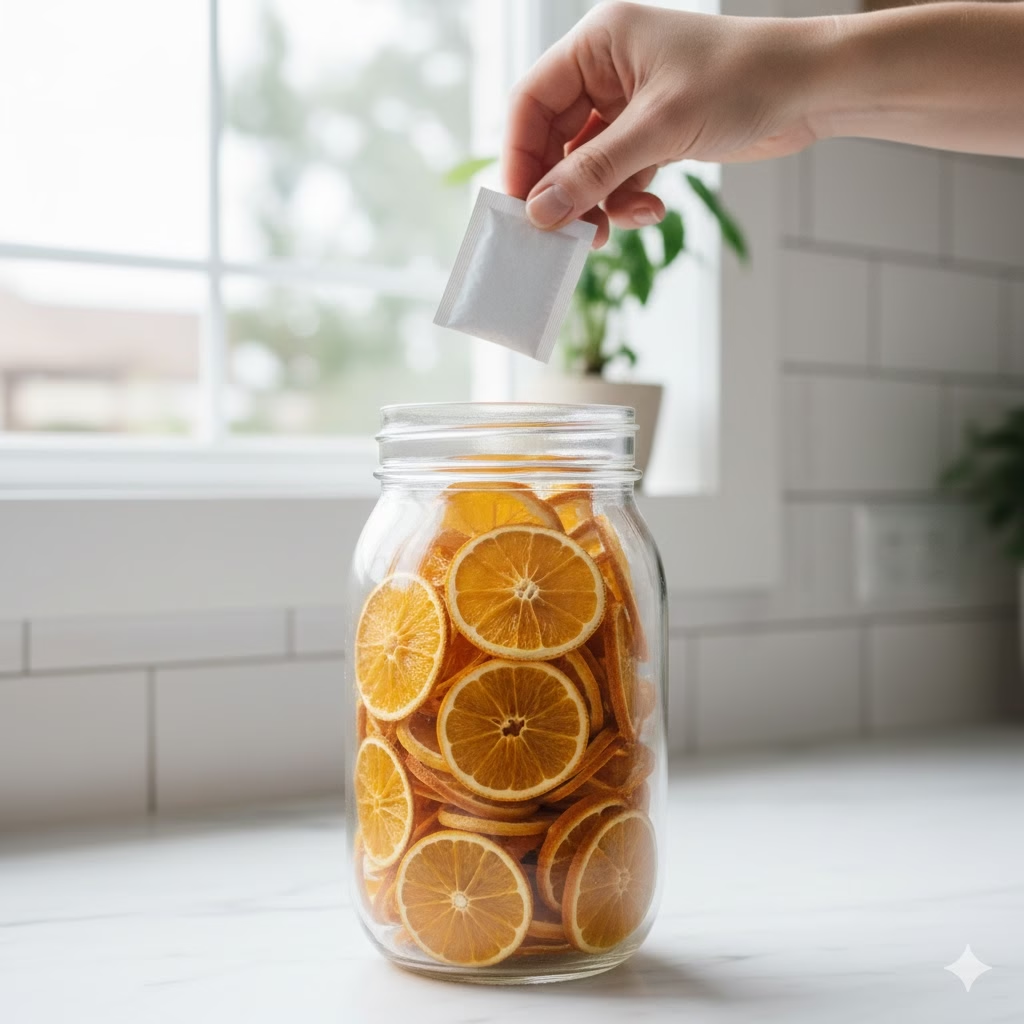
5. Using Oxygen Absorbers
If you live in a particularly humid climate, consider dropping a small food-grade silica gel packet or an oxygen absorber into the jar. These little packets act as an insurance policy against any stray moisture that might enter the jar when you open it to grab a slice.
Checklist: Signs of Spoilage
Even with the best intentions, moisture can sometimes find its way into your containers. Use this checklist to inspect your stash before using them in recipes or as decor. If you notice any of the following, it is best to discard the batch:
Visible Mold: Any fuzzy white, green, or black spots on the rind or the flesh.
Soft or Leathery Texture: If the slices have lost their “snap” and feel bendable or sticky, they have reabsorbed moisture from the air.
Off-Putting Odor: Dried oranges should smell brightly citrusy; a sour, musty, or fermented scent is a clear sign of bacterial growth.
Condensation in the Jar: Droplets of water or a “cloudy” look on the inside of the glass indicate the oranges were not fully dry or the seal has failed.
Significant Discoloration: While some natural darkening is normal over many months, a sudden shift to a dark brown or blackish hue usually indicates spoilage or improper storage.
Clumping: If the slices are sticking together in a brick-like fashion, there is enough residual sugar and moisture to invite mold.
Conclusion
By following these preservation steps, you can transform a simple bag of oranges into a long-lasting pantry staple that stays fresh for up to a year. The combination of thorough drying, the essential conditioning phase, and choosing a cool, dark storage spot is the only way to ensure your citrus wheels maintain their vibrant color and concentrated aroma. Whether you are prepping them for future recipes or festive decorations, taking these extra precautions ensures your hard work remains perfectly preserved for whenever inspiration strikes.
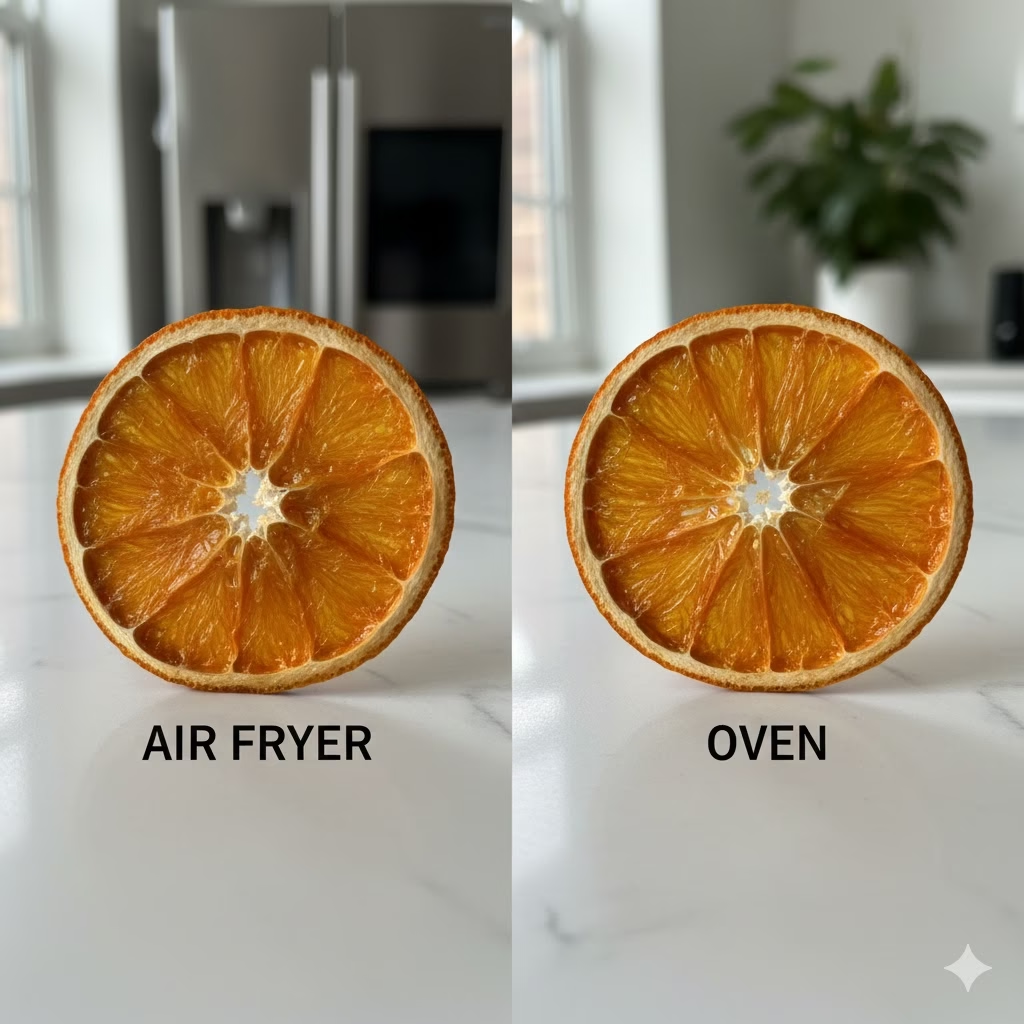
While using an oven is a great way to make Dry Orange Slices, sometimes you want results a bit faster. The air fryer is a perfect tool for this task. Because an air fryer uses a powerful fan to move hot air, it acts like a high-speed dehydrator. This speeds up the drying time and helps you stick to your zero waste goals in a fraction of the time.
Using an air fryer is one of the best food ideas for small batches. If you only have one or two oranges left in the fruit bowl, you can turn them into beautiful garnishes or snacks in about an hour. Here is exactly how to do it.
1. Prepare Your Citrus
Just like with the oven method, how you cut the fruit matters. For the air fryer, you want the slices to be very thin. This allows the air to move through the fruit fibers quickly.
Thin Slices: Aim for a thickness of about 1/4 inch. If they are too thick, the outside will dry while the inside stays mushy.
Remove Seeds: Take a moment to pop out any seeds. Seeds can become very bitter once they are heated in the air fryer.
Pat Dry: Use a paper towel or a clean cloth to soak up any juice on the surface. This small step can save you ten minutes of cooking time.
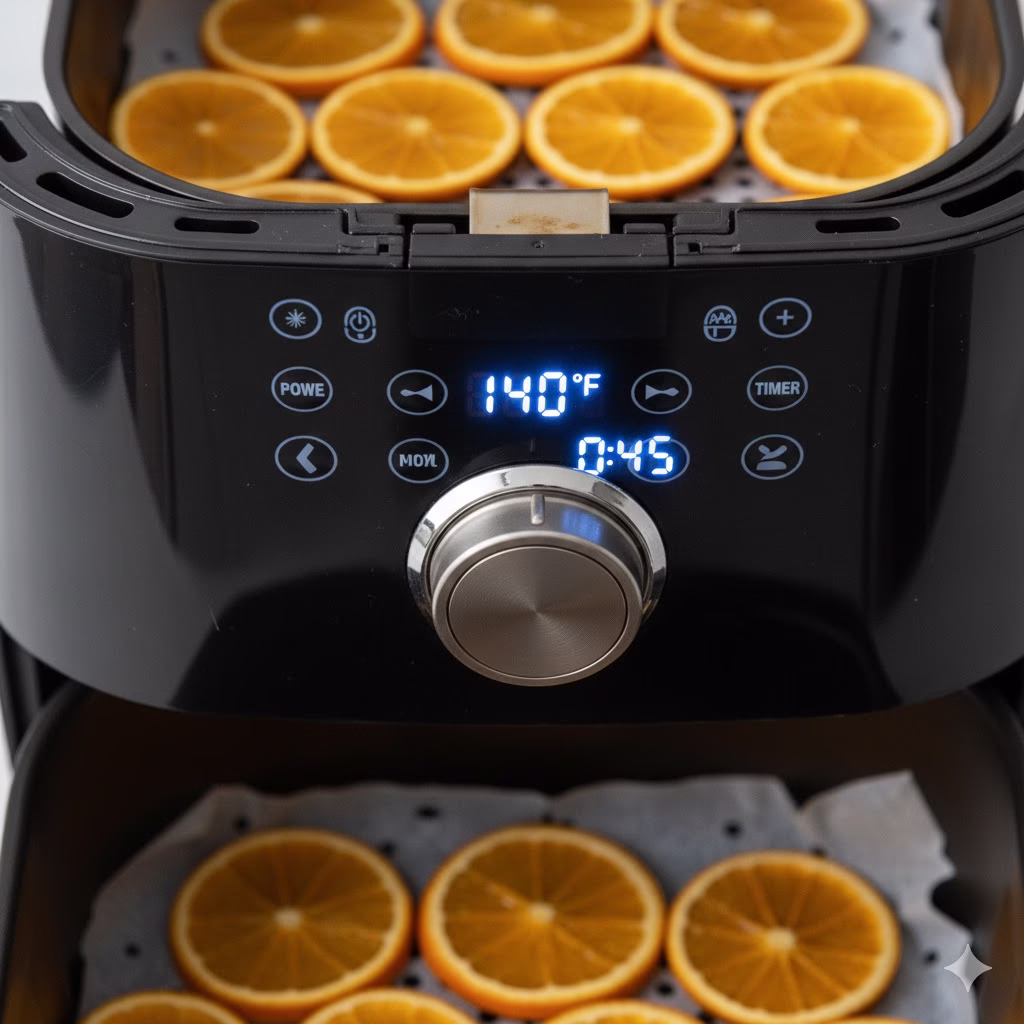
2. Setting the Temperature
The biggest risk with an air fryer is the heat. Most air fryers are designed to cook food fast at high heat. For Dried Orange Slices, you must use the lowest setting possible.
The Best Setting: Set your air fryer to 180°F (80°C). If your machine has a “Dehydrate” button, use that. Most dehydrate settings default to 130°F to 150°F, which is even better for keeping the color bright.
The Rack Setup: Place the slices in a single layer. Do not stack them! If you stack the slices, the air cannot reach the middle, and they will not get crisp.
Airflow Tip: If your air fryer has a basket, the slices might try to “fly” around because they are so light. You can place a small metal steaming rack on top of them to hold them down.
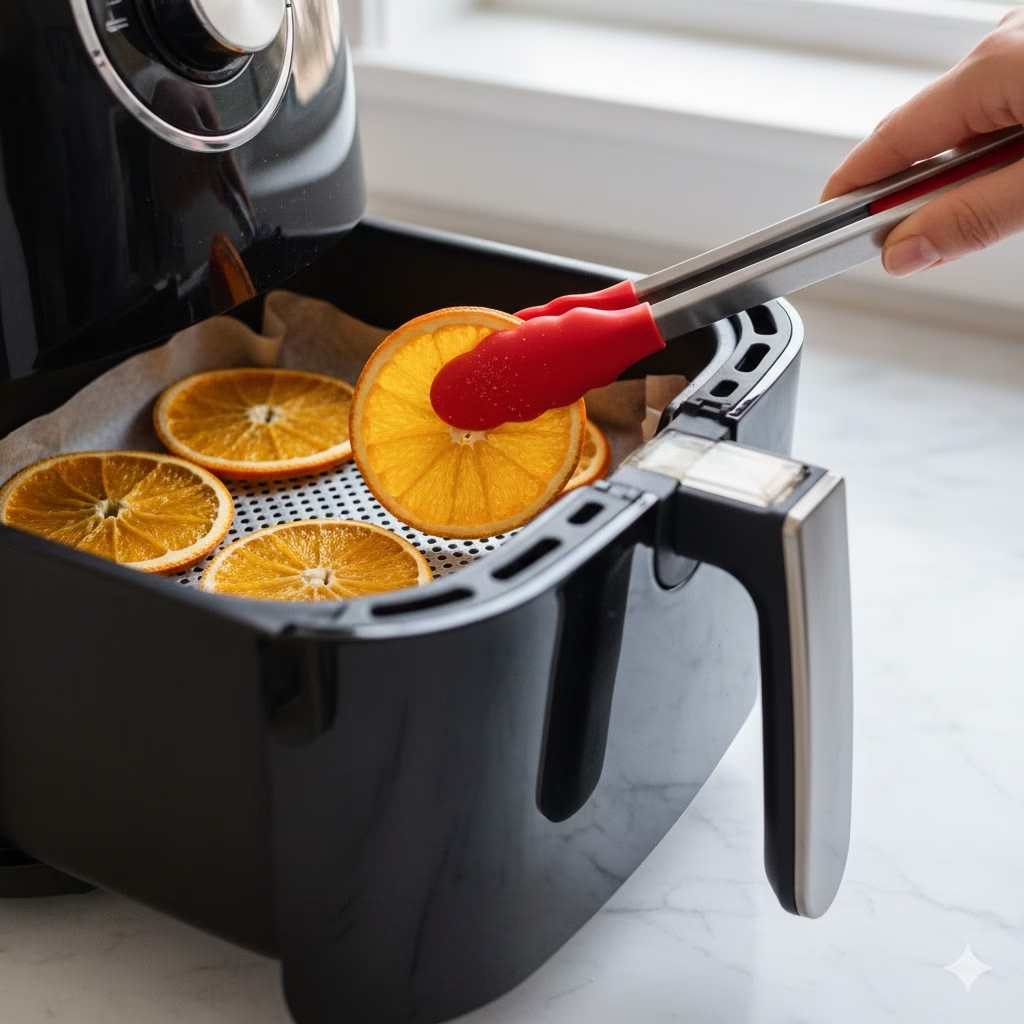
3. Timing and Flipping
Because the air is so concentrated in an air fryer, you need to keep an eye on your progress.
The Timeline: Total drying time usually takes between 45 to 90 minutes. This is much faster than the 4 to 6 hours required in a standard oven.
The Halfway Mark: Every 20 minutes, pull the drawer out and flip the slices over. This ensures that both sides dry at the same rate.
Check for Done-ness: Once the edges look slightly curled and the centers are no longer sticky, they are ready. They will continue to crisp up as they cool down on the counter.
4. Avoiding Common Mistakes
To keep your zero waste project successful, watch out for these two issues:
Burning: If you see the edges of the oranges turning dark brown or black, your air fryer is too hot. Lower the temperature immediately and check them every 5 minutes.
Soft Centers: If the slices feel “bendy” after they have cooled, they are not done. Put them back in for another 10 minutes. If moisture stays inside, they will not last long in storage.
Conclusion
The air fryer is a game-changer for making Dried Orange Slices. It is fast, efficient, and helps you create amazing food ideas with very little effort. Once you master this method, you can have a fresh batch of citrus garnishes ready before your next dinner party or craft project. It is a simple way to make the most of your fruit and enjoy a sustainable, flavorful home.
This guide shows you the best ways to use Dried Orange Slices in your daily life. It is a perfect project for anyone who loves zero waste living and natural home tips. These citrus rounds are great for cooking, baking, and making your house smell amazing. We will share many food ideas that help you use the whole fruit. Following these steps will help you live a more sustainable and creative life.
Getting Started with Dried Oranges
Transforming fresh citrus into beautiful, shelf-stable slices is one of the most rewarding zero waste projects you can take on in your home. Whether you are looking for festive food ideas or natural home scents, learning the best methods for preservation ensures you get the most out of every fruit. Before we dive into our favorite uses, you may want to check out our foundational guides:
By mastering the basics, you’ll always have a versatile cooking ingredient and beautiful decor pieces ready at a moment’s notice.
The best thing about citrus is how long it can last. A fresh orange is a tasty snack, but Dried Orange Slices offer much more. They have a deep flavor and a beautiful look that fresh fruit lacks. Today, many people want to follow zero waste habits. Learning how to dry and use every part of your fruit is a great way to start. You might have a bag of navel oranges or some seasonal blood oranges. Drying them is the first step toward many fun projects.
In this article, we will look at eight ways to use your citrus. These food ideas go from fancy drink garnishes to soothing bath soaks. The simple orange slice is one of the most useful items in a green pantry. It is easy to make and even easier to use.
1. Beverage Garnishes for Every Occasion
Using Dried Orange Slices is a top choice for making drinks look professional. Fresh slices can make a drink watery or lose their shape quickly. Dried versions stay firm and slowly release their natural oils into the liquid. This adds a subtle flavor that grows stronger over time.
How to use them:
Beverage Garnishes: Add them to hot tea, cocktails (like a gin and tonic or negroni), mulled wine, or spiced apple cider.
Cocktails: Put a slice in a classic Negroni. The orange oils mix well with the herbs in the gin.
Hot Teas: Place a slice in a cup of Earl Grey. The hot water brings out the scent of the fruit right away.
Winter Drinks: For cold nights, float slices in a big pot of mulled wine. They look very pretty and add a nice bit of zest.
2. Healthy Snacks for Gourmet Treats
If you want zero waste snacks, look at the orange itself. When you slice them thin and dry them until they are crisp, they act like fruit chips. They are both sweet and a little bit sour.
Healthy Snacks: * The Basics: Eat them plain like “chips” for a quick boost of energy. They are a great snack to take on a hike or to the office.
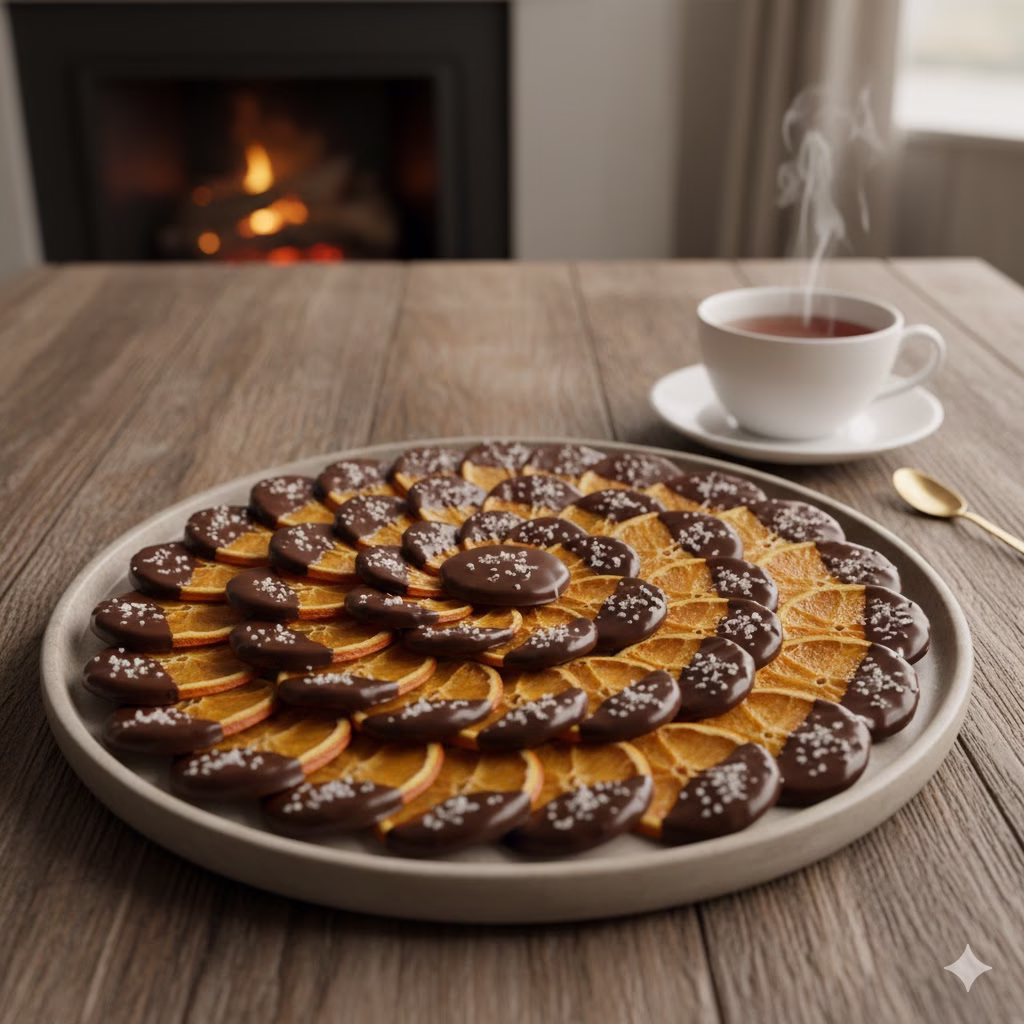
Gourmet Style: Dip them halfway in dark chocolate and sprinkle with sea salt for a gourmet treat. This mix of salt, dark cocoa, and bright citrus is a fan favorite. They are perfect for parties or as a special gift for a friend.
3. Baking Decorations and Tasty Mix-ins
The way Dried Orange Slices look makes them a top pick for decorating treats. They give a professional finish to your home baking with very little work. You can use them whole or break them into smaller bits.
Baking Decorations: * Cake Toppers: Use whole slices to top cakes, cupcakes, or tarts. They look great on top of white frosting or a dark chocolate glaze.
In the Mix: Finely chopped pieces can be folded into granola, muesli, or muffin batter. When you bake them inside the dough, they become soft and chewy. This adds a burst of flavor that is much better than store-bought peels.
Most people think of citrus as a fresh topping. However, Dried Orange Slices are a secret tool for savory meals. Drying the fruit takes away the water but leaves the sugar and acid behind. This makes the flavor very strong.
Cooking Ingredient: * Stew and Soup: Add slices to savory stews, soups, or marinades for fish and poultry to provide a subtle, concentrated citrus depth.
Roasting: Place a few slices under the skin of a chicken before you roast it. The heat of the oven will push the orange flavor into the meat. It works very well with herbs like thyme and rosemary.
Section 4: Savory Cooking Ingredient
Dried oranges aren’t just for sweet treats; they bring a sophisticated, concentrated acidity to savory dishes that fresh fruit often lacks. Because the drying process removes the moisture, the sugars caramelize and the citrus flavor intensifies, making them a powerhouse cooking ingredient for slow-roasted meats and stews.
One of the best food ideas for utilizing your stash is incorporating them into a traybake. Placing dried slices underneath or on top of chicken thighs allows the citrus oils to render into the pan juices, creating a built-in glaze. As the chicken roasts, the slices soften just enough to release a deep, marmalade-like essence that pairs beautifully with earthy herbs.
How to Use Them in Your Kitchen
Roasts: Tuck slices into the cavity of a whole chicken or layer them over pork loin before roasting.
Braises: Drop a few slices into a red wine braise or a Moroccan-style tagine to add a subtle bitter-sweet note.
Fish: Place a slice of dried citrus on top of a salmon fillet before wrapping it in parchment paper to steam.
Grains: Chop up a slice and stir it into couscous or quinoa with toasted almonds and parsley.
Using dried oranges in your main meals is a fantastic way to lean into zero waste cooking. Instead of letting a half-used orange go soft in the fridge, drying your harvest ensures you always have a hit of sunshine ready to brighten up a heavy winter meal.
5. Multi-Use Orange Powder
When your slices are very dry and brittle, you can turn them into a powder. This is a perfect zero waste move. You use the whole fruit, including the peel and the inside.
Orange Powder: * The Method: Grind completely dry slices in a food processor to create a powder that can replace orange zest in recipes or be mixed with salt/sugar for rimming glasses.
Flavor Boost: You can add this powder to dry rubs for meat or stir it into your morning oatmeal.
Drinks: Mix the powder with sugar to put on the rim of a margarita glass. It adds a bright color and a great smell to every sip.
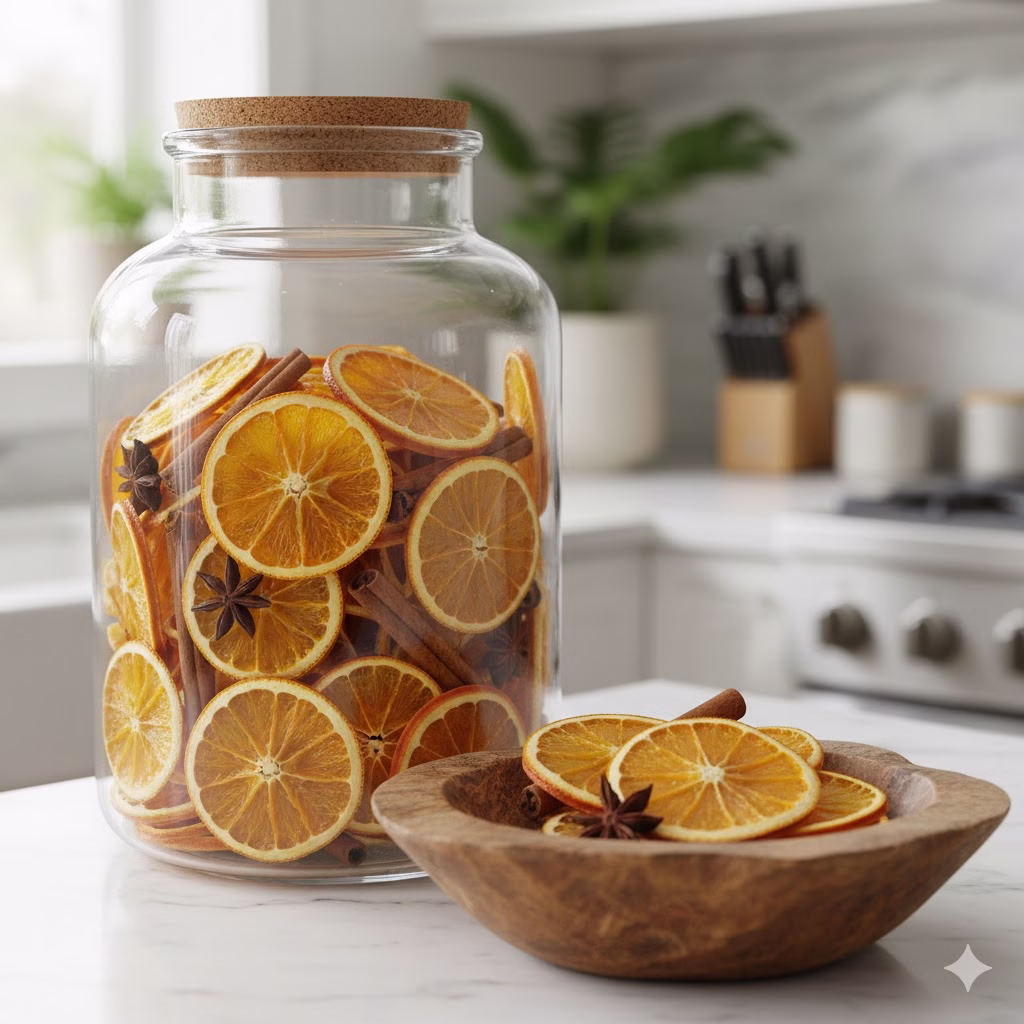
6. Aromatics and Home Potpourri
Oranges can do more than just taste good. They can make your whole home smell fresh and clean. Commercial sprays often have chemicals, but these slices are totally natural. This is a great way to use slices that might be broken or not look perfect for a cake.
Potpourri: * Natural Scent: Mix slices with star anise, cloves, and cinnamon sticks in a decorative bowl to scent a room naturally.
Decor: This looks beautiful sitting on a coffee table or a shelf. It brings a cozy feel to any room during the autumn and winter months.
7. Relaxing Simmer Pots
A simmer pot is a fast way to fill your house with a lovely aroma. It is a very popular zero waste food idea because you can use old spices and fruit scraps. It is much better than using a candle.
Simmer Pots: * Stovetop Scent: Simmer dried slices on the stove in a pot of water with other spices (like vanilla or nutmeg) to fill your home with a warm citrus aroma.
How to do it: Just fill a small pot with water and add your items. Keep the heat very low. As the water turns to steam, the scent spreads. You can add more water as it dries out to keep the scent going all day long.
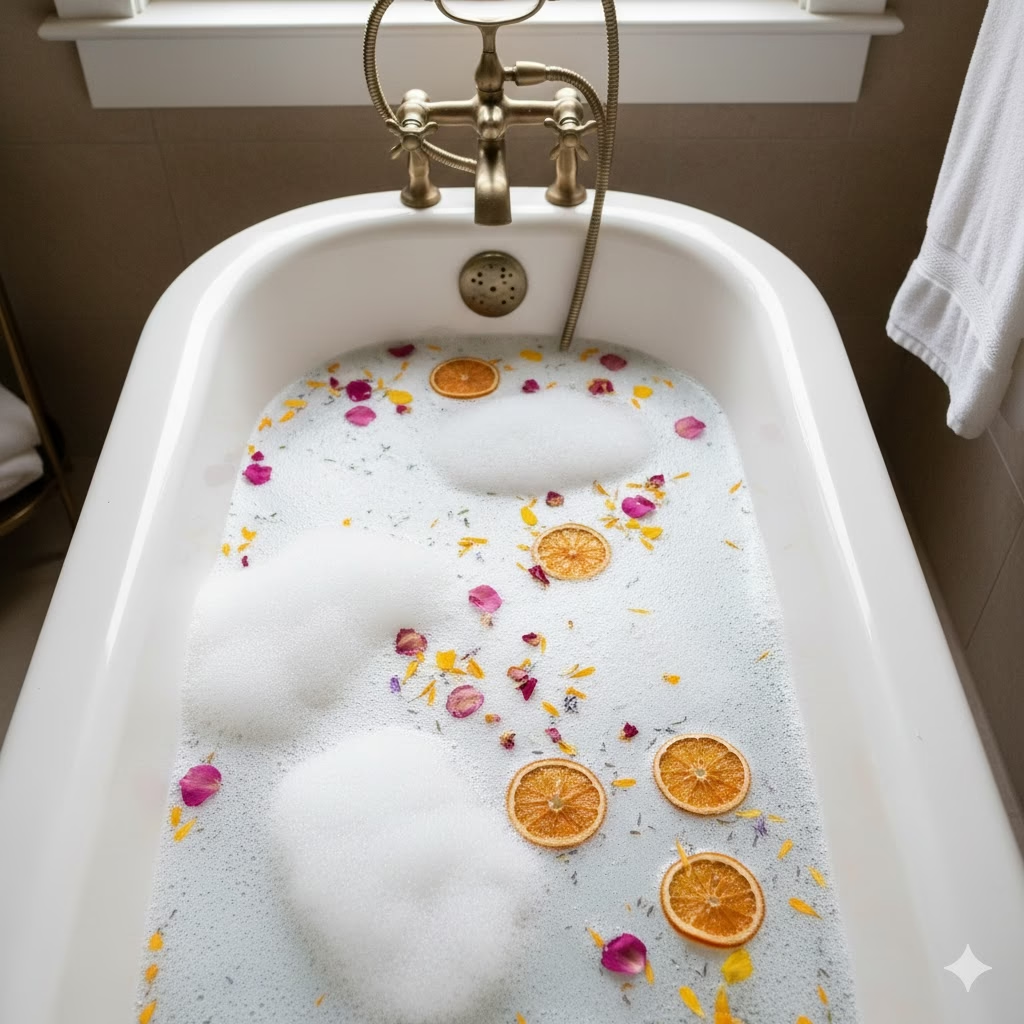
8. Calming Bath Infusion
Oranges are known to help people feel calm and happy. Using them in your bath is a great way to enjoy a spa day at home. It is a simple luxury that costs very little.
Bath Infusion: * Soak Away Stress: Float them in a warm bath along with Epsom salts or dried flowers for a relaxing, aromatic experience.
Skin Health: The natural oils in the peel are good for your skin and smell amazing. You can also put the slices into a small cloth bag. This keeps the bath water clean while still letting the scent out. It makes the cleanup much easier when you are finished.
Conclusion
Turning a fresh orange into a dried slice is a smart move for any home. It shows how easy it is to live a zero waste life. These food ideas give you so many ways to use a single fruit. You can use them in your morning tea, your evening meal, or even your bath.
By drying your own fruit, you save money and reduce trash. You also get to enjoy a natural product that has no extra chemicals. Whether you are baking a cake or just want your living room to smell like citrus, these slices are the perfect choice. Give it a try and see how many ways you can use them in your own home.
This article explores creative ways to repurpose everyday items into stunning accents for your living space. By focusing on sustainable home decor ideas, readers can reduce waste while personalizing their environment. These projects celebrate the intersection of green living and DIY craftsmanship. Transforming simple materials into functional art is a cornerstone of modern home décor.
Sustainable Home Decor Ideas: Transforming Tin Cans into Art
Making your own decorations is a great way to help the planet. Many people want to try a zero waste life. You can start this journey right in your kitchen. Every time you finish a can of soup or beans, you have a new tool for your home. These metal cans are strong and easy to use. You do not need to be a pro to make them look great.
Using home decor ideas that focus on upcycling is very smart. It saves you money and helps the earth too. This guide shows you twelve easy ways to change old cans into new treasures. These projects are fun for everyone. You will learn how to see beauty in things most people just throw away. Let’s look at how green living can make your house look amazing.
1. The Minimalist Succulent Planter
Small plants like succulents look very cute in tin cans. The hard metal and soft green leaves go well together. This is one of the easiest home decor ideas to try first. You just need to clean the can well and dry it. Then, you can paint it.
Make sure you put some holes in the bottom. You can use a hammer and a big nail for this. These holes let the water out so the roots do not rot. Use colors like white or soft grey to make them look modern. These little pots look great on a sunny desk or a shelf.
2. Rustic Twine-Wrapped Pencil Holders
If you like a cozy look, try using twine. This project adds a nice touch to any room. It feels warm and natural. It is a perfect choice for your home office. You only need a can, some glue, and a ball of string.
Start at the bottom of the can. Put a little hot glue on the metal. Stick the end of the string there. Now, wrap the string around and around. Keep it tight so you cannot see the metal. Put a bit of glue here and there as you go. When you get to the top, cut the string and glue the end inside. Now you have a pretty place for your pens.
3. Punched Tin Lanterns for Outdoor Ambiance
You can make beautiful lights for your porch. These lanterns make pretty shapes on the walls at night. It is a classic way to use metal cans. They are great for parties or just relaxing outside.
Pro Tip: Fill the can with water and put it in the freezer. When the ice is hard, it is easy to punch holes without denting the can. Use a nail to make patterns like stars or dots. When the ice melts, dry the can. Put a small candle inside and watch it glow. This is a top pick for green living style.
4. Chic Copper-Finished Kitchen Organizers
Copper is a very popular color for home décor right now. You can get this look without spending a lot of money. All you need is a can of metallic spray paint. This makes old cans look very expensive and sleek.
Clean the cans and take off any sticky glue. Spray them with a thin coat of copper paint. Let them dry and do it again. You can use these to hold your big spoons and whisks. They look very neat on a kitchen counter. It is a fast way to organize your space while staying zero waste.
5. Vertical Herb Garden for Small Spaces
Do you love to cook with fresh herbs? You can grow them in cans even if you do not have a big yard. A vertical garden saves a lot of space. You can hang these cans on a wall or a fence.
You can use wood or a metal grid to hold the cans. Paint each can a bright color. Write the name of the herb on the front. This makes your kitchen look fresh and green. It also makes your food taste better. Growing your own food is a big part of green living.
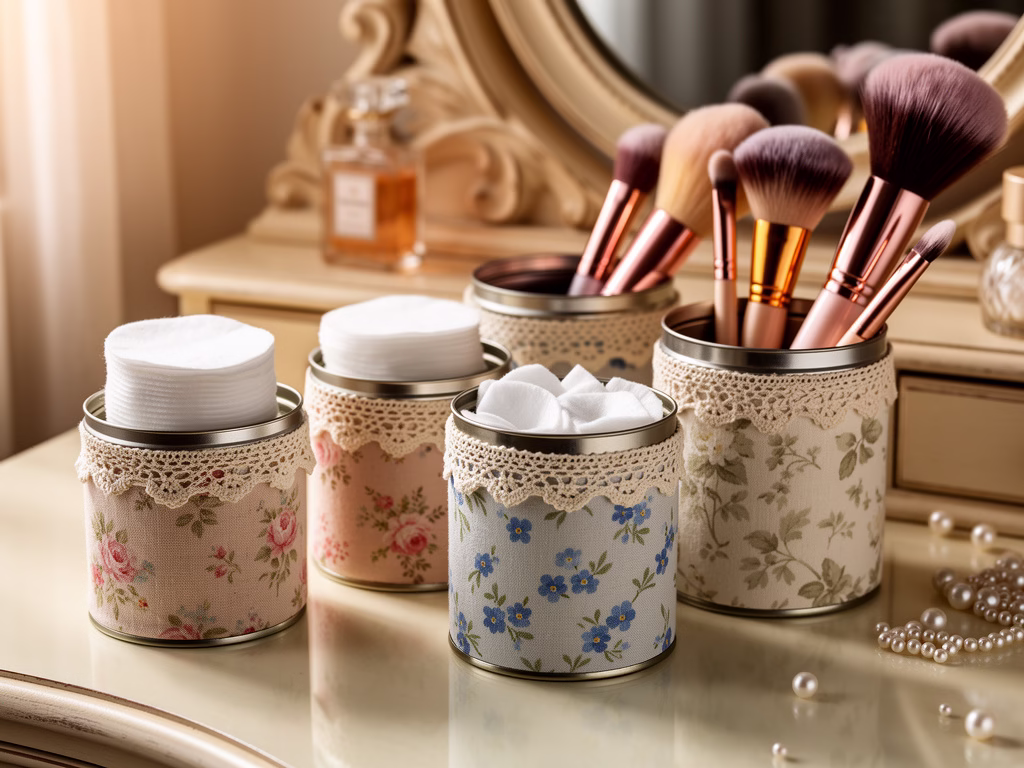
6. Vintage Fabric-Covered Storage Tins
Do you have old clothes or scrap fabric? Do not throw them away. You can use them to cover your tin cans. This is a good way to match your storage to your room colors. It makes the cans feel soft and pretty.
Use a glue stick or spray glue on the can. Wrap the fabric around it and smooth out any bumps. You can use lace or ribbons at the top for more detail. These are great for a bedroom or a craft room. Use them to hold hair clips, buttons, or jewelry.
7. Tiered Craft Organizer
If you have a lot of small items, a tiered tower is best. You can use cans of different sizes for this. A wide can goes on the bottom. A medium can goes in the middle. A tiny can goes on the top.
Use a very strong glue to stick them together. You can paint them all the same color so they look like one piece. This is one of those home decor ideas that keeps you tidy. It takes up very little space on your table but holds a lot of things.
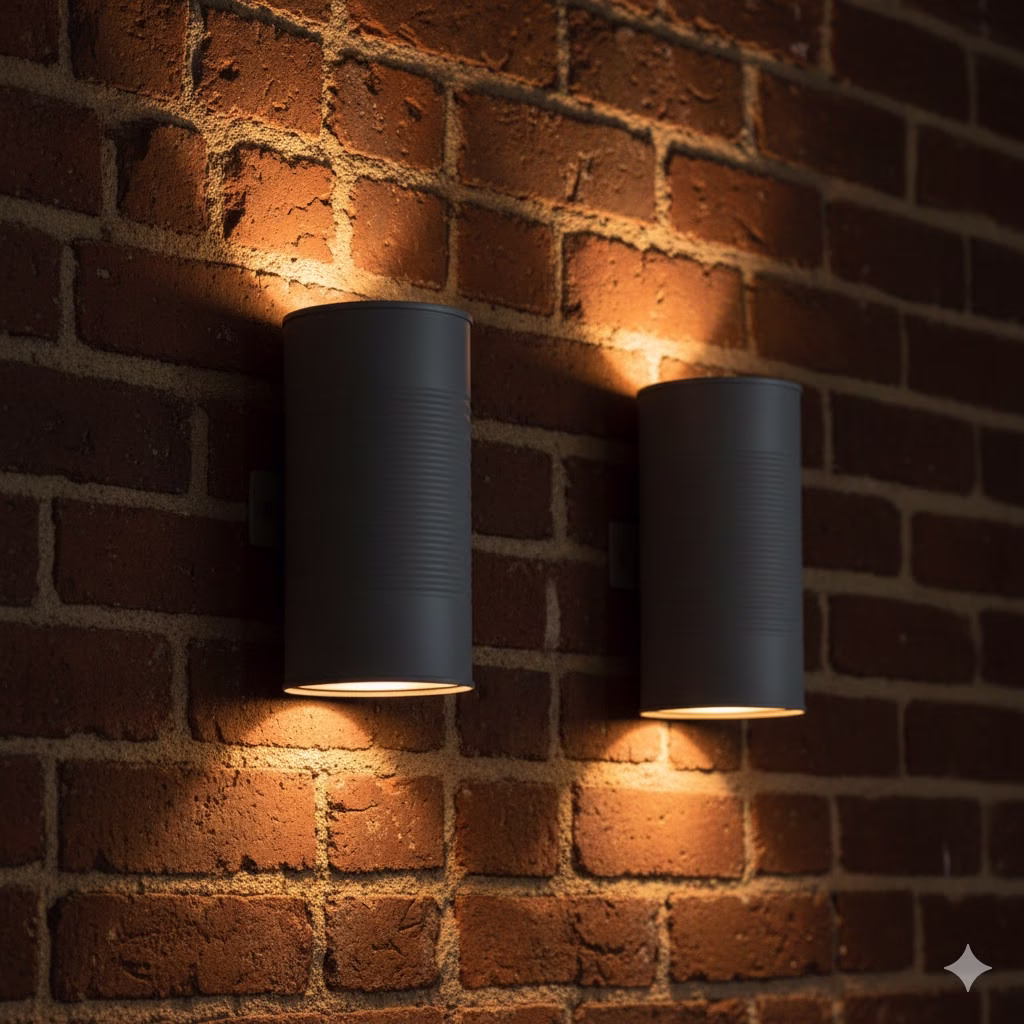
8. Industrial Wall Sconces
You can make your own wall lights with tall cans. This project gives your home a cool, industrial feel. You will need to take off both the top and the bottom of the can. This makes a metal tube.
You can mount this tube over a small wall light. The light will shine out of the top and the bottom. It looks very fancy in a hallway. It is a great way to use home décor to show off your style. People will be shocked that you made it from a soup can.
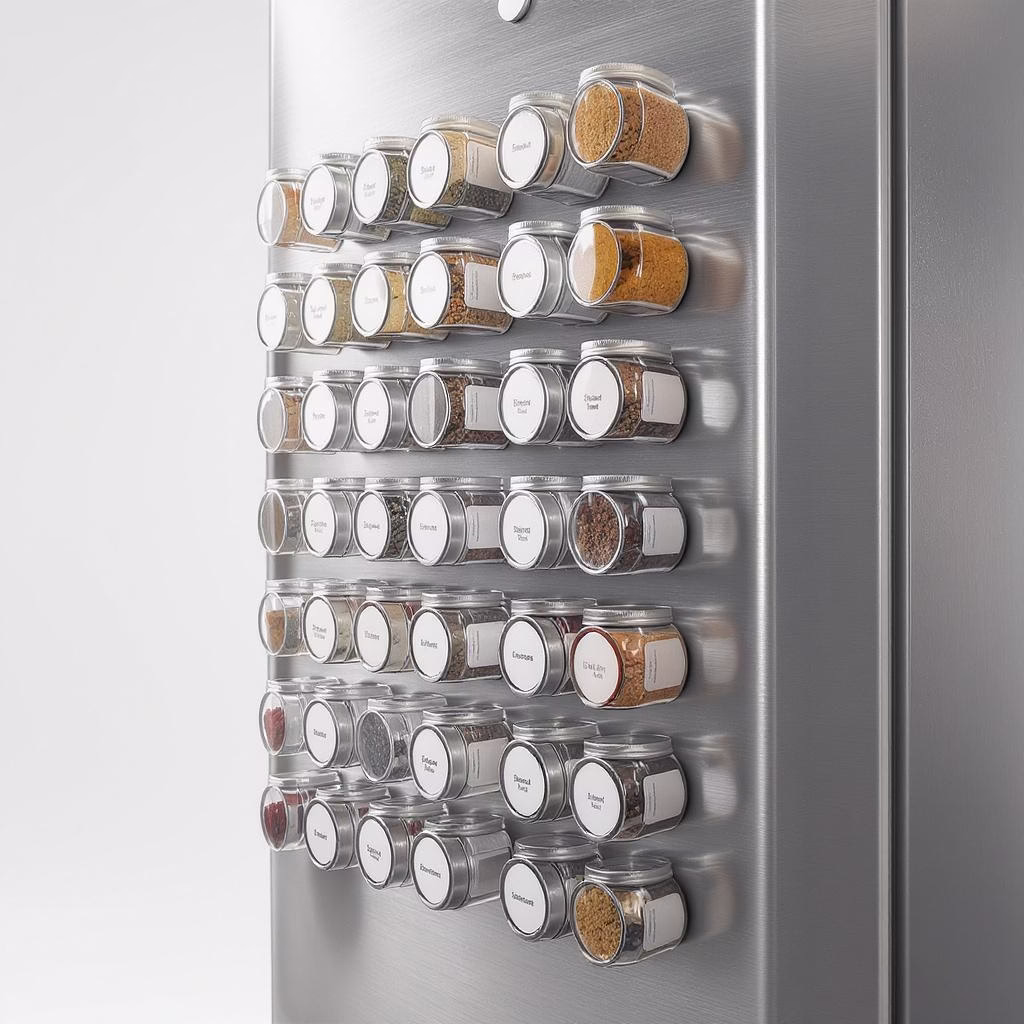
9. Magnetic Spice Rack
Small cans are perfect for spices. If you use magnetic paint or glue magnets to the cans, they can stick to your fridge. This keeps your spices right where you can see them. It is a very smart use of space.
Clear lids are best so you can see the colors of the spices. If your lids are not clear, just use labels. This is a fun project for any kitchen. It helps you stay organized while you practice zero waste habits.
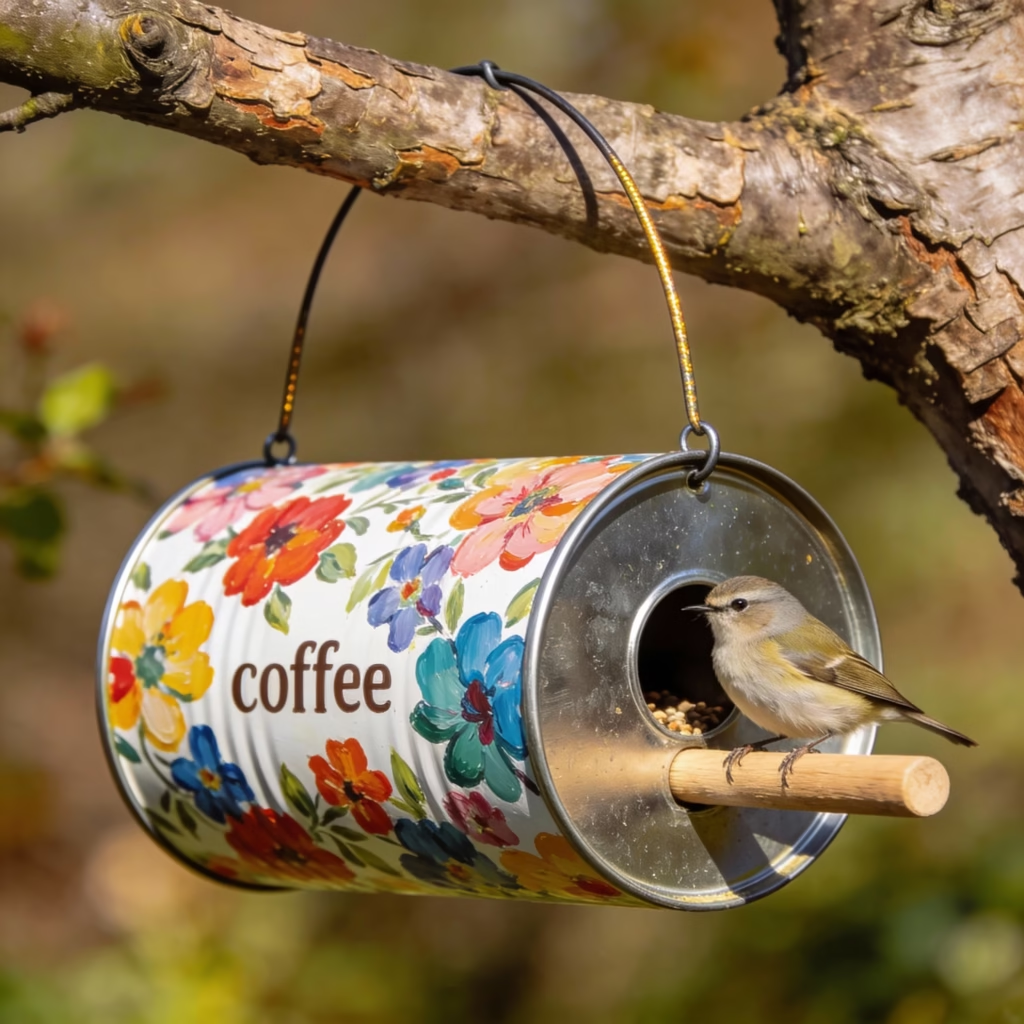
10. Bird Feeders for the Eco-Friendly Garden
Birds need food, and you can help them. A big coffee can makes a great bird feeder. Lay the can on its side and decorate it. You can glue sticks to the outside to make it look like part of a tree.
Put a small wooden stick at the opening for the birds to sit on. Hang it from a tree with a piece of wire. Fill it with seeds and wait for your new friends to arrive. This is a lovely way to bring more nature into your life. It is a project that gives back to the earth.
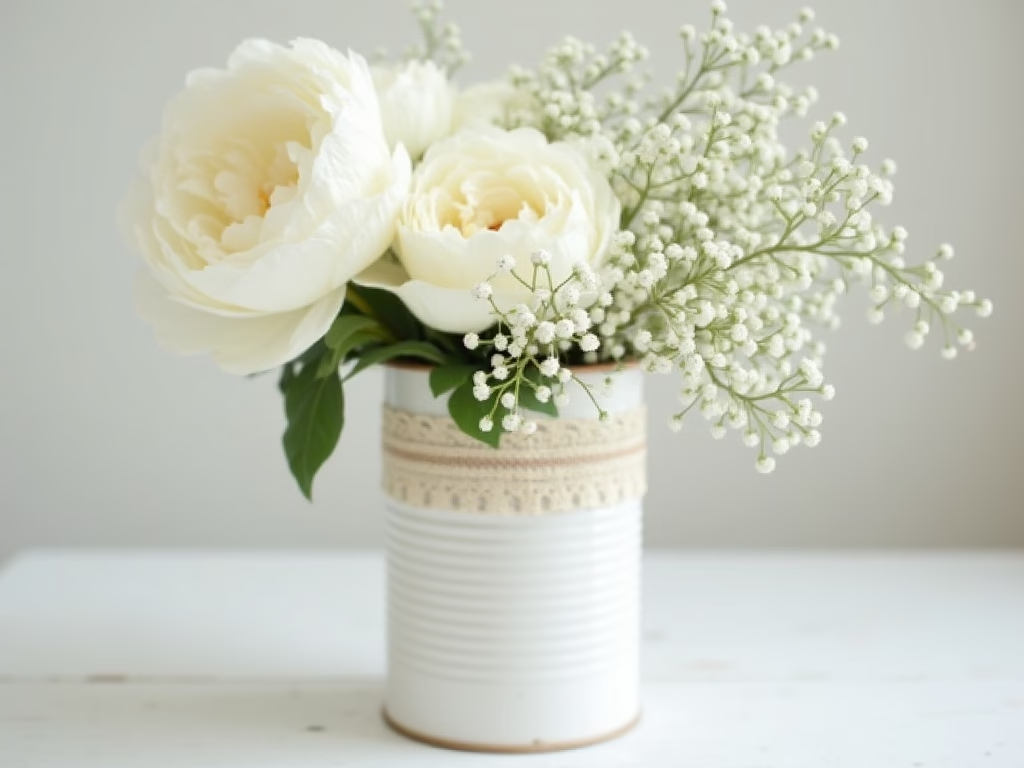
11. Romantic Lace-Trimmed Vases
Sometimes you want something soft and sweet. Tin cans can be very pretty vases for flowers. Paint the can a light pink or cream color. Then, wrap a piece of white lace around it.
The metal keeps the water inside, so it is perfect for real flowers. These look great at a party or on a dinner table. You can make many of them for very little money. They add a nice touch to your home décor without any waste.
12. Hanging Tea Light Chandelier
For a big statement, try a hanging light. You can tie several cans to a large hoop. Use different lengths of string so they hang at different heights. This creates a beautiful look for an outdoor space.
Put a little sand in each can so the candle stays still. When you light them at night, it looks like magic. It is a wonderful way to light up a garden path or a patio. This project shows how simple home decor ideas can be very bold.
Conclusion
Trying these home decor ideas is a joy. You learn to make something from nothing. Every can you save is a win for the world. You are making your home look better while you help the environment. This is what green living is all about.
You do not need to spend a lot to have a nice house. Upcycling is a path to a more creative life. It is fun to see what you can build with your own hands. Start with one can today. See where your mind takes you. Your home will feel more like you because you made the décor yourself.
This article provides a deep dive into Zero Waste Gift Ideas that anyone can create at home using repurposed materials. By focusing on the act of making, we can reduce the demand for new plastic products and celebrate with a smaller footprint. These Zero Waste Gift Ideas highlight the beauty of upcycling and the value of handmade craftsmanship. We explore how to turn everyday items into high-quality treasures that friends and family will cherish for years.
Crafting Magic with Zero Waste Gift Ideas
Most people think of shopping when they hear the word “gift.” But the best gifts often come from what we already have. Creating gifts from scratch is the heart of a green lifestyle. It turns “trash” into something special. This practice is called upcycling. It means you take an old item and make it better. By using Zero Waste Gift Ideas that focus on making, you save money and help the earth.
Below are ten ways you can create amazing presents. You do not need to buy anything new. You just need a little time and a lot of heart.
1. Infused Culinary Oils from Scratch
You can make a luxury kitchen gift using glass bottles you already have in your pantry. Instead of buying a new gift set, create an infusion.
The Process: Clean out an old oil or vinegar bottle. Sterilize it in hot water. Add sprigs of dried rosemary or chili flakes from your garden. Fill it with olive oil and let it sit.
The Result: A gourmet oil that looks beautiful on a counter and tastes great.
2. Personalized “Memory” Quilts
If you have old clothes that are too worn to donate, do not throw them away. You can create a memory quilt. This is one of the most sentimental Zero Waste Gift Ideas.
The Process: Cut squares from old cotton t-shirts or flannel shirts. Sew them together into a patchwork pattern.
The Result: A cozy blanket that tells a story of past adventures and favorite outfits.
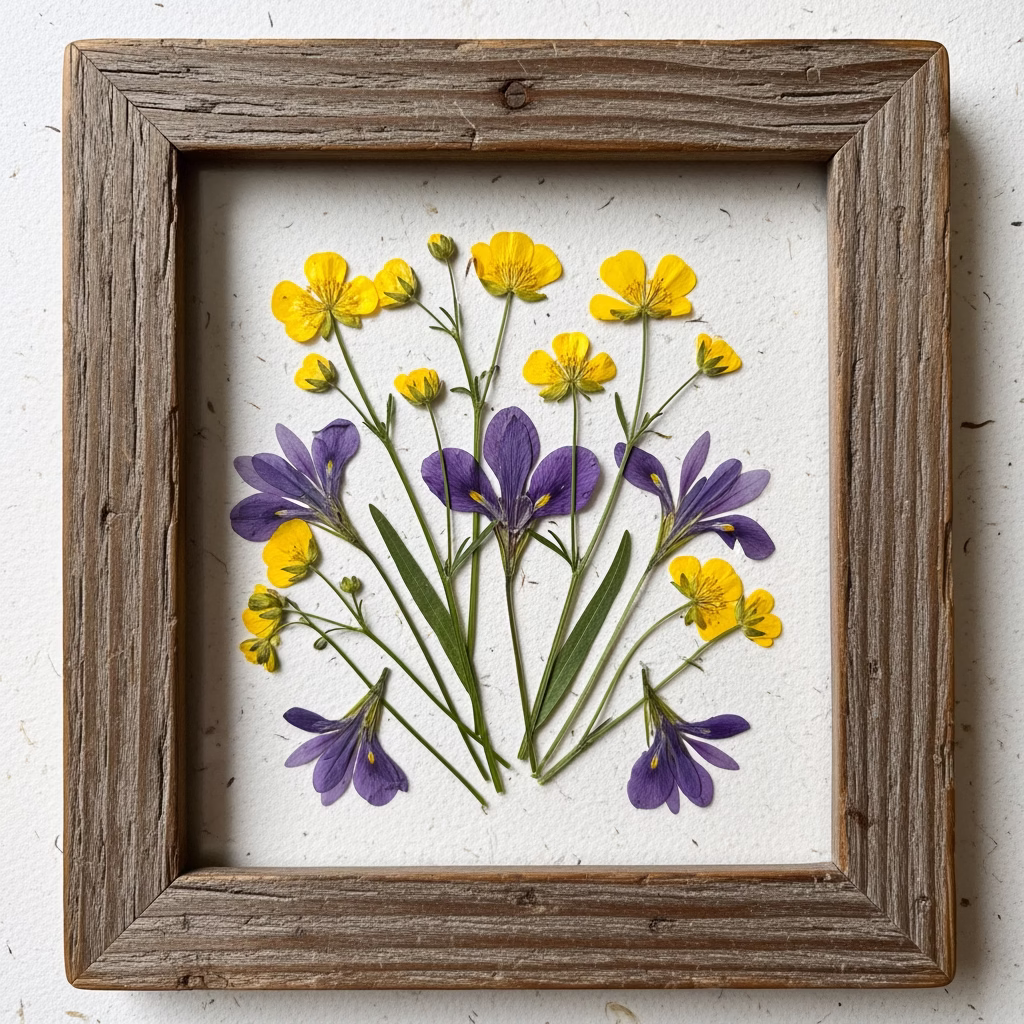
3. Homemade Pressed Flower Art
Nature provides the best materials for art. You can create stunning wall decor using just a heavy book and some wildflowers or garden weeds.
The Process: Pick a few pretty flowers. Place them between pages of a heavy book for two weeks. Once flat, arrange them on a piece of reclaimed cardboard or an old picture frame.
The Result: A delicate piece of botanical art that brings the outdoors inside.
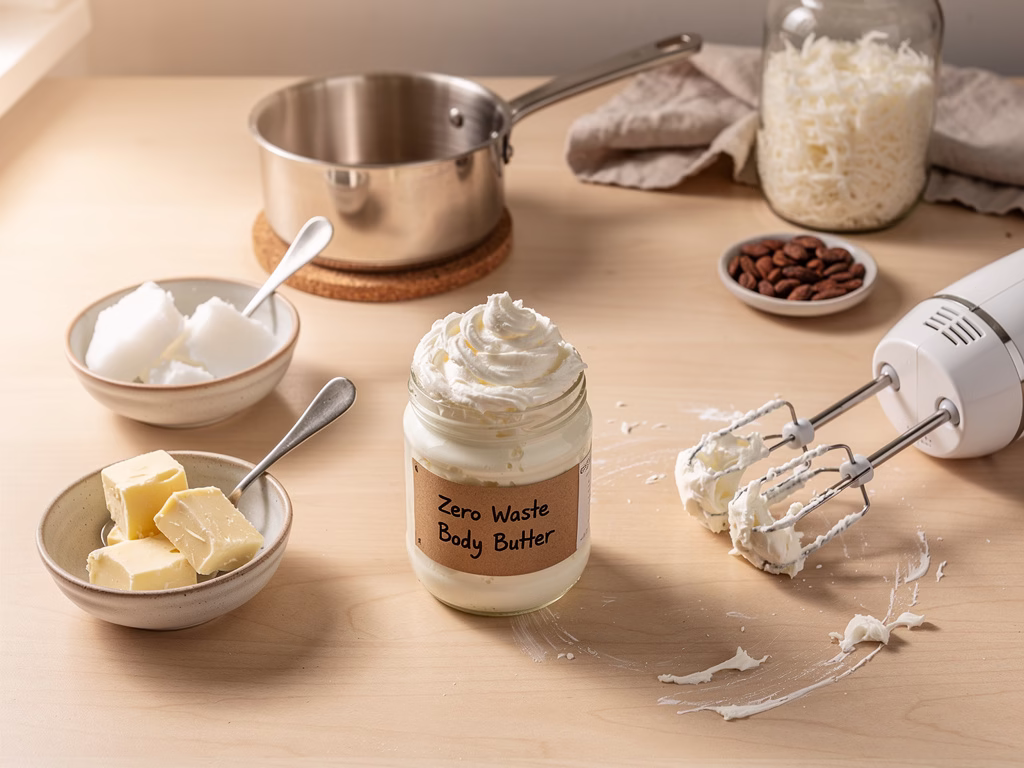
4. Zero Waste Body Butters
Many people spend a lot of money on skin cream. You can create a natural version at home using bulk ingredients or leftovers from your kitchen.
The Process: Melt down coconut oil and cocoa butter. Whip it with a hand mixer until it looks like frosting. Put it into a clean, small glass jar from your recycling bin.
The Result: A rich, fluffy lotion that contains no chemicals or plastic packaging.
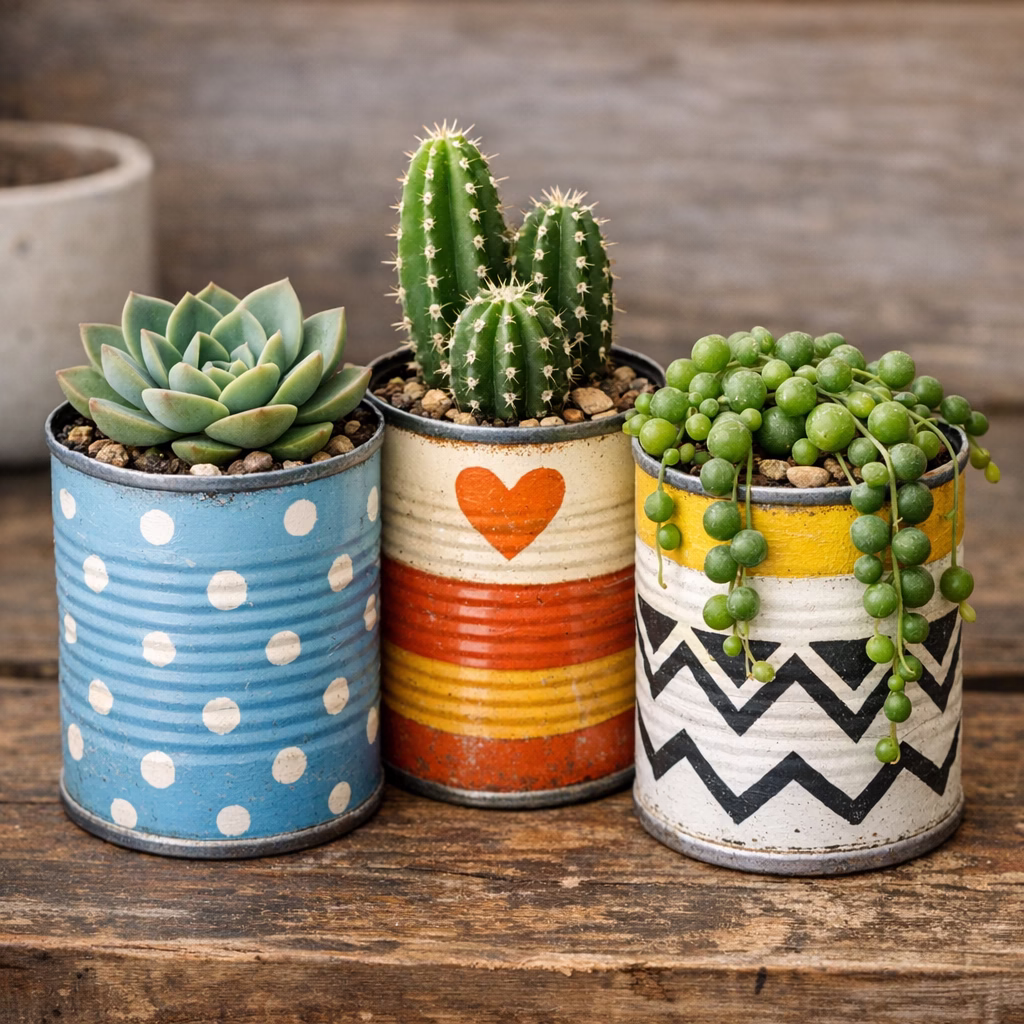
5. Upcycled Planters
Instead of buying a new pot for a plant, look in your recycling bin. You can create a trendy home for a succulent out of almost anything.
The Process: Take an old tin can or a thick glass jar. Clean it well. You can paint it with leftover house paint or wrap it in twine made from old fabric scraps.
The Result: A modern, chic planter that keeps metal and glass out of the landfill.
6. Hand-Poured Soy Candles
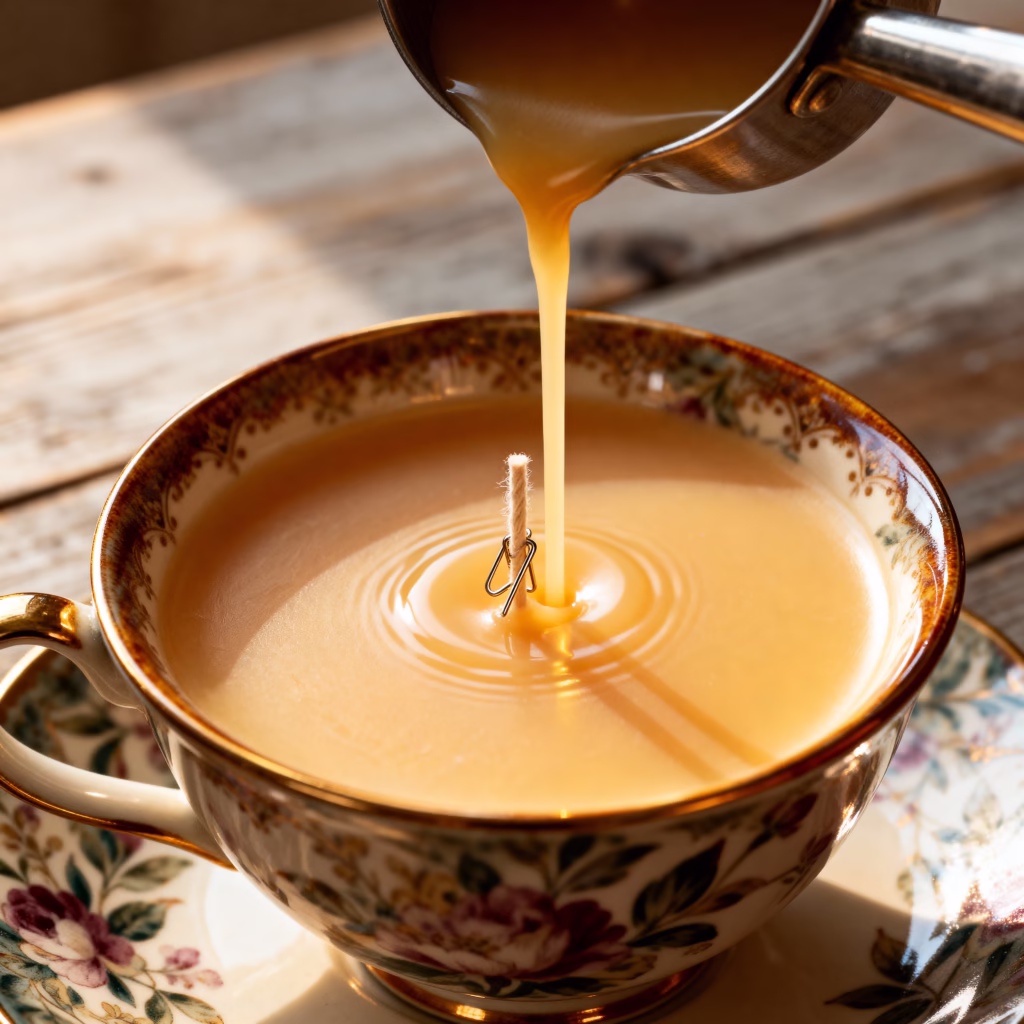
If you have old candles that have burned down to the bottom, you can save the wax. Creating a “new” candle from “old” wax is a classic zero waste move.
The Process: Melt the ends of old candles in a double boiler. Pour the liquid wax into a clean glass jar or a vintage teacup. Add a new cotton wick.
The Result: A custom candle that smells great and uses up every last bit of wax.
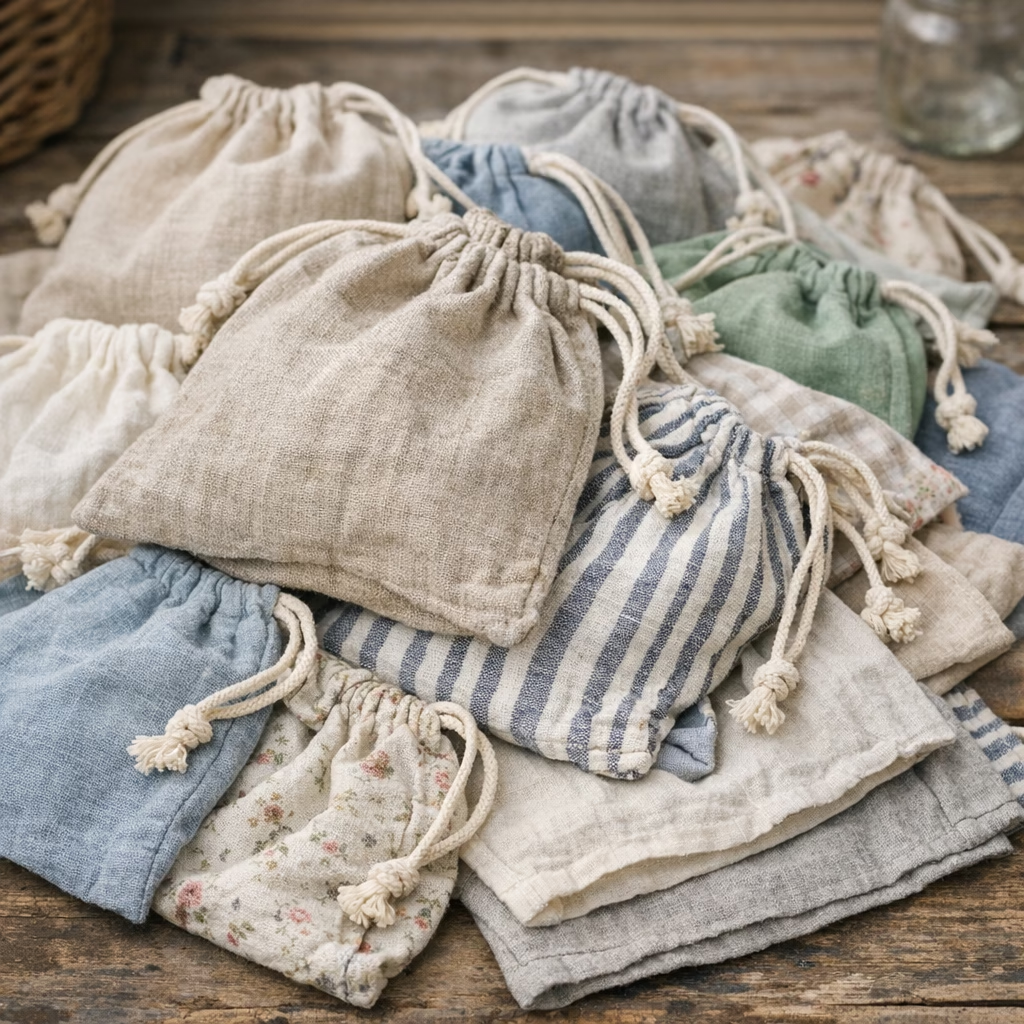
7. Fabric Scrap Produce Bags
For those who know how to sew even a little bit, this is a great project. You can create reusable bags for the grocery store using old curtains or thin bed sheets.
The Process: Cut the fabric into rectangles. Sew the sides and leave a small opening at the top for a drawstring. Use an old shoelace for the tie.
The Result: A set of bags that helps the recipient stop using plastic produce bags forever.
8. Gourmet Seasoning Blends
If you grow herbs in your yard, you can create custom spice mixes. This is a great way to use up the “end of season” harvest.
The Process: Dry out your herbs like basil, oregano, and thyme. Grind them up and mix them with sea salt. Store the mix in small spice jars you have saved.
The Result: A “House Seasoning” that adds a personal touch to any meal.
9. Upcycled Notebooks
Do you have old notebooks with only a few pages used? You can create a brand-new journal by combining the clean pages.
The Process: Pull the blank pages out of several old notebooks. Stack them up. Use a needle and thread to bind them together. Use a piece of an old cereal box or a heavy paper bag for the cover.
The Result: A rustic, handmade journal for sketching or writing.
10. Natural Room Sprays
You can create a fresh-smelling home without buying aerosols in metal cans. Use citrus peels and water to make a natural spray.
The Process: Put orange or lemon peels in a jar of white vinegar for two weeks. Strain the liquid and mix it with water in a glass spray bottle.
The Result: A cleaning spray or room freshener that smells like a summer day and uses food scraps.
Conclusion: The Power of Making
These Zero Waste Gift Ideas prove that you do not need a big budget to be a great friend. When you create a gift with your own hands, you give a part of your time. You also save an item from being wasted. This makes the gift much more valuable than something bought from a store.
The next time you want to celebrate, look around your home first. What can you change? What can you make? The world is full of materials waiting for a second life. By choosing to create, you choose a greener future.
Hosting a party is much easier when you serve Large Batch Mocktails to your guests. These drinks help you save time so you can focus on your friends and family. Every recipe in this guide is healthy and uses zero-waste methods to help the planet. These Large Batch Mocktails are the best choice for anyone who wants a fresh and fun holiday drink option.
Why You Should Serve Healthy Large Batch Mocktails This Year
The holiday season is a busy time for everyone. We often spend a lot of money and create a lot of trash during these weeks. One way to change this is by looking at what we drink. Many people are now looking for drinks that do not have alcohol. They want to feel good the next day and stay healthy. This is where Large Batch Mocktails come in to save the day. Making one big jar of a drink is much better than making one glass at a time. It lets the host enjoy the party too.
These drinks are not just juice in a glass. They use fresh herbs, spices, and real fruit. We also focus on being zero-waste. This means we use the whole fruit. We use the peels, the juice, and even the stems of herbs. This adds more flavor to your Large Batch Mocktails. It also means you have less to throw away at the end of the night. Using less sugar and more natural items makes these drinks better for your body. You can enjoy the festive spirit and still feel light and energetic.
In this guide, you will find ten great recipes. They are easy to make in large amounts. They use simple tools like big pitchers or slow cookers. Most of these ingredients can be found at any local store. By the end of this article, you will be ready to host the best holiday party of the year. Your guests will love the care you put into these healthy options.
1. Sparkling Pomegranate and Rosemary Punch
Pomegranate is a great fruit for the winter. It has a bright red color that looks like Christmas. It is also very good for your heart. This punch is very easy to make for a big group. The rosemary gives it a nice smell that reminds people of holiday trees.
Ingredients (Makes 12 drinks):
4 cups of pomegranate juice (look for the kind with no added sugar)
1 cup of fresh orange juice
Half a cup of maple syrup
5 long branches of fresh rosemary
1 large bottle of cold sparkling water
1 cup of pomegranate seeds
How to make it:
Get a large pitcher. Pour in the pomegranate juice and the orange juice. Add the maple syrup and stir it well. Put the rosemary branches into the liquid. Put the pitcher in the fridge for three hours. The rosemary flavor will slowly move into the juice. When your guests arrive, pour the juice into a big bowl. Add the sparkling water and the seeds.
Zero-Waste Tip:
When you are done with the orange juice, do not toss the skins. You can cut them into small bits. Put them in a jar with some salt to make a cleaning scrub for your kitchen. Or, you can dry them in the sun to use as fire starters for your fireplace.
2. Warm Apple and Spice Cider
This drink will make your whole house smell amazing. It is a warm drink that is perfect for a cold night. Using real spices instead of flavored syrups makes it much healthier.
Ingredients (Makes 10 drinks):
8 cups of organic apple juice
3 cinnamon sticks
6 whole cloves
2 pieces of star anise
1 thumb of fresh ginger, sliced thin
The peel from one orange
How to make it:
Put all the items into a large pot. Put the stove on low heat. Let the liquid get warm but do not let it boil fast. Let it sit on the heat for one hour. The spices will make the juice taste very deep and rich. Serve it in warm mugs.
Zero-Waste Tip:
After you drink the cider, the fruit and spices are still full of scent. You can put them back in a pot with fresh water and simmer them on the stove. This acts as a natural air freshener for your home. You do not need to buy chemical sprays.
3. Fresh Cucumber and Mint Cooler
Sometimes holiday food is very heavy and salty. A fresh green drink can help your stomach feel better. This cooler is very light and crisp. It is a great way to use the whole cucumber.
Ingredients (Makes 10 drinks):
3 large cucumbers
1 big bunch of fresh mint
Half a cup of lime juice
3 spoons of honey
1 liter of soda water
How to make it:
Take two cucumbers and blend them. Strain the juice into a large jar. Slice the last cucumber into thin rounds. Take the mint leaves and press them with a spoon in a bowl to get the oils out. Add the mint and lime juice to the cucumber juice. Add the honey and stir. Before serving, add the soda water and the cucumber slices.
Zero-Waste Tip:
When you strain the cucumber juice, you will have a lot of green pulp left. Do not throw this away. You can mix it into a bowl of plain yogurt with a little garlic. This makes a healthy dip for your party snacks.
4. Red Hibiscus and Orange Tea
Hibiscus tea is a beautiful dark red color. It is very tart, almost like a cranberry. It is full of things that help your body stay strong during flu season.
Ingredients (Makes 12 drinks):
Half a cup of dried hibiscus flowers
8 cups of water
The rinds of two lemons
The rinds of two oranges
Half a cup of honey
Fresh mint for the top
How to make it:
Boil the water in a big pot. Turn off the heat and add the flowers and the fruit rinds. Let it sit for twenty minutes. The water will turn a dark red. Strain the liquid into a pitcher. Add the honey while it is still a little warm so it melts. Let it get very cold in the fridge.
Zero-Waste Tip:
The fruit rinds can be used again. After you strain the tea, you can chop the rinds. Mix them with a little sugar and bake them on a low heat. They turn into a chewy candy that guests can eat.
5. Blackberry and Vinegar Shrub
A shrub is an old-fashioned way to make a drink. It uses vinegar to give a sharp taste. This is great for people who miss the bite of alcohol. It is also very good for your gut health.
Ingredients (Makes 8 drinks):
2 cups of blackberries (fresh or frozen)
1 cup of apple cider vinegar
A spoon of balsamic vinegar
1 cup of honey
Cold bubbly water
How to make it:
Put the berries and honey in a jar. Use a spoon to mash the berries. Let this sit in your fridge for a whole day. Then, add the two types of vinegar. Let it sit for one more day. Strain the liquid into a bottle. To serve, put two spoons of this syrup in a glass and fill the rest with bubbly water.
Zero-Waste Tip:
The mashed berries that you strain out are still very tasty. You can stir them into your morning oatmeal. You can also put them on top of a piece of toast with nut butter.
6. Pineapple Skin Tepache
This is the ultimate zero-waste drink. It is made from the parts of the pineapple that most people throw in the trash. It creates a natural fizz that is very refreshing.
Ingredients (Makes 10 drinks):
The skin and the core of one organic pineapple
8 cups of water
1 cup of brown sugar
1 cinnamon stick
2 cloves
How to make it:
Wash the outside of the pineapple very well. Peel the skin and cut the core into chunks. Put the skins, core, sugar, and spices into a large glass jar. Fill it with water. Cover the top with a clean cloth. Let it sit on your counter for two or three days. You will see small bubbles. This means it is working. Strain the liquid and put it in the fridge.
Zero-Waste Tip:
Since this drink uses the “trash” of the fruit, you are already being a hero for the earth. When you are done with the skins after the two days, they can finally go into your compost bin.
7. Pear and Thyme Winter Spritz
Pears are a soft and sweet fruit that many people forget about. When you mix them with thyme, they taste very fancy. This is a very elegant drink for a holiday dinner.
Ingredients (Makes 10 drinks):
5 ripe pears
Half a cup of lemon juice
8 sprigs of fresh thyme
3 spoons of maple syrup
1 liter of sparkling water
How to make it:
Blend the pears until they are like a smooth juice. Strain this into a pitcher. Add the lemon juice and maple syrup. Put the thyme sprigs inside and press them a little with a spoon. Let the flavors mix in the fridge for two hours. Add the sparkling water just before you serve it to your guests.
Zero-Waste Tip:
If your pears are very soft or have brown spots, they are perfect for this juice. You do not need “perfect” looking fruit to make a great drink. This helps reduce food waste in your home.
8. Blood Orange Brunch Mock-mosa
Blood oranges are only in stores for a short time. They have a deep red color inside that looks like a sunset. This is a healthy take on a classic brunch drink.
Ingredients (Makes 12 drinks):
5 cups of blood orange juice
1 spoon of vanilla extract
The zest of one orange
2 bottles of non-alcoholic sparkling cider or wine
How to make it:
Mix the juice, vanilla, and zest in a large jug. Keep it very cold. When it is time for brunch, fill half of a glass with the juice mix. Fill the other half with the cold sparkling cider. It looks beautiful and tastes like a dream.
Zero-Waste Tip:
Always zest your oranges before you juice them. You can freeze the zest in an ice cube tray with a little water. These “zest cubes” are great to drop into a glass of plain water later in the week.
9. Cranberry and Sage Holiday Punch
Cranberries are very tart. Sage is an herb that people usually use for cooking meat. When you put them together, you get a drink that is not too sweet. It feels very sophisticated.
Ingredients (Makes 10 drinks):
3 cups of cranberry juice (not the cocktail kind)
1 cup of orange juice
10 fresh sage leaves
2 spoons of honey
1 liter of soda water
How to make it:
Put the sage and honey in a pitcher and mash them gently. Add the cranberry and orange juices. Let this stay in the fridge for a few hours. When you are ready, add the soda water. You can drop in some whole frozen cranberries to keep it cold.
Zero-Waste Tip:
Buy a whole sage plant in a small pot instead of buying leaves in a plastic box. This way, you can keep the plant growing on your windowsill all winter. You will have fresh herbs whenever you need them.
10. Golden Ginger and Turmeric Punch
This drink is like a hug in a glass. It is bright yellow and very spicy. It helps your body fight off colds and makes your stomach feel good after a big meal.
Ingredients (Makes 8 drinks):
4 cups of pineapple juice
2 cups of orange juice
1 large piece of ginger, grated
1 spoon of turmeric powder
A tiny pinch of black pepper
1 liter of sparkling water
How to make it:
Mix the juices with the ginger, turmeric, and pepper. The pepper helps your body use the turmeric better. Let it sit for thirty minutes and then strain it. Pour it into a pitcher. Add the sparkling water and stir gently.
Zero-Waste Tip:
Take the ginger and turmeric pulp from your strainer. Put it in a small jar with honey. You can use a spoonful of this “honey paste” in a cup of hot water the next morning for a healthy tea.
How To Set Up Your Large Batch Mocktails Bar
When you host a party, you want to make things easy for yourself. Setting up a dedicated area for your Large Batch Mocktails is a great idea. You can use a kitchen counter or a small side table. Put out all the glasses and a bucket of ice. This lets people help themselves.
One secret to great Large Batch Mocktails is the ice. Do not use tiny cubes that melt fast. Instead, use big pieces of ice. You can freeze water in a muffin tin to make large round pucks. These will stay solid much longer. This keeps your drink from getting watery and losing its flavor.
Another tip is to keep the bubbles fresh. If a recipe calls for sparkling water, do not add it to the big jar until the last minute. Or, you can leave the bottles of sparkling water on the table. Guests can add the fizz to their own glass. This way, the last glass of the night is just as bubbly as the first one.
Making Your Party Sustainable
Being a good host also means thinking about the earth. You can make your Large Batch Mocktails bar very eco-friendly. Use real glass instead of plastic. If you need straws, look for metal or paper ones. You can also use things from nature to decorate your bar. Instead of plastic glitter, use pine cones, cinnamon sticks, and fresh fruit.
When the party is over, look at what is left. Most of the items in these recipes can go into a compost bin. This closes the loop and ensures that your holiday celebration does not leave a big mark on the planet.
Conclusion
Making Large Batch Mocktails is a smart and kind way to host a holiday party. It shows that you care about the health of your friends. It also shows that you care about the health of our world. These ten recipes are full of flavor and use the best ingredients from nature. You do not need alcohol to have a festive and fun time.
Whether you choose the spicy ginger punch or the cool cucumber drink, your guests will be impressed. You will have more time to talk and laugh, and less time spent mixing drinks. This is the true spirit of the holidays.
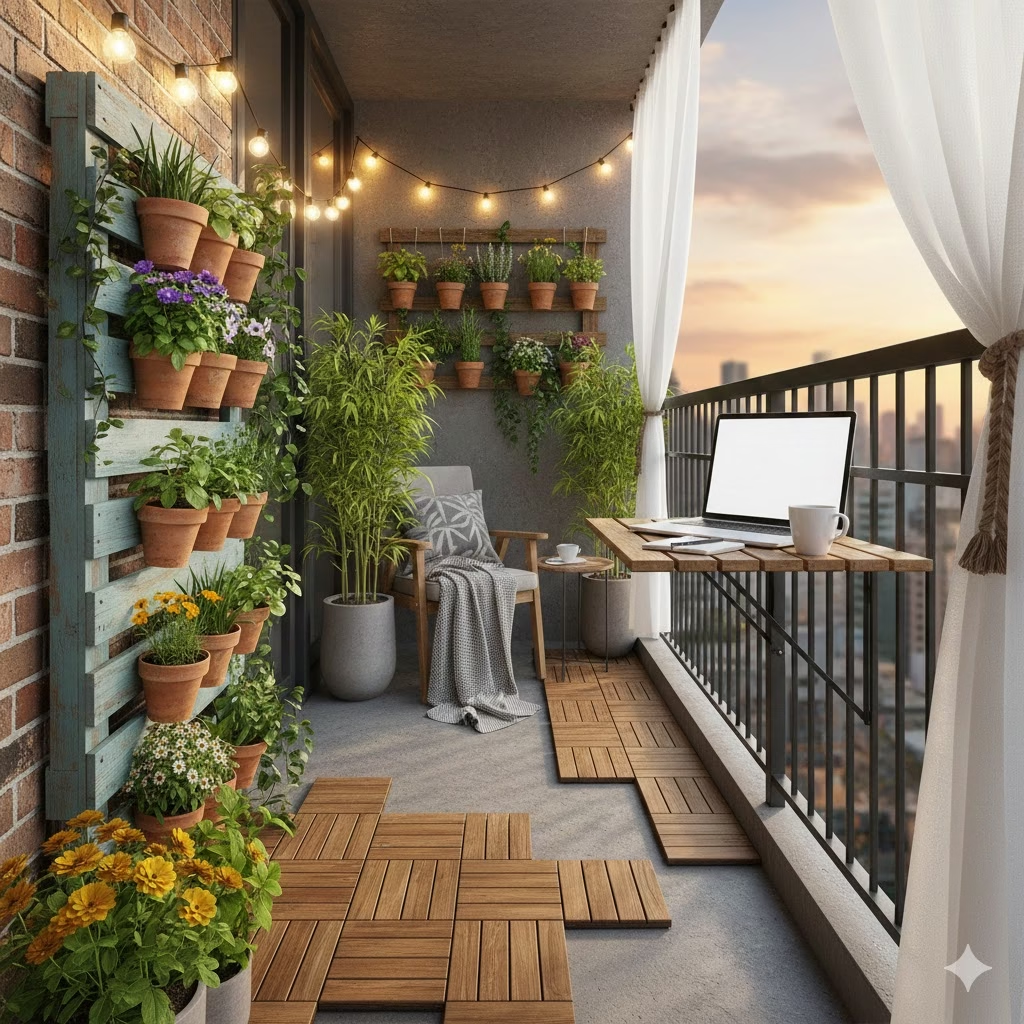
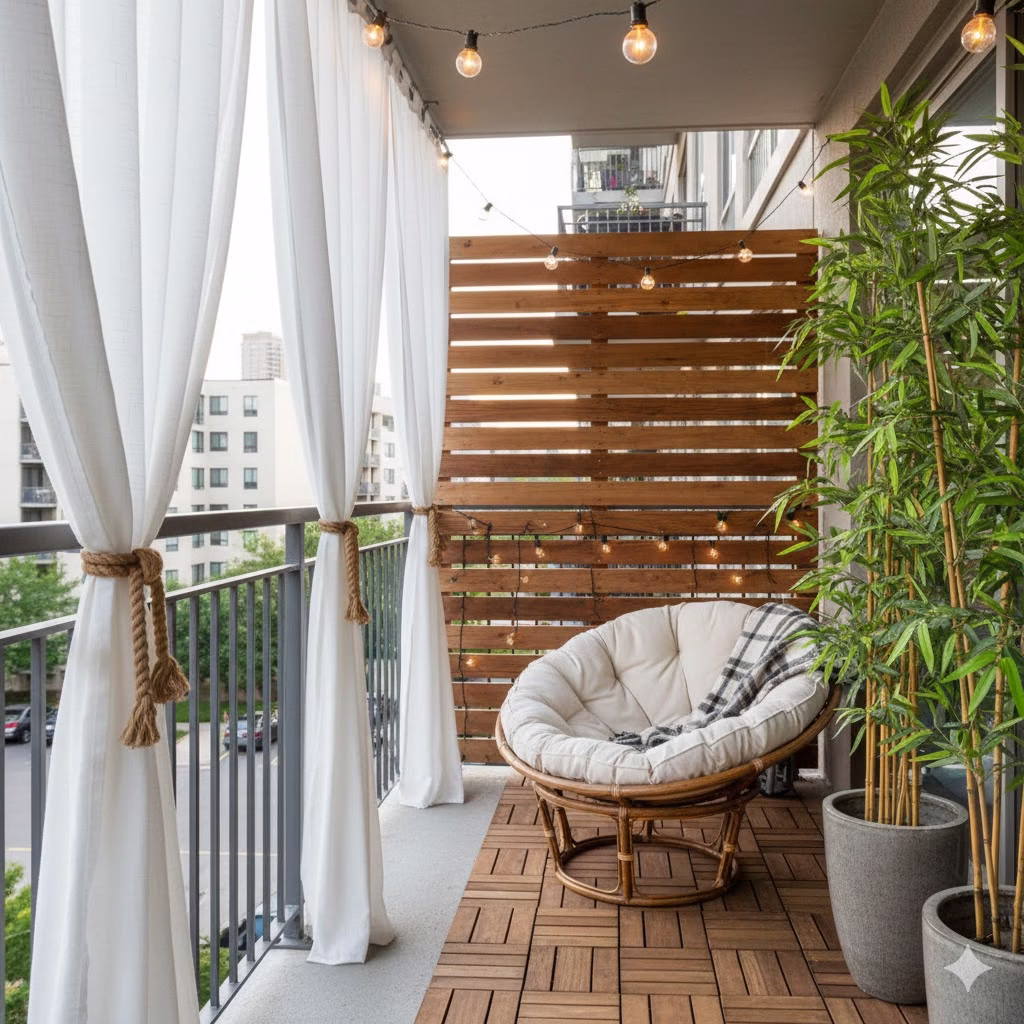
Lighting is the secret ingredient that turns a cold, concrete slab into a cozy sanctuary. Many renters feel stuck with a single, harsh overhead light—or no light at all. However, you do not need an electrician or a massive budget to create a high-end look. By using smart, wire-free solutions, you can transform your small apartment balcony into the most inviting room in your home. A dreamy nighttime oasis is within reach for anyone, regardless of the size of their outdoor space.
Why Lighting Matters for Small Balcony Ideas
Good lighting does more than just help you see in the dark. In a small space, it defines the boundaries and makes the area feel larger. When you use soft, warm light, the walls seem to recede. The focus shifts to the textures of your plants and furniture rather than the limitations of the space. This guide focuses on renter-friendly balcony ideas that require zero drilling and zero permanent changes. Creating a dreamy nighttime oasis is about more than just visibility; it is about creating a feeling of peace.
1. Create Depth with Three Layers of Light
To get that stylish look, avoid using just one light source. Instead, think in layers. Professional designers use three specific types of light to make a small apartment balcony feel complete.
The Ambient Layer
This is your base layer of light. Solar-powered string lights are the best choice here. Draping them across the ceiling or along the railing provides a soft glow that covers the whole space. It sets the mood for the entire area and acts as the foundation for your dreamy nighttime oasis.
The Task Layer
This light serves a specific purpose. If you have a small folding table for working or dining, place a cordless LED lamp there. This allows you to focus on a specific activity without straining your eyes. It makes the space functional for hobbies, reading, or late-night snacks.
The Accent Layer
Use this to highlight your favorite features. If you have a vertical garden or a large potted plant, place a small battery-powered spotlight at the base. Aiming the light upward creates dramatic shadows. It adds a sense of luxury and makes the plants look like living art in your dreamy nighttime oasis.
2. Choosing the Best Solar String Lights
Solar lights are perfect for balconies because they cost nothing to run. They charge during the day and turn on automatically at night. This is a very sustainable way to enjoy your outdoor area while keeping your utility bills low.
Look for Warm White Bulbs
Avoid “cool white” or blue-tinted LEDs. These can feel very clinical and cold, like a hospital hallway. Instead, look for warm white bulbs. These mimic the cozy glow of a candle or a sunset. They make the space feel much more welcoming and are essential for a dreamy nighttime oasis.
Check the Weather Rating
Ensure your lights are rated for outdoor use. Look for an IP44 rating or higher. This means they can handle rain, wind, and humidity. High-quality outdoor lights will last much longer through the seasons, saving you money in the long run.
Panel Placement is Key
If your balcony has a roof, the solar panel might not get enough sun. Look for sets where the solar panel is on a long wire. This lets you clip the panel to the very top of the railing. There, it can soak up the most rays during the day, ensuring your lights stay bright all night.
3. Use Lanterns for Portable Charm
Lanterns are one of the most versatile small balcony ideas. They are easy to move around and add a decorative touch even during the day. They come in many styles, from modern metal to classic wood.
Floor Lanterns
Place large lanterns directly on your interlocking deck tiles. This draws the eye downward and makes the floor space feel like a true part of the living area. Grouping them in different sizes—one large, one medium—creates a more professional look.
Flameless Candles
Real candles can be a fire hazard in tight spaces. Modern LED candles look incredibly realistic. Many even come with a flicker effect that mimics a real flame. They provide the same cozy vibe without any of the risk, making them perfect for a dreamy nighttime oasis.
Timer Functions
Choose battery-operated candles with built-in timers. You can set them to turn on for six hours every night at the same time. This way, you always come home to a glowing balcony without having to remember to flip a switch.
4. Renter Friendly Installation Tips
You do not need to damage your walls to hang beautiful lights. There are several clever ways to secure your fixtures without losing your security deposit. These methods are fast, easy, and leave no trace behind.
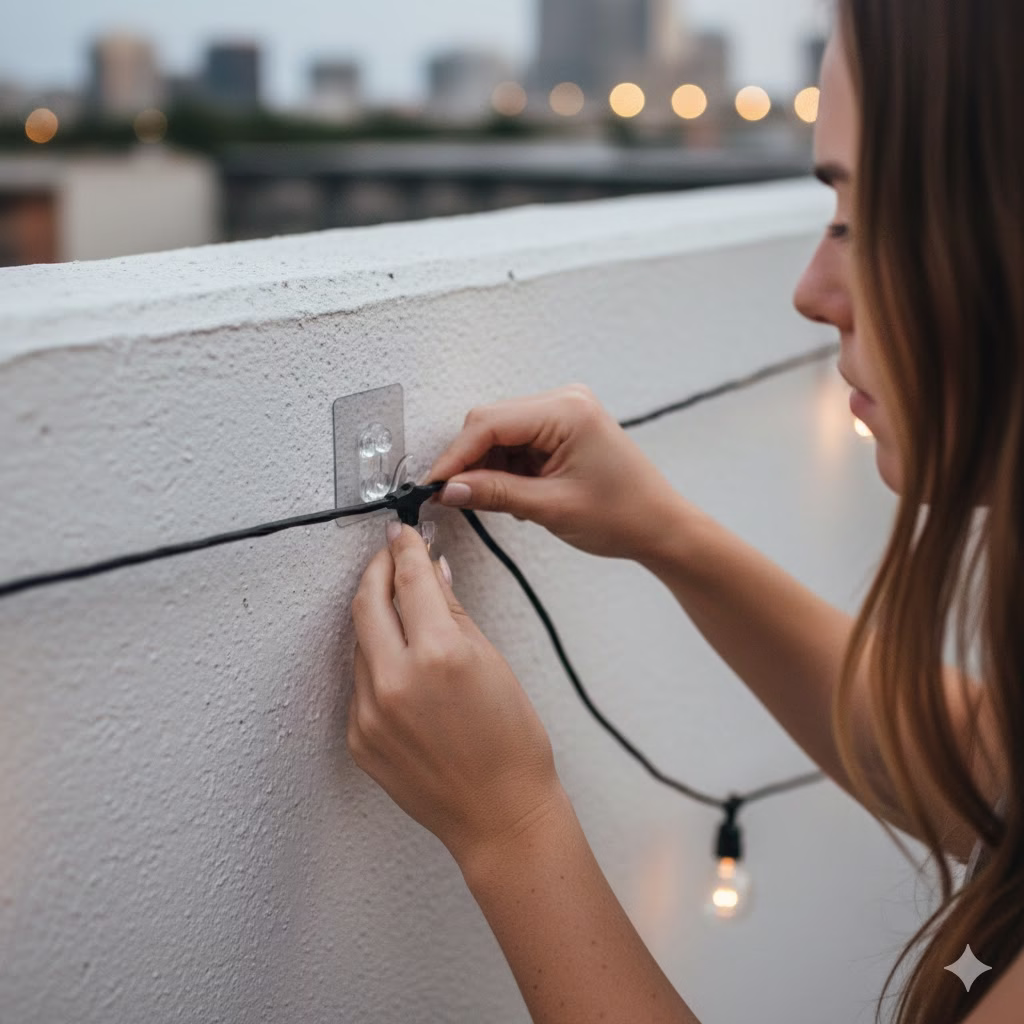
Outdoor Adhesive Hooks
Many brands make hooks specifically for outdoor use. They hold up well in heat and cold. They pull away cleanly when you move out. This is the best way to hang string lights on smooth walls or glass doors.
Zip Ties
These are a renter’s best friend. Use clear or black zip ties to attach string lights to your balcony railing. They are strong and very cheap. You can snip them off in seconds when you are ready to change your layout.
Suction Cups
If your balcony is enclosed by glass, heavy-duty suction cups are great. They can hold light strands or small lanterns without any hardware. They are perfect for people who have glass railings or large windows overlooking their dreamy nighttime oasis.
5. Managing Your Light Zones
If you want to take your small apartment balcony to the next level, consider smart bulbs or remotes. This adds a layer of modern comfort to your outdoor retreat.
Remote Controls
Many battery-powered lights now come with a small remote. This allows you to stay on your sofa and dim the lights with one click. You can also change colors or light patterns to suit your mood or the season.
Motion Sensors
For added safety, you can install small battery-operated motion sensor lights near the door. These will light up as soon as you step outside. It makes the transition from inside to outside much smoother and safer.
6. Seasonal Lighting Transitions
As the seasons change, your lighting can change too. This keeps your small apartment balcony feeling fresh and exciting all year long.
Summer Sparkle
In the summer, use fairy lights with tiny bulbs to mimic the look of fireflies. This creates a magical atmosphere for warm summer nights and enhances the dreamy nighttime oasis vibe.
Autumn Warmth
When the weather cools down, add more lanterns with deep orange or gold tones. This reflects the colors of autumn and makes the space feel extra snug and cozy.
Winter Glow
During the winter, keep the lights on longer to fight the early darkness. Using waterproof LED branches in your planters can add a festive touch without being too traditional.
7. The Importance of Color Temperature
When picking lights for your balcony ideas, pay attention to the Kelvin (K) rating on the box. This tells you how “warm” or “cool” the light will be. For a relaxing balcony, stay between 2000K and 3000K. This range provides a golden, soft light that is very soothing to the eyes. Higher numbers, like 5000K, will look like daylight and can be too harsh for a dreamy nighttime oasis.
8. Battery Maintenance and Care
To keep your battery-operated lights working well, you should take care of them properly. If you live in a place with very cold winters, bring the battery packs inside during freezes. Extreme cold can drain batteries very quickly. Also, wipe down your solar panels once a month with a damp cloth. Dust and dirt can block the sun and make your lights dimmer over time.
9. Combining Light and Greenery
Lighting and plants go hand in hand. Use your lights to show off your vertical garden. Wrapping thin wire lights around the stems of sturdy plants makes them glow from within. It creates a lush, jungle-like feeling even in the middle of a busy city. This combination is the key to a truly dreamy nighttime oasis.
10. Solving Common Lighting Problems
Sometimes your lighting plan might run into a few snags. Here is how to fix them quickly:
Lights are too dim: Check if the solar panel is clean or if the batteries need replacing.
String lights are sagging: Use more zip ties or hooks every 12 inches to keep the lines crisp and neat.
The light is too bright: If a lamp is too intense, try wrapping the bulb in a piece of heat-safe frosted film to soften the glow.
Final Thoughts on Balcony Lighting
The right lighting turns your balcony from a storage spot into a nighttime retreat. By layering your light and choosing the right solar or battery options, you create a space that is functional and beautiful. These small balcony ideas are easy to start today. You will love how much more you use your outdoor space once it is properly lit. Your dreamy nighttime oasis is just a few lights away.
References
For more technical advice and product inspiration to help you build your dreamy nighttime oasis, explore these helpful resources:
This guide offers comprehensive solutions for anyone looking to revitalize a small apartment balcony into a functional and stylish retreat. By focusing on space-saving techniques and versatile furniture, these balcony ideas ensure that even the most compact areas reach their full potential. Readers will discover how to blend aesthetics with utility to create a personalized outdoor sanctuary. Utilizing these small balcony ideas can significantly enhance the daily living experience in an urban environment.
10 Genius Ways To Maximize Your Small Apartment Balcony
Living in a big city often means your home is small. You might feel that your small apartment balcony is too tiny to use. Many people use this area to store old boxes or trash. However, even a very small space can become a great spot for you to relax. You can turn a cold concrete floor into a cozy nook. All it takes is a bit of a plan and some fun small balcony ideas.
When you have a small apartment balcony, you must think about how you live. Do you like to drink tea in the sun? Do you want to grow your own food? Once you know what you want, you can pick the right balcony ideas. These tips will help you make your space feel big and bright. You do not need a lot of money to make it look nice. You just need to be smart with the space you have.
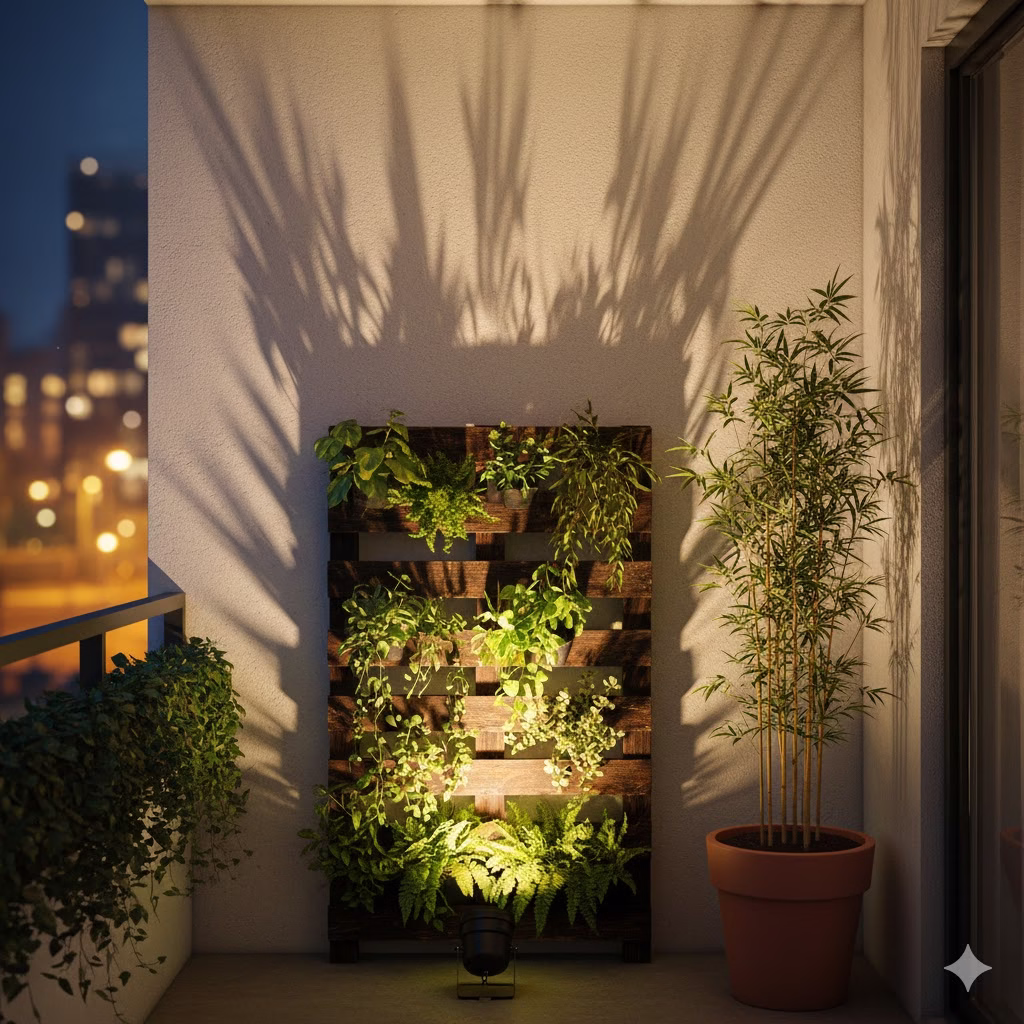
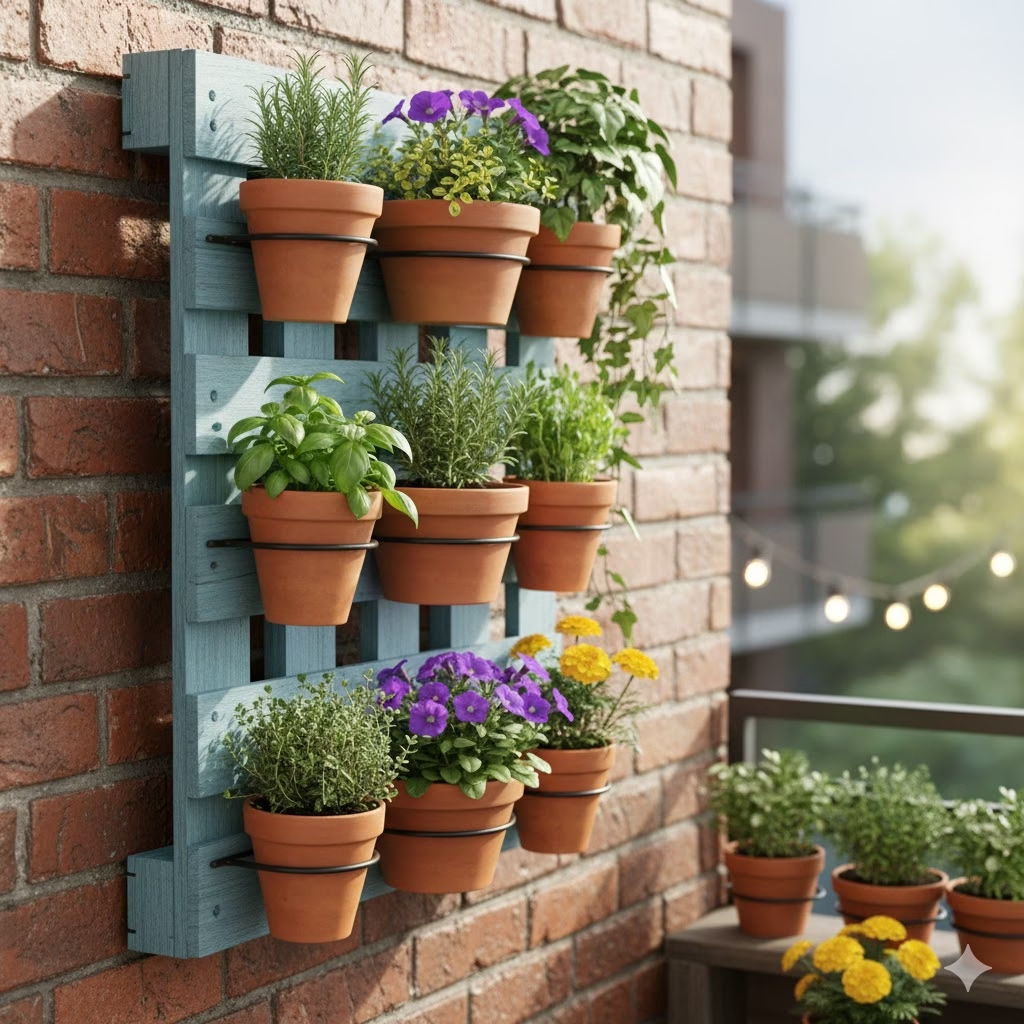
1. Think Vertically with Hanging Gardens
When you do not have much floor space, look at your walls. A small apartment balcony has lots of wall space that people forget to use. Vertical gardening is a smart way to add life to your home. You can hang pots from the ceiling or hook them onto the railing.
Using a trellis is one of the best small balcony ideas. You can grow vines that climb up the wood. This looks beautiful and also gives you some privacy. You can sit outside without everyone seeing you. It feels like a secret garden in the middle of the city. Plants like ivy or jasmine are great for this. They grow fast and smell wonderful.
2. Invest in Multi-Functional Furniture
On a small apartment balcony, every chair and table must do more than one job. You should look for furniture that has a hidden purpose. A bench that opens up is perfect. You can sit on it to read a book, and you can hide your tools inside it. This keeps the area clean and tidy.
Another idea is to use a small stool. It can be a seat when a friend comes over. It can also be a side table for your snacks. When you pick these items, choose thin frames. Thick furniture makes a small space feel crowded. Light wood or thin metal is a better choice. These balcony ideas help keep the area feeling open and airy.
3. The Power of Folding and Hanging Tables
Many people want to eat dinner outside. But a big table will take up the whole small apartment balcony. The best fix for this is a folding table. Some tables can even hang right on the railing. When you are done eating, you just fold it down.
This is a great tip for those who work from home. You can take your laptop outside for a few hours. You get fresh air while you work. Then, you can put the table away to have room for a yoga mat or a lounge chair. It is one of those small balcony ideas that makes a big difference in how you use your home every day.
4. Create Comfort with Weather-Resistant Textiles
A bare floor can look cold and sad. To make your small apartment balcony feel like a real room, you need a rug. An outdoor rug adds color and warmth. If you pick a rug with stripes, it can make the floor look wider. This is a simple trick that designers use all the time.
You should also add soft pillows and a blanket. Make sure the fabric is made for the outdoors so it does not get ruined by rain. Layering these items makes the space very cozy. It makes you want to spend more time outside. These soft touches are key to good balcony ideas. They turn a hard ledge into a soft lounge.
5. Establish Privacy with Style
Privacy is a big worry when you live in a flat. You want to enjoy your small apartment balcony without feeling watched. You can use bamboo screens to block the view. Bamboo is light and easy to move. It also gives your balcony a tropical look.
Another choice is to use outdoor curtains. You can pull them shut when you want to be alone. Curtains move in the wind and look very elegant. If you like plants, you can use tall grass in pots. This creates a green fence that looks very natural. These small balcony ideas help you feel safe and relaxed in your own space.
6. Layered Lighting for Ambiance
Light is very important for the mood of your small apartment balcony. Do not use the bright light that comes with the building. It is often too strong and not very pretty. Instead, use several small lights. String lights are a favorite for many people. You can wrap them around the railing.
Solar lanterns are also a smart pick. They charge in the sun all day and glow at night. You do not need to plug them in. This is great if you do not have an outlet outside. LED candles are safe too. They look like real candles but the wind will not blow them out. These balcony ideas make your night much more magical.
7. Incorporate a “Living” Floor
If your floor is ugly, you can cover it up easily. Interlocking deck tiles are perfect for a small apartment balcony. These tiles are like puzzle pieces. You just snap them together. You do not need any glue or tools. This is very good for people who rent their homes.
You can choose tiles that look like wood or stone. You can even get tiles that look like green grass. Faux grass is one of the fun small balcony ideas for kids or pets. It feels soft on your feet and stays green all year. It makes your balcony feel like a tiny backyard in the sky.
8. Use Mirrors to Create Depth
You might think mirrors only belong inside. But they are great for a small apartment balcony too. A mirror reflects the sky and the trees. This makes your balcony look like it goes on forever. It is a great way to make a tiny spot feel much larger.
Make sure you buy a mirror that is okay for the outdoors. Hang it on a wall where it can catch the light. When you look at it, you will see your plants reflected back at you. It is a simple way to add style. This is one of the most unique balcony ideas for urban living.
9. A Dedicated Herb Garden
You can grow your own food on a small apartment balcony. An herb garden is the best way to start. Herbs do not need a lot of room. You can grow them in small pots on a shelf or on the railing. Basil, mint, and parsley are easy to grow.
Having fresh herbs makes your cooking better. It also makes your balcony smell great. Every time you walk outside, you will smell the fresh mint or rosemary. This makes the space feel alive and useful. It is one of those small balcony ideas that is both pretty and practical.
10. Keep the Color Palette Cohesive
If you use too many colors, a small space can look messy. To keep your small apartment balcony looking neat, pick a few colors and stick to them. Using light colors like white or tan can make the space feel bigger. Light colors reflect the sun and keep the area bright.
You can add a pop of color with your flowers or a bright pillow. Maybe you like blue or yellow. Just use a little bit of it so it does not feel like too much. A clean look is very calming. When everything matches, your balcony ideas come together perfectly. It creates a space where you can truly rest.
Conclusion
Making the most of a small apartment balcony is a fun project. You do not need a huge deck to enjoy the fresh air. By using these small balcony ideas, you can turn any tiny space into a dream. Focus on using your walls and picking smart furniture. Add some lights and some plants to make it feel like home.
Your balcony is a part of your home that should bring you joy. Whether you are drinking coffee in the morning or watching the stars at night, it should be a place you love. Use these tips to start your makeover today. You will be very happy with your new outdoor retreat.
This blog helps you create beautiful, functional, and organized living spaces. We believe every inch of your home holds potential, especially those spots you often overlook. From clever storage hacks to beautiful decor solutions, our goal is simple: to inspire and guide you. Read our latest piece. We explore the powerful transformation of shelves above toilet designs. See how they can immediately make your bathroom look better and work harder.
Introduction: Elevate Your Bathroom with Smart Shelves Above Toilet Solutions
The bathroom is often the smallest room in the house. It poses a tough question: How do you fit great storage and style into a tiny space? Look at the blank wall above your toilet. If you have ever wondered what to do with it, you are not alone. This vertical space is a secret gem. It’s perfect for both practical use and beautiful style. Say goodbye to clutter and mess. It is time to turn this forgotten wall into a key design feature and a neat place to store things.
We are giving you a detailed guide. It will show you 10 stunning shelves above toilet ideas. These ideas will not only fix your storage problems but also make your entire bathroom look better. We are going beyond just basic function. Lets explore creative fixes that fit perfectly with your current decor, no matter your personal style. We have ideas for everyone. This includes sleek, modern designs and warm, rustic charm. Get ready to use your bathroom’s full potential. Discover how the right shelving choice can make a huge difference right away.
The Power of Vertical Storage: Why Shelves Above Toilet Are a Game-Changer
Floor space is valuable in any bathroom, especially small ones. Using the space that goes up the wall is vital. It keeps things tidy and easy to reach. It does this without losing any floor space. The wall area right over your toilet is the perfect spot for this. When you install shelves here, you get many benefits:
You Maximize Space: This converts a wall space that was not being used into a helpful storage zone.
Declutter: It gives a fixed spot for important items, keeping your counter tops clear.
You Add Style: Good shelving and decorations can boost your bathroom’s look.
You Improve Access: Items you use often will be easy to grab.
Let’s look at the ideas now. First, consider these key things: your bathroom size, your style, and how much storage you truly need. Do you want to show off decorations? Do you need to hide messy items? Or a bit of both? Knowing the answers will help you choose the best shelving solution from our list.
Idea 1: Floating Shelves – The Minimalist’s Dream
Floating shelves are always popular. They have clean lines and look simple. Which seem to come right out of the wall. They offer a smooth, quiet look. This design makes a small bathroom feel bigger and more open.
Why they work:
Visually Light: You can’t see the brackets, so the look is less messy.
Flexible: They look great with modern, simple, and traditional styles.
Customizable: You choose how many shelves you want and how far apart they are.
Styling tips: Use these for neat stacks of towels, small plants, fancy bottles, or organized toiletries. Choose natural wood for a warmer feel. Or, pick white shelves for a sharp, clean look.
Idea 2: Built-in Recessed Shelves – Seamless Integration
Are you planning to remodel your bathroom? If so, think about the ultimate smooth storage: built-in recessed shelves. These are cut right into the wall. They offer a flat, custom look. This truly uses all the space without sticking out into the room.
Why they work:
Saves Space: They do not take up any visual or physical space in the room.
High-End Feel: This adds a rich, custom-made touch.
Easy to Clean: There are no dusty tops or tight corners to clean.
Styling tips: These are great for storing extra toilet paper, small decorations, or even a tiny vase. Use a tile or paint color on the back that is different from the walls. This will make it pop.
Idea 3: The Ladder Shelf (Over-the-Toilet Unit) – Maximum Impact
The ladder shelf unit (often called a space saver) is the easiest storage fix. It is common because you do not have to drill anything. It gives you the most storage space. These units stand alone. They sit around the toilet and offer many levels of storage.
Why they work:
No Setup Needed: Just place it behind the toilet tank.
Plenty of Storage: They usually have three or four big levels for keeping and showing items.
Clear Style: They create a strong, tall visual point in the room.
Styling tips: Look for units that mix materials. For example, metal frames with wood shelves. This looks less plain and more industrial-chic. This is the perfect spot to mix both open shelves (for towels and art) and woven bins for closed shelves storage of smaller items.
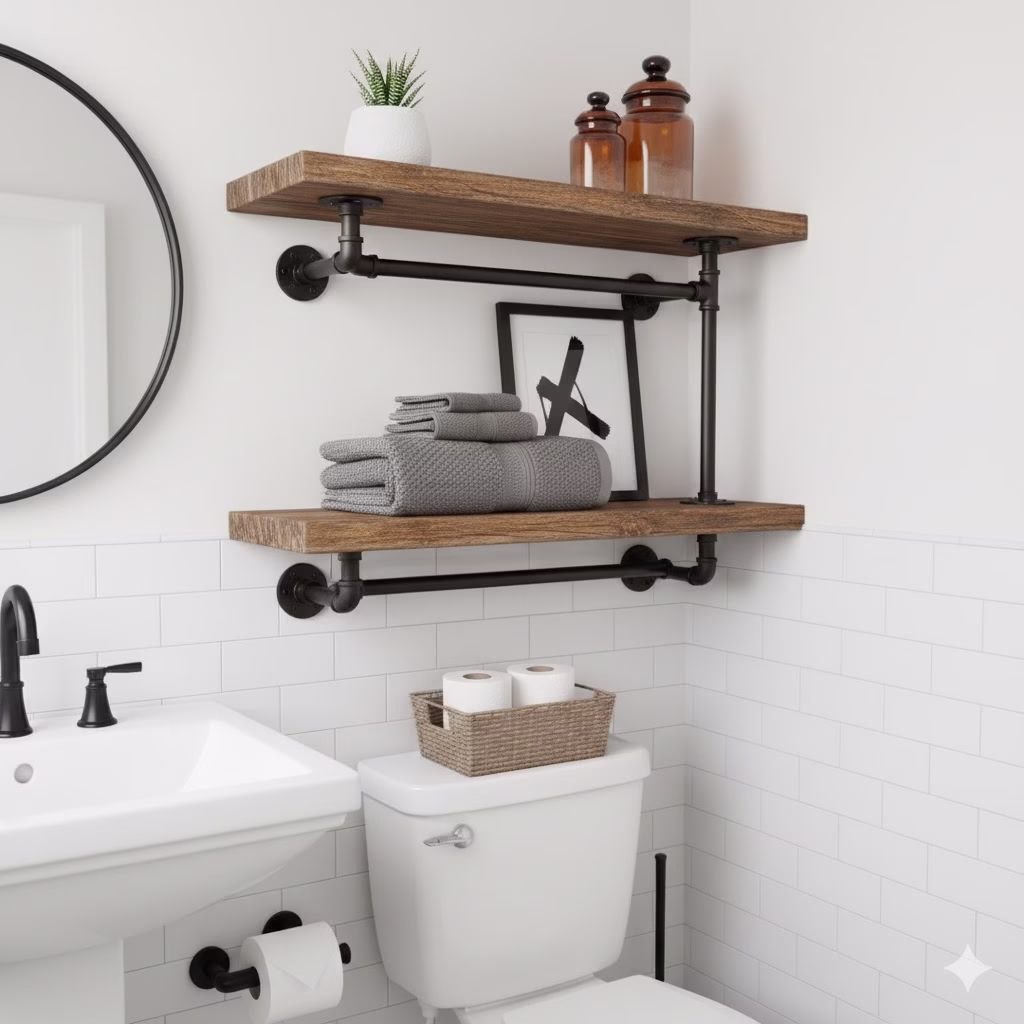
Idea 4: Industrial Pipe Shelving – Urban Edge
Want a rough, modern, or industrial farmhouse style? Try using pipe brackets. This design uses metal pipes (often black or silver) as supports. They are paired with thick, restored wood boards.
Why they work:
Very Strong: The materials are tough and handle moisture well.
Adds Character: This design makes the space much more interesting and textured.
Adjustable Height: The pipes can be moved to fit odd wall spaces.
Styling tips: Keep the rest of the bathroom simple. This lets the unique shelving stand out. Display old-fashioned jars, small succulents, and simple, folded linens. The rough texture of the wood looks great next to smooth ceramic fixtures.
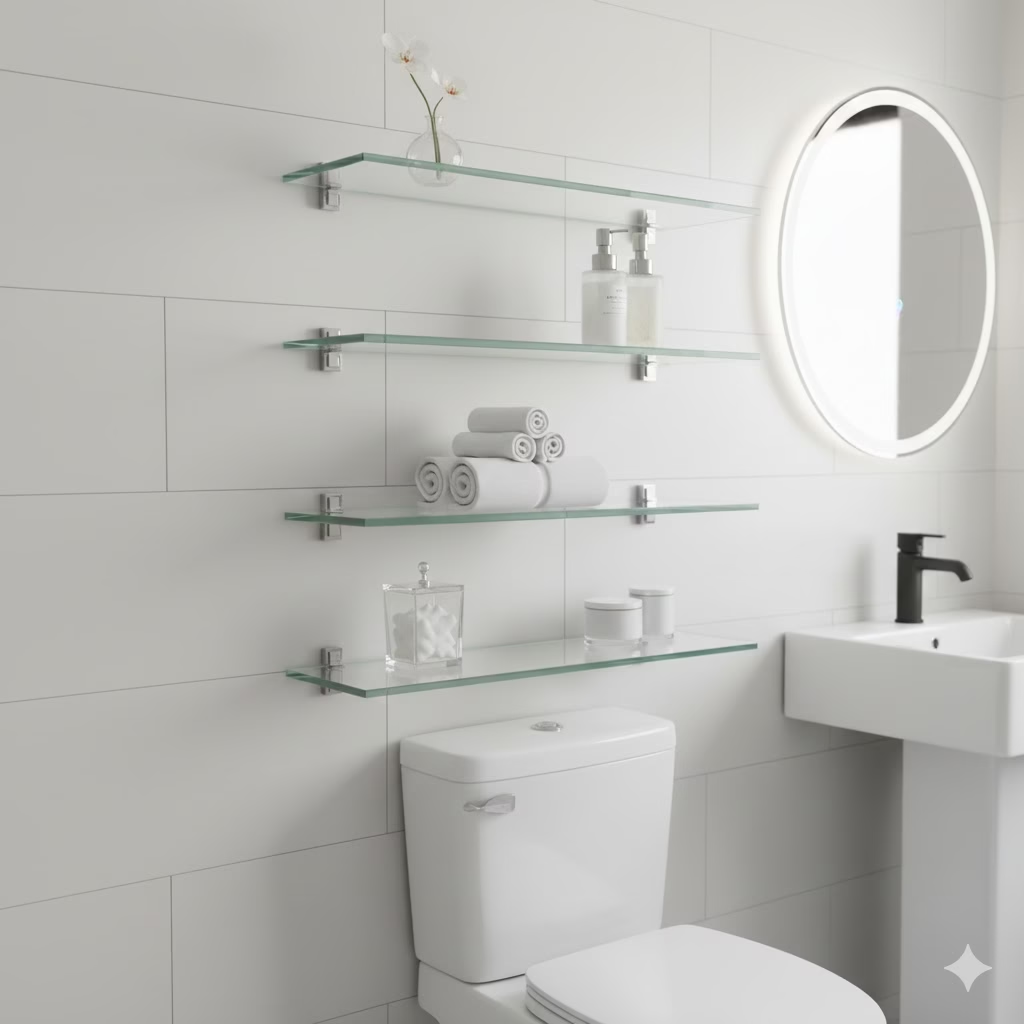
Idea 5: Glass Shelves – Light & Contemporary
Maybe you want storage but do not want the room to feel heavy or full. Glass shelving is a great option. The clear material almost disappears. It reflects light and keeps the airiness in the room.
Why they work:
Airy Look: Perfect for tiny bathrooms that need storage without visual weight.
Easy to Clean: Glass is very simple to wipe clean.
Modern Appeal: It offers a very smooth and up-to-date look.
Styling tips: Everything is visible, so organization is key! Use clear or cloudy containers so everything matches. Keep items to a minimum—a few bottles of scent, a small pile of white towels, and a delicate object.
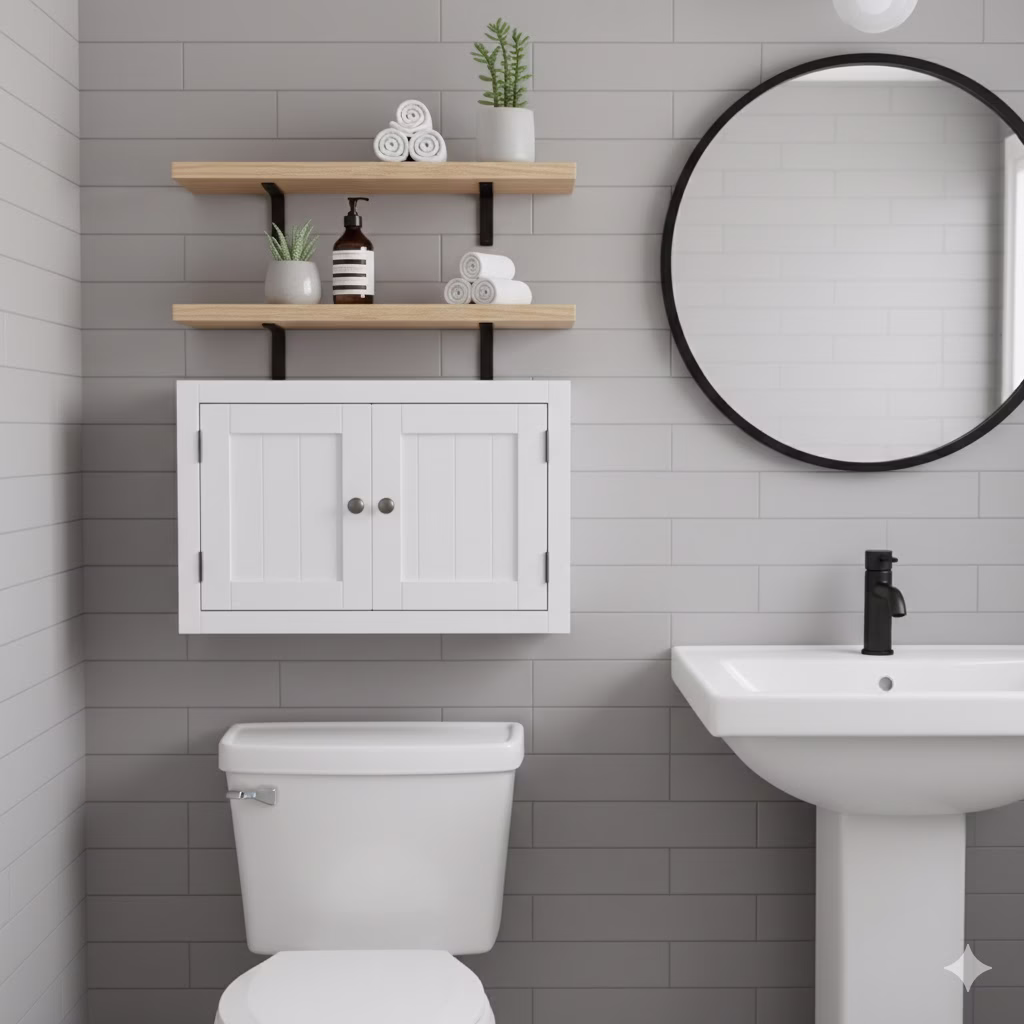
Idea 6: Shelves with Closed Storage Cabinets – The Organized Sanctuary
Sometimes, you just need to hide your things. Use a small wall cabinet in your shelves above toilet design. This gives you a good mix of items on display and items tucked away.
Why they work:
Discreet: Ideal for hiding less attractive items (medicine, cleaning tools, big hygiene products).
Dual Use: You get both open shelves for decorations and closed shelves for controlling clutter.
Clean Look: Doors make everything look neat and organized instantly.
Styling tips: Put the cabinet unit low or high. Use the open shelf/shelves next to it for attractive items. Make sure the cabinet handles match your other fixtures (faucets, towel racks). This creates a unified design.
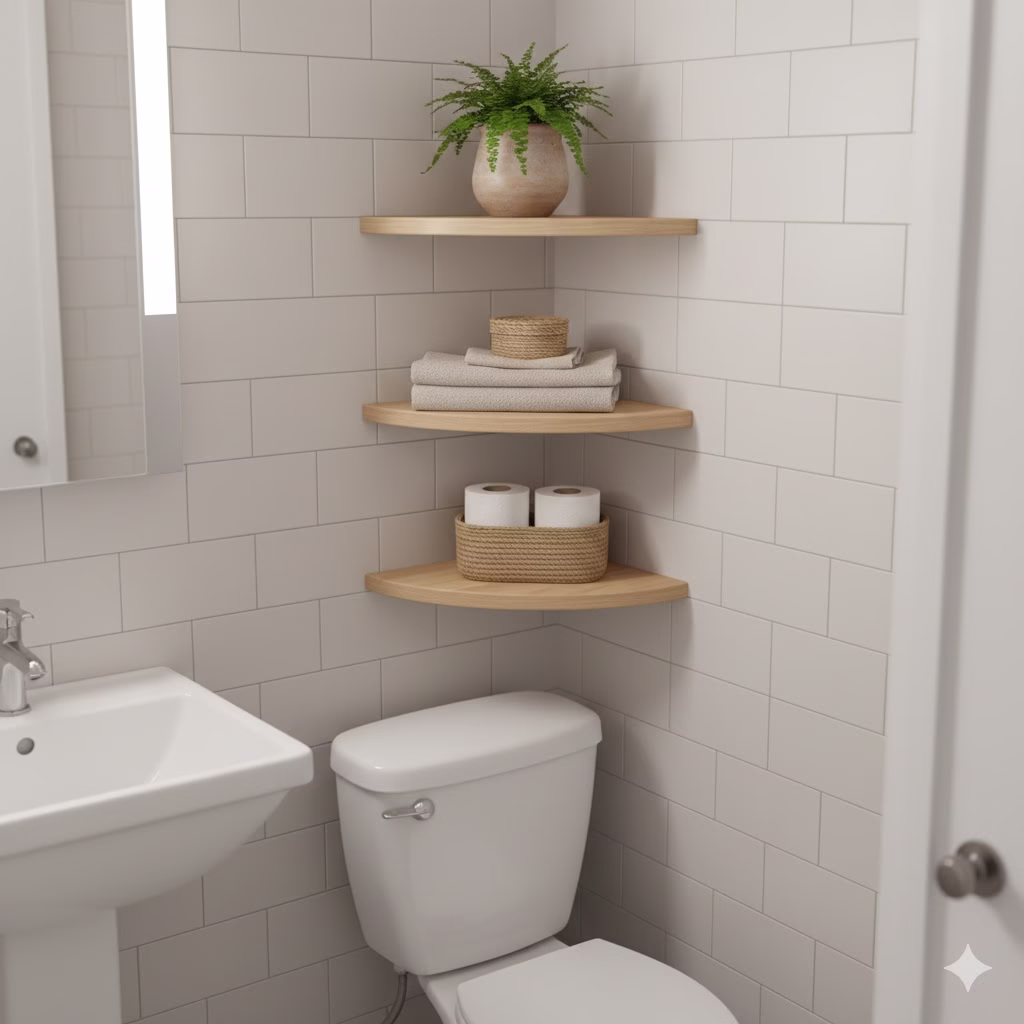
Idea 7: Corner Shelving Unit – Utilizing Awkward Angles
Is the wall behind your toilet very narrow? Do you have an unusual room layout? Do not forget the corners! A tiered corner shelving unit can cleverly turn a strange corner into useful storage.
Why it works:
Maximized Space: It uses space that is often wasted in bathroom layouts.
Unique Look: This offers a slightly different, softer look than straight wall shelves.
Balance: It can help make a large, empty wall look visually balanced.
Styling tips: Corner units are naturally cozy. They look great with natural materials and curved shapes. Think round baskets, small pots made of clay, and hanging plants like ivy or ferns.
Idea 8: Wooden Crate Shelving – Rustic Farmhouse Charm
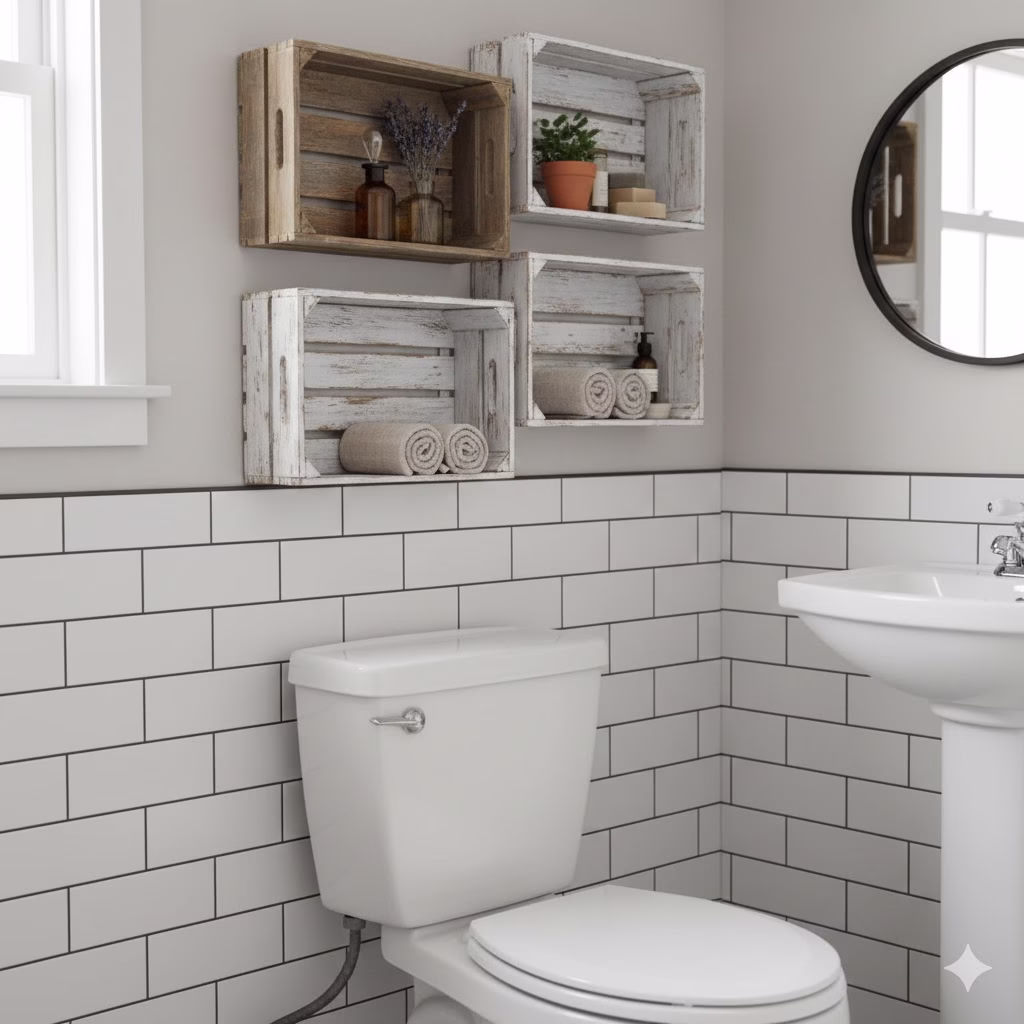
Do you like the cozy, rustic, or farmhouse style? Try using old wooden crates or boxes. Turn them into shallow, shelf-like shadowboxes. You can hang them individually or stack them in a fun way.
Why it works:
Texture and Warmth: Wood adds a natural, warm feel to a room that is mostly hard, cool surfaces (tile, porcelain).
Easy DIY: This project is simple and cheap to complete.
Depth: The box frame has a small edge. This stops items from easily falling off.
Styling tips: Fill them with vintage finds, essential oils, small bundles of dried lavender, and soft, hand-rolled washcloths. The worn look of the wood is a beautiful decoration on its own.
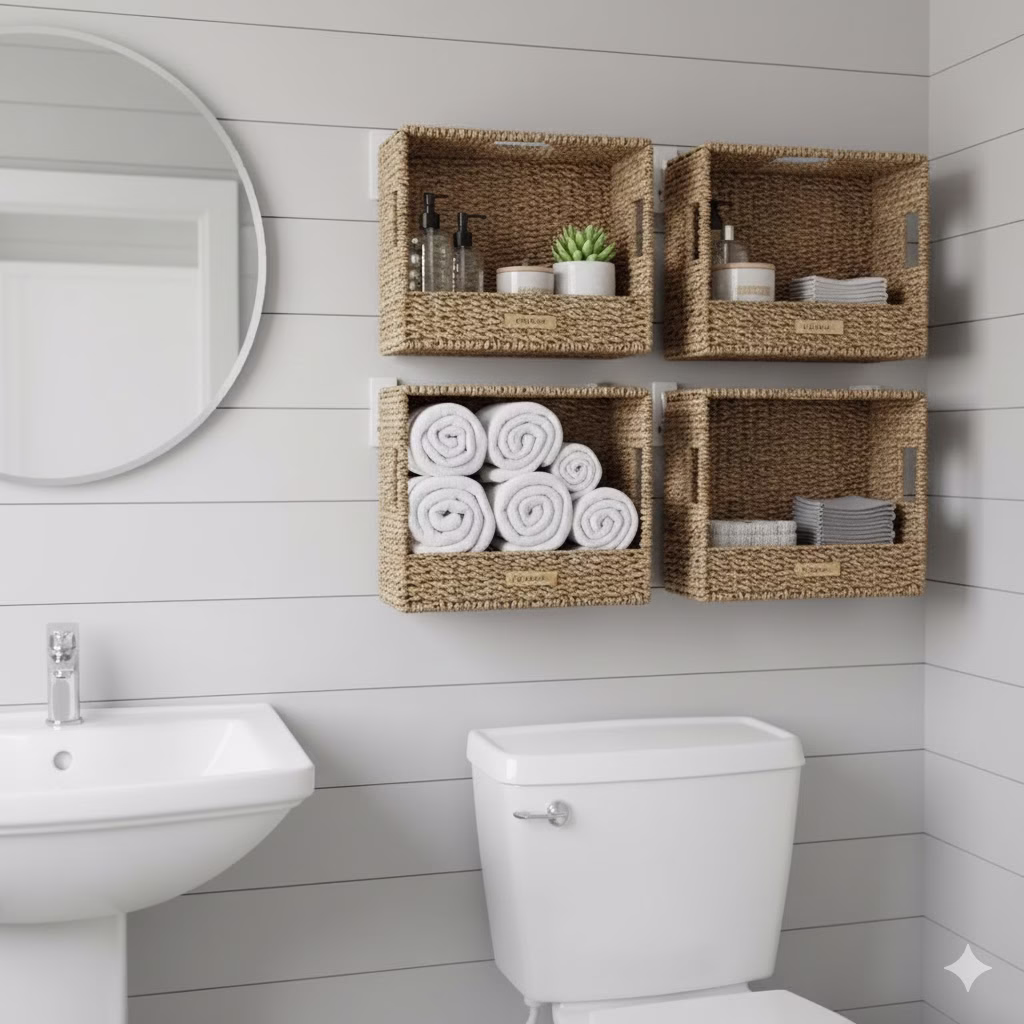
Idea 9: Woven Basket Shelves – Soft, Textured Storage
Forget standard wood or metal shelves for a moment. Instead, install strong brackets. Then, use large, flat-backed woven baskets as your shelves above toilet.
Why it works:
Texture and Softness: This adds natural fibers. This is great for making a plain, sterile bathroom feel softer.
Hidden Storage: The baskets can hide items well without using cabinet doors.
Bohemian/Coastal Vibe: Perfect for a relaxed, nature-inspired decor.
Styling tips: This works best with two or three large baskets that are all the same size. Put labels on the baskets so you know what is inside (e.g., “Toiletries,” “Linens,” “Backstock”). Pair these with simple white walls and light-colored towels.
Idea 10: Mixed Material and Asymmetrical Shelves – Modern Artistry
Ignore the usual rules! Use shelves of different lengths, depths, and materials. Arrange them in a pattern that is not symmetrical. This turns your storage solution into a piece of modern wall art.
Why they works:
High Design Impact: It immediately grabs attention. It shows that the design was well thought out.
Functional Art: It mixes practical storage with visual beauty.
Flexible: You can easily fit items of different sizes on these shelves.
Styling tips: Try mixing thin black metal shelves, a thick wooden shelf, and maybe a small mirror placed within the shelf layout. Pay attention to the empty space around the shelves. Display your items carefully for a gallery look.
Conclusion: Making Your Shelves Above Toilet Work for You
Choosing the perfect shelves above toilet setup means finding the best blend of function and beauty. You might choose the simple look of floating open shelves. Or, you might need the useful storage of ladder units. Maybe you prefer the smooth hiding power of closed shelves in a wall cabinet. Whatever you pick, the right choice will make your bathroom better.
Always remember to:
Measure Accurately: Make sure the shelves or unit will fit. Be sure they won’t hit the toilet tank or the lid. The bottom shelf should be high enough so you can open the lid fully.
Install Safely: Bathroom walls are often drywall. The items on the shelves can be heavy. Use strong wall anchors. Try to find a wall stud for the best stability.
Style with Care: Think about what you display. A few beautiful, high-quality items look much better than a mess of random products.
You are doing more than adding storage. By using one of these 10 stunning shelves above toilet ideas, you are making your bathroom more organized, more beautiful, and easier to use. Start improving that forgotten wall space today!