This article was crafted by a team of sustainability enthusiasts dedicated to the art of zero waste drinks. By exploring innovative ways to repurpose organic materials like Banana Peel, we aim to bridge the gap between high-end mixology and environmental responsibility. Our focus remains on extracting maximum flavor from overlooked ingredients like Banana Peels. Through rigorous testing, we ensure that every cocktail recipe contributes to a more sustainable and delicious future for home bartenders.
The Art of the Sustainable Banana Peel Daiquiri
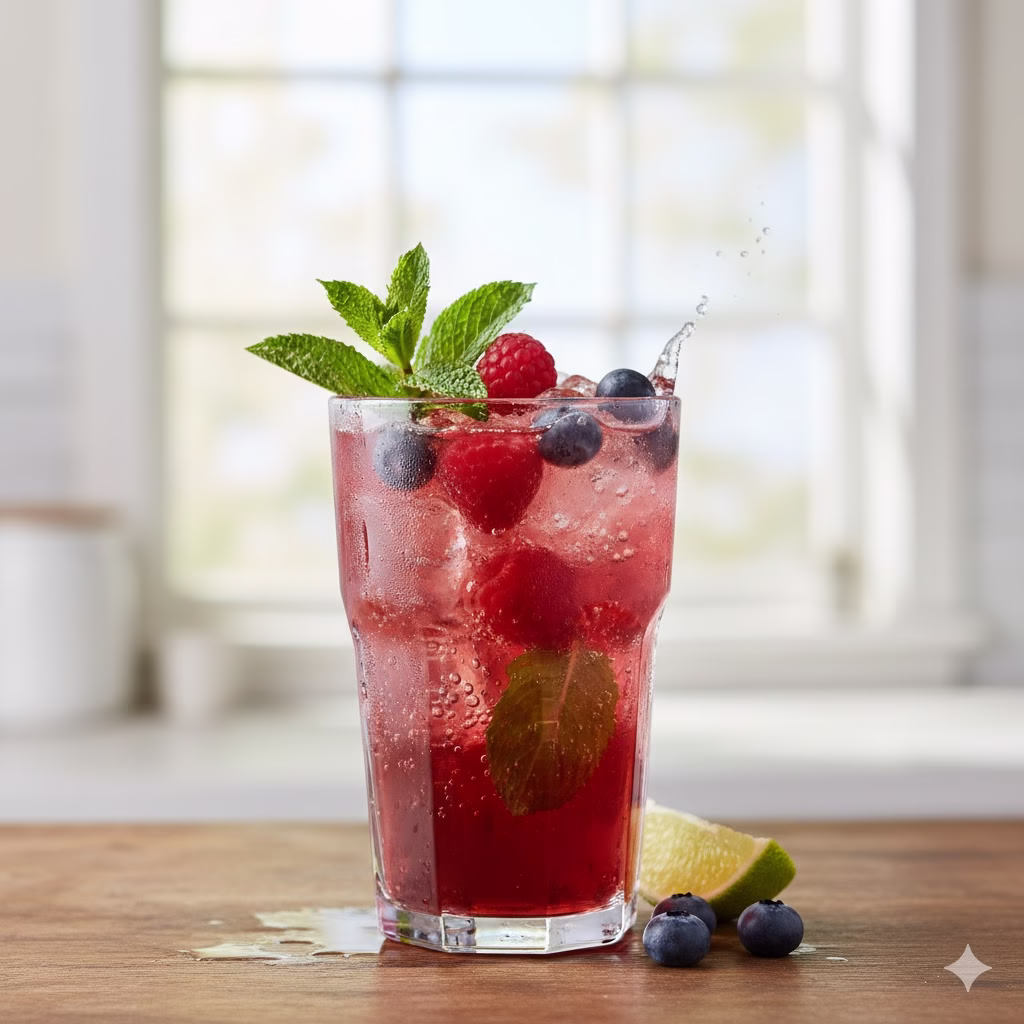
The modern cocktail movement is undergoing a quiet revolution. It is shifting its focus from big garnishes to deep sustainability. At the heart of this shift is a simple truth. Some of our most discarded food items are actually full of flavor. This cocktail uses banana peels to create a rich, caramel-flavored syrup, ensuring no part of the fruit is wasted. The Banana Peel Daiquiri is not just a drink. It is a new way to view waste in the kitchen and behind the bar.
For a long time, the banana peel was just a joke or a piece of trash. However, in the world of zero waste drinks, it is a prized prize. When you treat it right, the peel offers a deep profile. The fruit flesh cannot match it. It has notes of bitter tannins. And has deep caramel. It has a floral earthiness. This provides a great base for a classic sour drink.
Understanding Zero Waste Drinks
Being green in the bar world is about more than just straws. It is about using every part of the plant. When we talk about Banana Peels, we talk about a huge part of the fruit weight. Usually, this goes into the trash. In a landfill, food waste breaks down and makes gas that is bad for the air. By using these peels in our drinks, we help the earth. We also make our drinks taste better.
The idea of “Discarded” ingredients is growing fast. Some brands now make spirits from food waste. The goal is to close the loop. A Banana Peel Daiquiri shows this well. It is classy, tasty, and good for the planet. You do not have to give up taste to be kind to nature.
The Star Ingredient: Banana Peels
The secret to this drink is in the peel. As a banana gets ripe, it changes. The starches turn into sugars. But the peel stays tough. It holds onto oils and good smells.
Zero-Waste Ingredient: Banana peels.
When we use Banana Peels in a syrup, we do more than add flavor. We add a heavy feel to the drink. It adds a “cooked fruit” taste. This balances the sharp lime in a regular Daiquiri. It turns a light summer drink into something with more weight. It stays fresh but feels more complex.
Creating the Banana Peel Syrup
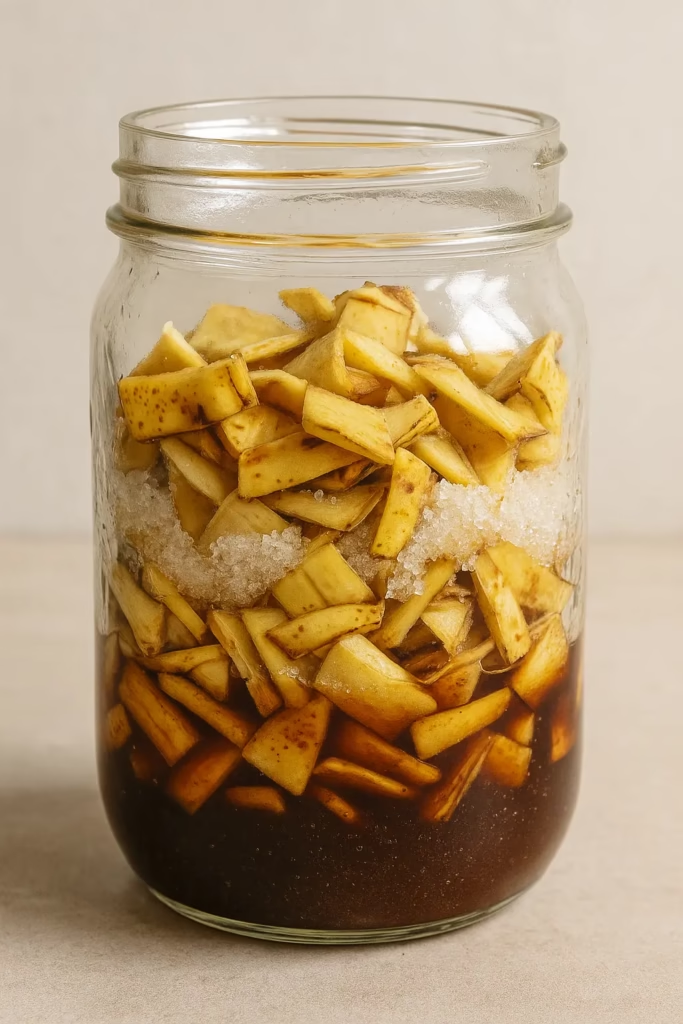
The base of a great Banana Peel Daiquiri is the syrup. We use sugar to pull out the moisture and oils from the peel. This is called osmosis. It makes a syrup that is much stronger than one made by boiling peels in water.
Syrup Recipe
Prep time: 10 minutes
Wait time: 6–24 hours
Yield: About 100ml of syrup
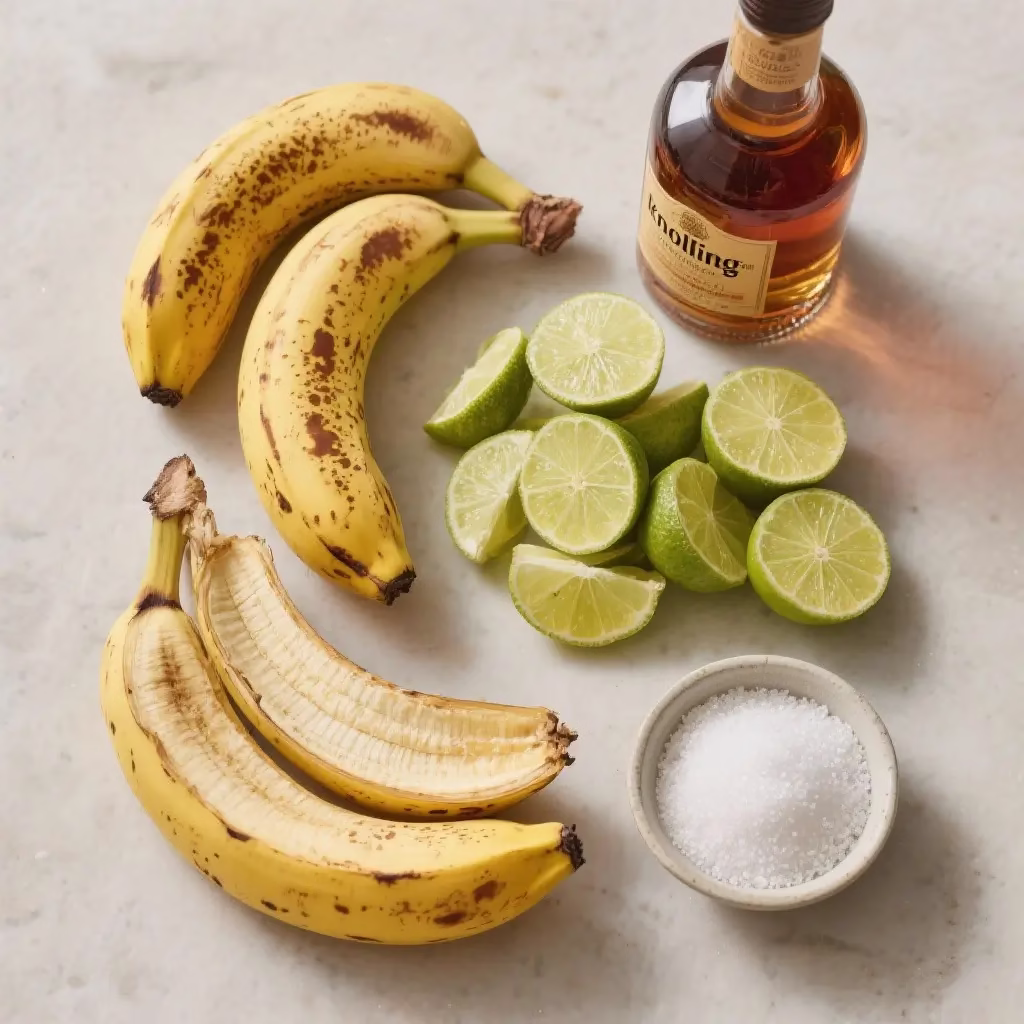
Clean the Peels: Try to use organic bananas. This is because the skin holds any spray used on the farm. Wash the peels well.
Chop: Chop a clean banana peel into small pieces. Small pieces give the sugar more area to work on.
Mix: Mix with an equal weight of sugar (e.g., 50g peel to 50g sugar) in a glass jar.
Wait: Let it sit for 6–24 hours until a syrup forms. You will see the sugar turn into a dark liquid.
Strain: Pour the syrup through a mesh tool or cloth. Press down on the peels to get all the liquid out.
The syrup you get is dark and rich. It tastes like liquid dessert. And gives the sweet touch for our Banana Peel Daiquiri. It also adds a layer of burnt sugar taste.
Selecting the Right Spirits
You can use a standard white rum. But the best choice is Discarded Banana Peel Rum. This spirit is made with peels that would be thrown away. This fits the “Banana Peels” theme perfectly. If you cannot find it, use a dark rum from Jamaica. The fruity notes of that rum go well with the peel.
The mix of wood notes from the rum and the peel oils makes a smooth feel. This makes the Banana Peel Daiquiri stand out. It feels soft on the tongue.
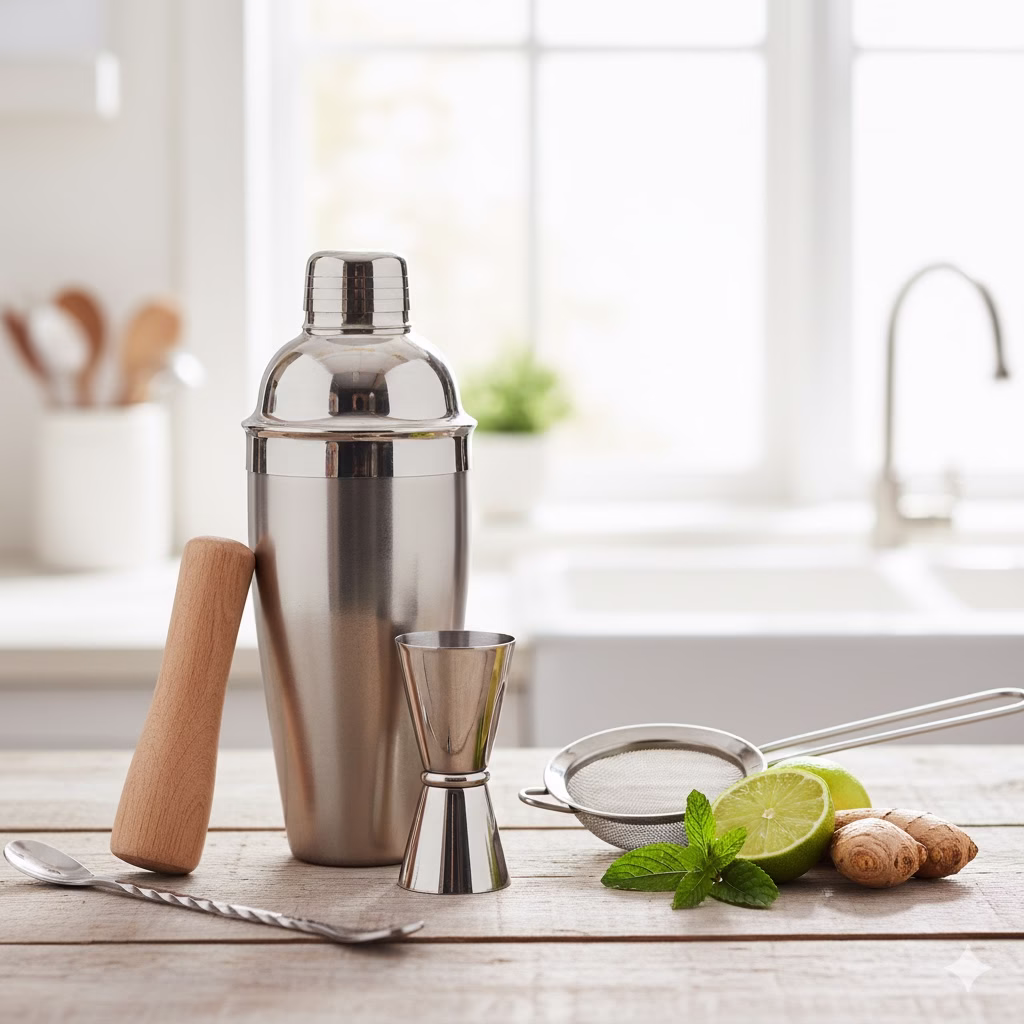
The Recipe: How to Make a Banana Peel Daiquiri
Now it is time to build the drink. A perfect Daiquiri needs balance. It needs sweet, sour, and strong parts. Because the banana peel syrup is so rich, we use a classic mix. This keeps the drink crisp.
Ingredients
50ml Discarded Banana Peel Rum
25ml Fresh lime juice
15ml Banana peel syrup
Ice: Use good, clear ice cubes for the best chill.
Method
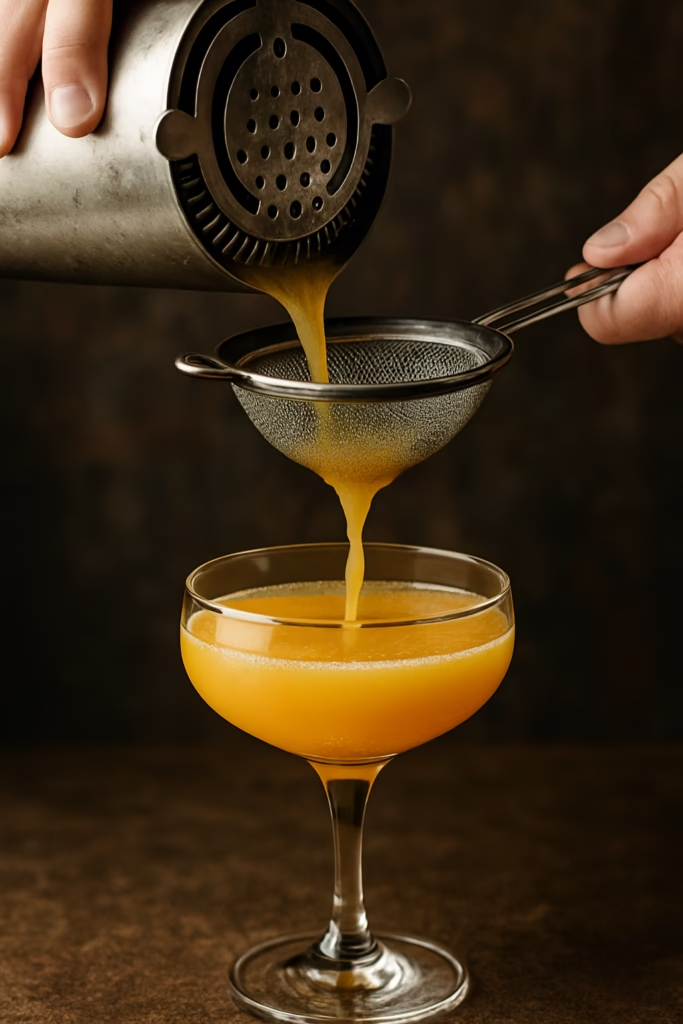
Chill your glass: Put a coupe glass in the freezer for 10 minutes.
Mix: Add the rum, lime juice, and syrup into a shaker.
Shake: Fill the shaker with lots of ice. Shake all ingredients with ice for about 15 seconds. The shaker should feel very cold.
Strain: Pour through two strainers into your cold glass. This keeps out small bits of ice or fruit. It keeps the drink very smooth.
Garnish: Keep it simple. Use a small piece of the used peel. Or use nothing at all. Let the color of the drink be the star.
Flavor Profile and Tasting Notes
When you take a sip of a Banana Peel Daiquiri, you first taste the lime. It is bright and sharp. Then, you taste the deep sweetness of the Banana Peels.
This syrup does not taste like candy. It has a real, earthy edge. You might taste vanilla or spice. The finish is clean because of the rum. It makes you want another sip. This is why zero waste drinks are great. They do not taste like “scraps.” They taste like a better version of the drinks we already love.
Expanding Your Zero Waste Bar
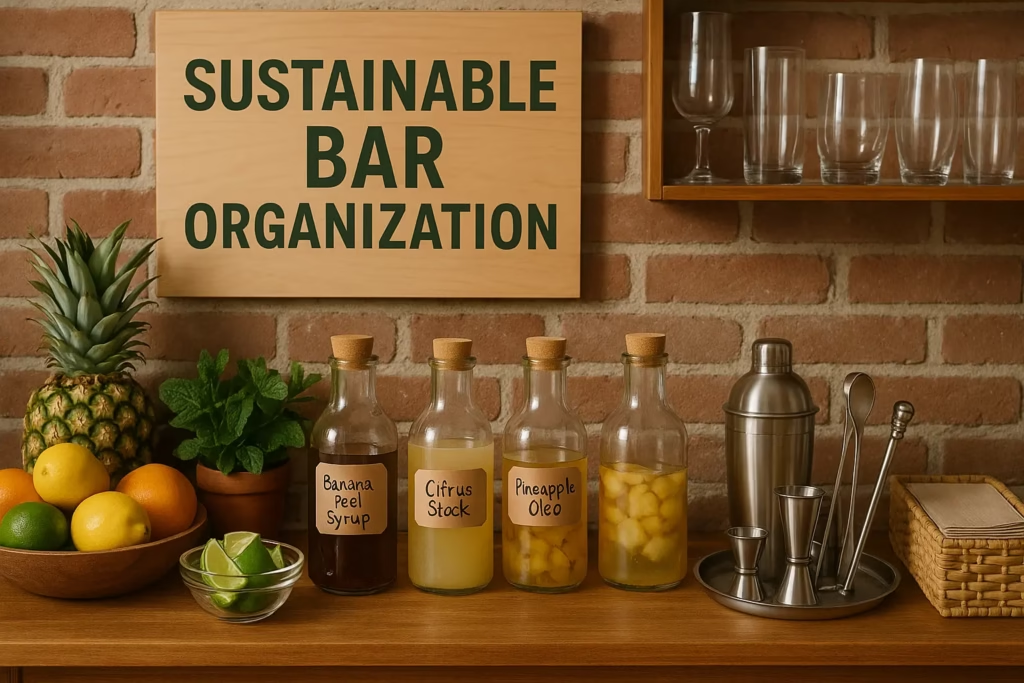
Once you make a Banana Peel Daiquiri, you can try other things. The world of zero waste drinks is very big.
Lime Skins: After you juice your limes, do not throw them away. You can boil them with sugar to make a lime stock. This helps you get more from your fruit.
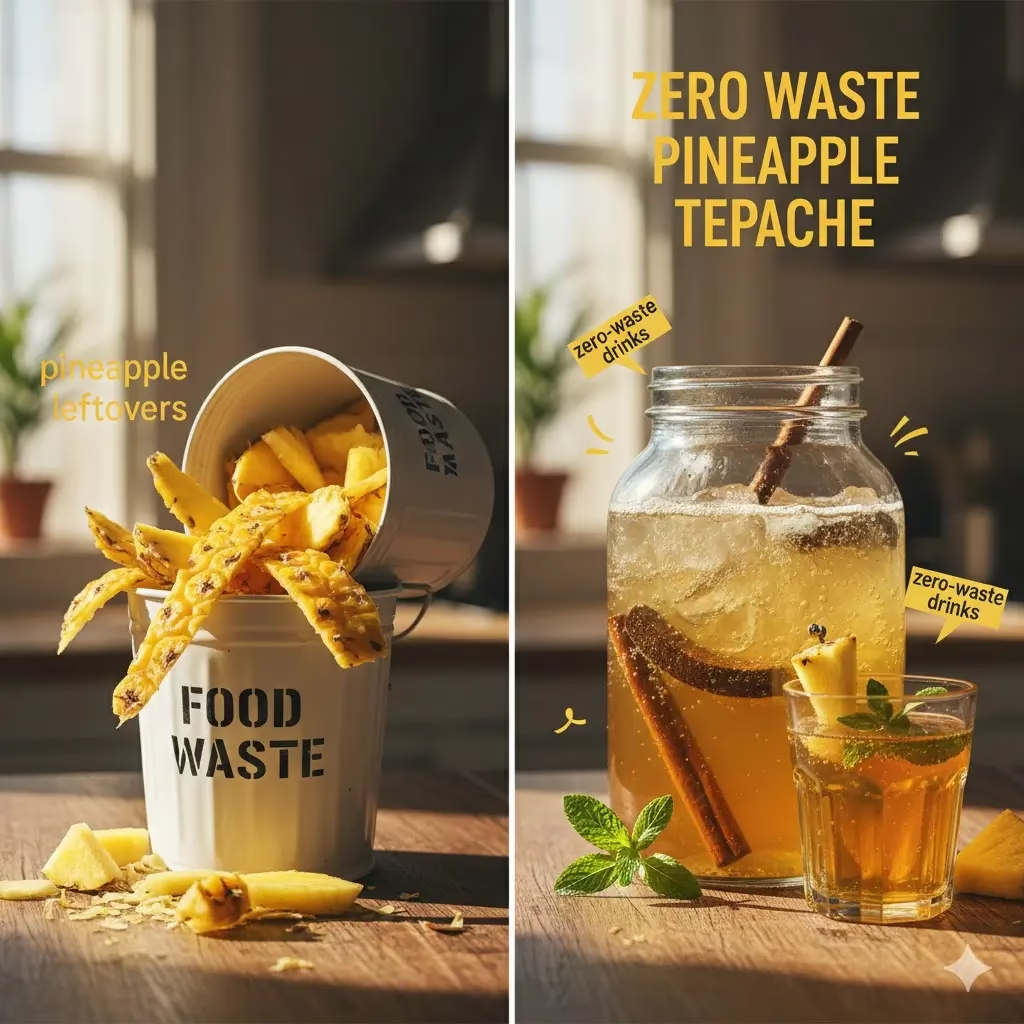
Pineapple Skins: Like Banana Peels, these can be used. Mix them with sugar and water to make a drink called Tepache. It is a bubbly drink you can mix with rum.
Coffee Grounds: Used coffee can go into spirits. It adds a dark, roasted taste to drinks.
By using Banana Peels, you learn a new skill. You start to see every scrap as a new ingredient. This makes you a better bar host.
Conclusion
The Banana Peel Daiquiri is more than a fun drink. It is a lesson in flavor. It shows us how to be mindful. By using Banana Peels, we make a fancy syrup. We prove that luxury and being green can go together. Any home bar can do this. Adding zero waste drinks to your list is a great way to help the earth.
Next time you eat a banana, look at the peel. It is not trash. It is a key part of a great drink. Shake up a Daiquiri today. Enjoy the burnt sugar notes. Cheers to a world where nothing goes to waste.
Frequently Asked Questions
Can I use any banana peel?
Yes, but the color matters. Use yellow peels with some brown spots. They have the best sugar and taste. Green peels are too bitter. Very black peels might taste too strong or sour.
How long does the syrup last?
The syrup has a lot of sugar. It will stay good for two weeks in the fridge. You can add a tiny bit of vodka to help it stay fresh for longer.
Is it safe to eat banana peels?
Yes, it is. We strain them out for the drink to keep it smooth. But peels have many vitamins. Making syrup is a safe way to get the flavor out.
This guide is developed by a team focused on sustainable living and the simple joy of home fermentation. We believe that reducing kitchen waste can be both delicious and easy for everyone to try. Our goal is to help you turn common pineapple leftovers into a bubbly, refreshing treat that your whole family will enjoy. By following these steps, you can master Pineapple Tepache while helping the planet one rind at a time. We hope this journey into traditional Mexican flavors inspires you to see the value in every part of your fruit.
Understanding the Joy of Pineapple Tepache
Making your own drinks at home is a wonderful way to save money and stay healthy. Pineapple Tepache is one of the easiest fermented drinks you can try. It does not require expensive tools or hard-to-find items. Most of the magic comes from the fruit itself. When you buy a pineapple, you usually eat the sweet yellow flesh and throw away the rest. However, the skin and the hard middle part, known as the core, are full of flavor and natural yeast.
By using these parts, you are practicing a zero-waste lifestyle. This means you are making sure nothing goes to waste in your kitchen. Instead of putting scraps in the bin, you put them in a jar. After a few days, they turn into a fizzy, golden soda that tastes like a tropical vacation. It is a great alternative to sugary store-bought sodas and is much better for your gut health.
Why Choose Zero Waste Drinks?
The world creates a lot of trash every day. A big part of that trash is food waste. When we throw away pineapple leftovers, we are throwing away potential energy and nutrients. Choosing to make zero waste drinks helps the environment. It reduces the amount of trash that goes to landfills.
Furthermore, making Tepache at home is very frugal. You are essentially making a second product for free from something you already bought. It is a win-win situation for your wallet and the Earth. This process teaches us to respect our food and see the beauty in things we used to overlook.
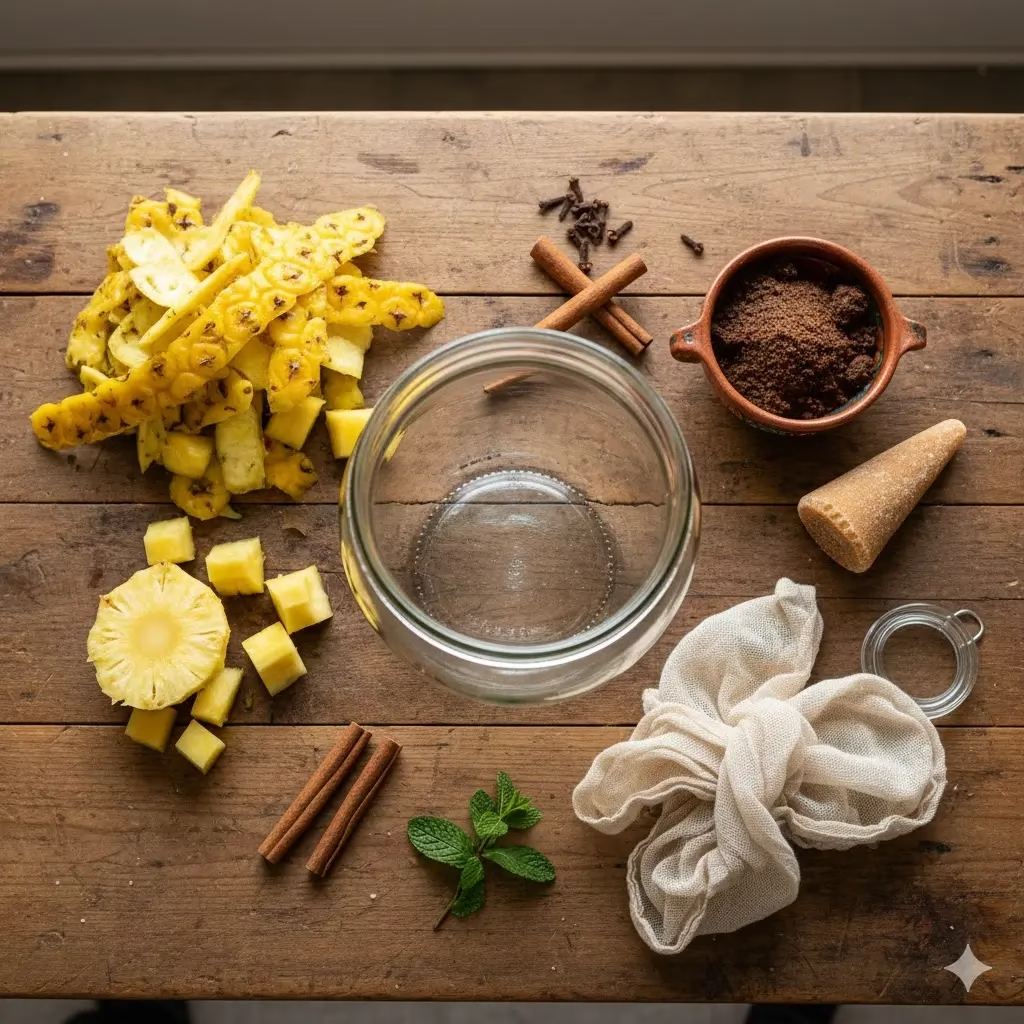
The Ingredients You Will Need
To make a great batch of Pineapple Tepache, you only need a few simple things. Most of these are likely already in your pantry.
The Pineapple: You need the skins and the core of one large, ripe pineapple. Make sure to wash the outside of the pineapple with water before you cut it to remove any dirt. Do not use soap, as we want the natural yeast on the skin to stay alive.
The Sugar: Traditionally, people use piloncillo. This is a raw, dark sugar from Mexico that tastes like caramel. If you cannot find it, dark brown sugar or even honey will work just fine.
The Water: Use clean, filtered water. If your tap water has a lot of chlorine, let it sit out for an hour before using it, or boil it and let it cool.
The Spices: A cinnamon stick and a few whole cloves add a warm, cozy smell and taste to the drink. Some people also like to add a small slice of fresh ginger for a little bit of a spicy kick.
Step-by-Step Recipe Instructions
Follow these simple steps to create your first batch of this delicious ferment.
Step 1: Prep Your Pineapple
Start by cutting the top and bottom off your pineapple. Stand it upright and slice the skin off in long strips. Keep some of the fruit attached to the skin for extra sweetness. Chop the hard core into small pieces. You can eat the soft fruit now or save it for a fruit salad.
Step 2: Dissolve the Sugar
Take about one cup of sugar and stir it into a large glass jar filled with four cups of water. Stir until the sugar is fully dissolved. The water should look dark and rich.
Step 3: Mix the Ingredients
Add your pineapple rinds, the chopped core, the cinnamon stick, and the cloves into the sugar water. Ensure the pineapple is fully submerged. If the pieces float to the top, you can use a clean weight or a small glass lid to push them down. This prevents any fuzzy mold from growing on the fruit.
Step 4: The First Fermentation
Cover the top of the jar with a clean piece of cloth or a paper towel. Secure it with a rubber band. This allows the drink to breathe while keeping bugs away. Place the jar in a warm, dark spot in your kitchen. Let it sit for twenty-four to forty-eight hours.
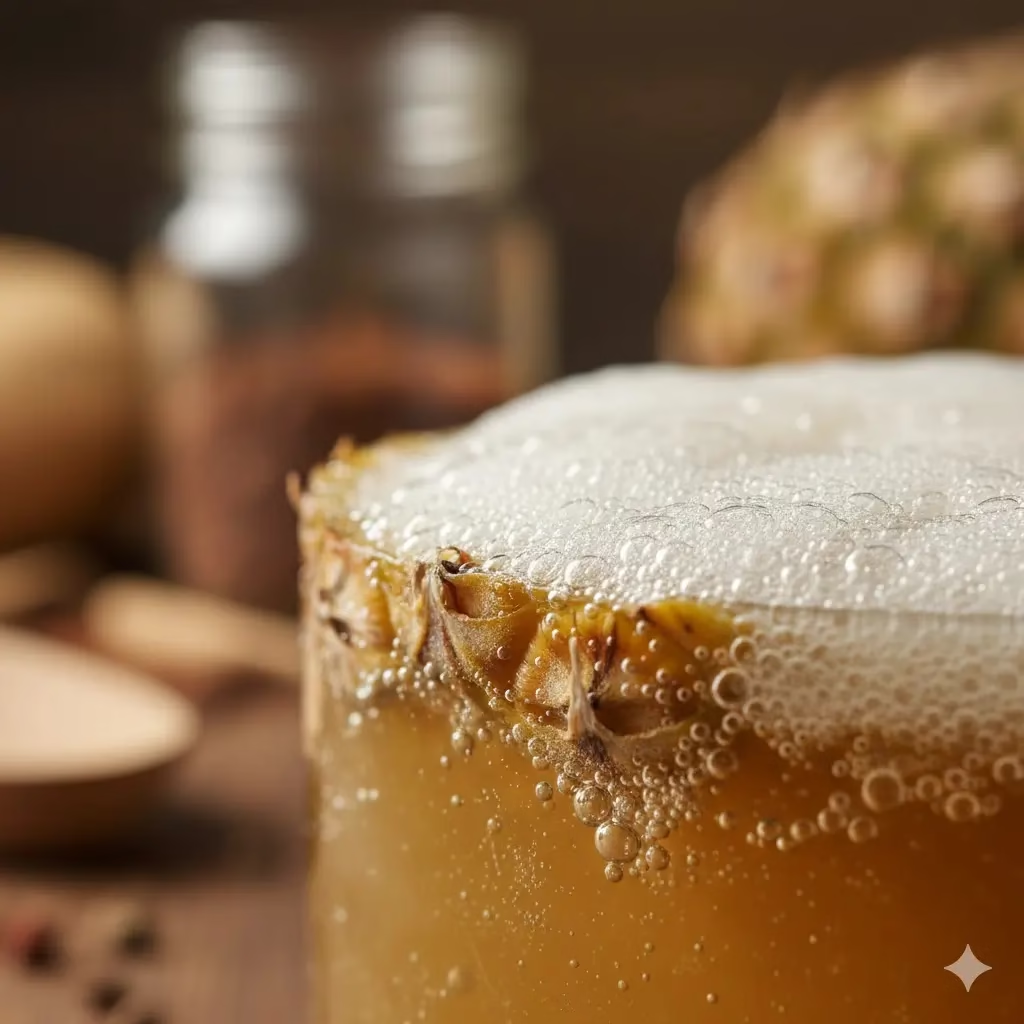
Step 5: Check for Bubbles
After a day or two, you should see white foam or bubbles on the surface. This is a good sign! It means the fermentation is working. Taste a little bit with a clean spoon. If it is sweet and slightly tangy, it is ready. If you want it more sour, let it sit for another day.
Step 6: Strain and Bottle
Once you love the flavor, strain the liquid through a sieve into a clean pitcher or bottles. Discard the solids (you can compost them!). You can drink the Tepache now over ice, or put it in the fridge to stop the fermentation.
How to Serve Your Tepache
Pineapple Tepache is very versatile. If you want a non-alcoholic treat, serve it in a tall glass with lots of ice. You can add a squeeze of lime juice to make it even more refreshing. For those who enjoy a cocktail, Tepache makes an amazing base. You can mix it with a light beer for a traditional “Tepache con Cerveza” or add a splash of rum or tequila for a tropical evening drink.
The fizz and the spice make it a perfect partner for spicy food like tacos or grilled chicken. It cleanses the palate and cools the tongue. Because it contains natural probiotics, it is also a great drink to have after a big meal to help your stomach feel settled.
Tips for Success and Safety
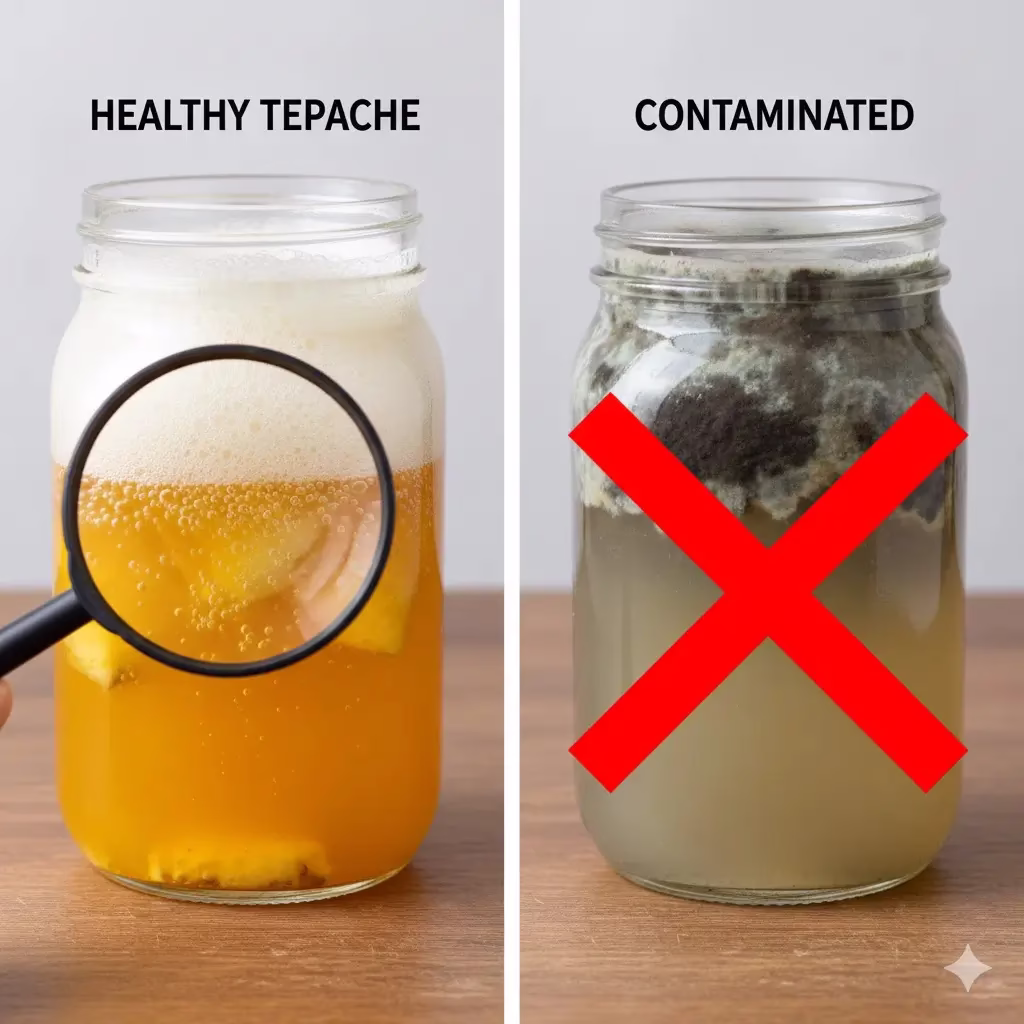
While fermenting at home is safe, there are a few things to keep in mind. Always use clean jars and tools. If you see black or green mold on the surface, throw the batch away and start over. A little bit of white foam is normal, but fuzzy colorful spots are not.
If you live in a very hot house, your Tepache will ferment very fast. Check it after twelve hours. If your house is cold, it might take three or four days. Trust your nose and your taste buds. It should smell fruity and yeasty, like a fresh cider.
Variations to Try
Once you are comfortable with the basic recipe, you can get creative. Here are a few ideas for your next batch:
Spicy Heat: Add a few slices of jalapeño to the jar for a spicy-sweet drink.
Herbaceous: Add fresh mint or basil leaves during the last day of fermentation.
Double Fruit: Add some mango skins or apple slices along with the pineapple.
Each change will create a new flavor profile, making this a hobby that never gets boring. The possibilities for zero waste drinks are truly endless when you start experimenting with different fruits and spices.
Conclusion: Embracing the Zero Waste Lifestyle
Learning how to make Pineapple Tepache is more than just a kitchen project. It is a way to connect with traditional wisdom and take a small step toward a better environment. By finding value in pineapple leftovers, you are proving that sustainability can be delicious. This drink is a celebration of what we can achieve when we slow down and let nature do its work.
Whether you enjoy it as a fizzy afternoon soda or as a complex cocktail base, your homemade Tepache is sure to be a hit. It is healthy, cheap, and helps the planet. So, the next time you bring a pineapple home, remember that the best part might be the part you used to throw away. Happy fermenting!
Hosting a party is much easier when you serve Large Batch Mocktails to your guests. These drinks help you save time so you can focus on your friends and family. Every recipe in this guide is healthy and uses zero-waste methods to help the planet. These Large Batch Mocktails are the best choice for anyone who wants a fresh and fun holiday drink option.
Why You Should Serve Healthy Large Batch Mocktails This Year
The holiday season is a busy time for everyone. We often spend a lot of money and create a lot of trash during these weeks. One way to change this is by looking at what we drink. Many people are now looking for drinks that do not have alcohol. They want to feel good the next day and stay healthy. This is where Large Batch Mocktails come in to save the day. Making one big jar of a drink is much better than making one glass at a time. It lets the host enjoy the party too.
These drinks are not just juice in a glass. They use fresh herbs, spices, and real fruit. We also focus on being zero-waste. This means we use the whole fruit. We use the peels, the juice, and even the stems of herbs. This adds more flavor to your Large Batch Mocktails. It also means you have less to throw away at the end of the night. Using less sugar and more natural items makes these drinks better for your body. You can enjoy the festive spirit and still feel light and energetic.
In this guide, you will find ten great recipes. They are easy to make in large amounts. They use simple tools like big pitchers or slow cookers. Most of these ingredients can be found at any local store. By the end of this article, you will be ready to host the best holiday party of the year. Your guests will love the care you put into these healthy options.
1. Sparkling Pomegranate and Rosemary Punch
Pomegranate is a great fruit for the winter. It has a bright red color that looks like Christmas. It is also very good for your heart. This punch is very easy to make for a big group. The rosemary gives it a nice smell that reminds people of holiday trees.
Ingredients (Makes 12 drinks):
4 cups of pomegranate juice (look for the kind with no added sugar)
1 cup of fresh orange juice
Half a cup of maple syrup
5 long branches of fresh rosemary
1 large bottle of cold sparkling water
1 cup of pomegranate seeds
How to make it:
Get a large pitcher. Pour in the pomegranate juice and the orange juice. Add the maple syrup and stir it well. Put the rosemary branches into the liquid. Put the pitcher in the fridge for three hours. The rosemary flavor will slowly move into the juice. When your guests arrive, pour the juice into a big bowl. Add the sparkling water and the seeds.
Zero-Waste Tip:
When you are done with the orange juice, do not toss the skins. You can cut them into small bits. Put them in a jar with some salt to make a cleaning scrub for your kitchen. Or, you can dry them in the sun to use as fire starters for your fireplace.
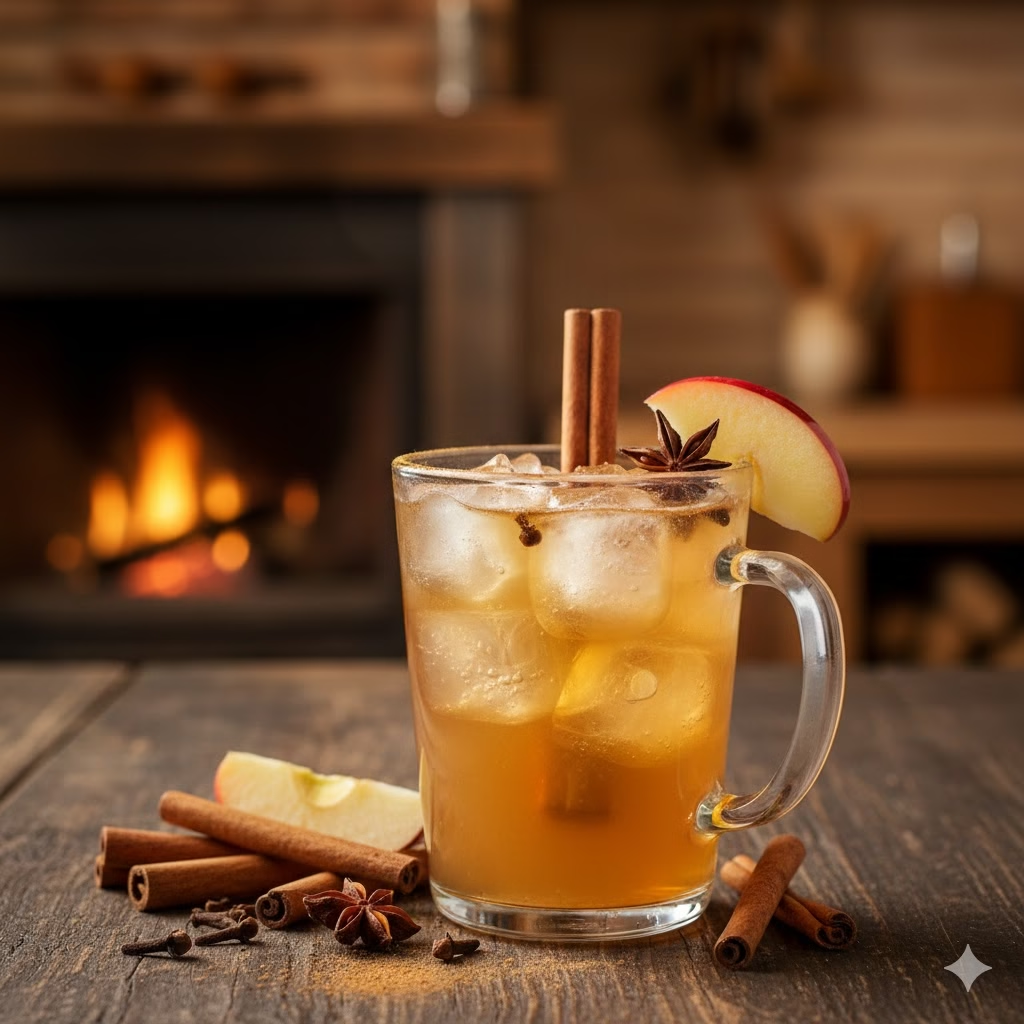
2. Warm Apple and Spice Cider
This drink will make your whole house smell amazing. It is a warm drink that is perfect for a cold night. Using real spices instead of flavored syrups makes it much healthier.
Ingredients (Makes 10 drinks):
8 cups of organic apple juice
3 cinnamon sticks
6 whole cloves
2 pieces of star anise
1 thumb of fresh ginger, sliced thin
The peel from one orange
How to make it:
Put all the items into a large pot. Put the stove on low heat. Let the liquid get warm but do not let it boil fast. Let it sit on the heat for one hour. The spices will make the juice taste very deep and rich. Serve it in warm mugs.
Zero-Waste Tip:
After you drink the cider, the fruit and spices are still full of scent. You can put them back in a pot with fresh water and simmer them on the stove. This acts as a natural air freshener for your home. You do not need to buy chemical sprays.
3. Fresh Cucumber and Mint Cooler
Sometimes holiday food is very heavy and salty. A fresh green drink can help your stomach feel better. This cooler is very light and crisp. It is a great way to use the whole cucumber.
Ingredients (Makes 10 drinks):
3 large cucumbers
1 big bunch of fresh mint
Half a cup of lime juice
3 spoons of honey
1 liter of soda water
How to make it:
Take two cucumbers and blend them. Strain the juice into a large jar. Slice the last cucumber into thin rounds. Take the mint leaves and press them with a spoon in a bowl to get the oils out. Add the mint and lime juice to the cucumber juice. Add the honey and stir. Before serving, add the soda water and the cucumber slices.
Zero-Waste Tip:
When you strain the cucumber juice, you will have a lot of green pulp left. Do not throw this away. You can mix it into a bowl of plain yogurt with a little garlic. This makes a healthy dip for your party snacks.
4. Red Hibiscus and Orange Tea
Hibiscus tea is a beautiful dark red color. It is very tart, almost like a cranberry. It is full of things that help your body stay strong during flu season.
Ingredients (Makes 12 drinks):
Half a cup of dried hibiscus flowers
8 cups of water
The rinds of two lemons
The rinds of two oranges
Half a cup of honey
Fresh mint for the top
How to make it:
Boil the water in a big pot. Turn off the heat and add the flowers and the fruit rinds. Let it sit for twenty minutes. The water will turn a dark red. Strain the liquid into a pitcher. Add the honey while it is still a little warm so it melts. Let it get very cold in the fridge.
Zero-Waste Tip:
The fruit rinds can be used again. After you strain the tea, you can chop the rinds. Mix them with a little sugar and bake them on a low heat. They turn into a chewy candy that guests can eat.
5. Blackberry and Vinegar Shrub
A shrub is an old-fashioned way to make a drink. It uses vinegar to give a sharp taste. This is great for people who miss the bite of alcohol. It is also very good for your gut health.
Ingredients (Makes 8 drinks):
2 cups of blackberries (fresh or frozen)
1 cup of apple cider vinegar
A spoon of balsamic vinegar
1 cup of honey
Cold bubbly water
How to make it:
Put the berries and honey in a jar. Use a spoon to mash the berries. Let this sit in your fridge for a whole day. Then, add the two types of vinegar. Let it sit for one more day. Strain the liquid into a bottle. To serve, put two spoons of this syrup in a glass and fill the rest with bubbly water.
Zero-Waste Tip:
The mashed berries that you strain out are still very tasty. You can stir them into your morning oatmeal. You can also put them on top of a piece of toast with nut butter.
6. Pineapple Skin Tepache
This is the ultimate zero-waste drink. It is made from the parts of the pineapple that most people throw in the trash. It creates a natural fizz that is very refreshing.
Ingredients (Makes 10 drinks):
The skin and the core of one organic pineapple
8 cups of water
1 cup of brown sugar
1 cinnamon stick
2 cloves
How to make it:
Wash the outside of the pineapple very well. Peel the skin and cut the core into chunks. Put the skins, core, sugar, and spices into a large glass jar. Fill it with water. Cover the top with a clean cloth. Let it sit on your counter for two or three days. You will see small bubbles. This means it is working. Strain the liquid and put it in the fridge.
Zero-Waste Tip:
Since this drink uses the “trash” of the fruit, you are already being a hero for the earth. When you are done with the skins after the two days, they can finally go into your compost bin.
7. Pear and Thyme Winter Spritz
Pears are a soft and sweet fruit that many people forget about. When you mix them with thyme, they taste very fancy. This is a very elegant drink for a holiday dinner.
Ingredients (Makes 10 drinks):
5 ripe pears
Half a cup of lemon juice
8 sprigs of fresh thyme
3 spoons of maple syrup
1 liter of sparkling water
How to make it:
Blend the pears until they are like a smooth juice. Strain this into a pitcher. Add the lemon juice and maple syrup. Put the thyme sprigs inside and press them a little with a spoon. Let the flavors mix in the fridge for two hours. Add the sparkling water just before you serve it to your guests.
Zero-Waste Tip:
If your pears are very soft or have brown spots, they are perfect for this juice. You do not need “perfect” looking fruit to make a great drink. This helps reduce food waste in your home.
8. Blood Orange Brunch Mock-mosa
Blood oranges are only in stores for a short time. They have a deep red color inside that looks like a sunset. This is a healthy take on a classic brunch drink.
Ingredients (Makes 12 drinks):
5 cups of blood orange juice
1 spoon of vanilla extract
The zest of one orange
2 bottles of non-alcoholic sparkling cider or wine
How to make it:
Mix the juice, vanilla, and zest in a large jug. Keep it very cold. When it is time for brunch, fill half of a glass with the juice mix. Fill the other half with the cold sparkling cider. It looks beautiful and tastes like a dream.
Zero-Waste Tip:
Always zest your oranges before you juice them. You can freeze the zest in an ice cube tray with a little water. These “zest cubes” are great to drop into a glass of plain water later in the week.
9. Cranberry and Sage Holiday Punch
Cranberries are very tart. Sage is an herb that people usually use for cooking meat. When you put them together, you get a drink that is not too sweet. It feels very sophisticated.
Ingredients (Makes 10 drinks):
3 cups of cranberry juice (not the cocktail kind)
1 cup of orange juice
10 fresh sage leaves
2 spoons of honey
1 liter of soda water
How to make it:
Put the sage and honey in a pitcher and mash them gently. Add the cranberry and orange juices. Let this stay in the fridge for a few hours. When you are ready, add the soda water. You can drop in some whole frozen cranberries to keep it cold.
Zero-Waste Tip:
Buy a whole sage plant in a small pot instead of buying leaves in a plastic box. This way, you can keep the plant growing on your windowsill all winter. You will have fresh herbs whenever you need them.
10. Golden Ginger and Turmeric Punch
This drink is like a hug in a glass. It is bright yellow and very spicy. It helps your body fight off colds and makes your stomach feel good after a big meal.
Ingredients (Makes 8 drinks):
4 cups of pineapple juice
2 cups of orange juice
1 large piece of ginger, grated
1 spoon of turmeric powder
A tiny pinch of black pepper
1 liter of sparkling water
How to make it:
Mix the juices with the ginger, turmeric, and pepper. The pepper helps your body use the turmeric better. Let it sit for thirty minutes and then strain it. Pour it into a pitcher. Add the sparkling water and stir gently.
Zero-Waste Tip:
Take the ginger and turmeric pulp from your strainer. Put it in a small jar with honey. You can use a spoonful of this “honey paste” in a cup of hot water the next morning for a healthy tea.
How To Set Up Your Large Batch Mocktails Bar
When you host a party, you want to make things easy for yourself. Setting up a dedicated area for your Large Batch Mocktails is a great idea. You can use a kitchen counter or a small side table. Put out all the glasses and a bucket of ice. This lets people help themselves.
One secret to great Large Batch Mocktails is the ice. Do not use tiny cubes that melt fast. Instead, use big pieces of ice. You can freeze water in a muffin tin to make large round pucks. These will stay solid much longer. This keeps your drink from getting watery and losing its flavor.
Another tip is to keep the bubbles fresh. If a recipe calls for sparkling water, do not add it to the big jar until the last minute. Or, you can leave the bottles of sparkling water on the table. Guests can add the fizz to their own glass. This way, the last glass of the night is just as bubbly as the first one.
Making Your Party Sustainable
Being a good host also means thinking about the earth. You can make your Large Batch Mocktails bar very eco-friendly. Use real glass instead of plastic. If you need straws, look for metal or paper ones. You can also use things from nature to decorate your bar. Instead of plastic glitter, use pine cones, cinnamon sticks, and fresh fruit.
When the party is over, look at what is left. Most of the items in these recipes can go into a compost bin. This closes the loop and ensures that your holiday celebration does not leave a big mark on the planet.
Conclusion
Making Large Batch Mocktails is a smart and kind way to host a holiday party. It shows that you care about the health of your friends. It also shows that you care about the health of our world. These ten recipes are full of flavor and use the best ingredients from nature. You do not need alcohol to have a festive and fun time.
Whether you choose the spicy ginger punch or the cool cucumber drink, your guests will be impressed. You will have more time to talk and laugh, and less time spent mixing drinks. This is the true spirit of the holidays.
Like many of you, I love a good drink, but I don’t always enjoy the sugar crash or the next-day regrets. I started exploring the world of Healthy Mocktails because I wanted a beverage that was refreshing, exciting, and genuinely good for me. What began as a personal quest quickly turned into a passion for crafting vibrant, low-sugar drinks that anyone can enjoy. I’m thrilled to share my journey and simple recipes for delicious Healthy Mocktails with you right here!
Welcome to the World of Delicious Healthy Mocktails
Do you want a refreshing drink that won’t ruin your health goals? Do you crave a sophisticated beverage without the sugar, calories, or alcohol? You’ve come to the right place! Welcome to the world of healthy mocktails. This is where taste, wellness, and creativity meet.
For too long, non-alcoholic drinks have been sugary sodas, plain water, or very sweet juices. But things are changing! People are watching what they eat and drink. They want delicious, low-sugar, and low-calorie choices. Healthy mocktails are the perfect answer. They work if you are cutting back on alcohol, watching your sugar intake, or just want healthier hydration. They are great for parties, quiet evenings, or a delightful pick-me-up any time.
This complete guide will show you how to create truly delicious healthy mocktails. We will cover essential ingredients, simple techniques, and many inspiring recipes. You will be able to make impressive, guilt-free drinks that everyone will love.
The Idea Behind Healthy Mocktails: Why Simpler is Better
The main rule for healthy mocktails is to get maximum flavor and fun while avoiding too much sugar, artificial ingredients, and empty calories. This doesn’t mean the drinks taste boring; it’s the opposite! We focus on high-quality, natural ingredients. These items give complex flavors and natural sweetness. They also often bring useful nutrients.
Why should you choose healthy mocktails?
Lower Sugar Intake: Regular cocktails and many store-bought mocktails are full of sugar. This leads to energy crashes, weight gain, and other health issues. Healthy mocktails use natural sweeteners lightly or rely on the natural sweetness of fruits and vegetables.
Fewer Calories: Less sugar and fewer high-calorie mixers mean lighter drinks. These are great for managing your weight or just feeling better.
Better Hydration: Many healthy mocktails are water-based. They use hydrating ingredients that help you drink more fluids overall.
Nutrient Boost: Using fresh fruits, vegetables, herbs, and spices gives you vitamins, minerals, and antioxidants in every sip.
No Alcohol, No Regrets: You get all the fun of a fancy drink without the alcohol effects. This is perfect for designated drivers, pregnant people, those in recovery, or anyone who chooses to be sober.
Easy Creativity: Mocktails are an easy way to be creative in the kitchen. Try unique flavor mixes and beautiful presentations.
Essential Items for Your Healthy Mocktails
You need the right items to build a great healthy mocktail. Think fresh, bright, and natural.
1. The Base: Fizz and Tea
These items are the foundation for most healthy mocktails.
Sparkling Water or Club Soda: Your best friend for bubbles without sugar. Choose unflavored types. Mineral water can add a subtle, earthy taste.
Chilled Brewed Teas: Green tea, black tea, hibiscus tea, mint tea, or herbal fruit teas work well. They provide complex flavors and nice colors. Brew them extra strong for a bolder taste.
Coconut Water: Great for a tropical taste. It naturally contains electrolytes.
2. Best Flavors: Fresh Fruits and Vegetables
This is where your drink gets exciting! Use produce that is in season for the best flavor.
Citrus (Lemons, Limes, Oranges, Grapefruits): These are vital for brightness, acidity, and balance. Always use fresh juice.
Berries (Strawberries, Raspberries, Blueberries): Naturally sweet, colorful, and full of antioxidants. Mash them gently for a strong flavor.
Tropical Fruits (Pineapple, Mango, Passion Fruit): They add an exotic sweetness and a bright smell.
Stone Fruits (Peaches, Cherries): They taste wonderful mashed or puréed when it’s their season.
Cucumbers: They offer a cool, refreshing, and slightly green taste. They help balance other flavors.
Ginger: Adds a spicy kick. Use it grated, sliced, or as a simple homemade syrup (see below).
Herbs (Mint, Basil, Rosemary, Thyme, Cilantro): These boost your mocktails with complex scents. Mint is common, but try basil with berries, or rosemary with citrus.
3. Natural Sweeteners (Use Only a Little)
We aim for low sugar, but a little sweetness sometimes helps to balance tart flavors.
Maple Syrup or Agave Nectar: Use very little. These are natural but still have calories and raise blood sugar.
Stevia/Erythritol (Natural Sweeteners): These are zero-calorie options. They provide sweetness without changing blood sugar. Use them carefully, as too much can taste funny.
Fruit Purées: A great way to add natural sweetness and thickness. Blend ripe fruits like dates (soaked), bananas, or berries.
Homemade Simple Syrups (Diluted): Infuse water with fruit or ginger. Then add a very small amount of sweetener. This lets you control the sugar!
4. Spices and Extracts
Don’t forget the power of a pinch of spice or a few drops of extract.
Cinnamon, Cardamom, Cloves: Great for cozy, warm mocktails, especially with apple or citrus.
Vanilla Extract: Adds a smooth, sweet smell.
Almond Extract: Just a few drops can change a simple drink.
How to Make Healthy Mocktails:Techniques and Tips
Making healthy mocktails is about more than mixing ingredients. It’s about learning a few easy techniques that make your drink truly amazing.
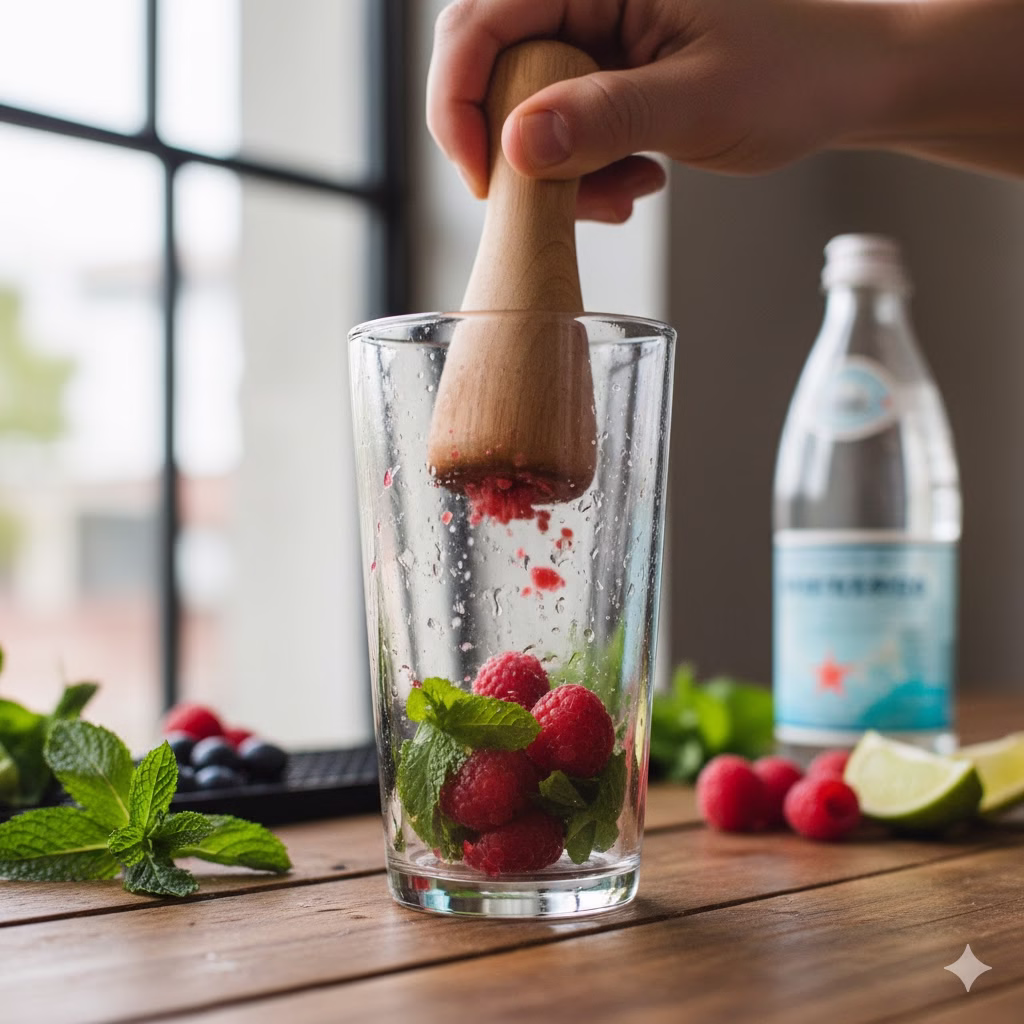
1. Muddling
What it is: Gently pressing fruits or herbs. This releases their juices and essential oils using a muddler or a spoon.
How to do it: Put your fruit or herbs into the bottom of a strong glass. Press down and twist a few times, but be gentle. You want to release the flavors, not make a mess of pulp.
Examples: Mint for a Mojito-style mocktail, or berries for a fruity spritzer.
2. Shaking
What it is: Mixing ingredients in a shaker with ice. This chills, slightly dilutes, and mixes the drink well.
How to do it: Fill a cocktail shaker halfway with ice. Add your liquid items (juices, syrups, etc.). Close the lid tightly and shake hard for 10 to 15 seconds. The shaker should look frosty.
Examples: Drinks with citrus juice, purées, or anything that needs a good chill and blend.
3. Layering
What it is: Creating separate colored layers in your drink. You pour liquids with different densities carefully.
How to do it: Pour the heaviest (most dense) liquid first. Then, pour the lighter liquid slowly over the back of a spoon. Hold the spoon against the inside of the glass.
Examples: Adding a splash of fruit juice to the bottom, then topping it with sparkling water.
4. Infusing & Syrups (Low-Sugar Style)
Make healthier syrups instead of using sugar-heavy ones.
Herbal or Fruit Infusions: Steep fresh herbs (like mint or rosemary) or fruit slices (cucumber, ginger) right in your sparkling water or tea. Do this for 30 minutes or an hour for subtle flavor.
Low-Sugar Simple Syrup: Mix equal parts water and a small amount of maple syrup/agave/erythritol in a pot. Heat it until the sweetener dissolves. For flavored syrups, add herbs or fruit while heating, then strain the mix after it cools. This keeps the sugar in your control!
Example: Ginger Syrup: Mix 1/2 cup water, 1/4 cup erythritol, and 1/4 cup sliced fresh ginger. Simmer for 10 minutes. Strain and cool.
5. Garnishes: The Perfect Finish
Garnishes look nice and add scent. They make the drinking experience better.
Fresh Herbs: A small bunch of mint, a basil leaf, or a sprig of rosemary.
Citrus Slices or Peels: Classic and fragrant.
Fruit Sticks: Berries or melon balls placed on a skewer.
Edible Flowers: For a touch of fancy style.
Cucumber Ribbons: Adds a spa-like feel.
5 Delicious Healthy Mocktails to Try Now
Let’s start mixing! Here are five easy and delicious healthy mocktail recipes. They are low-sugar and low-calorie. They work perfectly for any time.
1. Sparkling Berry Mint Refresher
A bright, refreshing, and naturally sweet mocktail.
Calories: About 30-50 per serving
Ingredients:
1/2 cup mixed berries (strawberries, raspberries, blueberries), fresh or frozen
5-6 fresh mint leaves
1/2 lime, juiced
1/4 to 1/2 teaspoon erythritol or a small amount of maple syrup (optional, to your taste)
1 cup unflavored sparkling water or club soda
Ice
Garnish: Fresh berries and a mint sprig
How to make it:
In a strong glass, add the mixed berries and mint leaves.
Gently muddle the berries and mint. This releases their juices and oils.
Add the fresh lime juice and the sweetener (if you are using it).
Fill the glass with ice.
Pour sparkling water over the top.
Stir gently to mix.
Garnish with extra berries and a mint sprig.
2. Cucumber Ginger Spritzer
Cool, spicy, and very hydrating.
Calories: About 20-40 per serving
Ingredients:
4-5 thin slices of cucumber
2-3 thin slices of fresh ginger
1/2 lemon, juiced
1/4 teaspoon erythritol or a tiny drizzle of agave (optional)
1 cup unflavored sparkling water
Ice
Garnish: A cucumber ribbon and a lemon slice
How to make it:
In a glass, gently muddle the cucumber and ginger slices. This releases their flavors.
Add the fresh lemon juice and sweetener (if you are using it).
Fill the glass with ice.
Pour sparkling water over the top.
Stir well.
Garnish with a cucumber ribbon (use a vegetable peeler to make one) and a lemon slice.
3. Tropical Green Tea Tango
An exotic, antioxidant-rich mocktail with a subtle tea base.
Calories: About 40-60 per serving
Ingredients:
1/2 cup chilled, strong-brewed green tea
1/4 cup unsweetened pineapple juice (or mashed fresh pineapple chunks)
1 tablespoon fresh lime juice
1/2 teaspoon passion fruit purée (unsweetened, if possible) or a few fresh passion fruit seeds
A pinch of erythritol or stevia (optional, to your taste)
1/2 cup sparkling water or club soda
Ice
Garnish: A pineapple wedge and a lime wheel
How to make it:
If using fresh pineapple, mash a few chunks in a shaker.
Mix the chilled green tea, pineapple juice, lime juice, passion fruit purée, and sweetener (if using) in a cocktail shaker. Fill it with ice.
Shake hard for 10 to 15 seconds until the mix is very cold.
Strain the drink into a glass filled with fresh ice.
Pour sparkling water over the top.
Garnish with a pineapple wedge and a lime wheel.
4. Spiced Apple Cider Fizz
A cozy, warm, yet refreshing mocktail for colder times.
Calories: About 50-70 per serving
Ingredients:
1/2 cup unsweetened apple cider (or natural apple juice mixed with water)
1/4 teaspoon ground cinnamon
A pinch of ground cloves (optional)
A squeeze of fresh lemon juice
1/2 cup unflavored sparkling water
Ice
Garnish: An apple slice and a cinnamon stick
How to make it:
In a glass, mix the apple cider, cinnamon, cloves (if using), and lemon juice. Stir well.
Fill the glass with ice.
Pour sparkling water over the top.
Stir gently.
Garnish with an apple slice and a cinnamon stick.
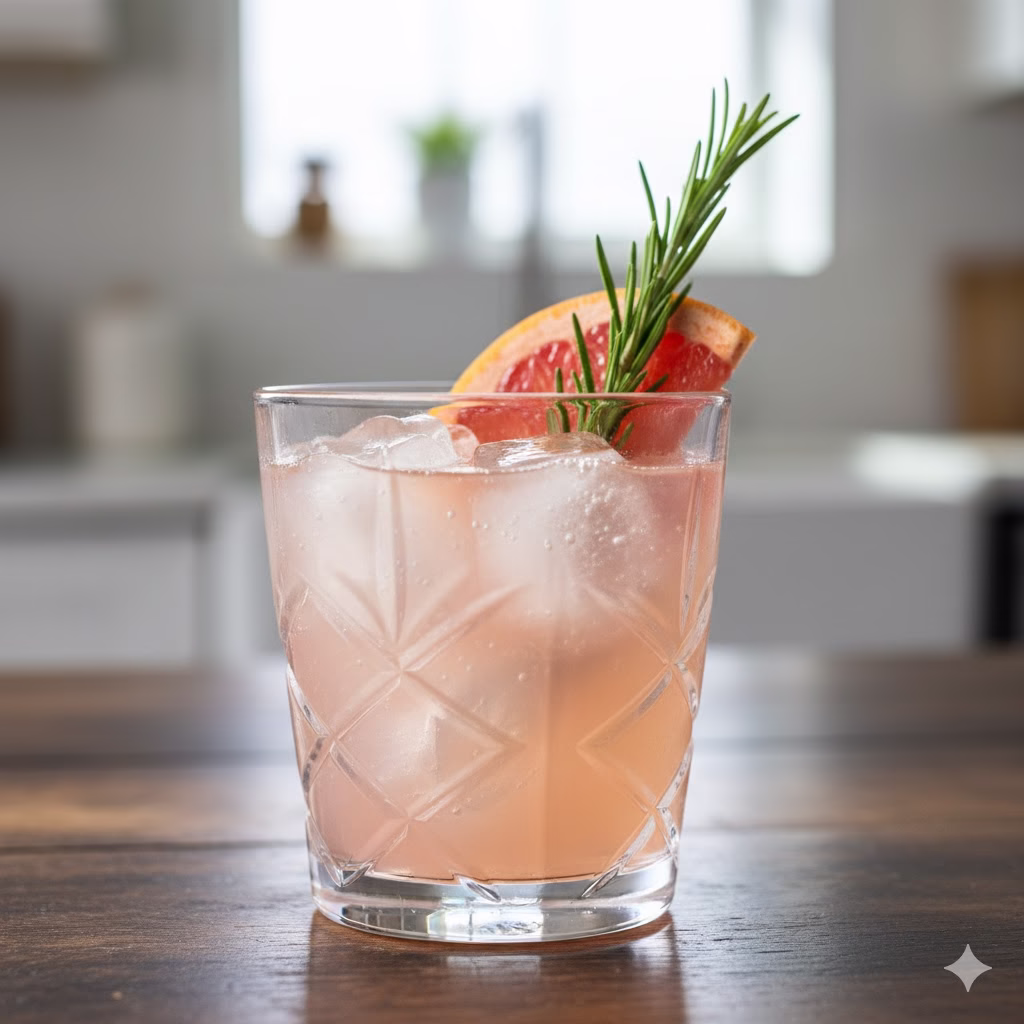
5. Rosemary Grapefruit Elixir
A sophisticated, slightly tart, and lovely smelling drink.
Calories: About 30-50 per serving
Ingredients:
1/2 cup fresh grapefruit juice (unsweetened)
1 sprig of fresh rosemary, plus extra for garnish
1/4 teaspoon erythritol or a tiny drizzle of agave (optional, to cut bitterness)
1/2 cup unflavored sparkling water
Ice
Garnish: A rosemary sprig and a grapefruit slice
How to make it:
In a glass, gently muddle the rosemary sprig. This releases its oils.
Add the fresh grapefruit juice and sweetener (if using). Stir well.
Fill the glass with ice.
Pour sparkling water over the top.
Stir gently to mix.
Garnish with a fresh rosemary sprig and a grapefruit slice.
Tips for Best Results and Customization for Healthy Mocktails
Taste as You Go: This is very important! Everyone has a different taste. Start with less sweetener. You can always add more later.
Fresh Tastes Best: Always use fresh juices and herbs for the best flavor.
Use Lots of Ice: Plenty of ice keeps your mocktail cold. It prevents it from tasting watery too fast. Use large ice cubes if you can.
Try Infusions: Try letting your sparkling water sit with cucumber and mint overnight. Or make a large batch of low-sugar ginger syrup.
Balance is Key: A great mocktail balances sweet, sour, and sometimes bitter or spicy notes.
Make Batches for Parties: If you are hosting, prepare your fruit purées, juices, and low-sugar syrups ahead of time. Mix individual drinks with sparkling water right before serving. This keeps the drink fizzy.
Good Presentation Matters: A nice glass and a beautiful garnish make the experience much better.
Taking Your Healthy Mocktails to the Next Level
To make your mocktails even better, try a little more creativity and attention to detail.
Homemade Infusions and Flavored Ice
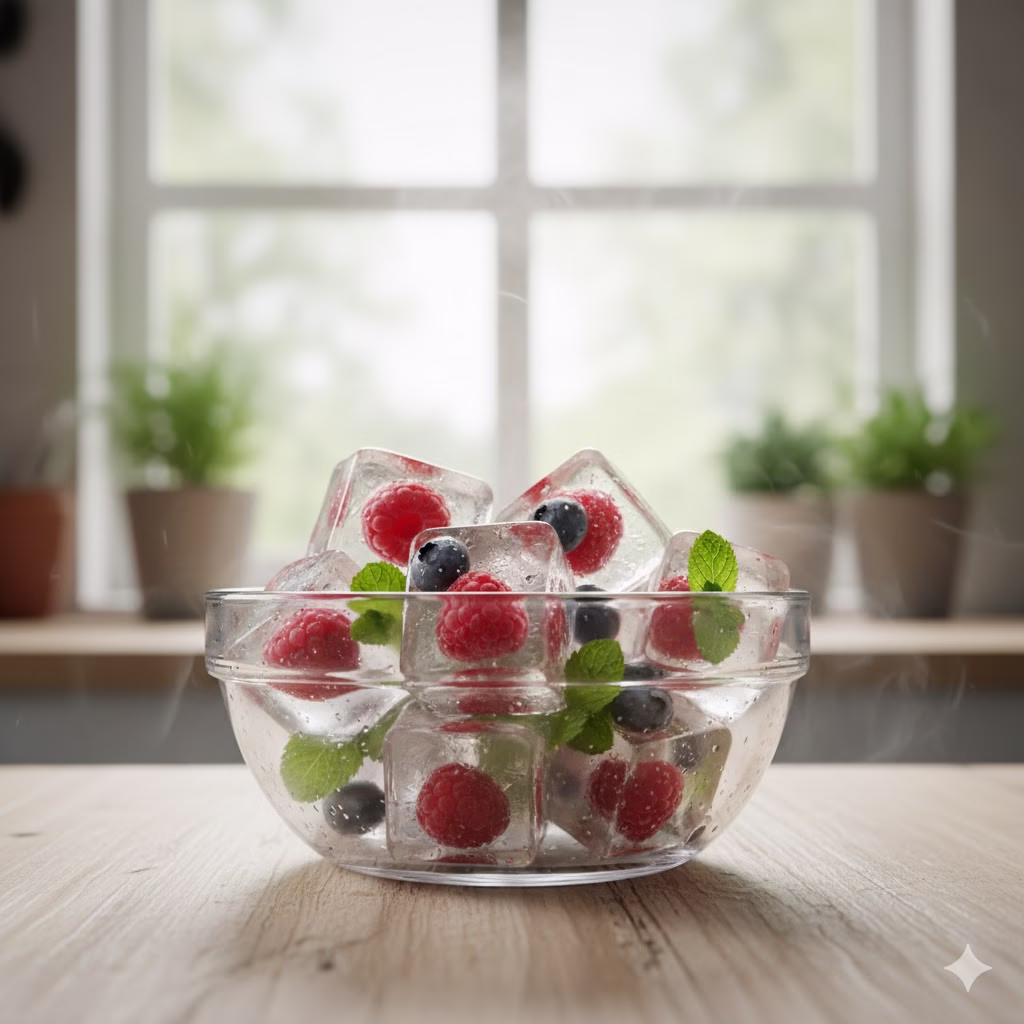
Fruit and Herb Ice Cubes: Freeze water with small bits of fruit (berries, citrus peel) or herb leaves (mint, basil). When they melt, they subtly flavor the drink instead of watering it down.
Floral Teas: Brewed and chilled hibiscus, rosehip, or lavender tea can make a beautiful base. They add complex floral tastes and vibrant colors.
Vegetable Juices: A small amount of fresh carrot, beet, or celery juice adds an earthy depth and nutrients. They pair well with citrus or ginger.
The Right Tools
You don’t need a professional bar setup, but a few tools help:
Muddler: Necessary for getting the flavor out of fruits and herbs.
Cocktail Shaker: For properly chilling and mixing your ingredients.
Jigger or Measuring Spoons: For measuring concentrated flavors accurately.
Citrus Juicer: A good squeezer makes juicing fresh citrus very easy.
Fine-Mesh Strainer: Use this to remove pulp or herb pieces if you want a smoother drink.
Variety of Glasses: Different glass shapes can make the drink more enjoyable.
Conclusion: Drink Healthy Mocktails for Greater Hydration
Making delicious healthy mocktails is a fun way to try new things. Use fresh, natural ingredients. Use less sugar. Experiment with different flavors. You can create drinks that taste great and also help your well-being. Whether you are hosting a party, relaxing after a long day, or just need a refreshing, healthy drink, these low-sugar, low-calorie mixes offer endless choices. So, grab your muddler, choose your favorite fruits and herbs, and start mixing. Your taste buds and your body will both thank you!
FAQ (Frequently Asked Questions)
Q1: What makes a mocktail truly “healthy”?
A1: A mocktail is healthy when it uses mostly fresh, natural items. It is low in added sugars and artificial sweeteners. And low in calories. It typically includes fruits, vegetables, herbs, and sparkling water or unsweetened teas.
Q2: Can I use frozen fruit for healthy mocktails?
A2: Yes, absolutely! Frozen fruit works great for mashing (muddling) or blending into purées. It also helps keep your drink colder for longer without getting watery too fast.
Q3: How can I make my mocktails more fizzy without adding sugar?
A3: Use unflavored sparkling water, club soda, or seltzer as your main bubbly base. Make sure these are very cold before you mix. You can also try naturally fermented drinks like kombucha (choose low-sugar types) for extra fizz and probiotics.
Q4: What is the best way to sweeten a mocktail without using sugar?
A4: Focus on the natural sweetness found in ripe fruits (like berries, mango, or pineapple). If you need more sweetness, use very small amounts of zero-calorie sweeteners like erythritol or stevia. A tiny bit of pure maple syrup or agave nectar also works. You can also make low-sugar syrups by mixing these sweeteners with water and infusing them with fruit or herbs.
Q5: How early can I prepare the mocktail ingredients?
A5: You can prepare most juices, purées, and low-sugar syrups 1 to 2 days before. Store them in closed containers in the refrigerator. For the best taste and fizz, always mix the final mocktail with sparkling water and ice right before you serve it. Add fresh herbs and garnishes at the very end.
Q6: Are the store-bought “zero-proof” spirits healthy?
A6: It depends on the brand. They are alcohol-free, but some might still have added sugars or fake ingredients. Always check the nutrition facts and ingredient list. Make sure they meet your goal for a healthy mocktail.
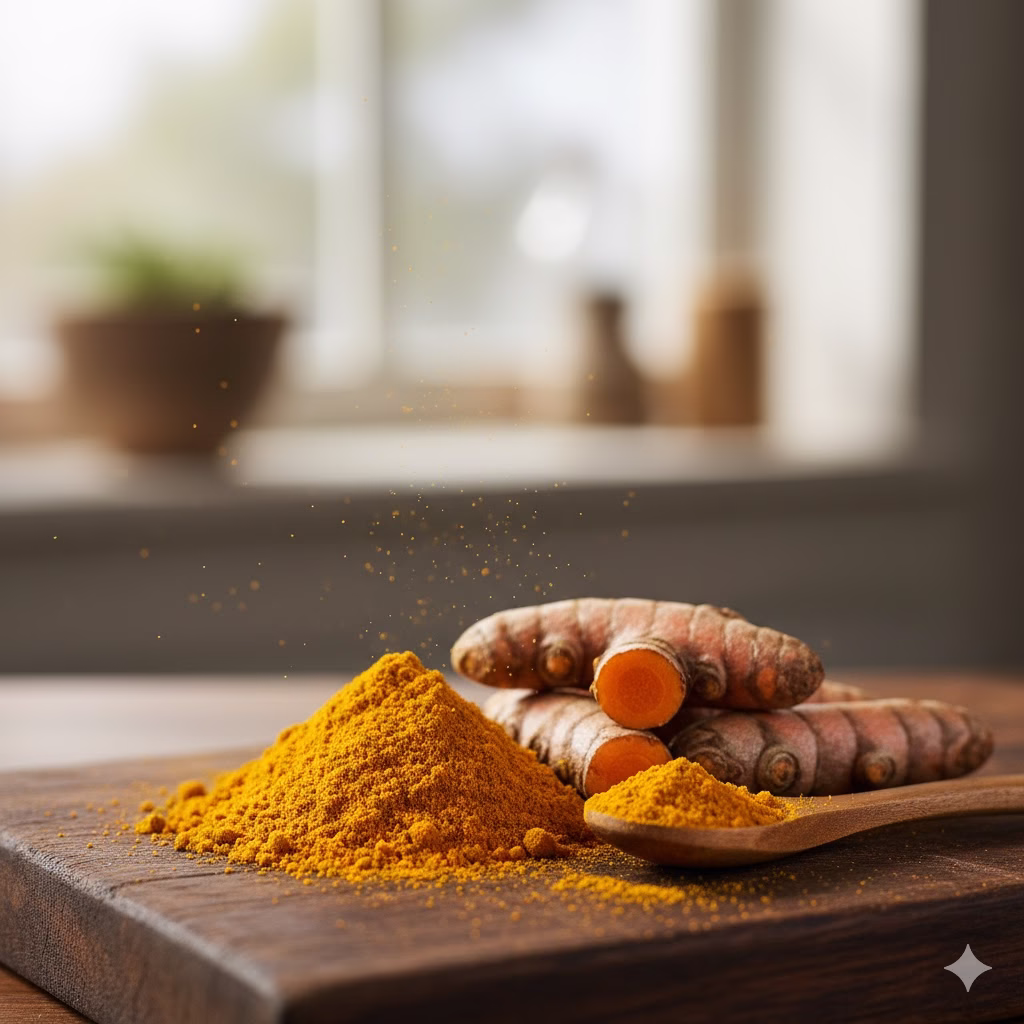
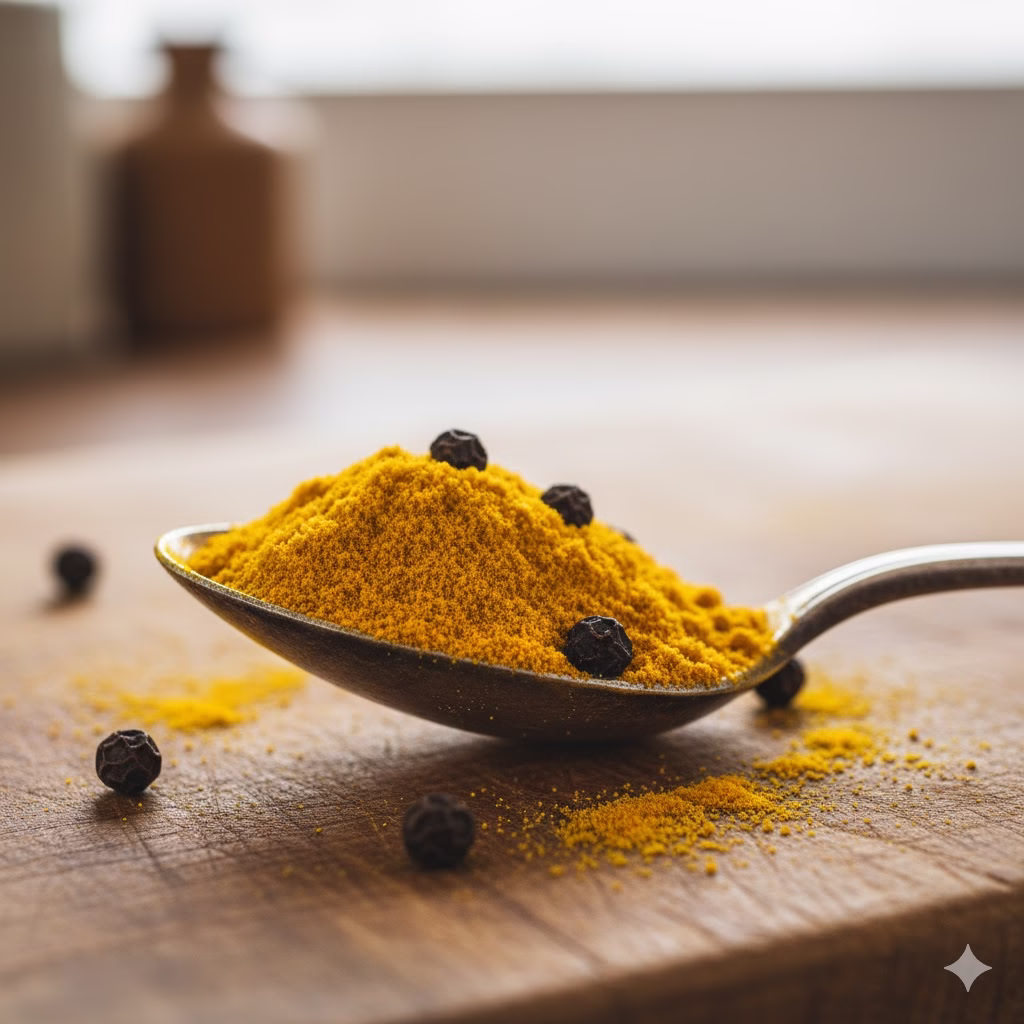
I used to think spices just made food taste good. Who would have guessed that the bright yellow powder in my kitchen—the one I only used for curry—was a secret health weapon. I love finding easy, natural fixes for daily health problems. It could be fighting fatigue or getting glowing skin. After researching the facts, I learned that Turmeric isn’t a new trend. It’s a powerful, old remedy that we all need to start using the right way.
Check your spice rack. You have a powerful secret right there! People have used it for thousands of years in Indian and Chinese medicine: Turmeric. This bright, yellow-gold root is called Curcuma longa by scientists. It gives curry its famous color and its deep, earthy taste. Turmeric is great for cooking, but its real power comes from its healing properties.
The huge power of turmeric comes from special parts called curcuminoids. The most important one is curcumin. Curcumin is a strong plant chemical. It does amazing things, especially when fighting bad cells and stopping swelling inside your body. Most of the health benefits of turmeric are thanks to this one, very active part.
Here is a major key: your body has trouble absorbing curcumin on its own. Your body breaks it down fast and throws it out. To get the most benefit from this golden spice, you must know how to eat it correctly. We will tell you that crucial secret soon.
Ready to unlock the full power of this simple spice? Here are 10 great ways research proves Turmeric can give your health a major lift.
1. Turmeric is the Best Natural Fighter Against Long-Term Swelling
If curcumin had one super power, it would be stopping inflammation. Short-term swelling is good. It helps your body fix injuries and fight sickness. But chronic (long-term) swelling is a huge problem. Experts now believe it causes or worsens almost every major illness. This includes heart disease, cancer, diabetes, and memory loss.
Curcumin works deep inside your cells. It blocks a key molecule called NF-kappaB. This molecule goes into your cells and turns on the genes that create swelling. By stopping NF-kappaB, curcumin basically hits the ‘stop’ button on the whole swelling process.
Example & How to Do It:
How to Do It: To get this strong effect, you usually need a powerful supplement. It must include piperine (the active part of black pepper). Piperine helps your body take in the curcumin up to 2,000% better.
Dosage Example: Studies often use 500 mg to 2,000 mg of curcumin extract daily. This extract is usually concentrated to 95% curcuminoids. Always ask your doctor or health expert for the right dose for your needs.
2. Sharpening Your Focus and Boosting Your Memory
Years ago, scientists thought brain cells could not grow once you were an adult. We now know that’s wrong! This growth is fueled by Brain-Derived Neurotrophic Factor (BDNF). BDNF is like a fertilizer for your brain. It is vital for learning, holding memories, and keeping all your brain cells healthy.
Low BDNF levels are linked to issues like depression and Alzheimer’s disease. Curcumin has been shown to raise the level of BDNF in your brain. This may help improve your memory and slow down the mental decline that happens with age.
How to Do It:
Daily Golden Latte: Drink a “Golden Milk” or Turmeric Latte every day (see the recipe below). Always add a healthy fat, like full-fat milk or coconut oil, and a pinch of black pepper. You must use it daily to see long-term brain benefits.
3. Protecting Your Heart by Improving Blood Flow
Heart disease kills more people than anything else worldwide. A major reason is damage to the endothelium. This is the special lining of your blood vessels. When it is damaged, it can’t properly manage blood pressure, clotting, or other key body jobs.
Curcumin has been proven to improve the way the endothelium works. In one important study of heart surgery patients, those who took four grams of curcumin daily before and after surgery had a 65% lower chance of having a heart attack while in the hospital.
How to Do It:
Dietary Integration: Start adding turmeric to savory meals. Try it in soups, stews, and roasted vegetables. Use between a half and one teaspoon of turmeric powder daily. Add a healthy cooking oil like olive or avocado oil for better absorption.
4. Natural Pain Relief, Especially for Joint Pain
Curcumin is great at stopping swelling, so it makes sense that it helps fight painful conditions like arthritis. Arthritis causes swollen joints, stiffness, and pain.
Several quality studies show that curcumin supplements can lower pain and help people move better. This applies to both osteoarthritis and rheumatoid arthritis. In some cases, it worked as well as standard pain pills, but without the risk of their side effects.
How to Do It:
Supplementation: If you have ongoing joint pain, you will likely need a strong curcumin supplement. You need the high doses used in studies to feel real relief.
5. Boosting Your Body’s Own Ability to Fight Damage
Oxidative damage is a main cause of aging and sickness. This damage comes from free radicals. These are unstable molecules that hurt important parts of your cells, like fats and DNA.
Curcumin is a very strong antioxidant. Its structure lets it directly stop these free radicals. Curcumin does more than just stop them. It also boosts your body’s own natural antioxidant enzymes. This gives you double protection against cell damage.
How to Do It:
Turmeric Tea: Make a simple turmeric tea. Boil 1 cup of water. Add 1 teaspoon of ground turmeric (or a slice of fresh root), a squeeze of lemon, and a necessary pinch of black pepper. Drink this warm tea in the afternoon.
6. A Promising Tool in the Fight Against Serious Illness
We still need more studies on people, but lab tests show exciting results for curcumin against cancer. Cancer is when cells grow out of control. Curcumin has been shown to affect this process in a few ways.
Researchers have looked at its ability to:
Help abnormal cells die (this is called apoptosis).
Slow down angiogenesis (when tumors grow new blood vessels to get food).
Reduce metastasis (when a tumor spreads to other body parts).
How to Do It:
Include it in: Always follow your doctor’s medical advice first. But regularly adding turmeric to your daily diet is a safe, easy step toward better health. Mix it into soup bases, use it on chicken, or blend it into your vegetable sauces.
7. Helping to Improve Your Mood and Fight Sadness
Turmeric’s benefits even reach your mental health. Evidence suggests that curcumin may help with depression. In one study, 60 people with major depression were split into three groups. One group took an anti-depressant drug, one took curcumin, and one took both. The group that took only curcumin showed improvements just as good as the drug group.
This mood lift is likely connected to the higher BDNF levels we talked about. It may also help increase key brain chemicals like serotonin and dopamine. These are essential for keeping your mood happy and stable.
Example & How to Do It:
Mindful Dosing: If you use supplements for mood help, try splitting your daily dose into two. Take one in the morning and one in the evening. This keeps the curcumin level in your blood steady.
8. Supporting a Healthy Stomach and Better Digestion
Turmeric has been used for a long time to calm stomach issues. Today’s science agrees with these old uses. Its power to stop swelling helps calm irritation inside the gut. This relief is especially good for people with issues like IBS (Irritable Bowel Syndrome) and chronic gut swelling.
Also, curcumin may help your gut microbiome. It seems to help good bacteria grow. At the same time, it makes the environment worse for bad bacteria. This leads to a better, more balanced digestive system.
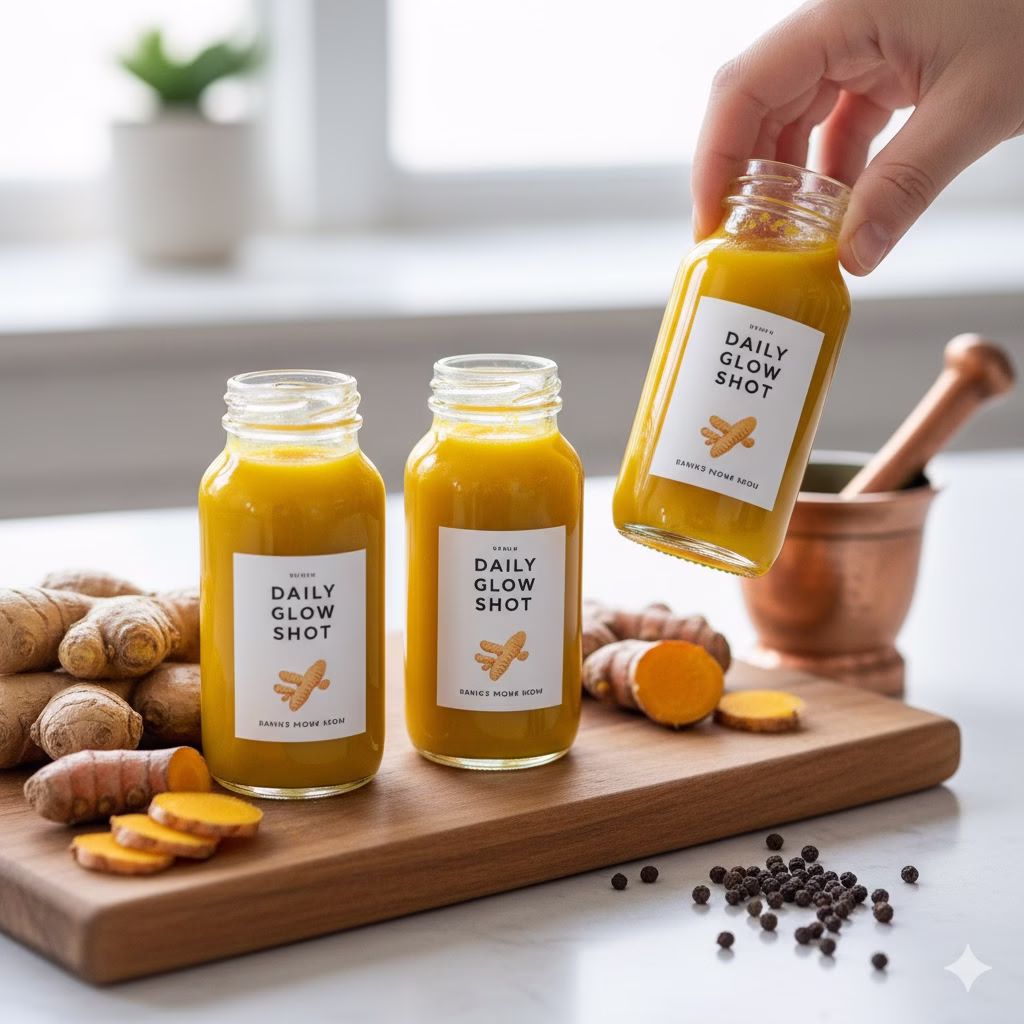
How to Do It:
DIY Turmeric Shots: Juice fresh turmeric and ginger root. Mix 1 tablespoon of this strong juice with a dash of black pepper and 1 teaspoon of honey. Take this shot daily for a strong stomach boost.
9. A Natural Glow: Getting Healthier Skin
From old ceremonies to modern beauty products, putting turmeric on the skin is famous. But eating it also helps your skin from the inside. By stopping swelling and fighting skin damage, curcumin can:
Help clear up acne and reduce redness.
Smooth out the look of fine lines and wrinkles.
Give your skin a much brighter, more natural look.
Example & How to Do It:
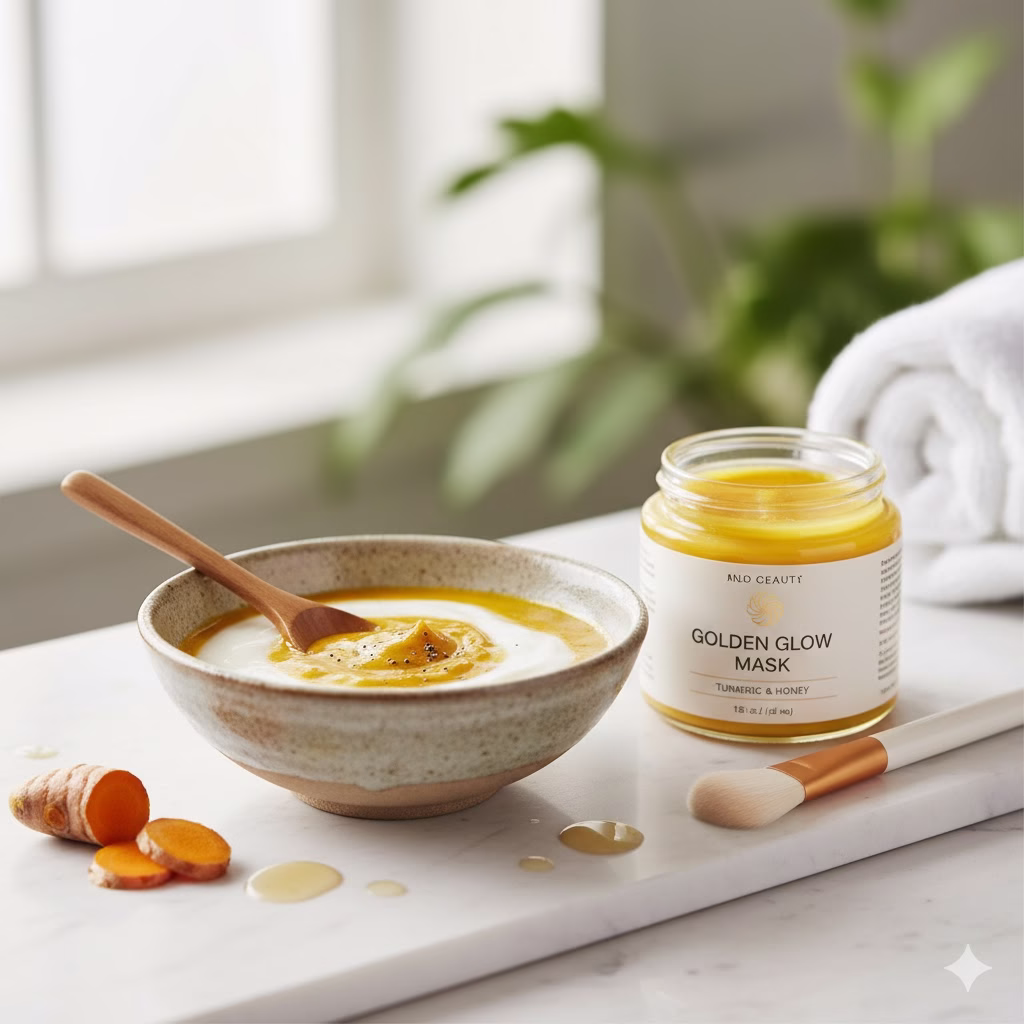
DIY Face Mask: For outside use, mix 1/2 teaspoon of turmeric powder with 1 tablespoon of plain yogurt and 1 teaspoon of honey. Put it on your face for 10 to 15 minutes, then wash it off. Note: Turmeric will stain yellow! Use towels you don’t care about.
10. Helping Your Metabolism and Managing Blood Sugar
If you are trying to manage or avoid issues like diabetes, turmeric is a great thing to add to your diet. Studies show that curcumin can help your body use insulin better. This helps your body handle glucose (sugar) well.
Its strong anti-inflammatory effects play a big part here, too. Long-term swelling is directly tied to insulin problems. By calming this swelling, curcumin helps your body use blood sugar more easily.
How to Do It:
Consistency over Quantity: Adding small amounts to your meals every day is the best way to support your metabolism over time. Try a small pinch in your morning smoothie, your eggs, or on top of roasted vegetables.
How to Maximize Turmeric’s Absorption: The Key Secret
We know that your body doesn’t absorb curcumin well. To get the maximum health impact from Turmeric, follow these two critical rules:
Always Add Black Pepper (Piperine): Black pepper has piperine. This natural compound is what makes all the difference. It can increase your body’s ability to use curcumin by a huge 2,000%. If you use turmeric powder in cooking, a small pinch of pepper is a must. Most quality supplements already include piperine.
Combine with a Healthy Fat: Curcumin is fat-soluble. This means it dissolves in fat, not water. Eating it with a healthy fat like olive oil, coconut oil, or whole milk helps your body take it from your stomach and put it into your blood better. This is the main reason why the traditional “Golden Milk” recipe works so well.
Recipe Example: The 3-Minute Golden Milk (Turmeric Latte)
This is the perfect and tastiest way to get your daily dose of easily-absorbed curcumin.
Ingredients:
1 cup of your choice of milk (dairy, almond, or coconut)
1/2 teaspoon of ground Turmeric
1/4 teaspoon of ground ginger (optional, for extra flavor)
A small dash of black pepper (THIS IS A MUST for absorption)
1 teaspoon of coconut oil or another healthy oil/fat
Honey or maple syrup to make it sweet
Instructions:
Put all the ingredients (except the sweetener) into a small pot.
Whisk it without stopping over medium heat until it is hot and foamy. Do not let it boil (about 3 minutes is enough).
Take the pot off the heat, strain the drink if you want it smoother, add your sweetener, and enjoy!
Frequently Asked Questions (FAQ)
Q1: Will I get all the health benefits just by using turmeric in my normal cooking?
A: Using turmeric in your food is excellent for general health. But the small amounts people use in cooking have very little curcumin. To get the strong, healing effects (like reducing long-term swelling or joint pain) found in studies, you usually need a strong, specialized curcumin supplement. These are often made with piperine to help absorption. Using about 1 teaspoon of turmeric powder in your food every day is great for overall wellness.
Q2: Is fresh turmeric root better than the dried powder?
A: Fresh turmeric root tastes better and keeps all its natural oils. Dried powder is just the root ground up. They are very similar in nutrition. Fresh might be slightly better because it keeps more of the natural oils. The best choice is what you find easiest to use. However, for getting the highest dose of curcumin, the concentrated extracts are the strongest choice.
Q3: Are there any side effects or risks to taking turmeric or curcumin?
A:Turmeric as a spice is very safe. Curcumin supplements are also safe for most people, even in large doses. But large doses can sometimes cause minor stomach problems like pain or diarrhea. Curcumin can also slightly thin the blood. If you already take blood thinning medication, you must talk to your doctor before taking any supplements.
Q4: How fast can I expect to see the health benefits of turmeric?
A: This really depends on what issue you are trying to help and how much you are taking. If you are treating simple muscle soreness, you might feel better in a few days. For long-term problems like joint pain, it might take four to 12 weeks of using a quality supplement every day to notice real changes. Consistency is the most important thing.
Conclusion
Turmeric is much, much more than a yellow spice. It is a powerful root that gives you a huge number of health benefits. These benefits are mainly due to its power to fight swelling and free radicals. The compound behind this is curcumin. Whether you start drinking Golden Milk, brew a simple tea, or take a quality supplement, adding this golden spice to your life is an easy step toward a healthier and more energetic future. Start small, use it every day, and watch the ancient magic work.
Discovering the real impact of natural fruit juice on your health is crucial for making informed dietary choices. This article delves into the often-misunderstood world of fruit juice, providing clarity for health-conscious individuals. Learn how to enjoy the benefits while avoiding potential pitfalls of natural fruit juice.
Unpacking the Natural Fruit Juice Debate
For years, natural fruit juice has been a staple in many households, often perceived as an easy and delicious way to get a daily dose of vitamins. Marketing campaigns have long positioned it as a healthy choice, a quick and convenient alternative to eating whole fruit. We’ve been told it’s packed with essential nutrients, a vibrant source of energy, and a natural way to support overall well-being. This perception often leads us to believe that pouring a glass of 100% fruit juice is just as beneficial as biting into an apple or peeling an orange.
However, a closer look reveals a more complex picture. While fruit itself is undoubtedly good for you, the processing involved in making juice can significantly alter its nutritional profile. The convenience and appealing taste often overshadow important distinctions between whole fruit and its liquid counterpart. This article aims to cut through the marketing hype and provide a clear, evidence-based understanding of what natural fruit juice truly offers and where its potential downsides lie.
The Hidden Sugars in Natural Fruit Juice
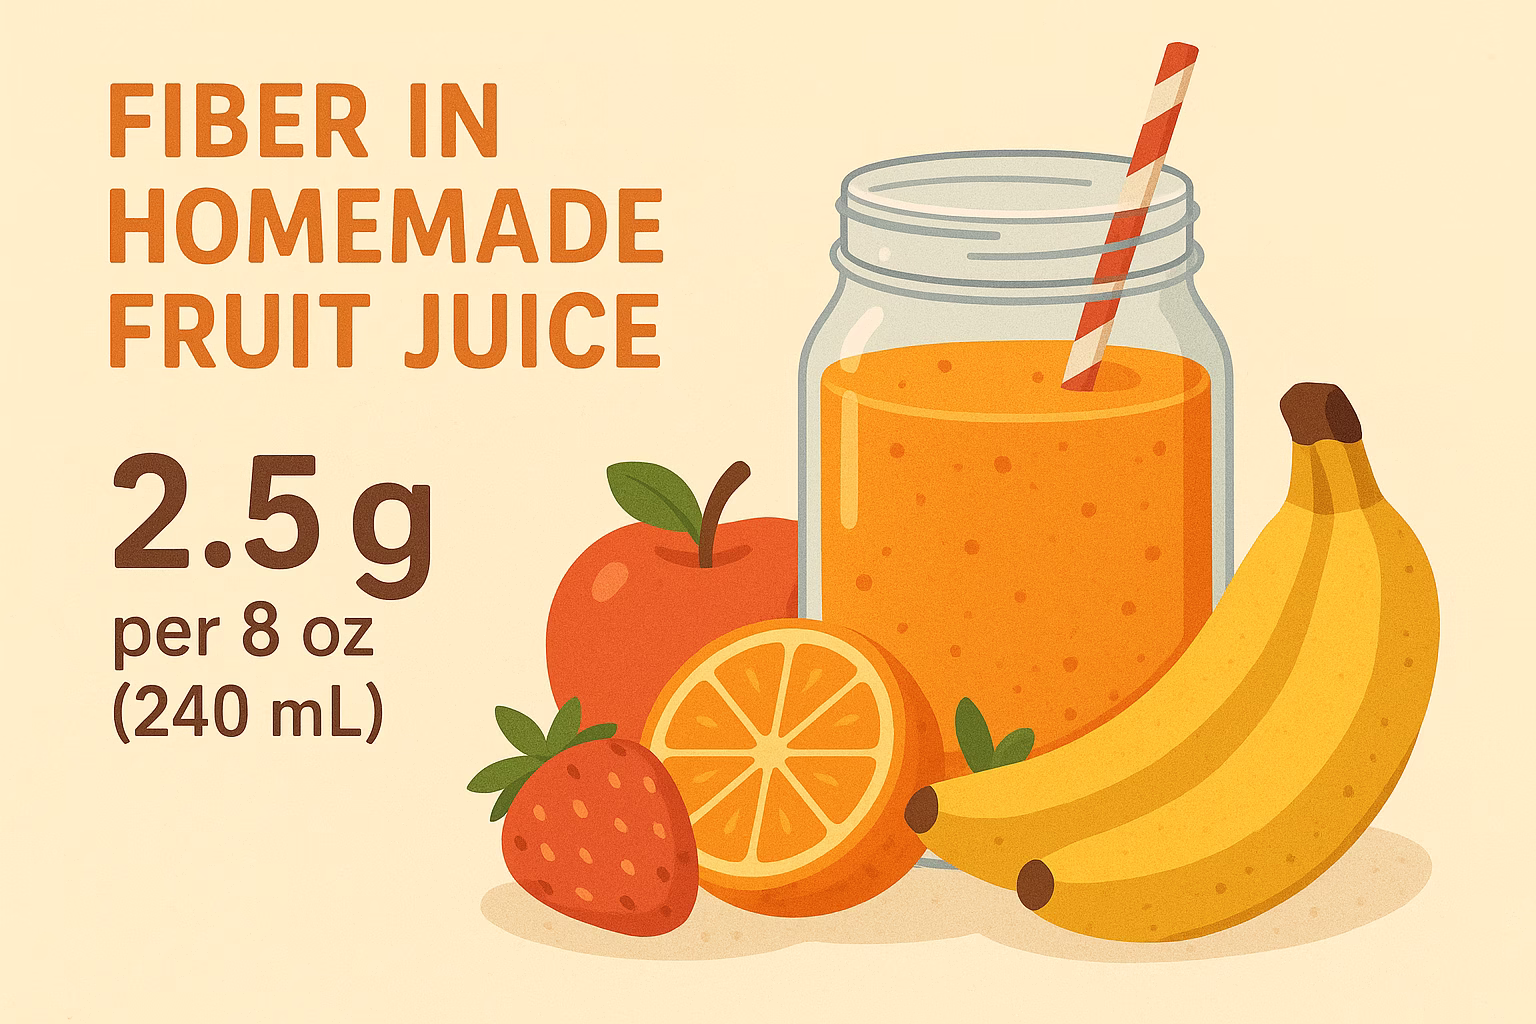
One of the primary concerns surrounding natural fruit juice is its sugar content. Despite being “natural,” the sugars in juice are concentrated, and the fiber found in whole fruit – which helps to slow sugar absorption – is largely absent. This means that a glass of juice can deliver a quick hit of sugar to your bloodstream, similar to a soft drink, albeit with more vitamins. Understanding this distinction is key to making informed choices about including juice in a healthy diet.
We’ll explore the nutritional science behind these claims, differentiate between various types of fruit juice, and provide practical advice for incorporating juice into a balanced lifestyle in a way that truly supports your health goals. From understanding sugar spikes to maximizing nutrient intake, this guide will empower you to navigate the world of natural fruit juice with confidence.
Ultimately, this article isn’t about villainizing fruit juice entirely. Instead, it’s about empowerment through education. By the end, you’ll have a comprehensive understanding of when and how to enjoy natural fruit juice as part of a balanced diet, along with a delicious and genuinely healthy recipe to try.
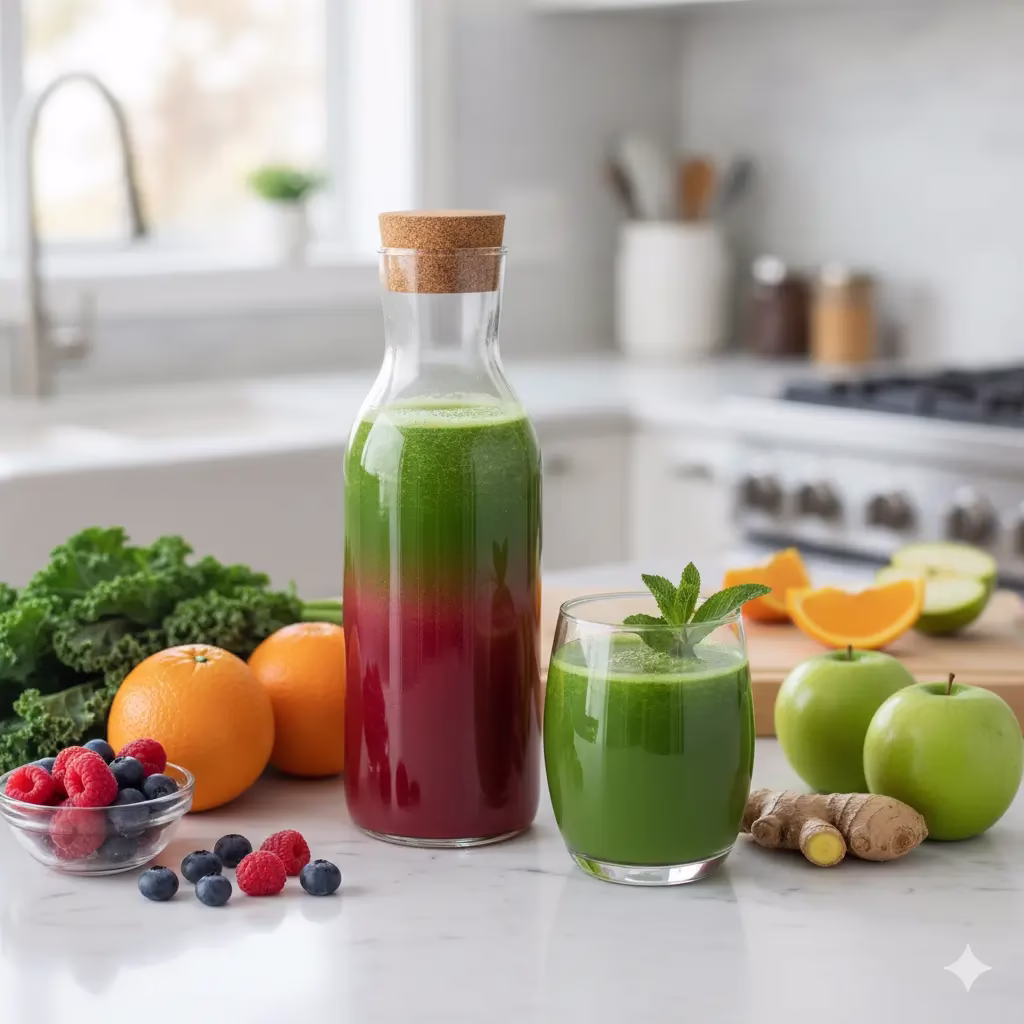
Crafting Your Own Healthy Natural Fruit Juice Blend
Making your own healthy natural fruit juice allows you to control the ingredients and maximize nutrient content. This recipe focuses on a balanced blend of fruits and vegetables to provide vitamins, minerals, and a touch of natural sweetness without overwhelming your system with sugar.
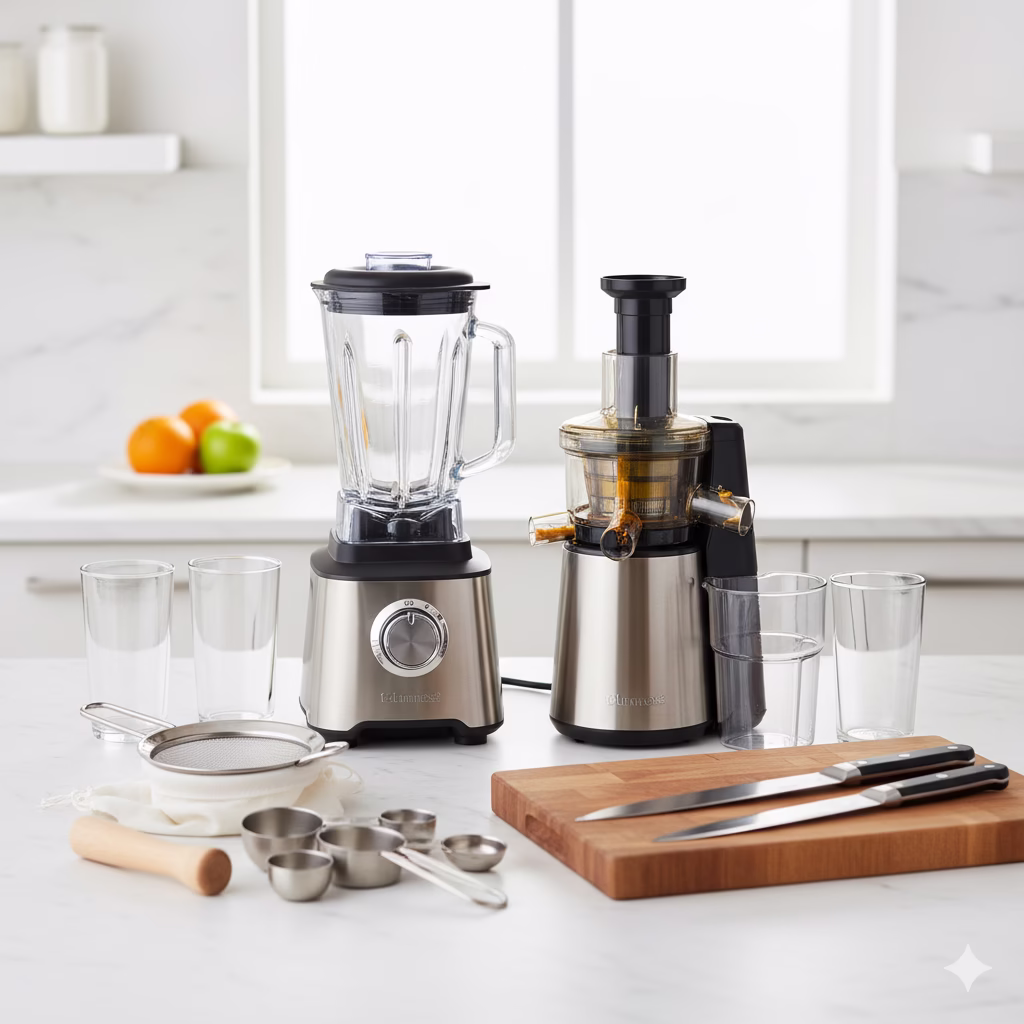
Equipment You’ll Need:
Blender or Juicer: A high-speed blender is excellent for a thicker, fiber-rich juice (often called a smoothie-juice hybrid), while a dedicated juicer will yield a clearer, pulp-free liquid. Choose based on your preference.
Cutting Board: For preparing your fruits and vegetables.
Sharp Knife: To easily chop produce.
Measuring Cups/Spoons: For precise ingredient quantities.
Fine-Mesh Sieve or Nut Milk Bag (Optional): If using a blender and you prefer a smoother, pulp-free juice, this will help strain out solids.
Drinking Glasses: To enjoy your freshly made juice!
Servings: 2
Time to Prepare:
10 minutes
Time to Cook/Blend:
5 minutes
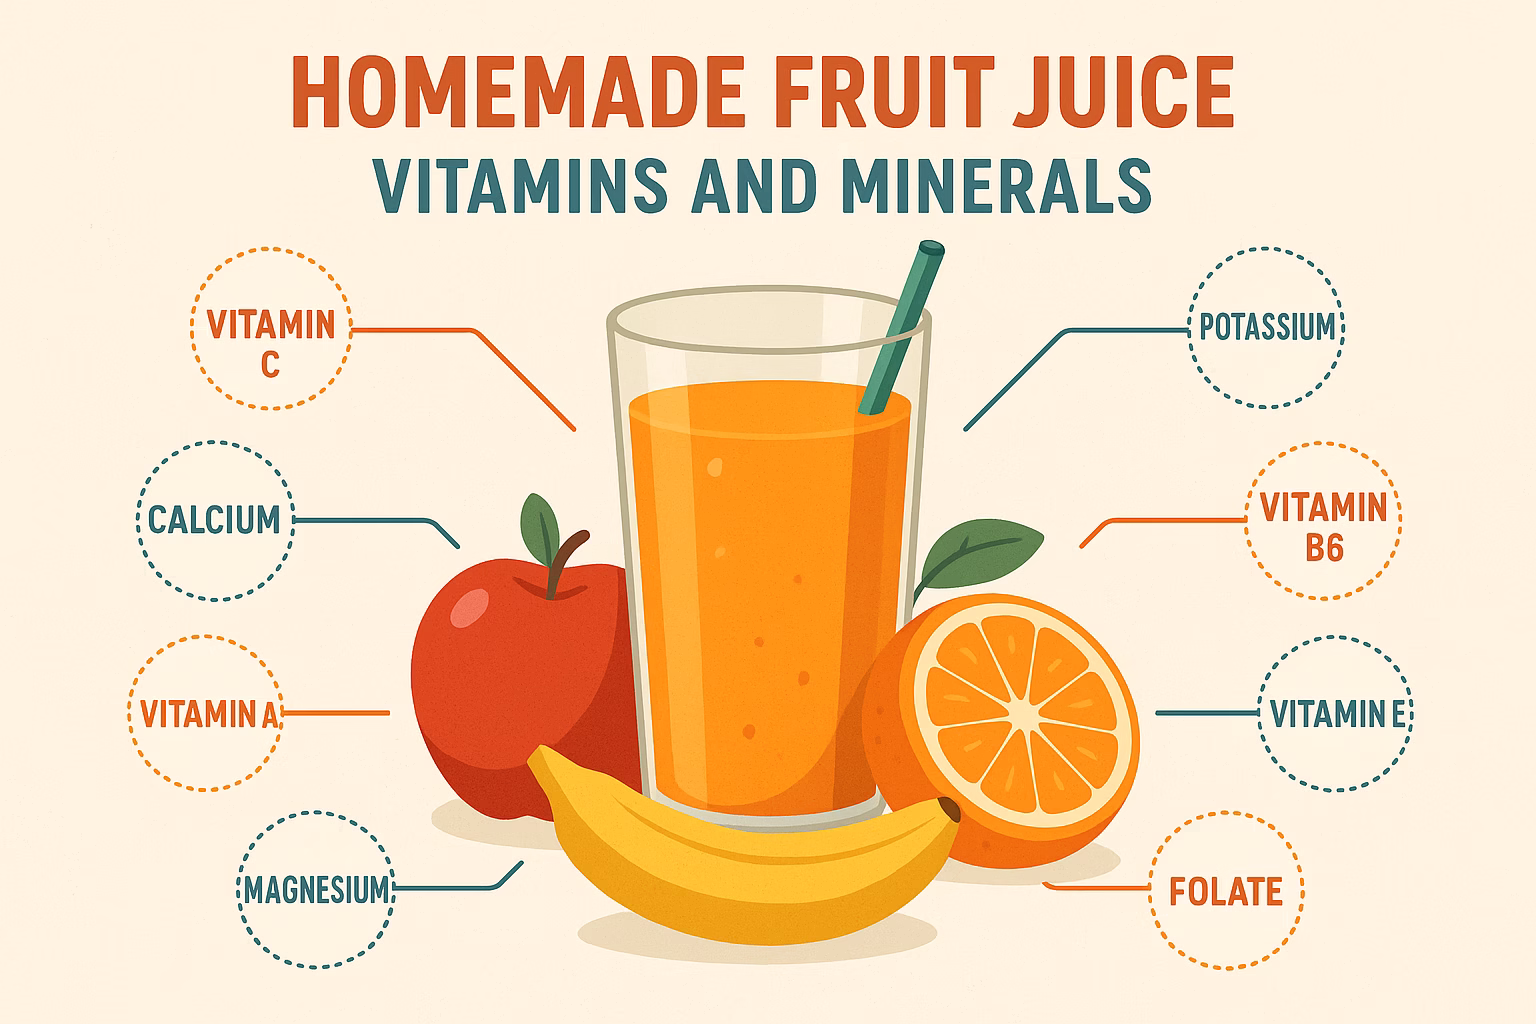
Nutritional Information (per serving, approximate):
Calories: 150-180 kcal
Carbohydrates: 35-45g
Sugars: 20-30g (naturally occurring)
Fiber: 4-6g
Protein: 2-3g
Vitamin C: 100%+ DV
Vitamin A: 50%+ DV
Potassium: Good source
Note: Nutritional values can vary based on exact ripeness of produce and any additional ingredients.
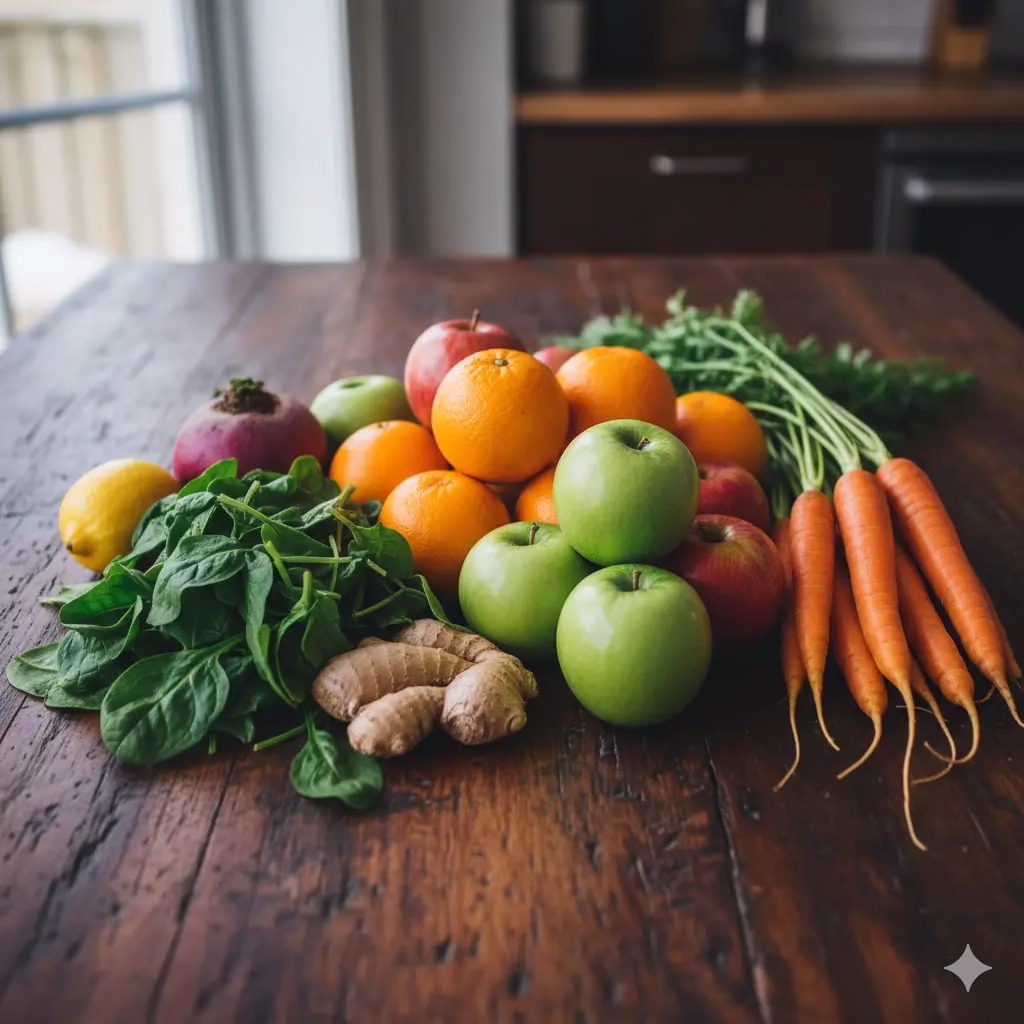
Ingredients for a Refreshing Green-Orange Natural Fruit Juice:
1 large orange, peeled and quartered
A green apple, cored and quartered
1 cup baby spinach, packed
1/2-inch piece fresh ginger, peeled (adjust to taste)
1/2 medium carrot, scrubbed and roughly chopped
1/2 cup filtered water (or more, for desired consistency, especially if blending)
Optional: 1/4 lemon, peeled (for extra tang and vitamin C)
Step-by-Step Instructions: Creating Your Natural Fruit Juice
Follow these detailed steps to ensure a perfect and healthy juice every time.
Prepare Your Produce: Begin by thoroughly washing all your fruits and vegetables under cool running water. Even if you’re peeling them, washing helps to remove any surface contaminants.
Peel and Chop:
Orange: Carefully peel the orange, ensuring you remove as much of the white pith as possible, as it can be bitter. Quarter the orange for easier processing.
Green Apple: Core the apple to remove seeds, then cut it into quarters or smaller pieces. Leaving the skin on provides extra fiber and nutrients; however, if using a juicer, check your model’s recommendations. For a blender, skin-on is usually fine.
Ginger: Using a spoon or a vegetable peeler, gently peel the skin from your 1/2-inch piece of fresh ginger. You can then roughly chop it into smaller pieces to help it blend or juice more easily.
Carrot: Give your half carrot a good scrub with a brush to remove any dirt. You don’t usually need to peel carrots, but you can if preferred. Chop it into manageable pieces, about 1-inch chunks, especially if using a blender.
Spinach: The baby spinach is ready to go as is! Just give it a quick rinse.
Lemon (Optional): If adding lemon, peel it thoroughly, removing all the pith and seeds, then quarter it.
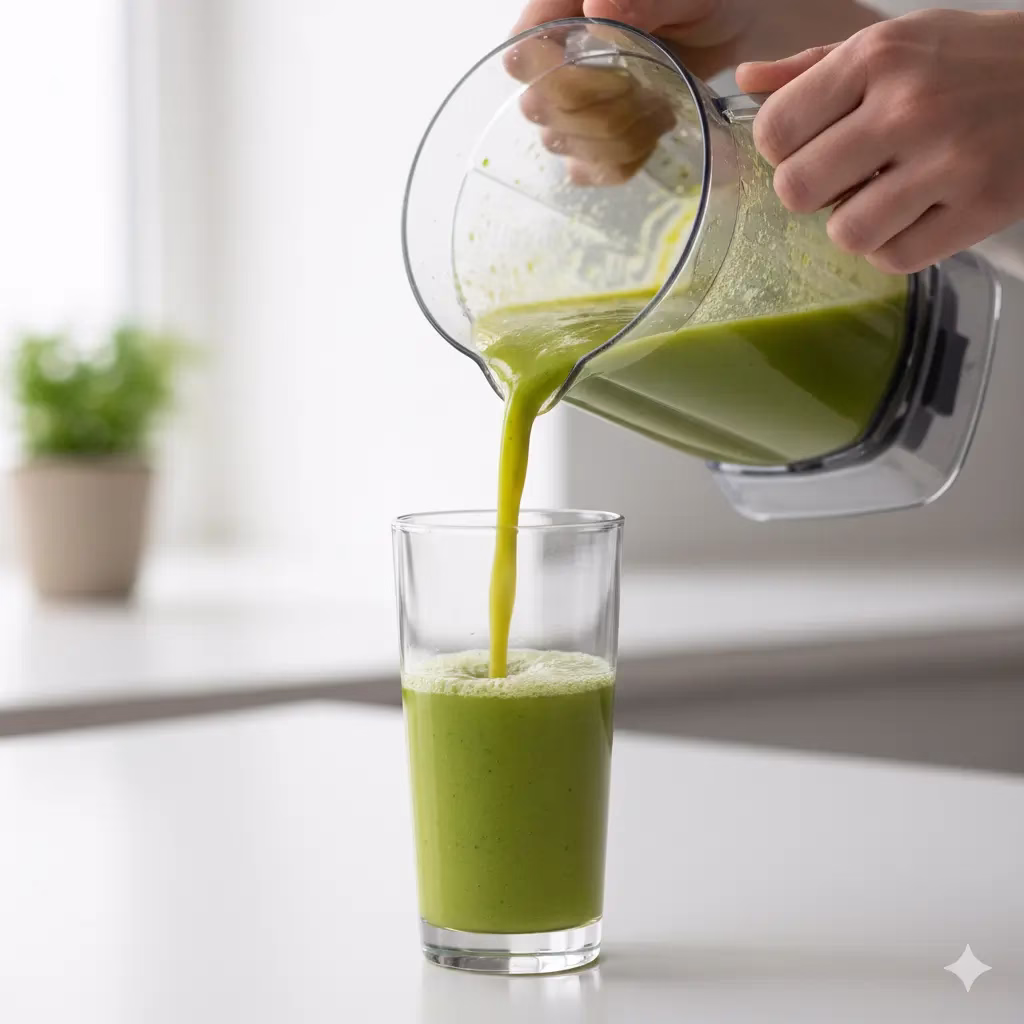
Load Your Appliance (Blender Method): If using a blender, start by adding the liquid first (1/2 cup filtered water). This helps the blades move more efficiently. Then add the softer ingredients like spinach and peeled lemon (if using), followed by the chopped orange, apple, carrot, and ginger. Adding ingredients in this order helps to ensure a smooth blend.
Load Your Appliance (Juicer Method): If using a juicer, you typically feed ingredients in one by one. Start with softer items like spinach, then alternate with harder items like apple, carrot, orange, and ginger. This helps to extract the maximum amount of juice. Follow your specific juicer’s instructions for optimal results.
Blend/Juice Until Smooth:
Blender: Secure the lid and start blending on a low speed, gradually increasing to high. Blend until the mixture is completely smooth and no large chunks remain. This might take 1-2 minutes. If the mixture is too thick, add a little more water (1-2 tablespoons at a time) until you reach your desired consistency.
Juicer: Turn on your juicer and feed the prepared fruits and vegetables through the chute. The machine will separate the juice from the pulp.
Strain (Optional for Blender Juice): If you used a blender and prefer a smoother, pulp-free juice, place a fine-mesh sieve over a large bowl or jug. Line the sieve with a nut milk bag or a few layers of cheesecloth. Pour the blended mixture into the sieve and gently press the pulp with a spoon or your hands (if using a nut milk bag) to extract all the liquid. Discard the remaining pulp or save it for another use (like adding to muffins or compost).
Serve Immediately: Pour your freshly made natural fruit juice into glasses and enjoy! For the best flavor and nutrient retention, consume it right away.
Alternative Methods for Natural Fruit Juice
While a blender or juicer are the primary tools, here are a couple of other approaches for incorporating natural fruit juice into your diet.
Muddling and Pressing for Small Batches:
For small amounts of citrus juice, like lemon or lime for a single glass, you can simply muddle the fruit.
Prepare: Cut your citrus fruit in half or quarters.
Muddle: Place the fruit in a sturdy glass or shaker. Use a muddler (or the back of a wooden spoon) to press and twist the fruit firmly, releasing the juice and essential oils.
Strain: Pour the muddled fruit and juice through a fine-mesh sieve to catch seeds and pulp.This method is great for adding a fresh, concentrated burst of flavor to water or other drinks.
Infused Water for Subtle Flavor:
While not strictly “juice,” infusing water with fruits and vegetables is an excellent way to get some natural fruit flavor and a very subtle nutrient boost without the sugar concentration.
Slice: Thinly slice a variety of fruits (e.g., berries, cucumber, mint, citrus, apple) and vegetables.
Combine: Place the slices in a pitcher of filtered water.
Infuse: Refrigerate for at least 2-4 hours, or overnight, to allow the flavors to meld.This creates a refreshing, subtly flavored drink that is very low in calories and sugar, and it encourages hydration.
Benefits of Homemade Natural Fruit Juice
Creating your own natural fruit juice offers numerous advantages over store-bought varieties, allowing you to tailor it to your health needs.
Rich in Vitamins and Minerals
Freshly made juice is a potent source of essential vitamins (like C and A) and minerals (such as potassium and folate). These nutrients are vital for immune function, skin health, energy production, and overall cellular repair. Consuming them in liquid form can make them highly bioavailable, meaning your body can absorb and utilize them efficiently.
Hydration Support
Beyond plain water, natural fruit juice provides additional electrolytes and natural sugars that can aid in hydration, especially after exercise or during warm weather. The water content of fruits and vegetables contributes significantly to your daily fluid intake.
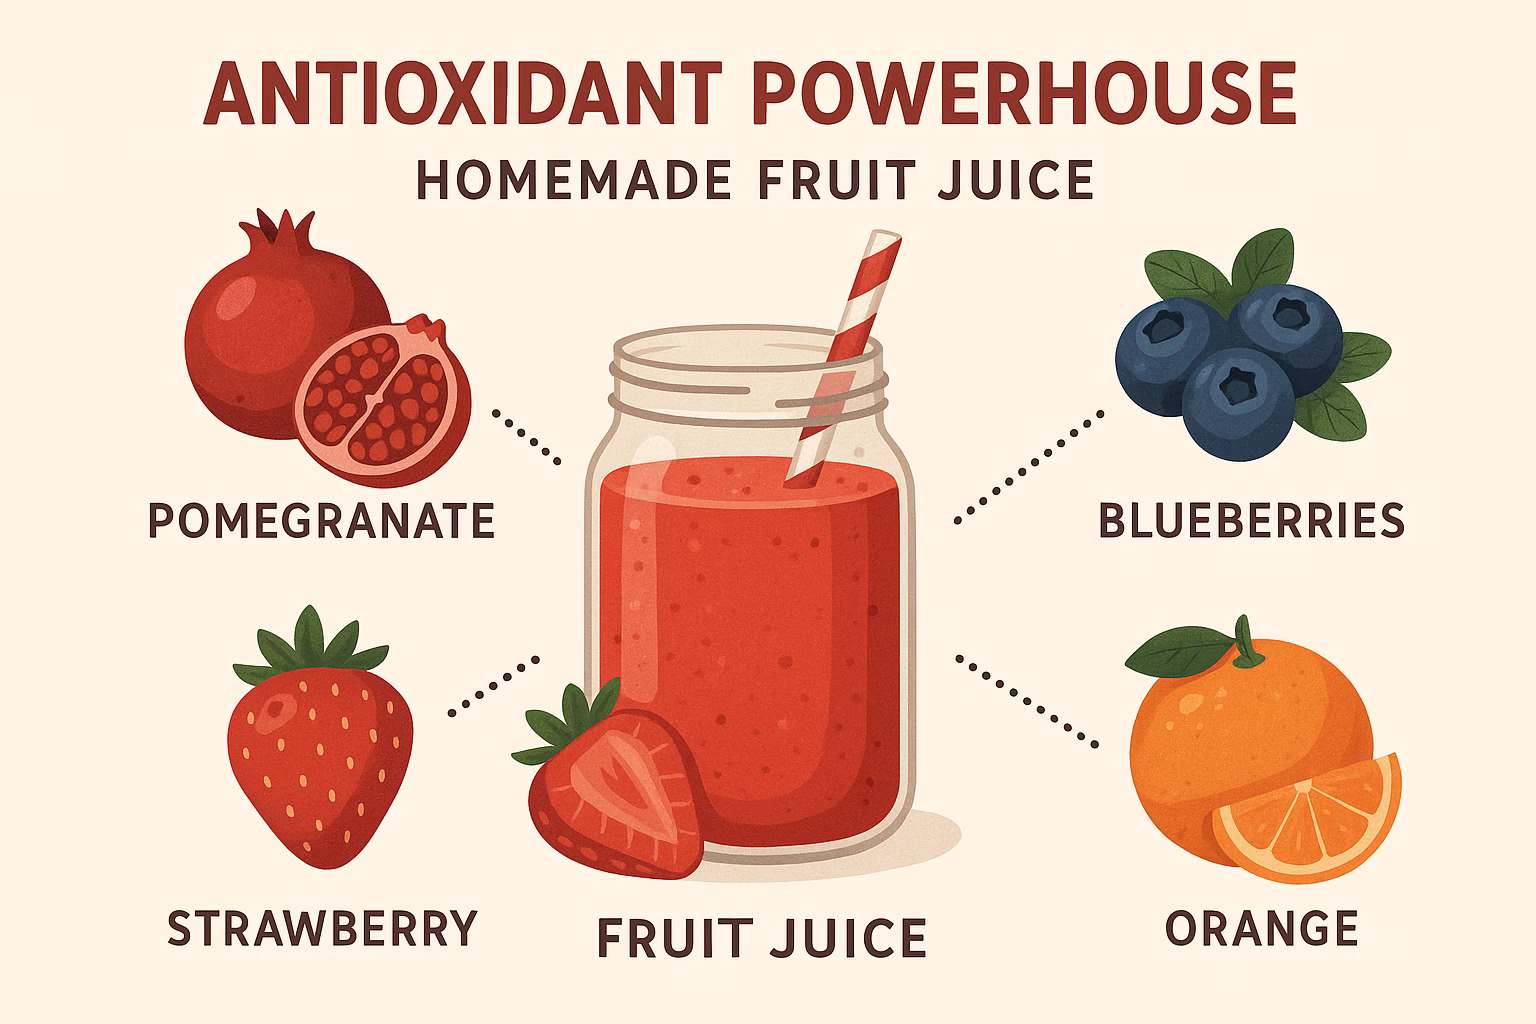
Antioxidant Powerhouse
Fruits and vegetables are rich in antioxidants, compounds that help protect your cells from damage caused by free radicals. This can contribute to reducing inflammation and lowering the risk of chronic diseases. Our green-orange blend, with its spinach and apple, is particularly rich in these protective compounds.
Digestive Health (with Fiber!)
When made with a blender, homemade juice retains a good amount of the fruit and vegetable fiber. Fiber is crucial for healthy digestion, promoting regular bowel movements and supporting a healthy gut microbiome. Even a juicer, while removing most insoluble fiber, can still extract some soluble fiber.
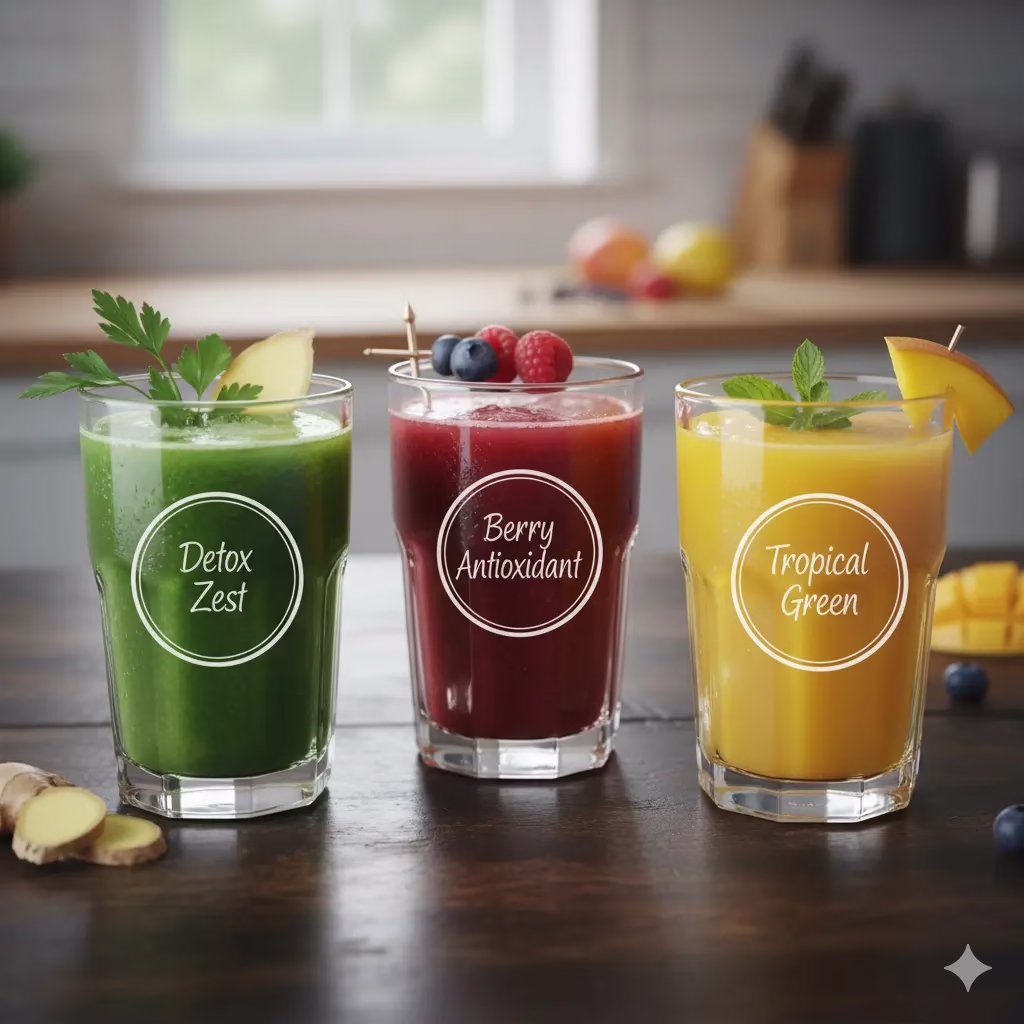
Variations for Your Natural Fruit Juice
Customize your natural fruit juice to suit different tastes, health goals, or seasonal availability.
Variation Name
Key Ingredient Change
Benefits/Reason
Immune Boost
Add 1/4 cup pineapple, a pinch of turmeric, and black pepper
Pineapple adds bromelain; turmeric is anti-inflammatory (pepper aids absorption).
Detox Zest
Increase ginger to 1 inch, add 1/4 cup fresh parsley
Ginger aids digestion; parsley is a natural diuretic and detoxifier.
Berry Antioxidant
Replace apple with 1/2 cup mixed berries (e.g., blueberries, raspberries)
Berries are packed with antioxidants and offer a different flavor profile.
Tropical Green
Add 1/4 cup mango, reduce orange slightly
Mango adds a creamy texture and more tropical sweetness.
Gut Health
Add 1 tbsp chia seeds (soak for 5 mins first), 1/2 cup cucumber
Chia adds soluble fiber; cucumber is hydrating and mild.
Final Thoughts on Natural Fruit Juice
The journey to understanding natural fruit juice reveals that while it can be a part of a healthy diet, it’s not a direct substitute for whole fruits and vegetables. Homemade juices, especially those incorporating vegetables and retaining fiber, offer a potent dose of nutrients and hydration. They empower you to control sugar content and avoid artificial additives found in many store-bought options. Embrace the power of fresh ingredients, experiment with different combinations, and savor the vibrant flavors and health benefits that your own kitchen can provide. Make informed choices and let your blender or juicer become a tool for vibrant health.
Frequently Asked Questions (FAQs)
Q: Is natural fruit juice as good as eating whole fruit?
A: No, generally it’s not. While natural fruit juice contains many vitamins and minerals found in whole fruit, it typically lacks the fiber that whole fruit provides. Fiber is crucial for digestive health, blood sugar regulation, and satiety. When fruit is juiced, the natural sugars become more concentrated and are absorbed more quickly into the bloodstream without the mitigating effect of fiber, which can lead to blood sugar spikes. Our recipe, by including spinach and apple skin, aims to maximize the fiber content.
Q: How much natural fruit juice should I drink daily?
A: For most adults, health organizations recommend limiting 100% fruit juice intake to about 4-6 ounces (1/2 to 3/4 cup) per day. This recommendation is due to the concentrated sugar content, even if it’s natural. However, vegetable-heavy juices (like our recipe) or those diluted with water can be consumed in larger quantities. It’s always best to prioritize whole fruits and vegetables as your primary source of nutrients and fiber.
Q: Can I store homemade natural fruit juice?
A: For optimal nutritional value and taste, freshly made natural fruit juice is best consumed immediately. Exposure to air and light can cause nutrients, especially vitamin C, to degrade quickly. If you must store it, transfer the juice to an airtight container and fill it to the very top to minimize air exposure. Store it in the refrigerator for no more than 24-48 hours. Adding a squeeze of lemon or lime juice can also help preserve it slightly due to its antioxidant properties.