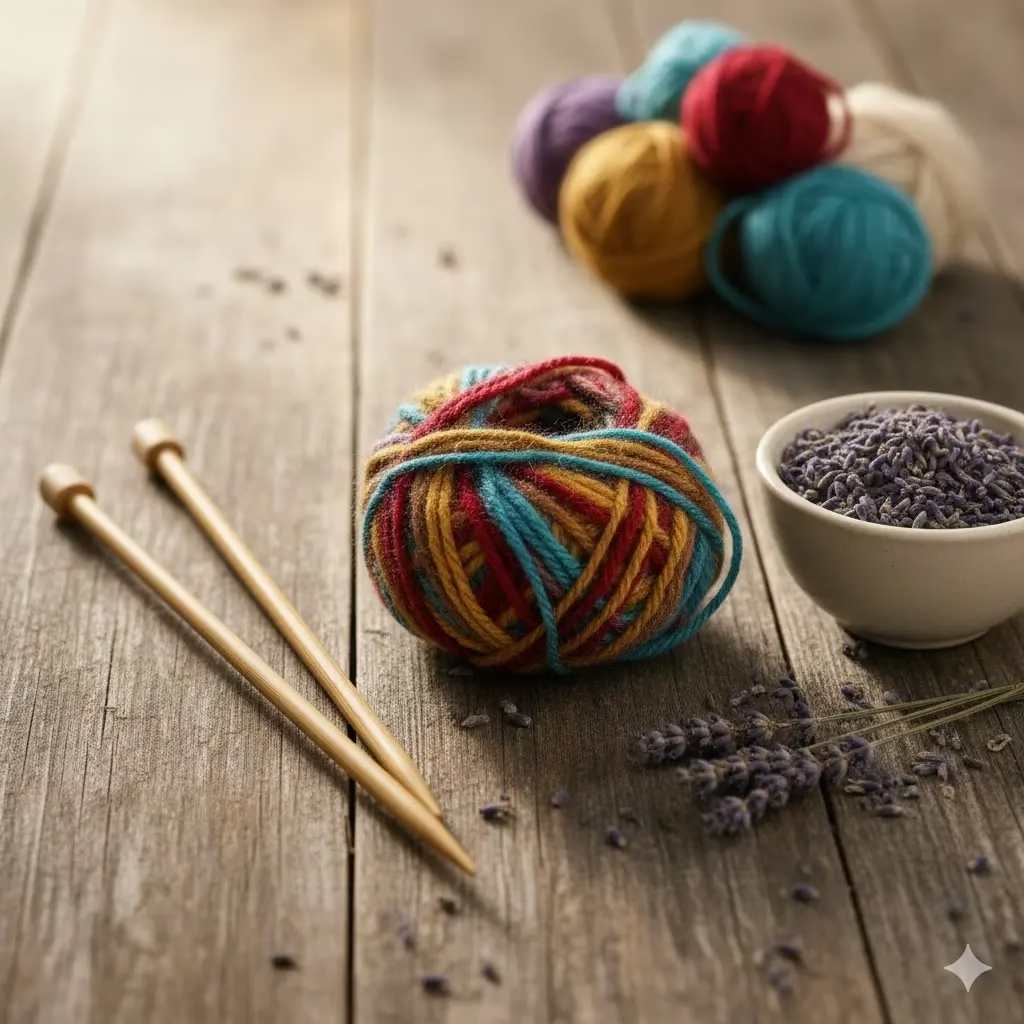
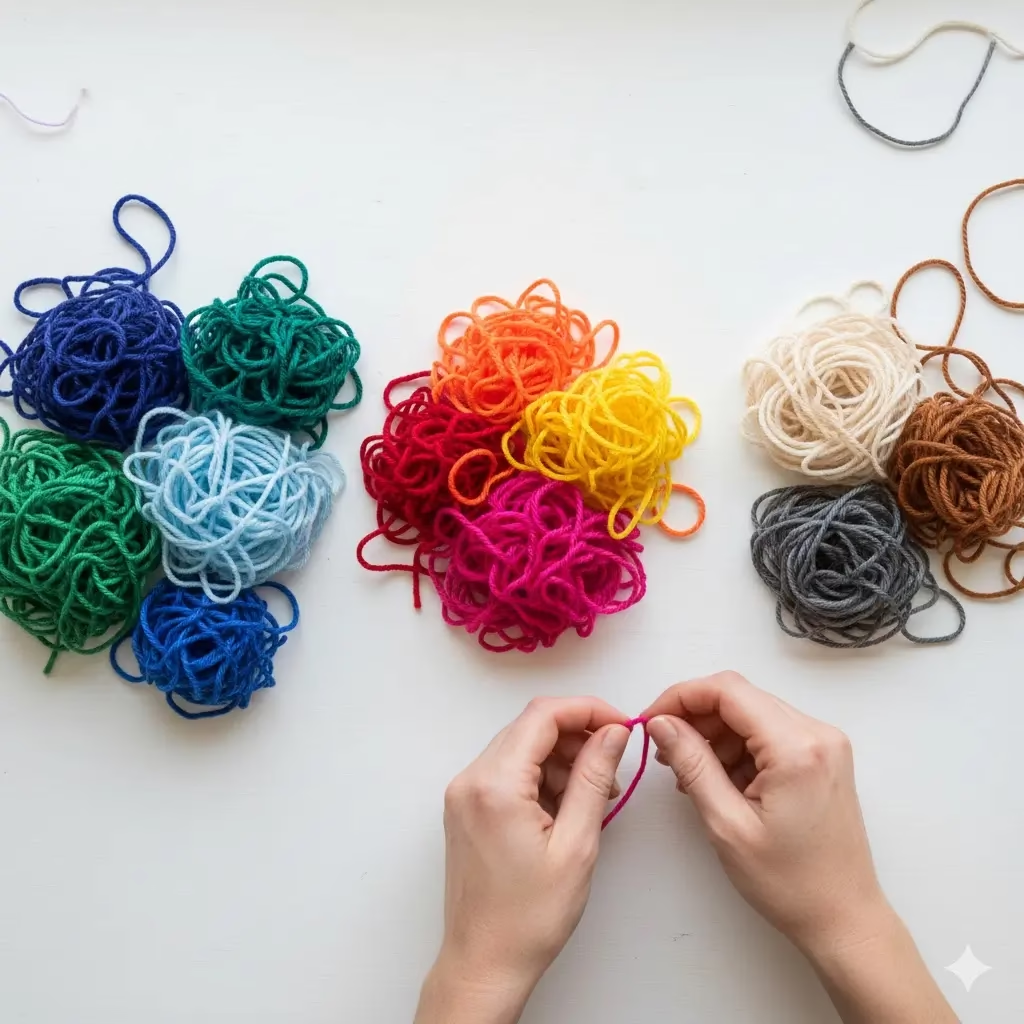
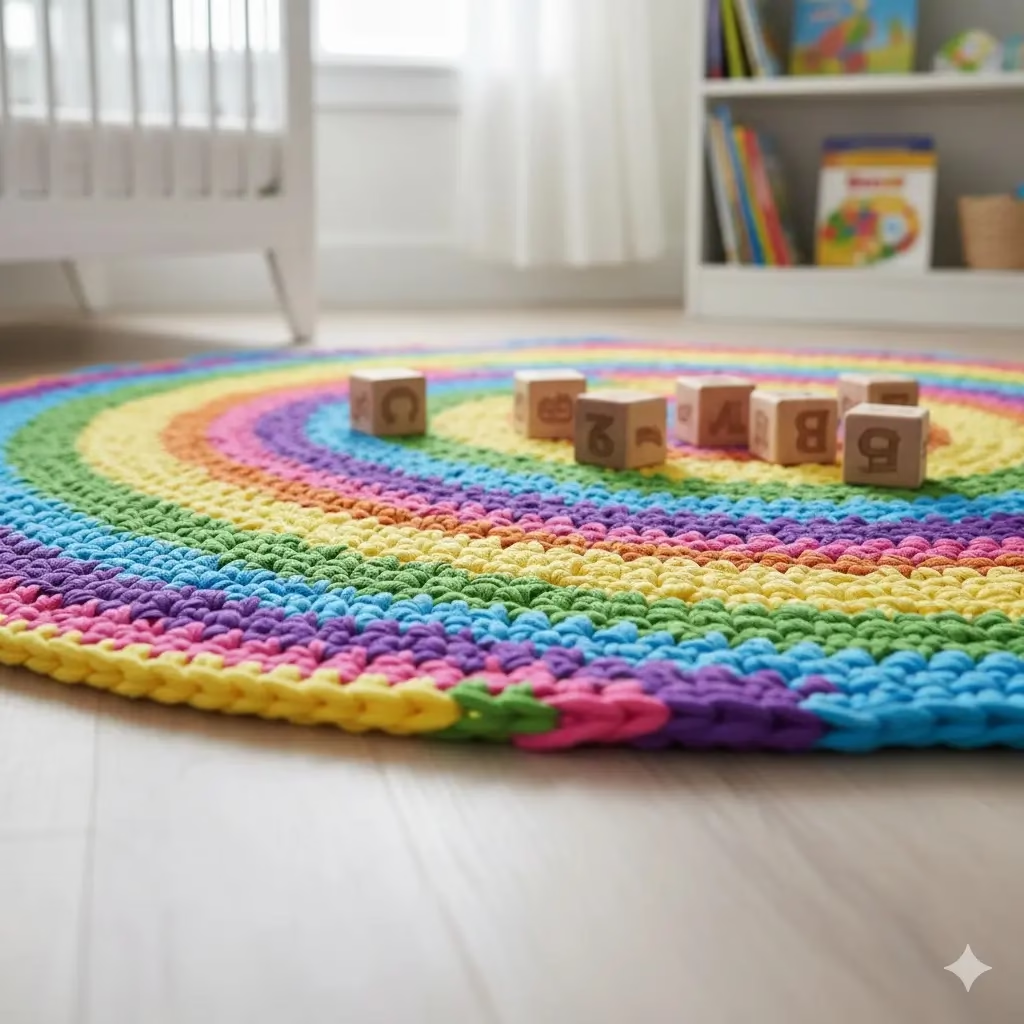
These simple Knitted Scented Sachet Envelopes are a perfect way to use up your shortest knitting yarn leftovers. They are quick to make and add a touch of luxury to your drawers or closets. Because they are small, they are also a great way to practice basic knitting skills like casting on, the knit stitch, and seaming.
Materials Needed
Yarn: Small amounts of knitting yarn leftovers (approx. 10–15 yards per sachet). Cotton or wool works best to allow the scent to escape.
Needles: A pair of straight needles in a size that matches your yarn weight.
Filling: Dried lavender, cedar chips, or rose petals.
Extras: A small piece of ribbon or twine to tie the top.
Tools: A tapestry needle for seaming and scissors.
Pattern Instructions
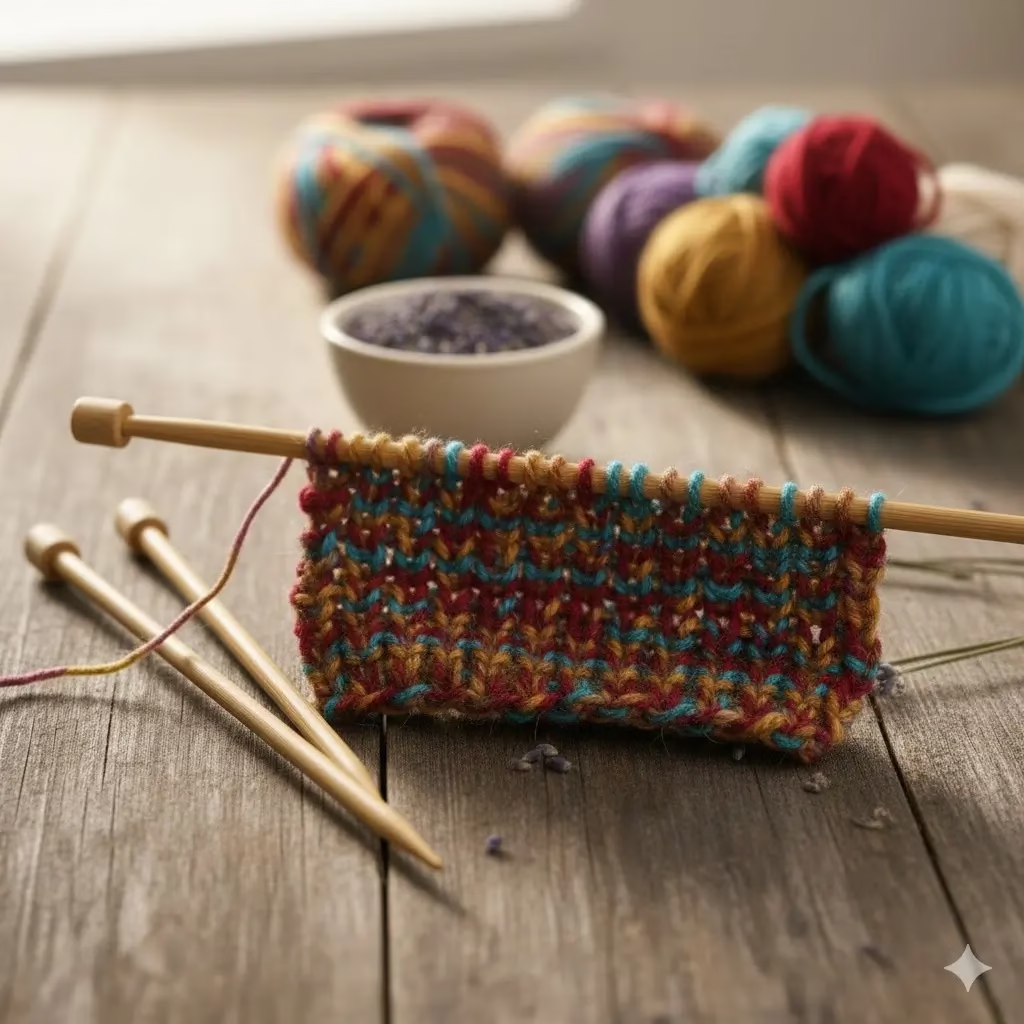
1. Cast On Cast on 15 stitches. This will create a sachet that is approximately 3 inches wide. You can add more stitches if you want a larger envelope.
2. The Body Knit every row (Garter Stitch) until your piece measures about 7 inches in length. This long rectangle will be folded to create the pocket.
3. Cast Off Cast off all stitches loosely. Cut the yarn, leaving a long tail of about 10 inches. You will use this tail to sew the sides.
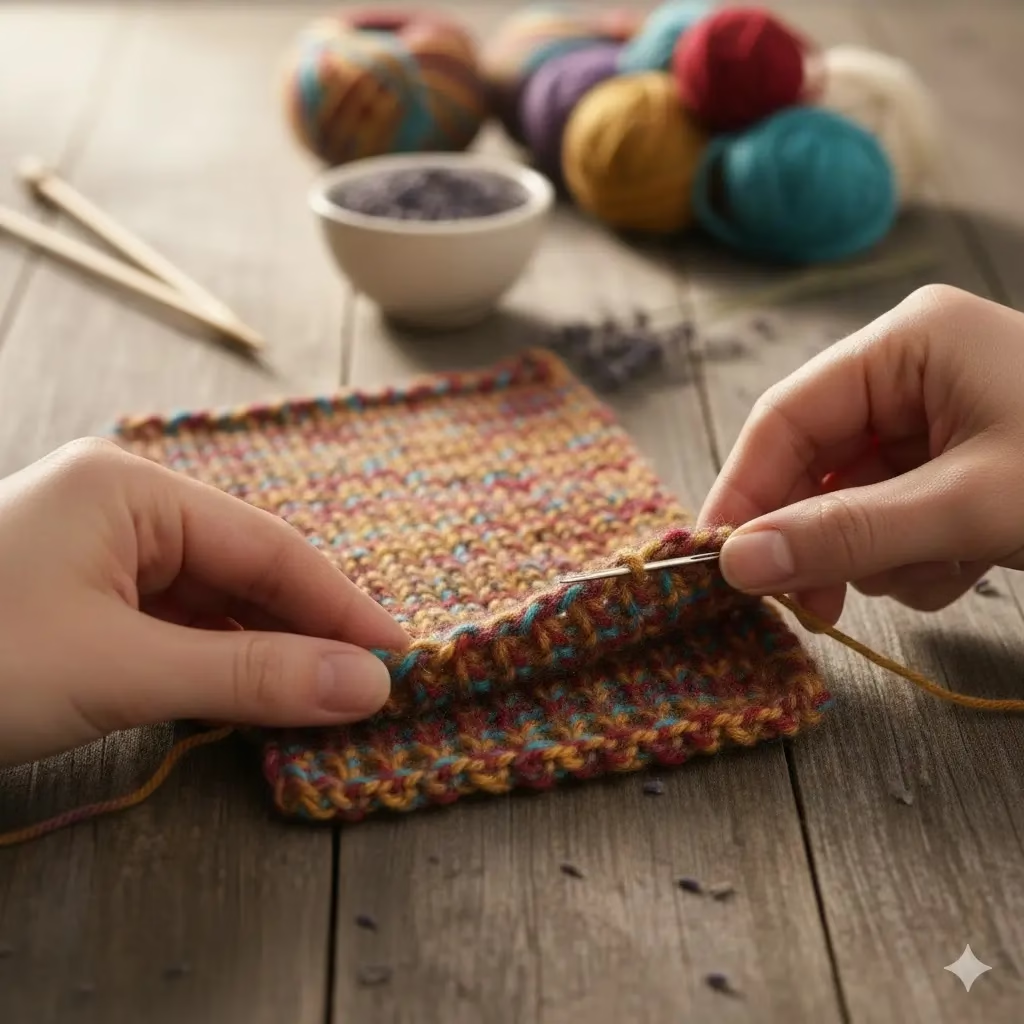
4. Folding and Seaming
Lay the knitted strip flat on a table.
Fold the bottom up about 3 inches. This leaves a 1-inch flap at the top.
Thread your tapestry needle with the long yarn tail.
Use a mattress stitch or a simple whip stitch to sew the left and right sides of the 3-inch pocket shut. Do not sew the top flap yet!
5. Filling the Sachet Turn the sachet right side out if you prefer a cleaner seam. Pour your dried herbs or cedar chips into the pocket. Do not overfill it, or it will be hard to close.
6. Finishing Touches Fold the top 1-inch flap down over the opening. You can sew this flap down with a single decorative button, or simply tie a ribbon around the entire sachet to keep it closed.
Why This Project Works for Zero Waste
This is a true zero waste knitting project. If you have yarn scraps that are too short to even finish a row, you can tie them together using a “magic knot” and knit them into the sachet. The small size means no piece of luxury fiber is ever wasted.
This article is brought to you by a community of fiber artists dedicated to the timeless craft of knitting. Our mission is to inspire creativity, promote sustainable practices in knitting, and help every crafter find joy in their stitches. We believe that every strand of yarn holds potential, and with a little imagination, even the smallest knitting yarn leftovers can be transformed into something beautiful. Join us as we explore the endless possibilities of knitting with what you already have.
Introduction: Transforming Your Knitting Yarn Leftovers into Treasures
Every knitter knows the feeling of finishing a big project. You have a new sweater or a warm blanket. But you also have a small ball of yarn left over. It is too small for a big project. But it is too nice to throw away. These are your luxury leftovers. They come from your best wool and silk. They are full of potential.
In our world today, we want to be more careful with what we use. Zero waste knitting is a great way to do this. It means we use every inch of our yarn. We do not waste anything. This helps the planet. It also helps us be more creative. When we have a small amount of yarn, we have to think fast. We have to try new things.
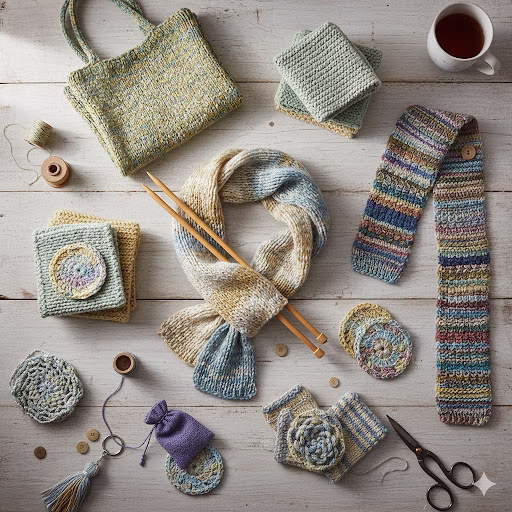
This article will show you 10 great projects for your knitting yarn leftovers. You will find ideas for your home and for your wardrobe. These knitting patterns are small and quick. They are perfect for a quiet afternoon. Let’s look at how you can turn your scraps into art.
1. The Simple Infinity Scarf
An infinity scarf is a long loop of fabric. It is very easy to make with scraps. You do not need to match the colors perfectly. In fact, a mix of colors looks very modern. You can use your softest wool for this. Since it sits near your neck, you want it to be cozy.
To make this, you just knit a long strip. You can use a basic stitch like the garter stitch. This is where you knit every row. When the strip is long enough, you sew the ends together. This creates the loop. You can add a new color whenever you run out of the old one. It is a fun way to see all your past projects in one piece.
2. The Chic Market Tote Bag
A market tote bag is very useful. It is a great way to use up cotton or linen yarn. These fibers are strong. They do not stretch too much. You can use many different colors to make stripes. This gives the bag a bright and happy look.
When you make a bag, you want a tight stitch. This makes the bag strong enough to carry heavy things. You can carry fruit or bread in it. It is much better than using a plastic bag. Using your knitting yarn leftovers for a bag is a smart move. It is practical and pretty.
3. Shabby Chic Dishcloths/Washcloths
Small squares are perfect for scraps. You can make dishcloths/washcloths in no time. For a “shabby chic” look, use light colors. Think of soft pink, pale blue, or cream. These look great in a rustic kitchen.
These projects are also good for learning. You can try a new stitch on a small scale. If you make a mistake, it is easy to fix. Cotton is the best choice for these. It soaks up water well. It also feels soft on your skin. These make great gifts for friends.
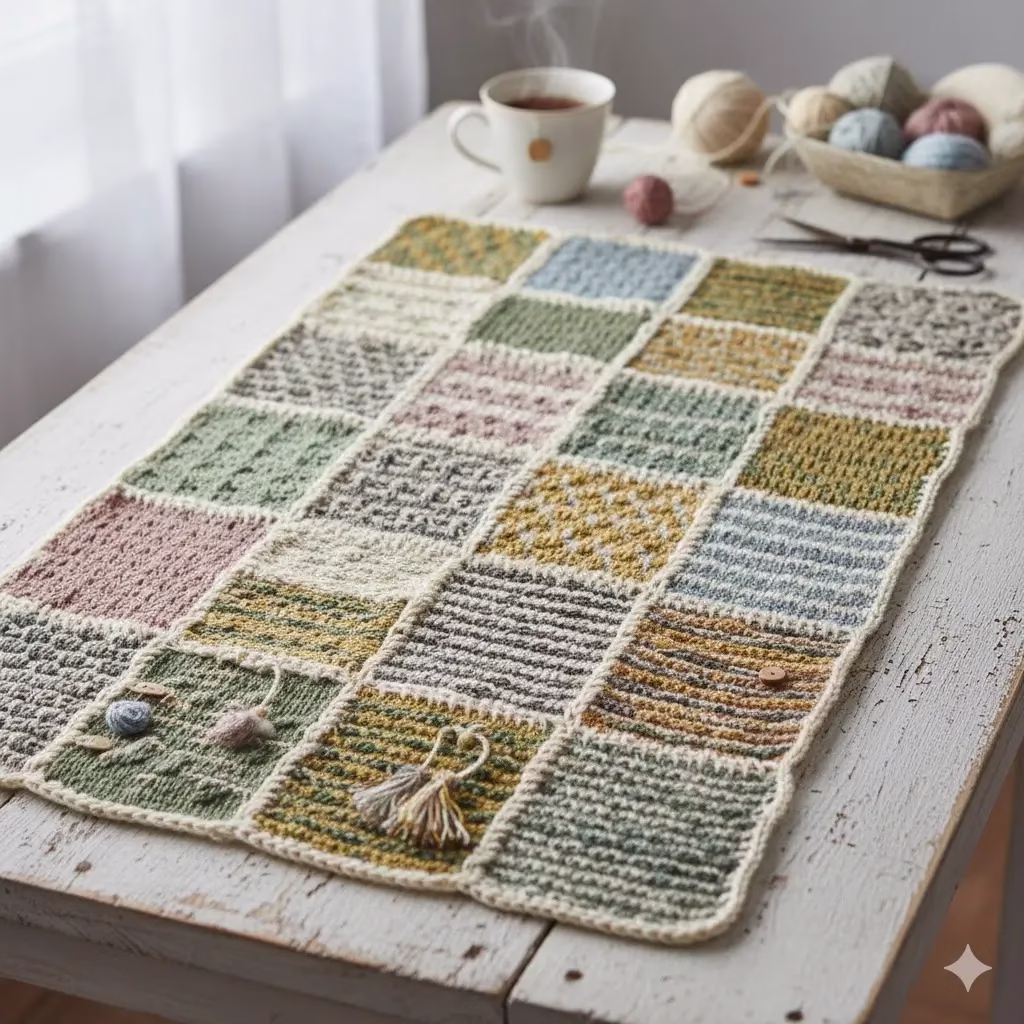
4. The Artistic Patchwork Scarf
A patchwork scarf is a work of art. You knit many small squares or rectangles. Then, you sew them all together. This lets you use very small bits of yarn. You can even use different types of yarn. You might have some fuzzy wool and some smooth silk. When you put them together, they create a rich texture.
This project takes more time than the others. But the result is worth it. It is a true “stash-buster.” Every piece tells a story. It is a great way to practice zero waste knitting. You are truly using everything you have.
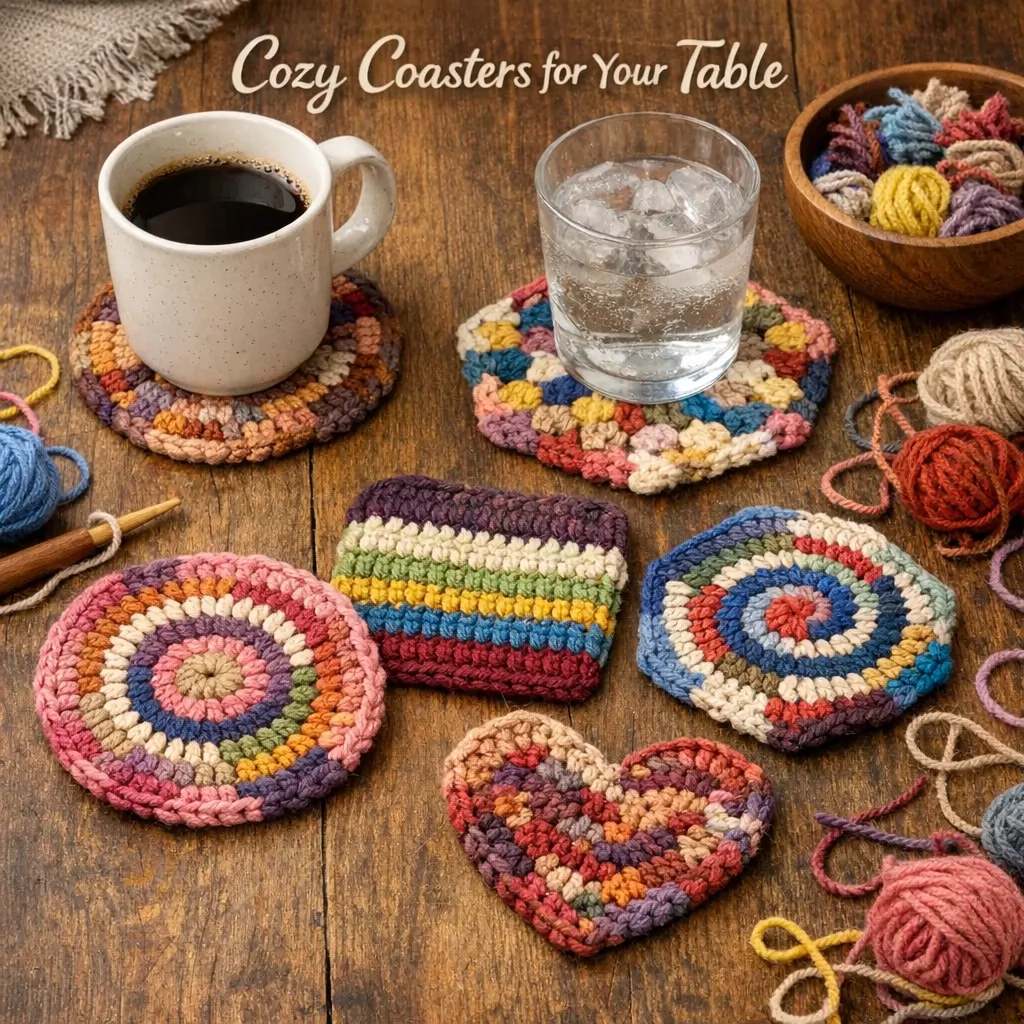
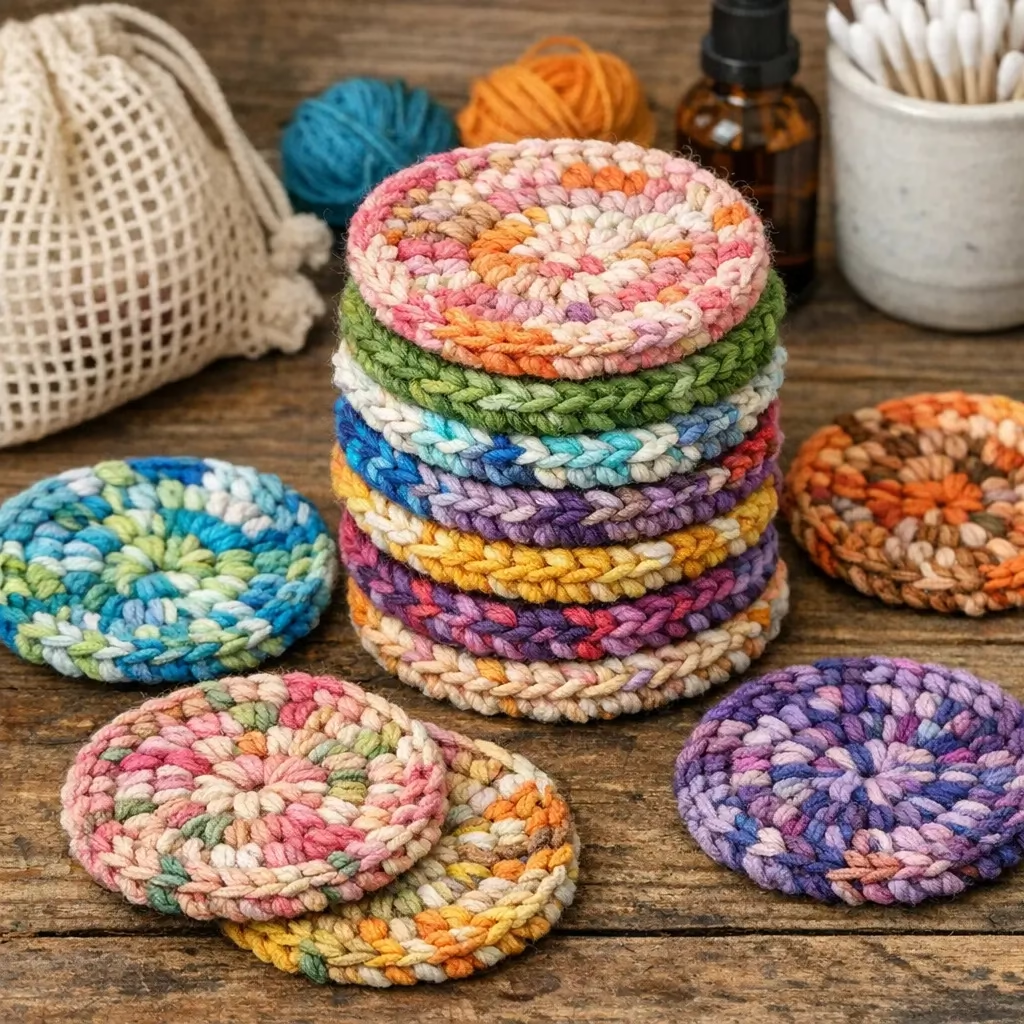
5. Cozy Coasters for Your Table
Coasters are the ultimate scrap project. You only need a few yards of yarn. You can make them round or square. They protect your table from hot cups. They also add a touch of color to your room.
For a shabby chic style, you can add a little lace edge. Or, you can keep them simple. If you have luxury wool, these will feel very soft. They are a small touch that makes a house feel like a home.
6. Soft Knit Headbands
Do you have some high-quality wool left? A headband is a great use for it. It keeps your ears warm in the winter. It also looks very stylish. You can knit a simple tube and twist it in the front. This is a very popular look right now.
Because headbands are small, they are quick to knit. You can make one in an hour. They are perfect for using up that last bit of expensive cashmere.
7. Reusable Makeup Pads
Many people want to reduce waste in their beauty routine. You can knit small rounds to remove your makeup. Use soft cotton yarn for this. It is gentle on your eyes.
After you use them, you can wash them in the machine. Then, you use them again. This is a great example of zero waste knitting. It saves you money. It also helps the environment.
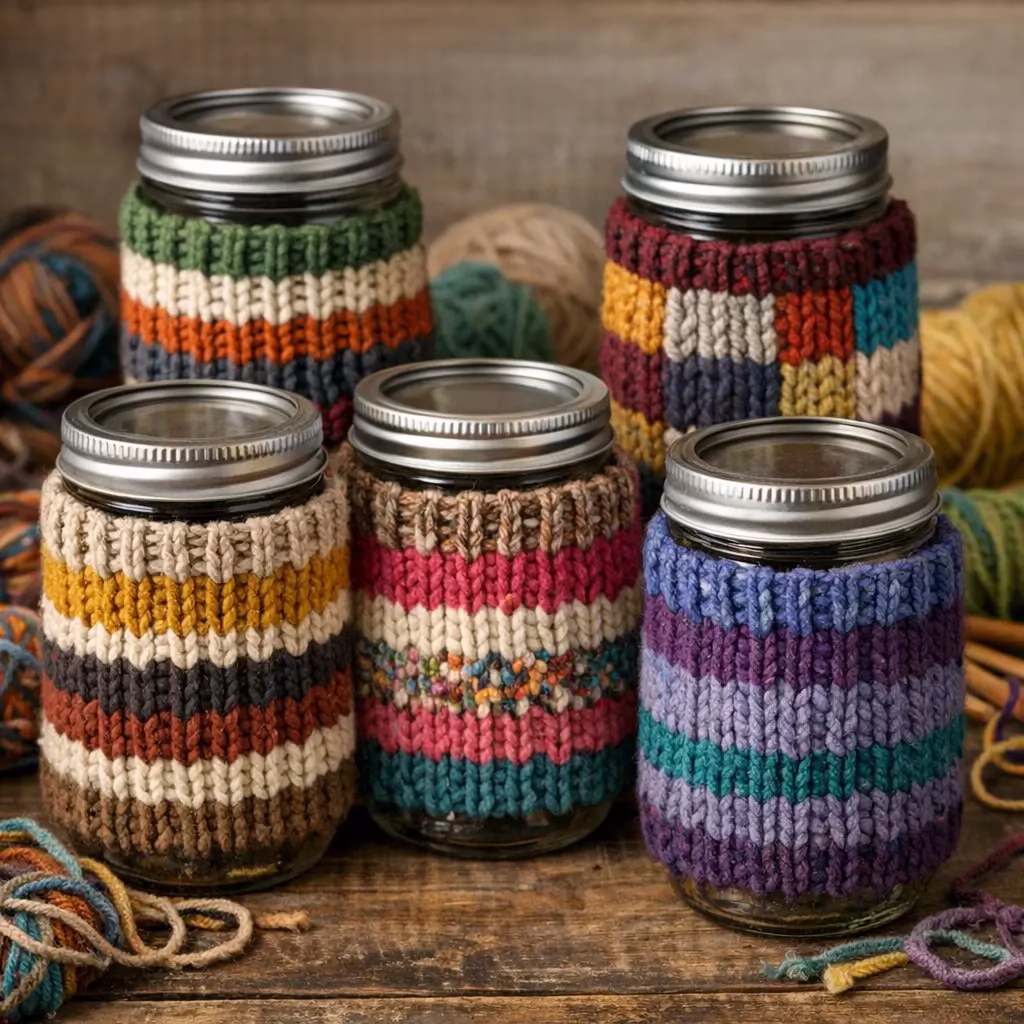
8. Mason Jar Cozies
Mason jars are great for storage. But they can look a bit plain. You can knit a “cozy” to go around them. This is just a small sleeve of fabric. It adds texture and color to the glass.
You can use these jars to hold pens or flowers. They fit perfectly into a shabby chic home. Use your knitting yarn leftovers to make a matching set. It makes your shelves look organized and cute.
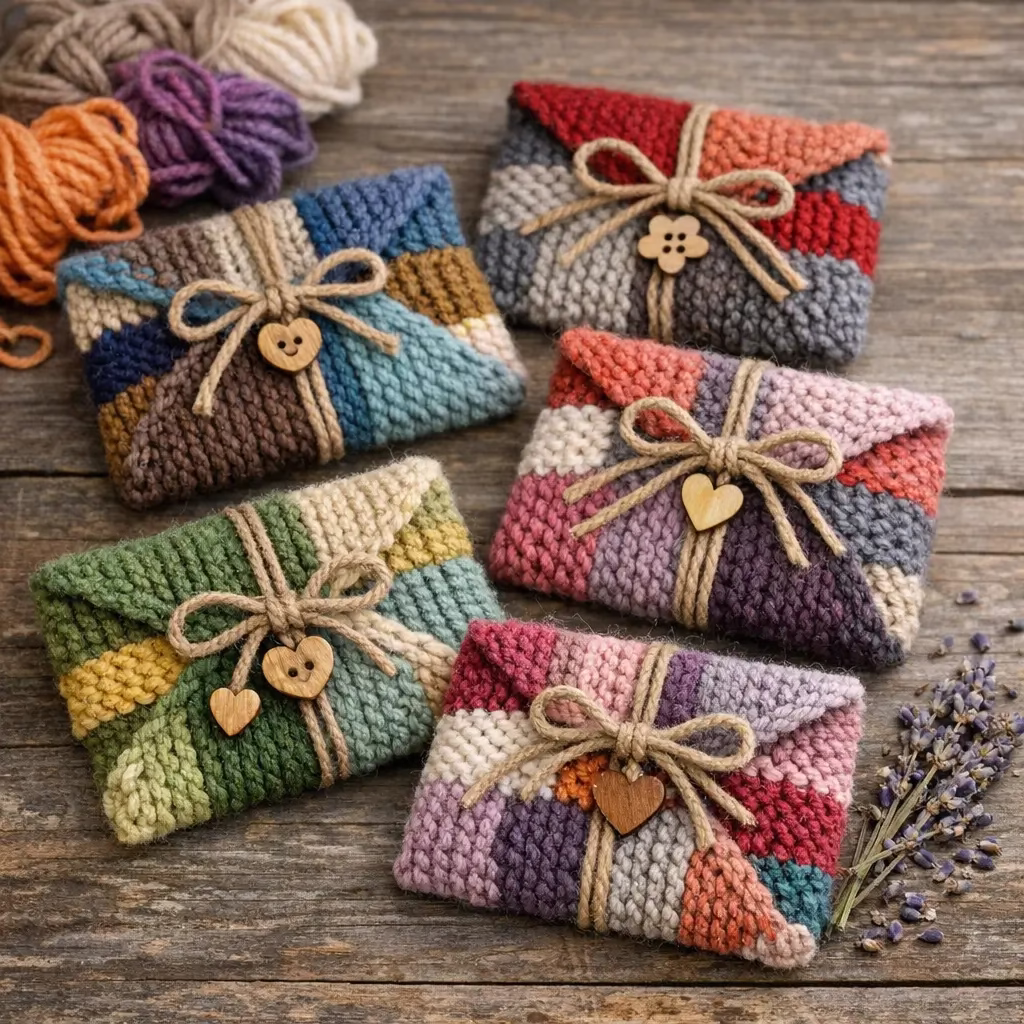
9. Scented Sachet Envelopes
A sachet is a small bag filled with herbs. Lavender is a common choice. You can knit a small pouch and fill it with dried flowers. Put it in your sock drawer to make everything smell nice.
These are wonderful for using up tiny scraps. You can use silk yarn to make them feel extra special. They are a lovely, small luxury. Click Here for the instructions to make this.
10. A Simple Pincushion
If you sew, you always need a pincushion. You can knit a small ball and stuff it. You can even use your tiniest yarn ends as stuffing! This is the best way to ensure nothing goes to waste.
Add a vintage button to the center for a shabby chic look. It is a tiny project that is very helpful.
Tips for Using Your Scraps
Working with scraps is fun. But it can be tricky. Here are some tips to help you.
Group by weight: Try to use yarns that are the same thickness. This keeps your project even.
Mix textures: Do not be afraid to mix a fuzzy yarn with a shiny one. This adds interest.
Join carefully: Learn how to join yarn without making big knots. This keeps your work looking neat.
Think about washing: Make sure all the yarns in one project can be washed the same way.
Conclusion: Small Stitches, Big Results
Knitting is a wonderful hobby. It is even better when we use every bit of our yarn. These 10 projects show that you do not need a lot of yarn to make something great. Zero waste knitting is about being smart and creative.
Whether you make an infinity scarf or a small coaster, you are making something unique. You are giving your knitting yarn leftovers a new life. Your home will look more beautiful. Your wardrobe will be more colorful. And you will feel good knowing you used every strand. Happy knitting!
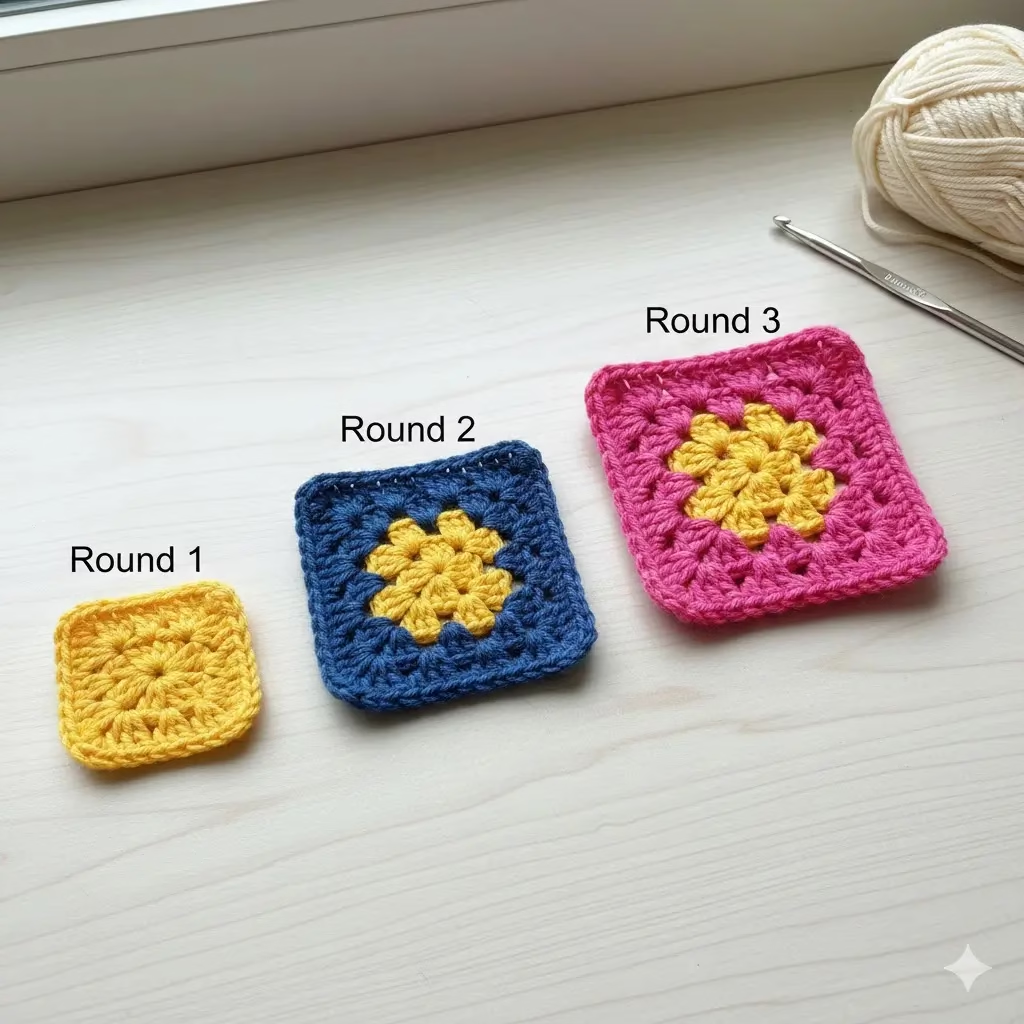
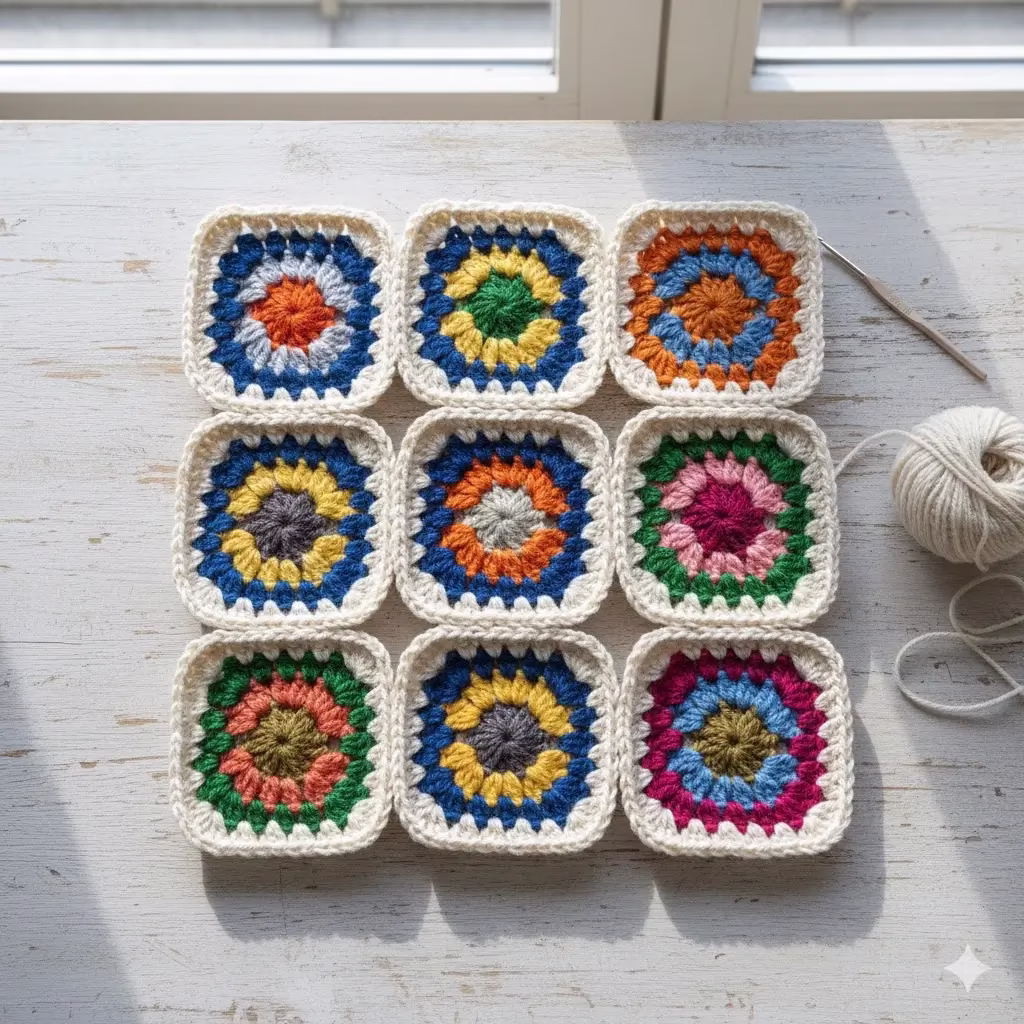
The Scrappy Chic Square Pattern uses standard terms and is perfect for using up those yarn bits. You can make these squares as large or as small as you like by adding more rounds.
Materials You Will Need
Yarn Scraps: Any weight, but try to keep them similar for each square.
Crochet Hook: Choose a size that matches your yarn (a 5mm hook works well for most scraps).
Scissors: To cut your yarn between color changes.
Tapestry Needle: To weave in your ends.
Special Stitches
Granny Cluster: A group of 3 double crochet (dc) stitches worked into the same space.
Corner: Two granny clusters separated by 2 chain stitches.
Step-by-Step Instructions
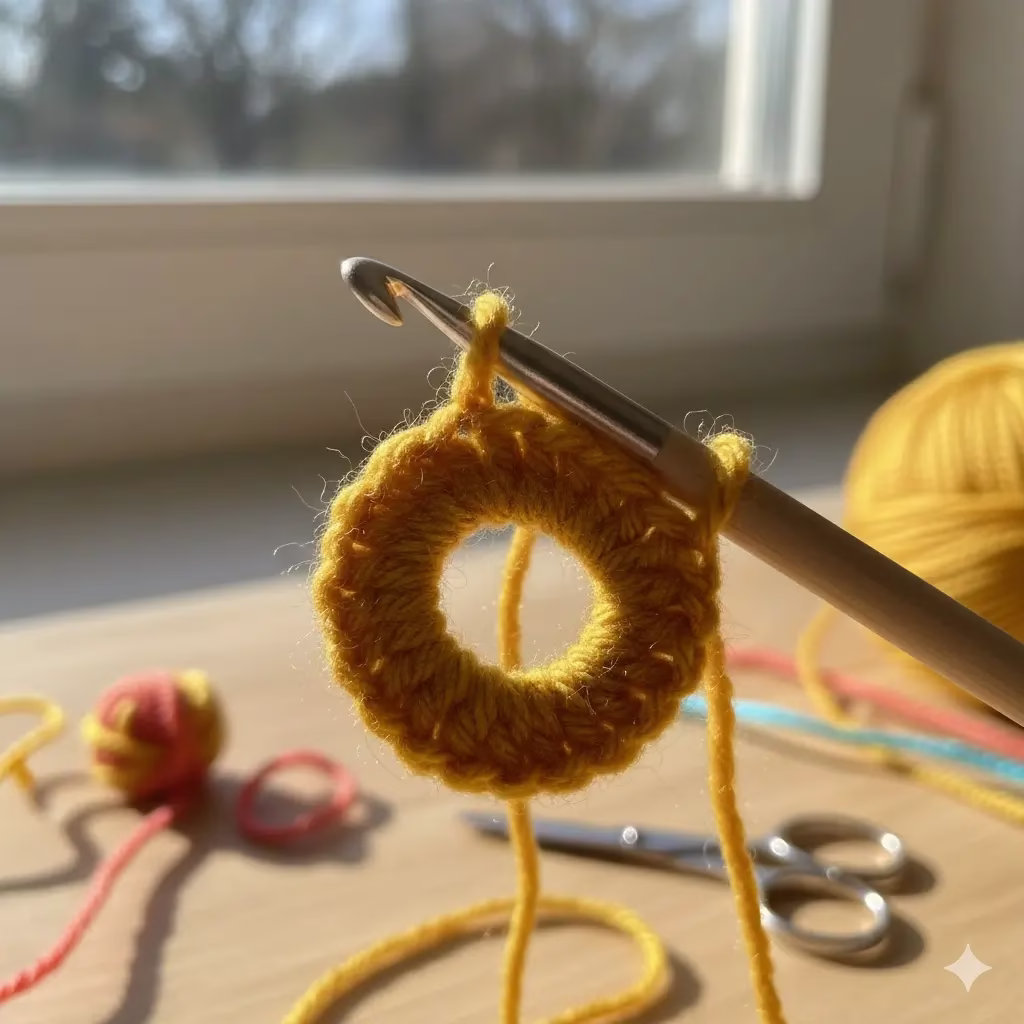
Round 1:
Start with a magic ring or chain 4 and join with a slip stitch to form a ring.
Chain 3 (this counts as your first dc). Work 2 dc into the ring. Chain 2.
Work 3 dc into the ring, chain 2. Repeat from * to * two more times.
Join with a slip stitch to the top of the starting chain 3. You should now have four clusters and four corner spaces. Fasten off your first color.
Round 2:
Join a new color in any corner space.
Chain 3, then work 2 dc, chain 2, and 3 dc all in that same corner space.
Chain 1.
In the next corner space, work 3 dc, chain 2, and 3 dc. Repeat from * to * for the next two corners.
Chain 1 and join with a slip stitch to the top of the starting chain 3. Fasten off.
Round 3:
Join your next color in any corner space.
Chain 3, then work 2 dc, chain 2, and 3 dc in that corner.
Chain 1.
In the next “side” space (the hole created by the chain 1 in the row below), work 3 dc.
Chain 1.
In the next corner, work 3 dc, chain 2, and 3 dc. Chain 1. Work 3 dc in the side space. Chain 1. Repeat from * to * around the square.
Join with a slip stitch to the top of the starting chain 3. Fasten off.
Round 4 (The Border Round):
To give your Scrappy Chic Square Pattern Blanket a clean look, use your “anchor” color for this round.
Repeat the steps for Round 3, adding a 3-dc cluster into every side space and a “corner” (3 dc, ch 2, 3 dc) into every corner space.
Join, fasten off, and weave in your ends immediately.
Tips for Success
Check Your Size: Measure your first few squares. If one is much bigger than the others, you may need to adjust your hook size.
Stay Consistent: Always use the same number of chains in your corners so the squares stay flat.
The Magic Ball: If you have very short scraps, tie them together with a small knot to create a “magic ball” and crochet right over the knots.
This guide was crafted for the eco-conscious maker looking to elevate their stash-busting game. It explores the intersection of sustainability and high-end craft through the creation of The Ultimate Scrappy Chic Blanket. By focusing on intentional color theory and traditional techniques, any crafter can transform remnants into a designer-quality heirloom. Discover how to celebrate the beauty of imperfections while mastering the timeless art of crochet granny squares.
Creating The Ultimate Scrappy Chic Blanket
Making things by hand is a joy that keeps on giving. Right now, many makers want to be more mindful of the planet. While the old-fashioned “scrap blanket” has been around for a long time, today’s crafters want a look that feels fresh and stylish. This is where the Scrappy Chic Blanket comes in. It is a project that uses zero waste crocheting to make something truly beautiful.
If you have a bag full of yarn bits from old projects, don’t throw them away. Those little scraps are the start of something great. This guide will show you how to turn those bits into a high-end granny square blanket. You do not need to buy new yarn to make an heirloom that looks like it came from a fancy shop.
The Joy of Zero Waste Crocheting
Before we start, let’s talk about why zero waste crocheting is so good for us. In a world of fast fashion, making something from what you already have is a big win. It feels good to use every inch of yarn.
Every small piece of yarn took water, dye, and work to make. When you make a Scrappy Chic Blanket, you keep those bits out of the trash. The “chic” part is all about how you pick your colors. You can use a mix of scraps but still make them look neat and tidy. We will focus on how to make your yarn stash look like a pro designed it.
Why We Love Crochet Granny Squares
The foundation of this blanket is the classic granny squares. These little squares are the best part of crochet history. They are easy to carry with you. You can make one while you wait for the bus or sit in the park. Most of all, they are perfect for using up short pieces of yarn.
When you work on a granny square blanket, each square is like a tiny frame. You can swap colors whenever you run out of yarn. You can even change colors in the middle of a row. This lets you use even the tiniest “yarn cakes.” The goal is to keep your stitches even. This makes it easy to sew the squares together at the end.
How to Pick Your Colors
The secret to a Scrappy Chic Blanket is the color plan. Even if you use random scraps, you can make them look like they belong together.
Pick a Main Color: Choose one color, like white or grey, to use for the very last round of every square. This acts like a frame and makes the whole blanket look calm.
Sort by Tone: Group your yarn by “mood.” You could put all the bright colors together or stick to soft pastels. This helps the blanket feel balanced.
Use a Spark of Color: Pick one bold color to pop up here and there. This adds a fun touch to the final look.
Easy Steps for Your Scrappy Chic Blanket
Step 1: Check Your Yarn Weight
It is best if your yarn scraps are about the same thickness. If you have a very thin yarn, you can use two strands at once. This helps the blanket stay flat and even. It also makes the granny squares feel sturdy.
Step 2: Hide Those Ends
The hardest part of a scrap project is the loose ends. To keep your work looking clean, weave in your ends as you go. Use a needle to tuck the yarn deep into the stitches. This keeps the blanket from coming apart when you wash it. A “chic” blanket is one that stays together for years!
Step 3: Make Your Squares Square
Blocking is a simple trick that makes a huge difference. Pin your finished squares to a board and give them a light mist of water. Let them dry. This makes them all the same size. It is much easier to join them when they are perfectly square.
Click Here for full instructions to make this granny blanket
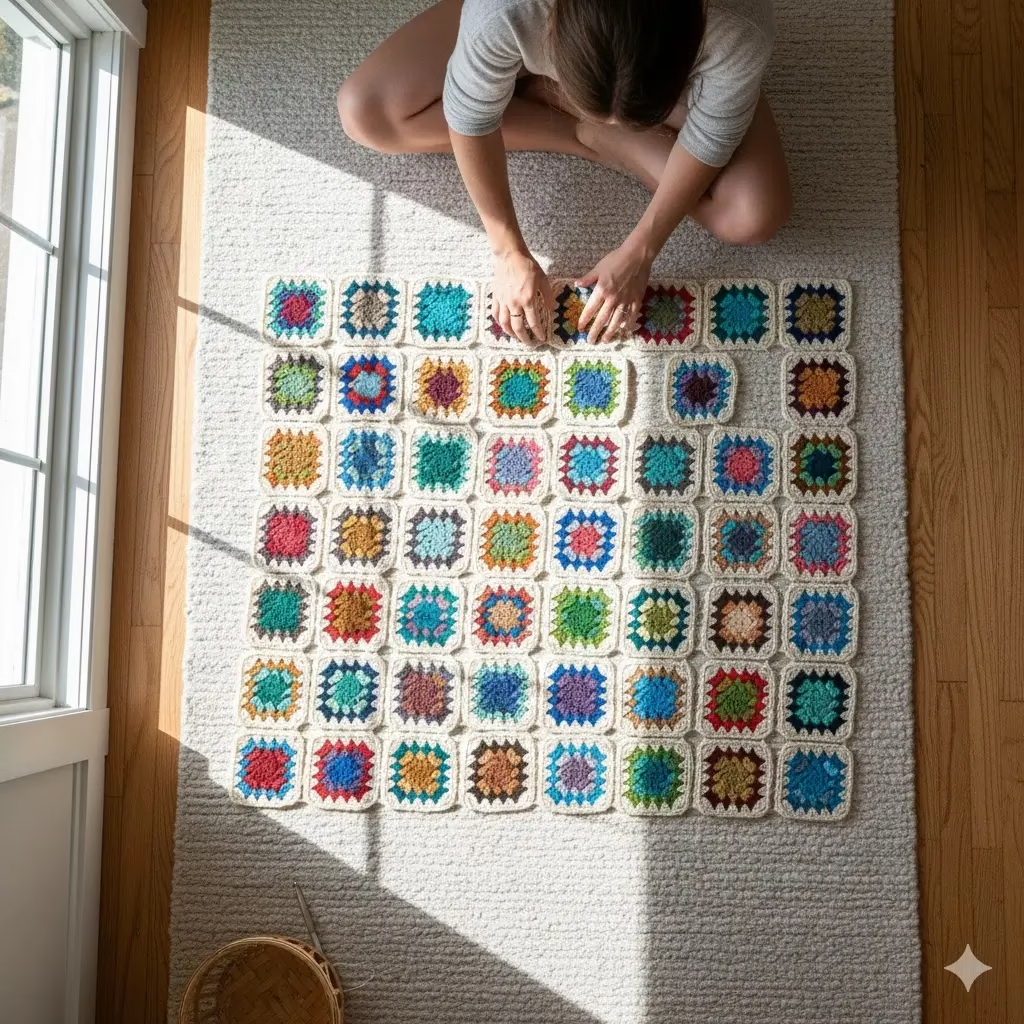
Planning Your Blanket Layout
Once you have a big pile of squares, it is time to be an artist. Lay them out on the floor or a large bed. This is where the magic happens.
The Fade Look: Put dark squares at one end and light ones at the other.
The Random Look: Mix them all up so the colors dance across the blanket.
The Pattern Look: Group squares to make big stripes or diamond shapes.
Joining Your Squares Together
How you sew your squares changes the look of the Scrappy Chic Blanket.
The Hidden Seam: Use a needle to sew the edges so you can’t see the thread. This looks very sleek.
The Lacy Join: Use your crochet hook to make a small chain between squares. This adds a pretty detail.
The Ridge Join: This makes a small bump between squares. it gives the blanket a cool, textured feel.
If you use the same color to join that you used for your borders, the blanket will look very high-end.
Sustainability and Your Craft
Doing zero waste crocheting is a great way to help the earth. You can even use the very tiny bits of yarn—those too short to crochet—as stuffing for toys. This means nothing goes to waste in your craft room.
The Scrappy Chic Blanket shows that we don’t need to buy new things to be happy. We can look at what we have and see something new. It is a slow and kind way to live.
The Timeless Granny Square
Granny squares never go out of style. People have loved them for over fifty years. They fit in with modern homes and cozy cabins. Because they are made of small parts, they are the best project for busy people. You can finish one square and feel a sense of pride. Soon, those squares will grow into a full granny square blanket.
This project also tells your story. That red bit might be from a gift you made for a friend. The green bit might be from your favorite hat. It is a blanket full of memories. It is more than just a way to stay warm; it is a scrap-book made of wool.
Caring for Your New Blanket
Since you used many types of yarn, you must be gentle. It is best to wash your blanket by hand in cool water. Use a mild soap. Do not wring it out. Instead, lay it flat on a clean towel to dry. This will keep the Scrappy Chic Blanket looking new for a very long time. It could even be a gift for your kids or grandkids one day.
Final Thoughts
Starting The Ultimate Scrappy Chic Blanket is a wonderful choice. it is good for your soul and good for the world. It teaches you to play with color and try new things. You will end up with a blanket that no one else has.
As you sit with your yarn and your hook, enjoy the slow pace. Every stitch is a way to value what you already own. We hope you love making your blanket as much as we loved writing this guide. Happy crocheting!
Creating a cozy, circular Chunky Pet Bed by crocheting with fabric yarn is an excellent project for beginners because the thick yarn provides immediate structure and comfort. This pattern creates a nest-style bed with raised sides.
Materials Needed
Fabric Yarn: 3–4 large rolls of thick t-shirt yarn.
Crochet Hook: 12mm or 15mm (depending on yarn thickness).
Stitch Marker: Essential for working in continuous rounds.
Large Eye Yarn Needle.
Instructions
1. Create the Flat Circular Base
To keep the base flat and sturdy, we use a standard circular increase pattern.
Round 1: Start with a magic ring. Work 6 single crochet (sc) into the ring. Pull tight. (6 stitches)
Round 2: Work 2 sc in each stitch around. (12 stitches)
Round 3:1 sc in the next stitch, 2 sc in the following stitch. Repeat from * to * around. (18 stitches)
Round 4:1 sc in each of the next 2 stitches, 2 sc in the following stitch. Repeat from * to * around. (24 stitches)
Round 5:1 sc in each of the next 3 stitches, 2 sc in the following stitch. Repeat from * to * around. (30 stitches)
Rounds 6–10: Continue this pattern, increasing the number of single sc stitches between the “2 sc” increases by one each round, until the base is the desired size for your pet.
2. Transition to the Sides
To make the sides turn upward, we stop increasing.
Round 11: Work 1 sc in the back loop only (BLO) of every stitch around. This creates a sharp edge that helps the wall of the bed sit vertically.
3. Build the Walls
Rounds 12–16: Work 1 sc in both loops of every stitch around.
Tip: If you want a “slouchy” bed, use a slightly larger hook for the walls. For a firm, upright wall, keep your tension tight.
Round 17 (The Rim): Work a slip stitch in every stitch around the top edge. This reinforces the rim so it doesn’t stretch out over time.
4. Finishing
Fasten off the yarn and leave a long tail. Use your large yarn needle to weave the tail deeply into the thick stitches to ensure it doesn’t come loose during washing or pet play.
Customization Tips
Extra Cushioning: You can crochet two identical flat bases and slip-stitch them together with a layer of foam or batting inside before starting the walls.
Low Entry: To create a “doorway” for older pets, work half-double crochets for most of the wall but switch to slip stitches for a 4-inch section across three rounds.
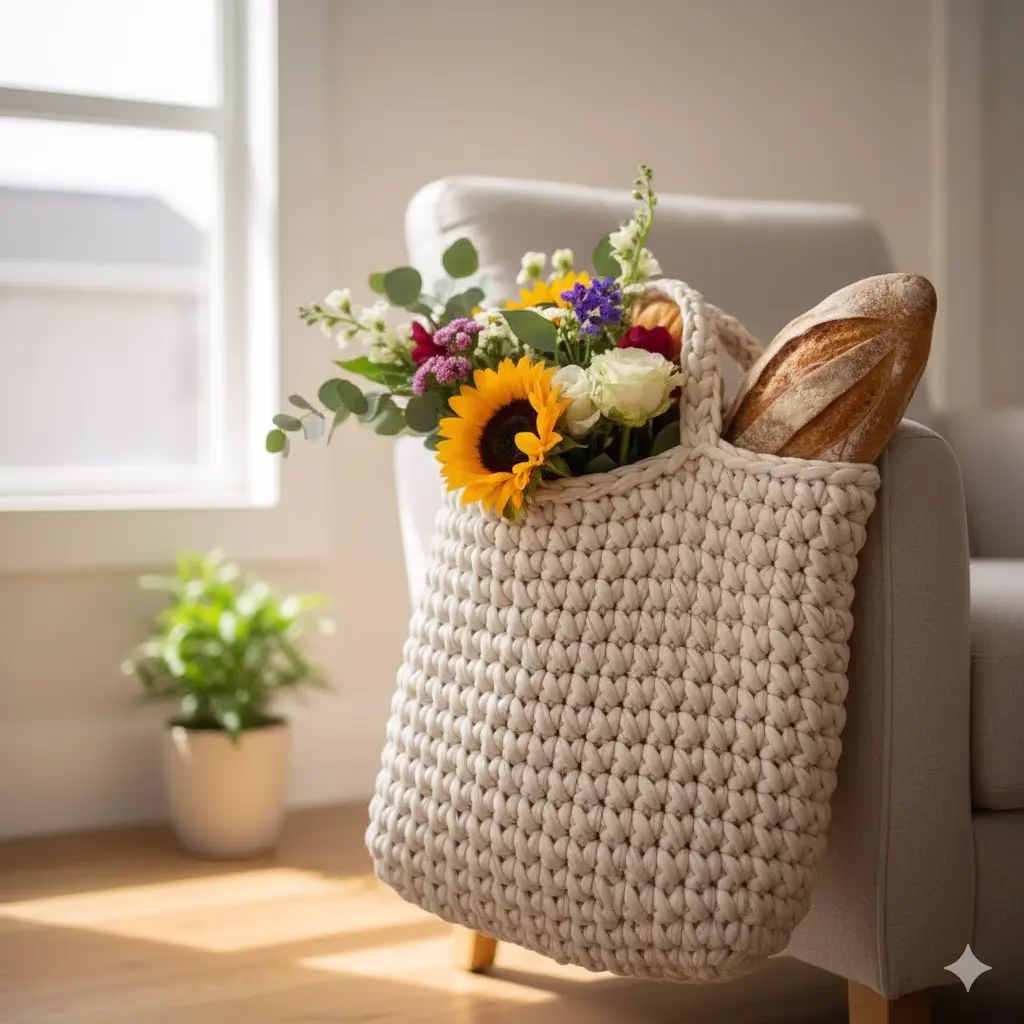
Creating a market tote by crocheting with fabric yarn is a rewarding project because the thickness of the material allows the bag to work up very quickly. This pattern uses a simple “V” stitch and a solid base to ensure the bag is both sturdy and stylish.
Materials
1–2 large balls of chunky fabric yarn (T‑shirt yarn or recycled textile yarn), about 350–450 g total
10–12 mm crochet hook (or size needed for a dense, non‑holey fabric)
Scissors and yarn needle for weaving in ends
Gauge & Size
Aim for a dense, squishy fabric: when you make a swatch of single crochet, stitches should sit close together with minimal gaps.
Finished bag (flat) is roughly: 32–35 cm wide and 35–38 cm tall, plus handles.
Abbreviations (US terms)
ch – chain
sc – single crochet
sl st – slip stitch
st(s) – stitch(es)
Step 1 – Crochet the Base
Ch 21 (this forms the width of the bag).
Row 1: Sc in 2nd ch from hook and in each ch across (20 sc). Turn.
Rows 2–8: Ch 1, sc in each st across. Turn.
You now have a flat rectangle base; add a simple border so you can work in the round: ch 1, sc evenly all the way around the rectangle, placing 3 sc in each corner. Join with a sl st to first sc.
Step 2 – Build the Sides in the Round
Round 1: Ch 1, sc in each st around, keeping tension firm so the fabric stays thick. Join with a sl st.
Repeat Round 1 until the bag is about 30–32 cm tall from the base. Do not fasten off.
As you work, stop occasionally to straighten and “squash” the bag into shape so the sides stay upright and boxy.
Step 3 – Shape the Top Edge
Work 1–2 more rounds of sc with slightly tighter tension to firm up the top edge.
At the end of the last round, stop at a side seam or center point; this will be your starting point for the handles.
Step 4 – Mark Handle Positions
Lay the bag flat and count the stitches around the top; divide by 2 to find the halfway point.
Use stitch markers (or scraps of yarn) to mark:
Front handle: about 6–7 sts in from the left edge and 6–7 sts in from the right edge.
Mirror those positions on the back for the second handle.
Leave a gap between markers where the handle opening will be (about 8–10 sts wide).
Step 5 – Crochet Handles
Front handle round:
From your current position, sc around until you reach the first front marker.
Ch 18–22 (this is the handle length; longer chain = longer handle). Make sure the chain is not twisted.
Skip the marked gap stitches and sc into the next marker stitch to attach the chain, forming an arch.
Continue with 1 sc in each stitch until you reach the first marker on the back.
Repeat: ch 18–22, skip the gap stitches, sc into the next marker on the back. Continue in sc to the start of the round; join with a sl st.
Reinforce handles:
Next round: Ch 1, sc in each st around, including working 1 sc into each ch of both handles.
Work 1–2 more rounds the same way to bulk up the handles and top edge so they match the thick, padded look.
Fasten off and carefully weave in all ends with a yarn needle.
Optional Finishing
Gently stretch the handles to even them out and shape the bag corners with your hands.
For extra structure, you can lightly steam block (holding the steam above the yarn, not pressing) and shape the bag while it cools.
This article was crafted by a team of passionate textile artists and sustainable living advocates. With years of experience in various fiber arts, our collective aim is to inspire creativity and mindful consumption within the crafting community. We believe in the power of transforming discarded materials into beautiful, functional pieces, particularly through the versatile medium of crocheting with fabric yarn. Our insights are born from countless hours spent experimenting with zero waste crocheting, always seeking innovative ways to bring new life to old fabrics.
The Versatile World of Crocheting With Fabric Yarn
In a world where we want to live better and waste less, the art of crocheting with fabric yarn is a great choice. It is a craft that blends fun with care for the earth. You can turn old clothes into pretty, strong, and useful items. This is not just a small hobby. Crocheting with fabric yarn—also called t-shirt yarn—lets you try new things. You can make items with textures and shapes that you just cannot get with thin wool.
This guide looks at unique ideas that show what you can do with crochet and fabric yarn. Maybe you have crocheted for years. Maybe you are just starting to learn about zero waste crocheting. These ideas will help you pick up your hook and use your old fabric. You will learn how to turn waste into treasure. From home decor to things you can wear, you will see how fun this can be.
The Allure of Fabric Yarn: Why Crochet It?
Before we look at the projects, let’s talk about why people love this material. First, it helps the planet. It supports zero waste crocheting by using old shirts, sheets, and denim. These things would usually go in the trash. Second, the thick feel of the yarn makes very strong items. The things you make will hold their shape well. They feel heavy and good to use.
Also, it is a cheap way to craft. You can find fabric in your own closet or at a thrift store. Working with it feels good in your hands too. The soft, stretchy strips make the work calm and fun. It is a great way for any crafter to mix a classic skill with modern green goals. You get to make something new without buying more plastic or new wool.
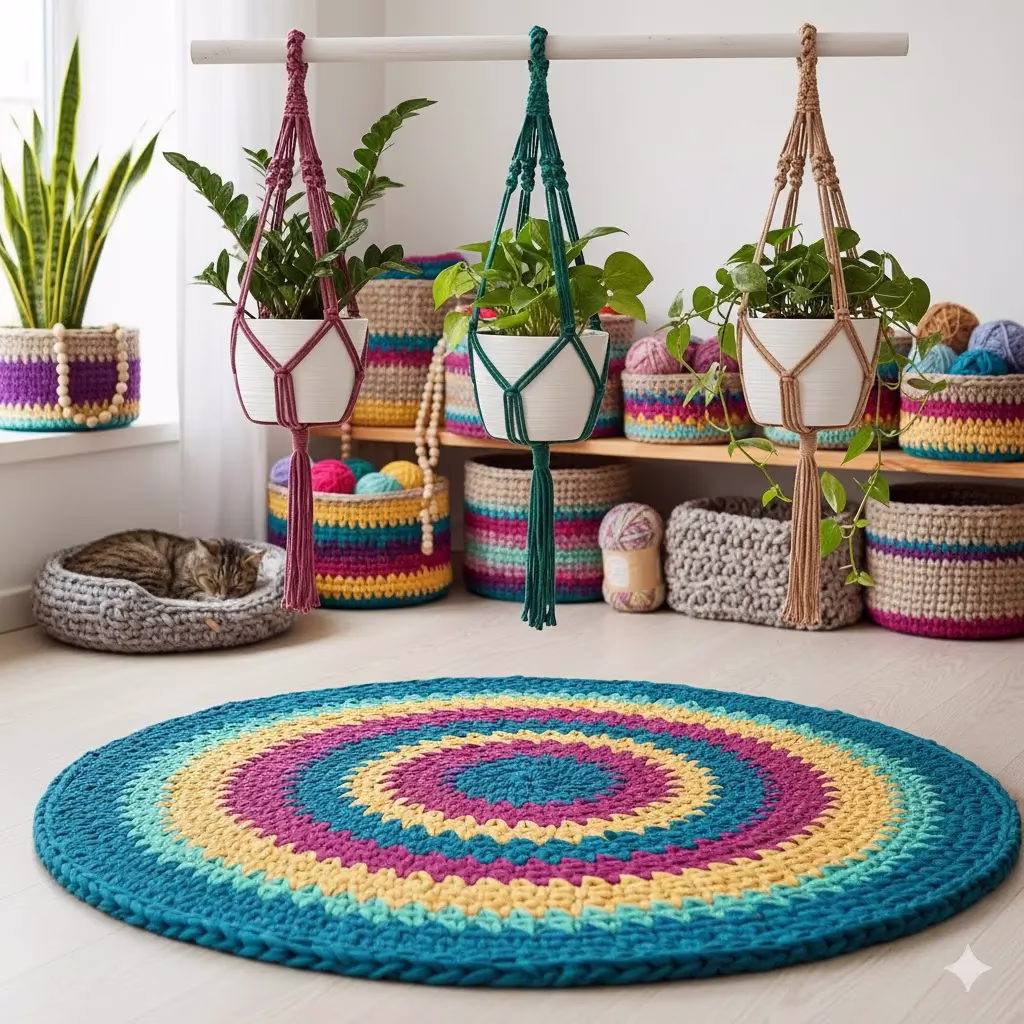
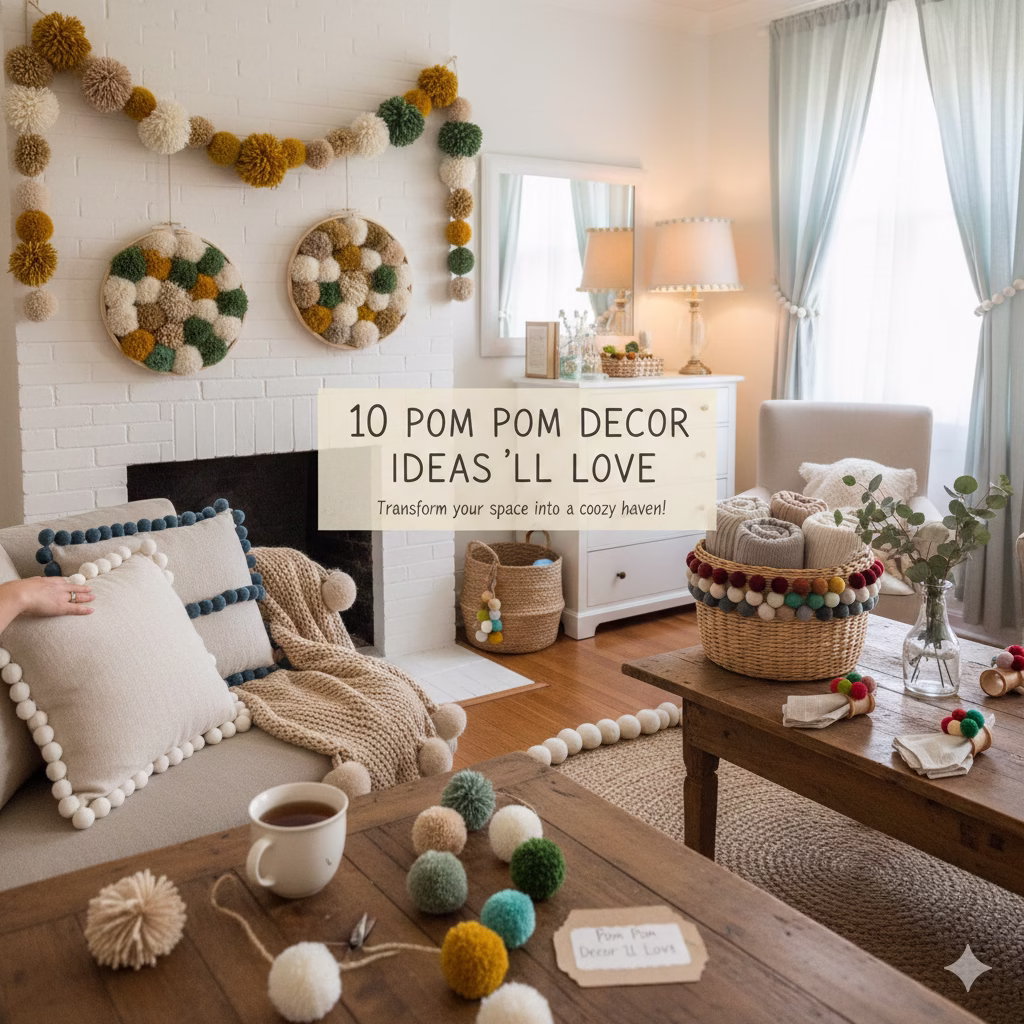
Sculptural Plant Pot Holders and Hangers
Fabric yarn is strong and thick. This makes it perfect for plant pot holders. Most thin cords look a bit weak, but fabric yarn looks soft and natural. It still holds a heavy pot very well. You can make striped holders to add color to a window. You can also make textured baskets that hang to save space on your desk.
The yarn is bulky, so these projects are very fast to finish. You can make a whole garden set in one afternoon. You can use a single crochet stitch for a stiff, strong look. Or, try a half-double stitch for a softer feel. These holders do more than just hold a plant. They are art. They bring a warm, handmade feel to your home. Try adding big wooden beads or rings to your crochet and fabric yarn work to make it look even better.
Textural Floor Rugs and Bath Mats
Using fabric yarn for rugs is a classic idea, but you can make it look modern. Today’s fabric rugs are stylish and last a long time. The weight of the yarn keeps the rug on the floor so it does not slip. These rugs feel great under your feet. You can make round rugs for the middle of a room or long rugs for a hallway. You can even make soft bath mats that soak up water well.
The best part is choosing the colors. You can use one color for a clean look. Or, use many colors for a fun, bright rug. Try using old towels to make bath mats. This is a great zero waste crocheting task that makes a big change in your home. Since the yarn is so thick, it is easy to clean. You can often just put these rugs in the wash when they get dirty.
Artisanal Storage Baskets and Organizers
Fabric yarn is great for making baskets that stand up on their own. You can use them to hide mess in any room. Make a small bowls for your keys by the door. You could also make a big bin for toys or laundry. Crocheting with fabric yarn lets you make tools for your home that also look like art. The thick yarn makes the walls of the basket very strong. They will stay up even when they are full.
Try making a set of three baskets that fit inside each other. Use different colors to make them look like a set. This can turn a messy shelf into a neat space. You can add leather handles to make them look like they came from a store. This project is not just about cleaning up. It is about adding a handmade touch to your house. These baskets last for years because the yarn is so tough.
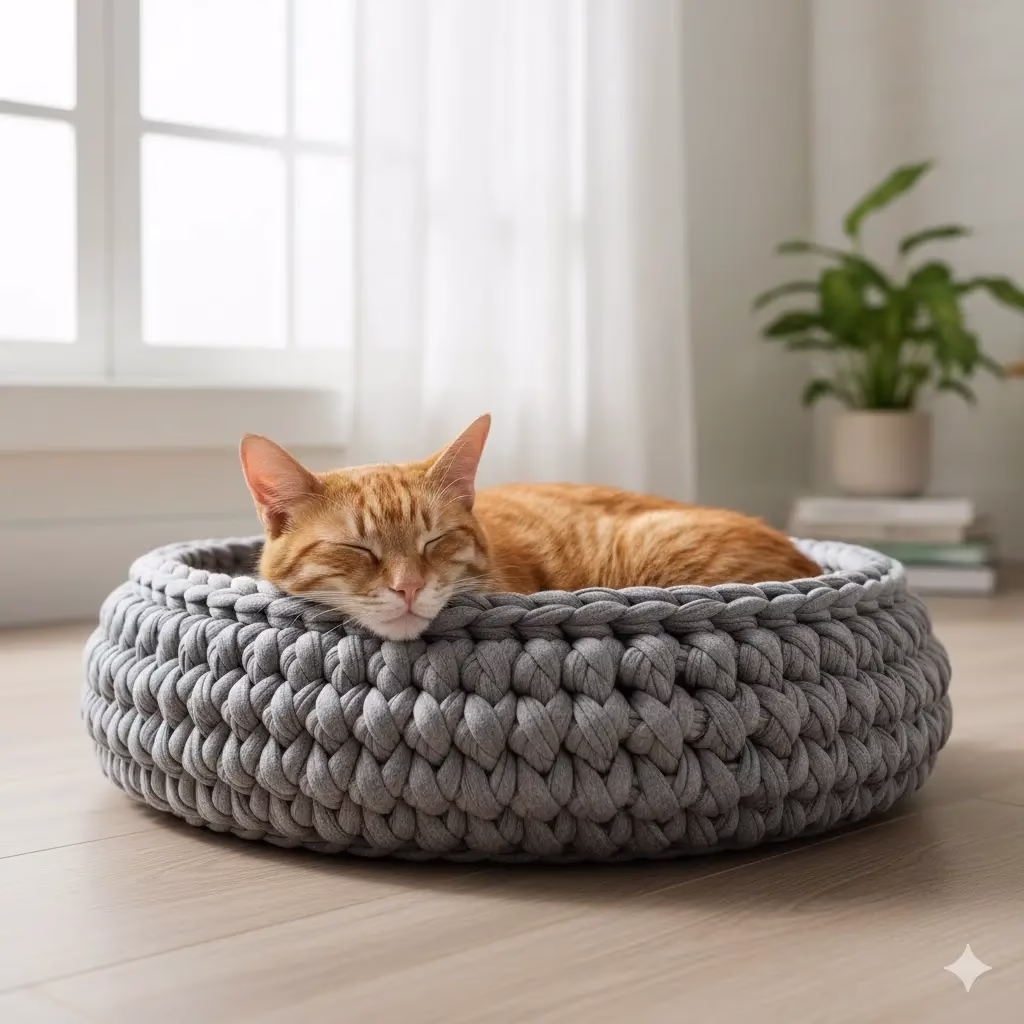
Chunky Pet Beds and Mats
Our pets deserve soft things too. Crocheting with fabric yarn is a smart way to make pet beds. The yarn made from old shirts is very soft on paws. The thick loops make a good cushion. These beds are easy to wash, which is very important for pet owners. They also can keep your pet’s space fresh and clean without any stress.
You can crochet a round bed with high sides for a cat. You can also make a flat mat for a big dog to lay on. Choose colors that match your couch or rug. This way, the pet bed looks like part of the room. This is a perfect zero waste crocheting project because it uses a lot of fabric. You can use up many old shirts at once. Your pet will love the soft feel of your handmade gift. Click Here for the instructions to make this.
Unique Statement Jewelry
Most people think fabric yarn is only for big things. But, you can also make very cool jewelry. You just need to use thinner strips of fabric. You can even cut strips from silk or old scarves. Imagine a thick necklace with wooden beads or a bold bangle. You can even cover hoop earrings with small crochet stitches.
This idea lets you be very creative. You can mix different types of fabric in one piece. You can even add a bit of shiny thread. Jewelry made this way is light and easy to wear all day. It is a fun zero waste crocheting project for using your smallest scraps. These pieces are great for starting a chat. They show people that you care about the planet and love to create.
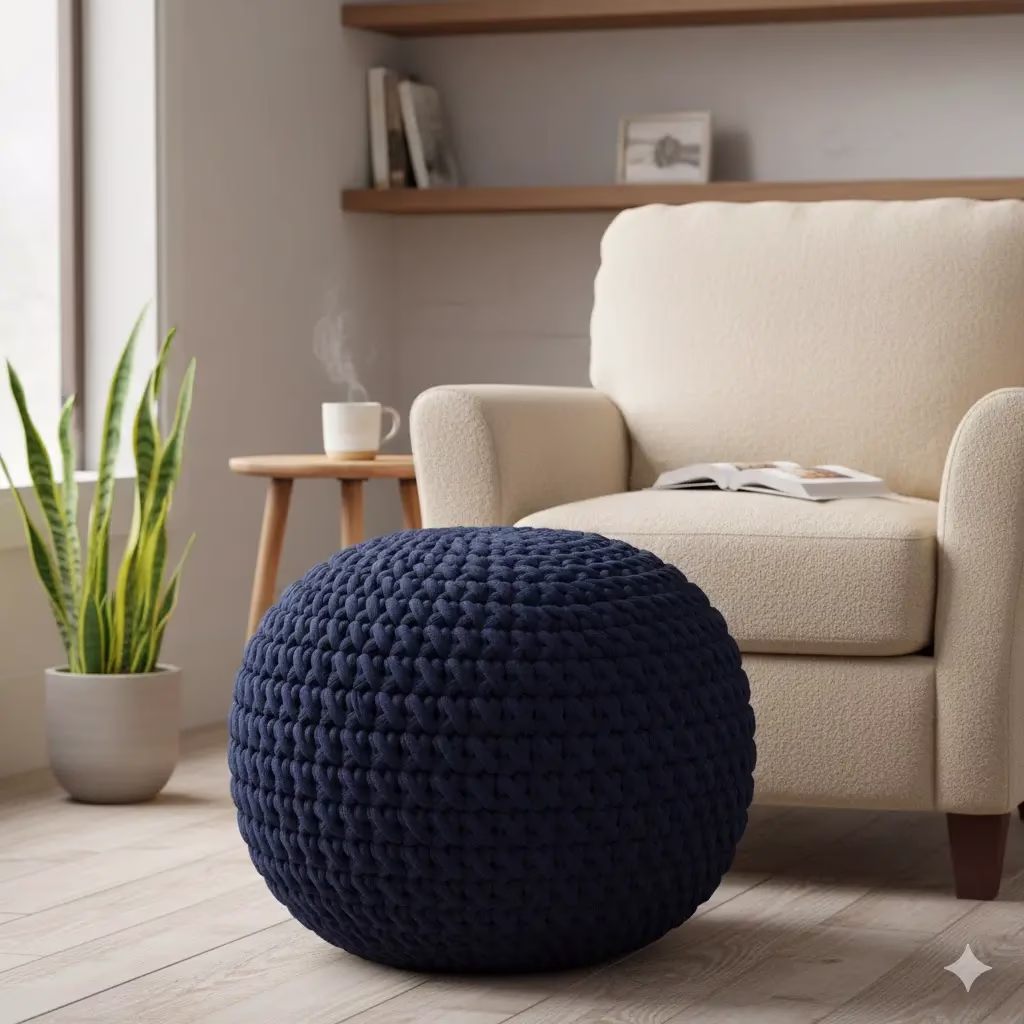
Decorative Poufs and Ottomans
This is a big project where fabric yarn really wins. You can make large floor poufs and ottomans. These are very strong and work well as extra seats. You can use them to rest your feet or as a small table. The thick crochet stitches provide a lot of support.
To make this, you will need a lot of yarn and a very big hook. You can make it one solid color or use stripes. You can fill the inside with old pillows or more fabric scraps. This keeps the project zero waste. This kind of work changes how you think about crochet and fabric yarn. It moves from small crafts to real furniture. It is a big piece that shows you value handmade items.
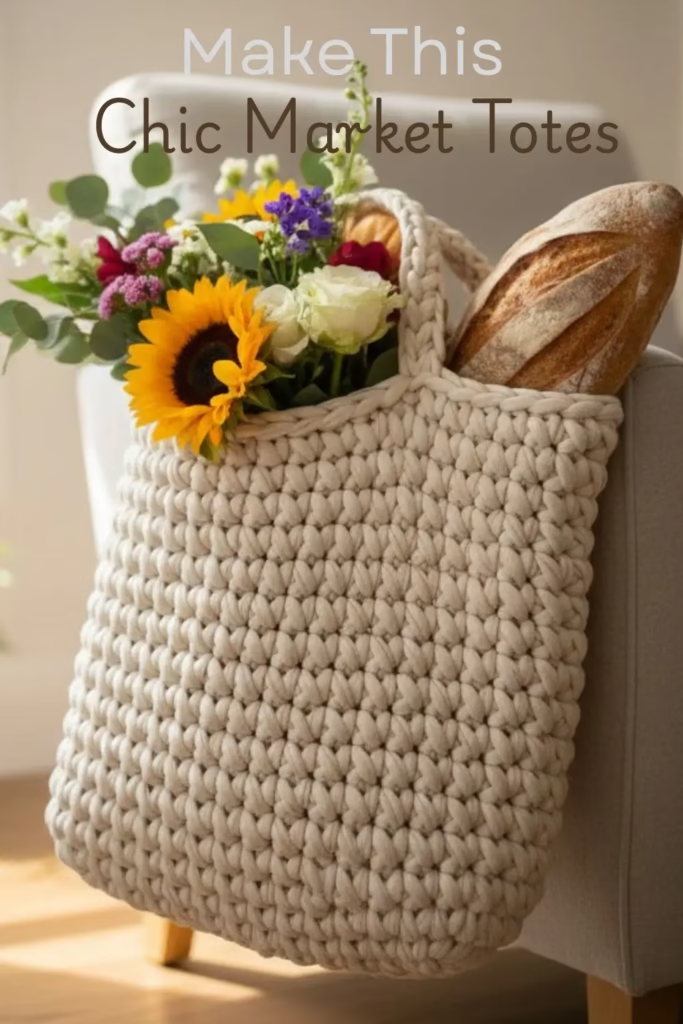
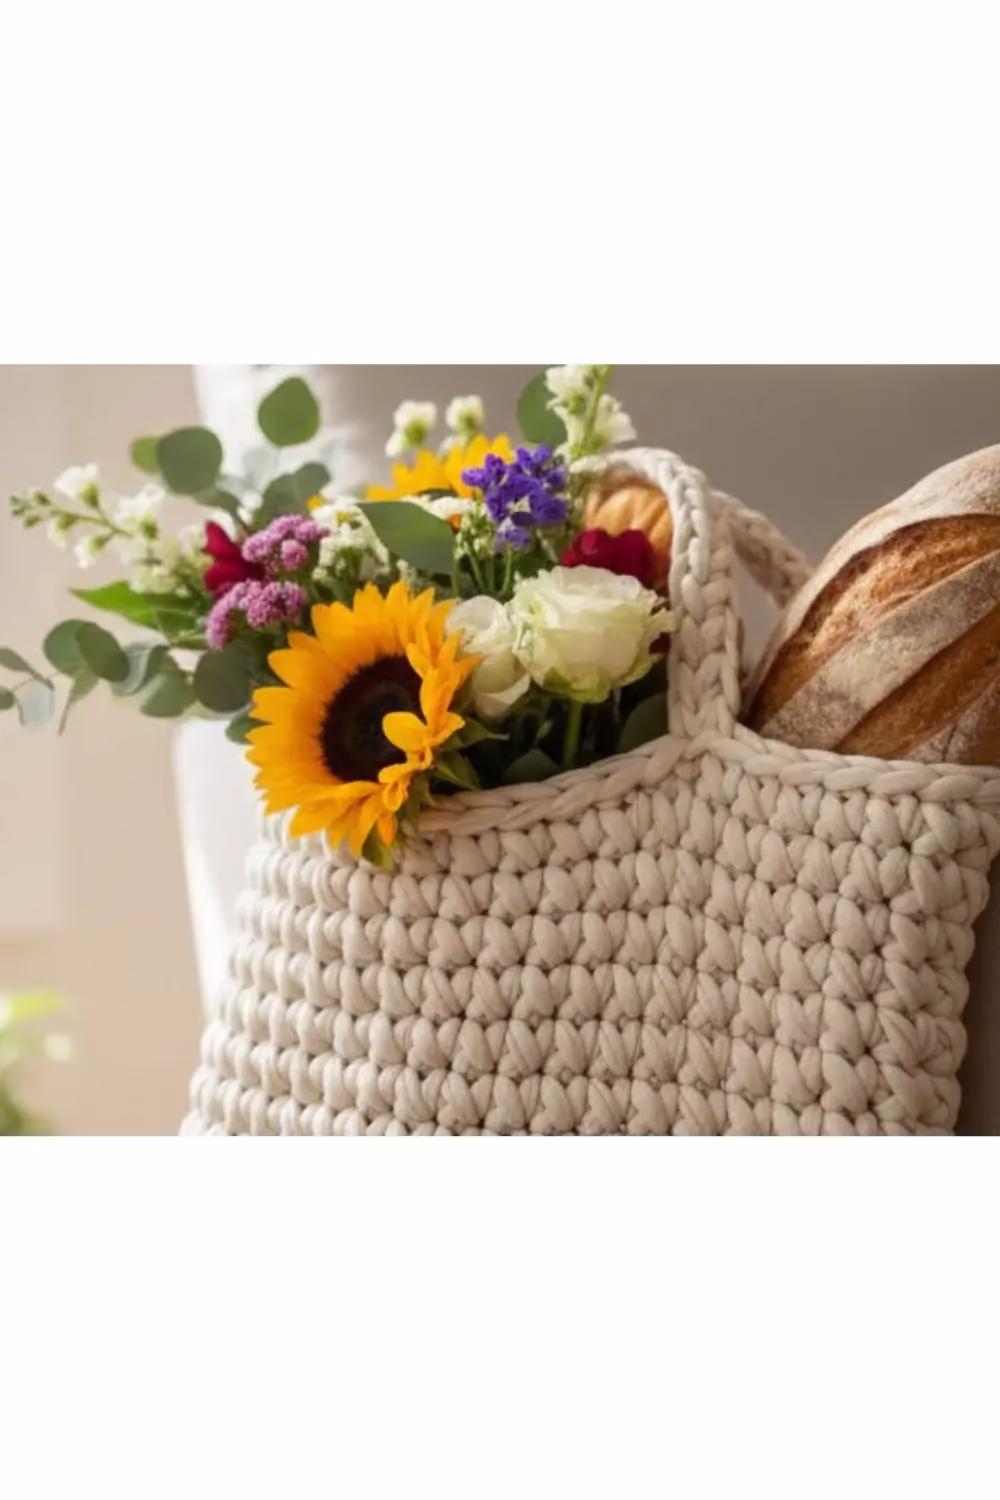
Chic Handbags and Market Totes
Crocheting with fabric yarn is a great way to make bags. The yarn is so strong that the bag can hold a lot of weight. You can make a tote for the market or a bag for the beach. Because the yarn is thick, the bag will be done fast and will keep its shape.
Try different stitches to see what you like. A tight stitch makes a very stiff bag. A loose stitch makes a bag that can stretch. You can add stripes or different handles. You can even put a fabric lining inside or a zipper. This zero waste crocheting task lets you make a bag that is just for you. A bright bag made from old shirts is a great way to show off your style. Click Here for the instructions to make this.
Cozy Coasters and Trivets
Fabric yarn is perfect for small things like coasters. The thick fabric protects your table from hot cups and plates. It also adds a nice look to your dining table. These are very fast to make. They are perfect for using up the last bits of your yarn.
You can make round or square shapes. You can even make a big mat for a hot pot. This zero waste crocheting idea is great because you can finish a set in one night. They make wonderful gifts for friends. These items will last through many washes and many years of use.
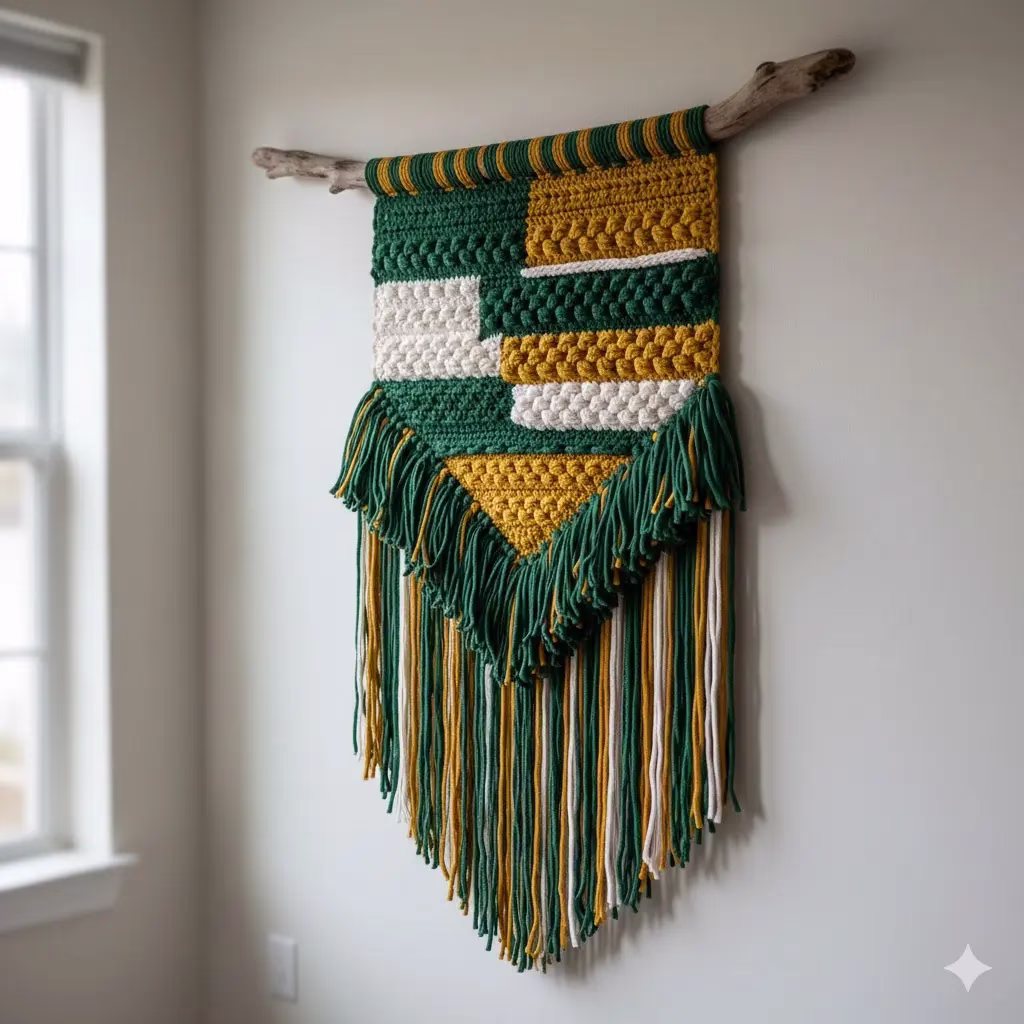
Modern Wall Hangings and Tapestries
The look of fabric yarn is a secret tool for art. When you make wall art, it looks like a sculpture. Because the yarn is thick, you can see every stitch. The light in the room makes shadows on the art. This makes it look deep and interesting.
Modern wall art often uses big blocks of color. You can hang your art from a piece of wood you found outside. This fits the zero waste crocheting theme perfectly. These hangings also help keep a room quiet because the fabric soaks up sound. By mixing different fabrics, you can make a piece that looks very expensive.
Durable Child-Friendly Play Mats
For parents, crocheting with fabric yarn is a way to make safe play mats. Most rugs are hard or scratchy. But a mat made from cotton shirts is soft on a baby’s skin. These mats give kids a soft place to crawl or play with blocks.
The mat is heavy, so it stays in place on the floor. This makes it safer for kids. Since the yarn comes from old clothes, it is already soft and easy to wash. When it gets dirty, just put it in the machine. This zero waste crocheting project is a sweet way to make something for a child. It also teaches them about using things again.
Conclusion
Working with fabric yarn is a path of fun and care for the world. When you use old fabric, you make things that are one of a kind. You are also helping the zero waste crocheting movement. These ideas are just the start. You will find more as you try new fabrics and stitches.
Every stitch you make helps create a better future. Whether you make a small mat or a big rug, it feels good to turn waste into art. We hope these ideas help you look at your old clothes in a new way. Pick up your hook and start something great today.
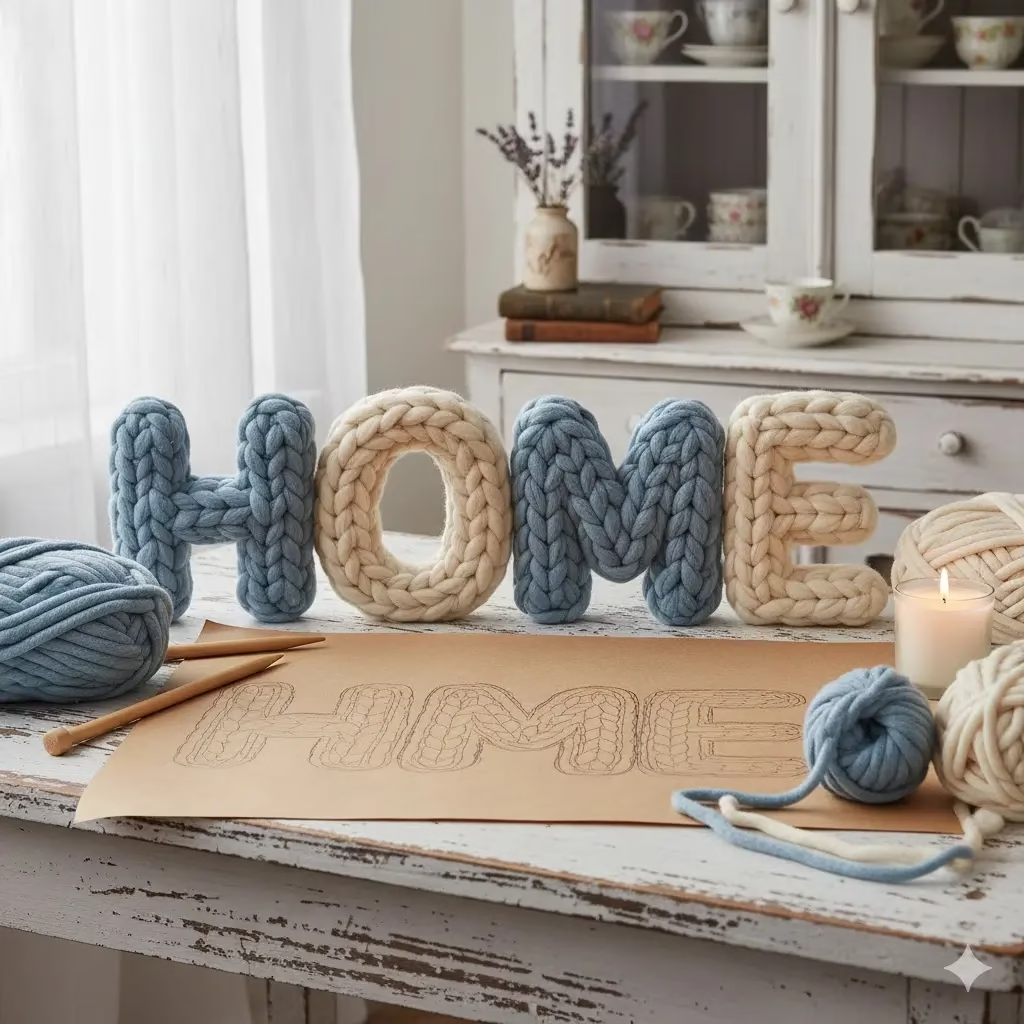
Embrace a sustainable approach to home decor with our guide to crafting custom Chunky Knit Letters using zero waste knitting principles. This method ensures that every inch of your premium roving or upcycled yarn is utilized, minimizing scrap while creating high-impact, eco-friendly statement pieces. By mastering these mindful techniques, you can transform simple materials into sophisticated, handmade treasures without the environmental footprint of mass-produced decor. Discover how to curate a beautiful, personalized home or create unique, planet-conscious gifts with these delightful chunky knit creations.
How To Make Chunky Knit Letters: A Comprehensive Guide to Crafting Cozy Decor
Chunky knit letters have taken the home decor world by storm, offering a unique blend of rustic charm and modern coziness. Whether spelling out a name, a beloved word like “HOME” or “LOVE,” or simply using an initial, these plush, oversized letters add a touch of warmth and personality to any room. They’re perfect for nurseries, living rooms, bedrooms, or as thoughtful, handmade gifts. While they might look intricate, creating your own chunky knit letters is a rewarding project that’s more accessible than you might think. This guide will walk you through every step, from design to the final decorative touches, ensuring you can craft beautiful, personalized pieces for your space.
Why Choose Chunky Knit Letters?
Beyond their undeniable aesthetic appeal, chunky knit letters offer several benefits:
Personalization: They allow for endless customization in terms of letter choice, yarn color, and embellishments, making them truly unique.
Texture and Warmth: The thick, soft yarn adds incredible texture and a sense of coziness, instantly making a space feel more inviting.
Versatility: They can stand alone on a shelf, lean against a wall, be hung, or even be used as soft floor decor in a child’s room.
Handmade Charm: There’s an inherent beauty in handmade items, and chunky knit letters carry that special touch that mass-produced decor often lacks.
Great Gift Idea: A custom chunky knit letter or word set makes an incredibly thoughtful and personal gift for baby showers, weddings, housewarmings, or birthdays.
Now, let’s dive into how you can make these delightful creations yourself!
Section 1: Planning Your Chunky Knit Letters Project
Before you even pick up your yarn, a little planning goes a long way. This initial phase helps ensure your project runs smoothly and that you achieve the desired outcome.
Choosing Your Letter(s) and Size
Consider where your chunky knit letters will be displayed and what message you want them to convey.
Single Initial: Perfect for a personalized touch on a bookshelf or bedside table.
Full Word (e.g., “HOME,” “LOVE,” a child’s name): Requires more planning for consistency in size and alignment.
Size Matters: Do you want large floor-standing letters or smaller ones for a mantelpiece? The size will dictate the amount of yarn and stuffing needed. A good starting point for a prominent letter might be 12-18 inches tall.
Designing Your Letter Templates
Accuracy in your template is crucial for a well-formed letter.
Drafting: On a large sheet of paper or cardboard, draw your desired letter. You can freehand it, but for better symmetry, consider using a stencil, printing a large font, or even projecting a letter onto your surface and tracing it.
Width: Decide on the desired thickness of your letter. This will be the width of your “tube” of knitting. For a chunky look, aim for a width of at least 3-4 inches.
Refine Edges: Use a ruler to straighten lines and curves. Ensure all corners are relatively sharp, or gently rounded if that’s your aesthetic. This template will serve as your pattern for shaping the knitted pieces.
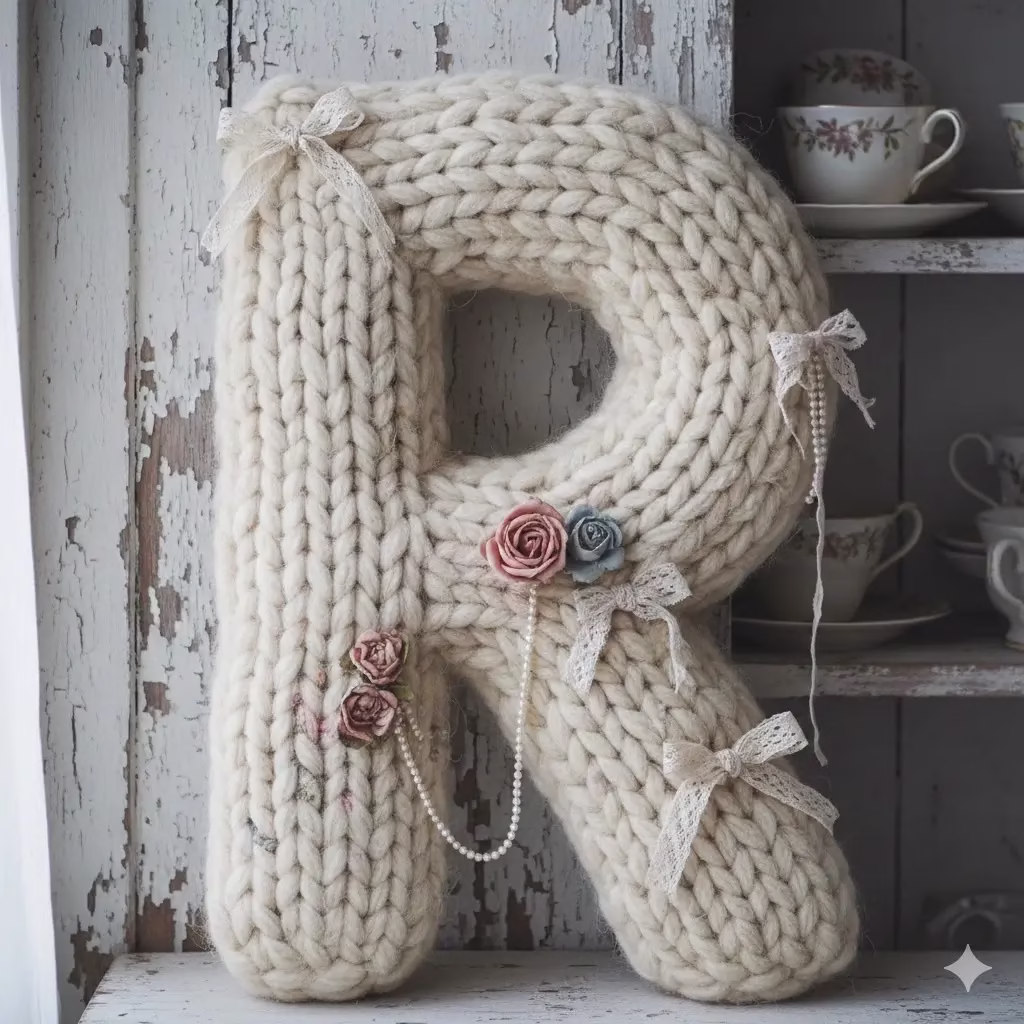
Mirror Image for Back (Optional but Recommended): While not strictly necessary if you’re careful, some prefer to create a mirror image template for the back pieces, especially for letters like ‘B’, ‘D’, ‘P’, ‘R’, etc., to ensure perfect symmetry.
Gathering Your Materials
Having all your supplies ready before you start knitting will make the process much smoother.
Chunky Yarn: This is the star of the show! Look for “super chunky” or “jumbo” weight yarn. Merino wool roving is popular for its incredibly soft texture and beautiful drape, but acrylic blends are also available and often more budget-friendly and durable. The quantity will depend on the size and number of letters. A good estimate is usually 500g-1kg per average-sized letter (12-18 inches), but always check the yardage/meterage on the yarn label.
Large Knitting Needles: Since you’re using chunky yarn, you’ll need appropriately sized needles. Often, this means 20mm-30mm (US Size 35-50) circular or straight needles. If using Merino wool roving, you might even opt for arm knitting.
Stuffing/Filler: Polyester fiberfill (like what’s used for pillows) is ideal. You’ll need a generous amount to make your letters plump and firm.
Fabric for Inner Structure (Optional but Recommended): For very large letters or letters that need to stand up well (like ‘I’ or ‘L’), a core made from felt, foam board, or even thick batting can help maintain shape and provide stability.
Scissors: For cutting yarn and fabric.
Yarn Needle (Tapestry Needle): For weaving in ends and seaming the knitted pieces together.
Measuring Tape: For checking dimensions and consistency.
Sewing Pins: To help hold pieces together during seaming.
Embellishments (Optional): Lace, ribbons, fabric flowers, beads, or small charms to add a shabby chic touch.
Hot Glue Gun (Optional): For attaching embellishments.
Section 2: The Knitting Process for Chunky Knit Letters
Now for the fun part – the knitting! The technique here is essentially creating a long, wide strip of knitting that will then be shaped into your chosen letter.
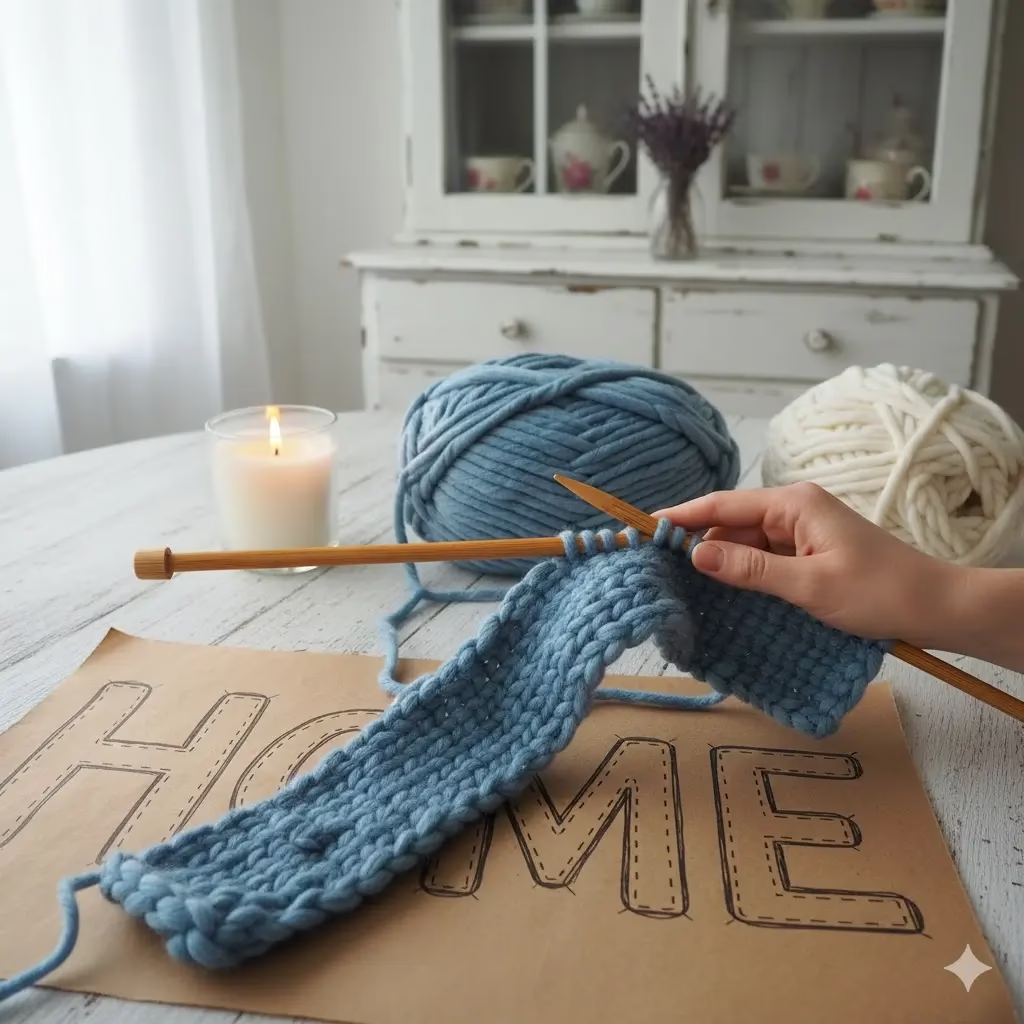
Basic Knitting for Chunky Yarn
For beginners, the garter stitch (knitting every row) is the simplest and creates a lovely, squishy texture perfect for chunky letters. If you’re comfortable, stockinette stitch (knit one row, purl one row) gives a smoother, more traditional knit look, but tends to curl, which can be managed when stuffing.
Cast On: Cast on a number of stitches that will give you the desired width of your “tube” when stretched. This usually translates to around 6-10 stitches for needles 20mm or larger, but swatch to confirm. Your swatch should be about 3-4 inches wide.
Tip: If you’re using Merino roving for arm knitting, cast on enough loops to achieve your desired width.
Knit Your Strip: Knit every row (garter stitch) or alternate knit and purl rows (stockinette stitch) until you have a very long strip. How long? This is where your template comes in.
Lay your knitted strip over your letter template, following the outline. You’ll need enough length to wrap around the entire perimeter of your letter, plus a little extra for seaming and fullness.
Example: If your letter ‘C’ has an outer perimeter of 30 inches and an inner perimeter of 20 inches, you’ll need approximately 50 inches of knitted strip (30 + 20) to cover both the outer and inner curves. For a straight letter like ‘I’, you’ll need enough length to cover all four sides. It’s always better to knit slightly too long than too short.
Bind Off: Once you have sufficient length, bind off your stitches. Leave a very long tail (at least 2-3 times the total perimeter length of your letter) for seaming.
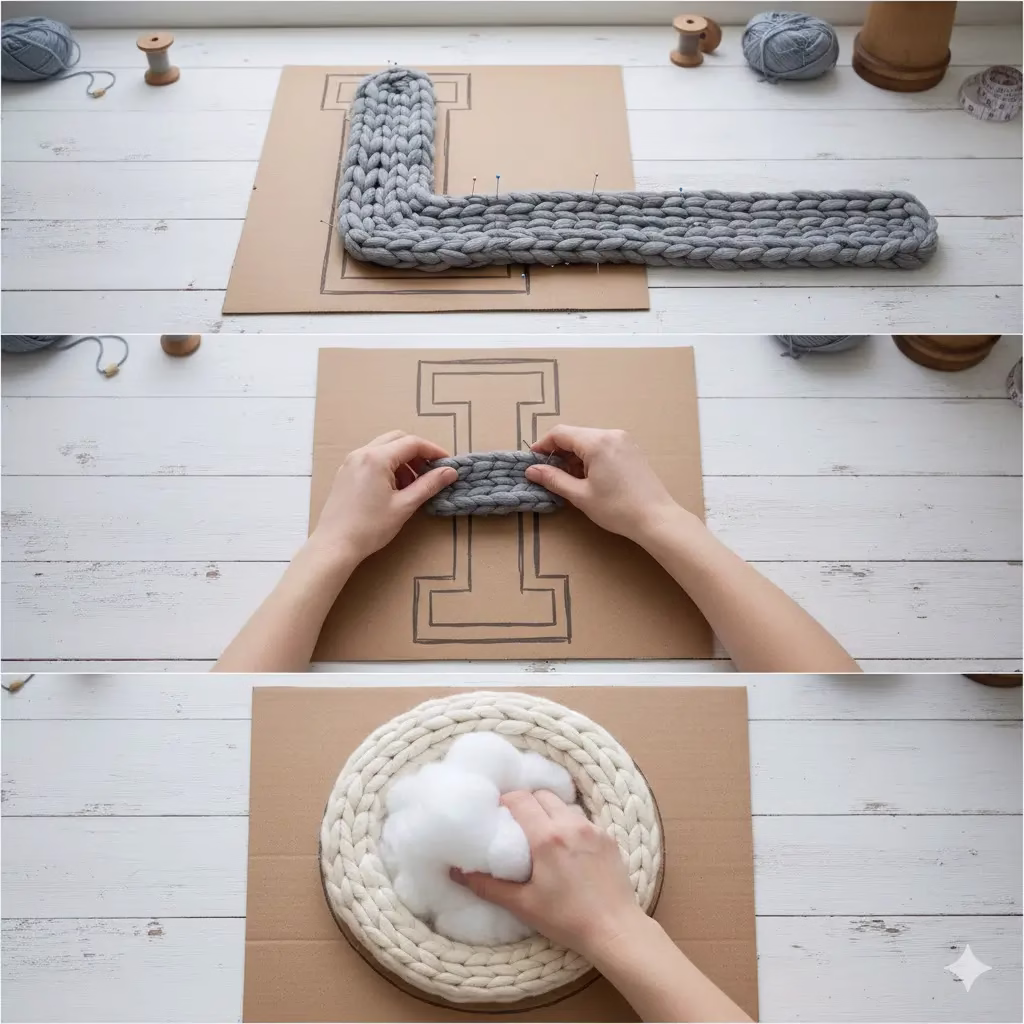
Section 3: Shaping and Assembling Your Chunky Knit Letters
This is where your long knitted strip transforms into a beautiful letter.
Forming the Letter Shape
Pin to Template: Lay your knitted strip on top of your letter template. Carefully follow the curves and straight lines of your letter, pinning the knitted fabric to the template as you go. This helps maintain the shape.
Seaming the Edges: You’ll essentially be creating a “tube” of knitting that follows the letter’s outline.
Using your yarn needle and the long tail, begin to seam the long edges of your knitted strip together. Imagine you’re folding the strip in half lengthwise and sewing the raw edges together, but in the shape of your letter.
For letters with straight lines (like ‘L’, ‘T’, ‘H’), this is relatively straightforward. For curved letters (like ‘C’, ‘O’, ‘S’), you’ll need to gently ease the fabric around the curves.
Use an invisible seam technique (like the mattress stitch) for a clean finish, or a simple whip stitch if the seam will be less visible.
Internal Gaps (for letters like A, B, D, O, P, Q, R): For letters with internal holes, you’ll need to create a separate knitted “inner” loop.
Knit a shorter strip, calculate its length by measuring the inner perimeter of the letter’s hole.
Seam this shorter strip into a loop.
Carefully attach this inner loop to the main letter structure as you are seaming, essentially creating two joined tubes.
Stuffing and Finishing the Letter
Stuffing: Once you have seamed a good portion of your letter’s shape, begin to stuff it with polyester fiberfill.
Stuff firmly and evenly to avoid lumpy areas. Use small handfuls of fiberfill and push it into all the corners and curves.
If using a fabric core: Insert your cut-out fabric core into the knitted sleeve before you begin stuffing. This core will provide a solid base for the stuffing and prevent the letter from collapsing.
Close the Letter: As you stuff, continue seaming until your letter is fully formed and plump. Ensure all open edges are securely sewn shut. Weave in any remaining yarn tails discreetly.
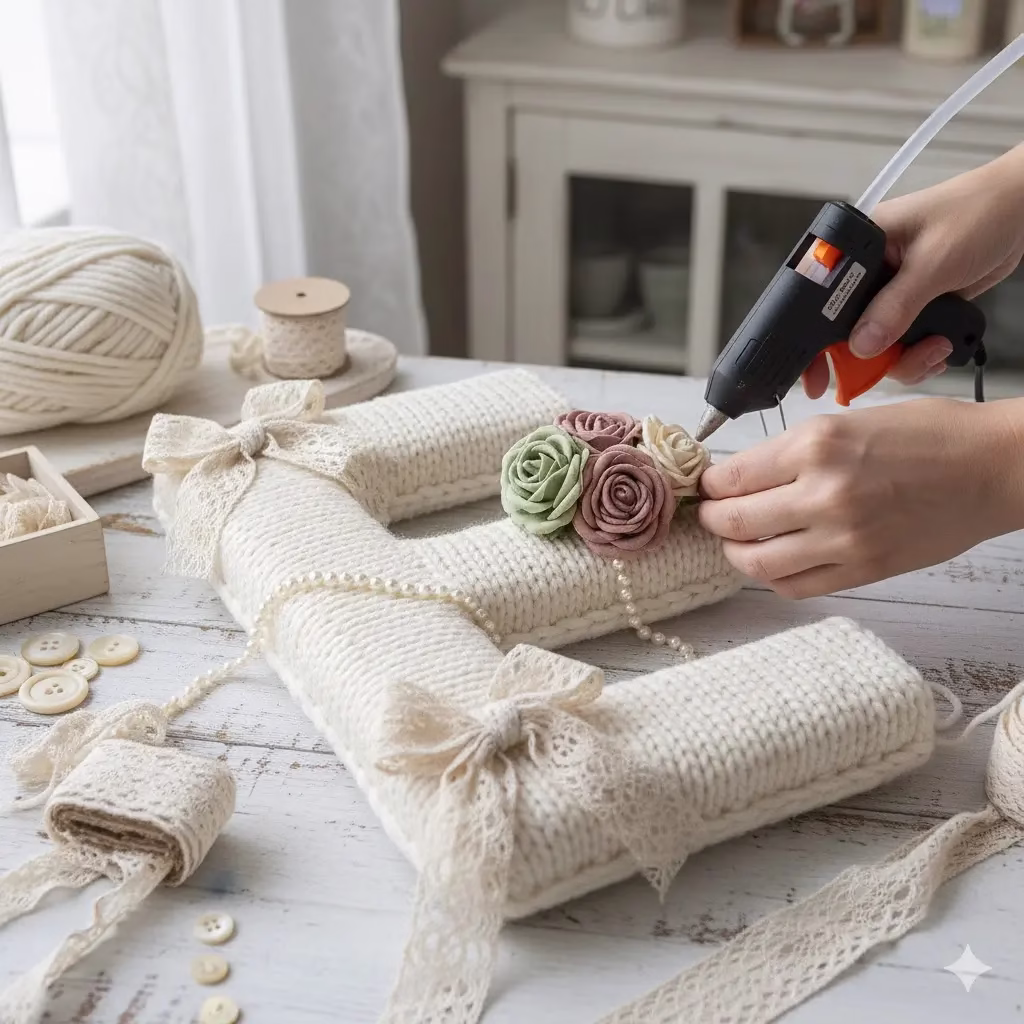
Section 4: Adding Shabby Chic Embellishments and Finishing Touches
Now that you have a beautifully formed chunky knit letter, it’s time to add those special shabby chic details that make it truly unique. This is where your creativity can really shine!
The Essence of Shabby Chic
Shabby chic style is all about embracing aged beauty, soft pastels, distressed finishes, and romantic, feminine touches. For your chunky knit letter, this translates to adding elements that evoke a sense of vintage elegance and gentle wear. Think delicate textures and muted colors.
Ideas for Embellishments
Lace and Ribbons:
Bow Accents: Tie small bows from delicate lace ribbon or satin ribbon in muted tones (ivory, blush pink, light blue, sage green). Attach them to the curves or corners of your letter using a hot glue gun or by stitching them securely.
Wrapped Sections: For a more intricate look, gently wrap a section of your letter with a strip of vintage lace or a wider ribbon. Secure the ends neatly on the back.
Hanging Ribbons/Lace: Attach longer pieces of lace or ribbon that drape elegantly from the letter, perhaps with small beads or charms at the ends.
Fabric Flowers:
Roses and Peonies: Handmade fabric flowers, especially roses or peonies made from cotton, linen, or even silk, are perfect. Look for muted, dusty colors. You can make these yourself from scraps of fabric or purchase them from craft stores.
Arrangements: Cluster a few flowers together, perhaps with a small lace leaf or a few pearls, and attach them to a prominent part of your letter. A hot glue gun is very useful for this.
Pearls and Beads:
Strands: Drape a delicate strand of faux pearls across your letter, securing it at a few points. This adds an instant touch of classic elegance.
Individual Beads: Stitch individual pearls or small glass beads onto the knit fabric for subtle sparkle.
Buttons:
Vintage Buttons: Collect vintage-looking buttons, especially those with intricate designs, mother-of-pearl finishes, or covered in fabric. Sew them onto your letter in small groupings or as single accents.
Distressed Fabric Elements:
Ruffles and Rags: Strips of frayed, distressed fabric (like linen or burlap) can be gathered into small ruffles or tied into bows for a more rustic shabby chic feel.
Small Charms:
Keys, Birds, Crowns: Tiny metal charms with a vintage aesthetic, such as keys, bird cages, or small crowns, can be subtly attached with a loop of thin ribbon or thread.
Tips for Attaching Embellishments
Placement is Key: Before permanently attaching anything, experiment with different placements. Lay out your embellishments and step back to see what looks best.
Less Can Be More: While shabby chic embraces detail, avoid overcrowding your letter. Often, a few well-placed, thoughtful embellishments have more impact than too many.
Secure Attachment: Use a strong fabric glue or a hot glue gun for most embellishments. For items like buttons or heavier charms, stitching them on with a strong thread will ensure they stay put. If using a hot glue gun, apply glue sparingly to avoid it seeping through the knit.
Color Palette: Stick to a soft, muted color palette for your embellishments to maintain the shabby chic aesthetic. Creams, whites, pastels, and soft metallics work beautifully.
Section 5: Displaying Your Chunky Knit Letters
Once your beautiful chunky knit letters are complete, it’s time to showcase them! Their versatility allows for many creative display options.
Shelf or Mantel Decor: This is a classic choice. Arrange single initials or full words on a shelf, fireplace mantel, or console table. Group them with other shabby chic elements like distressed picture frames, vintage books, or small vases of dried flowers.
Nursery or Child’s Room: Spell out a child’s name or initial on a dresser or wall shelf. The soft texture is perfect for a cozy nursery environment.
Wall Art: While they are chunky, smaller letters can be hung on a wall. You might need to add a small loop or hook to the back for hanging. Consider a gallery wall arrangement with other art.
Bedroom Accent: Place a large initial on a bedside table or lean a word like “DREAM” against the headboard for a personalized touch.
Living Room Statement: A larger “HOME” or “LOVE” can make a welcoming statement on a wide window sill, a coffee table, or even as soft floor decor in a relaxed setting.
Photo Props: Chunky knit letters make fantastic props for baby announcements, milestone photos, or wedding photography, adding a unique and personal touch.
Gift Presentation: Use a custom chunky knit letter as part of a gift basket for a baby shower or a housewarming, making the presentation itself a memorable part of the gift.
Conclusion
Creating your own chunky knit letters is a delightful journey into the world of handmade decor. From the initial planning and selection of the perfect chunky yarn to the final stitches and decorative touches, each step allows for personal expression and creativity.
The result is not just a decorative object, but a warm, inviting, and truly unique piece that reflects your personal style. Whether you’re making a single initial for a cozy corner or a complete word to adorn your mantel, these plush letters are sure to bring a touch of shabby chic elegance and handmade charm to any space. So, gather your materials, unleash your inner crafter, and start knitting your way to beautiful, custom home decor that will be cherished for years to come.
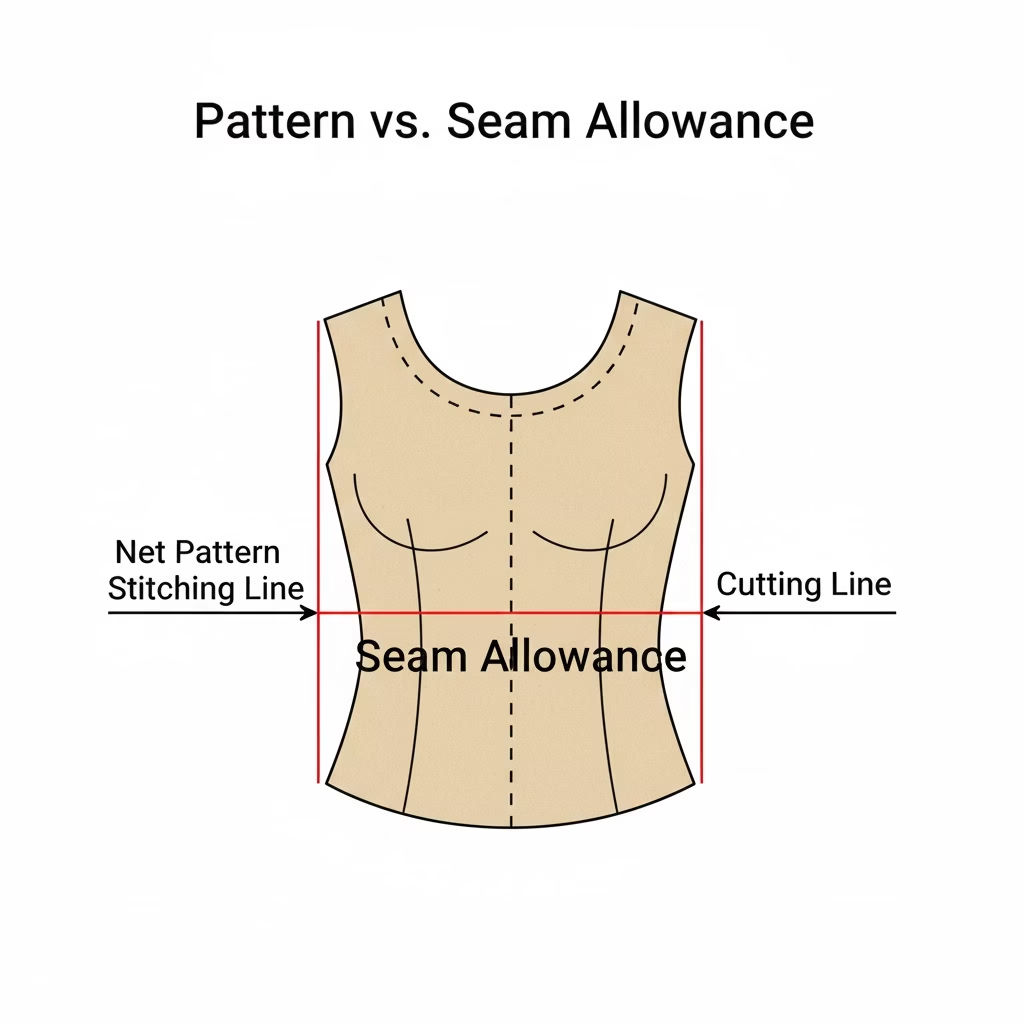
Once you have used your sloper to create new designs, you must add seam allowances before you cut your fabric. A master sloper has no seam allowances so that you can see the exact fit lines of the body. However, if you sew along the edge of a sloper without adding extra width, the dress will be much too small. Adding these allowances is a vital skill for anyone working with dress patterns.
Step 1: Choose Your Seam Allowance Width
The width you choose depends on the fabric and the type of seam you want to use. While commercial dress patterns often use a standard width, you can choose what works best for your project.
Standard (1.5 cm or 5/8 inch): This is the most common width. It gives you enough room to finish the edges or make small fit changes.
Narrow (1 cm or 3/8 inch): This is great for tight curves, like necklines or armholes. It is also good for knits or when using an overlocker.
Wide (2 cm or more): Use this for center back seams where you might put a zipper, or for side seams if you think you might need to let the dress out later.
Step 2: Trace Your Design Copy
Never add seam allowances to your master sloper. Instead, trace your new design onto a fresh piece of pattern paper. Use a pencil to mark the “stitch line” (the original edge of your sloper). This line is where your sewing machine needle will go.
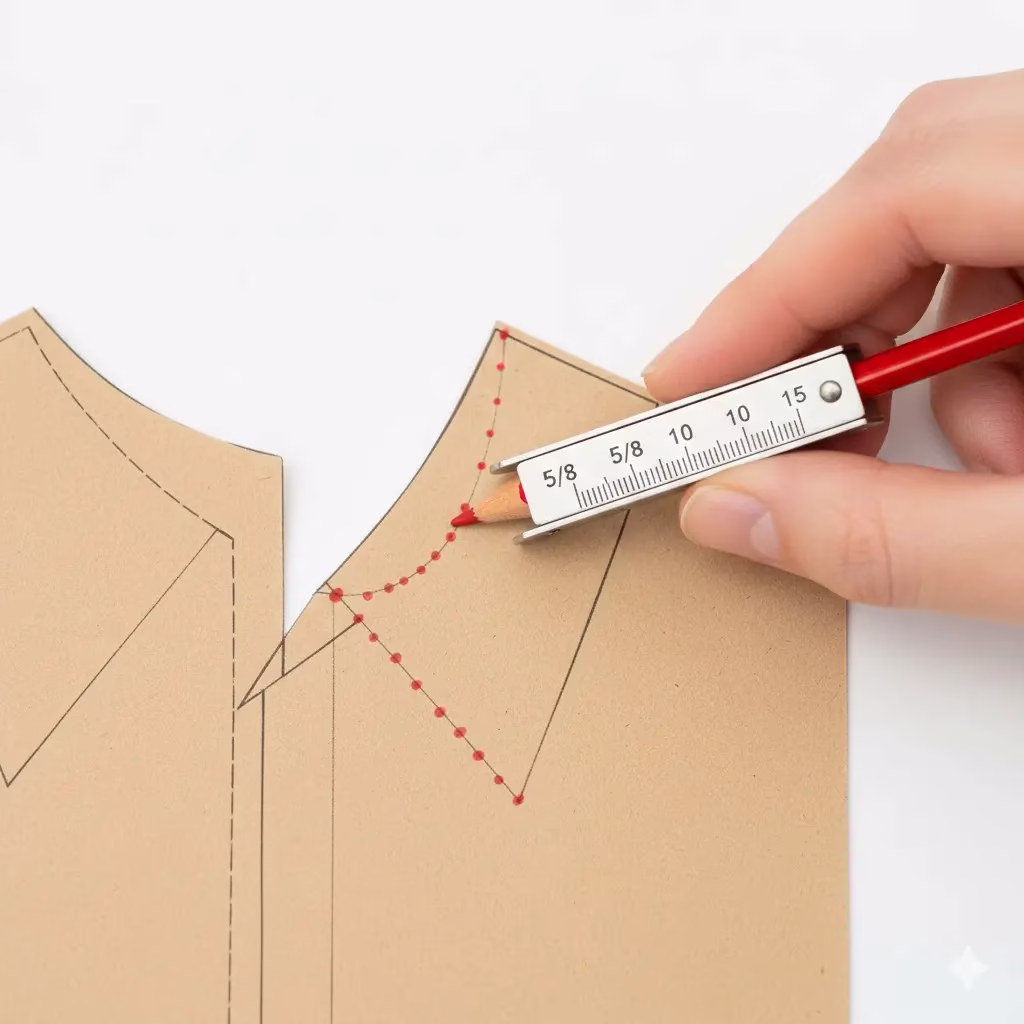
Step 3: Use a Grading Ruler for Accuracy
To add the allowance, place a clear grading ruler on your paper. Align the ruler so that the 1.5 cm mark sits exactly on your stitch line. Draw a new line on the outside. Do this all the way around the piece.
For curves, like the armhole or a V-neck, move the ruler slowly. Mark small dots every few centimeters and then connect them with a smooth line using a French curve. This ensures your dress pattern stays accurate.
Step 4: Handle Corners and Notches
When you reach a corner, like the bottom of a side seam, extend your lines until they cross. This creates a sharp point that is easy to follow.
Don’t forget to move your notches! If you have a notch on your stitch line to help you line up a sleeve, draw a line straight out to the new edge of the paper. Use a pattern-notcher to make a small snip so you can see it on your fabric.
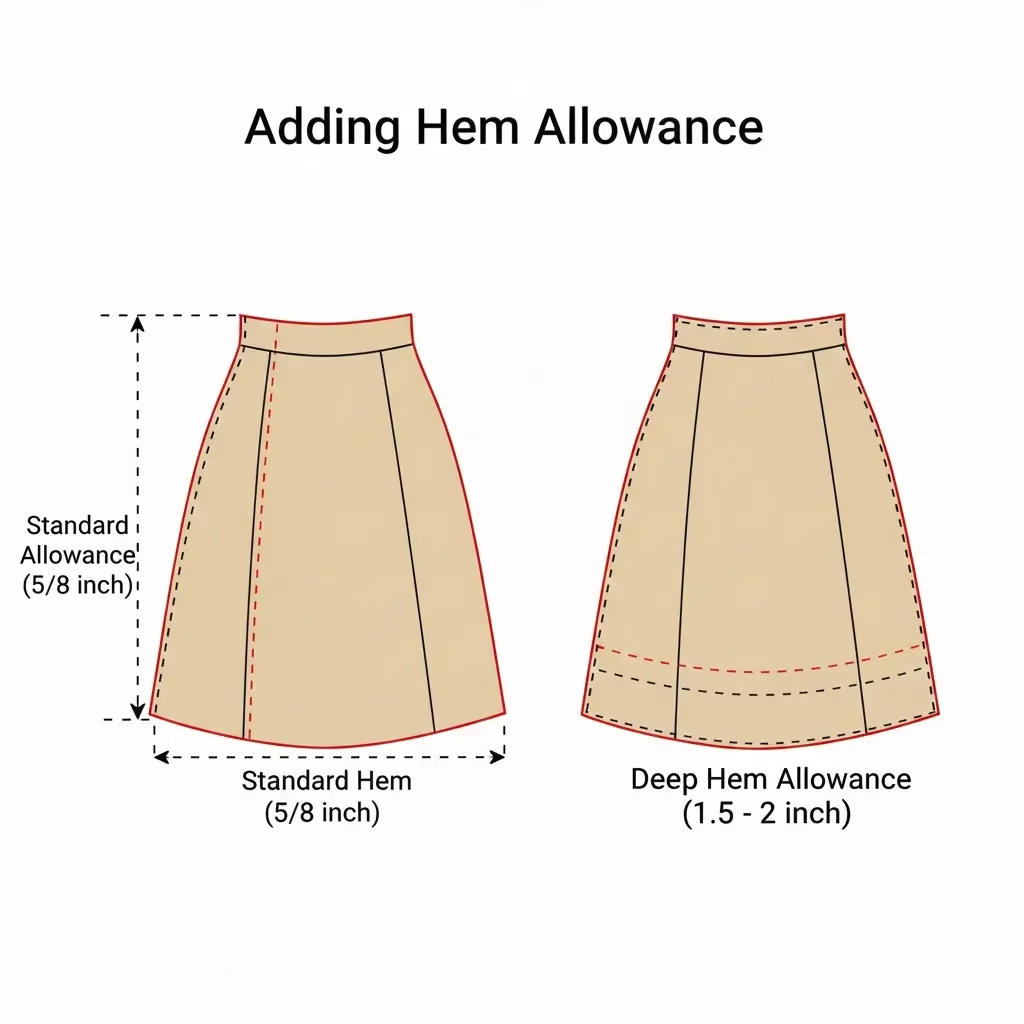
Step 5: Adding the Hem Allowance
The bottom of your dress or sleeve needs a larger allowance so you can fold the fabric up.
Straight Skirts: Add 4 to 5 cm for a deep, stable hem.
Circle Skirts: Add only 1 to 1.5 cm. A wide hem on a curved edge will bunch up and look messy.
Final Check and Labeling
Before you cut the paper, check that your seams match. Place the front side seam against the back side seam. They should be the exact same length. Label each piece clearly with the name of the style and the date.
By taking the time to add seam allowances carefully, your DIY dress patterns will look just as professional as any bought from a store. You will find that your pieces sew together much more easily when the math is correct from the start.
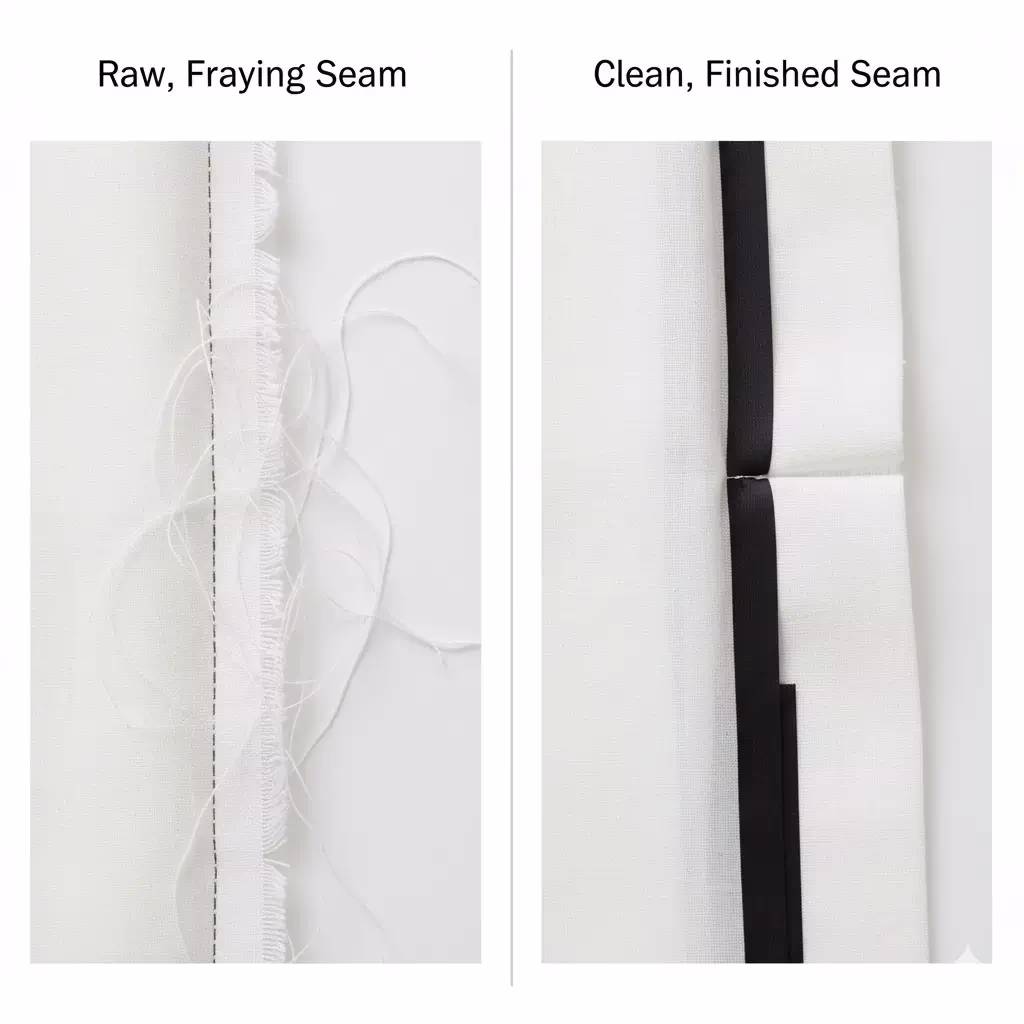
Once you have added your seam allowances and cut your fabric, the last step is to finish the raw edges. A raw edge can fray over time, which may ruin your dress. Choosing the right finish depends on the fabric you used for your dress pattern and how much wear the garment will get.
Method 1: The French Seam
The French seam is the gold standard for high-end dress patterns. It hides the raw edge completely inside a small tuck of fabric. This is best for thin, light fabrics like silk or chiffon.
Sew Wrong Sides Together: Start by sewing your pieces with the “wrong” sides of the fabric touching. Use a small seam allowance (about 0.5 cm).
Trim and Press: Trim the edge very close to the stitches and press the seam open.
Fold and Sew Again: Fold the fabric so the “right” sides are now together. Sew again at 1 cm. The raw edge is now trapped inside the seam.
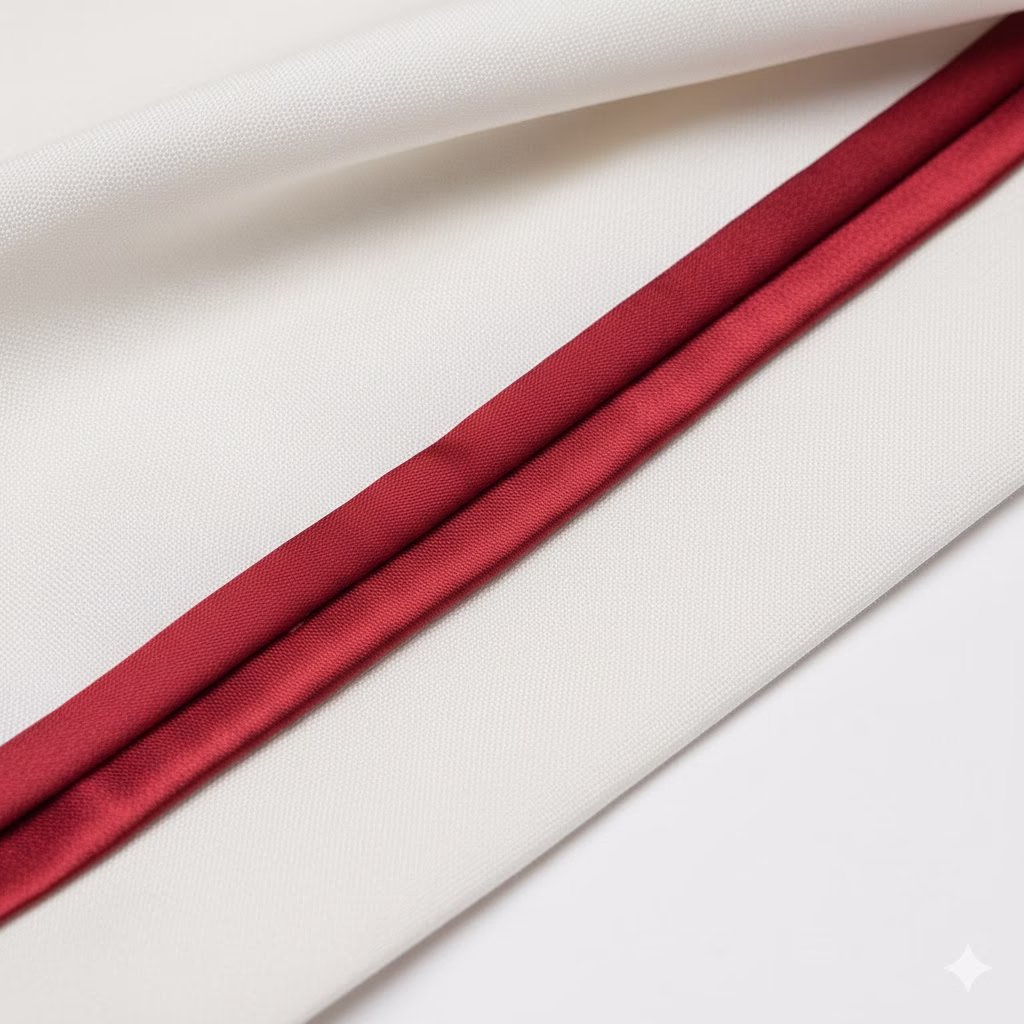
Method 2: Bias Binding
Bias binding is a beautiful way to finish necklines or armholes. It involves sewing a thin strip of fabric over the raw edge. This adds strength and a pop of color to your dress sewing patterns.
Clean Finish: It hides the edge and keeps the shape of the curve from stretching.
Comfort: It feels smooth against the skin, making it great for sleeveless dresses.
To do this, pin the binding to the right side of the edge. Sew along the fold, then flip the binding over to the inside and stitch it down.
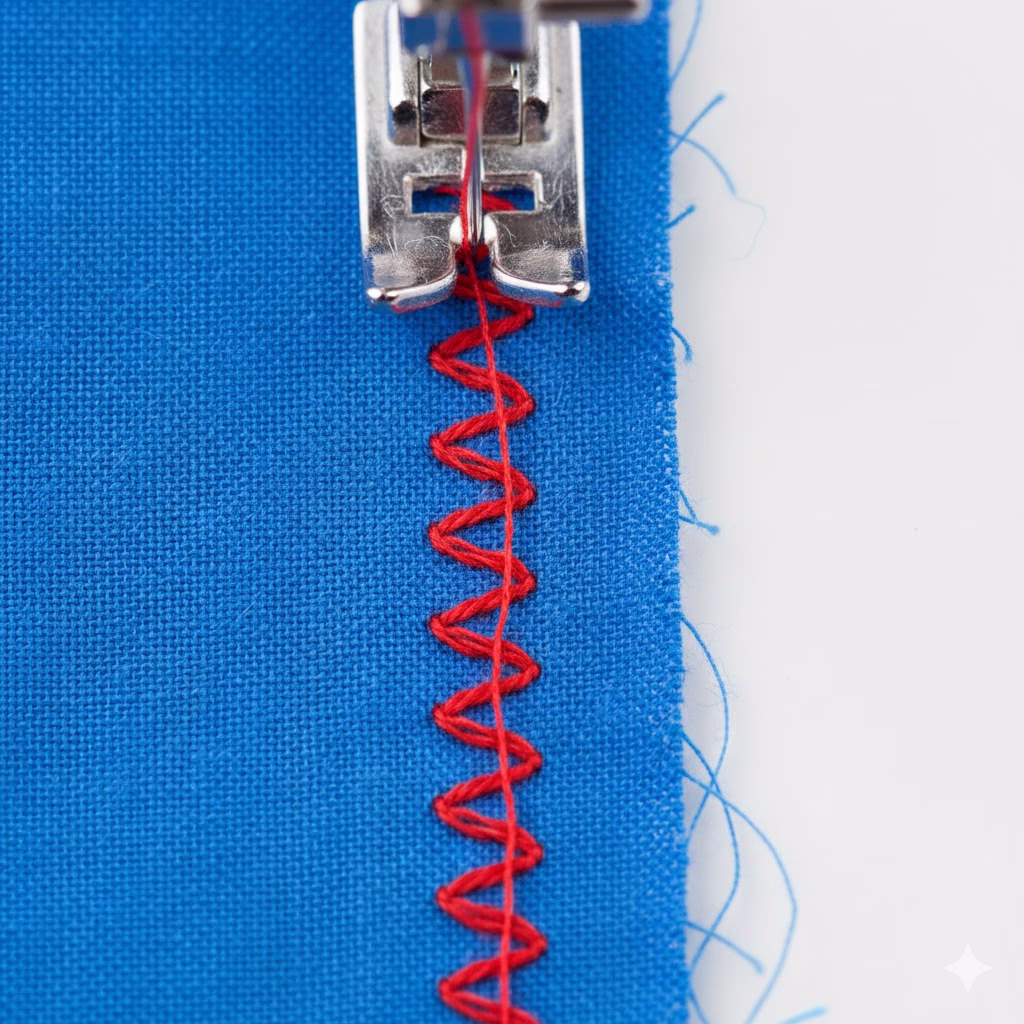
Method 3: The Zig-Zag or Overlock Stitch
If you want a fast and strong finish, use a zig-zag stitch on your home machine or an overlocker (serger). This is the standard for most commercial dress patterns.
Zig-Zag: Set your machine to a medium width. Sew right along the edge so the needle drops off the fabric on one side. This “locks” the threads in place.
Overlock: This machine trims the fabric and wraps it in thread all at once. It is very fast and gives a look like store-bought clothes.
Method 4: Pinking Shears
For fabrics that do not fray easily, like sturdy wool or some cottons, you can use pinking shears. These are scissors with a saw-tooth blade. By cutting the edge in a zig-zag pattern, you break up the thread lines and stop them from pulling out. This is a great “quick fix” for your DIY dress pattern projects.
Final Pressing Tips
No matter which finish you choose, always press your seams with an iron.
Press Flat: First, press the seam just as it was sewn to “set” the stitches into the fabric.
Iron to One Side: For most seams, press both allowances toward the back of the dress.
Press Open: For heavy fabrics, press the allowances away from each other to keep the seam flat.
Using these finishes ensures that the custom designs you made from your sloper will last for years to share or wear.
Building a dress from a custom dress pattern is a journey of many small steps. After you have hacked your sloper, added seam allowances, and chosen your finishes, it is time to put it all together. Use this checklist to stay on track. This will help you avoid the need to use a seam ripper and ensure your dress sewing patterns turn into a professional garment.
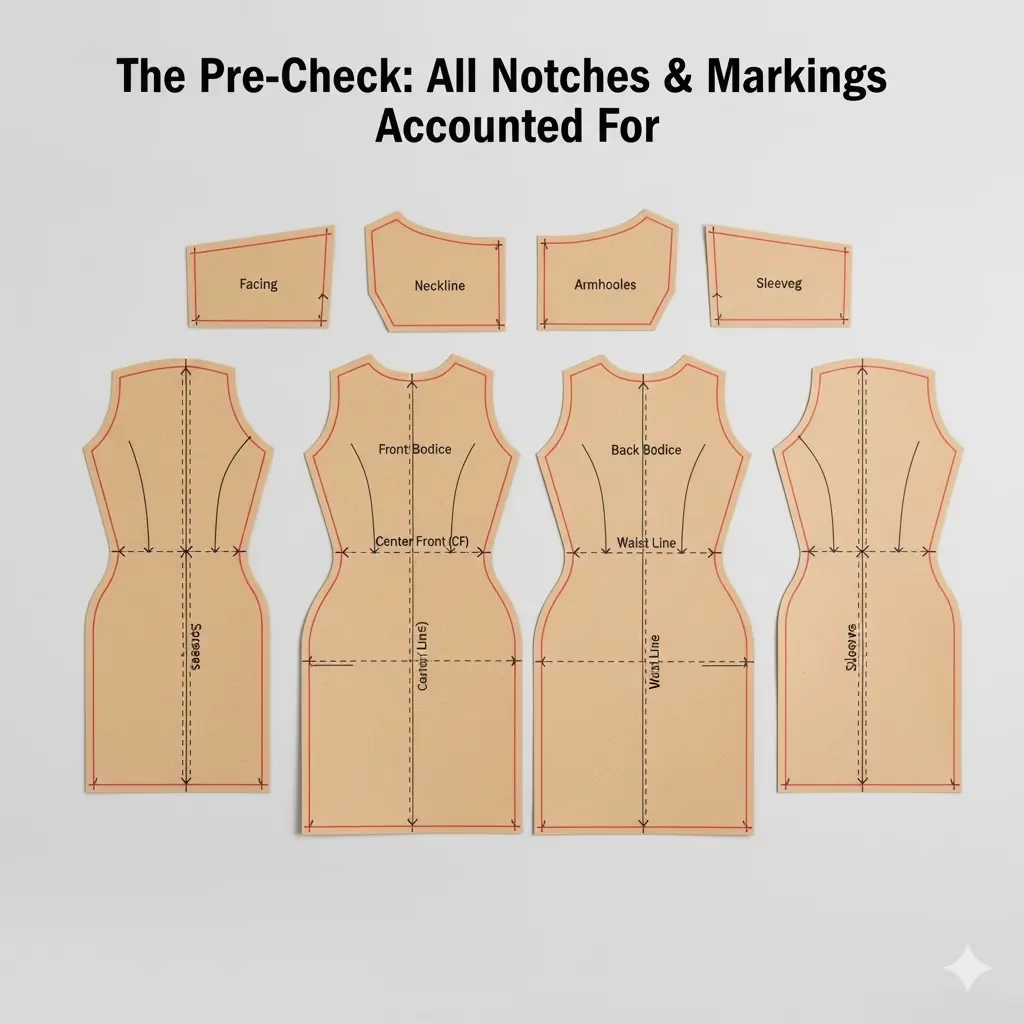
Phase 1: Preparation and Marking
Before you sit at the machine, ensure your fabric pieces are ready. Mistakes made during the cutting phase are hard to fix later.
[ ] Check Grainlines: Ensure every piece was cut on the grain as marked on your dress pattern. If the grain is off, the dress will twist on your body.
[ ] Transfer All Marks: Check that you have marked every dart point, notch, and pleat line. Use tailor’s chalk or a small snip within the seam allowance.
[ ] Stay-Stitch Curves: Sew a row of long stitches 3 mm inside the stitch line on necklines and armholes. This stops the curves from stretching out of shape as you handle the fabric.
Phase 2: Structural Sewing
This is where your sloper comes to life. Focus on the “inner” shape of the dress first.
[ ] Sew and Press Darts: Always sew darts from the wide end to the point. Tie a knot at the point rather than backstitching. Press bust darts down and waist darts toward the center.
[ ] Assemble the Bodice: Sew the shoulder seams first, then the side seams. If you are making a dress with princess seams, take extra care to pin the curves.
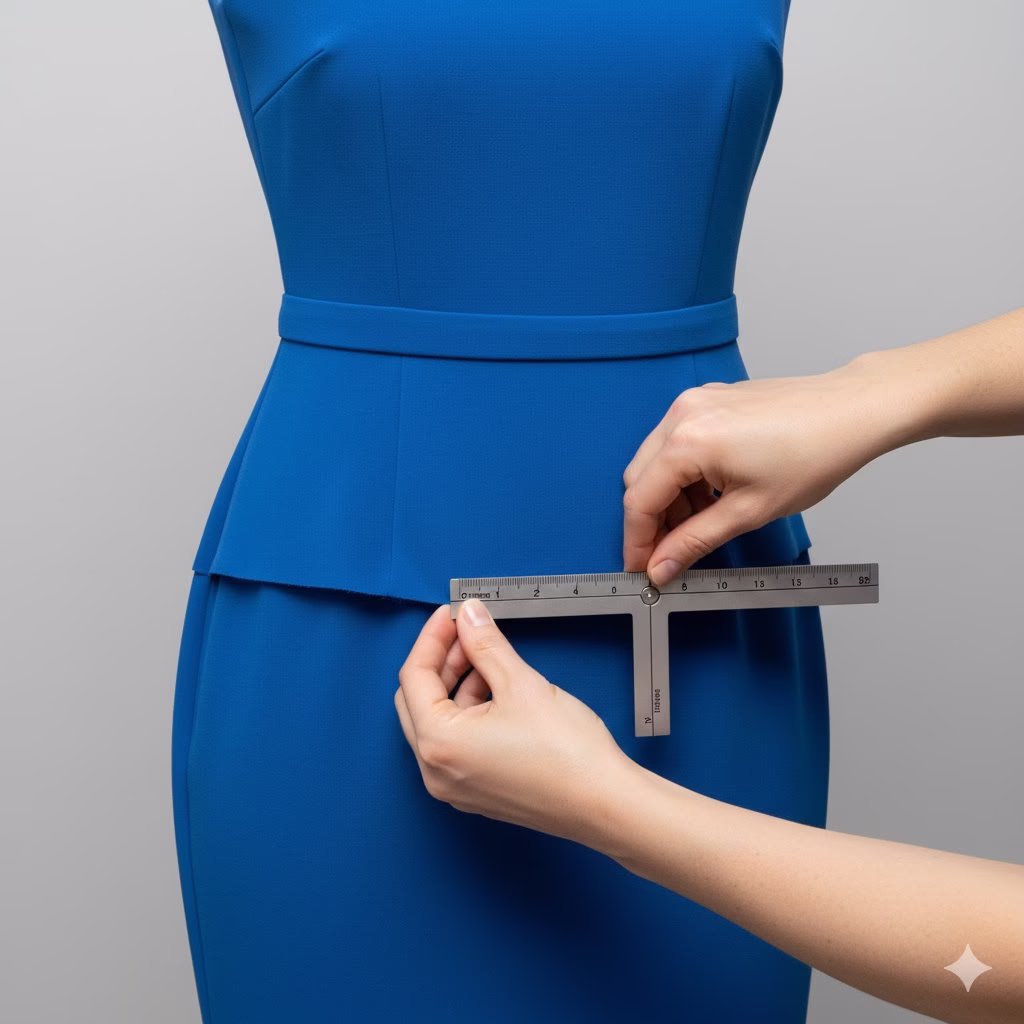
[ ] Check the Fit: Slip the bodice on. Since you used a tested dress sewing pattern, the fit should be close. If you need to make a change, do it now before the skirt is attached.
Phase 3: Closures and Sleeves
Closures like zippers or buttons give your dress its function. Sleeves provide the style and silhouette.
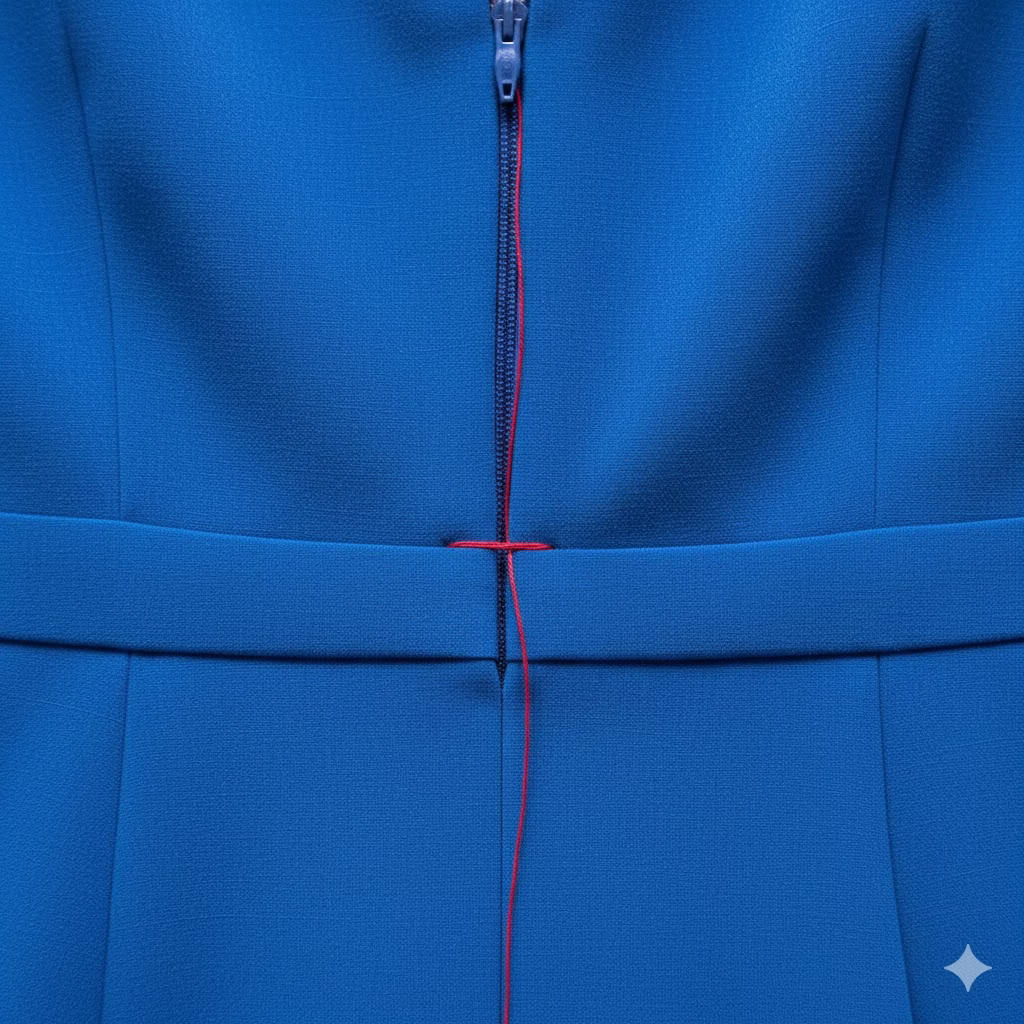
[ ] Install the Zipper: Whether it is a center back or a side zip, baste it in place first. This ensures the waist seams on the left and right sides line up perfectly.
[ ] Set the Sleeves: Pin the sleeve into the armhole, matching your notches. Distribute any “ease” (extra fabric) at the top of the sleeve cap for a smooth look.
[ ] Finish the Neckline: Apply your facing or bias binding as planned. Ensure the transition at the top of the zipper is clean and flush.
Phase 4: The Skirt and Hem
The skirt adds the final weight and drape to your design.
[ ] Attach Skirt to Bodice: Match the center front, center back, and side seams. If your skirt is gathered, ensure the gathers are spread out evenly.
[ ] Let the Dress Hang: If you have made a circle skirt or any flared style, let the dress hang on a form for 24 hours. This allows the bias of the fabric to stretch before you hem it.
[ ] The Final Hem: Measure the hem from the floor up to ensure it is level. Use your chosen finish from the previous guide to close the raw edge.
Phase 5: The Final Press
A dress is not truly finished until it has been “pressed into shape.” This is the difference between a homemade look and a high-end dress pattern result.
[ ] Clip and Grade: Trim away any bulky fabric inside the seams, especially where multiple seams meet.
[ ] Remove Basting: Pull out any temporary stitches used for the zipper or gathers.
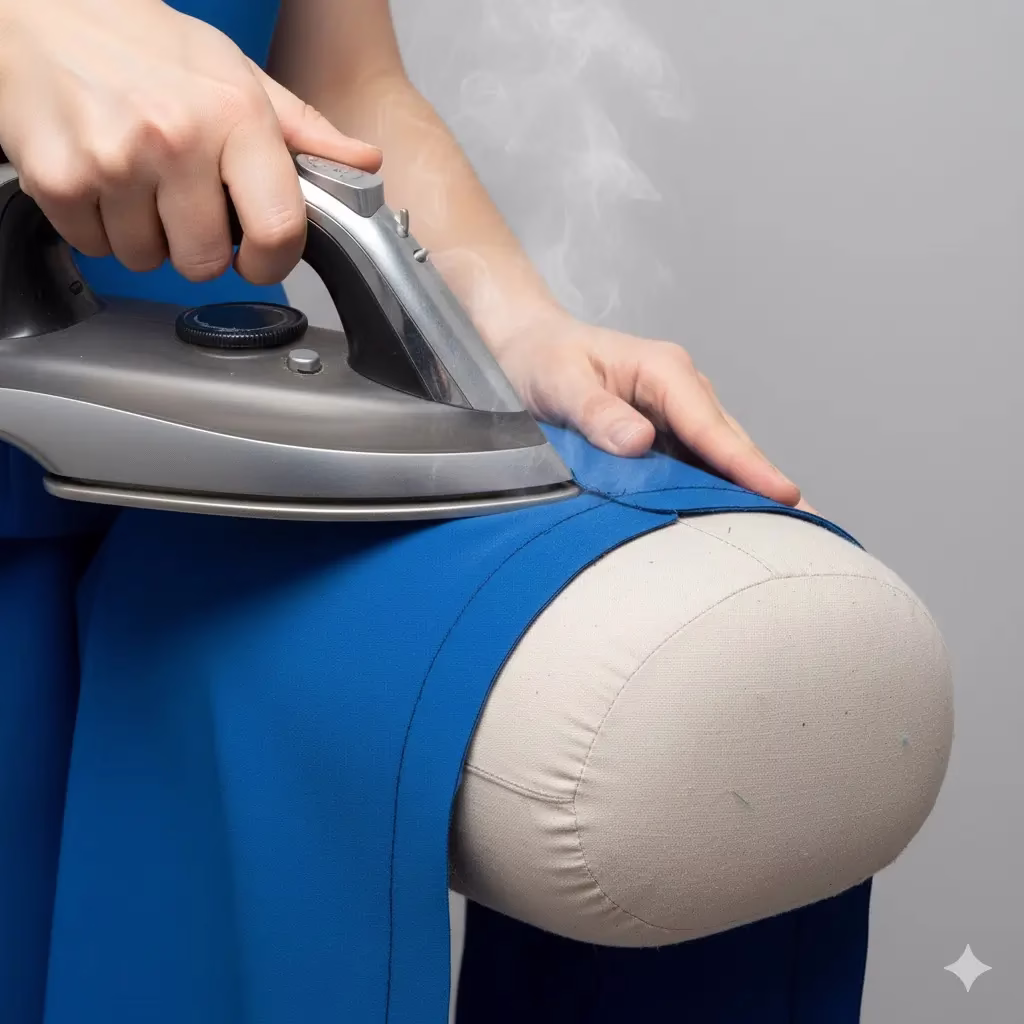
[ ] Final Steam: Give the entire dress a thorough steam. Focus on the collar, cuffs, and hemline.
Even with a well-tested dress pattern, fabric choice or small cutting errors can cause fit issues. During the assembly phase, it is vital to spot these problems early. Fixing a fit issue on a bodice is much easier before you attach the skirt or sleeves. Use this guide to solve the most common problems seen when using custom dress sewing patterns.
Issue 1: Gaping at the Neckline or Armhole
If the fabric stands away from your body at the neck or armhole, it usually means the curve has stretched or the pattern needs more contouring.
** The Fix:** Pinch the extra fabric into a small, temporary dart. Measure the width of this “pinch.” On your paper dress pattern, slash from the edge to the nearest dart and overlap the paper by that same amount. This “closes” the gap for your next version. For the current dress, you may need to add a tiny dart or use bias binding to pull the edge in tight.
Issue 2: Pulling Lines at the Bust
Horizontal pull lines across the chest mean the dress is too tight. If the lines point toward the bust apex, your dart may be in the wrong place.
The Fix: If the dress is too tight, let out the side seams. This is why adding a 2 cm seam allowance to your dress sewing patterns is so helpful. If the dart is the problem, unpick it and move the point. The dart should end about 2.5 cm (1 inch) away from the fullest part of your bust, not right on top of it.
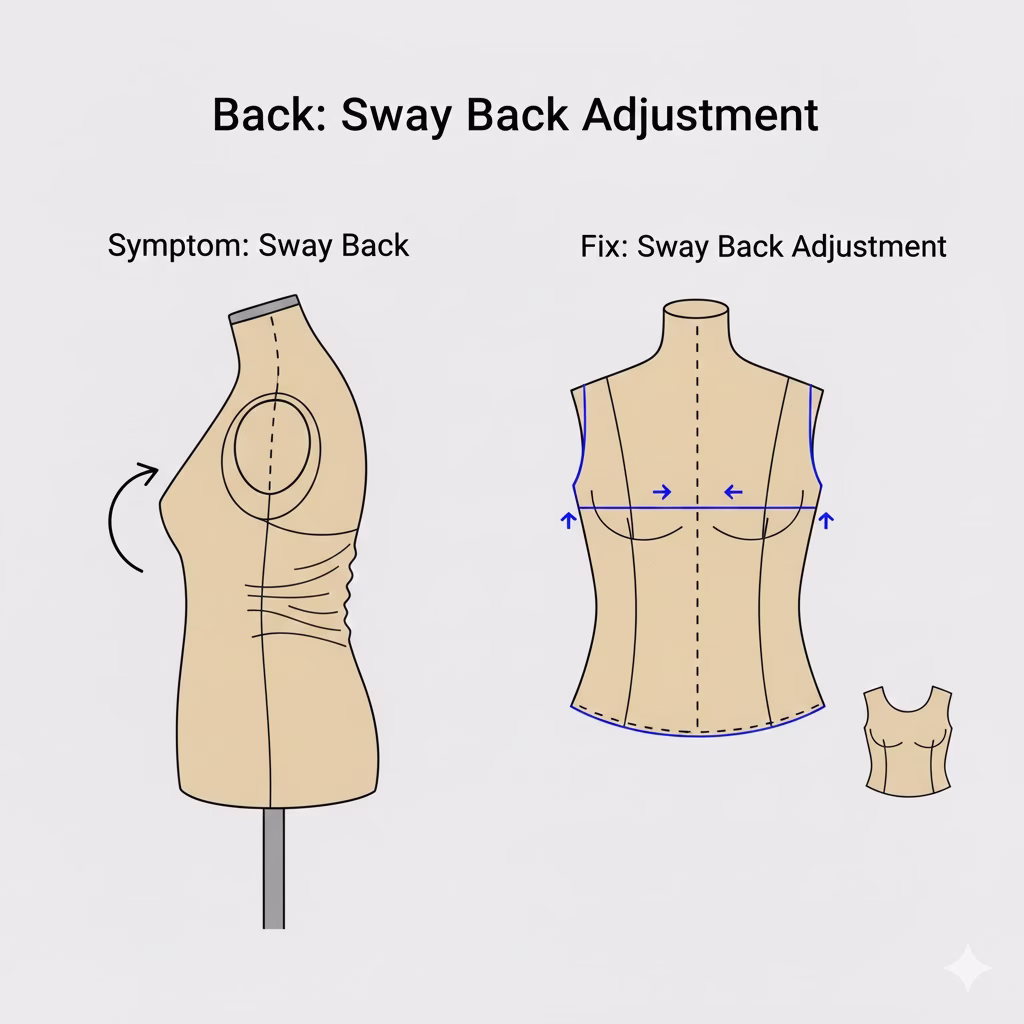
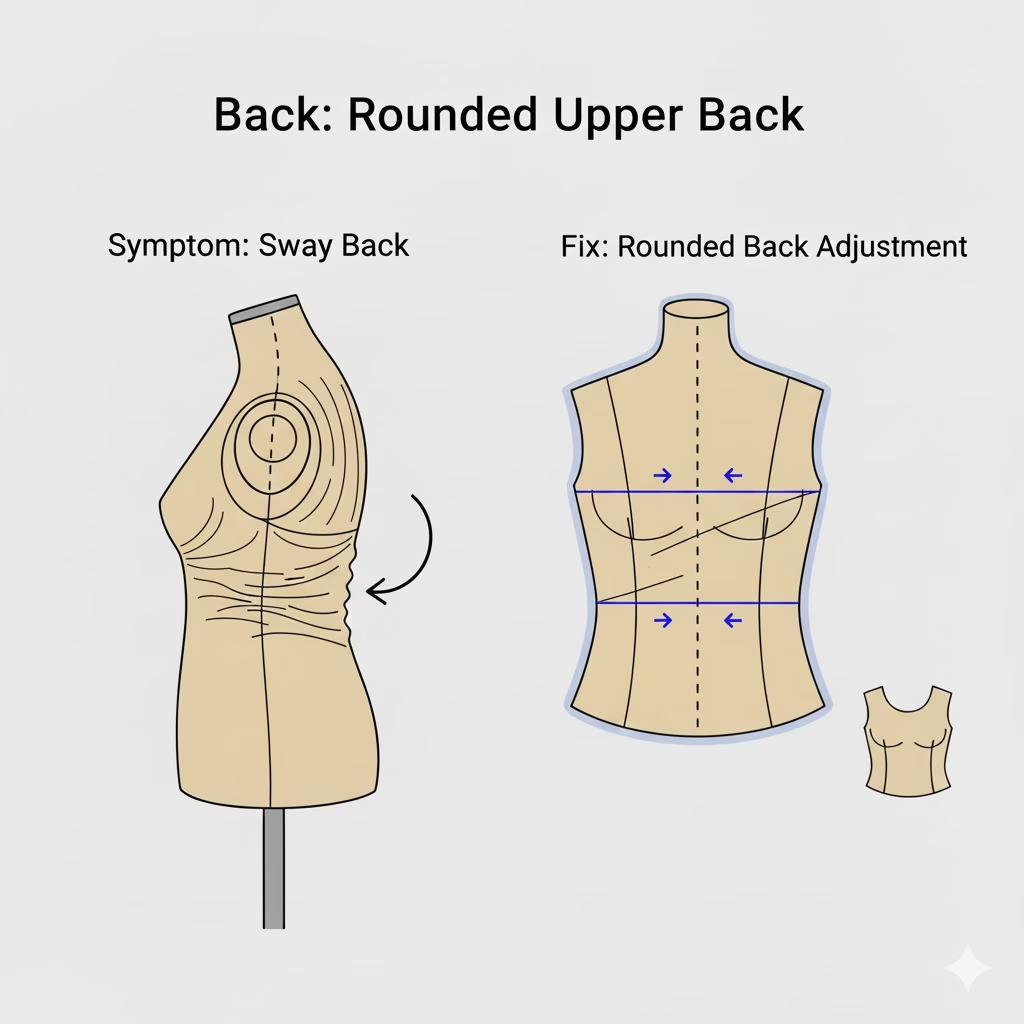
Issue 3: Folds or “Pooling” at the Lower Back
If you see fabric bunching up just above your waist at the back, you likely have a “short back.” This happens when the distance from your neck to your waist is shorter than the standard dress pattern size.
The Fix: Pin a horizontal tuck across the back bodice until the fabric lies flat. Measure the tuck. On your paper pattern, draw a line across the back and slide the top piece down by that amount. This shortens the back length without changing the width of the dress.
Issue 4: Tightness Across the Shoulders
If you feel like you cannot move your arms forward, the across-back width is too narrow. This is a common issue when moving from a sloper to a more structured dress pattern.
The Fix: Check your seam allowance at the armhole. You may need to trim a small amount (about 5 mm) from the back curve of the armhole to give your shoulder more room to move. For your master sloper, you should add a bit of “ease” to the across-back measurement.
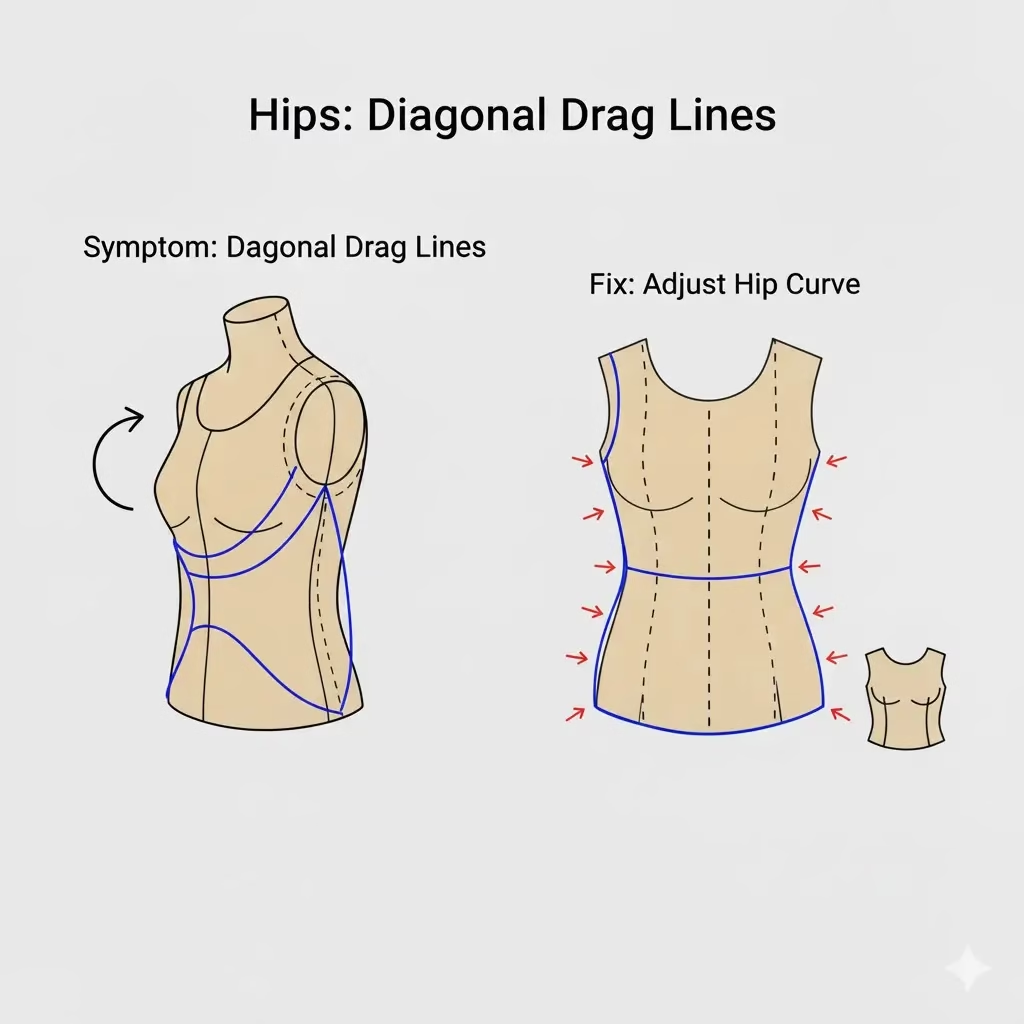
Issue 5: Drag Lines at the Hips
If the skirt of the dress rides up or shows “smile” lines across the hips, it is too tight in the seat or hip area.
The Fix: Open the side seams from the waist down. Let the fabric fall naturally and see how much it opens up. You can then sew a new seam with a smaller allowance. When you update your dress patterns, make sure to add more width to the hip curve of the skirt block.
Quick Fit Reference Table
Fit Sign
Meaning
Quick Action
Vertical Folds
Too much width
Take in the side seams.
Horizontal Folds
Too much length
Shorten the bodice or skirt.
Diagonal Lines
Tension point
Release the seam at the point the lines start.
Gaping Edges
Curve is too long
Shorten the edge with a small dart or binding.
Final Pro Tip: The “Sitting Test”
Before you finish your seams, put the dress on and sit down in a chair. A dress might look perfect while you stand, but feel too tight when you sit. If it feels tight in the waist or hips, use those extra seam allowances to give yourself a bit more room.
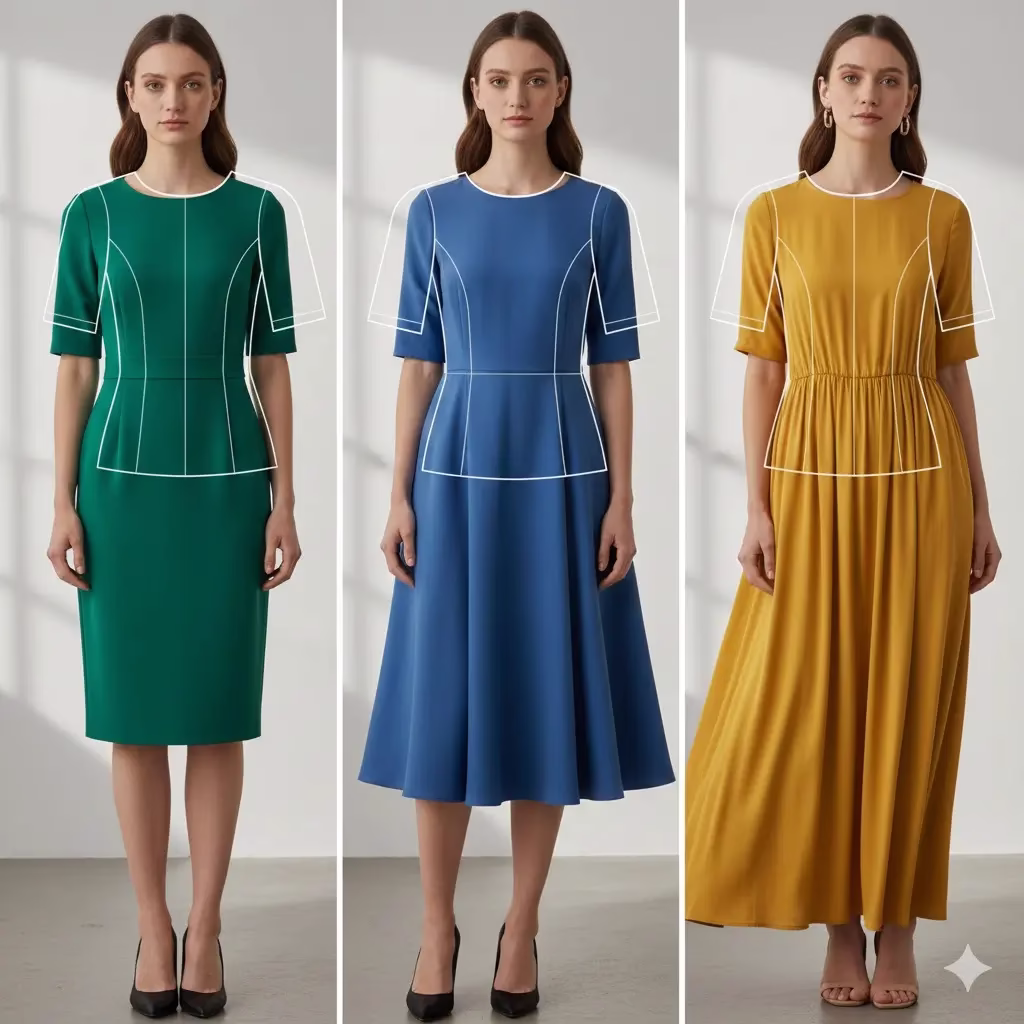
How to Choose the Best Fabric for Your Dress Patterns
Selecting the right fabric is the final step in turning your dress pattern into a masterpiece. The “hand” of a fabric—how it feels, falls, and moves—will change how your design looks on the body. A hack that works for a structured office shift may not work for a flowy party dress. Use this guide to match your fabric to your dress sewing patterns for the best results.
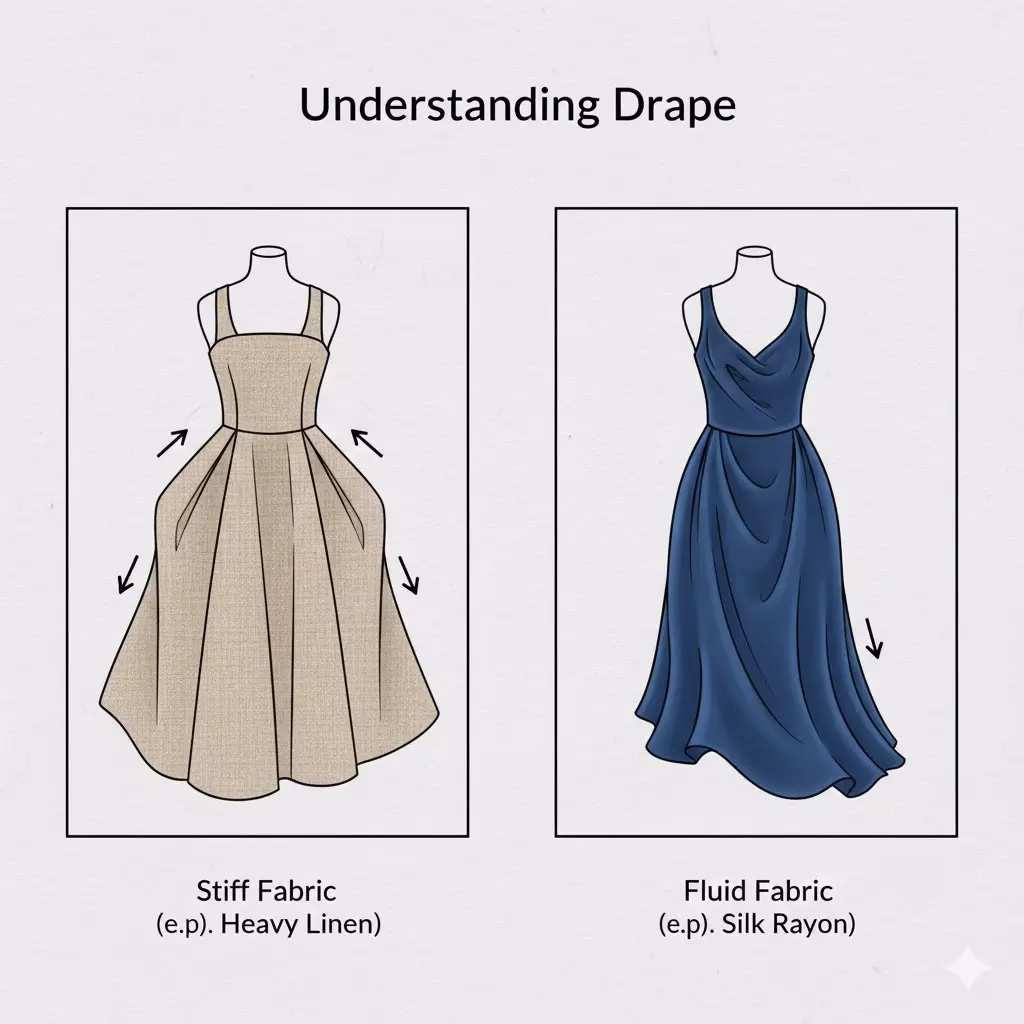
Understanding Fabric Weight and Drape
Before buying material for your dress patterns, you must consider two things: weight and drape.
Weight: This is how heavy the fabric feels. Light weights are for summer dresses, while heavy weights are for structured winter garments.
Drape: This is how the fabric hangs. A fabric with “high drape” (like silk) will cling to your curves. A fabric with “low drape” (like denim) will hold its own shape.
Matching Fabrics to Your Dress Styles
Different styles created from your sloper require different types of support from the cloth.
Styles with extra fullness need fabric that moves easily and does not look bulky at the waist.
Best Choices: Rayon (Viscose), Cotton Lawn, Voile, or Silk Crepe.
Why: These materials are thin enough to be gathered without adding too much “poof” to your silhouette.
3. Formal Styles (Princess Seams, Evening Gowns)
For gowns that need a bit of shine and a lot of structure, look for fabrics that feel expensive and sturdy.
Best Choices: Satin, Taffeta, or Brocade.
Why: These fabrics highlight the vertical lines of princess seams and hold the volume of a full skirt.
Fabric Choice and Your Pattern Hacks
If You Are Making…
Choose a Fabric That Is…
Avoid…
A Circle Skirt
Light and drapey (like Rayon)
Very stiff or heavy fabric.
Puff Sleeves
Crisp and firm (like Organdy or Poplin)
Very soft fabric that will collapse.
A V-neck Bodice
Stable (like Linen)
Slippery fabrics that may stretch.
A Wrap Dress
Slightly stretchy (like Jersey or Crepe)
Rigid fabrics that won’t move with you.
Tips for Shopping for Dress Sewing Patterns
The “Scrunch” Test: Take a corner of the fabric in your hand and squeeze it. If it stays wrinkled, it may be hard to keep looking fresh during a long day.
Check the Width: Most dress sewing patterns assume the fabric is 115 cm or 150 cm wide. Check your pattern pieces at home to make sure you buy enough length.
Pre-Wash Your Fabric: Almost all natural fabrics shrink. Wash and dry your fabric before you cut into it with your custom dress pattern. This ensures your dress fits perfectly after its first wash.
Estimating how much fabric you need is a vital step when you move away from store-bought dress patterns to your own custom hacks. Since you are working from a master sloper, you do not have a printed envelope to tell you how much to buy. This guide will help you calculate the yardage for your unique dress sewing patterns so you never run out of material mid-project.
How to Estimate Your Base Yardage
For a standard knee-length dress with no sleeves, a good rule of thumb is to buy twice the length of the dress plus 0.25 meters for the bodice.
The 115 cm (45″) wide fabric: You usually need about 2.5 to 3 meters.
For 150 cm (60″) wide fabric: You usually need about 1.5 to 2 meters.
If you are tall or making a maxi-length dress pattern, add an extra meter to these estimates.
Adding Fabric for Specific Design Hacks
When you change your sloper, you change the amount of fabric required. Use this table to add to your base estimate.
Design Hack
Extra Fabric Needed (Approx.)
Notes
Short Sleeves
0.5 Meters
For basic T-shirt style sleeves.
Long/Puff Sleeves
0.75 to 1 Meter
Puff sleeves need extra width for the volume.
Circle Skirt
2 to 3 Meters
These use a lot of fabric because of the wide radius.
A-line Skirt
0.5 Meters
Added to the base length of the skirt.
Gathers/Ruffles
1 to 1.5 Meters
Depends on how “full” you want the gathers to be.
Matching Plaid/Stripes
0.5 to 1 Meter
You need extra to line up the patterns at the seams.
The “Floor Layout” Method for Accuracy
If you want to be exact before heading to the store, try the floor layout method.
Mark the Width: Use masking tape on the floor to mark the width of the fabric you plan to buy (usually 150 cm).
Arrange Your Pieces: Lay your hacked dress sewing patterns inside those tape lines. Make sure to leave space for seam allowances between the pieces.
Measure the Length: Once everything fits, measure the total length from the top piece to the bottom. This is the exact amount of fabric you need.
Tips for Buying Fabric for Dress Patterns
The “Just in Case” Half-Meter: It is always smart to buy an extra 0.5 meters. This allows for fabric shrinkage during the pre-wash or for fixing a small cutting mistake.
Consider the Nap: If your fabric has a “nap” (like velvet) or a one-way print (like flowers that all point up), you must lay all your pieces in the same direction. This often requires more fabric.
Don’t Forget the Facing: If you are not using bias binding, you will need enough fabric for the neck and armhole facings. These can often be tucked into the “gaps” between larger pattern pieces in your layout.
Final Yardage Checklist
[ ] Did I account for the hem allowance?
[ ] Did I add extra for sleeves or pockets?
[ ] Is the fabric wide enough for my circle skirt pieces?
[ ] Do I need extra to match a pattern or stripe?
By using these estimates, you can shop with confidence, knowing you have exactly what you need to bring your custom dress pattern to life.
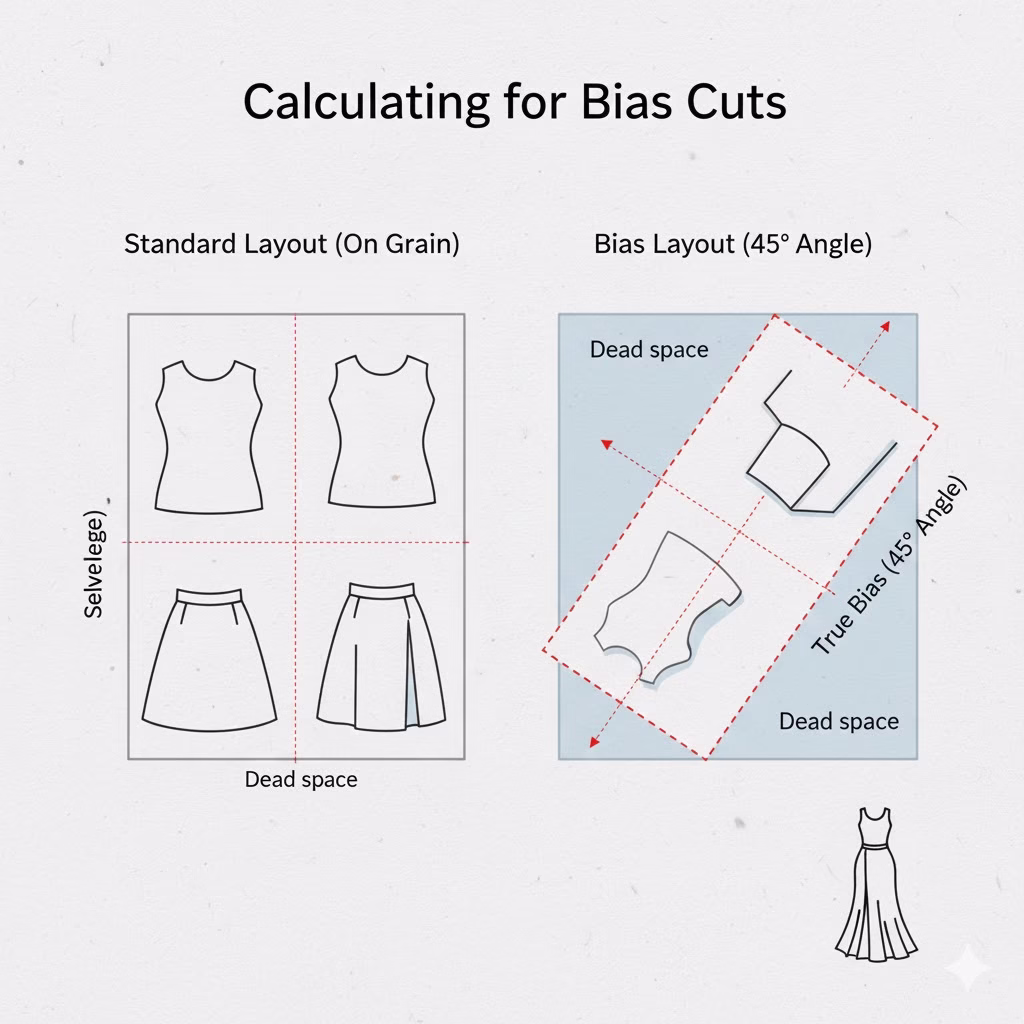
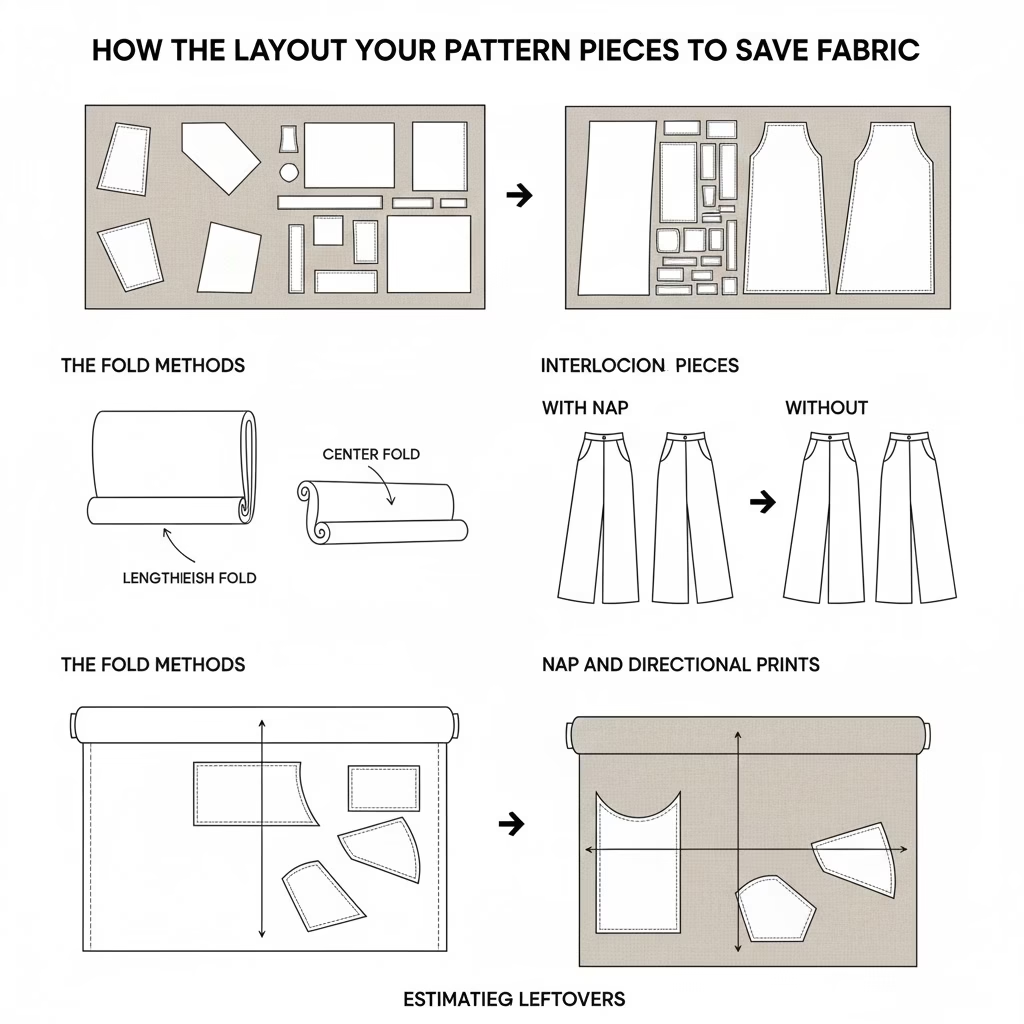
Once you have your fabric and your custom dress pattern, the next step is the “cutting layout.” This is the way you place your paper pieces on the cloth. A smart layout can save you a lot of money. It lets you use less fabric and leaves you with larger scraps for future projects. Learning to layout dress sewing patterns like a pro is a great way to make your sewing more sustainable.
Step 1: Prepare the Fabric
Before you lay down a single piece of your dress pattern, you must prep the cloth.
Iron the Fabric: Small wrinkles can lead to large cutting errors. Ensure the fabric is perfectly flat.
Find the Grainline: Look at the “selvage” (the finished factory edge). The grain of the fabric runs parallel to this edge.
Fold Correct-Side In: Fold your fabric with the “right” sides touching. This allows you to mark the “wrong” side with chalk and keeps the pretty side clean.
Step 2: The Logic of the Layout
There are two main ways to fold fabric for dress sewing patterns. The goal is to maximize the space.
Layout Type
When to Use It
How to Do It
Lengthwise Fold
Most common for dresses.
Fold the fabric so the two selvages meet.
Crosswise Fold
For very wide skirt pieces.
Fold the fabric so the cut ends meet.
Double Fold
To cut two “on-the-fold” pieces.
Fold both selvages toward the center of the fabric.
Step 3: Placing Your Pattern Pieces
Start with your largest pieces first, such as the skirt or the long bodice parts of your dress pattern.
Place on the Fold: Any piece that says “cut on fold” (usually the center front or back) must be placed exactly against the folded edge of the fabric.
The Interlocking Method: Look for ways to fit small pieces, like neck facings or pockets, into the gaps created by larger curves. For example, a sleeve can often nestle next to the curve of an A-line skirt.
Check the Grain: Every piece of your dress sewing patterns has a grainline arrow. Use a ruler to ensure this arrow is exactly the same distance from the selvage at both the top and the bottom.
Step 4: Special Layout Rules
Some fabrics require a bit more care. If you ignore these rules, your final dress might look “off.”
The Nap: Fabrics like velvet or corduroy have a “direction.” If you run your hand down the fabric, it feels smooth; if you run it up, it feels rough. All pieces of your dress pattern must point the same way, or the dress will look like it is made of two different colors.
Large Prints: If your fabric has a large floral or geometric print, you may want to “fussy cut.” This means placing your pattern pieces specifically to highlight a certain flower on the bust or the center of the skirt.
Step 5: Pinning and Cutting
Once you are happy with the layout, it is time to secure the paper.
Pinning: Place pins inside the seam allowance every 10 cm. Do not let the pins cross the cutting line.
Weights: Many pros use “pattern weights” (like large washers or smooth stones) instead of pins. This stops the fabric from lifting off the table.
The Long Cut: Use long, smooth strokes with your shears. Do not “chew” the fabric with short snips. This keeps the edges of your dress sewing patterns crisp and clean.
Final Saving Tip: The Scrap Bag
Even the best layout leaves small scraps. Save the long, thin strips to make bias binding. Save the larger squares for pocket linings or to test your iron heat. By using every inch, you respect the work that went into making the fabric.
Mastering expert techniques for maximizing your dress pattern allows you to transform a single block into a full wardrobe using hacks for custom dress patterns. By learning these modular methods, you can elevate your craft to create professional dress sewing patterns that ensure a perfect, consistent fit across every design you draft.
The Power of the Foundational Block
In the world of sewing, there is a secret tool used by many experts: the sloper. A sloper is the basic dress pattern that fits your body perfectly. It has very little extra room and no fancy details. It also has no seam allowances. Think of it as a simple map of your shape.
When you learn to use this one master piece, you stop needing to buy a new pattern for every trend. You move away from the basic nature of store-bought dress sewing patterns. Instead, you enter the world of true design. You can change your base block to make a high-end closet. These clothes will fit you perfectly every single time you sew.
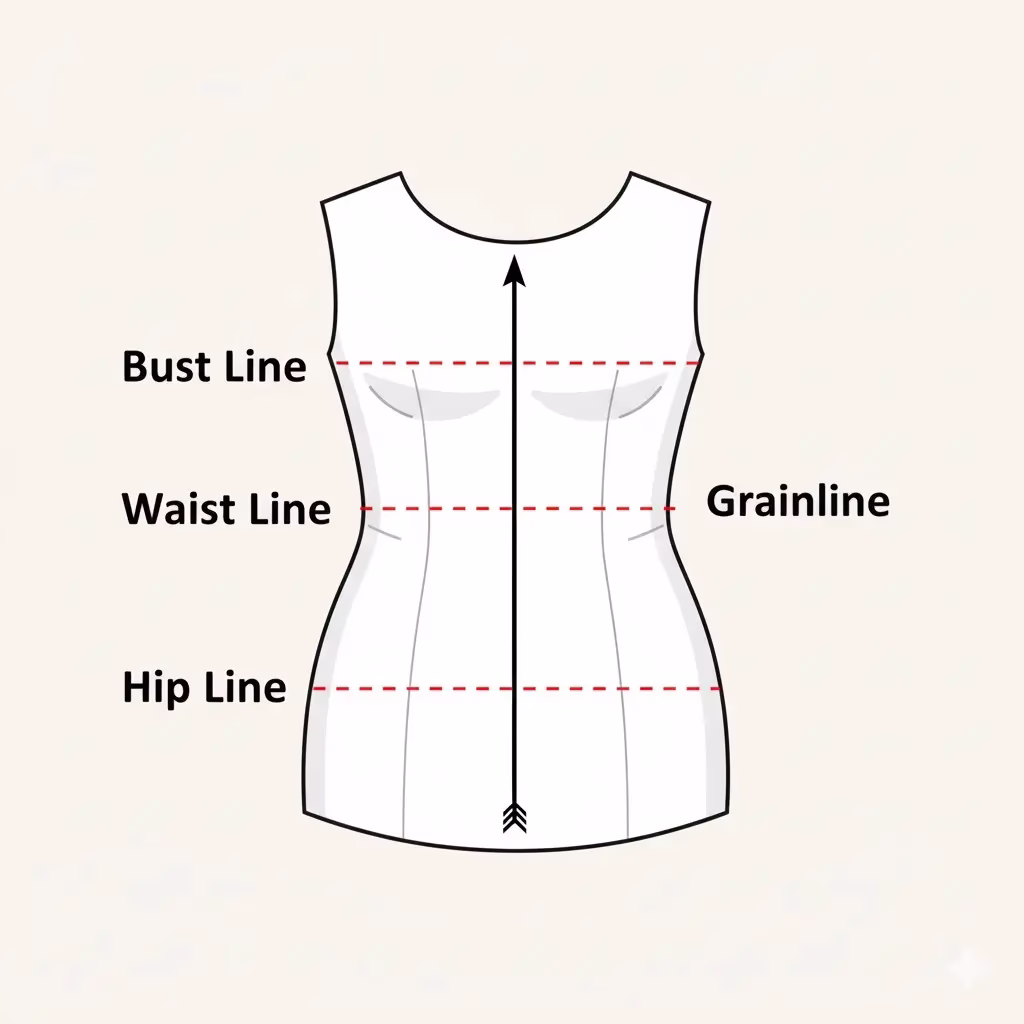
What is a Sloper or Bodice Block?
A sloper is a basic, custom-fitted pattern piece. It usually starts with the bodice front, the back, a sleeve, and a skirt. And captures your exact size. It does not have pretty parts like collars or hems. It only has the main shapes like the bust darts and waist curves.
To draw one, you need a few body measurements. You will need the length from your neck to your waist. And You also need your bust size and shoulder length. You draw these on paper to make a grid. This grid then turns into curves that match your body. For example, the back piece starts with a straight line down the center. Then, you square out for the bust width. This block is your “master” copy. You should keep it safe. You can then trace it to make new designs.
Why Use One Pattern for Many Designs?
Using one good dress pattern makes sewing much faster. You get to reuse a fit that you already know works. This stops the stress of trial and error. Often, store-bought dress patterns do not fit your specific shape.
Better Fit: Once you get the fit right, every new look will fit the same. The shoulders and bust will always look great.
Save Time: You can skip making a test garment for every new project. Your base is already perfect.
Less Waste: Using less paper is good for the earth. You also avoid buying patterns you never use.
More Fun: It lets you swap parts. You can take a neck from one look and a sleeve from another. You are the boss of your own style.
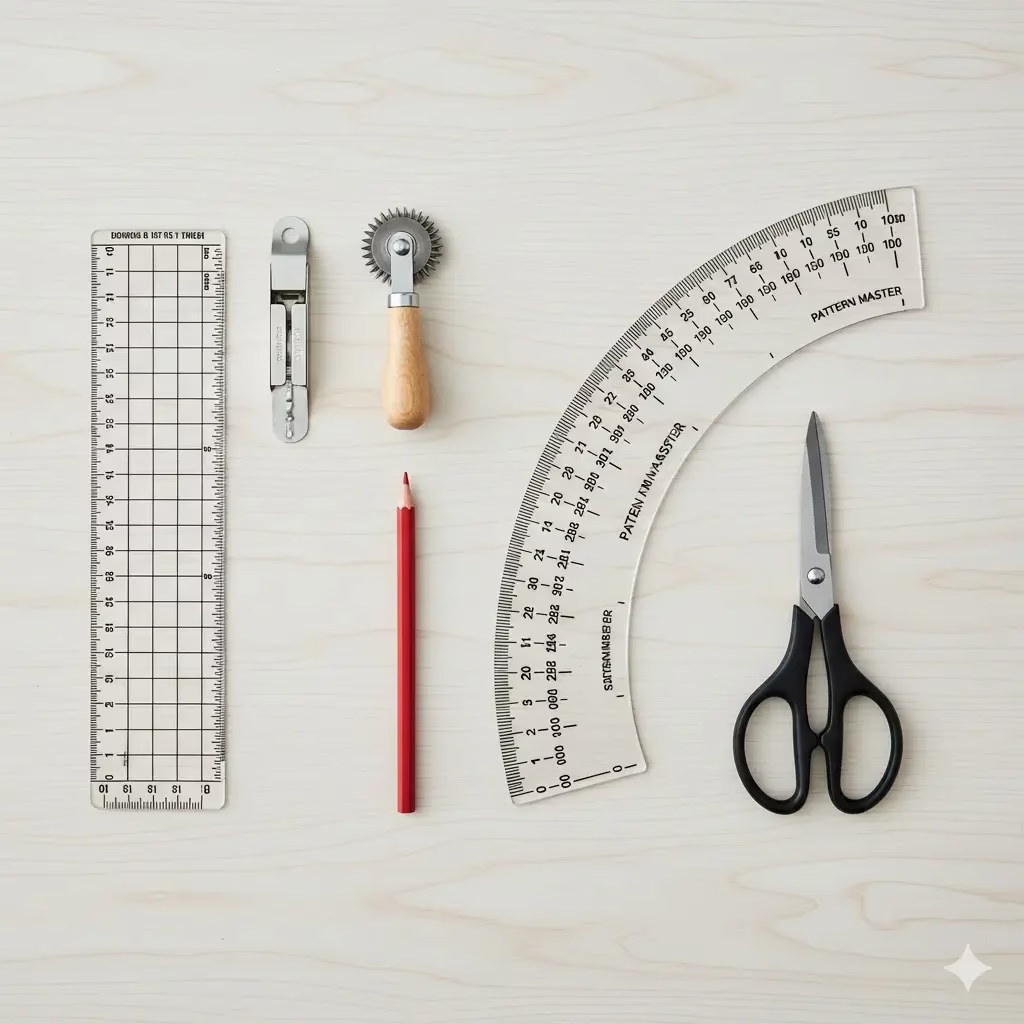
Essential Tools and Materials
Before you start to hack your dress sewing patterns, you need the right tools. Having a good set of tools makes the work easy. Drawing by hand helps you learn how the fit works.
Tool
Purpose
Pattern Paper
Used for tracing and changing your master sloper.
French Curve
Great for drawing smooth armholes and necklines.
Pattern-Notcher
Used to mark important spots on the fabric.
Muslin Fabric
A cheap fabric used to sew a test dress.
Tracer Wheel
Helps move marks to new paper without cutting the master.
Step 1: Drafting the Base Bodice Sloper
To start, you need to take a few measurements. These include the full bust, waist, hips, and shoulder width. You also need to know the depth of your neck and the curve of your arm.
The Back and Front Parts
Draw the back piece first. Mark a spot at the top left of your paper. Draw a straight line down for the center back. Then, draw a line across for the bust. Use your curved ruler to draw the neck and shoulder. For the front, you must add a bust dart. This is a small fold that lets the fabric fit over your chest. It should point toward the tip of the bust.
Testing the Fit
Once your paper draft is done, sew a test dress. This is a vital step for making great dress patterns. Check for any tight spots at the arms. Look for gaps at the neck. Fix the paper until it fits just right. This new piece is now your master tool.
Step 2: Marking Reference Lines for Easy Variations
Good dress sewing patterns always have clear marks. On your new copy, draw straight lines for the bust, waist, and hip. Add a line for the center front and center back. Also, draw a grainline to show how the fabric should hang.
These lines are like a map. They help you when you want to change the style. If you want to add more fabric for a full look, these lines keep things even. They make sure the left and right sides match.
Step 3: Drafting Modular Components
Think of your dress pattern as a set of blocks. You can build a library of parts. This lets you “build” a new dress very quickly.
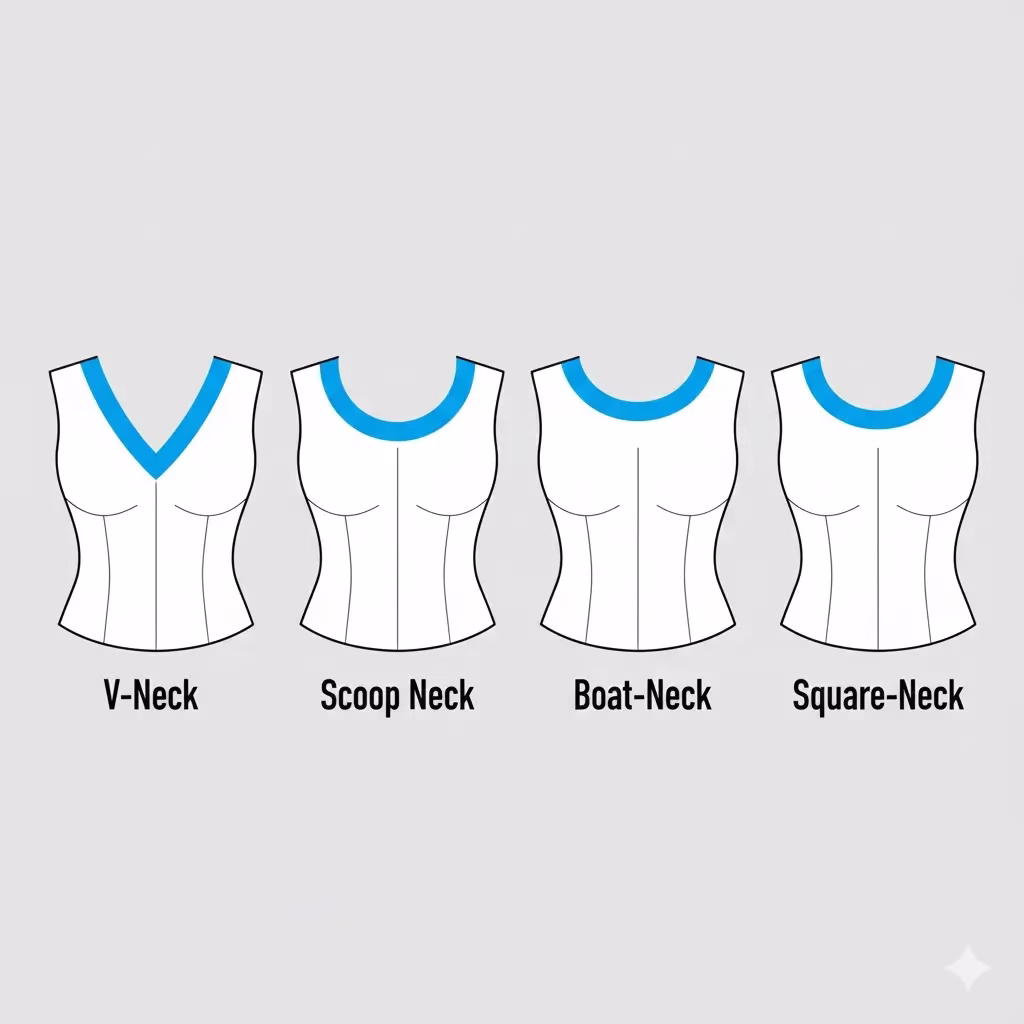
Customizing Necklines
Trace your bodice and draw new neck shapes over it.
V-neck: Draw a straight line from the shoulder to a point below the neck.
Boat neck: Draw a wide, flat curve from one shoulder to the other.
Square Neck: This neck drops straight down and then goes across. It looks like a box.
Scoop Neck: This is a deep, round curve. It is a very common and easy look.
Sleeves and Armholes
The arm hole should stay the same so the sleeve fits. From there, you can make a puff sleeve. You do this by adding more height to the top of the sleeve. You can also make a bishop sleeve by adding width at the wrist.
Skirt Variations
From the waist of your block, you can make many skirts:
A-line: Make the bottom of the skirt wider at the sides.
Pencil: Make the sides of the skirt tighter at the knees.
Circle Skirt: Spread the pattern out wide to make a very full skirt.
Step 4: Applying Pattern Hacks for Diverse Dresses
Now you can get creative. Use your traced sloper to “hack” the style. This changes how the dress looks on your body.
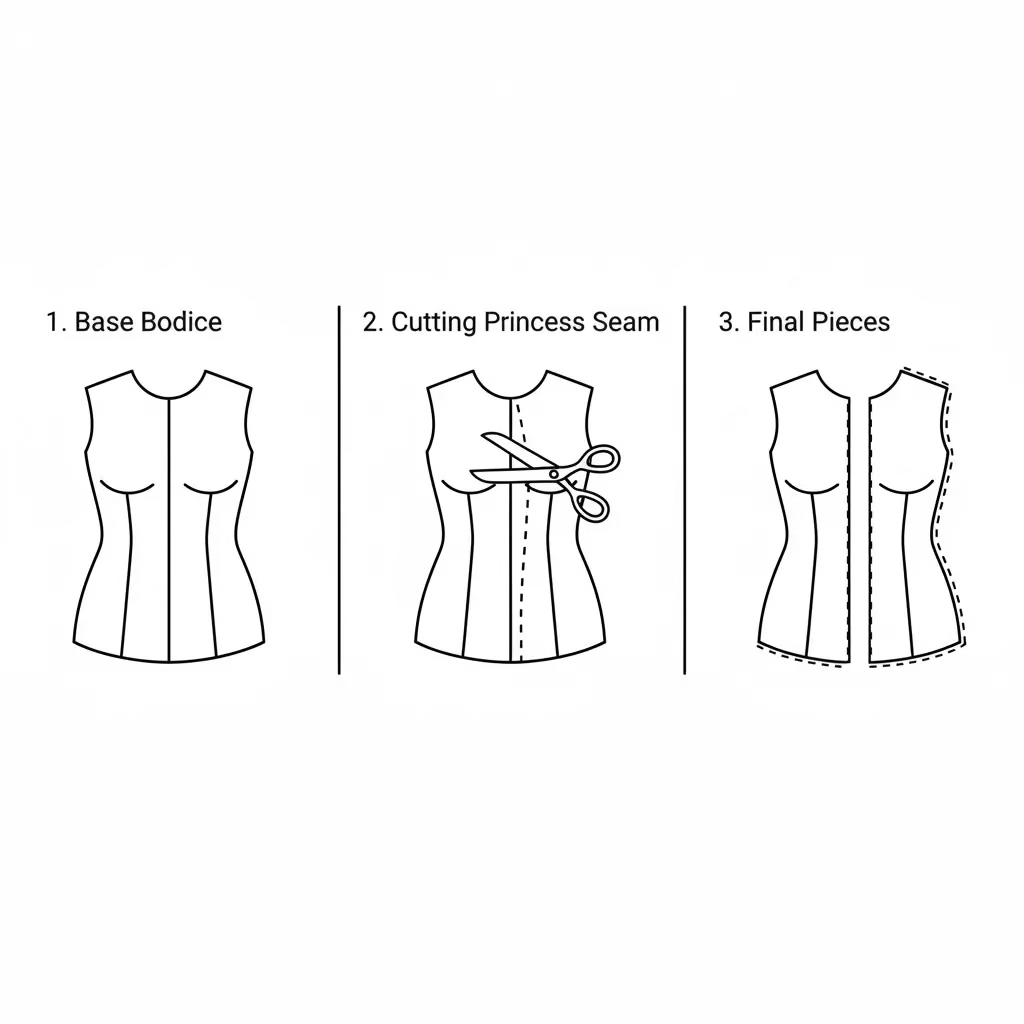
Princess Seams
These seams give a very smooth look. They are common in fancy dress patterns. Draw a curved line from the arm hole down to the waist. Cut along this line. Now you have two pieces. Add a bit of extra paper for the seams. This takes away the need for darts and looks very sleek.
Yokes and Empire Waists
An Empire waist sits high up. To make this, draw a line just below the bust. Cut the pattern in two. You can make the bottom part very full by adding fabric. Then, gather it back to fit the top part. This creates a soft, pretty look.
Fullness and Gathers
If you want a big, flowy dress, use the slash and spread way. Cut lines through your pattern from bottom to top. Do not cut all the way through. Spread the pieces apart like a fan. Tape extra paper in the gaps. This adds fabric that you will later sew into gathers.
Step 5: Organizing and Scaling Your Library
As you make more parts, you need to stay organized. Many pros keep their pieces in a binder. You can group them like this:
Group A: Neck and Body parts
Another group: Sleeve parts
Group C: Skirt parts
By mixing these, you can make many dresses. For example, if you have three necks, three sleeves, and three skirts, you can make 27 different looks. When you are ready to cut your real fabric, add your seam allowance. Usually, this is about 1.5 cm. Only add this to your working copies, not your master.
Advanced Tips for Professional Results
To make your dress sewing patterns look even better, try these tips:
Change Darts: You do not have to sew darts as simple folds. You can turn them into small pleats or gathers for a new look.
Strapless Looks: If you want a dress with no straps, you must make the neck tighter. This stops the fabric from falling away from the body.
Fabric Type: A pattern for heavy cloth will not look the same in light silk. Think about how the fabric moves before you cut.
Tech Tools: Hand drawing is best to start. But tools like PatternMaker can help you print many sizes at once.
When you treat your dress pattern as a tool that can grow, you find true freedom. You can turn a hobby into a way to make art. Whether you want a simple closet or want to share your work online, the sloper is the best place to start. It gives you a fit that is made just for you.