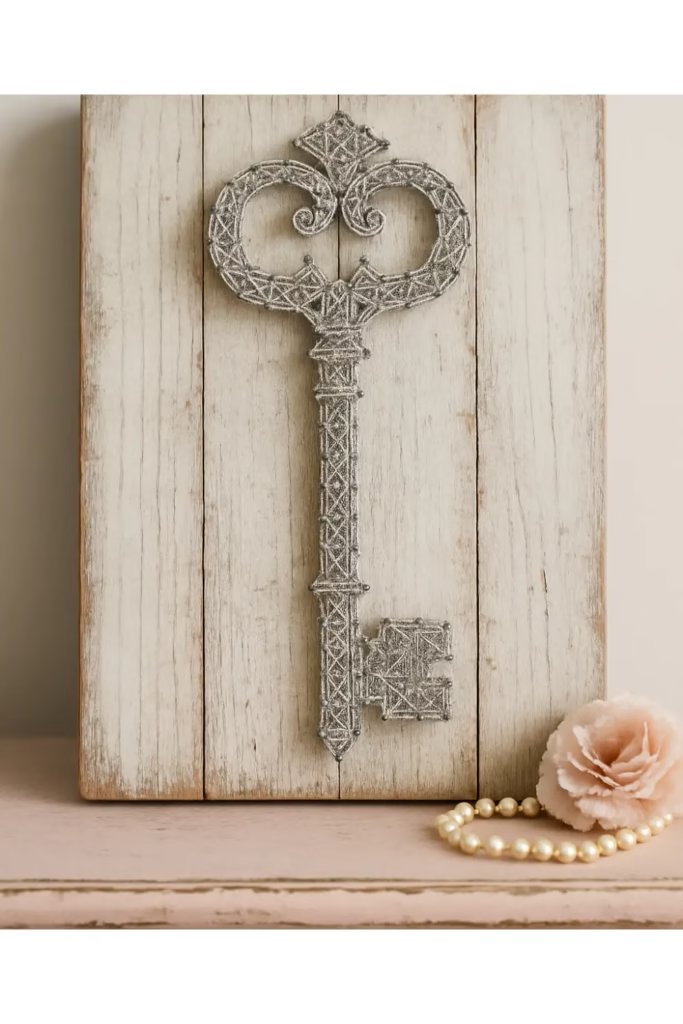
String art is a wonderfully hands-on craft. It allows you to transform simple materials into sophisticated décor. This project guides you through creating an ornate, antique-style skeleton key. It is mounted on a weathered, whitewashed wood base. This artwork perfectly captures the romantic elegance of the shabby chic aesthetic, making it stunning Shabby Chic Wall Art. This article provides a complete guide to crafting the piece, finding the perfect intricate design, and exploring key variations in color and material. These variations adapt this technique to suit almost any interior design style.
Understanding the Intricate Key Pattern
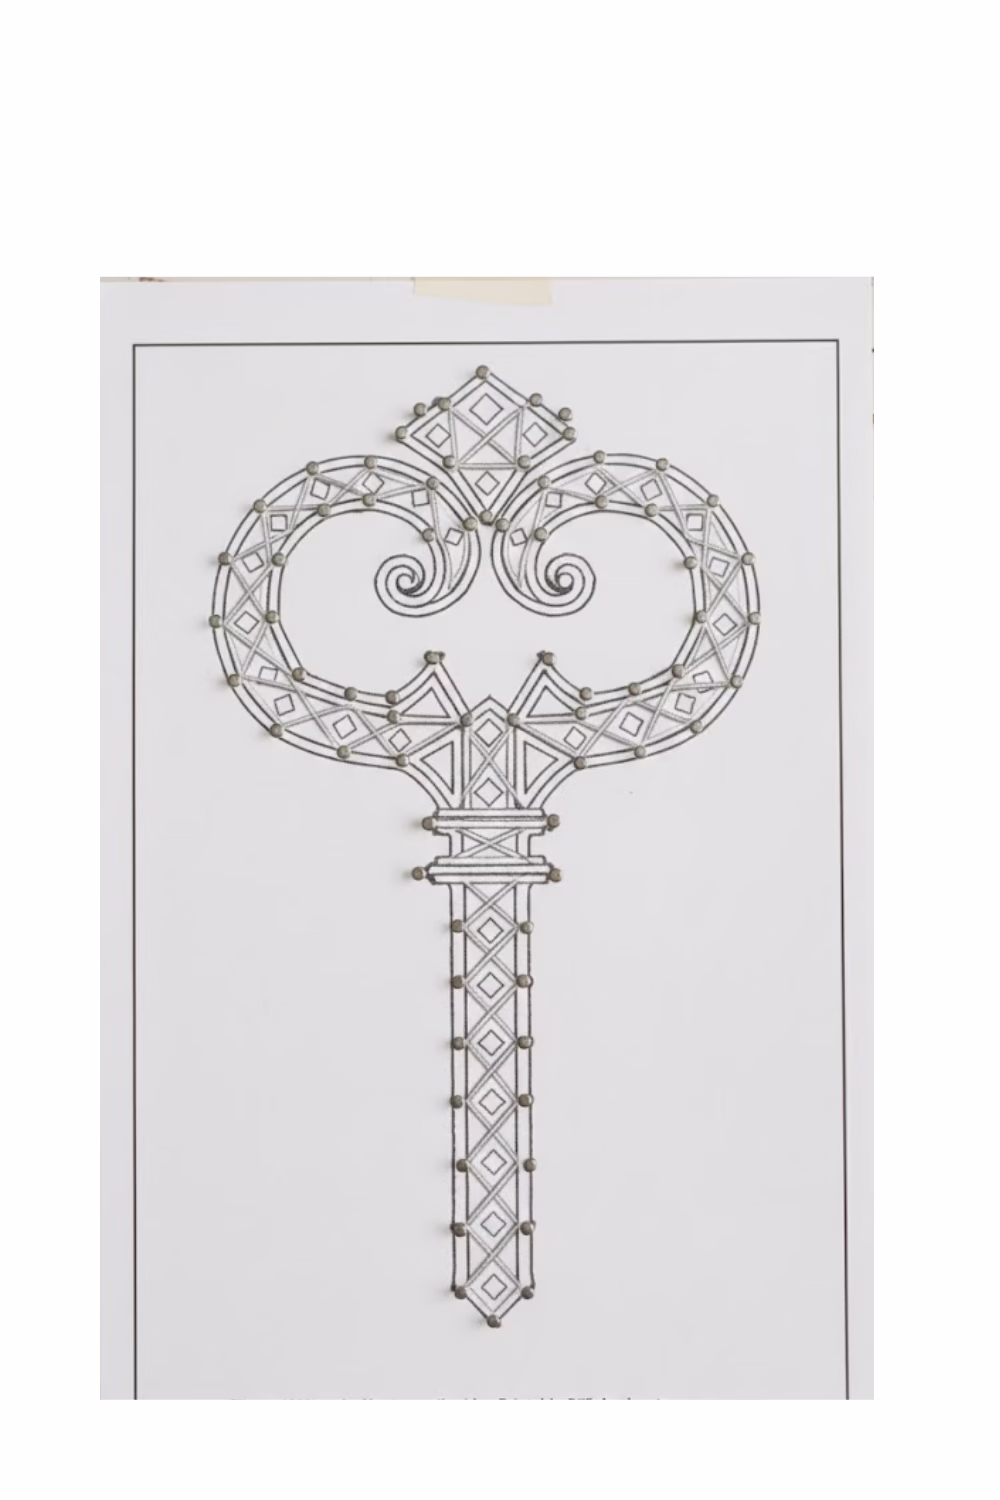
The most important part of this design is reproducing the look of an antique skeleton key. This type of key has a decorative bow (the top loop) and an intricate bit (the notched end). This project relies on a detailed silhouette, unlike simple geometric string art.
How to Find the Pattern:
- Search for Templates: The best way to find this pattern is to search online. Use terms like “ornate skeleton key silhouette” or “vintage skeleton key drawing.” Look for a graphic with high detail, especially in the bow and the bit. The complexity and realism of your finished string art rely completely on the precision of this outline.
- Edit and Size: Once you find a good image, use a basic photo editor or a word processing program. Resize the key to fit your wood base. It should fill most of the board so that no detail is lost (e.g., a 14- to 16-inch key on a 12- by 18-inch board). Make sure the lines of the printed image are clean and sharp.
- Print: Print the design onto paper. If the key is too big for one sheet, print it in sections. Then, tape the sections together very carefully. Ensure the key’s lines align perfectly across the seams. This paper printout will become your template for placing the nails accurately.
- Download: Click Here to download this version
Materials You Will Need
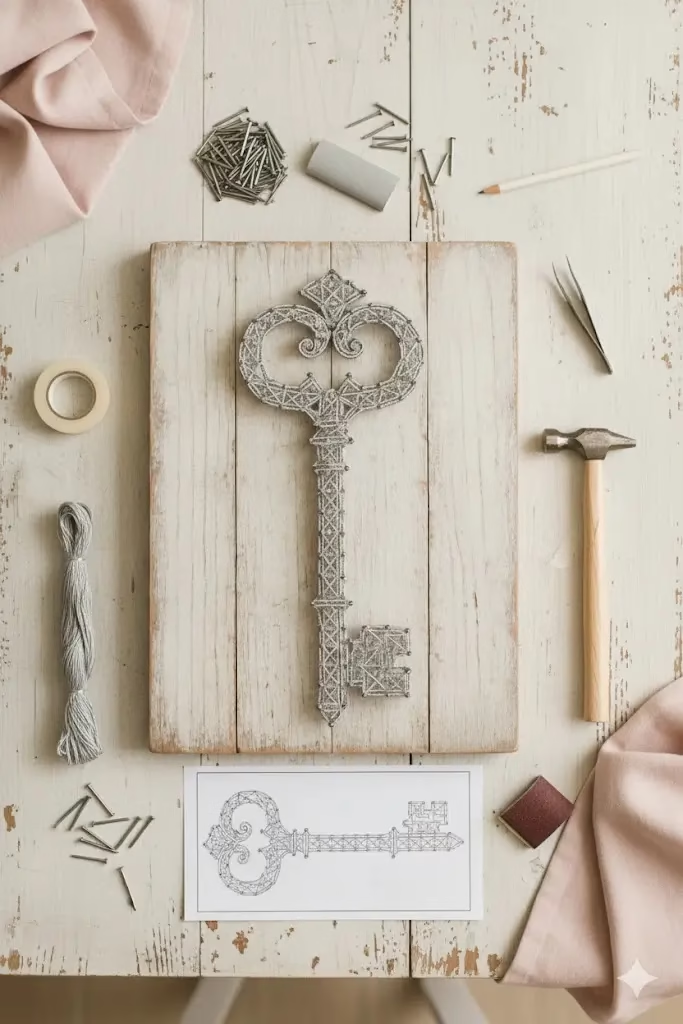
- Wood Base: Rustic wood planks, like distressed pallet wood, roughly 12″ x 18″. The wood must be strong enough to hold the nails. It should also have a naturally weathered appearance. You can use Plywood or MDF, but they will need extra surface texturing to look rustic.
- Paint: White or very light grey chalk paint, or thinned acrylic paint for the whitewashing process.
- Nails: Small silver-colored brad nails or tacks (e.g., 3/4 inch). Nails with a slightly wider head are better, as they help hold the thread securely.
- String/Thread: Light grey or silver embroidery floss, thin linen thread, or fine metallic thread. (More options are available in the String and Yarn Variations section).
- Tools: Hammer, fine-grit sandpaper, ruler, pencil, tape, tweezers, and the printed key template.
Step-by-Step Instructions
Section 1: Preparing the Weathered Wood Base
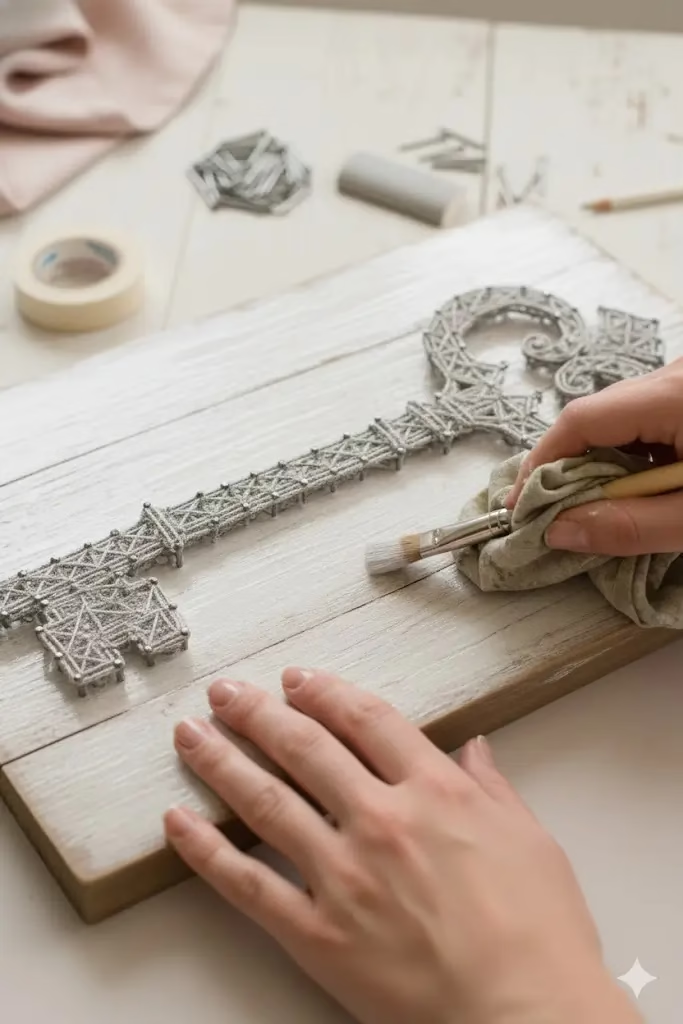
- Prep the Wood: If you use separate wood planks (like true pallet wood), secure them together. You can use wood glue and small backing supports. Clean the wood surface well before you start.
- Initial Distressing: Lightly sand the wood. Focus on rounding the edges and corners to give the wood a softened, aged feel. For intentional wear, you can randomly score the surface with a knife. You can also lightly dent the wood with a chain or hammer to make it look used over many years.
- The Whitewash Technique: Apply a very thin, watery layer of white or light grey paint over the entire wood surface. Proper dilution is key; the paint should be thin enough to be transparent. Immediately wipe off most of the paint with a clean, damp rag. This process, called whitewashing, lets the wood grain and faint colors show through the thin white layer. This creates the perfect base for a shabby chic look. Let the paint dry completely.
- Final Touches: Once the paint is dry, use fine-grit sandpaper. Lightly sand the base again. Focus on areas that would naturally show the most wear, like edges and corners. This step enhances the aged, “shabby chic” look by letting the rustic wood beneath peek through the paint layer.
Section 2: Nailing the Key Outline
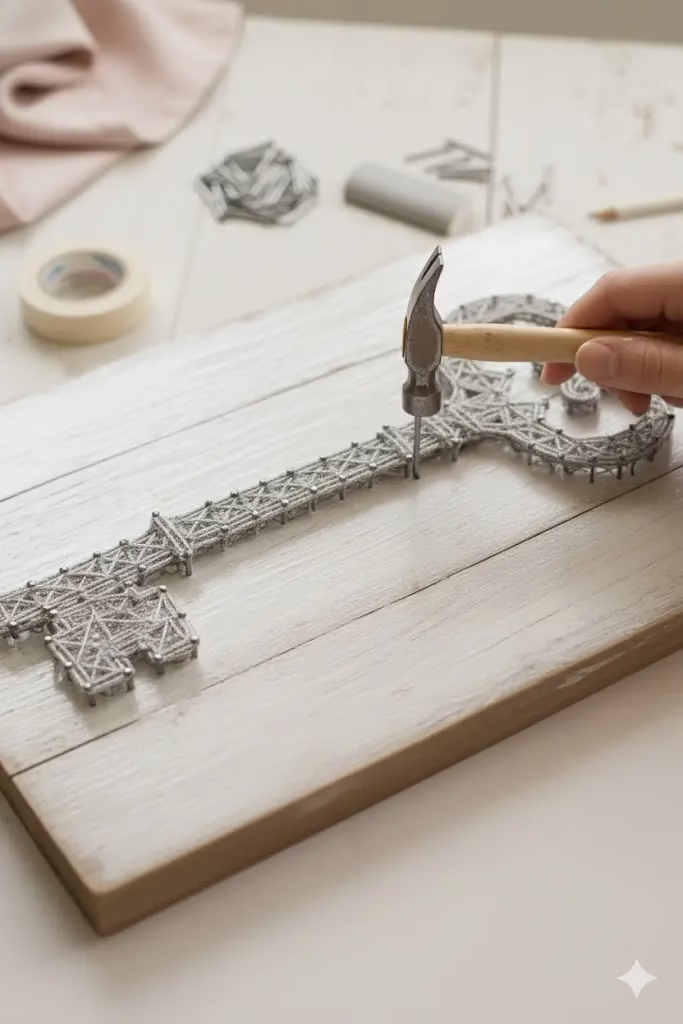
- Position the Template: Center your printed key template exactly on the dried wood base. Secure it firmly with small pieces of tape.
- Mark Nail Placement: Use the template as a guide. Lightly mark dots along the entire edge of the skeleton key design.
- Detail Areas: The bow and intricate bit are critical. Place the nails closer together here (about 1/4 inch apart). This ensures you capture the key’s delicate curves and fine details.
- Shaft Area: Along the straighter shaft of the key, you can space the nails a bit further apart (up to 1/2 inch). This will not compromise the final shape.
- Hammer the Nails: Carefully hammer the silver brad nails into all the marked points. It is crucial to drive the nails to a consistent depth. Leave about 1/4 to 1/3 inch of the nail shaft showing. Consistency is important; it prevents the final thread lines from sagging.
- Remove the Template: Gently tear the paper template away from the board. Use tweezers to remove any small scraps of paper that might be trapped under the nail heads.
Section 3: Creating the Ethereal String Web
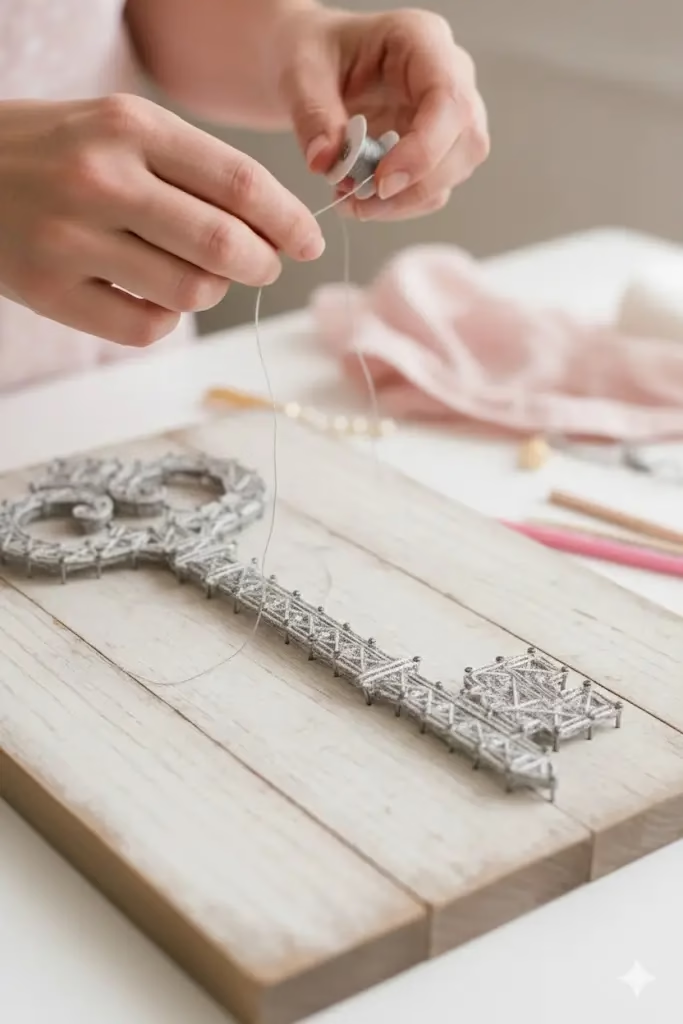
The goal of the stringing process is to create a delicate, “airy web.” This web defines the key’s shape without creating a dense, solid block of color. This approach ensures the weathered wood background remains visible as part of the finished artwork.
- Start the String: Tie a secure knot of the light grey or silver thread around the base of any nail on the key’s edge. Trim the excess string tail neatly.
- Establish the Outline: Before you start filling the inside, loop the string completely around every single nail on the outline, going around once. This step is necessary. It reinforces the key’s border and makes the final shape look clean and defined.
- Fill with Random Crossings: Start filling the empty space inside the outline. Run the string between nails in a random, criss-crossing pattern.
- Focus on Length: Run the string from one nail to a distant nail on the key’s opposite side. Then, loop it around a nail nearby, and run it across the space again.
- Maintain Airiness: Avoid making neat, parallel lines. Also, do not run the thread so many times that the shape becomes solid. The finished stringing should look like a soft, delicate web. By limiting the density, you allow the whitewashed wood background to show through. This creates the unique ethereal quality needed for this design.
- Finish the Art: Continue filling until the key’s form is clearly visible. The interior texture should be satisfying, but stop before the inside becomes too heavy. Once you are done, tie a final knot securely around one of the nails. Trim the thread closely to the knot. Tuck the loose end neatly into the surrounding strings.
Section 4: Color Variations for Any Interior Style
The light grey thread on a whitewashed base is ideal for Shabby Chic. However, you can change the skeleton key design to fit almost any interior style. You do this simply by changing the colors of the base and the thread. This table shows popular variations and the aesthetic each one creates:
| Interior Style | Base Finish | Nail Color | String/Thread Color | Resulting Aesthetic |
| Bohemian/Eclectic | Natural, dark stained wood (e.g., walnut or deep oak). | Copper or Brass | Deep Teal, Mustard Yellow, or Magenta | The colors are rich, grounding, and vibrant. The dark base makes the thread color stand out dramatically. |
| Modern Farmhouse | Matte Black or Dark Grey paint. | Silver or Galvanized Steel | Crisp White or Cream | This creates a high-contrast, clean, and graphic look. It offers a clean, updated rustic feel. |
| Industrial/Minimalist | Raw concrete slab or unpainted, smooth wood. | Black or Dark Gunmetal | Single Color Black or Charcoal Grey | This provides subtle texture over a solid shape. The string adds visual density without color being the main focus. |
| Coastal/Nautical | Light Blue or Aqua paint, heavily distressed. | White or Silver | Deep Navy Blue or Rope-colored Jute/Hemp | The look is fresh, airy, and textured. It evokes the feeling of artifacts weathered by the sea. |
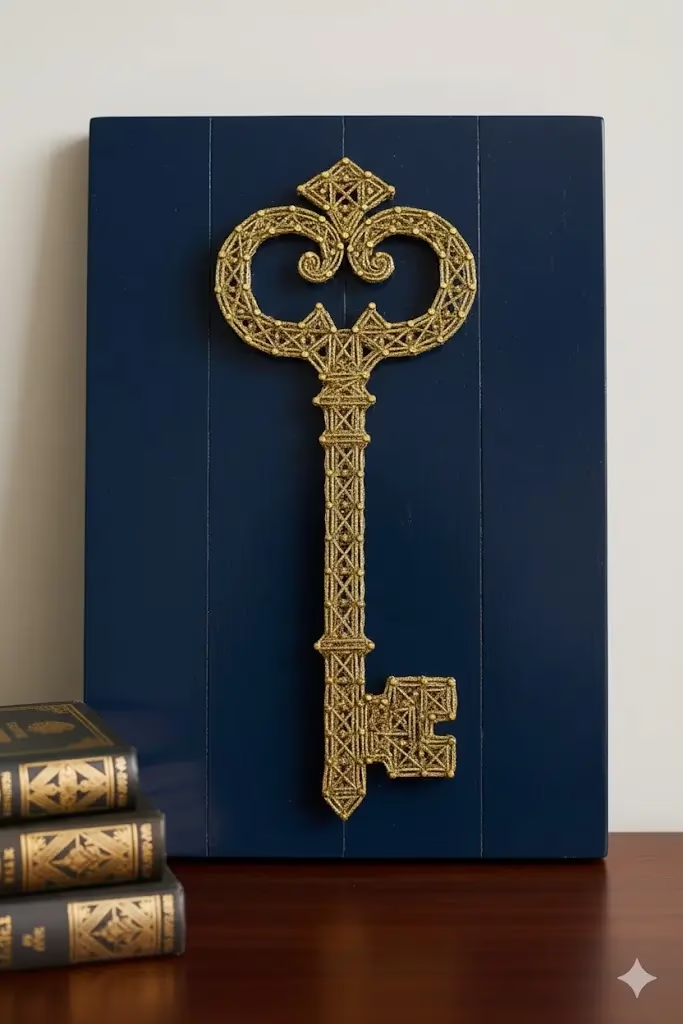
| Art Deco/Glam | Smooth, high-gloss painted wood (e.g., navy or emerald). | Gold or Shiny Brass | Metallic Gold, Silver, or Black Sparkle Thread | This style is luxurious, geometric, and high-shine. It focuses on the contrast of metallic and polished surfaces. |
| Scandinavian/Nordic | Light, unfinished Birch or Ash wood. | White or Light Grey | Charcoal Grey, Forest Green, or Deep Red | The overall feel is earthy, simple, and functional. The natural wood texture is the star of the piece. |
Section 5: Exploring String and Yarn Variations
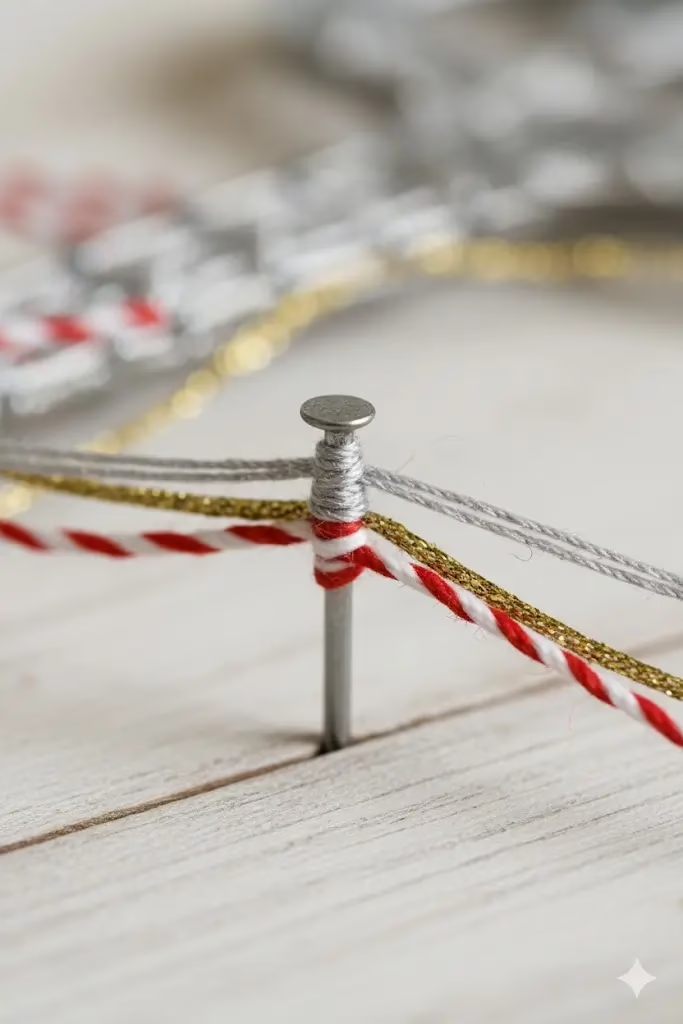
The type of thread you choose directly affects the finished string art. It influences the perceived weight, texture, and level of detail. The original design used thin embroidery floss for an “airy web.” But using other materials can drastically change the final look of the piece.
| String Type | Thickness/Composition | Best For | Visual Effect and Notes |
| Embroidery Floss | Thin, usually six strands that can be split. | Intricate designs, fine detail, gradient work. | It creates a fine, delicate line. And is excellent for the key design because it allows for high detail and minimal density. It is available in thousands of colors. |
| Crochet Thread | Available in various sizes (e.g., Size 10 is common). It is thicker than floss. | Solid color filling, designs that need a slightly bolder line. | This provides a smoother, cleaner line than floss. Its strength makes it very reliable for pulling the thread tight. |
| Baker’s Twine | Medium thickness, often made of two twisted colors (e.g., red and white). | Rustic, vintage, or whimsical designs. Good for creating a striped pattern. | This adds a distinct rustic texture and character. The two-tone twist creates a bold, noticeable line that is less delicate. |
| Thin Yarn (Acrylic/Cotton) | Thicker than thread, with a softer, sometimes fuzzy texture. | Larger projects, simple shapes, children’s string art. | It creates a soft, plush, and cozy texture. Because it is thick, it covers the background quickly. And is less suitable for very fine details like the key bit. |
| Metallic Thread | Thickness is similar to floss, often made of polyester or rayon. | High-glamour, luxury, or accenting small details. | It is reflective and highly visible. It adds a sophisticated shimmer to the artwork. It can be slippery to work with, but it has a big visual impact. |
| Linen/Hemp Cord | Thicker, rough texture. | Bohemian, natural, or Coastal styles. | This gives the art an organic, earthy feel. The natural thickness and slight stiffness of the fibers give the finished piece a raw, tactile texture. |
Key Considerations for String Selection:
- Detail vs. Thickness: For the intricate key design, choose thinner threads (floss, crochet thread). These are best for capturing the delicate turns of the bow and bit. Save thicker yarns for larger, simpler silhouette projects.
- Strength: Make sure the string is strong enough to be pulled taut without breaking. Weak thread results in a saggy, undefined image.
- Texture: Think about how the string’s texture will look against the nails and wood. A fuzzy yarn will appear much softer than a smooth, highly reflective metallic thread.
By learning the core technique and then trying these variations in base color, thread type, and color palette, you can easily recreate this elegant skeleton key string art. The finished piece will perfectly complement any space in your home.
References and Resources
Here are some resources that may be helpful when planning your string art project or sourcing materials. There is no affiliation with any of these suppliers:
- String Art Pattern Search: LR Crafts – A collection of string art patterns to use for free
- Whitewashing Technique Guide: Homebuilding – How to whitewash wood: top tips to get the distressed look
- Sourcing Brad Nails: Meite – Brad Nails
- Embroidery Floss Suppliers: Sullivans usa – Embroidery Thread & Floss
Recent Posts