Cookie Consent by Free Privacy Policy Generator Update cookies preferences

How To Make A Sensory Cuddle Ball

Here is an alt text description for the hero image, incorporating the requested keywords:

Flat lay of colorful fabrics (fleece, corduroy, stripe), ribbon, sewing tools, and jars of filling materials (plastic pellets, lentils, cotton stuffing) for making a DIY Sensory Cuddle Ball. This visual guide supports crafting for calming Sensory Activities.

Searching for simple, affordable ways to keep people—both young and old—engaged and help them manage big feelings through positive Sensory Activities is a common goal for many. It is often the simplest projects, like creating a custom Sensory Cuddle Ball, that yield the biggest rewards in terms of development, calm, and focus for everyone, including active toddlers. This guide offers a project born from the desire to create something truly comforting and tactile for the busy people in our lives. I hope this information helps you create a cherished, handmade item for a child or adult you care about.


1. Introduction: The Magic of the Sensory Cuddle Ball

The world today has a lot of screens. Because of this, kids need hands-on experience and sensory feedback. This is very important for children. Right from birth, babies learn by touching things, grabbing them, and tasting them. As they grow into toddlers, they need sensory input to help them build motor skills, thinking abilities, and emotional control. The Sensory Cuddle Ball is one of the best and easiest ways to give them this help.

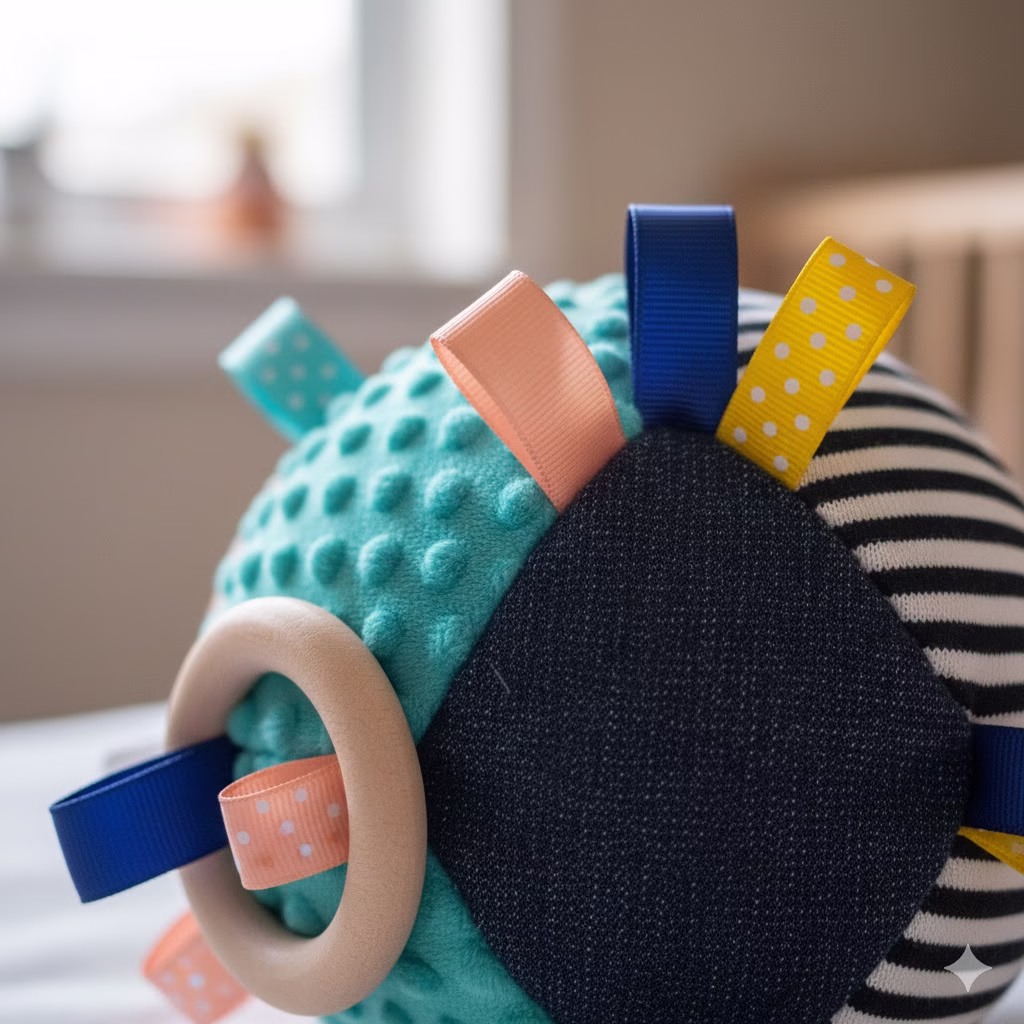
What is a Sensory Cuddle Ball? It is a handmade, round item. And is usually soft, strong, and easy to hold. It is made to have many different textures, weights, and sounds. It’s more than just a toy. It is a tool for therapy, an object for comfort, and a great way to start sensory activities. Toys you buy in a store often offer limited interaction. But a homemade Sensory Cuddle Ball can be made just for your child. It can help them if they need deep pressure to feel calm, or if they need exciting sights and sounds to stay interested.

This complete guide will show you everything about how to create an effective Sensory Cuddle Ball at home. We will talk about the necessary materials. And give detailed, easy instructions on how to do it. We will also give examples of different fabrics and fillings you can use. Most importantly, we will show you why this simple item is so valuable for your child’s playtime. Its benefits go far beyond just fun. They help with development and emotional health. Get your supplies ready and start making this rewarding, custom-made tool for your little one.


2. Why Sensory Play Matters

The benefits of the Sensory Cuddle Ball come from how the senses work together. This is called sensory integration. It is how the nervous system takes information from the senses and turns it into the right actions and behaviors. For babies and especially toddlers, playing with the senses is not just fun. It is the basic way they learn about the world and develop key skills. This is why planned Sensory Activities are so important.

When a child plays with a Cuddle Ball, they use many senses at once. They feel the weight and the texture (touch and body awareness). And hear the gentle shake or soft crunch (hearing). They see the different colors and designs (sight). This rich feedback helps their brain process information better. This leads to better organization and function.

The Main Benefits of Sensory Activities

  • Emotional Control: Sensory input, like the deep pressure from a slightly weighted ball, can be very calming. It helps a child calm down a nervous system that is too active. This makes the Cuddle Ball perfect for quiet time, calming tantrums, or making changes easier.
  • Fine Motor Skills: Moving the ball—passing it, squeezing it, or feeling the different seams—makes the small hand muscles stronger. It improves hand-eye coordination. These skills are needed later for things like writing and getting dressed.
  • Learning: Different textures and weights teach concepts like soft and hard, heavy and light, and smooth and rough. Playing with these properties helps build new ideas and grow language skills as the child learns to describe what they feel.

For Sensory Activities toddlers enjoy, the Cuddle Ball is perfect. It is not scary and can be changed easily. The child can control how much input they get. They can tap it softly for a tiny sound or squeeze it hard for comforting pressure. Using a Cuddle Ball every day offers an easy, fun way for children to develop and grow.


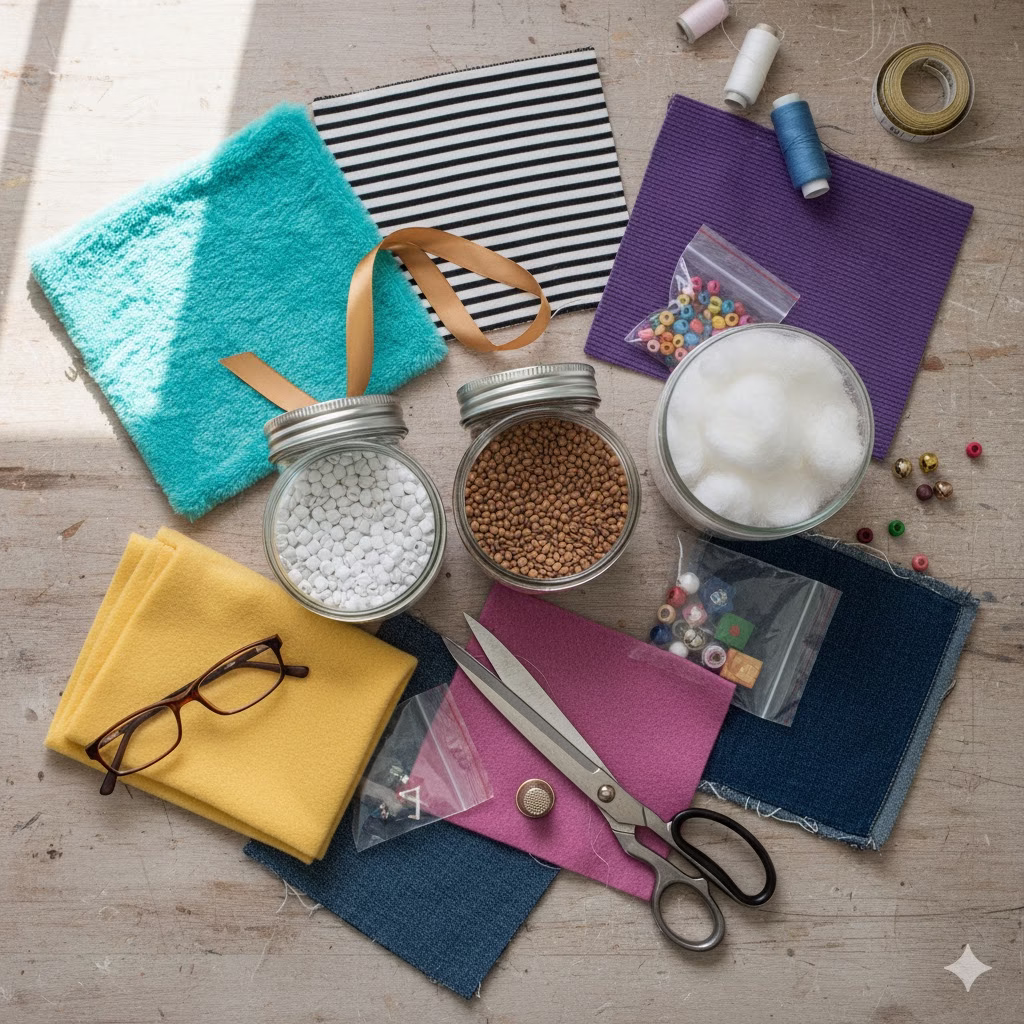
3. Materials You’ll Need: The Sensory Palette

A good Sensory Cuddle Ball starts with choosing the right materials. Your goal is to provide many safe, strong, and interesting textures and weights. Before you start cutting and sewing, gather all your supplies.

Here is an alt text description for the hero image, incorporating the requested keywords: Flat lay of colorful fabrics (fleece, corduroy, stripe), ribbon, sewing tools, and jars of filling materials (plastic pellets, lentils, cotton stuffing) for making a DIY Sensory Cuddle Ball. This visual guide supports crafting for calming Sensory Activities.
CategoryRecommended Material ExamplesSensory Benefit Provided
Outer FabricMinky fabric, corduroy, velvet, fleece, satin, cotton prints, repurposed denim, faux fur.Touch (Softness, roughness, smoothness, coolness) and Sight (Color contrast, patterns).
Inner Texture/SoundCrinkly plastic film (sewn inside layers), small bell, plastic rattle inserts, a strip of rough netting.Hearing (Crinkle sound, rattle) and subtle Touch feedback.
Weight/FillingPoly-Fil stuffing (for softness), plastic pellets (for weight and washing), dried rice or beans (for weight, must be sealed well), clean sand.Body Awareness (Deep pressure and weight), and Touch (Squishiness, moldability).
AccessoriesTextured ribbon loops (satin, grosgrain), small teething ring, large wooden beads sewn securely to a loop.Grasping, Mouth Exploration (if safe), and extra Touch excitement.
ToolsSewing machine or hand needle, strong thread, scissors, fabric marker, measuring tape or ruler.Needed for putting it together.

Safety Note: Always be sure that all materials are safe to touch and sewn on tightly. If you use heavy items like rice or plastic pellets, sew the seams twice. This will stop the filling from coming out. This is very important if the ball is for a young child or a child who plays rough.


4. Step-by-Step Instructions: How To Make A Sensory Cuddle Ball

These instructions tell you exactly how to do it. We will use a simple six-panel design. This makes a classic round ball shape that is great for adding different textures.

Step 1: Preparing Your Panels

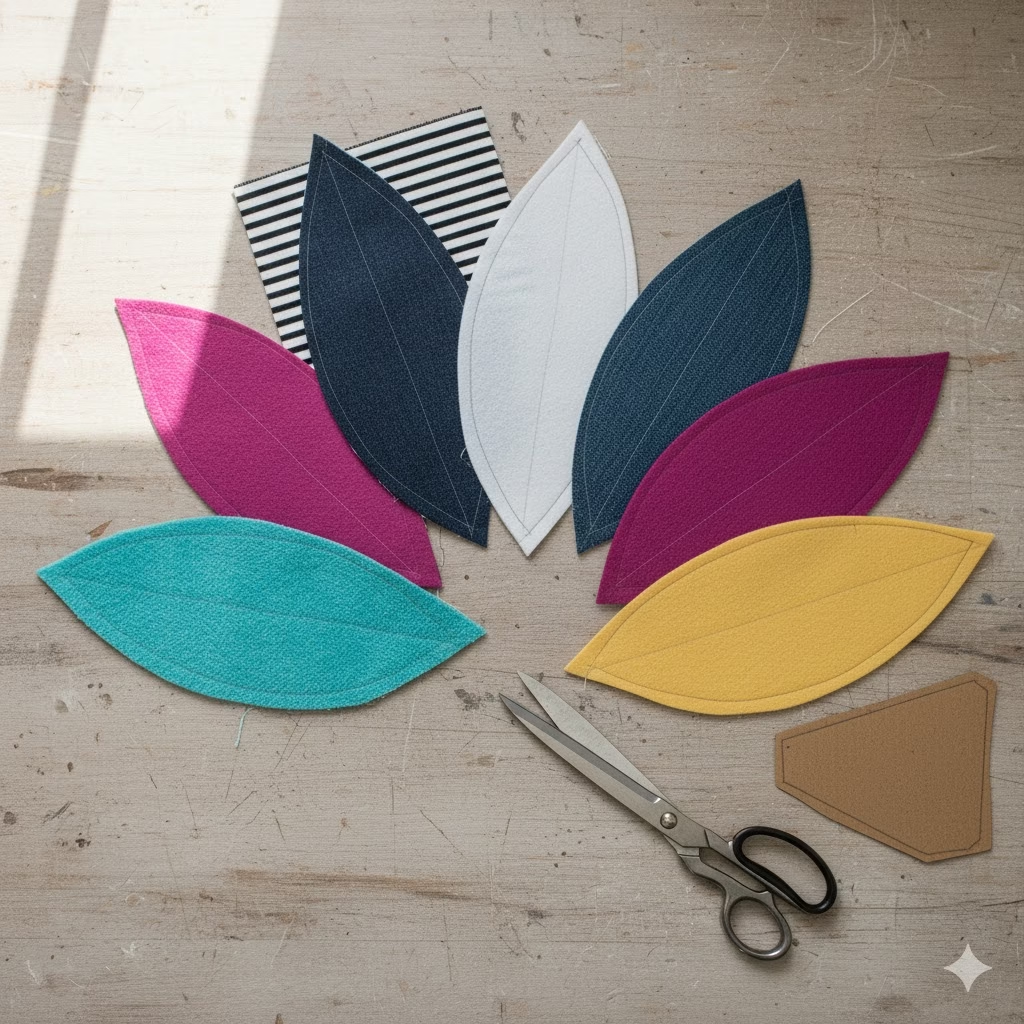
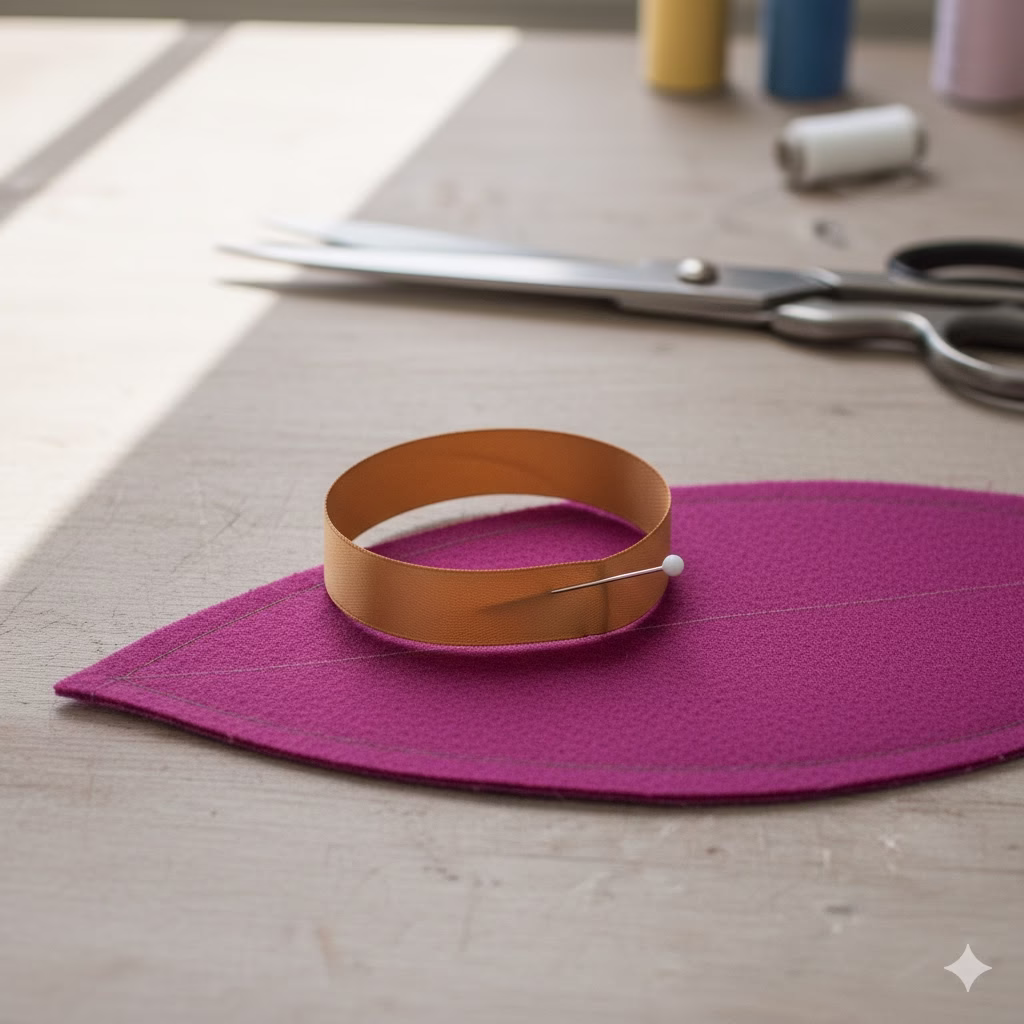
  1. Cut the Shape: Draw and cut a template for a six-panel ball shape on thick paper. It looks like a long oval, pointed at both ends. The final size is up to you. A ball about eight to ten inches wide is best for cuddling. Add a half-inch of extra fabric around the template for the seam.
  2. Choose and Cut Fabric: Pick your six fabrics. Choose a variety for the best sensory input. Pin your template to the fabric and cut out six panels that are all the same size.
  3. Prepare Small Items: Cut your ribbon loops or tabs into three-inch pieces. If you are adding crinkle material inside, cut a piece slightly smaller than one of your panels.

Step 2: Adding Sensory Elements

  1. Ribbon Loops: Decide where you want the ribbon loops and other things (like teething rings). Put the cut ribbons into the seam allowance on the curved edge of three or four panels. Make sure the cut ends line up with the edge and the loop points inward. Pin them firmly in place.
  2. Sound/Crinkle Layer: If you are using crinkle material or mesh, lay it flat on the back side of one fabric panel. Machine-sew it securely near the edges. This keeps it from moving around inside the finished ball.

Step 3: Sewing the Panels Together

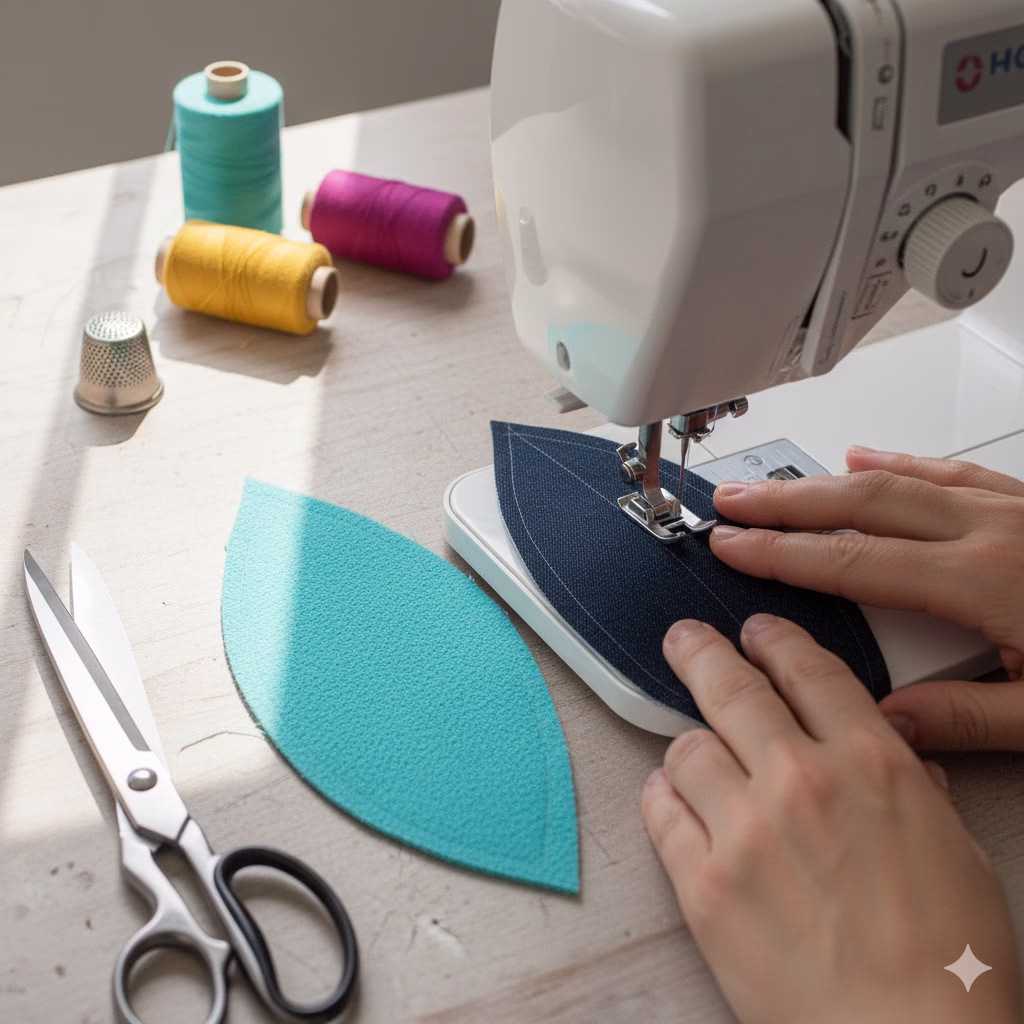
  1. Sew Pairs: Take two panels and place their right sides together. Stich along one long, curved edge, using your half-inch seam allowance. Sew backward at both pointed ends to make the seam strong. Do this until you have three sets of two panels sewn together.
  2. Join the Halves: Put two of your sewn pairs right sides together. Sew them along one of the open curved seams to make a piece with four panels.
  3. Finish the Ball Shape: Put the last two-panel piece right sides together with the four-panel piece. Sew along one seam. Leave the final long, curved seam open for now. You now have a six-panel piece that looks like a flat ball, with one seam open and the two small holes at the top and bottom still open.

Step 4: Stuffing and Finishing

  1. Turn and Shape: Turn the ball shape right-side out through the final open seam. Use a dull tool (like the back of a spoon) to gently push out the pointed ends so the shape is nicely round.
  2. Stuffing: This part controls how the ball feels and how heavy it is. First, push a small amount of Poly-Fil into the two end openings to round them out. Then, start filling the main part. If you add heavy items (rice, pellets), put them in the center. Surround them with Poly-Fil. This keeps the ball soft and its shape even. Stuff it tightly but do not make it too hard. The ball should be soft and easy to squeeze.
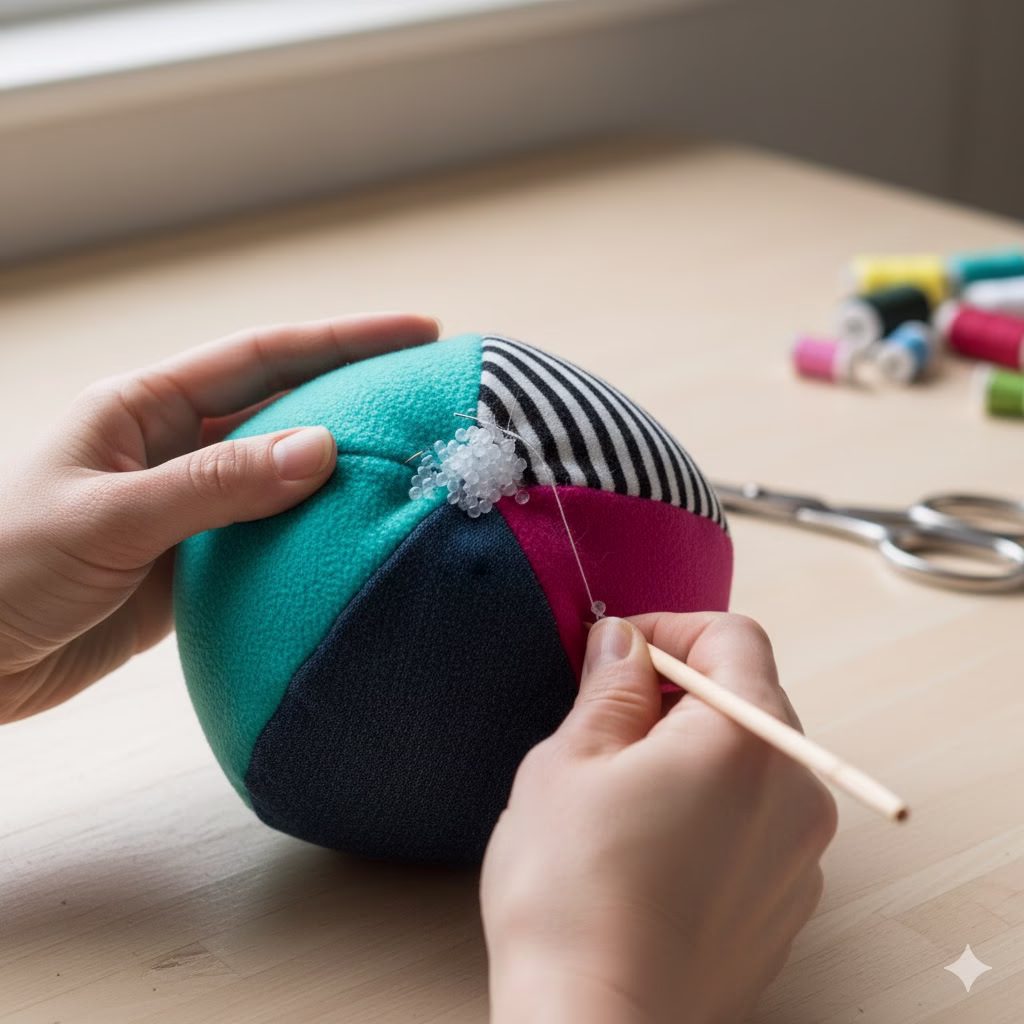
  3. Closing the Seam: When the ball feels firm and heavy enough, fold the raw edges of the open seam inward by half an inch. Pin the opening closed. Use a slip stitch (a hand stitch that is hidden) to close the last seam neatly and strongly. Check this seam twice for safety, especially near any heavy material. Your Sensory Cuddle Ball is now done!

5. Enhancing the Experience: Examples of Sensory Textures and Fillings

The best thing about the Sensory Cuddle Ball is that you can make it special. You can add materials that are just right for your child’s sensory needs. If you make a few balls, try different mixes to see what your child likes most. Here are some detailed examples of how to change the ball’s sensory feel.

Texture Combinations for Tactile Seekers

Kids who seek touch love many kinds of surfaces. These choices give strong feedback when touched or squeezed:

  • The Fuzzy-and-Rough Ball: Use panels of very soft, long faux fur or minky fabric. Mix them with panels of rough corduroy or coarse sackcloth. The big difference between the two gives a very interesting and satisfying feeling.
  • The Smooth-and-Cool Ball: Use smooth materials like satin or silk for four panels. Then, add two panels of thin, tightly woven linen. You can also sew in a small, smooth, flat plastic disc (like a coaster, covered safely in soft padding). This gives the child a cool, hard spot to press, which appeals to the sense of temperature.
  • The Raised Texture Ball: Use fabrics that already have a raised pattern, like thick waffle knit. You can also use denim with heavy stitching or fabric with felt shapes (like stars or bumps) sewn on securely.

Filling Examples for Proprioceptive Input (Weight and Pressure)

Body awareness input, or knowing where your body is, is key to staying calm and focused. Weight is the main factor here.

Weight TypeSensory BenefitBest Practice
Plastic Poly PelletsCan be washed, gives deep pressure, shifts weight (good for rolling and shaping).Best for young toddlers. They are safe and will not grow mold if the ball gets wet. Use a liner bag inside for the most safety.
Dried Lentils or RiceNatural weight, feels fine-grained, great for squeezing into the ball’s shape.Must be sealed very well and kept dry. Good for weighted items for older children to keep on their lap.
Small River Stones (Polished)Gives a unique, cool weight and a clear shifting feel.Only for older children. Must be completely wrapped in thick padding or fleece and double-sealed inside a small bag before being put in the Cuddle Ball.
Fiberfill (Poly-Fil) OnlyVery soft and squishy, great for comfort and gentle holding.Use this for a lighter ball where the feeling of touch is more important than deep pressure.

Integrating Auditory and Visual Stimuli

Sensory play is not just about touch. Add sounds and sights to make your Sensory Cuddle Ball a complete sensory activities item.

  • The Rattle Panel: Sew a small plastic rattle insert or a few dried beans/pebbles into a small pouch. Place this pouch inside one specific panel area. When the child taps that spot, they get focused sound feedback.
  • The Mirror Panel: Sew a small piece of safe, reflective vinyl or a secure, shatterproof plastic mirror (like those in baby toys) onto one panel before assembly. This helps with visual tracking.
  • High-Contrast Patterns: Make sure one panel uses a pattern with strong differences, like black-and-white stripes or squares. This is very stimulating for young eyes.

6. Cuddle Ball Care and Safety Tips

To keep your handmade Sensory Cuddle Ball safe and useful for sensory activities for a long time, follow these rules:

  • Security Check: Before giving the ball to a child, pull hard on all seams. This is extra important if you used heavy materials or attached small items like beads or rings. Pull firmly on all ribbon loops. The seams must be strong enough for active play.
  • Washing Weighted Balls: If the ball has natural weight (rice, beans, sand), do not wash it in a machine. Water will spoil the filling. Only clean spots with a damp cloth and gentle soap. Let it dry completely in the air.
  • Washing Washable Balls: If your ball only has Poly-Fil or plastic pellets, you can usually wash it gently in the machine on a cold cycle. Put it inside a laundry bag. Tumble dry on low or let it dry completely in the air.
  • Check Often: Look at the ball regularly for loose threads, torn seams, or worn ribbons. Fix or throw away the ball right away if the inside filling is showing. This is vital for toddlers who might still put things in their mouth.

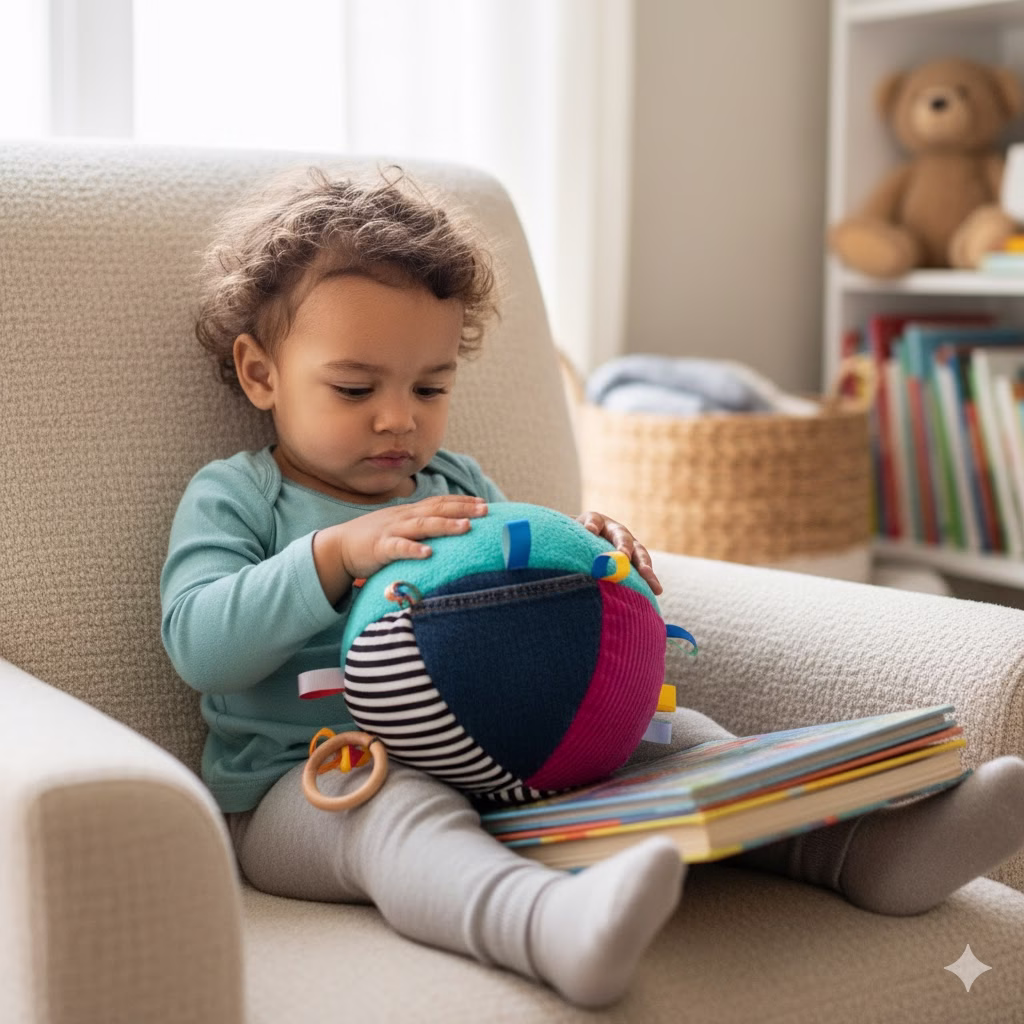
7. Ideas for Using Your Sensory Cuddle Ball

The Sensory Cuddle Ball is a very flexible tool. You can use it for focused help or simple quiet time. Here are some examples of Sensory Activities you can add to your daily routine.

  • The “Feelings” Cuddle: Use the ball to help kids deal with their emotions. When a child feels upset, tell them to squeeze the ball as hard as they need to. The body awareness input helps them manage their strong feelings.
  • Quiet Time Helper: Put the Cuddle Ball in a “calm corner” or a spot for reading. The weight and feel can help the child sit still and focus during story time or quiet play alone.
  • Touch Guessing Game: Put Cuddle Balls with different textures into a bag or container. Have the child reach in and try to name which ball is which (the soft one, the rough one, the one that rattles) without looking. This makes their sense of touch sharper.
  • Movement Play: Roll the weighted ball back and forth. Or, have the child try to carry it across the room in fun ways (on their head, between their knees). The weight gives extra feedback. This makes moving around more fun and helps build body awareness. These are great sensory activities toddlers love since they are always moving.

8. Sensory Cuddle Balls for Adults: Beyond Childhood Comfort

While often associated with children and toddlers, the benefits of Sensory Cuddle Balls are not limited by age. Adults, too, can greatly benefit from the calming and focusing properties of tactile and weighted sensory input. In today’s fast-paced world, stress, anxiety, and the constant digital overload can leave many adults feeling overwhelmed and disconnected. A thoughtfully designed adult Sensory Cuddle Ball can serve as a powerful tool for self-regulation, mindfulness, and sensory relief.

The principles remain the same – providing varied textures, appropriate weight, and engaging tactile elements – but the design and materials often reflect an adult aesthetic and different sensory needs.

Design Considerations for Adult Sensory Cuddle Balls

  • Subtle Aesthetics: Adult versions often feature more subdued color palettes and sophisticated fabric choices. Think deep blues, muted greens, grays, browns, and earthy tones, rather than bright primary colors. Fabrics like faux suede, thick corduroy, soft knit, brushed cotton, or linen blends offer comfort without looking overtly childlike.
  • Weight and Size: Adult Cuddle Balls are typically larger and heavier, ranging from 15 to 25 inches in diameter and weighing between 3 to 8 pounds. This increased weight provides more substantial proprioceptive input, which can be very grounding and calming for adult nervous systems. They can be used as lap weights, body pillows, or for gentle pressure during relaxation.
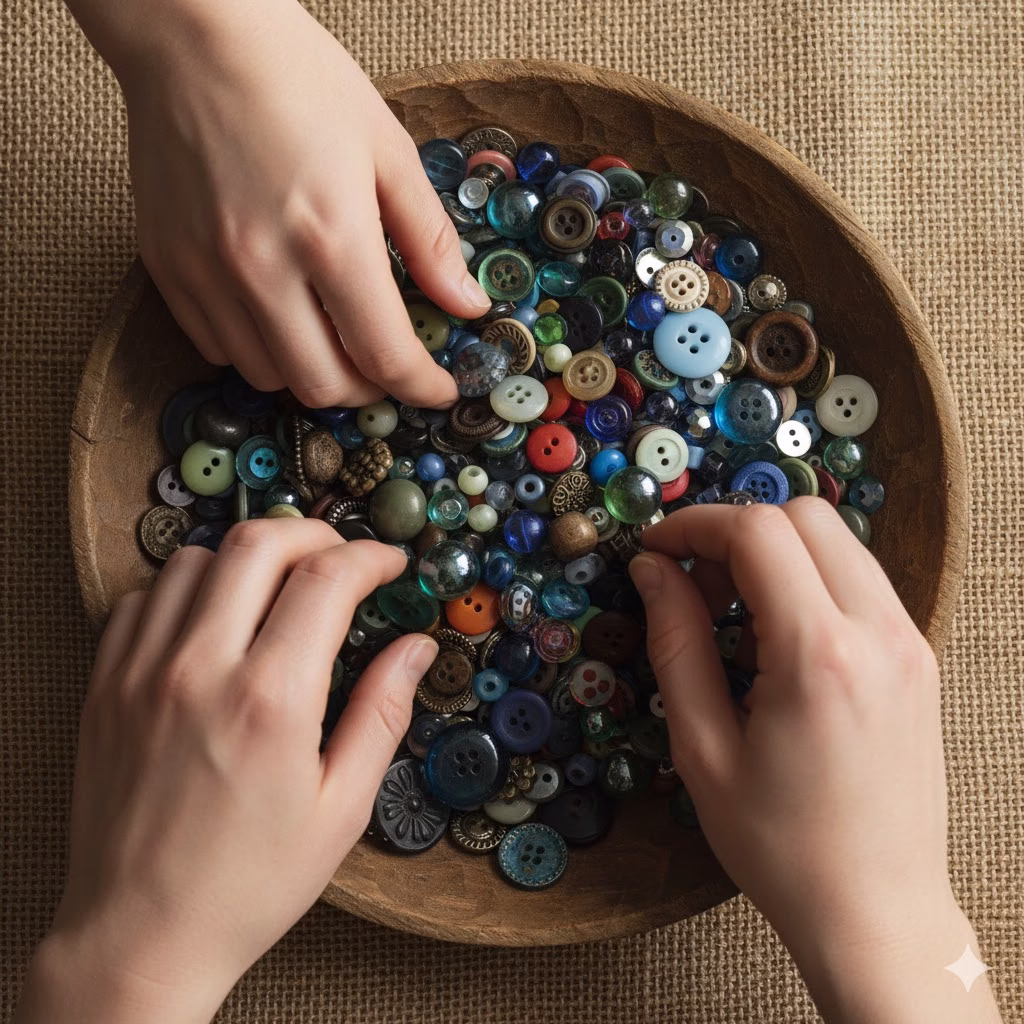
  • Advanced Tactile Elements: Beyond simple ribbons, adult versions might incorporate more complex tactile elements. These could include firmly sewn-on buttons (large and securely attached), braided rope handles, textured patches of different knits, or even small, smooth polished stones or wooden beads (again, securely encased) within specific sections to offer distinct haptic feedback.
  • Purpose-Driven Use: For adults, these balls are often used in specific contexts:
    • Stress and Anxiety Relief: Holding and squeezing a weighted, textured ball can provide comfort and help reduce feelings of anxiety.
    • Focus and Concentration: For individuals with ADHD or those needing to focus during tasks, the tactile input can act as a constructive fidget, preventing mental wandering.
    • Mindfulness and Grounding: Using the ball during meditation or quiet reflection can help adults stay present and grounded.
    • Sensory Seeking: Some adults naturally seek sensory input, and a Cuddle Ball offers a safe, acceptable way to fulfill this need in various environments.

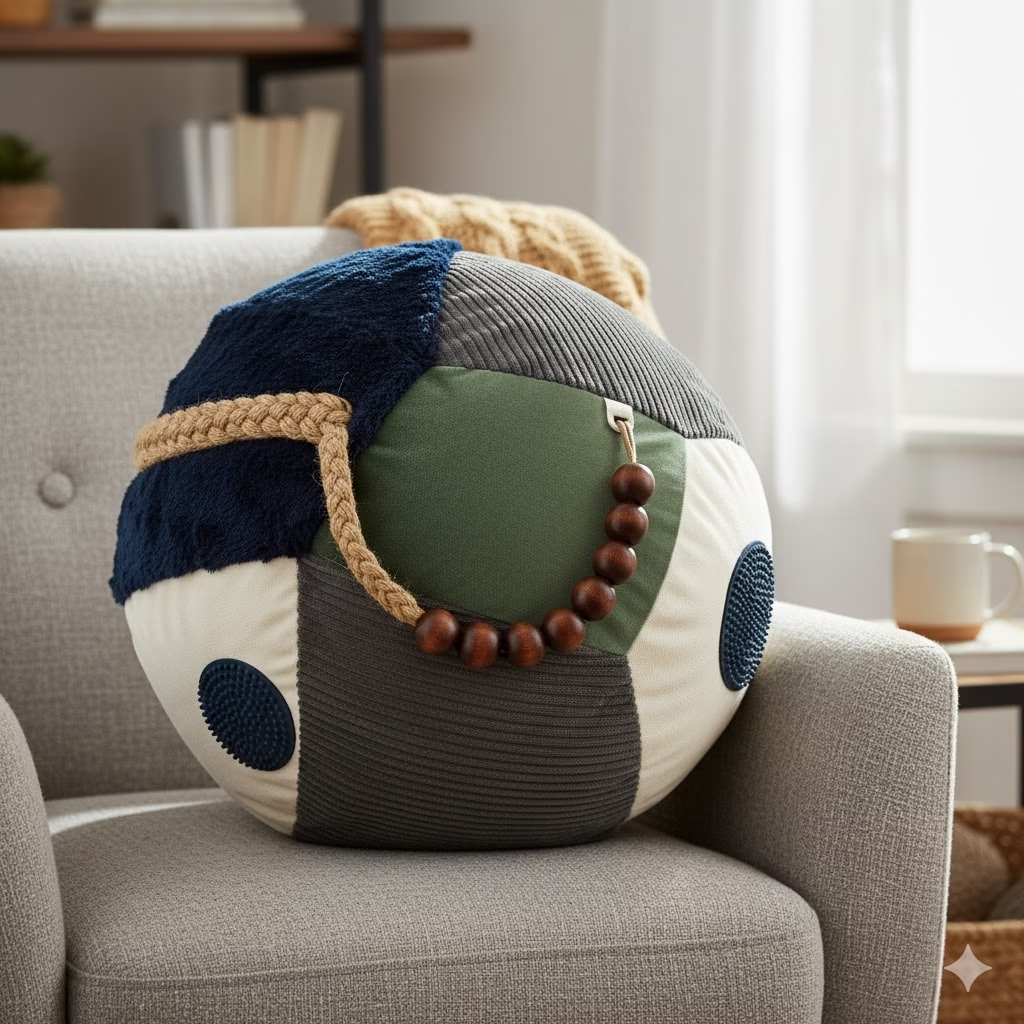
This image shows a larger Sensory Cuddle Ball, about 18-20 inches in diameter, suitable for adults. It features a sophisticated palette of deep blues, charcoal grays, and muted forest greens, with varied textures like soft faux fur, ribbed corduroy, smooth velvet, and a section of sturdy, slightly coarse canvas. The ball has subtle, securely stitched-in “fidget” elements such as large, smooth wooden beads, a braided rope handle, and a few patches of firmly sewn, tactile nubs (like those found on a massage ball). It is shown resting on a comfortable armchair in a cozy, adult-oriented living space, suggesting its use for stress relief, focus, or sensory comfort.


Frequently Asked Questions (FAQ)

Q: Is the Sensory Cuddle Ball safe for children who mouth objects?

A: If the ball is for a child who still puts things in their mouth, it must only be made with safe, washable fillings like Poly-Fil or plastic pellets. You must not use natural fillings like rice or beans. If the seam breaks, these can be a choking danger. They can also grow mold if they get wet. Make sure all ribbon loops and items are big enough so they are not a strangulation risk, and sew them on three times for strength.

Q: How heavy should a Sensory Cuddle Ball be?

A: The right weight depends a lot on the child’s size and what they need. For a typical toddler, a finished ball that weighs between one and two pounds is usually enough. This gives a calming deep pressure without being too heavy to hold. The ball should feel solid but still soft and easy to hold.

Q: Can I use pre-cut fabric shapes from a quilt kit?

A: Yes, you can use fabric from other projects. If you use square quilt pieces, you might have to change how you put it together. You could make a cube or a rectangle instead of a round ball. The main idea of the Sensory Cuddle Ball—different textures and weight—works for any sewn shape.

Q: What is the main difference between this and a standard plush toy?

A: A normal stuffed toy is mainly for comfort and make-believe play. A Sensory Cuddle Ball is specially made to provide a lot of focused sensory input (touch, sight, weight). Every material choice is strategic. It focuses on the goal of sensory control and development, making it a functional tool for Sensory Activities.


References


Recent Posts


Unplug and Color: Visual Focus for the Modern Mind

Overhead shot of a person's hands using a blue colored pencil to fill in a complex geometric pattern in an adult coloring book. A steaming mug and a muted smartphone are visible in the background, symbolizing a break from digital distraction for Visual Focus and Sensory Activities.

We live in a world with constant notifications, pings, and an endless digital scroll. Like many of you, I have felt the mental exhaustion that comes from trying to keep up with it all. This constant rush often leaves my brain feeling tired and messy. I believe that finding small, easy practices to take back our attention is vital for feeling well. This piece is a simple guide to using a quiet tool—the coloring book—to hit the mental ‘reset’ button. It will help you swap digital stress for real, calming Visual Focus.


The Hidden Price of Always Being Connected

The digital age has made our lives much easier, but it has also brought a hidden, low-level stress that we barely notice. We are experts at switching between tasks. We constantly split our attention among emails, social media, news alerts, and texts. This habit of having divided attention is tiring for the mind. It leads to what experts call attention fatigue or scattered focus.

Our brains were not made to handle this non-stop digital attack. When we are always reachable, our prefrontal cortex—the brain part that handles planning, making choices, and deep concentration—gets overloaded. This results in mental fogginess, a feeling of being overwhelmed, and the inability to focus on one thing for very long. .

The answer is not a huge change or a long trip away. Instead, it is finding simple, easy Sensory Activities that make our mind concentrate on just one task. This is where the quiet, strong practice of adult coloring comes in.

More Than Child’s Play: The Science of Adult Coloring Books

Adult coloring books are not just a fun throwback to childhood. They are a proven and very good way to practice mindfulness easily. Coloring’s healing value comes from its ability to use both sides of the brain at once in an activity that is calm and has no pressure.

  1. The Logical Left Brain organizes the work: picking colors, staying inside the lines, and deciding on a color plan.
  2. The Creative Right Brain is active when choosing shades, mixing tones, and creating the final look.

This balance gently pushes out worrying thoughts. The brain simply does not have the extra space to fret over your to-do list while carefully filling in a hard pattern. It makes you fully present in the moment, giving your mind a ‘digital detox’.

The Power of Pattern and Repeating Shapes

Your book’s theme—focusing on pattern and sight to calm the senses—is based on simple mental rules. Highly detailed, repeated patterns (like mandalas, repeated tile shapes, or geometric designs) naturally help us relax.

  • Familiarity Calms: Our brains like things to be predictable. Complex, repeated patterns offer a visual rhythm that is deeply settling.
  • Optical Flow and Focus: The motion of your pencil tip across the paper, and your focus on small, clear areas, trains your Visual Focus. This deep, concentrated action gives your mind a rest from the wide, spread-out attention needed to watch several screens.

How to Get Clear Focus with Coloring: A Step-by-Step Guide

To truly get the most from adult coloring, you should treat it as a structured Sensory Activity, not just a casual hobby. Follow these steps to get the most focus and calm.

Step 1: Create Your Sensory Calm Spot

A digital break needs a calm physical space.

  • Stop Notifications: You must do this. Turn off your phone sound, close your laptop, and tell people nearby you are taking 15 to 30 minutes of quiet time.
  • Set Up the Scene: Use soft light (maybe a warm desk lamp) and a comfy chair. Think about adding a non-visual sensory touch, such as a gentle, calming smell (like lavender) or quiet music—or choose complete silence.
  • Get Your Tools Ready: Having an organized set of colored pencils, thin pens, or markers ready means you won’t need to break your flow once you start.

Step 2: Pick Your Challenge Wisely

Not all pages are equal when you are seeking Visual Focus.

  • For High Anxiety: Start with simpler, larger patterns that need less detailed work. This gives fast, good results and an easier start into the flow state.
  • For Scattered Focus: Choose very detailed, repeated patterns (like complex mandalas or tile designs). These need intense, steady Visual Focus and are great for training your attention.
  • Try a Unique Adult Coloring Pages Free Printable: Sometimes, a new, fresh design can kickstart your creative side. Search for free geometric or abstract patterns to see what brings your focus to life.

Step 3: Use the 3-Step Focus Method

This method is made to keep your mind fixed on the page.

  1. The Color Choice: Before you touch the page, hold your pencil or pen over the next area and take two deep breaths. Decide on the single color you will use for that spot.
  2. The Visual Anchor: As you start to fill in the space, look closely at the exact spot where your tool meets the paper. Let your sight soften everything outside of that small, clear spot. This is your Visual Focus point.
  3. The Breathing Rhythm: Match your breathing with the movement of your hand. For example, breathe in as you move the pencil down and out as you move it up. This links the physical action, the visual focus, and your inner state.

Expanding Your Sensory Activities: Beyond the Book

While coloring is a strong tool, it is one of many Sensory Activities that can help you unplug and focus.

  • Visual Sensory Activities: Try adult dot-to-dot books, or complex cross-stitch or needlework. These activities use the same need for steady Visual Focus on small details.
  • Touch Sensory Activities: Get your hands fully busy by kneading dough, shaping clay, or sorting small, mixed items (like beads or buttons). The feel of the texture and the repeated movement can be deeply settling.
  • Sound Sensory Activities: Listen to special calming sounds or nature sounds while you color. This adds another layer of sensory input to block out the noise of distraction.

The Lasting Benefits of Visual Focus Practice

The benefits of doing Visual Focus through adult coloring books last long after you put down your pencil.

  • Better Work Focus: By regularly training your brain to ignore distractions while you color, you make the brain paths needed for deep work stronger. This helps with concentration in your job tasks.
  • Fewer Overthinking Thoughts: Coloring offers an ‘active meditation’ that is less scary than traditional meditation. It cuts down on how often and how strongly you ruminate—those loops of worried, negative thoughts. It does this by simply filling the mental space they would usually take up.
  • Better Problem-Solving: Allowing your mind to enter a relaxed, focused state can lead to sudden insights. You are not trying to solve a problem, but by lowering the mental burden, your subconscious mind often finds space to work and create answers.

See coloring not as a treat, but as a necessary part of keeping your mind healthy every day.

Examples of Visual Focus in Action

GoalColoring StrategyThe Mental Shift
High AnxietyPick a hard pattern and use only two strong, opposing colors (e.g., black and red). The clear color choice makes you fully pay attention.Focuses on simple contrast instead of complex choices, sending anxious energy into a careful action.
Digital TirednessUse soft, gentle colors (all blues, greens, or purples) to color a nature pattern.Calming and refreshing for eyes tired from bright screens; needs soft, steady focus.
Brain Fog/SlownessWork on a large, abstract pattern, filling in shapes with strong, random color choices with no plan.Starts creativity and breaks mental stiffness; the visual play is freeing and engaging.

How to Get Started Now

You do not need costly supplies. If you want to try this practice right now, look online for unique adult coloring pages free printable. Grab some pencils or pens, use the 3-Step Focus Method, and give your modern mind the break it needs.


Frequently Asked Questions (FAQ)

Q: How long should a coloring session be to work well?

A: Even 15 to 20 minutes of focused coloring can help a lot. The important thing is quality, not time. Make sure you are fully present and using the focus methods, rather than just coloring while watching TV.

Q: Is it less helpful if I can’t stay perfectly inside the lines?

A: Not at all. The goal is engagement and Visual Focus, not a perfect result. If a small mistake breaks your focus, gently bring your attention back to the movement of your hand and the space you are working on. The process is much more important than the final picture.

Q: What is the best kind of coloring page for stress relief?

A: Very detailed, repeated geometric patterns (like mandalas or complex art patterns) are often said to be the best for lowering stress. Their balanced look creates a sense of order and calm, which helps with Sensory Activities that quiet the nervous system.

Q: How does this compare to other Sensory Activities like knitting or puzzles?

A: All these actions are great for focus because they are structured, repetitive, and need hand skill. Coloring’s special benefit is its use of Visual Focus and the healing power of color. It gives a specific mental rest from words and numbers.

Q: Are there good places to find unique adult coloring pages free printable?

A: Many artists, museums, and libraries offer free coloring pages you can download. Searching for “geometric patterns,” “abstract art outlines,” or “botanical illustrations” often gives great, high-quality, and unique designs.


References

  1. TandFonline – Can Coloring Mandalas Reduce Anxiety?
  2. Mayo Clinic – Mental health benefits of coloring
  3. Healthline – Benefits of Adult Coloring: 9 Reasons to Try It

Recent Posts


How to Make Deliciously Healthy Honey Ginger Chicken

Healthy Honey Ginger Chicken served over brown rice, glistening with a turmeric glaze and garnished with fresh cilantro and sesame seeds. A perfect example of delicious Anti Inflammation Recipes and Anti Inflammation Meals.

If your weeknights feel like a constant scramble between work, family, and the perpetual question of “What’s for dinner?”, you are not alone. I am a busy home cook who believes that healthy eating should never mean sacrificing flavor or spending hours in the kitchen. This Healthy Honey Ginger Chicken recipe is the culmination of my journey to create meals that are both nourishing and exciting, proving that satisfying comfort food can also be deeply beneficial for your well-being. Join me in bringing a little bit of golden, anti-inflammatory goodness to your dinner table tonight as we explore delicious Anti Inflammation Recipes and simple Anti Inflammation Meals.

Introduction: The Golden Rule of Flavor and Wellness

Dinner is often the best part of our day. It is a moment to relax, connect with others, and nourish our bodies. Too often, though, the meals we rush to prepare leave us feeling heavy or unsatisfied. This recipe for Honey Ginger Turmeric Chicken changes that completely. It mixes sweet, savory, and a little bit spicy. It is designed to taste incredible, but it also gives you real, important health benefits.

We are taking basic chicken and making it a powerhouse meal. It is perfect for anyone looking for delicious Anti Inflammation Recipes. Fresh ginger, bright turmeric, and natural honey come together in a simple, deep-penetrating marinade. This article will show you every step. You will learn how to make a perfect, restaurant-quality meal. You can easily add this dish to your rotation of Anti Inflammation Meals.

Understanding the Power of the Ingredients

The true secret of this recipe is the star ingredients: ginger and turmeric. Both have been used for thousands of years in traditional medicine. Their use here turns a simple chicken dish into a truly Healthy Honey Ginger Chicken meal.

The Anti-Inflammatory Superstars

  • Turmeric: The Golden Healer. Turmeric contains a compound called curcumin. Curcumin is a strong antioxidant. It is the main reason this spice is known for fighting inflammation. When we eat turmeric, we give our bodies a natural boost. This boost helps fight long-term inflammation. How to do it: We want your body to absorb the most curcumin possible. To do this, we add a little black pepper to the turmeric. The piperine in pepper greatly helps your body use the curcumin.
  • Ginger: The Digestive Aid. Ginger has long been used to calm stomach issues and ease nausea. Its anti-inflammatory power comes from compounds called gingerols. These compounds also give ginger its strong, warm flavor. In this dish, fresh, grated ginger cuts through the sweetness of the honey. It makes the overall flavor brighter.
  • Honey: Nature’s Sweetener. We use a small amount of honey for flavor. It also creates that wonderful sticky glaze. Honey itself contains antioxidants and trace minerals. We suggest using a high-quality, raw honey. This gives you the best flavor and the most nutrients.

The Supporting Cast: Flavor Builders

  • Soy Sauce or Tamari: This ingredient is vital. It adds a necessary deep and savory umami flavor. Use tamari if you need a gluten-free option.
  • Garlic: Every great marinade needs garlic. It creates a strong, savory base note for the dish.
  • Lime or Lemon Juice: A splash of acid is very important. It tenderizes the chicken meat. It brightens the flavor. This acid balances the sweetness and richness of the honey.

The Prep: Building the Perfect Marinade

If you want ultra-tender and flavorful chicken, you must use an effective marinade. Do not skip this step! It is the base for our Healthy Honey Ginger Chicken.

  • Example: The Consistency Check. Your finished marinade should be thick enough to cling to a spoon. But it must still pour easily. If it is too thin, add a tiny bit more cornstarch or honey. If it is too thick, add a tablespoon of water or lime juice to thin it out.
IngredientMeasurement (Example)Purpose
HoneyHalf a cupSweetener, Glaze Base
Fresh Ginger, gratedTwo tablespoonsSpicy Warmth, Anti-inflammatory
Turmeric PowderOne teaspoonColor, Anti-inflammatory
Garlic, mincedFour clovesAromatic Base
Soy Sauce/TamariThird of a cupUmami, Salt
Black PepperQuarter teaspoonCurcumin Absorption
Lime JuiceOne tablespoonAcidity, Brightness
  • How to do it: Marinating Technique. Mix all the marinade ingredients in a medium bowl. Put your chicken pieces into a large, resealable bag. Chicken thighs are best for keeping the meat juicy, but breast meat works well too. Pour the marinade over the chicken. Make sure every piece is fully coated. Press all the air out of the bag and seal it tightly. Gently rub the chicken to spread the marinade around. Put it in the refrigerator for at least thirty minutes. For the absolute best flavor, marinate for a full four hours, or leave it overnight.

The Cook: Achieving that Perfect Sticky Glaze

Cooking is the moment of change. The marinade turns from a simple liquid into a caramelized, golden glaze. This glaze locks in all the flavor and moisture.

  • Pan-Searing Method (Best for speed and glaze):
    • Take the chicken out of the marinade. Pat the pieces dry slightly. This helps them get a better sear and crust.
    • Heat a tablespoon of high-heat oil (like avocado or coconut oil) in a large skillet. Use medium-high heat.
    • Place the chicken in the skillet. Do not put too many pieces in at once. You might need to cook them in two or three rounds.
    • Sear the chicken for five to seven minutes on each side. It should be deeply golden brown and fully cooked.
    • How to do it: Glaze Reduction. Pour the remaining marinade into the pan. Let it come to a simmer. Use a spoon to scrape up any browned bits stuck to the bottom of the pan. The sugar in the honey will quickly make the sauce thick. It will become a rich, sticky glaze. Turn the chicken pieces to cover them completely in the glaze before you serve.
  • Baking Method (Best for hands-off cooking):
    • Preheat your oven to three hundred and seventy-five degrees Fahrenheit.
    • Line a baking sheet with parchment paper. This makes cleaning up much easier.
    • Place the marinated chicken pieces on the baking sheet. Spread them out evenly.
    • Bake the chicken for twenty to twenty-five minutes. The exact time depends on how thick the chicken pieces are.
    • How to do it: Last-Minute Glaze. In the last five minutes of baking, brush the remaining marinade all over the chicken. For an extra crisp texture, switch the oven to broil. Broil for only one or two minutes. Watch it closely so the chicken does not burn.

Serving Suggestions for an Anti-Inflammation Meal

This Healthy Honey Ginger Chicken is the main dish. But the sides you choose are important. They help you build a complete, Anti Inflammation Meal.

  • Vibrant Vegetables: Serve the chicken over steamed dark, leafy greens. Kale or spinach are great choices. You can also use roasted broccoli and carrots. These vegetables are full of vitamins and fiber.
  • Smart Starches: Skip white rice. Choose fiber-rich complex carbohydrates instead. Brown rice, quinoa, or wild rice are good options. These starches release energy slowly. They are excellent choices for an anti-inflammatory diet plan.
  • Garnish: Do not forget to add finishing touches. Sprinkle toasted sesame seeds, chopped green onions, or fresh cilantro on top. These not only look good, but they add fresh, contrasting flavors too.

Troubleshooting and Common Questions

Even the simplest recipes can have small problems. Here is how to handle a few common issues when you make your Healthy Honey Ginger Chicken.

The Marinade Is Too Runny

If your marinade is not turning into a nice glaze in the pan, it probably needs to be thicker.

  • How to do it: Mix one teaspoon of cornstarch or arrowroot powder with one teaspoon of cold water. This creates a thick paste, or slurry. Whisk this slurry into the sauce as it simmers in the pan. The sauce should become thicker almost instantly.

The Chicken is Burning Before it’s Cooked

This often happens because the mixture of honey and soy sauce contains sugar. Sugar caramelizes and burns quickly if the heat is too high.

  • How to do it: Lower your heat setting to medium. If you are baking, cover the pan loosely with foil for the first fifteen minutes. This traps moisture and stops the surface from burning too fast. Then, remove the foil for the final browning.

Variations on the Recipe

One great thing about this recipe is how easy it is to change. You can easily adjust it to create new Anti Inflammation Meals. Use what you have in your kitchen or fit it to your diet.

  • Vegetarian/Vegan: Use firm tofu or tempeh instead of chicken. Press the tofu well before you marinate it. This helps it soak up all the delicious flavor.
  • Spicy Kick: Add one teaspoon of chili garlic sauce to the marinade. A pinch of red pepper flakes also works. This gives the dish a nice, fiery element.
  • Citrus Burst: Use the zest and juice of an orange instead of lime juice. This creates a brighter, sweeter glaze. It is similar to popular Chinese-American dishes.

Beyond the Chicken: Extending the Anti-Inflammation Focus

Adding Anti Inflammation Recipes to your diet is a continuous, positive habit. This Honey Ginger Chicken is a wonderful place to start. But think about adding these other simple steps:

  • Breakfast Boost: Start your day with a bowl of oatmeal. Stir in a little turmeric and cinnamon.
  • Hydration: Drink water infused with ginger and lemon throughout the day.
  • Fats: Eat healthy fats often. These include avocados, walnuts, and fatty fish. They are full of anti-inflammatory omega-three fatty acids.

Conclusion: A Simple Path to Well-Nourished Eating

This Healthy Honey Ginger Chicken recipe shows that food made with intentional, natural ingredients can be very satisfying. It is also great for your health. By using the power of spices like turmeric and ginger, you are actively choosing better nutrition. You are adding more Anti Inflammation Meals to your life. Best of all, you never have to give up flavor. This meal will surely become a favorite. It is easy enough for a weeknight, but it is good enough to serve to guests. Enjoy the golden flavor and all the feel-good benefits.


Frequently Asked Questions (FAQ)

Q: Can I use ground ginger instead of fresh ginger?

A: Yes, you can, but we highly recommend the fresh kind. Fresh ginger offers a much brighter, stronger flavor. This flavor is essential for this recipe. If you absolutely must use ground ginger, use only one third of a teaspoon. The ground flavor is very strong.

Q: Is this recipe suitable for meal prepping?

A: Absolutely, yes. This Healthy Honey Ginger Chicken keeps very well in the refrigerator. It stays good for up to four days. It is perfect for preparing several healthy lunches or dinners for the week ahead. The sticky glaze will firm up slightly when cold. However, it reheats beautifully in the microwave or on the stovetop.

Q: Where can I find fresh turmeric root?

A: Fresh turmeric root is now easier to find. Look in the produce section of most specialty grocery stores. You might also find it at Asian markets. It is usually placed near the fresh ginger root. If you cannot find the root, using the powder is a perfectly good substitute.

Q: How do I know if the chicken is cooked all the way through?

A: The best way to check if your chicken is safe and cooked right is to use a meat thermometer. Put the thermometer into the thickest part of the chicken. Be careful to avoid hitting the bone. The chicken is done when the internal temperature reads one hundred and sixty-five degrees Fahrenheit.

Q: Can I add vegetables directly to the pan with the chicken?

A: Yes, you can! This is a great way to make this an easy, one-pan Anti Inflammation Meal. Add vegetables that cook quickly, like sliced bell peppers, snap peas, or chopped onions. Add them to the pan during the last ten minutes of cooking time. Make sure they get covered in the delicious glaze.


References


The Best Anti Inflammation Recipes Ever? (Seriously)

A vibrant, overhead shot of a healthy bowl of Vegetables With Ground Beef, brightly lit on a wooden table, emphasizing delicious and effective Anti Inflammation Recipes.

My journey to feeling better didn’t start with a magic pill; it started in my kitchen. Like many people, I was tired of feeling sluggish, dealing with unexplained aches, and wishing for more energy every day. I discovered the amazing power of food to either harm or heal, and that’s when everything changed. Now, I’m sharing the simple, effective Anti Inflammation Recipes like my favorite Vegetables With Ground Beef meal, which helped me transform my health, proving that good eating can be both easy and incredibly satisfying.


If you have ever felt like your body is fighting against you—maybe you have constant tiredness, sore joints, or tummy trouble—you might have chronic inflammation. This word is everywhere now, and there is a good reason why. Inflammation is the root cause of many common health issues today. The great news is that your best tool to fight inflammation is not a medicine; it is the food in your kitchen.

This is more than just a diet. Eating an anti-inflammatory diet is a new way of living. It focuses on giving your body nutrients that actively fight the cell stress that causes inflammation. We will talk about colorful, whole foods. These foods are rich in compounds that protect your body, healthy fats, and fiber.

The idea of changing your diet can feel huge, but anti-inflammatory cooking is actually simple, cheap, and, best of all, delicious. This article will show you how. We will focus on one of the most basic and satisfying meals you can make: Vegetables With Ground Beef. This powerful recipe, along with a full guide on how to add anti-inflammatory ideas to your daily life, will help you start feeling your best right away.


What is Anti-Inflammatory Eating?

Before we look at the recipe, let’s quickly talk about what anti-inflammatory eating really means.

Inflammation is a normal and necessary body reaction. It is how your body protects itself when you get hurt or sick. Think of the redness and swelling around a small cut. That is acute inflammation doing its job well. But when this reaction stays too long and becomes chronic, it starts to damage healthy body parts and cells. Chronic low-grade inflammation is often linked to things we do every day. This includes stress, not enough sleep, and, most importantly, eating bad food.

Anti-inflammatory eating is a plan to lower chronic inflammation. You do this by cutting back on foods that cause it. These include refined sugars, bad fats, and highly processed oils. You increase foods that fight it. These include colorful vegetables, oily fish, nuts, seeds, and special spices.

The Foods That Fight Inflammation Best

To succeed with Anti Inflammation Recipes, you need to know the most important ingredients:

  • Omega-3 Fatty Acids: You find these in oily fish (salmon, sardines), walnuts, and flaxseeds. These fats directly compete with the bad Omega-6 fats that cause inflammation. They are vital for cell health.
  • Antioxidants: You find these in dark colored fruits and vegetables (berries, dark green leaves). They stop free radicals. Free radicals are unstable molecules that damage cells and cause inflammation.
  • Polyphenols: You find these in turmeric, green tea, and cocoa. These are strong plant compounds that powerfully fight inflammation and protect your body.
  • Fiber: You find this in whole grains, beans, and vegetables. Fiber feeds the good bacteria in your gut. A healthy gut is essential for controlling how your body responds to inflammation.


Feature Recipe: Power-Packed Vegetables With Ground Beef

This recipe is a perfect example of a strong anti-inflammatory meal. It is a simple one-pan dish. And it brings together lean protein, a variety of colorful vegetables that fight inflammation, and strong spices. It is easy to change up, fast to make, and is great for leftovers.

Why the Ingredients Fight Inflammation

  • Ground Beef (Grass-Fed is Best): People often worry about red meat, but quality matters a lot. Grass-fed beef is leaner. It has a better balance of anti-inflammatory Omega-3s than beef fed mainly on grain. It also gives you lots of zinc and iron.
  • Broccoli: This vegetable has sulforaphane. This is a compound known for lowering inflammation and protecting against cell stress.
  • Spinach/Kale: These dark leafy greens are full of vitamins A, C, and K. They also have strong compounds that help control inflammation.
  • Turmeric: This golden spice contains curcumin. Curcumin is one of the most studied anti-inflammatory compounds we know of.
  • Garlic and Onions: These vegetables have sulfur compounds. These compounds make your immune system stronger and help control inflammation.
  • Olive Oil (Extra Virgin): This is a healthy fat rich in monounsaturated fats. It also has oleocanthal, a compound that fights inflammation in a way similar to ibuprofen.

Ingredients

  • 1 tablespoon Extra Virgin Olive Oil
  • A pound lean grass-fed Ground Beef
  • 1 medium yellow Onion, cut into small pieces
  • 4 cloves Garlic, cut into small pieces
  • 1 cup chopped Broccoli florets
  • A cup chopped Carrots
  • 1 Red Bell Pepper, cut into small pieces
  • A cup baby Spinach or chopped Kale
  • 1 teaspoon Ground Turmeric
  • 1/2 teaspoon Black Pepper
  • 1 teaspoon Dried Oregano
  • 1/2 teaspoon Sea Salt (add more if you need it)
  • 1/4 cup Bone Broth or Water (optional, to keep it moist)

How to Do It: The Anti-Inflammatory Cooking Method

This way of cooking is planned to give you the best flavor and the most nutrients. It also keeps the steps very simple.

Step 1: Start the Flavor

  1. Heat the Olive Oil in a large skillet or deep pan over medium heat.
  2. Add the chopped Onion. Cook for 5–7 minutes until it looks clear and is soft. (Anti-Inflammatory Benefit: Cooking slowly helps keep the good parts of the oil and onions safe.)
  3. Add the cut Garlic. Cook for just one more minute until you can smell it strongly. (Anti-Inflammatory Benefit: Garlic’s immune-boosting power comes out when you heat it gently.)

Step 2: Cook the Beef and Add Spices

  1. Add the Ground Beef to the pan. Break it up with a spoon. Cook until the meat is fully browned.
  2. Once the beef is browned, pour out any extra fat if you need to.
  3. Stir in the Turmeric, Black Pepper, Oregano, and Sea Salt. (Anti-Inflammatory Benefit: Black pepper is very important. It greatly increases how well your body can use curcumin, the powerful anti-inflammatory compound in turmeric.)

Step 3: Add the Crunchy Color

  1. Add the Carrots and Broccoli florets to the pan. Cook for 5–7 minutes. You want the vegetables to be a little soft but still slightly crunchy. This helps keep their nutrients.
  2. If the pan seems dry, add a small splash of Bone Broth or water. This also helps steam the harder vegetables.

Step 4: The Final Greens

  1. Stir in the chopped Red Bell Pepper and the Spinach or Kale.
  2. Cook for only 2–3 minutes. Stop when the spinach has shrunk down and the bell pepper is still a bit firm. You want to avoid cooking the greens too much. This helps them keep their maximum level of protective compounds.

Step 5: Serve and Boost

  1. Taste the food and add more salt or spices if you want.
  2. Serve right away. For an extra dose of Omega-3s and crunch, you can put a few chopped walnuts or flaxseeds on top of the bowl.


How to Do It: Eating Anti-Inflammatory Meals Every Day

Cooking one anti-inflammatory meal is a good start, but eating like this all the time is the real goal. Here is a ‘how to do it’ guide to make this way of eating easy to stick with.

1. Get the Right Plate Balance

When you plan your meals (breakfast, lunch, and dinner), try to make your plate balanced. This means hitting all the things that fight inflammation:

  • Half of the Plate is Vegetables: Eat a lot of different colors. More colors mean more types of protective compounds you are eating. Look for dark greens, reds, purples, and oranges.
  • One-Quarter of the Plate is Lean Protein: This helps you feel full. It also helps your muscles fix themselves and keeps your immune system strong. Eat chicken, turkey, fish, grass-fed beef (like in our main recipe), eggs, or beans.
  • One-Quarter of the Plate is Healthy Fats or Slow-Burning Carbs: Choose healthy, anti-inflammatory fats like avocados, nuts, seeds, and olive oil. Or, choose carbs with lots of fiber, such as quinoa, oats, brown rice, or sweet potatoes.

2. Use Your Spices Well

Your spice rack is full of concentrated power to fight inflammation. How to do it:

  • Turmeric Paste: Mix turmeric powder with some black pepper and a healthy fat (like coconut oil). This makes a paste. Add a spoonful of this paste to your soups, stews, or cooked eggs every day.
  • Ginger: Add fresh grated ginger to your fruit shakes, teas, or stir-fry dishes. Ginger has gingerols, which are powerful compounds that fight inflammation and protect your cells.
  • Cinnamon: Use this to help keep your blood sugar steady. Keeping blood sugar steady is important for controlling inflammation. Sprinkle it on your morning oats, coffee, or add it when you bake healthy food.
  • Herbs: Use fresh herbs like basil, rosemary, and thyme often. They have natural oils that protect your body.

3. Smart Snacking

Snacking is often where people struggle to eat healthy. How to do it: Stop eating processed snacks that cause inflammation. Start eating these anti-inflammatory snacks instead:

  • Nuts and Seeds: A small amount of walnuts, almonds, or chia seeds gives you Omega-3s, fiber, and vitamin E.
  • Berries and Yogurt: A mix of blueberries or raspberries with plain, unsweetened Greek yogurt. Berries have little sugar and are rich in special protective compounds called anthocyanins.
  • Vegetables and Hummus: Dip carrots, celery, or bell peppers into hummus. This is a satisfying snack with lots of fiber.


Sample Anti-Inflammatory Meal Plan

Eating different foods helps you stick to the plan for a long time. It also makes sure you get all the nutrients you need. Here are examples of easy Anti Inflammation Recipes to fill out your day:

MealFocus on Anti-Inflammatory FoodsExample Recipe
BreakfastFiber, Omega-3s, Protective CompoundsCooked oats topped with flaxseeds, blueberries, and a sprinkle of cinnamon.
LunchLean Protein, Dark Greens, Healthy FatsBig salad with grilled chicken or chickpeas, mixed green leaves, avocado, and dressing made with lemon juice and olive oil.
DinnerLean Protein, Many Colors, SpicesVegetables With Ground Beef (our main recipe) served over a small amount of quinoa or shredded cauliflower.
SnackHealthy Fats, FiberApple slices with nut butter, or a hard-boiled egg.

The Power of the Gut

A lot of inflammation starts in your gut. If your gut bacteria are not balanced (this is called dysbiosis), it can harm the gut lining. This lets molecules that cause inflammation get into your blood.

How to do it:

  • Eat Fermented Foods: Eat foods like kimchi, sauerkraut, yogurt with live bacteria, or kefir. These foods are full of good bacteria (probiotics) that help balance your gut.
  • Eat Foods with Prebiotics: Prebiotics are the food for your good gut bacteria. You find them in onions, garlic, asparagus, bananas, and oats. Our Vegetables With Ground Beef recipe uses onions and garlic for this very reason.

Why the Vegetables With Ground Beef Recipe Works So Well

This specific recipe is very powerful. It directly addresses many things that cause inflammation. At the same time, it gives your body the basic materials it needs to repair itself:

  1. It Has No Refined Sugar: Unlike many ready-made meals or take-out foods, this recipe has no sugar added. This helps keep your blood sugar levels steady, which is very important for managing inflammation.
  2. It is Packed with Nutrients: By combining lean protein, lots of colorful vegetables, and strong spices, you are giving your body a huge dose of vitamins, minerals, and plant nutrients in one simple dish.
  3. Its Good for Your Gut: The high amount of fiber from the broccoli, carrots, and spinach helps keep your gut healthy and full of many different kinds of good bacteria.
  4. It is Flexible: You can easily swap the beef for ground turkey, lentils, or tofu. You can also change the vegetables based on what you have or what is in season. This helps stop you from getting bored with eating well. You can add a little chili pepper for an extra kick that also helps your body fight inflammation.

Sticking With It: Tips for Success

Making this change needs effort, but the benefits—more energy, less pain, and better health—are worth the work.

  • Prepare Meals Ahead of Time: Cook large amounts of basic foods on a Sunday. Cook things like the Vegetables With Ground Beef mix, quinoa, or roasted root vegetables. Having healthy food ready means you will not grab easy, unhealthy, high-inflammation foods when you are busy.
  • Stay Hydrated: Drink plenty of water. Drinking enough water is necessary for every body process, including flushing out inflammatory waste.
  • Check Food Labels: You need to look carefully. Look for hidden sugars, bad fats (trans fats), and fake ingredients, especially in sauces, dressings, and packaged snacks. If you cannot understand an ingredient, it is usually best to avoid it. Try to eat whole foods that only have one ingredient as much as you can.

Embracing Anti Inflammation Recipes is not about taking food away. It is about eating a lot of good food. It is about choosing bright, nourishing foods that actively help your body, instead of hurting it. Start with this simple and filling Vegetables With Ground Beef recipe. You will quickly begin to feel the amazing power of food.


Frequently Asked Questions (FAQ)

Q: Does all red meat cause inflammation?

A: Not necessarily. The studies show that the kind of red meat you eat matters most. Highly processed meats (like hot dogs or cold cuts) often cause inflammation. Lean, grass-fed ground beef, like the kind in our recipe, is better for you. It has less fat overall and more Omega-3s compared to beef fed on grain. It can be part of a healthy diet if you do not eat too much of it.

Q: Can I use frozen vegetables for the Vegetables With Ground Beef recipe?

A: Yes, absolutely. Frozen vegetables are usually picked when they are at their best and quickly frozen. This means they keep most of their nutrients. You might need to cook them a bit longer than fresh vegetables to make sure they are fully heated.

Q: How fast will I see a change when I eat an anti-inflammatory diet?

A: This is different for everyone. Some people feel better digestion and have more energy within one or two weeks. For others, it might take many weeks or months to notice a difference in long-term problems like sore joints. Staying consistent is the key to seeing good results over time.

Q: What is the single biggest change I should make today?

A: Stop eating added sugar and processed vegetable oils (like soy, corn, and cottonseed oils). These two things are thought to be the strongest causes of chronic inflammation in modern food. If you use natural sweetness and healthy fats like olive oil and avocado oil instead, you will see an immediate and important benefit.

Q: Do I need to stop eating gluten on this diet?

A: Not everyone has to stop eating gluten completely. If you have celiac disease or a doctor says you are sensitive to gluten, then you must avoid it. For other people, the goal should be to choose whole grains with lots of fiber (like oats, brown rice, or quinoa) instead of foods made from refined white flour. Refined grains can cause blood sugar to spike and add to inflammation.


References


Recent Posts


You NEED This Turmeric Chicken Soup: Quick Anti-Inflammatory Fix!

A steaming, beautifully presented bowl of golden Turmeric Chicken Soup, garnished with fresh cilantro, on a rustic wooden table next to a spoon, highlighting its comforting and healthy appeal as a Turmeric Chicken Soup.

Like many of you, I used to think the only cure for feeling run down was coffee and a nap. I struggled with constant aches, bloating, and that general “blah” feeling. Then, I realized my diet was the key to change. I’m just a regular person who found huge relief and energy by focusing on simple, delicious, anti-inflammatory foods. Now, I’m sharing the secret weapon—a soul-soothing, golden soup—the Turmeric Chicken Soup that made the biggest difference in my journey back to health.


The Golden Remedy: Why Turmeric Chicken Soup Is Your Ultimate Anti-Inflammatory Meal

Do you want to feel truly healthy? We all do. And want aches and pains to disappear. We want endless energy. But modern life often gets in the way. Stress, processed foods, and being constantly busy can lead to chronic inflammation.

This silent issue is a root cause of many common health problems. It causes joint pain. And leads to digestive issues. It makes you feel fatigued and can even cause skin problems.

The great news is that fighting back is simple. You don’t need a complicated detox. You don’t need expensive supplements. Sometimes, the most powerful medicine is already in your kitchen.

It’s Turmeric Chicken Soup. This is more than just comfortable food. It is a powerful, science-backed drink that fights inflammation. It is simply disguised as a delicious dinner. This soup uses the powerful effects of turmeric. It also includes other healthy, dense nutrients. This makes the soup more than a cold remedy. It is a proactive defense system for your entire body.

In this guide, we will look closely at why this soup works so well. We will give you a detailed “how-to” with easy examples. We will show you exactly how to make this delicious meal a key part of your anti-inflammatory lifestyle.

I. The Science Behind the Golden Glow: Key Anti-Inflammatory Ingredients

This recipe works because its ingredients work together powerfully. This is especially true for the main ingredient: turmeric.

1. Turmeric (The Anti-Inflammatory Powerhouse)

The active substance in turmeric is curcumin. Curcumin is a natural plant chemical. It has strong anti-inflammatory effects that are proven by science. And works by targeting many steps in the body’s process of inflammation. It does this at the molecular level. And lowers the amount of inflammatory molecules the body produces (Aggarwal & Harikumar, 2009).

How to Do It: You must pair turmeric with black pepper to get the most benefit. Black pepper has a substance called piperine. Piperine helps your body absorb curcumin much better. It can increase absorption by up to 2000% (Shoba et al., 1998). Our recipe uses a generous amount of black pepper for the maximum health benefit.

2. Chicken Broth (The Gut Healer)

The soup base is very important. If you use bone broth, it is full of collagen and gelatin. It also has amino acids like proline and glycine. These substances are vital for repairing and protecting your gut lining. This gut lining is often called the “second brain.” A strong, healthy gut stops inflammatory particles from getting into your bloodstream.

How to Do It: Broth from the store is fine if you are in a rush. However, making your own bone broth is best. Simmer chicken bones slowly for 8 to 24 hours. This process creates the highest amount of healing compounds.

3. Garlic and Ginger (Immune Boosters)

Both garlic and ginger have natural substances. People have used them for a long time. Scientists also recognize their power. They fight inflammation and act as antioxidants. Ginger contains gingerols. These compounds can stop the creation of chemicals that cause inflammation (Grzanna et al., 2005).

How to Do It: Use plenty of garlic and ginger! Don’t be shy. Add them early when you cook (after softening the onions). This will infuse the oil. It builds a very strong flavor base.

4. Leafy Greens and Vegetables (Antioxidant Load)

Adding vegetables like spinach, kale, carrots, and celery is important. They provide essential vitamins, minerals, and antioxidants. These antioxidants help neutralize free radicals. Free radicals are a main cause of inflammation in the body.

How to Do It: Add greens that cook fast, like spinach or chopped kale, right at the end. Stir them until they just wilt. This simple step keeps their highest level of nutrients.

II. The Core Recipe: Turmeric Chicken Soup

This recipe is simple and strong. It aims for high anti-inflammatory benefits without losing any of the great taste.

Turmeric Chicken Soup

Prep Time: 15 minutes

Cook Time: 45 minutes

Servings: 6–8

Ingredients

CategoryIngredientQuantityNotes
ProteinChicken Breast or Thighs1.5 lbs (boneless, skinless)Can be pre-cooked and shredded
AromaticsYellow Onion, finely chopped1 large
AromaticsCarrots, sliced or diced3 medium
AromaticsCelery, sliced3 stalks
AromaticsFresh Garlic, minced4−6 cloves
AromaticsFresh Ginger, grated1 tablespoonUse more for extra potency
Anti-InflammatoryGround Turmeric Powder2 teaspoonsDo not skimp!
Anti-InflammatoryBlack Pepper, freshly ground1/2 teaspoonEssential for turmeric absorption
Liquid BaseChicken Broth (low sodium)8 cupsUse bone broth if possible
Flavor/FinishBay Leaves2
Flavor/FinishLemon Juice (freshly squeezed)2 tablespoonsBrightens flavor at the end
GreensBaby Spinach or Kale2 cups, packedOptional, for added nutrients
FatsOlive Oil or Coconut Oil2 tablespoonsFor sautéing aromatics
SeasoningSalt (to taste)

Instructions: How to Do It

  1. Prep the Foundation (Sautéing): Use a large pot or Dutch oven. Heat the olive oil over medium heat. Add the chopped onion, carrots, and celery. Cook gently for 5–7 minutes. The onions should become clear. The vegetables should start to soften. This step is called “sweating.” It builds a vital flavor base.
  2. Activate the Powers (Turmeric & Aromatics): Add the minced garlic and grated ginger. Cook for 1 minute until they smell fragrant. Now, add the ground turmeric and black pepper. This step is crucial. Stir quickly for about 30 seconds. The heat and fat (oil) will help wake up the curcumin in the turmeric.
    • Example: By adding the turmeric right into the oil, you create a rich paste. This paste spreads the color and flavor throughout the soup very well.
  3. Simmer and Infuse (Broth & Chicken): Pour in the chicken broth. Add the bay leaves and the chicken pieces. (The chicken can be raw or pre-cooked and shredded.) Bring the soup to a soft boil. Then, quickly lower the heat to a gentle simmer.
    • If using raw chicken: Cook, covered, for 20–25 minutes. The chicken is done when it reaches an internal temperature of 165∘F or 74∘C.
    • If using pre-cooked chicken: Simmer for 15–20 minutes. This lets the flavors mix together perfectly.
  4. Shred and Return (If Using Raw): Take the cooked chicken out of the pot very carefully. Put it on a cutting board. Shred the chicken using two forks. Put the shredded chicken back into the pot. Remove and throw away the bay leaves.
  5. Final Touches (Greens & Acid): Stir in the packed spinach or kale. Stir until the greens just wilt (about 1 minute). Take the pot off the heat. Stir in the fresh lemon juice. Season the soup with salt until it tastes perfect to you.
  6. Serve: Scoop the soup into bowls. Put fresh herbs on top (like parsley or cilantro). This adds a last burst of flavor and color.

III. Expanding the Anti-Inflammatory Recipes: Variations and Examples

The main recipe is already a powerhouse of nutrition. But you can easily change and improve your Turmeric Chicken Soup. You can make it fit your taste and diet needs. This will boost its anti-inflammatory power even more.

1. Boost the Antioxidant Load (More Veggies)

  • Sweet Potato/Butternut Squash: Add cubed sweet potatoes or squash in Step 1. They offer complex carbs and beta-carotene. Beta-carotene is a very strong antioxidant.
    • Example: Add 1 cup of peeled and cubed butternut squash along with the carrots and celery.
  • Mushrooms: Include 1 cup of sliced shiitake or cremini mushrooms. Some substances in mushrooms, like beta-glucans, help the immune system. They also help lower inflammation.

2. Make it a Full Meal (Grains and Fiber)

  • Lentils or Chickpeas: Add 1/2 cup of pre-cooked lentils or a can of rinsed chickpeas. Add these during the last 15 minutes of simmering. These foods add fiber. Fiber helps keep your gut bacteria healthy. A healthy gut is key to controlling inflammation.
  • Gluten-Free Grains: Stir in 1/2 cup of pre-cooked quinoa or brown rice at the end. This makes the soup more filling.

3. Spice it Up (For Targeted Relief)

  • Chili/Cayenne: Add a tiny bit of cayenne pepper. This adds some heat. It also contains capsaicin. Capsaicin can help lower the feeling of pain. Add this in Step 2.
  • Coconut Milk: For a soup that is richer and creamier, stir in 1/2 cup of full-fat coconut milk (make sure it is unsweetened). Do this near the end of cooking. Coconut milk adds healthy fats. These fats help your body absorb nutrients better. It also gives the soup a lovely, comforting texture.

IV. Making Turmeric Chicken Soup a Lifestyle

You need to be consistent when fighting long-term inflammation. This soup is perfect for cooking ahead of time. You will always have a quick, healing meal ready to go.

Meal Prep How-To

  1. Large Batch Cooking: Always make two or three times the amount of the recipe. The soup freezes well. The flavors taste even better the next day after sitting in the refrigerator.
  2. Storage:
    • Refrigeration: Once the soup is cool, store it in containers that seal tightly. It lasts for up to 4 days.
    • Freezing: Let the soup cool. Ladle it into containers that are safe for the freezer. You can also use large freezer bags. Lay them flat for easy stacking. You can freeze the soup for up to 3 months.
  3. The “Soup Shot” Example: Do you struggle with sharp, local pain? (Like a knee flare-up.) Keep a small jar of the thick broth (without the chicken or veggies) in the fridge. Heat a small amount. Drink it like a hot shot in the morning. This gives you a fast dose of anti-inflammatory relief.

V. Beyond the Bowl: Other Anti Inflammatory Recipes

Turmeric Chicken Soup is a great food. But you need to eat other Anti Inflammatory Recipes every day for a full health plan.

Quick Anti-Inflammatory Swaps

MealAnti-Inflammatory Recipe/SwapBenefit
BreakfastTurmeric SmoothieMix berries (high in antioxidants), spinach, almond milk, and 1/2 tsp of turmeric/pepper mix.
LunchSalmon SaladUse wild-caught salmon (full of Omega-3 fatty acids). Place it over mixed greens with an olive oil/lemon dressing.
SnackAvocado ToastUse whole-grain or sourdough bread. Top it with mashed avocado (healthy fats). Sprinkle with chili flakes.
DinnerRoasted VegetablesRoast broccoli, cauliflower, or Brussels sprouts in olive oil. These green veggies contain substances that reduce inflammation.

Choose these healthy, nutrient-rich meals often. Meals like our wonderful Turmeric Chicken Soup help you heal. You are taking charge of your health. You are moving toward better, lasting well-being.


Frequently Asked Questions (FAQ)

Q: How often should I eat Turmeric Chicken Soup to see benefits?

A: Everyone is different, so results will vary. However, many people who start eating anti-inflammatory foods notice better energy and less pain within two to four weeks. If you want to focus on healing, try to eat a bowl 3 to 4 times a week. This is especially helpful when you are stressed or feel sick.

Q: Can I use fresh turmeric root instead of powder?

A: Yes, absolutely! Fresh turmeric root is amazing. You will need to grate it into very small pieces. A good guide is to use about three times more fresh root than powder. For this recipe, use about 2 to 3 inches of grated root.

Q: I don’t eat chicken. Can this be a vegetarian Anti Inflammatory Recipe?

A: Yes, it can! You can make a vegetarian version. Replace the chicken with chickpeas, lentils, or firm tofu. Use a high-quality vegetable or mushroom broth. The main anti-inflammatory benefits come from the turmeric, ginger, garlic, and vegetables, which you still use.

Q: Does heating the turmeric destroy the curcumin?

A: Cooking gently, like simmering in this soup, does not harm the curcumin very much. In fact, cooking turmeric with fat (the oil) helps your body absorb it better. The most important thing is that you must always include the black pepper.

Q: What is the best type of oil to use for the highest anti-inflammatory benefit?

A: Extra Virgin Olive Oil (EVOO) is usually the best choice. It has many healthy fats and plant chemicals. These chemicals, like oleocanthal, have anti-inflammatory effects much like common pain relievers. Coconut oil is also a great choice because it contains healthy medium-chain fats.


References


Recent Posts


10 Reasons To Go On Vacation In A Tiny House

A modern, dark-wood tiny house with large windows sits nestled on a stone path next to a flowing river, backed by a dense pine forest and snow-capped mountains at sunrise, perfectly capturing a serene and isolated mountain Vacation spot.

In a world that often demands more—more space, more things, more complexity—finding a moment to just be can feel like a luxury. We’ve all felt the familiar drag of life’s endless to-do list, which is why a Vacation is essential. The next time you need to reset, consider shrinking your world, just for a little while. This is the simple secret behind the growing joy of a tiny house getaway.


Introduction

The tiny house movement has caught the attention of many people. It is not just a new way to live full-time, but also a fresh and very meaningful way to take a Vacation. Escaping the routine of our big, traditional lives does not need a huge resort or an expensive, high-maintenance villa. Instead, it often requires the opposite: a smart, perfectly sized space. This space helps you focus on the world outside and the people you are with.

A tiny house Vacation is your chance to try out a simpler, minimalist life. It is a time to step away from constantly buying things. It lets you lower your impact on the environment. You trade your large home’s cleaning tasks for extra time to watch the sunrise. Far from feeling cramped, a well-designed tiny home offers a deep sense of freedom. You are not just renting a space; you are choosing a way of thinking. This mindset focuses on important experiences instead of too many things.

The benefits of choosing a tiny house for your next trip are huge, from saving money to feeling closer to nature. What follows are 10 strong reasons why this small dwelling leads to a truly big adventure.


1. Reconnect with Nature and Yourself

One of the best and most immediate benefits of a tiny house Vacation is that you will be very close to nature. Hotels are often built in busy city areas. Tiny house rentals, however, are usually set in beautiful, quiet spots. These include forests, mountain hideaways, lakeside areas, or gentle meadows.

The careful design of most tiny homes makes this connection even stronger. They often have huge windows, folding doors, and big decks. These features make the line between the cozy inside and the great outdoors less clear. This means your living room view is always changing. The sound of birds is your morning alarm. And watching the stars is your evening entertainment.

This forced closeness to nature is a great cure for modern-day stress. It helps you take a real break from your screens. It encourages you to put down your phone and instead read a book, use a hiking map, or talk with your travel partner. This is more than just a change of view; it is a vital reset for your mind and feelings.

Example: Picture yourself waking up in a tiny house in the Scottish Highlands. A tall window next to your bed perfectly frames the misty mountains. You walk out onto a small wooden deck, and the only sound is the gentle wind. This feeling of being truly immersed in nature is a healing experience you cannot get in a standard hotel.


2. Save Money Right Away

For many people, the first reason they like the tiny house idea is the money they save. This benefit works perfectly for a Vacation. Renting a tiny house is almost always cheaper than booking a traditional hotel room or a big holiday rental of the same quality and unique style.

The lower cost of your stay frees up a lot of your budget. Instead of spending too much on expensive nightly rates, you can use that money for great activities. This might include a local cooking lesson, a guided fishing trip, great meals at local places, or just making your trip a few days longer. The tiny house makes high-quality travel affordable. It changes what ‘luxury’ means—it is not about the size; it is about great design and location for a much lower price.

How to do it: Budgeting Brilliance

  • Compare Prices: When you plan your trip, compare the cost of a nice tiny home in a good area (like near a National Park) with a regular-sized rental. You will often find the tiny house offers a more special, custom-built experience for less cash.
  • Use the Kitchen: Tiny houses almost always come with a small but full kitchen. Cooking just a few meals a day in your tiny home greatly cuts down on eating-out costs. This adds up to big savings throughout your Vacation.

3. Enjoy the Happiness of Simple Living

A tiny house shows you the best of smart design. It makes you live with only what you truly need. This limit is surprisingly freeing. When you only have space for a few outfits, a couple of books, and the basic items, the stress of clutter and endless choices disappears.

This simple living rule of “less is more” directly helps your mind during your Vacation. Less space means less time spent cleaning, organizing, or looking for lost things. It is a chance to live mindfully. You become very aware of every item you bring and use. This simplicity allows you to step off the continuous cycle of buying things. You can focus purely on relaxing, connecting with others, and exploring. The simple home leads to a simpler, calmer mind.


4. See Clever, High-Quality Design

Tiny houses are not just simple sheds; they are often amazing pieces of architecture. Since the space is small, every part is planned with great care. This leads to truly smart, high-quality, and often custom-made design details.

When you choose a tiny house for your Vacation, you often stay in a space with luxury finishes. These would be too costly to use in a regular-sized home. Think about custom-built cupboards, high-end taps and fittings, beautiful wooden parts, and clever ways to save space, like beds that fold into the wall or sliding walls. The experience is often special, unique, and deeply personal. It gives you a level of charm and skilled work that large hotel chains cannot match.

Example: Some tiny houses are converted shipping containers with cool, modern interiors. Others are handmade wooden cabins with a sleeping loft that has a skylight for perfect night-time viewing. This wide range of unique design makes choosing your rental an adventure on its own.


5. Take a Real Break from Screens

While many tiny house rentals offer Wi-Fi, more and more hosts are offering cabins made just for a break from screens. These often sit far from strong phone service, which encourages you to turn off your devices on purpose.

The tiny house setting perfectly supports this goal. Without the large rooms and endless TV channels of a hotel, your attention naturally moves to activities that do not involve screens. You might find yourself reading more, playing board games (often provided by the host), writing, drawing, or just having a talk without any interruptions. This intentional break from the digital world is likely the most helpful part of the Vacation for many tired, modern travelers.

How to do it: The Digital Detox Lockbox

  • Many tiny house retreats made for digital breaks offer a simple lockbox. The process is clear: when you arrive, put all your non-essential electronics (phones, laptops, tablets) into the box. Agree not to open it until you leave. This small step creates an immediate, strong barrier between you and your digital life. It makes sure you get the full benefits of the experience.

6. Keep Your Environmental Impact Small

If you care about the planet, a tiny house Vacation is a choice you can feel good about. Because they are so small, tiny homes naturally need much less material to build. They also use much less energy to heat and cool.

Many rental tiny houses go even further. They often have sustainable technology that gives you a true off-grid experience. These may include:

  • Solar Panels: These provide clean energy from the sun.
  • Composting Toilets: These greatly reduce the amount of water used.
  • Rainwater Systems: These collect water for uses like washing (not drinking).

Staying in such a space connects you clearly to sustainable living. You can enjoy a relaxing Vacation with a much smaller carbon footprint. This feeling of being a responsible traveler is a growing and important part of the modern getaway.


7. Enjoy Complete Privacy and Quiet

In a hotel, you share walls, hallways, and public areas with many other guests. A tiny house, however, gives you total and complete privacy. These units are usually placed on private land. They are often far apart from others in a small group, or completely alone in a remote spot.

This quiet and separation is ideal for a trip for two, a private place for serious creative work, or simply a calm space for people who need to recharge alone. You control your surroundings. You are free from the noise of neighbours or the need to talk with staff. The tiny house becomes your own private safe place in nature.

Example: Think about a tiny house set on a vineyard or a busy farm. Though the farm might welcome visitors, your tiny home is hidden away on a far corner of the land, looking out over the fields. You can watch the local work from a distance or go out to join in. All the while, you have a personal, private base to return to.


8. Try Out the Tiny House Lifestyle

Perhaps you have thought about moving to a smaller house, building your own tiny home, or making your life simpler. A tiny house Vacation offers the perfect, easy way to try this lifestyle for yourself. It is a practice run—a weekend test drive of a big life change.

This direct experience helps you answer practical questions before you commit long-term:

  • How does it feel to cook in a very small kitchen?
  • Are you okay climbing a ladder to get to a high bed?
  • Do you truly like the simple way of dealing with storage and living space?

By trying the tiny house life on your Vacation, you gain helpful knowledge. This makes sure that if you do decide to go tiny forever, you do so with confidence and clear thinking.


9. Get Closer to Local Communities

Tiny houses are generally located outside of the main tourist areas. This places you closer to real local communities and unique cultural experiences. This is very different from the common, less personal feeling of staying in a large corporate hotel.

Staying in a tiny house often means buying your food from a local farm stand. You can visit a small bakery or eat a meal at a local, favourite restaurant that is not a chain. Hosts often give personal suggestions. They share their inside knowledge of the best trails, hidden spots, and community events. This deeper look into the local culture makes your Vacation much richer than a regular tourist trip.

How to do it: Maximise Local Engagement

  • Ask Your Host: Before you arrive, email your host. Ask for their top three favourite local spots, such as cafes, hiking paths, or shops. These ideas are extremely helpful.
  • Visit a Farmer’s Market: Plan one of your tiny house meals around fresh food from a local market. This supports the people in the area and makes sure you are eating very fresh, seasonal food.

10. Start Creative Ideas and Focus Better

The small, focused environment of a tiny house is surprisingly good for creative thinking and deep work (if you need to work). Experts have noted that a few limits on your environment can actually improve focus and creativity. When everything has its place, and you are free from the distractions of a large, messy home, your mind has room to wander and create in a useful way.

Many tiny house rentals are sought out by writers, artists, and people who work remotely. They look for a calm, focused retreat. The peace of nature combined with the simple function of the home creates the perfect state of ‘flow’ for starting a creative project or enjoying a meaningful time of personal thought.


How to Book Your Tiny House Vacation

Booking a tiny house is easy now, thanks to specialized rental websites and booking platforms.

1. Finding the Perfect Tiny House

  • Special Platforms: Companies (both big and small) that only focus on tiny houses or off-grid experiences are great places to look first, as they offer carefully chosen options.
  • General Booking Sites: Major holiday rental websites now have sections for ‘Tiny House’ or ‘Cabin’. Use the search filter for ‘Unique Stays’ or ‘Tiny Homes’ to find what you need.

2. Key Things to Look For

  • Location: Decide what kind of nature you want: beach, forest, desert, or mountains. Search by the region or by the nearest National Park.
  • Things You Need: Be clear about your must-haves. Do you need Wi-Fi to work, a hot tub for luxury, or are you aiming for a fully off-grid trip (which means no electric plug-ins)?
  • Beds: Check the sleeping arrangements carefully. Tiny houses often have raised bedrooms reached by a ladder. Make sure this works for everyone in your group.

3. Getting Ready for Your Stay

  • Pack Light (Very Important): Space is tight. Pack only a few key outfits, items that have many uses (like travel soap), and only essential devices. You will be glad your bags are not blocking the floor.
  • Bring Fun Activities: Assume the Wi-Fi will be weak or non-existent. Pack physical books, a deck of cards, or a small board game.
  • Plan Simple Meals: Since storage and fridge space are small, plan simple meals. Buy groceries often and locally, instead of trying to buy a whole week’s worth of food at once.

FAQ

Q: Are tiny houses comfortable enough for a long Vacation?

A: Yes, they are. Modern tiny houses are designed to be comfortable and fully useful. They are small, but they have full bathrooms, comfy beds (often in a loft), temperature control, and kitchens with good equipment. The smart design means every space is used well, so you do not have to give up comfort.

Q: Can a family stay in a tiny house?

A: Many tiny houses are built for two people. However, more and more are being built to hold families. They often have two separate loft areas or one bed on the main floor and one loft. Always check the listing for the exact number of beds and how many people can stay. Look for tiny houses on wheels (THOWs) or custom-built tiny cabins, as they can have different layouts.

Q: What is the main difference between a tiny house and a cabin Vacation?

A: A tiny house is defined by its small size (usually under 400 square feet). It is also based on the idea of simple, efficient, and often sustainable living. A cabin might also be small, but it might not have the same level of smart architecture or focus on efficient, multi-use space and green technology that defines the tiny house movement. Tiny houses offer a focused, intentional experience of living small.

Q: Is it possible to go completely off-grid?

A: It is absolutely possible. Many tiny house rentals are made specifically for an off-grid experience. They use solar power, gas, and water collection systems. If you want a complete break from the electricity grid, look for words like “off-grid,” “digital detox,” or “solar powered” in the rental description. Be ready to use less power for items like hair dryers.


Reference Section


Recent Posts


Creating Museum-Quality Art at Home (No Skill Needed!)

A high-impact, minimalist textured canvas art piece in off-white hangs above a chic wooden console table in a bright, modern room. This elegant Art at Home piece showcases the beauty of DIY textured wall decor, complementing a black vase and books.

Like many people, I thought beautiful, statement-making Art at Home belonged only in expensive galleries. My own walls were often bare or covered in prints that felt lifeless. I struggled with decorating on a budget. Then I found simple ways to turn cheap materials into sophisticated DIY Wall Art and elegant Wall Hangings. This completely changed my home and my creative outlook. Now, I want to show you how you can achieve that same high-end look without any art experience.


Introduction: The Key to High-End Art

For centuries, people viewed art as a difficult skill. It needed special training and costly materials. But modern art movements, like Abstract Expressionism, proved something different. Impact comes from concept, texture, and size, not just technical skill.

The most beautiful art you see in design magazines looks complex, but it is often made using simple methods. This guide will make the process easy. We will turn intimidating projects into fun weekend activities. Are you looking for new Wall Hangings? Do you need easy DIY Wall Art ideas? Do you simply want to make sophisticated Art at Home? We will cover three easy techniques that guarantee stunning, museum-quality results.


Project 1: The Minimalist Sculptural Canvas

Contemporary high-end art often uses heavy texture, few colors, and a large size. This technique is surprisingly easy. It requires zero drawing or painting ability. The focus is completely on surface and dimension.

What You’ll Need (The Art at Home Toolkit)

  • Canvas: Pick a deep-edge canvas for a gallery style. For a big impact, choose a size of at least 24in×36in.
  • Joint Compound or Spackling Paste: This is cheap and found at any hardware store. It acts as your sculpting material.
  • Trowel, Palette Knife, or Old Credit Card: Use these tools for spreading the material and adding texture.
  • Acrylic Paint (Optional): Use matte white, beige, or a deep charcoal for a sleek finish.
  • Caulk Gun and Caulk (Optional): Use this for creating raised, controlled lines.

How To Do It: Creating Abstract Texture

Step 1: Prepare Your Space

Place your canvas flat on a surface you can protect. You can apply a layer of primer, but for textured art, you can often start right on the raw canvas.

Step 2: Add the Base Layer of Texture

Use a large trowel or palette knife. Scoop up a lot of the joint compound. Start spreading an uneven, thick layer across the canvas. Do not try to make it perfect. Variation and randomness are your goals. Push the compound around. Create high spots and low areas.

Step 3: Adding Controlled Detail (Optional)

You can create a sculptural effect that is popular in modern DIY Wall Art. Load your caulk gun with clear or white caulk. Slowly and carefully, draw straight lines, curves, or simple geometric shapes onto the wet compound. These shapes will look very dramatic once the piece dries.

Image Placement 2: Process Shot

Step 4: The Final Swipe

Take a long, flat object, like a piece of cardboard or a ruler. Drag it lightly over the surface. This will flatten some high spots. It will also leave deep channels and ridges. This mimics a professional method called impasto. The finished surface will catch light beautifully. This gives it that expensive, museum-worthy finish.

Step 5: Drying and Finishing

Let the compound dry completely. This might take 24 to 48 hours, depending on how thick it is. Once it is dry, you have two choices. You can leave it the natural color (usually matte white). This is the truly minimalist look. Or, you can paint it a single, sophisticated color using matte acrylic paint.


Project 2: Abstract Watercolor Bleeding (High-Contrast Art)

Maybe you do not like texture. If so, the drama of high-contrast color bleeding is an easy way to create sophisticated Abstract Expressionist Art at Home. With this method, the material does the hard work. The resulting pieces look complicated but are actually simple to make.

What You’ll Need

  • Watercolor Paper or Bristol Board: Choose a heavy kind, 140lb or more. This stops the paper from bending or buckling.
  • Liquid Watercolor Ink or Acrylic Ink: Use highly pigmented liquid colors for the best “bleed” effect. Only use 2 to 3 colors that look good together (for example, Prussian Blue, Burnt Sienna, and Gold).
  • Spray Bottle: Fill this with plain water.
  • Large Flat Brush: Use this to wet the paper.
  • Eye Droppers or Small Pipettes: Use these for precise control when adding ink.

How To Do It: Controlled Flow and Contrast

Step 1: Prepare the Paper

Tape your paper down to a stiff backing board with painter’s tape. This stops it from warping. You can also just work on a very flat, protected table. Use the large flat brush. Completely soak the area where you plan to add the color. The paper must be very wet, not just damp. This is essential for letting the colors flow.

Step 2: Dropping the Color

Fill your pipette or dropper with one color. Hold the dropper close to the paper. Drop small, concentrated spots of ink onto the wet surface. Watch as the water immediately pushes the pigment outward. This creates beautiful, unpredictable bursts of color.

Step 3: Adding the Second Color

Let the first color settle for a moment. Then, add your second color. Drop it near, but not directly on the first color pool. The inks will meet and mix at the edges. This creates a soft transition, like a natural gradient. A brush cannot easily copy this effect.

Step 4: Activating the Flow

Pick up the paper and gently tilt it. Let gravity pull the colors into controlled streaks. Or, use the spray bottle. Lightly mist water right onto the color pools. This will make the colors bleed and blur even more. The less you touch it with a brush, the more natural and professional the result will look.

Step 5: Framing for Impact

Once it is dry, put it in a simple, museum-style frame. A thin profile in black or natural wood, plus a wide, white mat, will improve the look instantly. This turns your abstract study into true museum-quality art at home.


Project 3: The Oversized Textile Wall Hanging

Not all high-end DIY Wall Art needs a frame. Large Wall Hangings made of fabric are a great way to add warmth, texture, and quiet to a room. This is a very good approach for making a centerpiece above a couch or a bed.

What You’ll Need

  • Fabric: Choose a heavy, textured fabric. Good options are raw canvas, linen, duck cloth, or a thick cotton drop cloth. Use a natural, plain color for the most sophisticated feel.
  • Dye or Fabric Paint (Optional): You can create a soft, dipped color effect with fabric dye.
  • Wood Dowel or Branch: You will use this to hang the fabric. The dowel should be a little wider than your fabric.
  • Twine or Rope: Use this for hanging the textile.
  • Sewing Machine or Fabric Glue: Use this to create a simple sleeve for the dowel.

How To Do It: Simple, Large Textile Art

Step 1: Prepare the Fabric

Cut your fabric to the size you want. A long, narrow piece often looks best for a modern Wall Hanging. For example, 3ft wide by 5ft tall. Finish the raw edges. You can use a sewing machine or strong fabric glue to make a clean hem.

Step 2: The Hanging Sleeve

Fold the top edge of the fabric over by about 2in. Sew or glue it down to make a sleeve, also called a casing. Make sure the dowel can slide through this sleeve easily.

Step 3: Applying Texture (The Shibori Method)

A subtle pattern improves the look. This step is optional. The Japanese shibori method (a type of tie-dye) works very well. Scrunch or fold a section of the fabric. Secure it tightly using rubber bands. Dip only the bottom half of the fabric into a bucket of diluted fabric dye. When the fabric dries and you remove the ties, you will see soft, organic patterns. This makes the Art at Home piece look high-concept.

Step 4: Put It Together

Slide your wood dowel or natural branch through the sleeve at the top. Tie a length of strong twine or rope to both ends of the dowel. Your large, museum-worthy Wall Hanging is now ready to mount on the wall.


Key Principles for Museum-Quality DIY Wall Art

The success of your DIY Wall Art is less about skill. It is more about using four main design principles:

1. The Power of Size

A small piece of art on a large wall looks out of place. A large piece of art on any wall makes a statement. To get that gallery look, always choose a size bigger than you think you need. A piece that fills two-thirds of the empty wall space will look more important and more expensive.

2. Focus on Texture

Texture makes everything equal. If you use few colors (like shades of white, black, or grey), the viewer will focus on the three-dimensional surface. This is why joint compound or thick textiles work so well. They add depth that a flat print cannot offer.

3. Use Few Colors

Professional galleries often display art that uses a simple, limited color plan. Stick to one, two, or maybe three colors at most. Choose colors that are muted, like earthy tones, or use strong neutral colors. This keeps the focus on the form and texture. It creates a refined, curated feeling.

4. Professional Display

Do not forget how important the frame and the hanging method are.

  • Framing: Choose frames with thin, clean lines. Use black, white, or natural wood. For prints, use a mat that is very wide. This creates “negative space,” a trick used by professional galleries.
  • Hanging: Make sure your Wall Hangings or framed art are hung at eye level. The middle of the artwork should be about 57in from the floor.

Expanding Your Collection: More Art at Home Ideas

Idea 1: The Magazine Collage (Clean Minimalism)

How To Do It: Find pages from fashion or architecture magazines. Look for large areas of color, black and white images, or interesting text. Cut these into simple geometric shapes. Carefully arrange them onto a board or a canvas. Seal the whole surface using only matte Mod Podge. The precise layering and clean cuts create a sharp, graphic style. This often looks like early 20th century abstract art.

Idea 2: Line Drawing on Linen

How To Do It: Buy a piece of raw, unbleached linen or drop cloth. Stretch it over a wood frame. Use a thick black paint pen or a permanent marker. Draw a single, continuous, slightly imperfect line. Draw a simple figure, face, or landscape. The natural feel of the linen combined with the single, bold line creates a very modern, gallery-worthy piece of Art at Home.

Idea 3: Shadow Box Assemblage (Wall Hangings from Found Objects)

How To Do It: Find an old shadow box or a deep picture frame. Collect small objects that are all the same color (for example, all white, all rusty metal, or all natural wood pieces). Glue them inside the shadow box. Use strong glue. Create a repeating pattern or an abstract scene. This turns simple found items into a 3D Wall Hanging. It adds depth and interest to your space.


Frequently Asked Questions (FAQ)

What is the cheapest material for large-scale DIY Wall Art?

The cheapest and most useful material is a simple cotton painter’s drop cloth. They come in very large sizes. They have a beautiful natural texture. You can use them as a canvas for the sculptural project or as the fabric base for Wall Hangings. You can usually find one big enough for a small wall for less than the cost of one store-bought print.

Do I truly need ‘no skill’ to make the sculptural canvas?

Yes, that is true. The sculptural canvas works because the texture is meant to be uneven and random. There is no correct or incorrect way to spread the joint compound. Your “mistakes” are what give the art its unique look and depth. This mimics the expressive style of professional abstract art. It is the perfect DIY Wall Art project for anyone starting out.

How can I protect the finished surface of my DIY art?

For painted pieces (ink or acrylic), spray a final layer of matte or satin varnish. This will seal the surface. It protects it from dust and keeps the color from fading. For the sculptural joint compound art, spray a clear matte topcoat after it is fully dry. This prevents the surface from getting scuffed.

What is the best way to hang large, heavy DIY Wall Art?

Always use two separate picture hooks or D-rings. Place them about one-third of the way down from the top edge on the back of the piece. This makes sure the weight is spread out evenly. It also stops the piece from tilting. For very large Wall Hangings or canvases, use wall anchors if you cannot find wall studs.


References


Dream Backyard Landscaping Ideas That Will Blow Your Mind

A breathtaking, multi-level backyard landscape featuring a pool, a fire pit area with built-in seating, and a dining pergola covered in flowering vines, all bathed in warm, soft sunlight. This is a stunning example of luxury Backyard Landscaping design.

Hey there, fellow dreamers and garden lovers! Like many, I’ve spent lots of time looking at pictures, wishing for a backyard that feels like a peaceful spot just for me. My journey to change outdoor spaces started with a small, boring patch of grass and a big dream. Through trying, learning a lot about Backyard Landscaping, and loving the process of making beautiful, useful spaces, I’ve found the ways to turn those amazing ideas into real places. Join me as we explore how to plan the backyard of your dreams, one inspiring idea at a time!


Do you feel tired of looking at a plain green area? Do you wish for a backyard that is fun and relaxing, instead of feeling like work? Many people feel this way. Our backyards are part of our homes. They are a space ready to be changed into a peaceful outdoor haven. This is where you can make memories, find peace, and enjoy nature. Do not worry. Making a dream backyard landscaping plan does not need a huge budget. It also does not need a team of experts. With a few good ideas, smart planning, and some hard work, you can build a wonderful and real outdoor paradise. This space will truly amaze you.

This full guide will show you fresh backyard landscaping ideas. It will give you easy “how-to” advice. It will also tell you about being sustainable. This makes sure your outdoor space is kind to the planet and also very beautiful. Get ready to use all the potential of your yard!

Defining Your Dream: What Does “Amazing” Mean to You?

Before we look at specific designs, take a minute to think about your perfect outdoor space. Is it a lively spot for parties? And is it a quiet garden for thinking? Is it a play area for children and pets? Or is it a garden that grows food? Knowing what you care about most and how you live is the first key step. It is key for any successful backyard landscaping project.

Think about these things:

  • Purpose: Do you want to host, relax, garden, play, or eat?
  • Style: Do you like modern, rustic, simple, or tropical looks?
  • Time for Upkeep: How much time will you spend taking care of it?
  • Budget: Be real about how much money you can spend.
  • Weather and Land: What plants grow well where you live? What natural features does your yard have?

Once you know what you want, the fun part starts.

Section 1: Making Zones for Great Use and Easy Flow

A very effective backyard landscaping trick is to make separate “zones” in your yard. This makes the space seem bigger and much more useful. Think of it like making different rooms in your house, but outside.

Idea 1: The Outdoor Living Room – Comfort Outside

Bring your indoor comfort to the outdoors. An outdoor living room is a set area for sitting, reading, and casual get-togethers.

How to Do It:

  1. Mark the Space: Use paving stones, a wood deck, or a large outdoor rug to show the edges of this area. A cover like a pergola or a big umbrella can give shade. It also helps define the “ceiling.”
  2. Soft Seating: Buy tough, weather-proof sofas, chairs, and footrests with soft cushions. Outdoor throw pillows and blankets make it feel extra cozy.
  3. Feeling and Light: Use string lights, lamps, and maybe an outdoor fireplace or fire pit. This adds warmth and light at night. A small, easy-to-move outdoor speaker can play music for the right mood.
  4. Mixing in Plants: Use large plants in pots, hanging baskets, or raised garden beds around the edges. This makes the space softer. It connects the spot with the natural yard.

Idea 2: The Outdoor Dining Spot – Eating Outside

Why eat inside? You can eat under the stars or in the warm afternoon sun. A special place for dining makes every meal better.

How to Do It:

  1. Where to Put It: Pick a spot that is easy to reach from the kitchen. Keep it away from paths where people walk a lot. Think about morning sun for breakfast or evening shade for dinner.
  2. Strong Base: A patio made of natural stone, concrete, or a strong wood deck gives a firm spot for your dining set.
  3. Dining Set: Choose strong, weather-safe furniture. Make sure it fits your overall backyard style. Tables that can be made longer are great for guests.
  4. Shade and Light: A big patio umbrella, a roll-out cover, or a pergola with climbing plants (like wisteria) gives needed shade. Put in outdoor lights like wall lamps, hanging lights, or focused spotlights for eating at night.

Section 2: Adding Water Features for Calm and Sound

Not many things add as much calm and beauty to backyard landscaping as water features. The gentle sound of water running can hide city noise. It makes a very peaceful feeling.

Idea 3: Still Ponds and Fountains – Quiet Look and Sound

Whether it is a still pond that shows the sky or a bubbly fountain, water is lovely to watch.

How to Do It:

  1. Pond Spot: Choose a spot that is fairly flat. It should get some sun. Do not put it under trees that lose their leaves (to keep the leaves out). Dig the shape of the pond. Line it with a special pond liner. Add the right filter system.
  2. Water Plants: Use water plants like lilies, irises, and tall grasses. These make it look nice and help clean the water naturally.
  3. Fountain Setup: Many fountains that stand alone are simple to put in. Just place them, fill them, and plug them in. For bigger, custom fountains, make sure the water pipes and electricity are set up right.
  4. Lighting: Lights under the water in ponds or bright lights aimed at fountains can look magical when it is dark.

Idea 4: Winding Stream or Waterfall – Nature’s Music

For a more real feel, a small stream or waterfall that cycles the water can look like a natural scene.

How to Do It:

  1. Plan the Path: Use a garden hose to mark the way your stream or waterfall will go. Think about height changes to make natural drops.
  2. Lining and Rocks: Dig out the path. Line it with pond liner. Place different sizes of rocks and pebbles carefully. This makes it look like real small rapids and pools.
  3. Pump System: A pump placed in the lowest part of the stream pushes water back up to the highest point. This makes the water flow all the time.
  4. Planting: Plant plants that love water, like ferns and hostas, along the sides. This helps connect the water feature to the rest of the yard landscaping.

Section 3: Sustainable Backyard Landscaping and Green Choices

A truly amazing backyard is not just pretty. It is also good for the earth. Making sustainability part of your yard landscaping makes your space healthier. It helps the planet, too. This means using less water, helping local plants and animals, and making less waste.

Idea 5: Dry Landscaping and Low-Water Gardens – Beauty with Less Water

Dry landscaping, or xeriscaping, uses plants that need very little water. This is great for simple backyard ideas and saving this precious resource.

How to Do It:

  1. Smart Plan: Put plants that need the same amount of water together. Make low spots or rain gardens to catch and soak up rainwater.
  2. Better Soil: Mix in natural materials to the soil. This helps the soil hold water better.
  3. Right Plants: Pick native plants that are used to your local weather. Find plants that need little water. These include types of cacti, lavender, and many tall grasses.
  4. Use Mulch, Always Use Mulch: Put a thick layer of natural mulch (wood chips, leaves) around plants. This stops weeds. It keeps the soil wet. It also keeps the soil temperature steady.

Idea 6: Bee Gardens and Native Plants – Helping Local Nature

Invite useful insects, birds, and butterflies to your yard. Plant native species. Make a friendly place for these tiny helpers.

How to Do It:

  1. Find Native Plants: Ask local plant shops for a list of plants that grow naturally in your area. These plants work best with your weather and soil. They give food and shelter for local animals.
  2. Have Many Kinds: Plant a wide mix of flowers. Make sure they bloom at different times of the year. This gives food all year long.
  3. No Bug Killers: Use natural ways to control pests. This keeps the helpful insects safe.
  4. Water Source: A shallow bird bath or a small water area gives a place for wildlife to drink.

Section 4: Making the Most of Small Areas and Simple Backyard Ideas

Even the smallest yard can become a great haven. Simple backyard ideas focus on smart plans, items that do more than one thing, and growing plants vertically. This uses the small space in the best way.

Idea 7: Vertical Gardens and Living Walls – Grow Up, Not Out

When you do not have much room on the ground, grow up! Walls of plants look amazing. They can even grow food for you.

How to Do It:

  1. Pick Your System: You have choices. These range from simple stacked planters and hanging pockets to fancy wall systems with built-in watering.
  2. Check Sunlight: Pick plants that can handle the light on your vertical wall. Small cacti, ferns, herbs, and small yearly flowers are popular choices.
  3. Install It: Attach your vertical garden safely to a strong fence, wall, or stand-alone frame. Make sure water can drain out properly.

Idea 8: Small Fire Pits and Seating – Cozy Spots

A fire pit is a great spot to gather. Even small yards can fit one.

How to Do It:

  1. Be Safe First: Make sure your fire pit is far away from buildings, low branches, and anything that can burn. Check the rules in your area.
  2. Size and Type: For simple backyard ideas, think about a metal fire bowl you can move. Or try a small, ready-made stone fire pit kit.
  3. Built-in Seats: Do not use big chairs. Think about making seats that are part of the structure around the fire pit. This saves room. It can also act as a low wall if you plan it well.

Section 5: The “How-To” Basics for Your Dream Backyard Landscaping

To make these ideas happen, you need some basic skills and knowledge.

Planning and Design (The Map for Success)

  1. Study Your Land: Know the special details of your yard. Note the sunlight during the day, existing trees or structures, soil type, water drainage problems, and the common wind direction.
  2. Draw a Plan: Draw a map of your yard to scale. Try out different ways to place your zones, paths, and main features. This is where your backyard landscaping vision becomes clear.
  3. Choose Plants: Look up plants that work well in your weather (hardiness zone). Consider their need for sun, soil type, and how big they will get. Think about how they look all year long. Also, remember sustainability. Choose native types when you can.
  4. Pick Materials: Think about paving stones, gravel, wood, stone, and other decorations. These items add a lot to the look and feel of the space.

Execution and Setup (Getting Your Hands Dirty)

  1. Clear the Area: Take out unwanted weeds, trash, and old structures.
  2. Leveling and Drainage: Make sure the ground slopes correctly, away from your house. Fix any standing water issues with special drains or by changing the slope of the ground.
  3. Do Hardscaping First: Put in patios, paths, walls, and large water features before you plant. This protects the newly planted areas from damage.
  4. Get the Soil Ready: Mix in compost and other natural matter to your soil. This gives your plants a healthy base.
  5. Planting: Dig holes that are twice as wide as the plant’s root ball. Water them well after planting. Remember how big plants will grow so they do not get too crowded.
  6. Watering System: Think about putting in drip lines or soaker hoses. These are efficient for watering and good for sustainability efforts.
  7. Mulch: Put a layer of natural mulch, 2 to 4 inches thick, around all your plants. This keeps water in, stops weeds, and makes the soil better over time. This is a very important step for healthy yard landscaping.
  8. Lighting: Put in outdoor lights for safety. Use them to show off your beautiful features after the sun goes down.

Section 6: Adding the Final Touches – Making Your Yard Landscaping Great

The small details are what truly make a backyard “mind-blowing.”

Idea 9: Smart Lighting Plans – Setting the Mood

Lighting does more than just help you see. It completely changes the look and feel of the space.

How to Do It:

  1. Use Different Lights: Mix work lights (for cooking), accent lights (to show off features), and ambient lights (for a general glow).
  2. LED Lights: Use LED lights. They save energy and last a long time, which is great for sustainability.
  3. Timers and Sensors: Put in timers or motion sensors. This makes it easy to use and saves energy.
  4. Path Lights: Help guests walk safely with soft lights along your walkways.

Idea 10: Art and Decor – Showing Your Style

Just like inside your home, outdoor art and decorations add your own touch.

How to Do It:

  1. Garden Art: Choose art that can handle the weather and matches your style.
  2. Outdoor Rugs and Pillows: Add color and texture to your sitting areas.
  3. Wind Chimes: Bring gentle sounds into your space.
  4. Bird Feeders and Houses: Welcome birds and add a bit of living nature to your yard.

Conclusion: Your Dream Yard Is Ready

Changing your backyard into a truly amazing place is a mix of being creative, planning well, and working with your hands. Use these great but real backyard landscaping ideas. Make useful zones. Add calm water features. Focus on sustainability. Make the most of even the smallest areas. By doing this, you can create an outdoor place that shows your style. It will make your life better. Always remember, your yard is your own special canvas. Be bold with your dreams, get inspired, and enjoy the great journey of making your vision come to life. Happy yard landscaping!


Frequently Asked Questions (FAQ)

Q1: What is the price to landscape a backyard completely?

A1: The price changes a lot. It depends on the size, how complex the plan is, the materials you use, and if you do the work yourself or hire experts. Simple backyard ideas, mostly done by you with basic plants, might cost a few hundred dollars. More detailed plans with a lot of hardscaping, special features, and professional work can easily cost many thousands of dollars. Start with a budget and pick the most important things first.

Q2: What are some good, easy-to-care-for plants for backyard landscaping?

A2: There are many choices! Look at native plants. They need less help once they are growing well. Also consider ornamental grasses, small cacti, lavender, coneflowers, and certain bushes. A thick layer of mulch also means less work for you.

Q3: Can I really do large backyard landscaping projects myself, or do I need a professional?

A3: Yes, you can! Many parts of yard landscaping are easy to do yourself, as long as you plan well and are patient. Hardscaping like laying stones or building a deck can be harder. But skilled people can do it. For very complex tasks, like a lot of ground leveling, big water features, or tricky electric work, it is helpful to ask a professional for advice.

Q4: How important is sustainability in backyard landscaping?

A4: Sustainability is very important. It reduces your impact on the environment. And saves resources, especially water. It helps local wildlife. It can even make your bills lower. Using dry-landscaping methods, native plants, composting, and smart watering makes your backyard healthier and stronger.

Q5: What are some simple backyard ideas for someone with a small yard?

A5: For small yards, focus on vertical growth (walls of plants, stacked planters). Use furniture that has more than one purpose (benches with storage). Create cozy spots with small fire pits. Use light colors to make the area seem bigger. Choose plants carefully (small types of trees or bushes). Every little bit of space is important!


References


Recent Posts


Maximize Your Mini-Space: The Ultimate Small Backyard Landscaping Reveal

A beautifully designed small backyard with a living wall, fire pit, and defined seating areas, showcasing effective Small Backyard Landscaping.

Like many homeowners, I’ve faced the dilemma of looking at a tiny outdoor space and wondering if it’s even worth the effort to landscape. For years, my own small yard felt more like an afterthought than a functional extension of my home. But necessity truly is the mother of invention, and I eventually learned that limited space simply demands more creative, focused Small backyard landscaping design. Now, I’m excited to share the strategies that turned my cramped corner into an inspiring, multi-functional oasis, proving that any small backyard can be a magnificent retreat.


The modern home often comes with a modern challenge. This challenge is a decidedly un-modern-sized backyard. Your outdoor area may feel more like a small patio than a lush yard. If so, you are not alone. The dream of a large garden, an expansive lawn, or an outdoor kitchen often seems impossible. This is true when you face limited square footage.

However, the size of your yard does not control the scope of your vision. Small Backyard Landscaping is not about reducing your ideas. Instead, it is about making them bigger and better. It is a precise design focus. It aims to maximize every vertical inch and horizontal foot. This turns limits into chances for creativity. By using smart design rules, you can change a neglected patch into a useful, beautiful, and highly personalized outdoor room.

This full guide will walk you through the core concepts. It includes practical examples and step-by-step instructions. These steps will help you achieve the ultimate small backyard reveal. We will focus on new, sustainable design and powerful yard landscaping techniques.

I. Change Your Mindset: Design for Scale, Not Size

The first step for any successful Small Backyard Landscaping project is to change how you look at the space. Think of your small space not as a tiny yard. Think of it as an outdoor room. Every room—indoor or out—needs a clear purpose.

How to Do It: Define Your Zones

Before you buy any plants or paving stones, decide what your yard needs to do.

  1. Prioritize: You likely cannot fit a full dining set, a fire pit, and a large vegetable garden. Choose one or two main functions. Do you need a private reading corner? Do you need an outdoor dining space for two? Or maybe you need a play area for a small pet?
  2. Sketch it Out: Create a simple top-down sketch of your yard. Use a ruler to help you imagine the size of things. Mark off the areas you want. For example, mark “Dining Area,” “Relaxation Nook,” and “Vertical Garden.” Even a small yard can hold two separate zones if you separate them smartly.
  3. Use Psychological Tricks: Larger pavers or decking planks can trick your eyes. They make you think the space is bigger. Laying them in a diagonal pattern is one of the oldest simple backyard ideas. This method creates the illusion of depth.

II. Maximize Vertical Space: Use the Power of the Wall

In small yards, the ground area is precious. The key to great yard landscaping here is to look up. Vertical gardening is one of the most effective and sustainable ways to add plants and function. It does this without sacrificing any floor space.

How to Do It: Vertical Solutions

  • Living Walls and Trellises: Put up a simple trellis against a fence or wall. Use it for climbing plants like clematis, jasmine, or edible grapes. This adds visual appeal. It also hides ugly boundaries. For a more modern look, build a system of small planters. Bolt them right onto the wall to create a living green wall.
  • Tiered Shelving: You can reuse old wooden pallets. Or you can buy slim, tiered plant stands. These stands can hold a variety of herbs, succulents, or flowers. This creates a focused spot that makes the eye move up.
  • Tool Storage and Function: Vertical space is not just for plants. Use wall-mounted hooks and shelving to store your gardening tools. You can also store lighting or even a fold-down table. This makes your design functional.

Example: The Culinary Wall

A great example of vertical Small Backyard Landscaping is making a “culinary wall.” Use hanging baskets or pocket planters to grow herbs like mint, basil, and rosemary. You can also grow small vegetables like strawberries and cherry tomatoes. This turns a plain wall into a fragrant, useful, and good-looking centerpiece. It perfectly shows off simple backyard ideas.

III. Hardscaping for Flow and Function

Hardscaping is the non-living part of your yard. This includes things like paving, walls, and decking. It is the structure that holds up your plants (softscaping). In a small space, the right hardscaping can mark paths. It can also create the look of a larger area.

How to Do It: Strategic Hardscaping

  • Minimal Materials: Stick to just one or two main materials for your hardscaping. Too many textures and colors can make the space feel busy and small. A single, continuous surface makes the space feel larger and better put together. Use either decking or stone pavers.
  • Curved Lines: Straight lines are neat, but gentle curves can make the space look longer. Even a short winding path suggests a journey. It makes the yard feel deeper than it really is.
  • Multi-Purpose Furniture: Buy furniture that can do more than one thing. A built-in bench, for example, gives you a place to sit. It can also be used for storing cushions or garden supplies. This is a smart move for efficient Small Backyard Landscaping.

Example: The Floating Deck

Do not pour a large concrete slab. Instead, think about building a small, raised “floating” deck in one corner. This small change in height quietly separates the yard into a lounge area. Install low-voltage LED strip lighting under the deck. This creates a soft light. It makes the deck seem to float. This adds a modern, roomy feel to your yard landscaping.

IV. Smart Softscaping: Picking Plants for Limited Space

When choosing plants for your small yard, focus on quality over quantity. Every plant must be worth the space it takes. Choose plants that look good across multiple seasons. They should have good shape and stay a manageable size. This focus on careful choice is a key part of sustainability. Planning well reduces waste. It also reduces the need to replace plants often.

How to Do It: Plant Selection

  • Use Texture and Shape: Put plants with large leaves next to plants with fine textures. Examples are hostas next to ferns or grasses. The difference in texture adds visual depth and richness. This is a classic simple backyard idea used by all designers.
  • Container Gardening is Essential: Use nice, well-chosen planters instead of digging big garden beds. Containers allow you to move plants easily. You can adapt them for different seasons or needs. Use large containers. They should be at least 15 to 20 inches wide. Use them as focal points. Small pots create clutter. A few large ones create a strong impact.
  • Vertical Focus Trees: Choose thin, column-shaped trees. Look for small types of juniper or ornamental pears. Use these instead of wide, spreading varieties. They give you the height and shade of a tree. They do this without using up your important ground area.

Example: The Rule of Three

Use a design rule called the “Thriller, Filler, Spiller” when planting in a container or small bed.

  • Thriller: This is a tall, impressive plant for the center. Think of a fountain grass or a canna lily.
  • Filler: These are medium-sized plants. They fill out the middle. Examples are impatiens or petunias.
  • Spiller: These are trailing plants. They hang over the edge. Examples are creeping jenny or sweet potato vine.This creates a deep, layered look. It adds a lot of interest to your yard landscaping.

V. Lighting, Water, and Mirrors: Making Things Look Bigger

These elements are the secret tools for Small Backyard Landscaping. They do not take up much room. But they have a huge effect on the feel of the space, especially at night.

How to Do It: Creating Atmosphere

  • Strategic Lighting: Do not use harsh, bright lights. Use soft lights that point in a certain direction. Use them to show off your best features. You can highlight a favorite plant, a textured wall, or a water feature. Draped string lights define the “ceiling” of your outdoor room. This makes the space feel closed-in and cozy.
  • The Power of Reflection: Putting an outdoor mirror on a fence or wall is an amazing trick. It reflects light, views, and greenery. This instantly doubles the size you think your yard is. Frame the mirror nicely. Make it look like a window onto another part of the garden.
  • Sound and Movement: A small, self-contained water feature adds a calming sound. It could be a bubble fountain or a simple tiered bowl. This masks city noise. It brings a feeling of calm and movement into the space. These features are often great examples of simple backyard ideas that add big value.

VI. Embrace Sustainability in Small Spaces

A small yard gives you a great chance to focus on sustainability. Less space means less to care for. It also means less use of resources. However, it needs choices made with thought.

How to Do It: Sustainable Practices

  • Native and Drought-Tolerant Plants: Pick plants that naturally grow in your area. They need less water, fertilizer, and bug control. This makes them a low-effort, sustainable choice for your Small Backyard Landscaping.
  • Rain Collection: Include a thin rain barrel in your design. This gives you free, sustainable water for your containers. It lessens how much you need to use city water. This is an important step in eco-friendly yard landscaping.
  • Composting: Maybe you cannot fit a big compost bin. If so, look into compact systems. These include worm farms or small tumbling composters. They turn kitchen and garden waste into rich soil for your containers.

Example: Permeable Paving

For your hardscaping, think about materials that water can pass through. Use gravel, permeable pavers, or decomposed granite. These materials are better than solid concrete. They let rain soak straight into the ground. This reduces water runoff. It also improves the local water supply. This strongly supports overall sustainability.

VII. A Step-by-Step Guide to Your Small Backyard Transformation

Are you ready to begin? Use this easy process to set up your ultimate Small Backyard Landscaping project.

  1. Vision and Audit (The Planning Phase):
    • Measure your space exactly.
    • Note where the sun hits during the day. Check morning, noon, and evening.
    • Decide on your two main useful areas. For example, Dining and Relaxation.
  2. Hardscape First (The Foundation):
    • Install your main floor. This could be decking, pavers, or gravel.
    • Build any lasting structures. This means raised beds, built-in benches, or vertical supports.
  3. Vertical Integration (The Ascent):
    • Put up trellises, mirrors, or shelves on any border walls or fences.
    • Now is the best time to run any wires needed for permanent lighting.
  4. Softscape Placement (The Greenery):
    • Place your large, main containers and fill them with plants.
    • Plant any permanent beds or borders. Use the Thriller, Filler, Spiller method where it works best.
    • Install your sustainable items, like a small rain collector.
  5. Furnishing and Lighting (The Polish):
    • Bring in your furniture that has more than one use.
    • Set up your final decorative lighting. This means string lights and spot lights. Set up any water features.
    • Step back and enjoy your maximized mini-space!

Frequently Asked Questions

Q: How can I make my small yard look wider?

A: The best trick is to make the eye look across the space, not toward the back. Use horizontal lines in your decking or paving. Put one main horizontal item across the view from the house. This could be a long, low planter or bench. This makes people look sideways. It makes the space feel broader.

Q: What is the best color for small backyard landscaping?

A: Lighter colors for hard surfaces are best. Think of light gray pavers or light-colored wood stain. These colors reflect light. They make the space feel bright and larger. For plants, use cool colors like blues, purples, and whites in the back corners. These colors seem to fade into the distance. This helps the illusion of depth in your yard landscaping.

Q: Should I use a fence or a hedge for privacy in my small backyard?

A: Fences often use space better. They are flat. A hedge is lovely and sustainable, but it can use up valuable ground space. If you pick a fence, think about painting it a dark color, like black or charcoal. This makes the boundary seem to disappear. It highlights the plants in front of it.

Q: How can I add a water feature when I have very little space?

A: Look for fountains that hang on the wall. Or use small tabletop fountains. They give you the nice sound of water. They do this without needing any floor space. You can also turn a nice ceramic pot into a simple “bubble fountain” with a small pump. This is one of the most effective simple backyard ideas for luxury without the size.

Q: Are raised garden beds a good choice for a small yard?

A: Yes, they are, but only if they are built-in and also work as seating. Typical, separate raised beds can feel bulky. They take up too much floor space. A better choice for Small Backyard Landscaping is often a vertical garden. Or you can use a thin, border-style raised bed along a wall. This keeps the middle of the area open and clear.


References


Recent Posts


The Only Landscaping Guide You’ll Ever Need: Stunning Results Guaranteed

A vibrant, sustainable front yard featuring native plants, permeable pathways, and lush garden beds under a warm, golden hour sun, showcasing beautiful and eco-friendly home landscaping.

Ever stared at your yard and felt completely overwhelmed? We’ve all been there—dreaming of a beautiful, functional outdoor space but having no idea where to even start with your Landscaping. This simple guide is written just for you: the homeowner and garden enthusiast who wants a gorgeous landscape without harming the planet. Join me as we break down the basics and make your outdoor living better than ever.


Section 1: Landscaping with a Purpose: Why Sustainability Matters

Landscaping has traditionally been all about making your home look good. But today, a truly stunning landscape does so much more. It needs to be healthy, easy to care for, and kind to the environment. This is what we call sustainability in your yard.

Sustainable landscaping means we stop fighting nature and start working with it. It focuses on using less water, avoiding harsh chemicals, helping local wildlife, and using resources wisely. The ultimate goal is to create a beautiful, low-maintenance, and tough garden that lasts.

How to Start: Your Yard’s Report Card

Before you buy anything, you must study your site. This crucial first step is the secret to successful Garden Design and long-term sustainability. It saves you time and money later on.

How to Do It:

  1. Watch the Sun and Shade: Spend a day tracking how the sun moves across your property. Note which areas get sun all day (full sun), some sun (partial sun), and almost no sun (shade). Matching plants to these spots means they will naturally thrive, and you won’t need to baby them later.
  2. Get to Know Your Soil: Do a simple soil test. You can buy kits at any garden center. Find out your soil’s pH (how acidic or alkaline it is) and what it is made of (sand, silt, or clay). Plants have very specific soil needs. Match the plant to your existing soil, and you cut down on buying expensive soil amendments.
  3. Spot Water Problems: Look for wet spots, dry hills, or areas sheltered from the wind. Pay attention to where water collects during a big rainstorm. Areas that hold water are perfect for creating rain garden features. This helps the water sink into the ground and stops dirty runoff from leaving your property.

Section 2: Simple Steps for Amazing Garden Design

Great Garden Design uses simple rules to make a space that works well, looks beautiful, and fits with your home. It’s about creating smooth pathways, giving different areas their own purpose, and picking materials that will last forever.

The Three Main Pieces of Design

  1. Hardscape (The Structure): This means all the non-living parts: patios, walking paths, walls, and fences. For sustainability, always choose materials that water can pass through. Use things like gravel, loose stone, or special permeable pavers for your paths. This allows rainwater to soak into the soil, feeding your plants instead of rushing down the street.
    • Example: Take out an old solid concrete driveway. Replace it with a beautiful path made of spaced flagstones that have sand and fine gravel between them. Water can now sink right into the earth.
  2. Softscape (The Plants): This is your entire planting plan: all the trees, bushes, flowers, and groundcover. The main rule here is simple: The Right Plant in the Right Place. Focus on plants that are native to your local area. Native species already know how to live in your climate and soil. This means they need much less water, less fertilizer, and almost no help fighting pests compared to foreign plants.
  3. Define Your Zones: Divide your landscaping into areas that each have a clear job. This is extremely important if you are tackling Small Backyard Landscaping.
    • The Fun Zone: Your patio, deck, or a cozy fire pit area.
    • The Work Zone: Your compost pile, tool storage, or a simple clothesline.
    • The Food Zone: Your vegetable garden, herbs, or fruit trees.
    • The Nature Zone: Areas filled with native plants to attract local birds and insects.

Section 3: Making the Most of Small Backyard Landscaping

If your yard is small, that is actually a good thing! Small Backyard Landscaping gives you unique chances to be creative and focus your efforts. The main goal is to make the area feel bigger than it really is and make sure every inch has a purpose.

How to Do It: Tricks for Tiny Spaces

  1. Go Up, Not Out: Use vertical space by putting planters, trellises, and shelves on walls and fences. Vertical gardens make your eye travel up, making the space seem taller. They also let you grow way more plants without using up precious ground area.
    • Example: Put up a simple metal grid on your garage wall. Train climbing beans, beautiful roses, or morning glories to grow up it. This adds stunning visual interest and saves space.
  2. Use Angles: When building paths or laying out your patio, run the lines diagonally instead of parallel to your house. This simple design trick fools your brain into seeing a much longer, more interesting space.
  3. Plant in Layers: Create depth by using plants of different heights and textures. Put the tallest plants, like thin evergreens or tall grasses, at the very back. Then, plant shorter and shorter things toward the front. This layering creates depth and makes your small space feel deep and full.

Section 4: Save Water: The Smart Landscaping Approach

Saving water is the most powerful thing you can do for sustainability in your landscaping. The practice of xeriscaping means reducing or even removing the need for extra watering.


How to Do It: Easy Water Management

  1. Stop Wasting Water: Traditional sprinklers lose a lot of water to wind and heat. Switch to drip irrigation or simple soaker hoses. These systems slowly drip water right onto the roots of your plants. This smart method can save you up to half of the water you use now.
  2. The Magic of Mulch: Put a thick layer (about three inches is perfect) of organic mulch—like wood chips, shredded leaves, or straw—around all your plants. Mulch is like a blanket for your soil. It keeps the moisture in the ground and stops the sun from drying it out. It also keeps weeds down. Plus, as it breaks down, it naturally feeds your soil.
  3. Catch the Rain: Install a simple rain barrel connected to one of your roof’s downspouts. You can use this free, natural rainwater to water your flowerpots and beds. This is an ideal solution for Small Backyard Landscaping where you want to maximize every natural resource.

Section 5: Healthy Gardens: No Chemicals Allowed

A sustainable landscape is a buzzing, healthy place. For true sustainability, you must stop using harsh chemical fertilizers and pesticides. These things pollute our water and kill the helpful insects and tiny life forms that keep your soil healthy.


How to Do It: Building a Natural Ecosystem

  1. Invite Good Guests: Plant many different types of native flowers that bloom all year long, from early spring to late fall. This provides a steady supply of food for local bees, butterflies, and hummingbirds. This practice is key to having a vibrant, healthy garden.
    • Example: Include native milkweed (which Monarch butterflies love), bright coneflower, and purple aster in your flower beds.
  2. Love Your Soil: Start a simple composting system in your yard. Composting your kitchen scraps and yard waste creates a super-rich soil food called humus. Humus makes your soil hold more water and stay healthier. Healthy soil is the base of any successful, low-effort landscaping project.

  1. Let Nature Handle Pests: Instead of spraying chemicals, bring in helpful insects. You can buy and release ladybugs to eat annoying aphids. Or, plant herbs like dill, fennel, and coriander. These herbs attract tiny, beneficial wasps that naturally prey on many common garden pests.

Section 6: Keep it Easy: Maintenance for the Long Run

A sustainable landscaping plan is designed to be easy to maintain, but “easy” does not mean you do nothing. You still need to do a few important tasks to keep your beautiful garden looking stunning year after year.

Key Tasks for the Year

  • Weeding: Keep your mulch layers thick to help prevent weeds. Pull out any weeds that manage to sprout by hand before they drop seeds.
  • Trimming: Cut back trees and shrubs at the correct time of the year to keep them healthy and looking good. Avoid cutting them too aggressively, as this can weaken them over time.
  • Water Check: Once a year, check your drip system for any clogs or leaks. This makes sure your water is delivered to your plants as efficiently as possible.

Section 7: The Final Details That Make an Impact


The small finishing touches are what turn good landscaping into stunning Garden Design.

  1. Smart Lighting: Use low-energy LED or solar-powered lights to highlight beautiful features, light up your paths, and create a cozy evening mood. This uses very little electricity and lets you enjoy your outdoor space longer.
  2. Repurpose Materials: Bring natural things like large, interesting rocks or driftwood into your landscaping. You can also use repurposed items, like old wooden barrels or thick pieces of reclaimed wood. This gives your yard character and fits perfectly with sustainability by using materials you already have.

Frequently Asked Questions (FAQ)

Q: What is the single best thing I can do for sustainable landscaping?

A: The most impactful change is to shrink your traditional lawn or replace it with native, tough plants that do not need much water. Regular grass needs huge amounts of water and chemicals, making it the least sustainable part of most home landscaping.

Q: Do I really need to hire a professional for Garden Design?

A: Not if you do not want to. For projects like Small Backyard Landscaping, a simple plan based on your yard’s needs is often enough. Use the sun analysis and zoning tips from this article to create a rough sketch before you start digging.

Q: What is the most important element of sustainable hardscape?

A: The most important word is “permeability.” This means choosing materials for your paths and driveways that let rainwater soak into the earth, like gravel or pavers with open joints. This stops runoff and filters water, which is a key part of long-term sustainability.

Q: Are raised garden beds better for a vegetable garden?

A: Yes, in most cases. Raised beds offer much better drainage, warm up faster in the spring, and let you completely control the quality of your soil. They are an excellent choice for intensive Small Backyard Landscaping and growing your own food.

Q: What are the best plants for a low-maintenance garden that saves water?

A: This depends on your region, so always check local guides. Generally, look for local native plants, succulents, ornamental grasses, and tough perennial flowers like lavender and sedum. These are naturally adapted to need very little help in your garden.


Reference Section


Recent Posts