Cookie Consent by Free Privacy Policy Generator Update cookies preferences

Reclaimed Wood is the New Luxury

Close-up of a prominent, thick reclaimed wood kitchen island worktop in a bright, modern farmhouse kitchen with dark blue cabinets, showcasing the unique grain and natural distressed texture of the wood.

Hey there, fellow home enthusiasts! Like many of you, we are always searching for ways to make a home both beautiful and sustainable. After countless hours scrolling through design feeds and dreaming up kitchen makeovers, we found a secret that’s too good not to share: the enduring appeal of Reclaimed Wood. Join us as we explore how to bring character, history, and a touch of eco-chic into your most beloved space with this stunning material.


Embracing Reclaimed Wood: The New Luxury Begins Here

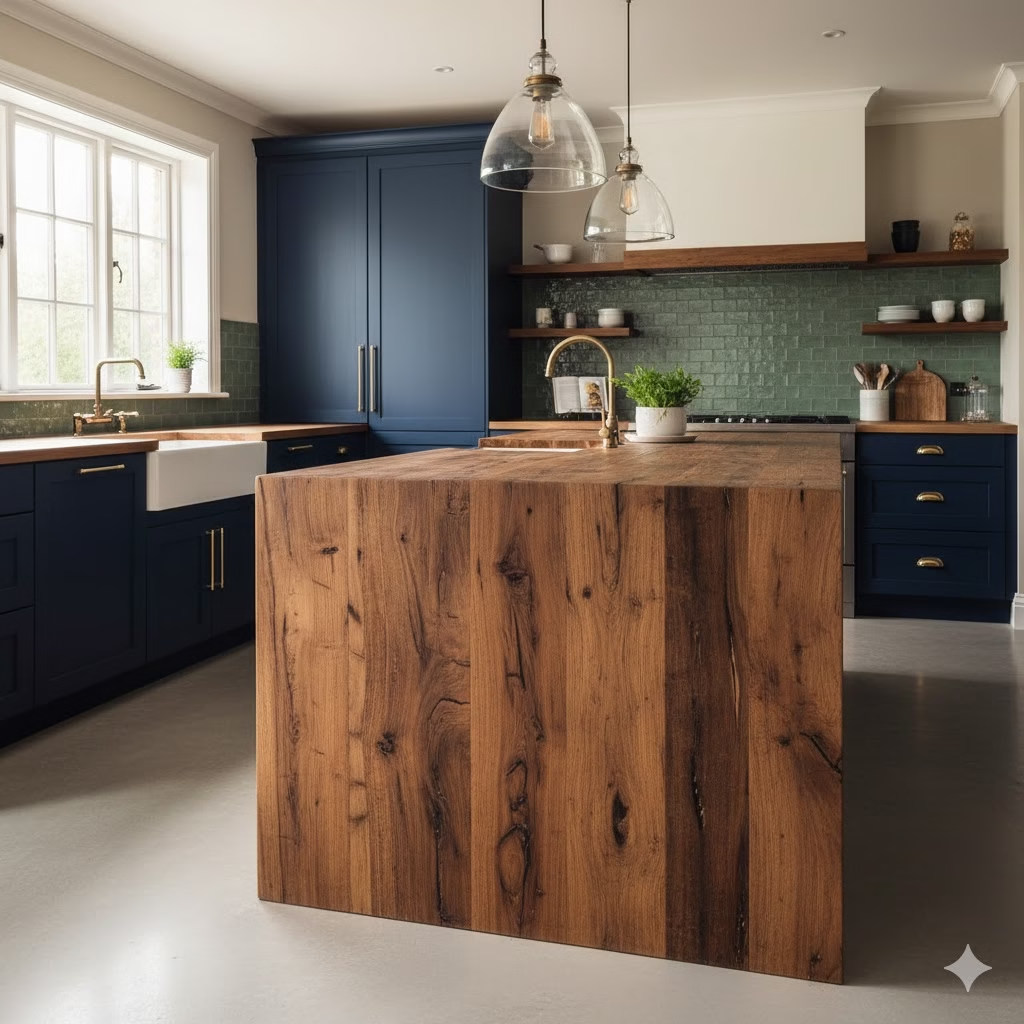
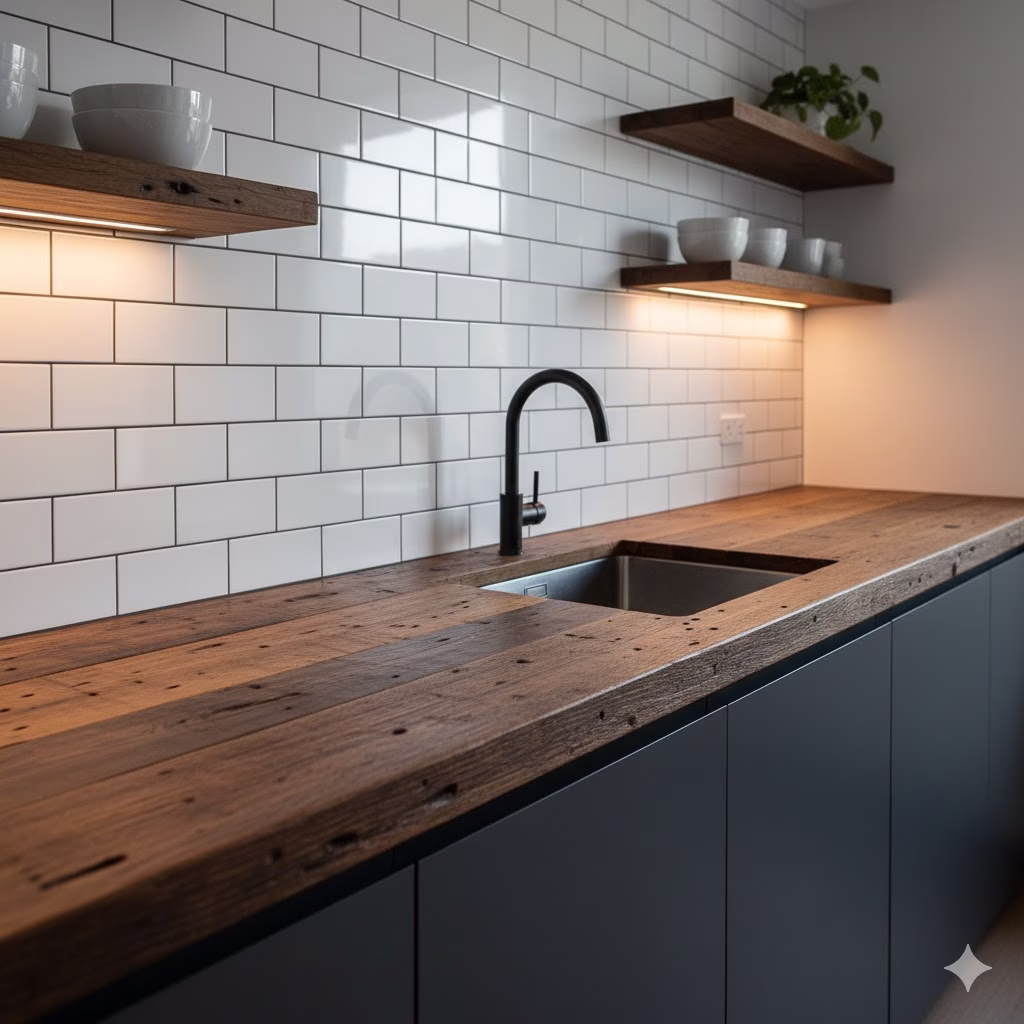
A beautifully styled kitchen featuring a prominent reclaimed wood island or worktop, perhaps with natural light streaming in, showcasing its unique grain and texture.

It used to be that luxury meant pristine, untouched, and brand new. We aspired to gleaming granite, flawless marble, or factory-perfect laminates. However, times, and tastes, are changing fast. A quiet revolution is happening in kitchen design. It’s led by a material that carries stories, whispers of history, and boasts a unique character no new product can ever replicate: reclaimed wood.

Forget what you thought about opulence. True luxury today is about authenticity, sustainability, and owning something unique. That is precisely what a reclaimed wood worktop delivers.

Why Reclaimed Wood? Beyond the Hype

The allure of reclaimed wood is more than just a trend. It’s a move toward conscious and meaningful design. When you choose a worktop made from reclaimed wood, you aren’t just buying a surface. You are investing in a piece of history, an heirloom for your home that tells a real tale.

1. Unmatched Character and Aesthetic Appeal

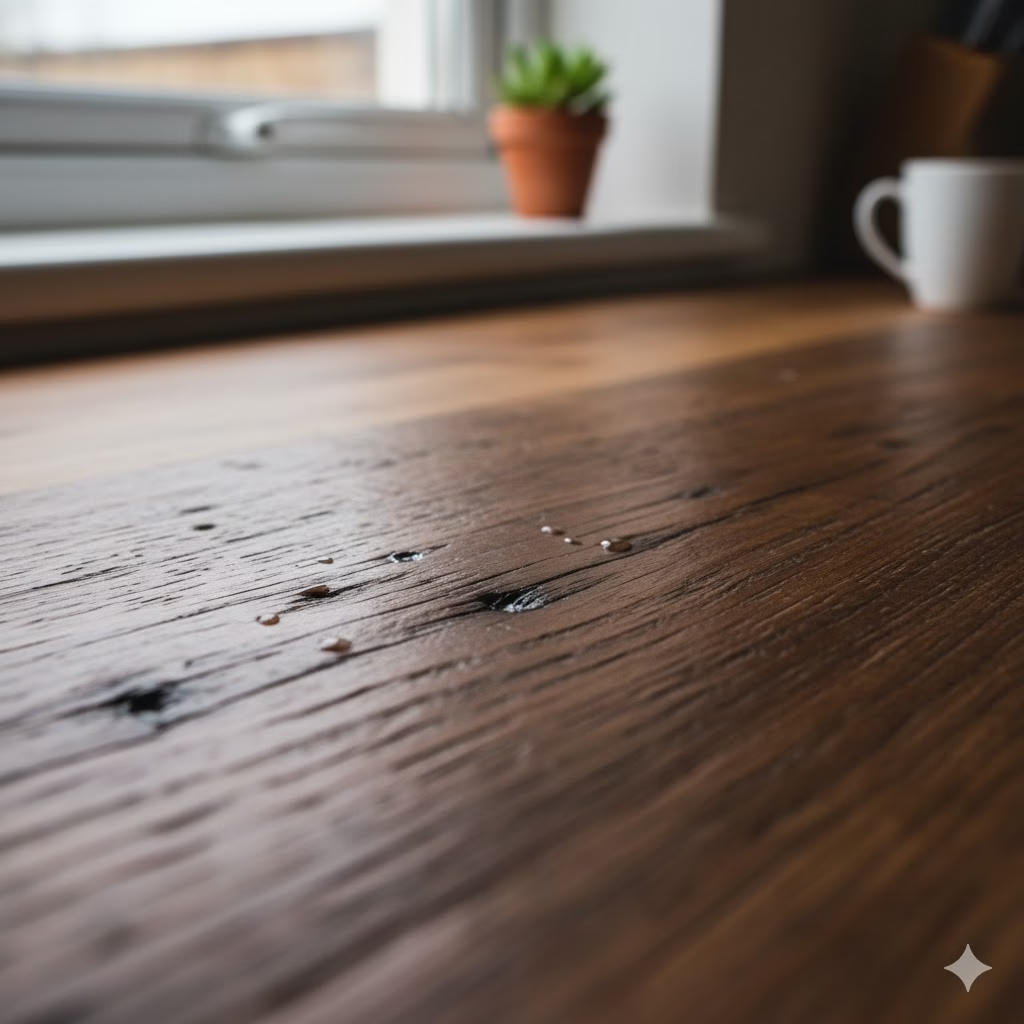
Imagine wood that has weathered decades, or even centuries, as part of an old barn, a forgotten factory, or a dismantled warehouse. This wood has seen seasons change and felt the hands of countless people. It has developed a unique finish that you cannot make artificially. Knots, nail holes, saw marks, grain variations, and natural distressing—these are not flaws. They are badges of honour.

Examples of Character-Rich Reclaimed Wood:

  • Barnwood Oak: Often has a deep hue and incredible texture. It shows circular saw marks and natural blemishes.
  • Factory Maple: Known for its hardiness and lighter tones. It often bears subtle marks from industrial use.
  • Old Growth Douglas Fir: Can display stunning, tight grain patterns and a beautiful reddish-brown colour. It often comes from large timbers.

These elements create warmth and depth. They instantly elevate a kitchen and add a focal point that is both rustic and refined. This is the kind of feature that makes people pause, look closer, and ask, “Where did you get that?”

2. A Champion for Sustainability

Environmental impact is a critical concern today. Choosing reclaimed wood is one of the most eco-friendly decisions you can make for your kitchen.

Reclaimed wood helps the planet by:

  • Reducing Landfill Waste: These beautiful, aged timbers are given a second life instead of ending up in a dump.
  • Conserving New Resources: Using reclaimed wood reduces the need for newly harvested timber. This helps preserve forests and their vital ecosystems.
  • Lowering the Carbon Footprint: The energy needed to process reclaimed wood is far less than the energy required for harvesting, milling, and transporting new lumber.

It’s a simple win-win for your home and for the planet.

3. Inherent Durability and Stability

Do not let the “old” in reclaimed make you think it is weak. Wood that is reclaimed has often endured tough conditions for many decades. This long exposure to various climates causes the wood to fully season. This means it has stabilized, shrunk, and expanded as much as it ever will. Because of this, reclaimed wood is often more stable. It is less likely to warp and crack than newly cut timber.

How to Do It: Bringing Reclaimed Wood Luxury into Your Kitchen

Ready to embrace the character of reclaimed wood? Here is your simple guide to making it happen.

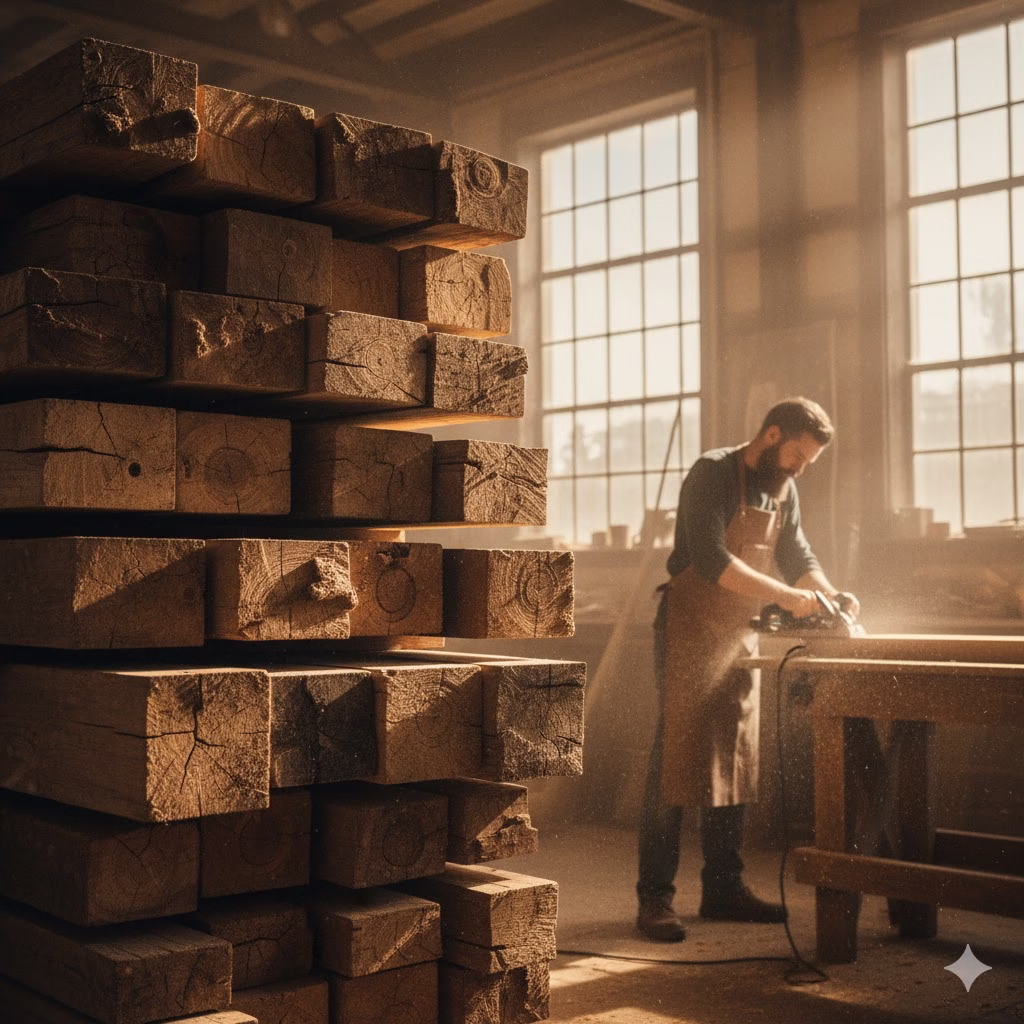
Step 1: Sourcing Your Reclaimed Wood

This is perhaps the most exciting part! Finding the right supplier is very important.

Places to Find Quality Reclaimed Wood:

  • Dedicated Reclaimed Wood Dealers: These specialists have networks for salvaging wood from old buildings. They offer a wide variety of wood species and historical backgrounds. They know how to properly de-nail, clean, and mill the wood to your exact needs.
  • Architectural Salvage Yards: These are like treasure troves! You might find individual slabs or beams you can turn into a stunning worktop.
  • Local Craftsmen/Woodworkers: Many independent artisans work mainly with reclaimed materials. They can source, prepare, and custom-build your worktop for you.

Key things to look for:

  • Species: Think about the look and the wood hardness. Oak, maple, chestnut, and longleaf pine are popular choices.
  • Condition: Imperfections are good, but avoid wood with serious rot, extensive bug damage, or structural weakness.
  • Provenance: Always ask about the wood’s history! This is part of its story and adds to its appeal. Did it come from a Civil War-era barn? A turn-of-the-century factory?
  • Moisture Content: Make sure the wood has been properly dried to stop warping after installation. Reputable suppliers use professional kilns for this.

Step 2: Design and Fabrication

Once you have your wood, it is time to make your vision real.

  • Measure Precisely: Accuracy is key for worktops. Get professional measurements if you are unsure.
  • Consider Thickness: Reclaimed wood worktops often look best with a thicker profile (1.5 to 2.5 inches). This shows off their solidity.
  • Edge Profiles: Decide on the edge style. A simple square edge, a soft chamfer, or a rounded bullnose can all work. A clean, natural edge often showcases the material best.
  • Cut-outs: Plan for sink, faucet, and hob cut-outs. These need precise work. They are often best handled by experienced fabricators.
  • Working with a Professional: Unless you have high-level woodworking skills and tools, let a professional woodworker or a specialized company fabricate your worktop. They have the knowledge to safely de-nail, mill, join planks (if required), and prepare the surface correctly.

Example:

I once saw a kitchen where the fabricator carefully kept an interesting knot in the reclaimed wood. They filled it with a clear resin. This created a subtle, stunning design feature. It proves how individual pieces can inspire unique touches.

Step 3: Finishing for Durability and Beauty

The finish protects the wood from moisture, stains, and daily wear. This is the stage where your reclaimed wood worktop changes from rough timber to a functional, stunning surface.

The finish you choose affects the look, feel, and maintenance of your worktop.

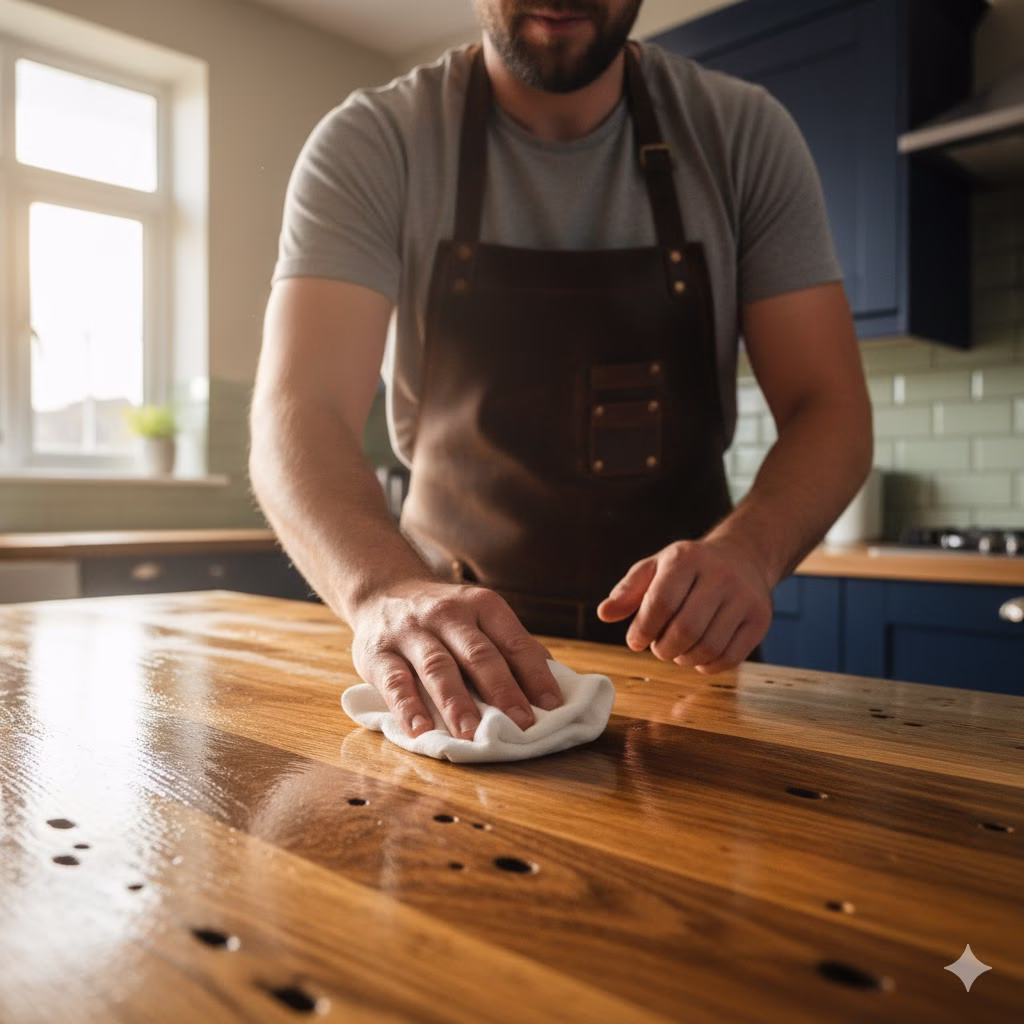
A. Oil Finishes (e.g., Tung Oil, Hardwax Oil):

  • Pros: Penetrates the wood, boosting its natural grain and warmth. It is easy to repair scratches or damage by spot-treating the area. Offers a more natural, matte, or satin look.
  • Cons: Needs more frequent reapplication (at least once or twice a year). It is less resistant to standing water if not maintained.
  • How to Do It: Apply thin coats with a clean cloth. Rub the oil into the wood. Let it dry fully between coats. Buff off any extra oil. Use multiple coats for the best protection.

B. Polyurethane or Varnish Finishes:

  • Pros: Forms a tough, protective film on the surface. It offers great resistance to water and stains. And is available in various sheens, from matte to high gloss. It needs less reapplication than oils.
  • Cons: Can look less natural because it sits on top of the wood. It is hard to repair small areas. It often means sanding and refinishing the whole section.
  • How to Do It: Apply evenly with a brush or roller in a dust-free area. Lightly sand between coats for better adhesion. Apply several coats for the best result.

C. Epoxy Resin Finishes:

  • Pros: Creates a very tough, waterproof, and heat-resistant glass-like finish. Great for showing off unique wood features.
  • Cons: Can look very modern, which may not suit all traditional reclaimed wood styles. Mixing and applying it must be precise. Repairs are difficult.
  • How to Do It: Follow all manufacturer instructions for mixing. Pour carefully and spread evenly. Use a heat gun or torch to remove any bubbles. This is often a job for a professional.

Recommendation: For an authentic, luxurious feel with reclaimed wood, a high-quality hardwax oil is often best. It lets the wood breathe and is simple to refresh.

Step 4: Installation

While some adventurous people might install this themselves, professional installation is usually recommended. This is especially true for large or heavy worktops.

Key Installation Steps:

  • Level Cabinets: Ensure your base cabinets are perfectly level. This prevents stress on the worktop and ensures a flat surface.
  • Secure Fastening: Use the right fasteners to secure the worktop to the cabinets. This should allow for the slight seasonal movement of the wood.
  • Sealing Edges (for sinks): If you have a sink cut-out, seal all raw edges thoroughly with a waterproof silicone sealant. Do this before the sink is dropped in. This prevents moisture damage.

Living with and Loving Your Reclaimed Wood Worktop: Maintenance

Good maintenance of your reclaimed wood worktop is vital. It preserves its beauty and durability for decades to come.

Daily Care Tips:

  • Wipe Spills Immediately: Water is wood’s enemy. Do not let spills sit, especially acidic liquids like lemon juice or wine, which can damage the finish.
  • Use Mild Cleaners: A damp cloth with a little dish soap works well. Avoid harsh cleaners, abrasive scrubbers, or steam cleaners. These can strip the finish.
  • Use Cutting Boards and Trivets: Always use a cutting board for chopping. Always use trivets for hot pans. While wood is tough, you must protect your surface from direct cuts or scorch marks.
  • Avoid Standing Water: Especially near sinks and taps. Wipe these areas dry after every use.

Periodic Maintenance:

  • Re-oiling (for oil finishes): Depending on how much you use it, re-oil your worktop every 6 to 12 months. Do this when the wood looks dry or easily absorbs water. This is a simple process: clean the surface, sand lightly if needed, and apply a thin coat of the oil.
  • Inspecting for Damage: Check often for any deep scratches or areas where the finish looks weak. Fix these immediately to prevent worse damage.
  • Addressing Scratches (Oil Finishes): Light scratches on oiled surfaces can be gently sanded out. Then, re-oil the area to blend it in. Deeper scratches will need more work.

Long-Term Considerations:

  • Humidity Control: Wood reacts to changes in humidity. Keep a consistent indoor humidity level (ideally 40–50%). This helps to minimize wood movement.
  • Embrace Patina: Your reclaimed wood worktop will naturally develop its own patina over time. This adds to its charm and should be seen as a sign of life, not a flaw.

Styling Your Reclaimed Wood Worktop

The great thing about reclaimed wood is its flexibility. It can fit with almost any kitchen style.

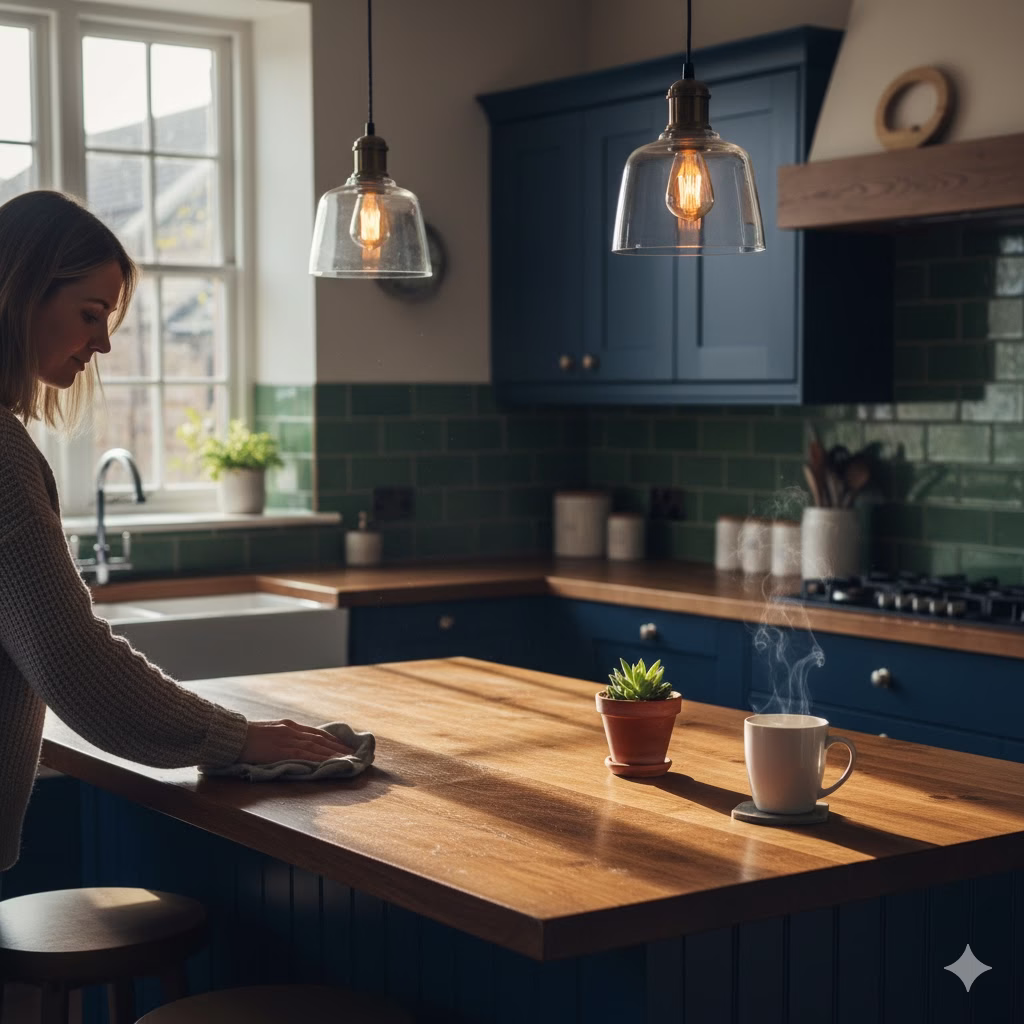
  • Modern Farmhouse: Pair it with Shaker-style cabinets, subway tiles, and open shelving. The wood adds warmth to crisp white colours.
  • Industrial Chic: Mix the raw texture of reclaimed wood with black metal accents, exposed brick, and stainless steel appliances. The contrast is powerful.
  • Minimalist Nordic: Let the wood be the main feature. Keep other items simple and clean. Light colours and natural textures let the wood’s character shine.
  • Eclectic Bohemian: Mix different textures, patterns, and colours. Reclaimed wood keeps the space grounded. It brings an authentic, earthy feel to a vibrant room.

Final Thoughts: The Enduring Appeal of Reclaimed Wood

Choosing a reclaimed wood worktop is more than a design choice. It is a powerful statement. That shows your commitment to sustainability, your appreciation for history, and your love for real beauty. It is a focal point that will start conversations, collect memories, and age gracefully with your family.

If you want to fill your kitchen with soul, character, and a touch of eco-conscious grandeur, embrace the allure of reclaimed wood. It is truly the new luxury. Your kitchen deserves a surface with a story to tell.


Frequently Asked Questions (FAQ)

Q: Is reclaimed wood more expensive than new wood?

A: Not always. The cost depends a lot on the wood species, its rarity, and the process of preparing it. It may cost more due to the work involved in salvaging and preparing it. However, it offers unique style and sustainability benefits that new wood cannot match.

Q: Can reclaimed wood be used in bathrooms or other wet areas?

A: Yes, with the right sealing and maintenance, just like any wood. However, you must be extra careful to wipe away standing water right away. A very waterproof finish, like marine-grade varnish or epoxy, might be a good choice for very wet spots.

Q: Will reclaimed wood warp or crack?

A: Good suppliers make sure the wood has been properly dried (kiln-dried) to control its moisture level. This makes it less likely to warp and crack than newly milled wood. However, all wood can react to big changes in humidity. Keep consistent indoor conditions to minimize movement.

Q: How do I clean a reclaimed wood worktop?

A: Use a damp cloth with a mild dish soap solution for daily cleaning. Do not use harsh chemical cleaners, abrasive pads, or steam cleaners. These can damage the finish or the wood itself.

Q: Can I cut directly on a reclaimed wood worktop?

A: Wood is resilient, but you should always use a cutting board. This protects your worktop from knife marks. It also helps keep its finish and lengthens its life.


References


Recent Posts


Make 20 Amazing Creations Using Public Domain Maps

An inspiring collection of items made from public domain maps, featuring a framed antique map, map-inspired accessories, printed fabric, and decorative paper crafts, highlighting creative uses of historical cartography.

Like many of you, I’ve always loved the beauty and history in old maps. I thought they were either too costly or too restricted for my own projects. Then I found the world of public domain maps archives and saw the huge creative potential waiting to be used. I think everyone should have free access to great resources for their passion projects. This applies whether you’re designing new art or just making a nice gift. Join me as we change these old cartographic treasures into something new and amazing.


Public Domain Maps: Your Source for Twenty Must-Make DIY Projects

For hundreds of years, maps have been much more than just tools for finding your way. They are great works of art. And they keep historical records. They offer beautiful glimpses of the world as it was long ago. But many creators, designers, and hobbyists miss one big secret: the huge and free collection of Public Domain Maps.

These are maps whose copyrights have run out. This means you can use them completely free of charge. You can change them. And you can even sell them in your own creations. You do not have to worry about complex fees or legal rules.

The public domain is a fantastic place for creativity. This is especially true with old maps. These charts and atlases offer details, texture, and artistry. You cannot easily copy this with today’s digital tools. They are the perfect basic material for a wide and surprising range of projects.

We are going beyond just framing an old map. This guide gives you the plan for twenty remarkable, unique items. You can make them right now. All you need are these free map assets. Get ready to find a new world of creativity.


Part One: The Basics (How to Find and Use Them)

Before you start the projects, you must know how to get and prepare your maps. These steps are key to your success.

Where to Find Your Cartographic Gold

To start this process, you need to know where to look. Several excellent world groups have made their collections digital. They have generously placed these maps into the public domain.

  • The Library of Congress (LOC): This is a huge resource. It has millions of items. This includes detailed city maps, Civil War charts, and special atlases. Their digital library is easy to search. They let you download high-quality files.
  • The New York Public Library (NYPL) Digital Collections: This group is known for its large set of historical maps. They focus on New York City. These maps often have tiny details perfect for small projects.
  • Wikimedia Commons: This is a central spot. Many public domain maps from different places are kept here. Their licenses are clearly marked. Always check the license, but most public domain maps are easy to identify.
  • The David Rumsey Map Collection: Not all their maps are public domain. However, many of the very oldest and best assets are. They offer some of the clearest, highest-quality scans you can find.

Simple Steps to Start Your Project

Once you pick a map you like, the process is very simple:

  1. Download the Best File: Always choose the largest file size you can find. This is often a TIFF or a high-quality JPEG. This guarantees your final print will be clear.
  2. Look Closely for Issues: Old maps often have folds, spots, or tears. Decide if you want to keep that old look or clean it up.
  3. Clean It Up Digitally (If You Want): Use a free or professional image editor. You can use GIMP or Photoshop. Adjust the brightness. Make the background whiter. Remove big spots or marks.
  4. Take Out Just One Piece: Maybe you only want a border, a logo, or a single state from a large map. Use the selection tool to cut out or focus on that element.

Part Two: Twenty Creative Projects (With Examples and How-To Guides)

This list gives you twenty clear ideas. You can turn those old maps into amazing creations.

The Home Decor Series

  1. Unique Wall Art and Poster Prints
    • The Idea: This is the easiest project and it makes a big impact. Print a whole, high-resolution map. Or print a small section of a map. The result is a stunning piece of wall decoration.
    • How to Do It: Find a map with nice colors. Or find one with an interesting topic, like a star chart or an old city plan. Use an online printing service. Or go to a local print shop. Choose high-quality paper or canvas for a luxury look. You can zoom in on one specific corner of a large map for a unique abstract look. For instance, the detailed roads of an old London map become a beautiful geometric piece.
  2. Decoupage Furniture and Tables
    • The Idea: Glue map parts to the top of small furniture. This works well on small tables, drawer fronts, or the inside of a cabinet. It gives the piece a very custom look.
    • How to Do It: Print the maps to fit the size you need. Put a thin layer of special glue (like Mod Podge) onto the furniture. Carefully place the map piece over the glue. Use a soft roller or card to smooth out all air bubbles and wrinkles. When it is dry, seal the whole surface. Use several coats of the glue or clear spray for a tough, lasting finish. A simple used dresser instantly looks like a fancy, special piece.
  3. Map-Lined Lampshades
    • The Idea: Put a piece of a historical map on the inside of a lampshade. When the light turns on, the map’s detail softly glows.
    • How to Do It: Gently take out the old fabric or plastic lining from the shade frame. Print a map section that is slightly see-through. Use thin paper or vellum. Use a heat-safe spray glue to attach the map print to the inside. The light shining through the old text and landscape lines creates a very cozy feel.
  4. DIY Map Coasters
    • The Idea: Make a set of coasters that are waterproof. Use different map sections. They are great for starting a conversation.
    • How to Do It: Buy simple four-by-four inch ceramic tiles. Print the map sections to fit the size. Glue the paper to the tiles using the special decoupage glue. Once it is fully dry, cover the top. Use several coats of a waterproof resin or clear sealant. Put felt pads on the bottom so they do not scratch tables.

Wearable and Accessory Creations

  1. Jewelry and Pendants
    • The Idea: Make small map sections even smaller. Place them into tiny metal frames. This creates unique necklaces, earrings, or cufflinks.
    • How to Do It: Pick maps with bright colors or small, clear writing. Print the tiny sections and cut them out neatly. Glue them into the metal jewelry trays (bezels). Seal the picture with a clear liquid resin. Or use a glass dome, which makes the map detail look bigger and better.
  2. Custom Phone and Laptop Skins
    • The Idea: Print a map design onto sticky vinyl. This makes a unique cover for your phone or computer.
    • How to Do It: Use an online printer that makes custom stickers. Use maps of specific cities that mean something to you. Maybe it is where you had a great trip or where you grew up.

Profitable Digital Products

  1. High-End Digital Art Prints
    • The Idea: Make very desirable wall art for the online market. Do this by selecting, changing the colors, and fixing up parts of old maps.
    • How to Do It: Take an old map. Change its colors to match modern trends. For example, turn a brown map into a solid blue or deep green color. Sell this as a high-resolution file. Customers can download it and print it themselves right away. This is a very easy digital product to scale up.
  2. Digital Scrapbook and Planner Sticker Sets
    • The Idea: Take out decorative pieces. These could be compass pictures, fancy title blocks, or unique border designs. Turn them into digital sticker files.
    • How to Do It: In an image editor, select and carefully cut out the piece you want. Take the background out completely. Save it as a transparent PNG file. Put these pieces into groups. You can sell these on sites like Etsy.
  3. E-book and Course Cover Designs
    • The Idea: Use the map look and drawings to make cool, historical-looking cover art for your own books or online courses.
    • How to Do It: Put a map texture as a background layer on your cover design. Use the map’s lines or aged paper look. This instantly makes the title and text look more serious and interesting.

Stationery and Paper Goods

  1. Unique Greeting Cards and Postcards
    • The Idea: The beautiful small pictures and classic text on old maps are perfect for making special stationery.
    • How to Do It: Pick maps with interesting text, small pictures, or colorful shorelines. Design a simple edge. Add a modern saying or greeting in a clean font. Print this on thick paper.
  2. Custom Wrapping Paper
    • The Idea: Repeat a map design—or a small part of a map—to make unique, themed wrapping paper.
    • How to Do It: Use image software to create a block of a map detail that can repeat easily. This could be a small town or a mythological animal drawn on the map. Send the repeating design to a custom printing service that makes large wrapping paper.
  3. Book Covers and Journal Inserts
    • The Idea: Create amazing paper covers for books. Or print the maps to use as decorative pages or dividers inside custom-made journals.

Functional and Gift Items

  1. Map-Covered Storage Boxes
    • The Idea: Use the glue technique to turn plain, cheap storage boxes into decorative pieces with map art.
  2. Personalized Jigsaw Puzzles
    • The Idea: Print a high-quality map of a certain area. This could be a hometown or a place where someone got married. Have a company turn it into a custom puzzle. This is an excellent, very personal gift.
  3. Thematic Wallpaper Accent Walls
    • The Idea: This project is for the very adventurous creator. A high-resolution public domain map can be repeated and printed. You can use it as a temporary or permanent accent wall in an office or a reading room.
  4. Map and Resin Serving Trays
    • The Idea: Place a map section inside a wooden serving tray. Cover it with clear resin. This makes a tray that is tough, useful, and artistic.

Advanced and Artistic Projects

  1. Map-Based Screen Printing Stencils
    • The Idea: Change the line work of a simple old map into a sharp, black-and-white stencil. Use this for screen printing on shirts, bags, or canvas.
    • How to Do It: Change the map image into a pure vector file. This should be just black and white lines. Use this image to prepare a screen for printing. The clean lines of the original map art print perfectly onto fabric.
  2. Interactive Map Displays (Digital Use)
    • The Idea: Use the map image as a base layer for a digital project. You can add pins, web links, and old facts to it. This creates a fun and interactive experience on a website or app.
  3. Laser-Cut Wood or Leather Art
    • The Idea: Change a map’s street or river layout into a vector file. Use a laser cutter to carve the design onto wood, leather, or plastic.
    • How to Do It: Use software to trace the lines of the map. Create a vector file that the laser machine can read. The carved depth makes the flat map come alive in a cool three-dimensional way.
  4. Custom Fabric for Sewing Projects
    • The Idea: Print a detailed map design onto fabric. This works on cotton or silk. Then use the fabric in sewing projects like pillows, scarves, or large shopping bags.
    • How to Do It: Many online companies offer custom fabric printing. Repeat the map image to make a pattern that covers a large piece of fabric without any breaks.

Frequently Asked Questions

Q: How can I be absolutely sure a map is in the public domain?

A: A work is generally in the public domain if its copyright has ended. In the United States, works published before the year nineteen twenty-eight are surely free to use. Most big archive websites, such as the Library of Congress, clearly say what the copyright status is. Always look for phrases like “no known copyright restrictions” or just “public domain.”

Q: Do I need to say where the map came from when I sell my product?

A: No, you do not have to give credit for works in the public domain. It is not a legal rule. However, it is polite and shows respect to the group that shared the map. You can choose to mention the original source like the Library of Congress. This is your personal choice, not a legal one.

Q: I only want a small piece of a very large map. How should I cut it?

A: Use your image editing program to zoom in. Focus on the area you want. When you cut it, save the small piece at the highest possible resolution. Do not just take a quick, blurry screenshot. If you plan to print it large, you will likely need the full, high resolution of the original file.

Q: Can I sell these public domain map creations? Like on Etsy?

A: Yes, definitely. The best part of using public domain assets is that you can use the images for business without paying fees. You can sell physical items, digital files, and anything else you create using these maps.


References


Recent Posts


The Ultimate Guide to Sweater Refashion: 10 Must-Try DIYs

An attractive display showcasing several finished sweater refashion projects, including throw pillows, felted coasters, a pet bed, fingerless gloves, and a wine bottle gift bag, with a person sewing in the background.

We all have that pile—the collection of formerly beloved sweaters relegated to the back of the closet because of a missing button, a small hole, or simply because they feel a bit dated. I know the feeling; my own closet has housed retired knits for years, waiting for a second chance. It’s surprisingly cathartic to take something old and transform it into something you genuinely love and use again. This guide to Sweater Refashion is for anyone ready to give their favorite fabrics a new life, proving that true style is sustainable and creative.


Introduction: The Power of Sweater Refashion

In an era increasingly focused on sustainability and mindful consumption, the concept of sweater refashion moves beyond a simple trend; it’s a practical commitment to reducing textile waste. Old sweaters, whether wool, cashmere, acrylic, or a cotton blend, are treasure troves of high-quality fabric. They offer texture, warmth, and often unique colors or patterns that are hard to find in new yardage.

The beauty of upcycling knitwear lies in its versatility. A sweater’s inherent stretch and soft texture make it ideal for a wide range of projects, from practical home goods to fashionable accessories and wearable art. This guide delves into ten distinct, must-try DIY projects that will breathe new life into your retired garments. We will cover everything from simple, no-sew fixes to more involved transformations, ensuring there’s a project for every skill level.


10 Must-Try Sweater Refashion DIY Projects

The following projects utilize different parts of the sweater—sleeves, body, cuffs, and neckline—to create something entirely new. Remember, before starting any project involving wool or cashmere, felting the garment by washing it in hot water and drying it on high heat can make cutting and sewing much easier by preventing fraying.

Project 1: Cozy No-Sew Throw Pillow Covers

Pillows add instant warmth to any room, and a sweater cover offers that perfect, hygge texture. This is one of the easiest entry points into sweater refashion.

Materials Needed:

  • One large sweater (the body section is ideal)
  • Pillow form insert
  • Sharp fabric scissors
  • Hot glue gun (optional, for sealing edges if preferred over sewing)

How to Do It:

  1. Lay the sweater flat. Decide how large your pillow form is. You will be using the main body of the sweater.
  2. Cut across the sweater horizontally, just below the armpits. You should have a top section (with the neck/shoulders) and a bottom section. We will use the bottom section for this tutorial.
  3. Turn the sweater body inside out.
  4. Insert the pillow form. You want the sweater fabric to be taut but not overly stretched around the pillow.
  5. Pin the raw bottom edge shut, overlapping the two sides of the raw cut slightly.
  6. If you are sewing, stitch a straight line across the pinned edge. If you are using hot glue, apply a thick, continuous line of glue along the pinned seam and press firmly until dry.
  7. Turn the cover right side out, fluff the pillow, and insert it. The existing bottom hem of the sweater often serves as a neat, finished edge!

Project 2: Fingerless Gloves or Mittens

Utilizing the sleeves of a sweater is a classic sweater refashion technique. Fingerless gloves are perfect for keeping hands warm while allowing typing or dexterity.

Materials Needed:

  • One long-sleeved sweater
  • Scissors
  • Needle and matching yarn (if desired for finishing)

How to Do It:

  1. Lay the sweater flat and cut off one sleeve near the armpit seam. Repeat for the other sleeve.
  2. Take one sleeve. Decide where you want the bottom edge (near your wrist) to fall. Usually, the original cuff makes a great wristband.
  3. Measure where your thumb will emerge. This is the trickiest part. Lay the sleeve on your forearm with the natural curve of the elbow pointing down. Mark a point about 1 to 2 inches below the thumb joint when your hand is relaxed.
  4. Carefully cut a small vertical slit, about 1 inch long, at this marked point.
  5. To prevent unraveling, use a small running stitch with matching yarn around the edge of this thumb-hole opening. This gives it a clean, professional finish.
  6. Repeat for the second sleeve. The existing sleeve opening becomes the hand hole.

Project 3: Adorable Pet Bed Liner

For pet lovers, this is a fast way to provide a soft, washable sleeping surface for small dogs or cats.

Materials Needed:

  • One very large, thick sweater or two medium sweaters
  • Stuffing (old pillow stuffing, fabric scraps, or poly-fill)
  • Needle and strong thread

How to Do It:

  1. Cut the bottom section of the sweater off, just below the armpits, keeping the bottom hem intact.
  2. Fold the cut edge over to create a finished border, or leave it raw if you plan to tuck it under.
  3. Stuff the sweater body firmly with your chosen material until it resembles a soft doughnut shape.
  4. Use a sturdy whipstitch to close the open, cut edge securely. Pay extra attention to making this seam strong, as pets can be rough on their beds!

Project 4: Felted Wool Coasters or Trivets

This method requires 100% wool sweaters that can be successfully felted (shrunken and tightened). This process makes the fabric dense and water-resistant.

Materials Needed:

  • 100% wool sweater
  • Sharp scissors
  • Cookie cutters or a large circle template
  • Washing machine and dryer

How to Do It:

  1. Felting: Wash the sweater in the hottest water cycle possible and dry it on high heat. Repeat until the fibers are locked tightly together and the fabric doesn’t stretch much.
  2. Trace your desired shape (circle, square, etc.) onto the felted wool.
  3. Cut out the shapes. Since they are felted, they will not fray. You can stack two layers for extra thickness if needed.
  4. For a decorative edge, you can sew a contrasting blanket stitch around the perimeter of each coaster/trivet.

Project 5: Cozy Leg Warmers or Boot Cuffs

Another simple use for the sleeves, perfect for layering over tights or tucking into boots for an extra pop of texture.

Materials Needed:

  • Sweater sleeves
  • Scissors
  • Optional: Elastic band

How to Do It:

  1. Cut the sleeves off as described in Project 2.
  2. If you want them to stay up better, fold the raw, cut edge over by about half an inch and stitch a casing. Slide a piece of elastic inside this casing and stitch the ends of the elastic together before closing the casing seam.
  3. Alternatively, simply cut the sleeve to the desired length, leaving the original cuff at one end. The natural stretch should hold them up well enough for casual wear.

Project 6: Sweater Sleeve Hand Warmers (Rice Filled)

These are excellent for microwaving to provide soothing, reusable heat.

Materials Needed:

  • Sweater sleeves
  • Needle and thread
  • Uncooked rice or flaxseed
  • Ribbon or yarn for decoration

How to Do It:

  1. Cut a sleeve to a length appropriate for wrapping around your hands (usually 8 to 10 inches).
  2. Sew or securely hot glue one end closed.
  3. Using a funnel or a carefully opened seam, fill the sleeve about three-quarters full with rice or flaxseed. Do not overfill; it needs room to bend.
  4. Sew or glue the second open end closed securely.
  5. Tie a ribbon around the middle to define the two hand pockets. Microwave for 30-60 seconds for instant heat.

Project 7: Sweater Mitts (The Sewing Intensive Option)

This involves more detailed cutting and sewing but results in a complete, warm pair of gloves.

Materials Needed:

  • One large, non-felted sweater (for stretch)
  • Glove pattern (print one online or trace your own hand)
  • Sewing machine or strong hand-sewing skills
  • Pins and fabric chalk

How to Do It:

  1. Cut out the entire front and back torso section of the sweater.
  2. Using your pattern, cut out the four main pieces (two palms, two backs of hands) from the sweater fabric, adding a small seam allowance ($1/4$ inch) around all edges. If you want distinct fingers, you must also cut five finger sections per mitt.
  3. Pin the corresponding pieces right sides together (inside out).
  4. Carefully sew the seams, using a stretch stitch (like a zig-zag or a narrow triple stitch) on a machine, or a tight zig-zag hand stitch.
  5. Turn right side out. If the opening is too large, you can add elastic at the wrist or use the original sweater cuff attached to the bottom edge of the palm piece.

Project 8: Decorative Wine Bottle Gift Bags

A quick, elegant presentation for a hostess gift or holiday bottle.

Materials Needed:

  • Sleeve section of a contrasting or richly textured sweater
  • Scissors
  • Ribbon

How to Do It:

  1. Cut the sleeve to be slightly longer than the wine bottle you plan to use.
  2. Fold the raw cut end up about 1 inch and stitch a simple hem for a neat bottom edge.
  3. Slide the bottle in from the top (the original cuff end). The cuff now acts as a decorative collar around the neck of the bottle.
  4. Tie a festive bow around the neck of the bottle, just above the cuff, to secure the bag.

Project 9: Cozy Draft Stopper (Door Snake)

Combat cold air under doors with a long, stuffed tube made from the body of a sweater.

Materials Needed:

  • The remaining body section of a sweater (or two sewn together for extra length)
  • Stuffing material (scraps, rice, or dried beans for weight)
  • Needle and thread

How to Do It:

  1. Cut a long, rectangular piece from the sweater body. You are essentially creating a long, flat tube.
  2. Sew or glue the long side seam together, turning the resulting tube inside out so the seam is hidden.
  3. Sew one of the short ends closed securely.
  4. Turn the tube right side out. Fill it densely with your stuffing material.
  5. Sew the final open end closed tightly. Place it firmly against the base of a drafty door.

Project 10: Felted Wool Brooches or Appliqués

A fantastic way to use up small, colorful swatches from felting projects (Project 4).

Materials Needed:

  • Scraps of felted wool
  • Brooch pins (available at craft stores)
  • Fabric glue or strong thread

How to Do It:

  1. Cut your felted wool into simple shapes (circles, flowers, abstract shapes).
  2. Layer two or three shapes together for dimension, slightly offsetting the layers if desired.
  3. Secure the layers together by stitching a few small stitches through all layers or using a dot of strong fabric glue on the back of each layer, ensuring the glue doesn’t seep through.
  4. Attach the brooch pin to the back center of the final piece using strong thread and a secure stitch pattern (like a figure-eight) or strong jewelry glue.

Conclusion: Embracing Sustainable Style

These ten projects only scratch the surface of what is possible through sweater refashion. By taking a small amount of time to deconstruct and reimagine an old garment, you divert textile waste from landfills while gaining unique, handmade items. Whether you are a beginner looking for a no-sew solution or an experienced crafter ready for pattern work, repurposing knitwear is a rewarding way to keep your wardrobe, and your home, cozy and creative. Start small, enjoy the process, and watch your collection of unwanted knits transform into cherished pieces.


Frequently Asked Questions (FAQ)

Q: What is the best type of sweater to use for upcycling projects?

A: The best type depends on the project. For items that need to hold shape (like coasters or structured bags), 100% wool is ideal because it can be felted. For items that need stretch and drape (like gloves or pillow covers), cotton blends or acrylic/wool mixes work well, as you don’t need to worry about felting.

Q: Will my sweater unravel if I cut it without sewing first?

A: Yes, most natural fibers (like wool or cotton) will unravel quickly if cut without stabilization, especially if they are not felted. Acrylic or synthetic blends may unravel less but can still look messy. Always use a stretch stitch when sewing knits, or pre-felt the material if using 100% wool.

Q: How do I wash finished upcycled sweater items?

A: Always use cold water and a gentle cycle for all finished items, unless you specifically want them to felt further (as with the coasters). Laying them flat to dry is the safest way to maintain their shape and size.

Q: Can I combine different colored sweaters into one project?

A: Absolutely! Combining colors and textures is a hallmark of creative sweater refashion. For instance, using the colorful sleeves from one sweater with the solid body of another can create a vibrant, unique garment. Just ensure the fabrics have similar weights and stretch for the best results when sewing them together.


References


Recent Posts


Wooden Crate Magic: Fifteen Projects That Will Surprise You

A workbench filled with miniature wooden crate projects, including small shelves, beds, and tables, with larger stacked wooden crates in the background featuring the text 'Wooden Crate Magic,' suggesting creative DIY upcycling.

Remember that feeling of finding a forgotten treasure in your grandma’s attic? That’s me, Sarah, with a lifelong love for turning overlooked items into something beautiful and functional. My weekends are often spent covered in sawdust or paint, experimenting with ways to give new life to old things. I believe that creativity shouldn’t break the bank, and that’s why I’m thrilled to share how simple wooden crates can unlock a world of DIY magic for your home.


15 Brilliant Wooden Crate Projects to Instantly Upgrade Your Home

There’s something great about an old wooden crate. Maybe it’s the rustic feel, the scent of old wood, or the silent story it tells of goods once shipped and journeys taken. These simple wooden boxes should not be stored in a dusty garage. They hold an amazing, hidden potential. With a little creativity, some basic tools, and a dash of effort, you can turn these overlooked items into stunning, useful, and unique pieces for every room in your home.

Prepare to be surprised as we explore the “wooden crate magic,” looking at fifteen smart projects. These projects will not only improve your home decor but will also offer simple solutions. You will enjoy the rewarding spirit of upcycling.


The Appeal of the Wooden Crate: Why Repurpose It?

Before we look at the projects, let’s quickly understand why wooden crates are such a perfect material for DIY.

  • Low Cost: You can often find wooden crates for free or very cheap. Check local markets, antique shops, or even behind grocery stores (always ask for permission!).
  • Eco-Friendly: Reusing old materials reduces trash. It lowers the demand for new production, which is a great choice for the environment.
  • Flexibility: Crates come in many sizes and shapes. This offers endless options for change.
  • Rustic Look: The natural wood grain and aged look add warmth to any area. They fit well with farmhouse, industrial, bohemian, and even modern styles.
  • Strength: These crates were built to handle the demands of shipping. They are often surprisingly strong and can hold a lot of weight once properly braced.

Now, let’s get inspired!


The Fifteen Projects That Will Surprise You

1. Chic Coffee Table with Hidden Storage

Are you tired of clutter on your coffee table? This project gives you a sleek answer.

How to do it:

  • Materials: Four matching wooden crates, wood glue, screws, caster wheels (optional), sandpaper, stain or paint, polyurethane sealer.
  • Assembly: Set the four crates in a square. Face their open sides outwards. This creates a space in the center. Glue and screw the crates together safely from the inside. For more strength, add a piece of plywood to the bottom. You can add one to the top as well, if you want a solid surface.
  • Finishing: Smooth any rough spots with sandpaper. Stain or paint the whole piece to match your decor. Apply a few coats of polyurethane. This makes it last longer and protects it from spills. Put caster wheels on the bottom for easy movement.
  • Surprise Element: The open sides allow easy shelving for books, remotes, or decor. The central space (if you add a lift-off top) offers hidden storage for blankets or magazines.

2. Elegant Bookshelf or Display Unit

Turn several crates into a custom shelf system that fits any wall.

How to do it:

  • Materials: Several wooden crates (different sizes look good), wood glue, screws, wall anchors, sandpaper, paint or stain.
  • Assembly: Decide how you want to set them up. You can stack them flat, upright, or in a random pattern. Make sure the crates are level. Glue and screw each crate tightly to the ones next to it. For bigger units, attach the finished piece to wall studs using L-brackets or strong wall anchors for safety.
  • Finishing: Sand and finish it as you like. One color can create a clean look. Or, use different colors to highlight each space.
  • Surprise Element: This is more than a bookshelf; it’s art you can change. You can move it around, add more crates later, or use it to show off plants, photos, or small art items.

3. Rolling Storage Bin for Toys or Laundry

Keep messes held in one mobile spot!

How to do it:

  • Materials: One strong wooden crate, four caster wheels, screws, sandpaper, paint or stain, optional rope handles.
  • Assembly: Be sure the bottom of the crate is solid. If it isn’t, brace it with a piece of plywood cut to size. Sand the crate until it is smooth. Attach one caster wheel to each bottom corner using screws.
  • Finishing: Paint or stain it your preferred color. Drill holes and put strong rope handles on the short sides for easy pulling.
  • Surprise Element: No more dragging heavy bins! This rolling bin makes clean-up easy for kids’ rooms, laundry areas, or even as a mobile planter for larger indoor plants.

4. Rustic Pet Bed

Give your pet a cozy and stylish place to sleep.

How to do it:

  • Materials: One correct size wooden crate, sandpaper, non-toxic paint or stain, soft cushion or blanket.
  • Assembly: Sand all surfaces well. Pay extra attention to any splinters. If the crate is deep, you can remove one of the long sides. This creates an easy way for your pet to get in.
  • Finishing: Paint or stain the crate. Think about using a clear, pet-safe sealer. Once it is dry, put in a soft, washable cushion or blanket.
  • Surprise Element: It is charming, and it raises your pet off the cold floor. You can even write your pet’s name on it!

5. Stylish Bathroom Storage Tower

Make the most of the vertical space in a small bathroom.

How to do it:

  • Materials: Two or three matching wooden crates, wood glue, screws, sandpaper, paint (often a light, moisture-proof paint for bathrooms).
  • Assembly: Stack the crates one on top of the other. Line them up perfectly. Glue and screw them together from the inside for a neat look. You can have all the open sides facing forward, or you can switch them for a unique design.
  • Finishing: Sand and paint. You can paint the inside a bright color for a fun contrast.
  • Surprise Element: This tower gives you open shelves for towels, soaps, and decor. It turns an unused corner into a useful and attractive space.

6. Unique Wall Sconces or Floating Shelves

Add character and useful surfaces to your walls.

How to do it:

  • Materials: One or more shallow wooden crates or crate fronts, sandpaper, paint or stain, strong picture hangers or L-brackets, small LED lights (optional).
  • Assembly: If you use a full crate, stand it on its side, open end facing out. Sand and finish. Tightly attach heavy-duty picture hangers or L-brackets to the back. Mount it to the wall studs.
  • Finishing: For a wall light look, attach a small LED light to the inside top. This gives a soft, gentle glow.
  • Surprise Element: These are more than just shelves; they are display boxes. They can show off small treasures, plants, or even act as a source of mood lighting.

7. DIY Planter Box or Herb Garden

Bring nature inside or improve your outdoor area.

How to do it:

  • Materials: One wooden crate, plastic liner or garden cloth, potting soil, plants/herbs, sandpaper, outside-grade paint or sealer.
  • Assembly: Line the inside of the crate with strong plastic sheeting or garden cloth. Staple it along the top edges. Poke small drain holes in the bottom of the liner to stop roots from rotting. Fill it with soil and plant your chosen herbs, flowers, or small vegetables.
  • Finishing: Sand and apply an outside-grade paint or wood sealer. This protects the wood from water if you use it outdoors.
  • Surprise Element: A beautiful, rustic planter box. You can put it on a patio, porch, or a sunny window. For an herb garden, it keeps all your cooking plants together in one nice spot.

8. Entryway Shoe Rack and Bench Combo

A helpful and welcoming piece for your home’s front area.

How to do it:

  • Materials: Two strong wooden crates (or three for more seating), a solid piece of plywood for the top, wood glue, screws, sandpaper, paint or stain, optional cushion fabric and foam.
  • Assembly: Put two crates next to each other. Face the open ends outwards to create shoe slots. Fasten them together with glue and screws. Cut a piece of plywood to fit across the top. It should stick out slightly over the edges. Screw the plywood top on from underneath.
  • Finishing: Sand and finish the entire piece. For added comfort, make a simple cushion. Cover a piece of foam with fabric and put it on top of the plywood.
  • Surprise Element: This gives you both useful shoe storage and a handy place to sit down to put on or take off shoes. The rustic look immediately makes your entryway feel friendly.

9. Vintage-Inspired Nightstand

A charming bedside piece with lots of personality.

How to do it:

  • Materials: One strong wooden crate, sandpaper, paint or stain, optional small wooden legs or caster wheels.
  • Assembly: Decide if you want the crate standing tall or on its side. If it’s tall, the open side faces forward, making a shelf. If it’s on its side, the top surface is wider. Sand all surfaces.
  • Finishing: Paint or stain the crate. You can attach small wooden legs to raise it up or caster wheels for easy moving.
  • Surprise Element: It has an open shelf for books and things you need. The flat top surface is good for a lamp and alarm clock. The rustic feel brings warmth to your bedroom.

10. Portable Art Supply Caddy

Keep your creative tools neat and ready to use.

How to do it:

  • Materials: One medium-sized wooden crate, sandpaper, paint or sealer, optional wooden dividers (thin plywood strips), wood glue, handle (e.g., a stick or thick rope).
  • Assembly: Sand the crate. If you want, cut thin wood strips to create sections inside the crate for different supplies (brushes, paints, pencils). Glue these dividers into place. Drill holes in the top edges of the crate on the short sides. Thread a stick or rope through to make a handle.
  • Finishing: Paint or seal the caddy.
  • Surprise Element: Artists and crafters will love this! It keeps everything tidy and can be easily moved from room to room. You can even take it outside for painting outdoors.

11. Stackable Pantry or Produce Bins

Organize your kitchen with style and function.

How to do it:

  • Materials: Several strong wooden crates, sandpaper, food-safe sealer or paint (optional).
  • Assembly: Simply sand the crates, making sure there are no splinters.
  • Finishing: You can leave them natural for a rustic look. Or, you can put on a food-safe sealer so they are easy to clean.
  • Surprise Element: Stack them in your pantry for tidy storage of canned goods, dry food, or vegetables. The open design lets air move around. This is perfect for things like onions and potatoes.

12. Kids’ Play Kitchen or Lemonade Stand

Start fun, pretend play with a custom project.

How to do it:

  • Materials: Two or three wooden crates, plywood scraps, wood glue, screws, sandpaper, non-toxic paint, small wooden knobs, fabric for curtains (optional).
  • Assembly: Use one crate as the bottom (for the oven). Put another on top for the counter or sink area. You may need to add a back panel made from plywood. Cut a circle in the top crate for a “sink.” Add a wooden knob for a “faucet.”
  • Finishing: Sand and paint in bright, cheerful colors. Add small wooden knobs for oven controls. You can even add a small curtain to the “oven” opening.
  • Surprise Element: This project is very rewarding. It creates a special play area that encourages many hours of creative fun.

13. Outdoor Side Table or Stool

Great for a patio or garden, it is both strong and attractive.

How to do it:

  • Materials: One strong wooden crate, sandpaper, outside-grade stain or paint, polyurethane sealer.
  • Assembly: Just sand the crate very well.
  • Finishing: Apply an outside-grade stain or paint. Follow this with several coats of an outdoor-rated polyurethane sealer. This will guard the wood from the weather and make it last longer outside.
  • Surprise Element: A simple, yet effective item for any outdoor seating. It provides a handy surface for drinks, books, or small plants.

14. Wall-Mounted Wine Rack

Show off your wine collection with a rustic, cool look.

How to do it:

  • Materials: One strong wooden crate, sandpaper, stain or paint, L-brackets or French cleat system, wine bottle holders (e.g., small wooden dowels or metal rings).
  • Assembly: Sand the crate. You may need to add inner dividers or dowels, depending on how you want to display the bottles. For a flat display, attach small dowels across the width of the crate to hold bottles securely. Firmly mount the crate to wall studs using L-brackets or a French cleat system.
  • Finishing: Stain or paint the crate to make it look nicer.
  • Surprise Element: A beautiful, small way to display a few bottles of wine. It adds an unexpected, rustic feel to your dining room or kitchen.

15. Charming End Table with Magazine Holder

A multi-purpose item for your living room.

How to do it:

  • Materials: One wooden crate, wood glue, screws, sandpaper, paint or stain, optional small wooden legs or caster wheels.
  • Assembly: Stand the crate on its side. If the crate has slatted sides, you can use one of the open sections to hold magazines. Sand the entire surface.
  • Finishing: Paint or stain the crate. Add small wooden legs or caster wheels if you prefer.
  • Surprise Element: This simple setup gives you a surface for a lamp or drink. The open slats or inner space can smartly hold magazines, remotes, or even a small throw blanket, keeping your living room neat.

Essential Tips for Working with Wooden Crates

No matter which project you pick, a few basic steps will help you succeed and stay safe:

  1. Find Crates Safely: When you get crates, always check for stamps showing they were heat-treated (HT). Avoid those that were chemically treated (MB for Methyl Bromide). HT crates are safe for use inside. Do not use any crates that have strong chemical smells or signs of mold. If you get them from a store, always ask for permission!
  2. Cleaning is a Must: Wash your crates well with soapy water, especially if they are old or have been outside. A mix of water and a little bleach can help clean them. Let them dry completely.
  3. Sanding for Smoothness: This step is vital for both looks and safety. Use medium-grit sandpaper (about 120-150 grit) to smooth rough edges and take off splinters. Finish with fine-grit (220 grit) for a truly smooth surface, especially for items you will touch often.
  4. Brace the Crates: Old crates can sometimes be shaky. Use wood glue in the joints. Brace them with small nails or screws if needed, especially for furniture pieces.
  5. Final Touches:
    • Stain: This improves the natural wood grain and adds warmth.
    • Paint: This offers endless color choices to match your decor. Think about chalk paint for a worn, farmhouse look.
    • Sealer/Polyurethane: This is key for long life. It protects against water, scratches, and wear. Use an outside-grade sealer for projects that will be outdoors.

Conclusion: Unleash Your Inner Crate Creator

Who knew that a simple wooden crate held so much promise? From useful storage answers to stunning home decor items, these fifteen projects are just the start of what you can do. Each change shows the power of ideas and the joy of giving a tossed-away item a second, even better, life.

So, the next time you see an old wooden crate, don’t just see a box. See the chance for a chic coffee table, a charming pet bed, a neat pantry, or a fun play kitchen. Embrace the “wooden crate magic,” roll up your sleeves, and surprise yourself with what you can create! Happy crafting!


FAQ (Frequently Asked Questions)

Q: Where can I find old wooden crates?

A: You can often find them at antique shops, flea markets, local wineries (they sometimes give them away), small grocery stores (ask first!), Facebook Marketplace, or online DIY groups. Look for crates stamped “HT” for heat-treated. These are safer than “MB” (methyl bromide) treated crates.

Q: How do I get an old wooden crate ready for a project?

A: First, wash it well with soapy water and a brush, then let it dry fully. Next, sand all surfaces and edges with medium-grit sandpaper (120-150). This removes splinters and makes the wood smooth. Follow this with fine-grit (220) for a smoother final surface. Check for loose nails and either take them out or secure them.

Q: What kind of paint or stain should I use?

A: That depends on the look you want. For a natural look, use a wood stain. For color, use acrylic or latex paint. Chalk paint is great for a rustic, worn finish. Always add a sealer like polyurethane. This is especially true for items that will be used a lot or get wet.

Q: Are wooden crates strong enough for furniture?

A: Yes, many wooden crates are quite strong, especially vintage ones made for shipping. However, for furniture like coffee tables or benches, always brace the joints with wood glue and screws to ensure safety and stability. If the bottom is weak, add a piece of plywood.

Q: Can I use crates for outdoor projects?

A: You certainly can! Just be sure to properly clean, sand, and then seal the wooden crate with an exterior-grade paint or sealer. This protects the wood from water, sun, and weather changes. It will make it last much longer outdoors.

Q: What tools do I need for these projects?

A: Most projects require simple tools: sandpaper (or an electric sander), wood glue, screws, a drill, a screwdriver, and paint brushes or rollers. For more complex projects, you may need a saw (hand saw or jigsaw) for cutting plywood or making custom dividers.


References


Recent Posts


10 Easy Ways To Scent Your Space Without the Candles

A minimalist arrangement on a wooden shelf featuring three homemade methods for creating a natural home scent: a clear glass spray bottle, a glass jar of dried citrus potpourri, and a glass reed diffuser next to a small potted green plant.

Hello, fellow homebodies! Like many of you, I used to rely only on candles to make my apartment smell cozy. Then, I realized how much they cost and the faint, black residue they can leave. I started looking for better, cheaper, and unique ways to create a signature home scent using simple items I already had. I’ve gathered my favorite, easy, and effective tricks to change your home’s aroma using kitchen items, essential oils, and smart heating methods.


Creating a Signature Home Scent

A home’s aroma is its invisible décor. It’s a silent, powerful welcome mat that tells a story about the people who live there. For years, the easiest way to get a cozy, inviting feel was to light a scented candle. Candles are nice, but they have big downsides. They need constant checking, they can be costly, and they often put artificial smells into the air.

The good news is great! You have a full supply of powerful, natural smells right now in your pantry and on your spice rack. Creating a special home scent is simple, low-cost, and very satisfying. By using gentle heat, evaporation, and basic ingredients, you can keep your home smelling fresh and unique without ever lighting a wick.

Here are ten simple, proven ways to naturally scent your space. The instructions explain exactly how to start today.


1. The Stovetop Simmer Pot (Nature’s Slow Cooker)

A glass pot on a modern stovetop gently simmers sliced oranges, cinnamon sticks, and star anise, releasing a natural home scent and steam into a brightly lit kitchen.

The stovetop simmer pot is likely the best and most traditional way to fill an entire home with a natural, comforting scent. It works by gently heating water and smelly ingredients on the stove. This action allows the steam to carry the scent throughout your rooms.

How To Do It:

  1. Gather Your Items: Pick fragrant things like sliced citrus fruits (lemon, orange, grapefruit), spices (cinnamon sticks, cloves, star anise), fresh herbs (rosemary, thyme), and vanilla extract. You can also add evergreen branches or pine cones for a forest smell.
  2. Mix and Heat: Fill a medium-sized saucepan about three-quarters full with water. Add your chosen items. Bring the mix to a boil. Then, immediately turn the heat down to the lowest setting so it just barely simmers.
  3. Keep it Going: The water will evaporate. You must check the pot every hour or so and add more water. This stops the pot from boiling dry. You can safely leave the pot simmering for many hours. This creates a lasting, wonderful aroma.

Example Simmer Pot Combinations:

  • Winter Warmer: Orange slices, 3 cinnamon sticks, 1 tablespoon of whole cloves, and a few drops of almond flavoring.
  • Fresh & Clean: Lemon slices, sprigs of fresh rosemary, and 1 teaspoon of vanilla extract.
  • Autumn Spice: Apple peels, cinnamon, a touch of nutmeg, and a few cardamom pods.

2. Dried Citrus and Spice Potpourri

A simmer pot is a short-term solution. A dried potpourri mix offers a hands-off, long-lasting scent. This method is a great way to use citrus peels and spices that you need to use up.

How To Do It:

  1. Dry Your Items: Slice citrus fruits (oranges, grapefruit) very thin. Lay the slices on a baking sheet with parchment paper. Bake them at a very low temperature (around 200∘F or 95∘C) for two to three hours. Flip them now and then until they are crisp and totally dry.
  2. Mix and Boost: Mix the dried citrus with whole spices like star anise, dry bay leaves, whole nutmeg, and cinnamon sticks. Put the mixture in a nice bowl or a small cloth bag (sachet).
  3. Make the Scent Stronger: To make the aroma last longer, pour a few drops of a matching essential oil (like bergamot or patchouli) over the dry mix. Toss it gently to spread the oil.

3. The Salt and Essential Oil Diffuser

For a simple, non-electric diffuser, just use coarse salt. Rock salt or Epsom salts work best. The large crystals act like a sponge. They soak up the essential oils and slowly let the scent out into the air.

How To Do It:

  1. The Base: Pour about half a cup of coarse salt into a small jar, a shallow dish, or a ramekin.
  2. The Scent: Add 15 to 20 drops of your favorite essential oil or a mix of oils right onto the salt.
  3. Put it Somewhere: Place the dish in a small area, like a bathroom shelf, nightstand, or laundry room. To refresh the aroma, simply shake the jar lightly or add a few more drops of oil. This trick works very well with strong oils like peppermint or eucalyptus.

4. Homemade Baking Soda Air Freshener Jars

Baking soda is famous for being a natural cleaner. It soaks up bad smells instead of just covering them up. Mixing it with essential oils creates a freshener that does two things at once. It leaves a lovely scent behind.

How To Do It:

  1. Mix: Fill a small mason jar halfway with baking soda. Add about 10 to 15 drops of essential oil. Lavender and tea tree are great choices for bathrooms. Stir the mixture with a spoon to blend it well.
  2. Let it Breathe: Secure a piece of cloth or a coffee filter over the top of the jar using the metal lid ring. This lets the scent escape but keeps the baking soda inside.
  3. Reactivate: Shake the jar sometimes to bring the aroma back to life. When the scent starts to fade, just add more essential oil. This is a great way to fight musty smells in closets or basements.

5. Linen and Fabric Sprays

Fabrics, like couches, curtains, and rugs, naturally grab and hold smells. A homemade linen spray can make your cloth items smell new again. It spreads a light, pleasant scent that lasts for many hours.

How To Do It:

  1. The Solution: Get a small spray bottle. Mix two parts distilled water, one part witch hazel or vodka. The alcohol helps the water and oil mix and dry cleanly. Add 20 to 30 drops of essential oil.
  2. Shake and Spray: Shake well every time you use it. Lightly mist it over fabrics. Be sure to test a small area first to check for any color changes.
  3. Best Scents: Use calm oils like chamomile or cedarwood for bedding. Use bright citrus oils for living room curtains.

6. Scenting Your Vents and Filters

Use the natural airflow of your home’s systems to spread your chosen aroma. This simple trick can scent an entire floor with very little work.

How To Do It:

  1. The Carrier: Put a few drops of an essential oil onto a cotton ball.
  2. Placement: Place the cotton ball right onto your furnace filter. You can also put it behind the air vent in a room, or lightly tape it behind a fan blade.
  3. The Magic: When the furnace or fan starts, the air moving past the cotton ball will carry the scent through the ducts and into the room. Change the cotton ball every few days when the smell lessens. Note: Always make sure the cotton ball is held securely and does not block the airflow.

7. Natural Vanilla Oven Deodorizer

If you are having people over and need a fast, great-smelling scent that makes it seem like you’re baking something good, this method is a sure winner.

How To Do It:

  1. Prepare: Add two tablespoons of vanilla extract to a coffee mug or a small, oven-safe dish.
  2. Bake: Put the mug into a warm oven. The temperature should be very low, about 250∘F or 120∘C.
  3. The Result: As the vanilla gently heats up, the aroma will fill your kitchen. It will float into nearby rooms. This creates a lovely, warm, and comforting scent of fresh-baked goods without any actual baking. Watch the vanilla closely so it doesn’t burn.

8. Coffee Bean and Vanilla Extract Centers

This method is popular for getting rid of smells in places like entryways or kitchens. It also gives off a rich, energetic aroma.

How To Do It:

  1. The Base: Fill a small, attractive container (like a glass holder or shot glass) with whole, unused coffee beans.
  2. The Boost: Place a small, shallow dish or even a thimble inside the coffee beans. Fill it with a few drops of vanilla extract.
  3. Why it Works: The coffee beans have a strong, deep aroma. They naturally soak up bad odors. The vanilla adds a layer of sweet, comforting scent. The mix is complex and welcoming.

9. DIY Reed Diffusers

A store-bought reed diffuser uses a scented oil base and bamboo sticks (reeds). The reeds pull the scent up and let it out into the air. Making your own lets you control the items and avoid fake perfumes.

How To Do It:

  1. The Vessel: Find a small glass bottle that has a narrow opening. This helps slow down evaporation.
  2. The Base: Mix a carrier oil (like fractionated coconut oil, sweet almond oil, or even mineral oil) with a very small amount of strong alcohol like vodka or rubbing alcohol. The alcohol thins the oil and helps it travel up the reeds better.
  3. The Scent: Add 30 to 50 drops of your preferred essential oil mix to the blend.
  4. The Reeds: Put bamboo skewers or special diffuser reeds into the oil. Turn the reeds over once a week to refresh the diffusion.

10. Herbal Steam Cleaner for Floors and Surfaces

This is not a purely passive scent method. But this trick combines cleaning with wonderful smells. It leaves a lasting, fresh scent on your largest surfaces: your floors.

How To Do It:

  1. The Infusion: Add a handful of fresh herbs, like mint, thyme, or rosemary, to a pot of water. Bring it to a boil. Simmer it for about 15 minutes, then strain the liquid.
  2. The Cleaner: Use the strained, fragrant herbal water as your base for cleaning wood floors, counters, or linoleum. Add a splash of white vinegar or a few drops of dish soap to help with cleaning.
  3. The Result: The light, residual scent of the herbs stays on the cleaned surfaces. This makes your whole home smell naturally crisp and clean.

Key Takeaways for Long-Lasting Scenting

To make your homemade scents last a long time, remember these simple rules:

  • Humidity is Key: Steam and heat are the best ways to carry a scent. Use a simmer pot or even a simple bowl of hot water with essential oils in a sunny room. This will make the aroma stronger.
  • Layer Your Scents: Don’t rely on just one trick. Combine a stovetop simmer during the day with a baking soda jar in the bathroom. Use linen spray on your bedding. This creates a full, layered home scent.
  • The Power of Porous Items: Things like salt, cotton, dried flowers, and baking soda soak up and release fragrance slowly. This makes them great for hands-off, long-term scenting.

By using these easy, natural choices, you can take charge of how your home smells. You can move beyond expensive candles and create a signature scent that is completely yours and entirely natural.


FAQ Section

How long do simmer pot ingredients last?

The ingredients in a simmer pot can be used again for several days. Just cover the pot and store it in your refrigerator overnight. When you want to use it again, add fresh water and bring it back up to a gentle simmer. The smells will get a bit weaker each time you use them. You may want to refresh the mixture after two or three uses.

Are essential oils safe to use around pets?

Be careful when using essential oils around pets, especially cats. Some oils can harm them if they breathe them in or if they get on their skin. Peppermint, citrus, ylang-ylang, and tea tree oil are often dangerous. Always check with a vet about the safety of specific oils before using them in rooms where your pets spend time. Sticking to whole, natural items like cinnamon sticks and orange peels is usually a safer choice.

What is the best way to get rid of a lingering bad odor first?

Before you try to add a beautiful scent, you need to take away the bad smell. The best natural methods use activated charcoal. This absorbs smells without adding any fragrance. You can also place a small bowl of white vinegar in the middle of the room for a few hours. Sprinkling baking soda on rugs and then vacuuming it up is also excellent for lifting smells from cloth.

Can I use fresh herbs from my garden for potpourri?

Yes, you can and should use fresh herbs. But, they must be fully dried before you mix them into potpourri. Putting fresh herbs in a mix will trap moisture and can cause mold. To dry them, you can use a food dehydrator. You can also hang them upside down in a cool, dark spot for a few weeks, or bake them at a very low temperature, just like the citrus peels.


References


Recent Posts


Beyond the Bowl: Crafting Beautiful Dried Fruit Garlands

Close-up of a stunning, handmade Dried Fruit Garlands draped across a sunlit white window sill. The garland features translucent dried orange and lemon slices, cranberries, wooden beads, and small pinecones strung on twine, with sunlight shining through the fruit to showcase the vibrant, warm colors.

As a lifelong lover of simple, natural home décor, I find joy in crafting beautiful things from everyday materials. There’s a magic in taking something ordinary, like a humble piece of dried fruit, and turning it into vibrant, sun-kissed art that brightens a room. This guide to making Dried Fruit Garlands is born out of my own efforts to make my house feel more like a home, filled with warmth and natural charm. I hope it inspires you to embrace your inner crafter and create something truly beautiful and lasting for your own space.


The Natural Charm of Dried Fruit Garlands

We all want home décor that is both beautiful and meaningful. For this goal, natural elements often provide the best results.

Dried fruit garlands were once a staple of old-time holiday decoration. They are now popular again. Homeowners look for décor that is sustainable, charming, and vibrant. These garlands are not just for the holidays. When made right, Dried Fruit Garlands offer color and texture all year long. They make any room look warm with their translucent glow and light scent.

The appeal of a dried fruit garland is its simple, natural feel. Making one is relaxing. The final product is a stunning display of nature’s palette. You see deep cranberry reds and translucent orange citrus slices. They catch and reflect light in a way artificial items cannot. This gives your home a warm, inviting, and handcrafted feel.


Why Use Dried Fruit Garlands?

  • Natural Brightness: Drying makes the color stronger. This creates a stained-glass effect when light shines through.
  • Eco-Friendly Decor: They use natural, safe materials. This makes them a green choice for decorating.
  • Pleasant Scent: The light smell of citrus, apple, or spice adds a gentle, welcoming aroma to your home.
  • Easy to Match: They fit any style, from country rustic to sleek modern. It depends on the fruits and string you choose.

The Art of Drying: Good Prep Works Wonders

Perfectly dried fruit is the start of any beautiful Dried Fruit Garland. Rushing this step can cause problems. You might see mold, color change, or brittle slices that break easily. The goal is simple: remove all moisture. You must also keep the slice’s shape and color intact.

Step-by-Step Drying Guide

Choose and Slice:

Pick firm, undamaged fruit. Citrus fruits (oranges, lemons, limes, grapefruit) are the best choices. They have striking color and catch light well. Apples and pears also look nice, but their color darkens. You can use a special soak to fix this.

  1. Slice Evenly: Use a sharp knife or a slicer (be careful!) to cut slices. Aim for 1/8 to 1/4 inch thick. Cutting them all the same size is vital for quick, even drying. Thinner slices dry faster but break easier. Thicker ones need more time.
  2. Press Out Water: Lay the slices on paper towels. Gently blot them. This removes water from the surface. It stops sticking and speeds the process.
  3. Soak Apples/Pears (Optional): To keep apples and pears from turning brown, dip them briefly. Use a mix of equal parts water and lemon juice before drying.

Drying Methods:

MethodTemp.Time (Approx.)Best ForTips
Oven Drying170−200∘F4−8 hoursCitrus, ApplesThe easiest and most common way. Turn slices every hour.
Dehydrator135∘F8-12 hoursAll fruitsRequires a machine. Offers the most control and speed.
Air DryingN/A3-7 daysThin slices, BerriesOnly works well in places with low moisture. Put on a mesh rack.

The Ready Test:

The fruit is done when it feels dry. It should be leathery and slightly hard, but not burnt. It must not feel cold or sticky. Press it firmly. No water should appear. Once fully dry, let the fruit cool fully before you start stringing.


Design Ideas: Beautiful Garland Examples

The true beauty of Dried Fruit Garlands comes from mixing different textures, colors, and materials. Here are several great ideas for your own craft project:

Concept A: Bright Citrus Shine

This is the classic dried fruit garland. It offers the most light and color.

  • The Look: Warm, bright, and glowing. Perfect for windows, shelves, or doorways.
  • Contents: Alternate slices of dried oranges and dried lemons.
  • Added Pieces: Whole cinnamon sticks (tied with brown string) and small bunches of dried bay leaves or star anise.
  • String Material: Thin natural jute twine or clear fishing line for a floating look.

Concept B: Cozy Apple and Spice

A nice, darker garland with a warm, country feel.

  • The Look: Earthy, textured, and with a soft, nice smell. Great for a kitchen or dining area.
  • Contents: Dried apple slices (keep the skin on for a rustic style) and dried orange rounds.
  • Added Pieces: Small pinecones, wooden beads, and small groups of whole cloves pressed into a few apple slices before they dry.
  • String Material: Thick, natural hemp rope or rustic ribbon woven into the top.

Concept C: Red Cranberry and Lime

A brighter, more festive garland. It has nice flashes of red and green.

  • The Look: Lively, colorful, and great for a party or celebration.
  • Contents: Dried lime slices and whole, air-dried cranberries (poke them with a needle first).
  • Added Pieces: Small silver or gold bells and wooden pieces painted a light mint green color.
  • String Material: Simple cotton string or thin wire for a drape that holds its shape well.

The Stringing Process: Making the Garland

Your fruit is dry and cool now. Next, you begin to put the pieces together. This stage needs patience and the right simple tools.

Tools You Will Need

  • Needle: A long needle with a large opening (a weaving or doll needle works best).
  • String: Your choice of twine, wire, or clear line.
  • Small Poke Tool (Optional): A thin awl or skewer. Use it to pre-poke holes in fruit that is thick or very hard.
  • Scissors
  • Accent Pieces (beads, cinnamon sticks, etc.)

How to String a Garland

  1. Measure the Length: Check the space where the garland will hang. Add extra length for loops and knots at the ends. Cut your string long enough. It’s best to start too long than too short.
  2. Tie the Start: Tie a large knot. Or, tie on a small bead at one end. This stops the fruit from sliding off.
  3. Go Through the Fruit: Thread your needle. Gently push the needle through the center of the dried fruit slice. For the best look and strength, pierce the fruit in two spots near the top edge. Keep the holes about an inch apart. This two-point threading helps the slice lay flat. It keeps it from spinning on the string.
  4. Add Spacers: Add an accent piece between each fruit slice. This could be a wooden bead, a small cinnamon stick, or a simple knot. This keeps the slices from crowding together. The pattern of fruit and spacer makes the final look of the garland.
  5. Keep it Gentle: Pull the string to keep it neat, but do not pull too tight. Too much force could tear the dried fruit.
  6. Secure the End: When you reach the length you want, tie a strong final knot. Make a loop for hanging, or tie on another accent piece to secure all items.

Beyond Fruit: Adding Natural Elements

Dried fruit is the main star. However, the other natural items you add give your garland depth and texture.

Natural ElementWhat It DoesHow to Attach
Cinnamon SticksAdds a rich scent and dark, woody look.Tie it to the string using thin twine. Or, push the string through the stick’s center hole.
Bay LeavesBrings a soft green color and a different shape.Push the stringing needle through the stem end.
Star AniseBeautiful, pointed shape and spicy smell.Tie with fine thread. Or, use a small dab of hot glue to fix them to the string.
Popcorn/CranberriesAdds bright color and light bulk.String them one by one with the same needle. Make sure the popcorn is fully popped and cool.
Wooden BeadsGood, even spacers that give a rustic feel.Simply thread them onto the string between the fruit pieces.

Keeping Garlands for a Long Time

Everyone asks: how long can my Dried Fruit Garlands last? With good care, they can last for many seasons, maybe even years. The worst threats are moisture, which causes mold, and bugs.

Tips for Long-Term Care

  1. Dry Fully: This is the most important step. The garland will not last if any water remains inside the fruit. This is why drying slowly at a low heat is best.
  2. The Clear Coat Choice: You can brush both sides of the dried fruit with a clear craft sealant. Use a kind that will not yellow. This seal keeps out moisture and insects. This does make the natural scent disappear.
  3. Pick the Right Spot: Hang your garlands inside. Keep them away from high moisture areas (sinks, baths) and direct heat. A fireplace mantel or a sunny window works well. The sunlight helps keep them dry.
  4. How to Store: When you take it down, store the garland in a cool, dark, dry place. Wrap it loosely in thin paper, not plastic. Plastic can trap water. Place the wrapped garland in a strong cardboard box.

More Than Standard: Creative Display Ideas

Draping a garland over a door or shelf is lovely. However, Dried Fruit Garlands can be used in many new ways.

  • Window View: Hang a garland right in a window. The sun will shine through the fruit, giving it a stained glass look.
  • Table Center: Weave a shorter garland along the middle of a table. Mix it with candles and green branches.
  • Gift Wrap: Use a small length of the garland instead of a ribbon on a present. This adds a unique, natural flair.
  • Light Fixture: Gently wrap a light garland around the arms of a hanging light. This adds a soft, warm, festive glow to the room.
  • Curtain Tie-Backs: Use short sections to hold back curtains. This adds a decorative touch to your window.

Frequently Asked Questions

Q: Can I use fresh fruit to make my garland?

A: No, you must dry the fruit completely first. Fresh fruit will rot quickly and become moldy. Also, the water inside will be too heavy and tear the slices apart.

Q: Why is my dried fruit turning brown or dark?

A: Apples and pears often turn brown. This is due to air exposure. You can slow this down by soaking the slices in lemon water before you dry them. Also, too much oven heat can cause the fruit to burn and darken. Use a very low oven heat, below 200∘F.

Q: How do I keep bugs away from my Dried Fruit Garlands?

A: Bugs like water and leftover sugar. The best defense is to make sure the fruit is 100% dry. Hang it in a low-moisture area. If you see any bugs, take the garland down right away. Throw away any pieces with bugs. You can wipe the rest with a cloth barely wet with white vinegar before you re-hang them.

Q: What is the best type of string to use?

A: Natural materials like jute, cotton, or hemp work well for a rustic look. Use clear line or a thin wire for a floating, invisible look. Choose a string that looks good with your garland’s style.


Reference Section


Recent Posts


The Top 7 Botanical Prints Trending Right Now

A gallery wall featuring an assortment of framed pressed flower art, showcasing various Botanical Prints in different frame sizes and colors, including brown wood and black. The collection displays multiple pressed flower types, such as blue, yellow, and red blossoms, arranged as herbarium-style specimens.

Hi there, fellow nature lover and home decor enthusiast! I’m Sarah, and like many of you, I’ve always loved the simple beauty of nature. My journey into botanical art started in my grandmother’s garden. I learned to turn fleeting blossoms into lasting treasures and create stunning Botanical Prints. Join me as we explore how to bring that same magic into your home with stunning pressed flower art.


Botanical prints are popular right now. They bring a calming, natural feel to any space, from a tiny apartment to a large country home. This trend is not new, but it is strong. People want to connect with nature inside their homes. Old botanical prints were often like science diagrams. Today’s prints are fresh, bright, and very adaptable. They range from delicate pressed flowers to bold digital art. The world of botanical prints has something for everyone.

But which styles are truly trending now? Which ones are captivating home decorators? This guide will show you the top seven trends in botanical design. We include clear examples. We also give you a detailed “how-to” guide. You can create your own beautiful wall art. Get ready to update your home with the lasting beauty of nature!


Why We Love Botanical Prints

First, let’s talk about the appeal. Why do these prints feel so good to look at? In a modern world full of screens, botanical art keeps us grounded. It reminds us of growth, life, and the wonder of the natural world. These prints create a feeling of peace. They can boost your mood. They lead to a more mindful living space. Whether you see a tiny pressed fern or a bright floral picture, these prints connect you to something essential and beautiful.

The Top 7 Botanical Prints Trending Right Now

Here are the styles of botanical prints that designers and homeowners favor today:

1. The Classic Pressed Wildflower Medley

Everyone loves the simple beauty of a wildflower collection. It’s like a captured memory. These flowers are carefully pressed and arranged. They hold a moment in time. This trend uses the organic, rustic look of nature. Often, you see many types of wildflowers in one frame. Think of tiny blue forget-me-nots. Picture delicate Queen Anne’s Lace. See the red of crimson clover. All are composed into art. Their beauty comes from their natural, unique shapes. The pressing process adds subtle color changes.

Why it’s trending: It feels nostalgic. It connects us to the outdoors. It celebrates quiet, simple beauty. It’s perfect for creating a gallery wall that looks truly handmade.

How to do it yourself:

  • Collection: Pick small, flat wildflowers. Find them in your garden. Forage responsibly. Don’t pick thick, wet flowers. They may grow mold easily.
  • Pressing: Use a flower press if you have one. You can also use heavy books. Place the flowers between blotting paper, newspaper, or coffee filters. Press them firmly. Wait for two to four weeks. Change the paper every few days if it feels wet.
  • Arrangement: Make sure the flowers are totally dry. Arrange them on archival paper. Try different looks. You can cluster them. And scatter them. You can line them up.
  • Framing: Use a tiny amount of clear glue to stick them down. Use clear adhesive dots if you prefer. Frame the art under glass. UV protection is best to stop colors from fading.

2. Bold, Single-Stem Statement Pieces

This trend is the opposite of the medley. It focuses on just one stunning plant. It makes a big impact. Imagine a large, perfectly pressed fern. Picture a vibrant, flat tropical leaf. Think of one beautiful rose bloom. Put it in a large frame. This style highlights the plant’s shape, texture, and color.

Why it’s trending: It gives a modern, clean look. The small details of the plant stand out. It becomes a strong focal point. It won’t make the room feel too busy.

How to do it yourself:

  • Selection: Pick a flat, strong specimen. Good choices are big fern fronds (like Maidenhair). A single, young, flat Monstera leaf works too. You could also use a pressed Dahlia petal design.
  • Pressing: Use a big press or large books for bigger items. Flatten thick stems or leaves gently before you press them. Be patient; big specimens need more time.
  • Presentation: Place the dried plant exactly in the center of a plain white or cream background. The empty space around the plant is important. It adds to the drama.
  • Framing: Choose a simple, elegant frame. Thin black metal, natural wood, or a clear acrylic frame all look great.

3. Herbarium Style: Scientific & Elegant

This trend is based on old plant collections. The herbarium style uses pressed plants. Each one is carefully labeled. The label shows the scientific name. It shows the common name. It gives the date and place it was collected. This style mixes science with art. It often uses stylish fonts. The paper sometimes looks old. It is organized beauty. It tells the plant’s story.

Why it’s trending: People who love history and science like this style. It adds a smart, refined feel to any room.

How to do it yourself:

  • Preparation: Press a whole plant specimen. Include the stem, leaves, and flowers. If the roots are small and clean, include those too. Keep the plant as complete as possible.
  • Mounting: Carefully glue the entire specimen onto a strong, archival paper.
  • Labeling: Create a label. You can write it by hand with a fine pen. You can print it. Include the Botanical Name (in italics). Add the Common Name. List the Date Collected and Location. Put the collector’s name too. Place the label neatly in one corner.
  • Framing: A classic wood frame looks best. Choose dark or natural wood. Add a mat for extra elegance.

4. Minimalist Geometry with Botanical Accents

This trend is a mix of natural shapes and clean lines. It takes the soft look of botanicals and puts them with sharp, geometric designs. You might see pressed leaves inside a clean circle. Maybe delicate flowers are placed near an abstract line drawing. The print might use modern frames with geometric patterns. The soft, living elements contrast beautifully with the straight, hard lines.

Why it’s trending: It works well for both natural and modern design. It’s perfect for homes that like neat lines but still want a touch of nature.

How to do it yourself:

  • Design: Draw your shape first. This helps plan the layout. You could make a circle. The flowers could fan out from the center. Or, pressed stems could form simple, abstract lines.
  • Elements: Pick small, thin pressed flowers or leaves. They should be easy to bend into shapes. Good choices are small fern pieces, lavender stems, or single petals.
  • Mounting: Glue your pressed pieces onto the background paper. The paper should highlight your geometric shape. You can draw the shape lightly first as a guide.
  • Framing: Use a thin, modern frame. Black metal or clear acrylic sandwich frames work well. They make the modern look stronger.

5. Vibrant & Abstract Petal Art

Many pressed flower pieces look very real. This trend is different. It uses petals for abstract designs. It means arranging petals into bright, non-realistic pictures. Think of patterns that look like mosaics. Imagine swirling colors or smooth color changes. All the colors come from natural flowers. Roses, hydrangeas, and delphiniums are good for this. They have rich colors and unique petal shapes.

Why it’s trending: It is a fresh, artistic style. It brings a lot of color and texture. And it is a great match for modern or bohemian homes. It lets you be very creative.

How to do it yourself:

  • Preparation: Press a lot of petals from different, colorful flowers. Sort the petals by color and size.
  • Composition: Play with the arrangement on paper first. Make swirls, color fades, or abstract shapes. You can even try to make tiny landscapes of color. Overlapping petals adds depth.
  • Adhesion: Use just a tiny bit of clear-drying glue. Take your time. You will build up the shapes and layers slowly.
  • Framing: A simple frame with a wide mat helps the art pop. It keeps the focus on the vibrant colors.

6. Pressed Foliage and Greenery Studies

This trend puts the spotlight on greenery and leaves. It skips the flowers altogether. It celebrates the different shades of green, the texture, and the unique structure of leaves. You see ferns, moss, eucalyptus, and small sprigs of pine. The prints often have a monochromatic, calming effect. They give a subtle hint of the forest. The arrangements are simple and often large-scale.

Why it’s trending: It is gender-neutral and versatile. It works with any interior style, from industrial to ultra-modern. It’s the perfect way to add quiet color and texture.

How to do it yourself:

  • Selection: Pick a variety of leaves. Find different shapes and colors of green. Thin leaves press best. Try ferns, eucalyptus, or small ivy leaves.
  • Pressing: Press them flat, just like flowers. They may take longer to dry than petals. Make sure they are totally dry before framing. Wet leaves will mold easily.
  • Arrangement: Create a layered look. Place the larger leaves down first. Then, add smaller ferns and sprigs on top. This adds depth and shadow.
  • Framing: A light-colored wood or a white frame looks fresh. A dark background paper, like navy or black, will make the green stand out strongly.

7. The Layered Transparency Look

This trend uses clear glass or acrylic frames. There is no paper background. The pressed flower is visible on both sides. This creates a floating effect. The wall color becomes the background. When light hits the frame, the pressed flower casts a beautiful, soft shadow. It’s a delicate, ethereal, and very modern way to display plants.

Why it’s trending: It is modern and airy. It creates visual lightness. The flower seems to float. It adds an interactive element because the shadows change with the light.

How to do it yourself:

  • Materials: You need a special frame. Look for a floating frame. It uses two pieces of glass or acrylic.
  • Preparation: This method demands perfect flowers. Any smudge or excess glue will be very visible. Use only very thin, flat pieces.
  • Mounting: Clean the glass well. Place the flower on the bottom piece of glass. Use a tiny amount of clear epoxy or clear-drying glue on the back of the flower. Use tweezers for careful placement. Gently put the top glass over the flower and secure the frame.
  • Placement: Hang this art in a place where it can catch natural light. This is how you get those beautiful shadows.

Mastering the Art of Pressing: Your Detailed How-To

Creating your own botanical prints is simple. It only needs patience. The process is easy. The payoff is huge. Here is a simple, easy-to-follow guide to pressing and framing your flowers.

Step 1: Gathering and Selection

  • When to Pick: Pick flowers in the middle of the day. They should be dry. Wait for the dew to dry. Flowers with less moisture press better. They will not mold.
  • Which Flowers are Best: Choose flowers with flat petals and thin centers. Pansies, violas, single-petal roses, cosmos, and ferns are great. Avoid thick flowers like tulips or dense buds. They are too bulky.
  • Pre-Press Prep: Remove any leaves that you don’t want. Trim stems to the length you need. Gently flatten the flower with your fingers.

Step 2: The Pressing Method

  • Use a Book: This is the easiest, cheapest way. Open a heavy book. Place the flower between two sheets of absorbent paper. Blotting paper is best. You can also use plain newsprint or coffee filters. The absorbent paper draws out moisture.
  • Positioning: Place the flowers face down. Keep space between them. If they touch, they can stick together. Spread out the petals and leaves as you want them to look. Be careful.
  • Pressure: Close the book. Place more heavy books on top. Use bricks or other heavy items for more weight. The pressure must be even.
  • Waiting: This is the hard part. Wait for two to four weeks. Do not check too soon. The flowers must be totally dry. They will feel like paper. If they bend, they need more time.

Step 3: Arranging and Gluing

  • Materials: Get tweezers, archival paper, and clear-drying craft glue. A small brush or a glue pen helps control the glue.
  • Arrangement: Use tweezers to move the delicate, dried flowers. Arrange them on your paper. Try different positions. Once you are happy, take a picture with your phone. This helps you remember the layout.
  • Gluing: Put a very tiny amount of glue on the back of the flower. Use the brush or glue pen. Place the flower on the paper. Press it gently for a moment. Work slowly. If a petal breaks, just glue it back together.
  • Drying: Let the entire piece dry completely. Give it at least 30 minutes.

Step 4: Framing Your Botanical Prints

  • Protect Your Art: Pressed flowers can fade in direct sunlight. Use a frame with UV-protective glass. This keeps the colors brighter for longer.
  • Choosing a Mat: A mat is the cardboard border around the art. It adds a professional look. It also keeps the flower from touching the glass. This protects the delicate petals.
  • Display: Hang your botanical prints where you can see them often. Group a few together for a gallery wall. This makes a great design statement.


Frequently Asked Questions (FAQ)

Q: What is the formal name for pressed flower art?

A: The art of pressing and arranging dried flowers is often called Oshibana. This is a Japanese art form. It has been practiced for many centuries.

Q: How long will my pressed flower art last?

A: If you prepare and frame them well, pressed flowers can last for many years. The key is to keep them out of direct sunlight. This slows color fading. You must also make sure they are completely dry before you frame them. This prevents mold.

Q: Which flowers are the absolute easiest to press for beginners?

A: For beginners, choose flowers that are already flat and thin. Pansies and Violas are perfect. Ferns, Queen Anne’s Lace, and small single-petal Daisies are also very easy to work with.

Q: Can I use a microwave to press flowers faster?

A: Yes, you can use a microwave press. This method is much faster than the book method. It can dry flowers in minutes. You must be very careful with it. You need a special microwave press or thick paper and ceramic tiles. This prevents burning. The traditional, slow method often gives the best color retention.

Q: What is the best type of paper for the background?

A: Use archival-quality paper or cardstock. This paper is acid-free. It will not yellow over time. You can choose white or cream. Darker colors, like navy, can make bright flowers pop strongly.

Q: Where should I display my finished botanical prints?

A: Display your prints indoors. Avoid spots with high humidity, like a very steamy bathroom. The biggest rule is to avoid direct, strong sunlight. Sunlight will cause the natural colors to fade over time.


Reference Section


Recent Posts


A Simple Guide to Decoupage Flower Coasters

Four square, vintage-style Decoupage Flower Coasters featuring a mix of dusty pink and deep red roses with green leaves on an aged, cream-colored background. The coasters have rounded corners and distressed edges, resting on a white, weathered wood surface.

We all have those little moments—a special bouquet from a loved one, a perfect specimen found on a walk, or a memory tied to a specific bloom. While fresh flowers fade, the desire to hold onto their beauty and meaning doesn’t stop. This guide helps the casual crafter. It gives you an easy, meaningful way to turn those beautiful blossoms into charming, everyday keepsakes, such as Decoupage Flower Coasters, for your home or to give as gifts. Let’s start crafting and keep those memories alive!


The Timeless Charm of Decoupage Flower Coasters

Decoupage is an easy and rewarding craft. It lets you change ordinary objects into personalized art. Simply put, it’s the process of decorating something with paper cutouts and then covering it with clear sealant. This makes a smooth, finished surface.

When you use this method to preserve delicate pressed flowers on a coaster, the result is beautiful. You get a glossy, very useful piece of home décor. This guide will walk you through every step. You will soon be creating your own stunning, unique Decoupage Flower Coasters.

Why Pick Decoupage Over Resin?

Resin is popular for preserving flowers. But decoupage is often simpler, cleaner, and more accessible for most crafters.

  • Simplicity: Decoupage needs few special tools and materials. You do not have to measure exactly, mix chemicals, or worry about air bubbles.
  • Cost: The main items—decoupage medium (like Mod Podge), a brush, and a tile—are cheap. You can find them easily at any craft store.
  • Safety: There are fewer fumes and safety worries compared to working with chemical resins. This makes it a comfortable project to do inside.
  • Speed (The Start): The first steps of the project are quick. It does not take long to set up or start gluing.

Decoupage is a great way to start crafting with flowers. It gives you a strong, waterproof, and heat-safe finish. This makes it perfect for a good, lasting coaster.


Section 1: Getting Ready – A Great Start

A successful decoupage project depends on good preparation. This is especially true when working with fragile natural materials.

Picking Your Base Material

The coaster material, or base, is the bottom of your project. The best materials are smooth and flat. They should also hold up well against water.

  • Ceramic Tiles (Matte or Plain): These are the most common choice. They cost little and you can find them at any hardware store. They also give a classic look. A four-inch by four-inch size works well. If the tile surface is glossy, lightly sand it first. This helps the glue stick better.
  • Wood Blanks or Slices: These give your coasters a natural, rustic feel. Make sure they are sanded smooth. If the wood is too soft or rough, you may need a clear wood sealant first. But often, a base coat of the decoupage medium works fine as a primer.
  • Cork: Cork coasters are light and soak up moisture naturally. You might need to use a thicker coat of the decoupage medium here. This helps make the finished surface smooth over the cork’s texture.

Getting Your Flowers Ready

The quality of your dried flowers matters a lot for your finished coasters. They must be totally dry and flat.

  • How to Press: Use a flower press. Or, you can just put the flowers between sheets of absorbent paper (like blotting paper) and stack heavy books on top. It may take one to four weeks to dry the flowers. The time depends on how thick the flower is and how wet the air is.
  • Good Flowers to Use: Flowers that are thin and naturally flat work best. Some great examples are:
    • Small pansies and violas
    • Flat fern fronds
    • Thin, small-leafed herbs
    • Single petals from cosmos
    • Delicate Queen Anne’s Lace
    • Single petals from a rose (do not use the whole bulky bud)
  • Check for Wetness: Before you use them, gently feel the pressed flowers. If they feel cool or slightly bendy, they are not ready. They still have water in them and might go moldy under the sealant. They must be very dry and brittle.

What You Will Need

  • Coasters: Four to six ceramic tiles, wood blanks, or cork rounds.
  • Decoupage Medium: This is a glue and sealant that is water-based and dries clear. Choose a glossy or satin finish. Pick one that says it works for indoor and outdoor use if you want the coaster to be extra strong.
  • Brushes: Get a few soft-bristled brushes in different sizes. You need one for applying the glue and one for the smooth topcoat.
  • Pressed Botanicals: Your dried and prepared flowers.
  • Tweezers: You need these to handle the very delicate flowers without tearing them.
  • Scissors: Small, sharp scissors for trimming stems or shaping your plants.
  • Clear Spray Sealer (Optional but Good): This gives you a final, very tough protective layer.
  • Felt Pads or Cork Backing (Optional): These go on the bottom to protect your furniture.

Section 2: Step-by-Step – Making the Coasters

This process has three simple parts: gluing the flowers down, adding protective layers, and the final details.

Part 1: Planning the Layout

Before you put on any glue, plan your design. This is your chance to try out different flower arrangements.

  1. Clean Up: Wipe your coaster base clean. Use a dry cloth or a little alcohol to remove any dust or oils. Dirt will stop the glue from sticking.
  2. Test the Look: Place your pressed flowers right on the coaster surface. Play with different groupings and angles. You could try a full, thick coverage. Or, you could make a simple, artistic design. Decide if you want the flowers to go right to the edge or stay in the center.
  3. Take a Photo: Once you find a layout you like, snap a quick photo. This picture will help you remember the design when you start gluing. Moving the flowers once the glue is on can be hard.

Part 2: Gluing and Sealing

The decoupage medium works in two ways here: first as glue, then as a sealant.

  1. The Base Glue Coat: Take a clean, soft brush. Spread a thin, smooth layer of the decoupage medium on the coaster surface. Apply it where the flowers will go. The layer should be a little sticky, not soaking wet.
  2. Placing the Flowers: Use the tweezers. Gently pick up the pressed flowers and put them onto the wet glue. Follow your photo for the design.
  3. Pressing Gently: Carefully and lightly press the flowers into the glue. Use your fingertip, a clean piece of wax paper, or the back of a spoon. You need to make sure the whole flower, especially all the edges, touches the glue. This is key: If any air or unsealed edges are left, water could get in later. This will cause mold or make the flower peel up.
  4. First Sealing Coat: Let the glue and flowers dry fully. This takes at least 20 to 30 minutes. Once dry, apply a very gentle, thin top coat of the medium. Start at the center of the flowers and brush outward. Be very light with your brush. The flowers are fragile when they soak up the liquid.

Part 3: Building a Strong Protective Layer

How long and how good your Decoupage Flower Coasters last depends on this step. You need to create a barrier that keeps out both water and heat.

  1. Adding Layers: Let the first sealing coat dry for at least one hour. Then, put on a second coat. Make this one a little thicker than the first. You will do this step many times.
  2. The Smooth Goal: You want the top layer of the decoupage medium to be totally flat. It should be level with the tallest part of the pressed flowers. When you touch the surface, you should not feel the texture of the flower anymore. For thicker flowers, you might need five or more coats to get this smooth finish.
  3. Sanding (Optional but Good): After three or four coats, and only when the layer is fully dry (best to wait overnight), you can very lightly sand the surface. Use very fine sandpaper (like 400 grit or higher). This removes any brush lines and makes the next coats smoother. Be careful! Do not sand so hard that you hit the flowers. Wipe off the dust with a damp cloth before you apply the next coat.
  4. Final Coats: Keep putting on coats until you get a deep, glass-like shine and a smooth surface. Most projects need at least 4 to 6 coats for the best protection.

Section 3: Extra Tips and Final Touches

Once you finish the main decoupaging, there are a few things you can do to make your finished coasters look even better.

The Final Seal: Making It Tough

The decoupage medium protects well. But a final sealant layer is vital for items that get a lot of use, like coasters.

  • Acrylic Spray: After your last decoupage coat has set (wait 24-48 hours), move your coasters to a place with good airflow. Apply 2-3 light coats of a clear, glossy spray sealant. Look for one that is oil-based or a high-quality acrylic. This creates a very strong barrier. It handles water and heat well. This lowers the chance of water rings or damage from a hot mug.

Adding the Edges and Backing

The sides of your coasters need some care, too, especially if you used ceramic tiles.

  • Coloring the Sides: You can paint the edges of your ceramic tiles. Use acrylic paint that matches the flowers. Or, use a metallic paint (gold or silver) for a fancy look. Make sure the paint is dry before you add the backing.
  • Felt or Cork Backing: Put a soft backing on the bottom to keep your furniture from getting scratched. This also stops the coasters from sliding. You can buy sticky felt dots. Or, cut thin cork sheets into squares and glue them on. This small step makes the coaster look finished and professional.

Design Ideas to Copy

Here are a few design ideas using different flowers and layouts. Use them for inspiration!

Design IdeaFlower TypeHow to ArrangeThe Look
Simple FocusOne single, large pansy or poppy petal.Place one perfect flower right in the middle.Clean, Simple, Modern, Elegant
Wild Garden MixA mix of small flowers (violas, small ferns, Queen Anne’s Lace).Overlap the flowers to make a thick, natural look like a field.Natural, Rustic, Full of Detail
Straight LinesStraight stems, fern fronds, or clover leaves.Arrange four same-sized pieces growing out from the middle or across the corners.Modern, Structured, Balanced
A Few PetalsJust a few individual petals (rose or hydrangea).Scatter three to five petals across the tile. Make it look random.Soft, Delicate, Light, Airy

Section 4: Care and Long Life

If you take care of your handmade Decoupage Flower Coasters the right way, they can last for many years. They will become treasured items.

Allowing It to Cure

The decoupage medium and any spray sealants need time to fully harden, or “cure.” This happens even after they feel dry to the touch.

  • Wait Time: Do not use the coasters with hot mugs or let them sit in water for at least three to four weeks. This step is vital. It makes sure the medium becomes as strong as possible. Using them too soon can leave marks on the surface or make the coating cloudy.

How to Clean Them

  • Wiping: Clean your coasters with a soft, slightly wet cloth. Do not use strong cleaners or rough sponges. They can scratch the glossy surface.
  • Water Safety: The layers are waterproof. But do not soak the coasters in water or wash them in a dish machine.

Frequently Asked Questions (FAQ)

1. Why did my pressed flowers turn brown or clear after I glued them?

This problem is common. It usually means one of two things:

  • Water Was Trapped: The flower was not fully dry when you sealed it. The trapped water reacts with the glue and starts to rot or change color. Be sure your flowers are very brittle and dry before you start.
  • Too Much Glue: Putting the decoupage medium on too thick or too fast can make the petals absorb too much liquid. This makes them look bruised or see-through. Use light, gentle strokes and build up thin layers slowly.

2. Can I use flowers that are still fresh?

No, you cannot. Fresh flowers have a lot of water inside. They will quickly rot and mold once you seal them with the decoupage medium. They must be completely dry and flat (pressed) before you use them.

3. I see little bubbles in my finished coating. How can I stop them?

Bubbles can come from two places:

  • Air Under the Flower: Use your tweezers or a small tool to press the flower down firmly but softly. Make sure all the air is pushed out when you apply the first coat of glue.
  • Mixing the Medium: Stir the decoupage medium gently. Do not shake the container. Shaking adds air bubbles. When brushing, stroke in one direction. Do not over-brush. If a bubble appears, quickly pop it with a pin or lightly brush over it before the glue dries.

4. What is the best decoupage glue for this project?

For coasters, you need glue that dries clear, is waterproof, and is very strong. Look for a product labeled for “hard surfaces” or a high-gloss finish. Many brands work well. A classic glossy decoupage glue is a great choice for new crafters.

5. My coasters feel sticky even after a long time. Why are they tacky?

Tackiness can happen if the room is too humid while they are drying. It can also happen if the glue you used is not meant for the high heat/water resistance needed for a coaster. Applying a final coat of a clear acrylic spray sealant will usually solve the problem. The spray dries harder than the decoupage medium.


References


Recent Posts


How to Use Potato Skins: 10 Easy Ideas

A close-up of a bowl filled with golden-brown, crispy and seasoned homemade Potato Skins, garnished with fresh chives and coarse sea salt.

We all have those kitchen reflexes—like tossing a perfectly usable food item. This zero-waste journey began by recognizing that even something as humble as Potato Skins has incredible potential. Turning kitchen scraps into fantastic meals is not just rewarding; it’s fun! If you can transform a simple potato skin, you can transform your entire cooking mindset.


The Unexpected Hero: Unlocking the Power of Potato Skins

We’ve all been there: peeling potatoes for mash, salad, or a spectacular roast, and tossing those beautiful, earthy skins right into the compost or trash. It’s a kitchen reflex. But what if I told you that you are habitually discarding one of the most flavorful, versatile, and nutrient-dense parts of the potato? It’s true! The potato skin isn’t just a byproduct; it’s a hidden gem ripe for culinary transformation.

In our quest for efficiency and a commitment to reducing food waste—a goal that is both environmentally responsible and great for our wallets—repurposing kitchen scraps has become an essential skill. And few scraps offer the instant culinary payoff that potato skins do. Think about it: they’re pre-portioned, full of fiber, rich in vitamins, and, perhaps most importantly, incredibly textural. That thin layer of potato flesh still clinging to the skin, once roasted or fried, becomes pure, irresistible crunch.

This article isn’t just about reducing waste; it’s about instant gratification. We’re talking about ten incredibly easy and fast ways to turn those peelings into gourmet snacks, satisfying sides, and even innovative ingredients for other dishes. Forget complicated, time-consuming recipes. These are hacks you can implement right now, using ingredients you already have. Get ready to rethink your routine, maximize your potato prep, and elevate your cooking with these simple, powerful ideas for your leftover potato skins.


1. The Classic Crisps: Ultimate Homemade Potato Skin Chips

This is the cornerstone of potato skin utilization and often the first thing people think of, but the how-to makes all the difference between a sad, soggy peel and a shatteringly crisp chip. These are perfect for snacking or serving alongside a sandwich.

How to Do It:

  1. Prep: Wash the skins thoroughly before peeling. After peeling, pat them absolutely bone-dry with a clean kitchen towel or paper towels. Moisture is the enemy of crispiness.
  2. Season: Toss the skins in a bowl with a generous drizzle of olive oil, fine sea salt, and a pinch of your favorite seasoning (garlic powder and smoked paprika are excellent choices).
  3. Bake: Spread the skins in a single layer on a baking sheet. Overcrowding creates steam, leading to limp chips. Bake at 400∘F (200∘C) for 10 to 20 minutes, flipping halfway through.
  4. Finish: They are done when they are dark golden brown and audibly crisp. Serve immediately with a French onion dip or a simple vinegar drizzle.

2. Flavor-Packed Potato Skin Stock Base

Instead of using plain water or store-bought vegetable stock for your next soup or stew, use potato skins to create an inexpensive and deeply flavorful stock. The starches and residual flavor from the potato enrich the liquid beautifully.

How to Do It:

  1. Combine: Place a generous amount of potato skins into a large pot. Add rough-cut vegetable scraps you might also have, such as onion ends, carrot peels, and celery leaves.
  2. Simmer: Cover the ingredients with water, add a bay leaf and a few peppercorns. Bring to a boil, then reduce the heat and simmer gently for about an hour.
  3. Strain: Pour the liquid through a fine-mesh sieve or cheesecloth, pressing on the solids to extract all the liquid. Discard the spent skins and scraps.
  4. Use: The resulting golden liquid is a rich, slightly earthy stock, perfect for making gravy, adding depth to risotto, or serving as a base for a hearty vegetable soup.

3. Savory Baked “Bacon” Bits Substitute

For a vegetarian or vegan option, or simply when you want a quick, crispy topping for salads, baked potatoes, or mac and cheese, potato skins can mimic the crunch and savory notes of bacon bits.

How to Do It:

  1. Mix the Marinade: In a bowl, combine a teaspoon of olive oil with a drop of liquid smoke (optional, but adds a great smoky depth), a pinch of salt, a dash of garlic powder, and a small amount of nutritional yeast for a cheesy note.
  2. Coat: Toss the dried potato skins thoroughly in this mixture.
  3. Roast: Roast them at 375∘F (190∘C) until they are very dark and extremely crunchy, which usually takes around 20 minutes.
  4. Chop: Once cooled, chop them roughly into small pieces. Store them in an airtight container for a week of easy salad topping.

4. Garnish for Creamy Soups and Chili

A spoonful of richly seasoned, crispy potato skins can elevate a humble bowl of soup from ordinary to extraordinary. This works particularly well on creamy soups, like leek and potato, or hearty chilis where the crunchy texture contrasts nicely with the smooth base.

How to Do It:

  1. Follow the preparation steps for the Homemade Potato Skin Chips (Idea 1), ensuring they are extra crispy.
  2. Crush them lightly with your hands—you want small, irregular pieces, not dust.
  3. Sprinkle them over your finished chili or soup just before serving. The warmth will enhance their aroma.

5. Fried Potato Skin “Puffs” for Appetizers

When skins are peeled a bit thicker, they hold their shape better during a shallow fry, turning into delicious, airy puffs. This is a perfect, rustic appetizer for a casual dinner party.

How to Do It:

  1. Oil: Heat about a half-inch of neutral oil (like canola or vegetable oil) in a heavy-bottomed pan to medium-high heat.
  2. Fry: Carefully drop the dried, unseasoned skins into the hot oil. Do this in small batches to maintain oil temperature.
  3. Drain: Fry them for 2 to 3 minutes until golden and puffy. Remove with a slotted spoon and drain on paper towels.
  4. Season Immediately: While still hot, sprinkle them generously with a vibrant seasoning mix—try chili powder, lime zest, and cumin, or simply salt and pepper.

6. Homemade Potato Skin Salt Rub

Don’t just use salt on the skins; infuse your salt with the skins! Drying and blending the skins creates an earthy, umami-rich seasoning rub that enhances everything from roast chicken to scrambled eggs.

How to Do It:

  1. Dehydrate: Bake or dehydrate the skins (without oil or seasoning) until they are completely brittle. This may take up to an hour in a low-temp oven (200∘F or 95∘C).
  2. Blend: Place the brittle skins and a generous amount of coarse salt (like kosher or sea salt) into a food processor or a strong blender.
  3. Grind: Process until you have a fine, uniform seasoning blend.
  4. Store: Store this bespoke, earthy salt in a shaker to use as a finishing salt.

7. Potato Skin “Flour” for Thickening and Texture

The dehydrated skins can be pulverized even further than the salt rub to create a fine, earthy flour. This isn’t meant to replace wheat flour, but to act as a stealthy, flavorful thickener.

How to Do It:

  1. Pulverize: Follow the dehydration step from Idea 6, then grind the skins in a spice grinder until they are a very fine powder, avoiding any chunky pieces.
  2. Use: Stir a spoonful into stews, gravies, or sauces just before serving to add body, a rustic texture, and a subtle potato flavor boost. It’s a fantastic, low-carb alternative to traditional thickeners in certain dishes.

8. The Loaded Snack: Mini Potato Skin Bites

While traditional potato skins use the scooped-out potato itself, you can create a bite-sized, minimalist version using the skins alone, focusing on the topping. This is a speedy, crowd-pleasing snack.

How to Do It:

  1. Pre-Bake: Bake the skins (as in Idea 1) until they are about halfway cooked—still soft, but slightly firm.
  2. Top: Sprinkle the skins with shredded sharp cheddar cheese and small bacon pieces (or the vegetarian ‘bacon’ bits from Idea 3).
  3. Finish: Return them to the oven and bake until the cheese is melted, bubbly, and slightly browned.
  4. Garnish: Remove, let cool slightly, and top with a dollop of sour cream or Greek yogurt and a sprinkle of chopped chives. These disappear fast!

9. Rustic Bread Crumb Replacement in Meatloaf or Burgers

When making meatloaf, meatballs, or burgers, breadcrumbs are typically used as a binder and to keep the finished product moist.1 Finely chopped or ground potato skins can step in to serve this same purpose while adding an unbeatable rustic, savory depth.

How to Do It:

  1. Prep: Use a sharp knife to very finely mince the raw or slightly softened potato skins. Alternatively, pulse them a few times in a food processor—you don’t want a puree, just small pieces.
  2. Mix: Substitute the potato skin pieces for about a quarter of the breadcrumbs called for in your favorite recipe.
  3. Cook: Proceed with your usual recipe. The skins will essentially melt into the mixture as it cooks, lending moisture and flavor without changing the structural integrity of your meat dish.

10. Crispy, Savory Bowl Filler (Instead of Noodles)

Looking for a satisfying crunch in your next Asian-inspired rice or noodle bowl? Tossed with spices and baked until crisp, potato skins provide an exciting textural element that’s far more flavorful than plain croutons or fried noodles.

How to Do It:

  1. Season: Toss the dried potato skins with a teaspoon of sesame oil, a pinch of chili flakes, and a dash of soy sauce or tamari.
  2. Bake: Bake at 375∘F (190∘C) until very crispy.
  3. Garnish: Just before serving your ramen, pho, rice bowl, or stir-fry, sprinkle a handful of these savory skins over the top for a guaranteed textural pop.

Tips for Maximizing Your Potato Skin Yield

To ensure success with any of these methods, a little prep goes a long way.

  • Wash Thoroughly: Potatoes grow in the soil, so a meticulous wash with a vegetable brush is critical before peeling. This is non-negotiable for cleanliness and flavor.
  • The Thicker the Better: If you intend to make loaded bites or puffs, use a vegetable peeler that allows for a thicker peel, grabbing a little extra of the inner potato flesh. For chips and salts, a thin peel is just fine.
  • Keep it Dry: When making crispy items (chips, garnishes), patting the skins completely dry before adding oil is the single most important step for achieving that signature crunch.
  • Storage: Raw skins can be stored in the refrigerator in a sealed container for a few days, but they are best used immediately. Once baked, store them like potato chips—in an airtight container at room temperature.

By embracing these ten easy ideas, you’re not just saving scraps; you’re unlocking new possibilities in your kitchen. That feeling of turning what was once waste into a delicious, gourmet-style food is truly instant gratification.


Frequently Asked Questions (FAQ)

Q: Are potato skins actually nutritious?

A: Yes, they are! The skin holds a significant amount of the potato’s fiber, B vitamins, Vitamin C, and essential minerals like potassium and iron. When you eat the skin, you are getting more concentrated nutrition than if you only consumed the white, starchy interior.

Q: Do I need to use organic potatoes if I’m eating the skins?

A: While it is always recommended to choose organic when possible, the most important step is always to wash the potatoes thoroughly with a brush under running water to remove any dirt or surface residue. If you are concerned about pesticides, organic is the best choice.

Q: Can I use the skins from any type of potato?

A: Absolutely! Russet potato skins tend to be the thickest and most rugged, making them ideal for the loaded bites and classic chips. Yukon Gold and Red potato skins are thinner and more delicate, perfect for stock, salt rubs, or the savory bowl fillers where a light crisp is desired.

Q: How long can I store leftover baked potato skins?

A: Once they are fully baked and crispy, treat them like homemade potato chips. Store them in an airtight container at room temperature for up to four or five days. They can lose some crunch over time, so you might need a quick re-bake at 350∘F (175∘C) to refresh them.


References


Recent Posts


Minimalist Magic: 10 Subtle Dividers for a Harmonious Home

A bright, open-plan living and dining area separated by a vertical slatted wooden screen, showcasing a Minimalist and airy design.

I firmly believe that your home should be your sanctuary—a place of calm, not clutter. My personal journey into Minimalist design wasn’t about getting rid of everything; it was about honoring the space I have and making every object count. I learned that clever division is the secret to both harmony and function in an open layout. If you want a home that feels both open and organized, these solutions are for you!


The Power of Subtle Separation in Minimalist Design

The modern home often celebrates the Minimalist idea of open-plan living. We love how airy it feels, the way light moves, and the wide sense of space. However, this open design can quickly bring disorder and mental fatigue. How do you work, relax, and dine in the same large space without the mess and stress crossing over from one area to the next?

The best solution is not to build heavy, soundproof walls. The answer is to learn the art of the subtle room divider. For a truly Minimalist and calm home, the best divider does not grab attention. It guides your eye, softens the view, and gently suggests that the room’s function has changed. It keeps the space bright and open while setting up necessary areas for specific tasks—a quiet spot to read, a focused workspace, or a cozy place to eat.

A subtle divider is more than just a piece of furniture. It is a design element that creates visual and mental order. It helps you rest your eyes by setting clear borders without demanding total separation. In this guide, we look closely at ten easy and stylish solutions. They use texture, light, and shape to bring structure and peace to your home.


1. The Slatted Wood Screen

Slatted wood partitions are the perfect Minimalist divider. Their straight lines and gaps define an area while letting most of the light and visual connection pass through. They are ideal for separating an entryway from a living room.

How to Do It:

  1. Material Selection: Pick light-colored woods like natural oak or bamboo for a true Zen feeling. The width of the slats should match your room’s size. Use thinner ones for small spaces and thicker ones for bigger areas.
  2. Installation: You can buy slat screens as ready-made panels or build them at home. The key is to secure them only to the floor and ceiling track. This gives them a smooth, floating look. For an easier job, use floor-to-ceiling posts and attach thin slats to the side of the posts.
  3. Finish: Use a matte, natural oil finish instead of a shiny one. This keeps the look simple and matches the Minimalist style.

2. The Tall, Open Shelving Unit

This is the most useful divider because it offers both separation and storage. An open shelf unit creates division without blocking the light. This is especially true if you carefully choose what you place on the shelves.

How to Do It:

  1. Placement: Choose a unit without a solid back that is almost as tall as the ceiling. Place it straight out from a wall. This immediately creates two clear zones.
  2. Styling (The 80/20 Rule): To keep the Minimalist light flowing, try to leave about eighty percent of the shelves empty. You can also fill them with things that let light through, like art or plants. Only twenty percent should hold things you need to hide, such as simple storage boxes.
  3. Anchoring: Always fasten tall, free-standing shelves to the floor or a wall. This is a must for safety, especially if you have children or pets.

3. The Hanging Textile Panel

For areas that need a divider you can hide easily, sheer or linen fabrics offer a soft, beautiful solution. These work well to block off a dressing area in a bedroom or a small spot for reading.

How to Do It:

  1. Fabric Choice: Choose a fabric that is slightly see-through, like muslin, thin linen, or a light cotton. The goal is to soften the light, not to block it. Neutral colors like white, cream, or soft gray are best for a Minimalist design.
  2. Hardware: Install a simple, thin track on the ceiling. The fabric should hang from top to bottom. Let it gather slightly on the floor for a rich, relaxed feel that contrasts with the clean lines of the divider.
  3. Functionality: Use a simple cord or pulley system. This lets you quickly pull the fabric aside. The space then instantly becomes open again.

4. Low-Profile Furniture Placement

The simplest division does not need any building work at all. Simply using how your largest pieces of furniture face can define a zone.

How to Do It:

  1. Anchor Piece: Use the back of a large, low sofa to separate the living area from a dining or kitchen zone. Place a large, simple console table right behind the sofa. This gives you useful surface space while acting as a gentle wall.
  2. Area Rugs: Use different-sized Minimalist rugs to mark the boundaries even more. A large wool rug under the couch clearly shows the living area. A runner or a smaller, simpler rug can mark the kitchen prep area.

5. Vertical Indoor Garden Screens

Bringing nature indoors is a key part of the Zen and Minimalist look. A tall, stacked stand of plants can create a visually interesting, lively, and natural screen.

How to Do It:

  1. Structure: Choose a light, tiered metal or wood plant stand that is at least six feet tall.
  2. Plant Selection: Mix tall plants (like snake plants or bamboo) with vines. The thickness of the leaves controls how much privacy you get. To let more light through, put the pots further apart.
  3. Maintenance: Make sure the divider is where the plants get enough light and water. An extra benefit is cleaner air, which adds to the room’s harmony.

6. Translucent Glass or Acrylic Panels

For a modern, polished separation that lets the most light through, a full-height glass or acrylic panel is ideal. It gives privacy while still maximizing the light.

How to Do It:

  1. Material: Choose frosted, ribbed, or tinted glass for subtle visual privacy. The frosting spreads the light beautifully and stops hard shadows.
  2. Mounting: These panels need to be installed by a professional. They should have a very thin frame (black or white steel is common in Minimalist design). This keeps the focus on the glass itself.
  3. Sliding Option: If you need the ability to open the space fully, a sliding track system for the glass panels makes the divider a flexible part of the room.

7. Subtle Color Blocking and Paint Transition

This is the easiest and cheapest way to create a Minimalist divider. Simply changing the color or texture of the paint on the walls and ceiling can create a hidden room division.

How to Do It:

  1. The Change: In an open living and kitchen area, keep the main walls white. Then, paint the walls and ceiling of the kitchen area in a slightly darker, calm neutral shade (like a soft gray or beige).
  2. The Floor: Add to the division by changing the floor material. For example, switch from light wood in the living area to a matte concrete or large, neutral tile in the kitchen. The different surfaces quietly signal that the room’s use has changed.

8. Architectural Screening with Curtains of Rope or Beads

While beads may sound old-fashioned, a modern take using simple wooden beads, natural ropes, or thin metal chains can create a shimmering, moving divider that is mostly transparent.

How to Do It:

  1. The Material: Choose thin, natural-fiber ropes or simple, unpainted wood rods of the same length.
  2. The Installation: Hang the ropes from a thin track fixed to the ceiling. Make sure the ropes are far enough apart to walk through easily but close enough to define the zone. The gentle movement of the ropes adds a calming, pleasing element to the space.

9. Built-in Benches or Low Walls

For a permanent yet simple division, building a low wall or a fixed, built-in bench gives you function, seating, and structure without blocking the view across the room.

How to Do It:

  1. Height is Key: The divider should be no taller than your waist (about thirty-six inches). This keeps the space visually connected.
  2. Dual Function: A low wall can be the backrest for a dining bench on one side. It can be a display area or bookshelf on the living room side. This double use is a key part of Minimalist design.
  3. Clean Finish: Plaster and paint the low wall the same Minimalist color as the main walls. This makes it look like a smooth, natural part of the room.

10. Sliding Shoji-Style Panels

Inspired by old Japanese design, the Shoji panel is the perfect example of Zen-like, Minimalist separation. The see-through paper or fabric panels spread the light evenly while creating total privacy when closed.

How to Do It:

  1. Material: Use light wood frames (like pine or bamboo). Insert rice paper or a strong, frosted plastic/fabric.
  2. Track System: Install a smooth track system on the floor and ceiling. When open, the panels should stack neatly against the wall. This makes them almost disappear to highlight the room’s open feel.
  3. Function: This is a great choice for separating a bedroom from a walk-in closet. It also works for a workspace that you need to hide completely during downtime.

Frequently Asked Questions (FAQ)

Q: Will these subtle dividers help with soundproofing?

A: No, not really. Subtle dividers are built to separate areas visually and to let light flow. They are not made to block noise. Things like slatted screens, plants, or low walls will do very little to stop sound. If noise is a big problem, look at the full-height glass panels or heavy, thick fabrics. These offer the most sound reduction among the options listed.

Q: Which divider is best if I rent my home?

A: The best choices for renters are those that don’t need any permanent installation. This includes using low-profile furniture placement, area rugs, hanging fabrics (using removable ceiling hooks), and movable, free-standing open shelving units.

Q: How do I choose the right height for my divider?

A: The height depends entirely on what you want to achieve. If you want the most light and to see across the room easily, keep the divider low (about waist-height). If you want more privacy and a clear break, choose a divider that goes all the way up (like a sliding panel or tall slatted screen). For a middle ground, choose a divider that is about five to six feet tall. This separates the space without blocking the view overhead.

Q: Do these ideas work in very small apartments?

A: Yes, definitely! Minimalist design and subtle division are perfect for small spaces. Changing the floor surface, using different paint colors, or adding tall, thin shelves are great ways to mark off zones in a studio apartment without losing important floor space.


References


Recent Posts