
My holiday motto is simple: if I can make it, I will. This year, tired of the same old tinsel and pine, I challenged myself to reimagine the Christmas tree as a piece of sophisticated home decor. The result is this curated collection of twelve modern, boutique-hotel-worthy Homemade Christmas Trees. I hope these projects inspire you to ditch the generic store-bought look and infuse your space with handmade elegance this season.
12 Homemade Christmas Trees
The scent of pine needles is classic, but sometimes, the same old evergreen just doesn’t fit the aesthetic. If your style leans more toward minimalist luxury, gallery-wall chic, or refined modernity, it’s time to rethink the traditional centerpiece. This year, transform your holiday decor with a collection of Homemade Christmas Trees that look less like a seasonal craft project and more like they belong in a high-end boutique or a five-star hotel lobby.
We’ve curated twelve truly unique, sophisticated, and surprisingly simple DIY projects. These are not your grandmother’s felt crafts; they are elegant, architectural, and completely customizable to your modern home.
1. The Gilded Geometric Wire Tree
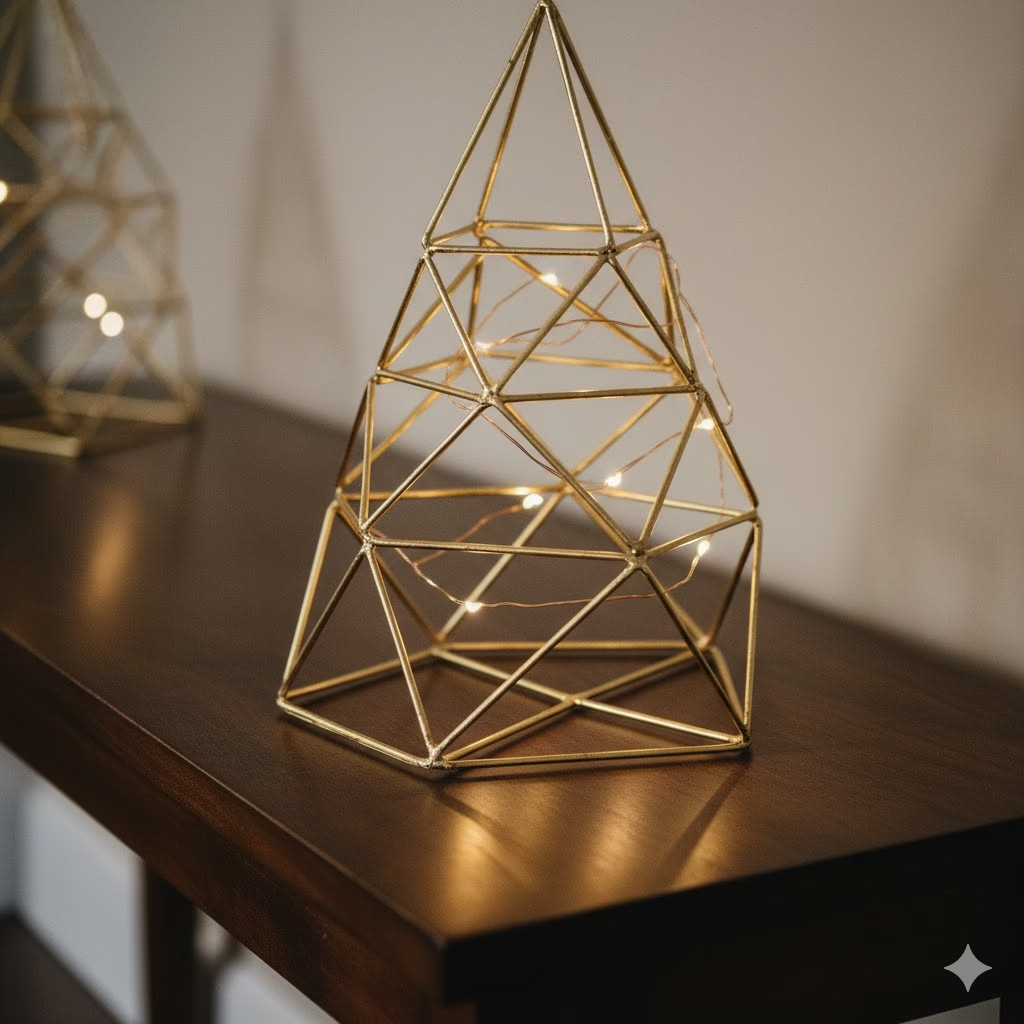
Concept: A three-dimensional, architectural sculpture that captures light and creates stunning shadows. This piece is all about negative space and clean lines.
Materials:
- Thin gauge wire (craft wire or floral wire)
- Needle-nose pliers
- Gold or copper metallic spray paint
- Small wooden base (optional)
- Micro LED string lights (battery operated)
How to Do It:
- Form the Base: Begin by bending the wire into a large triangle for the base. This will define the size of your tree. Twist the ends to secure them.
- Build the Sides: Cut three more lengths of wire. From each corner of your base triangle, bend one length upwards and meet them at a single point, forming a pyramid shape. Secure the peak by twisting the wires tightly.
- Add Structure: For a more complex geometric look, add horizontal or diagonal wire bracing inside the pyramid. Think of it like building a basic tetrahedron structure. The cleaner the angles, the more modern the result.
- Finish: Once the shape is secure, spray the entire structure with the metallic paint. When dry, wrap it sparingly with micro LED lights for a delicate sparkle. This tree works perfectly on a console table or mantelpiece.
2. The Floating Driftwood Cone Tree

Concept: A coastal-meets-Scandinavian look. This tree uses natural, weathered elements arranged in a classic conical shape, lending an organic, textured feel.
Materials:
- A sturdy cardboard or foam cone base
- Small, uniform pieces of thin driftwood or smooth, light-colored twigs
- Hot glue gun and ample glue sticks
- White or pale gray craft paint (optional)
- Small starfish or shell ornaments
How to Do It:
- Prep the Wood: Ensure your driftwood pieces are clean and dry. For a unified, boutique look, lightly dry-brush them with white or very pale gray paint, allowing the natural wood grain to still show through.
- Start at the Base: Working in small sections, apply hot glue near the wide base of the cone. Start adhering the driftwood pieces horizontally, staggering the lengths so they overlap slightly but keep the overall circular shape.
- Layer Up: Continue gluing the pieces, working your way up the cone. Let the wood dictate the spacing; a slight overlap adds texture. Ensure the cone is completely covered.
- Display: Place on a simple pedestal or in a sleek ceramic vase. The finished look is textural, airy, and effortlessly chic.
3. The Minimalist Ladder Tree

Concept: A highly versatile, space-saving, and industrial-chic piece. This is less about decoration and more about structural display.
Materials:
- Four equally long wooden dowels (about 4–6 feet tall)
- Smaller dowels or branches for “rungs”
- Wood glue and clamps
- Drill and small screws (optional, for extra stability)
- White, black, or dark charcoal paint/stain
How to Do It:
- Cut and Sand: Decide on the height and angle. Cut the small dowels to gradually decreasing lengths—these will be the “branches.” Sand all pieces smooth.
- Assemble: Create two identical ladder frames by gluing and securing the short dowels between two long ones. Use clamps to hold the pieces until the glue is fully set.
- Paint: Apply your modern finish (white for Scandinavian, black for industrial, or natural stain for a rustic look).
- Stand: Once dry, stand the two ladder frames up, opening them slightly at the bottom (like an A-frame tent) and securing them at the top with a single screw or thick twine. Hang lightweight, geometric ornaments directly from the rungs.
4. The Stacked Marble Book Tree

Concept: An intellectual, elegant centerpiece perfect for a library, office, or sophisticated living area. This tree uses the color and structure of books and blocks.
Materials:
- 10–15 hardback books of varying sizes (use old books and cover them)
- Contact paper or wrapping paper in a chic, neutral design (e.g., solid gray, black, or white marble print)
- Small, upscale ornaments (e.g., glass globes, brass stars)
How to Do It:
- Cover the Books: For a unified, modern look, cover all the books in the same marble-patterned contact paper. This is the key to achieving the “boutique” aesthetic.
- Create the Base: Start with the largest book on a flat surface.
- Stack: Continue stacking the books in gradually decreasing size, turning them slightly on each layer to create a spiral or offset effect that mimics a tree shape.
- Decorate: The spine of each book serves as a perfect ledge for small, curated ornaments or a delicate garland of pearls. The “tree” instantly looks refined and tailored.
5. The Corkscrew Paper Garland Tree
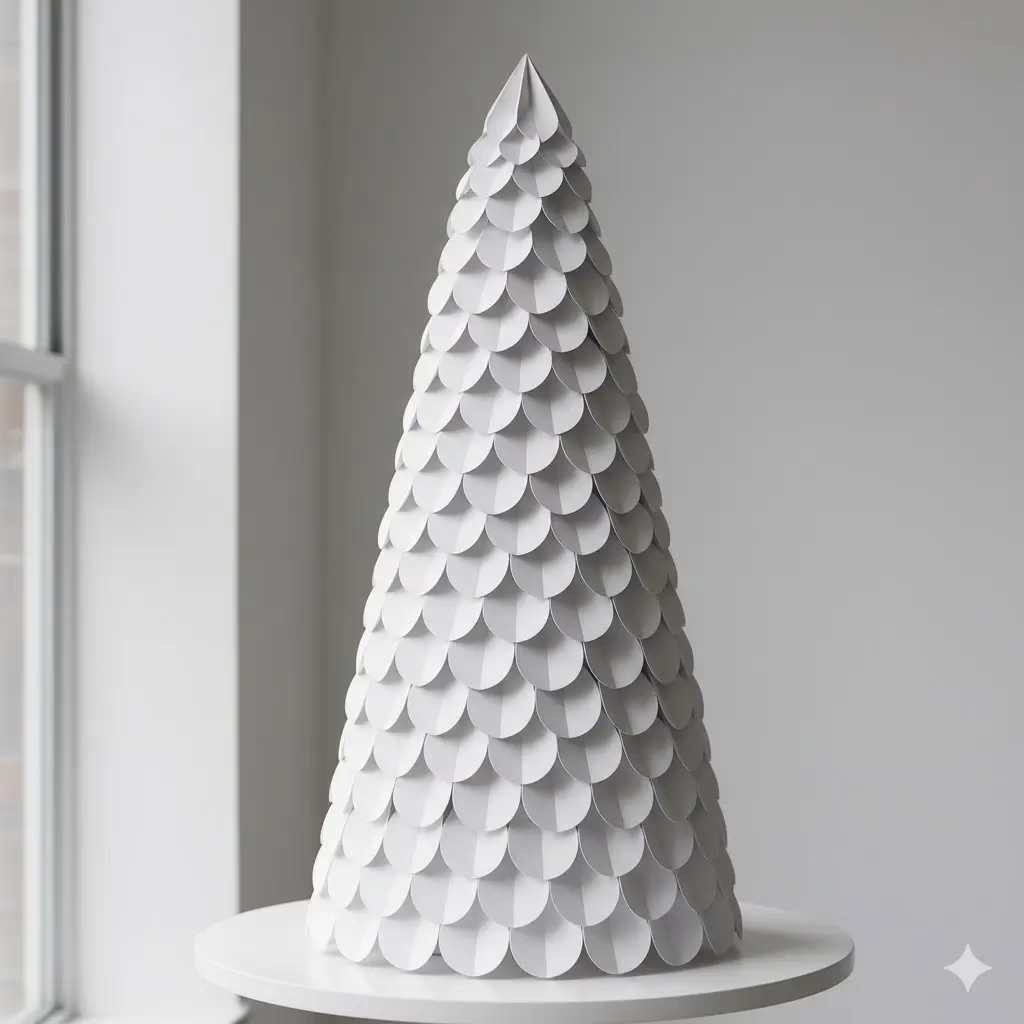
Concept: A textural, monochrome fantasy that provides incredible depth and movement. It’s surprisingly simple and budget-friendly.
Materials:
- Large foam or cardboard cone (at least 3 feet tall)
- Dozens of circles cut from thick cardstock or metallic paper (all the same size, about 1-inch diameter)
- Hot glue gun
How to Do It:
- Prepare the Circles: The trick is to give them texture. Gently fold or crimp the paper circles to create a soft, dome-like shape.
- Attach: Starting from the base of the cone, apply a small dot of hot glue to the top edge of a circle and press it onto the cone.
- Layering: Overlap the circles slightly and stagger the placement as you work your way around and up the cone. The crimped edges should stick out, giving the tree a feathered, corkscrew-like appearance.
- The Reveal: When finished, the tree should look like it’s made of layered scales or petals. Use matte white paper for a snow-drift look or metallic silver for high glamour.
6. The Minimalist PVC Pipe Grid Tree
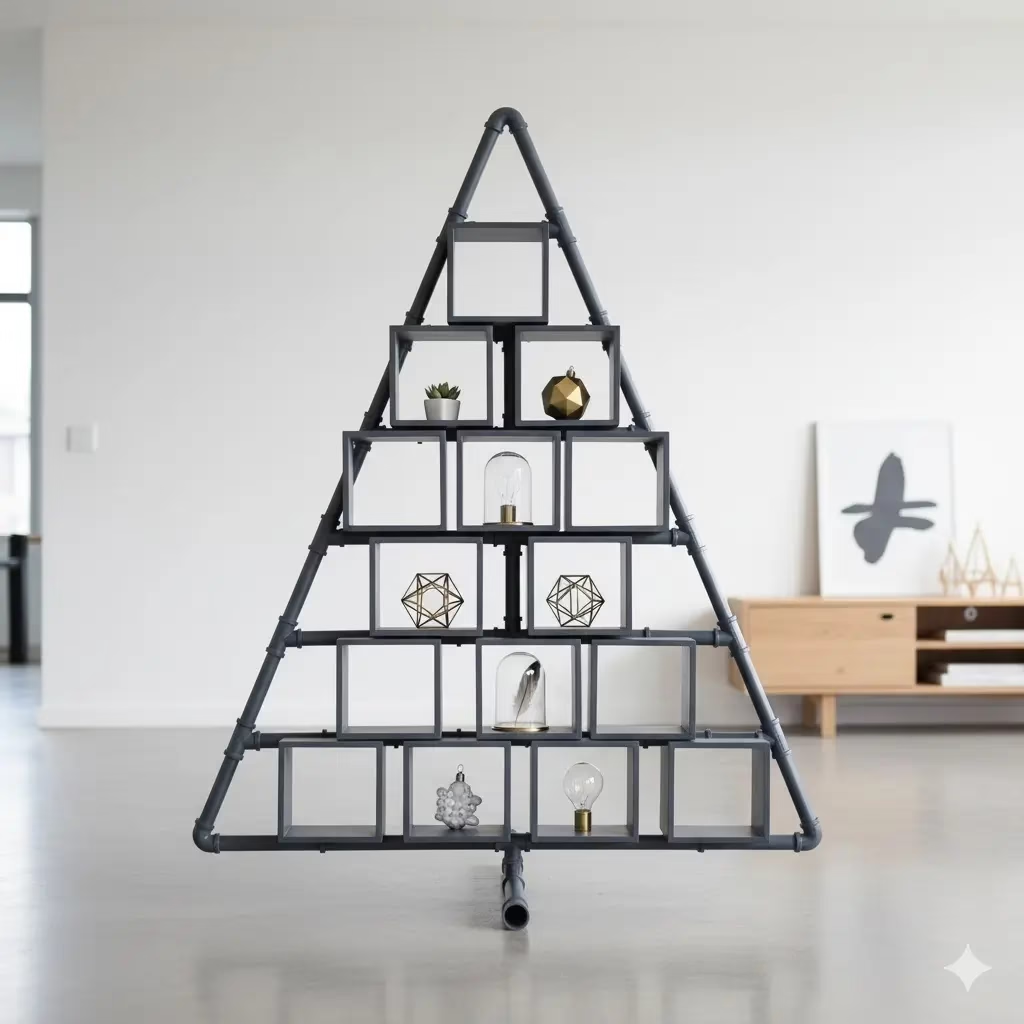
Concept: A true modernist’s dream—industrial materials used to create a clean, gridded display unit that happens to be triangular.
Materials:
- PVC pipes of a moderate diameter (about 1.5–2 inches)
- PVC pipe T-connectors and 90-degree elbows
- PVC cement
- Matte black or dark bronze spray paint
How to Do It:
- Measure and Cut: Determine your desired height and width. Cut the PVC pipes into various short lengths that, when connected, will form small, uniform squares or rectangles.
- Build the Grid: Use the T-connectors and elbows to create a large triangular grid structure, securing all joints with PVC cement. Take time to ensure the lines are perfectly straight.
- Finish: Once cured, spray the entire structure with a matte black or deep metallic paint to remove the cheap plastic appearance.
- Style: The open cubbies become perfect niches to display single, standout ornaments—a tiny succulent, a glass cloche, or a single statement bulb.
7. The Painted Canvas Mural Tree
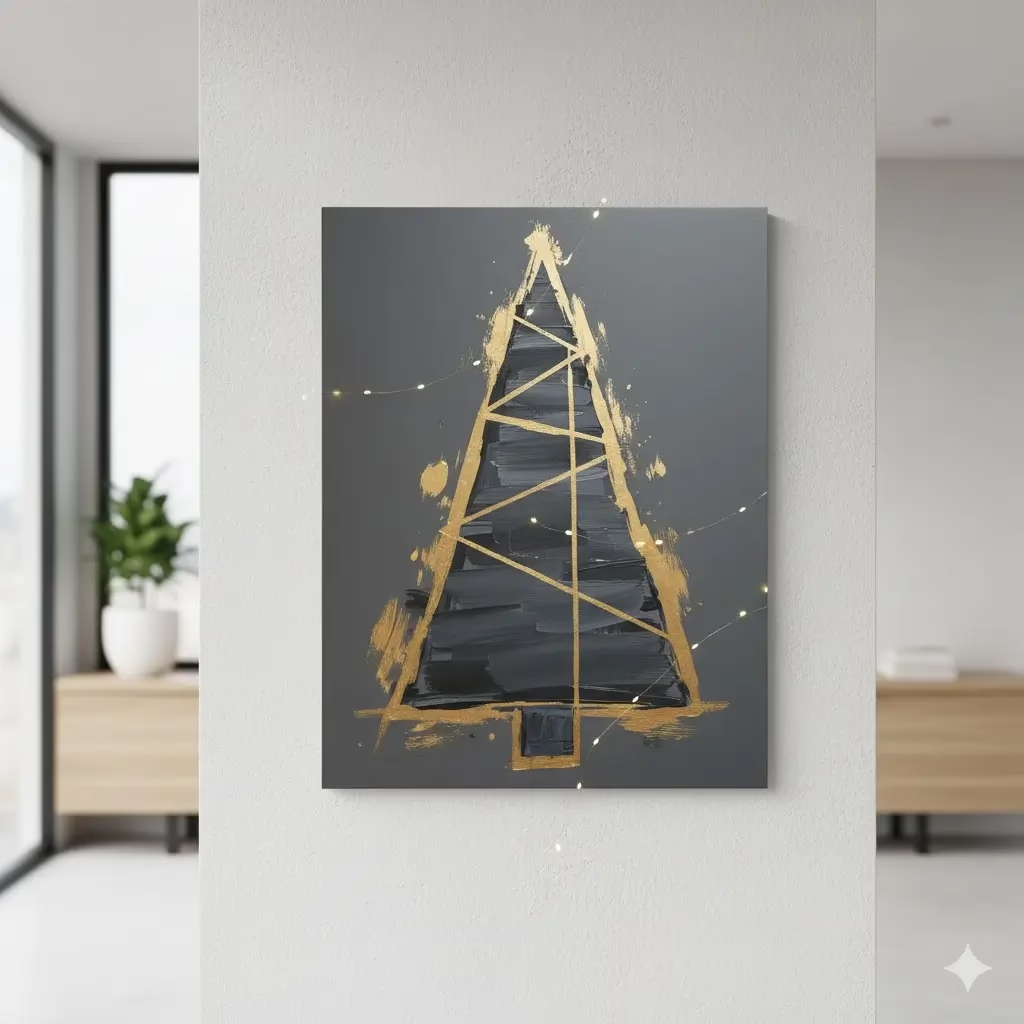
Concept: For walls where space is at a premium, this is a two-dimensional, graphic, and highly impactful solution.
Materials:
- Large, square or rectangular blank canvas (at least 3×4 feet)
- Painter’s tape
- Acrylic paints in a sophisticated palette (e.g., deep charcoal, gold, blush pink, or navy)
How to Do It:
- Tape the Shape: Use painter’s tape to mark out the shape of your tree directly on the canvas. Instead of a traditional triangle, consider a modern geometric design—three overlapping triangles, or a single thick, stylized geometric cone.
- Paint: Paint the taped-off area with your main color. Once dry, remove the tape for crisp, clean lines.
- Detailing: For a truly boutique look, add abstract brushstrokes of a metallic paint (gold or silver) over the main color. Alternatively, use a contrasting color to paint a second, smaller shape inside the main tree outline.
- Hang: The canvas becomes a statement piece of holiday art.
8. The Stacked Log Base Tree
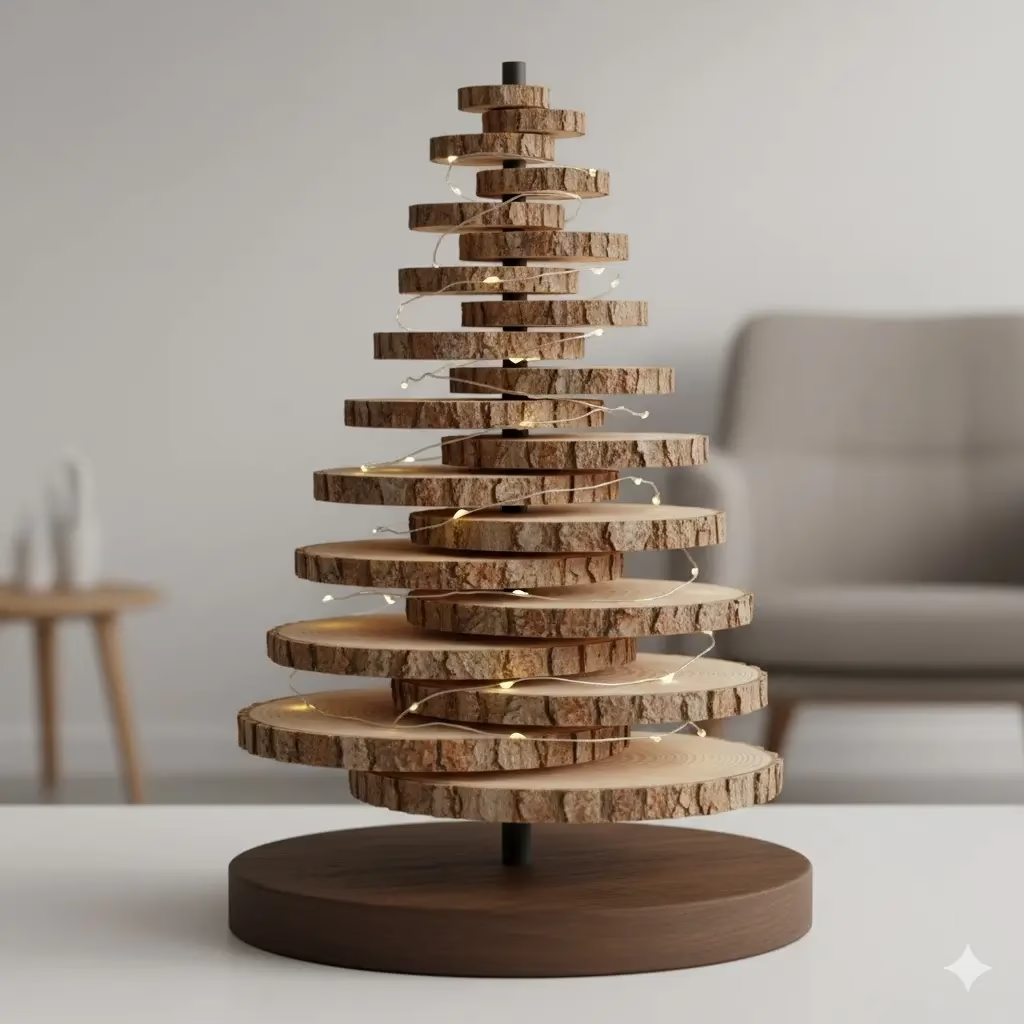
Concept: A sophisticated, rustic-meets-contemporary look. This piece uses the beautiful, raw texture of wood slices arranged on a central pole.
Materials:
- Wooden slices of varying diameters (pre-cut from a craft store or sawed from a log)
- A central wooden dowel or metal rod for support
- A sturdy, heavy base (a piece of thick wood or a metal plate)
- Drill with a bit slightly larger than the dowel
- Wood glue
How to Do It:
- Drill the Slices: Drill a centered hole in all the wooden slices.
- Secure the Base: Drill a hole in the sturdy base and glue the central dowel into it. Let it dry completely.
- Stack: Start with the largest log slice and thread it onto the dowel. Continue stacking the slices in decreasing size. You can place a small bead of glue or a thin washer between each slice to keep them slightly separated for an airy look.
- Final Touches: Top with a small, brass star. This tree is naturally beautiful and only needs a few subtle micro-lights.
9. The Golden Hoop and Garland Tree
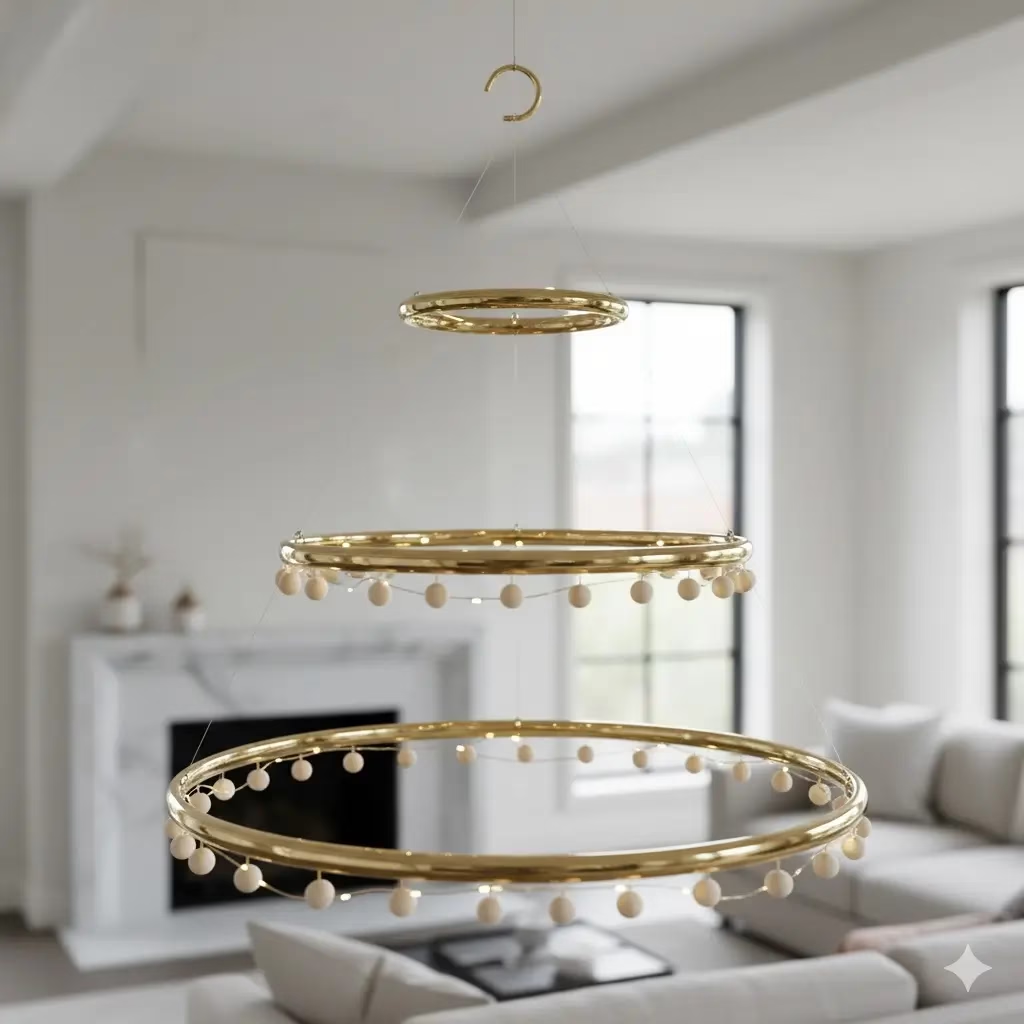
Concept: An utterly modern, mobile-inspired take on the traditional chandelier tree. It’s light, airy, and glamorous.
Materials:
- Three to four brass or gold metal hoops (different sizes, from small to large)
- Invisible fishing line
- Pre-made or DIY simple, minimalist garland (e.g., white pom-poms, wooden beads, or simple green sprigs)
- Ceiling hook
How to Do It:
- Arrange the Hoops: Tie fishing line to the largest hoop. Then, suspend the next size up from the first, and so on, creating a stack of concentric circles that form a cone shape.
- Hang: Hang the stacked hoops from the ceiling hook.
- Drape: Drape the garland or string of beads around the edges of the hoops. Keep the garlands sparse for an upscale, not cluttered, effect. The circular shape is a chic break from the classic triangle.
10. The Cone of Curled Magazine Paper
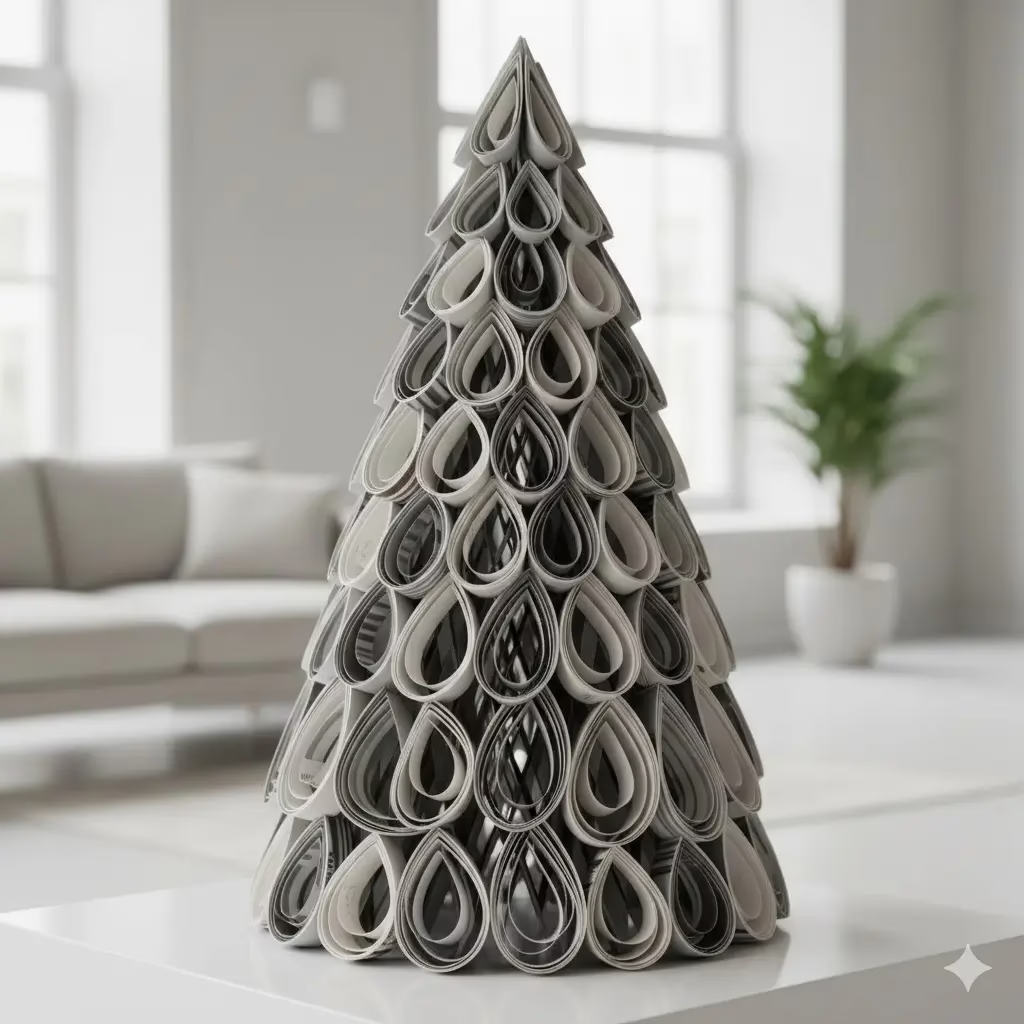
Concept: Recycling meets sophistication. This tree uses the color and gloss of magazine paper to create a vibrant, yet structured, textural piece.
Materials:
- Large cone (foam or cardboard)
- Glossy magazine pages or art paper (curate the pages to a specific color palette—e.g., only black, white, and silver)
- Wood skewers or pencil
- Hot glue
How to Do It:
- Cut the Strips: Cut the paper into uniform strips (e.g., 6 inches long and 1 inch wide).
- Curl: Tightly wrap each strip around a wooden skewer or pencil to create a paper curl. Slide the curl off the skewer.
- Attach: Starting from the bottom of the cone, apply a dot of hot glue to the inside of the curl and press it onto the cone.
- Layer: Overlap the curls slightly and work your way up. By carefully choosing the colors from the magazines (avoiding harsh reds or greens), you can achieve a muted, gallery-quality look.
11. The Acrylic Pyramid Display

Concept: A highly sleek, almost invisible tree that focuses entirely on the ornaments. This is ideal for showcasing a curated collection of beautiful ornaments.
Materials:
- Clear acrylic sheets (thin and easy to cut)
- Acrylic glue or strong, clear epoxy
- Metal clips or small plastic clamps
- Small, elegant hooks for ornaments
How to Do It:
- Cut: Carefully cut four large triangles from the acrylic sheets (three sides and a base, if desired). Ensure the sides meet at a clean, sharp point.
- Glue: Use the acrylic glue to join the three sides into a pyramid shape. You may need to clamp the edges while the glue cures.
- Place Hooks: Before the glue is completely dry, you can embed small metal hooks into the seams or use a drill to carefully thread fishing line through the edges once dry.
- Style: The tree itself is nearly invisible, letting your precious ornaments float in mid-air.
12. The Woven Yarn Tassel Tree
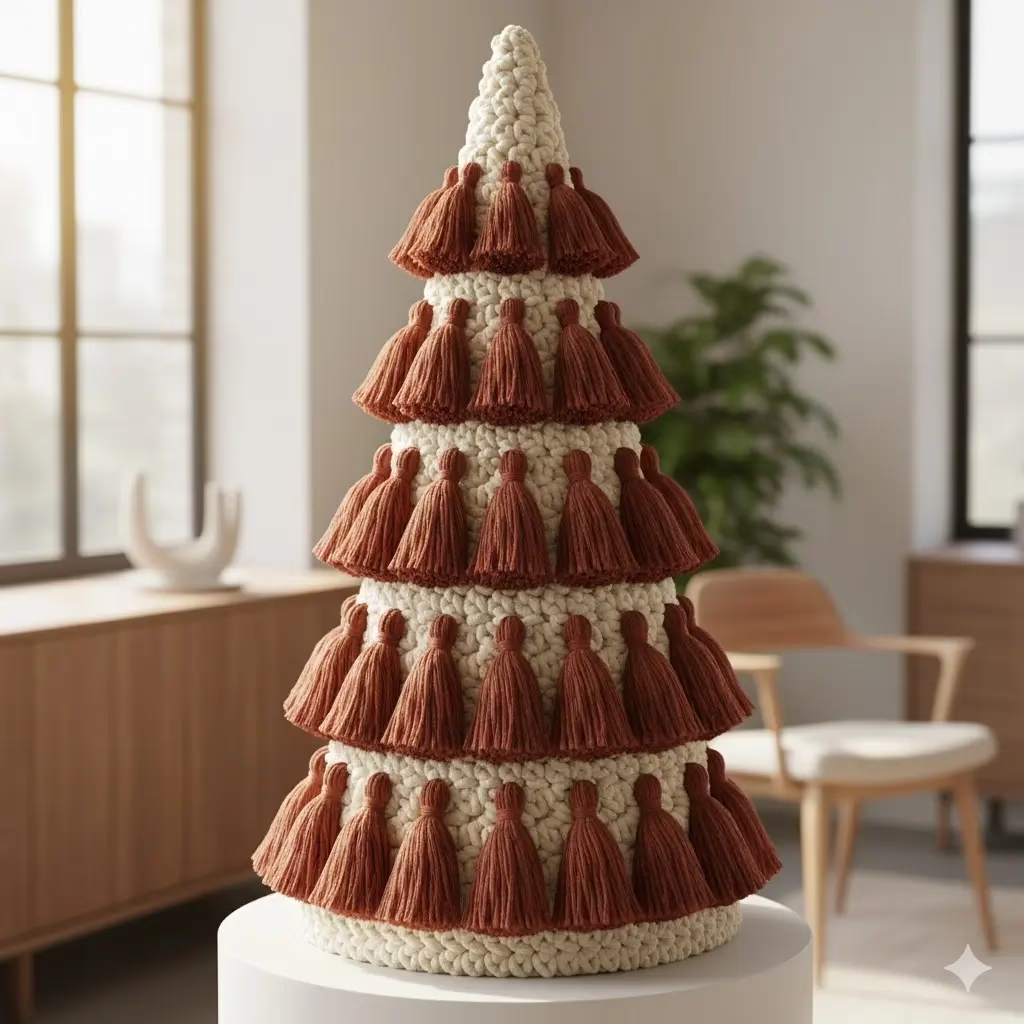
Concept: A soft, tactile, and highly unique bohemian-meets-modern look. It uses texture and a single, muted color for a cozy, upscale vibe.
Materials:
- Large cardboard cone
- Thick, high-quality yarn in a luxurious, muted color (e.g., cream, deep forest green, terracotta, or navy)
- Hot glue gun
How to Do It:
- Make the Tassels: Create dozens of small, uniform tassels. The key is using thick, quality yarn.
- Make the Loops: Before securing the tassels, make simple loops of yarn about 2 inches long. These will act as the “needles” or texture on the cone.
- Attach the Loops: Start at the base and cover the entire cone with the yarn loops, gluing them tightly together to completely hide the cardboard underneath. This gives the tree its plush texture.
- Add the Tassels: Glue the finished tassels to the exterior, staggering them slightly. Use a different textured yarn for the tassels than the loops for added visual interest.
Tips for Achieving a Boutique Look
- Edit Your Palette: For a boutique feel, limit your tree palette to just two to three colors. Think monochrome (white and silver), deep jewel tones (navy and brass), or earthy neutrals (cream, terracotta, and natural wood).
- Embrace Negative Space: Modern design loves negative space. Don’t over-decorate your Homemade Christmas Trees. Let the structure and the materials speak for themselves. A single strand of lights is often more impactful than a dozen.
- Choose High-Quality Materials: Swap cheap plastic for real wood, metal, glass, or thick cardstock. A coat of matte spray paint can instantly upgrade plastic or cardboard.
- Lighting is Key: Use delicate, warm-white micro LED wire lights. Avoid large, multicolored bulbs, which can instantly cheapen the look.
Scaling Your Design: From Tabletop to Tree-Sized Centerpiece
While many of the chic Homemade Christmas Trees featured here are perfect as sophisticated tabletop accents, most of these modern designs are easily scaled up to replace a traditional 6- or 7-foot floor tree. The key is to simply increase the size of the core materials and ensure the base is stable.
For projects where the instructions might seem small, remember these scaling tips to achieve a full-sized, boutique-worthy centerpiece:
| Project Name for Homemade Christmas Trees | Scaling Requirement to Reach 5–7 Feet |
| The Minimalist Ladder Tree | Use 4–6 foot dowels for the main vertical supports and increase the diameter of the wood for stability. |
| The Minimalist PVC Pipe Grid Tree | Use wider diameter PVC pipe (2–3 inches) and buy pipes in 10-foot lengths to build a full, tall pyramid structure. |
| The Golden Hoop and Garland Tree | Source large metal hoops, with the bottom hoop measuring at least 30–36 inches in diameter, and hang from the ceiling using strong, secure hooks. |
| The Stacked Log Base Tree | Purchase a central threaded metal rod (not just a dowel) 6 feet long and use large, heavy wood slices for the base to ensure stability. |
| The Corkscrew Paper Garland Tree | Source a large conical form that is 3–4 feet high, then place it on an elevated stand or pedestal to achieve the full height. |
| The Painted Canvas Mural Tree | Increase the size of the canvas to at least 4×6 feet to make it an impactful visual replacement for a tree in a main living area. |
By committing to larger materials, you ensure your DIY project is not only elegant but also fulfills the role of a proper holiday centerpiece.
Frequently Asked Questions (FAQ)
Q: Are these trees durable enough to last multiple seasons?
A: Yes, absolutely. Projects utilizing materials like wood, metal, PVC, and thick acrylic (Trees 1, 3, 6, 8, 9, and 11) are built to last. For the paper and yarn-based trees (Trees 5, 10, and 12), use a sealant spray or store them carefully in a box to maintain their shape.
Q: I have very little crafting experience. Which tree is the easiest to start with?
A: The Floating Driftwood Cone Tree (Tree 2) and the Stacked Marble Book Tree (Tree 4) are excellent beginner projects. They primarily rely on simple gluing and stacking techniques, with minimal cutting or complex construction needed.
Q: How can I safely light the wooden or paper-based trees?
A: Always use battery-operated, cool-to-the-touch LED micro-lights for any tree built from paper, yarn, or wood. These lights do not generate significant heat, making them a safe choice for all your Homemade Christmas Trees.
Q: Where is the best place to find unique, modern ornaments for these trees?
A: Look for geometric shapes, matte finishes, and natural materials like unfinished wood, brass, or colored glass. Many craft stores sell basic ornaments that can be spray-painted in your chosen modern color palette (e.g., matte black or metallic gold) to achieve a coordinated, upscale look.
Q: I don’t have enough space for a full-sized tree. Which of these can be made small?
A: Nearly all of them can be scaled down. The Geometric Wire Tree (Tree 1), the Stacked Log Base Tree (Tree 8), and the Corkscrew Paper Garland Tree (Tree 5) all make exceptional, sophisticated tabletop displays when made in miniature.
Reference Section
- InspirationsWholesale – 10 Benefits of Artificial Christmas Trees
- Sightline – Ten DIY Christmas Trees that Reuse, Recycle
- Thehandcraftedhaven – DIY Wood Christmas Tree Tutorial
Recent Posts
